This blog post may contain affiliate links. As an Amazon Associate I earn from qualifying purchases.
Every camping trip starts the same way — staring at a pile of gear wondering what you’ve forgotten. That specific anxiety is real, and it’s not a sign you’re unprepared. It’s a sign you don’t yet have a system.
Pack the wrong things and you’ll spend the night shivering in a sleeping bag rated for summer. Pack too much and you’ll spend an hour unpacking gear you never touch. Both outcomes are avoidable — not by memorizing a 100-item list, but by understanding how camping gear is organized.
This guide gives you a complete essential camping supplies list organized into five functional layers — shelter, sustenance, clothing, safety, and specialization — covering everything from your first weekend tent trip to specialized RV, beach, and car camping setups. Work through each layer in order, and you’ll never arrive at camp missing something critical again. Sections cover the universal 5-Layer framework, shelter and sleep systems, camp kitchen and food management, clothing and hygiene, lighting and safety, and specialized camping types.
- The 5-Layer System covers all camping scenarios from weekend car camping to extended RV trips, using a dependency-based framework that prevents entire categories from being forgotten
- Shelter is your foundation: tent, sleeping bag rated for expected temps, and sleeping pad (R-2 minimum for summer, R-4+ for three-season use)
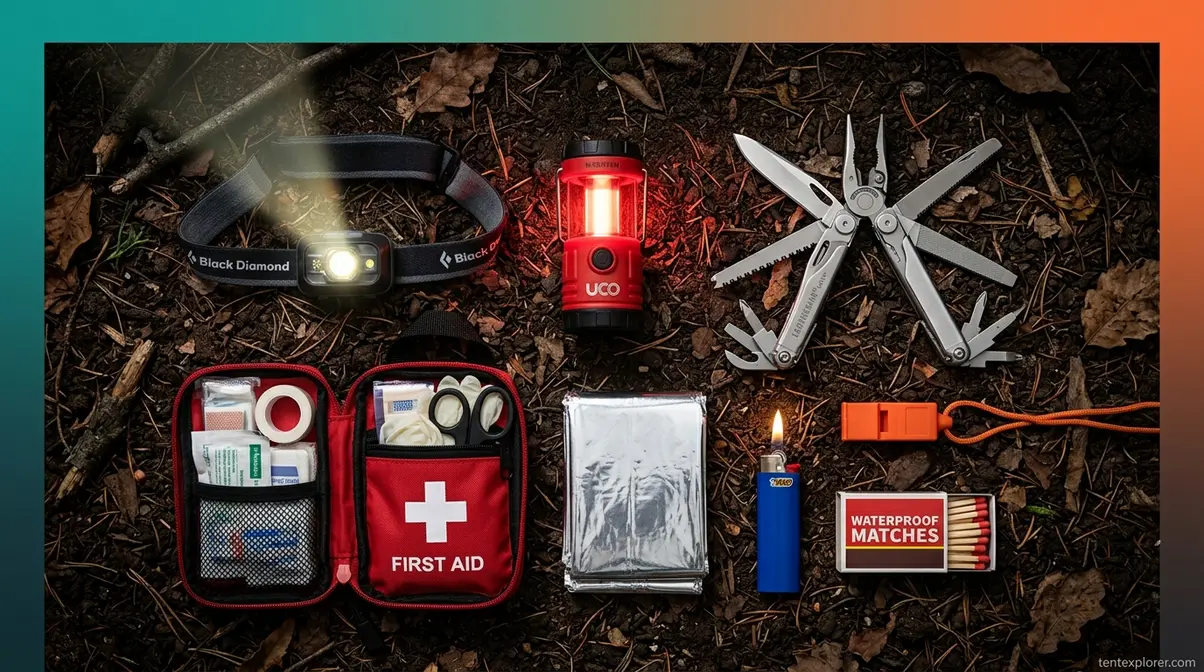
- Safety items are non-negotiable: first aid kit, headlamp with spare batteries, multi-tool — Layer 4 doesn’t change regardless of trip type
- Specialized gear matters: RV, beach, and car camping each require 8–12 additions or substitutions beyond the standard list
- Overpacking food is the #1 beginner mistake — REI recommends 1.5–2 lbs of food per person per day for most camping trips

- Portable & Lightweight 2-Person Tent: The backpacking tent is only 3.96lb,Ideal tent for camping, backpacking, hiking, beaching, fishing, and weekend music festivals
- Easy Minutes Set-Up: No particular skills are needed, one person also could set up the tent easily in 3 minutes.this dome camping tent can be taken to anywhere easily
- Great Ventilation : Double-layer dual-purpose design on the top and unlike the other 2 person tents, our tent can be opened or closed windows from the inside
- 2 Person Backing Tent: Assembled size 7ft x 5ft x 42 inches, spacious tent for 2 people, Fits well with 1 to 2 sleeping pads and sleeping bags individually with roomy space to store backpack aside with you
- After Sale Service: UNP camping tent offer you a risk-free purchase, If you have any questions about the tents,and we’ll give you a satisfactory solution in 12 hrs
Last update on 2026-04-05 / Affiliate links / Images from Amazon Product Advertising API

- The standard for ultralight backpacking. The XLite NXT mattress delivers unrivaled comfort and warmth for minimal weight
- Foam-free NeoAir design weighs just 13 oz (370 g) in size Regular and rolls up as small as a conventional 1-liter bottle
- 3-inch (7.6 cm) thick profile and baffled internal structure provide unrivaled stability and support
- Equipped with a dependable and rugged WingLock valve providing easy inflation and lightning-fast deflation
- Reflective ThermaCapture technology traps radiant heat while the Triangular Core Matrix construction minimizes convective heat loss providing a 4.5 R-Value, warm enough for year-round adventures
Last update on 2026-04-05 / Affiliate links / Images from Amazon Product Advertising API

- Fine-Tuned Fit – Fit-on-the-Fly harness and hipbelt make for improved comfort and a fine-tuned fit
- Integrated Raincover – Keeps your pack and gear dry in inclement weather
- Enhanced Organization – Large, curved side zip access into main compartment on both sides
- Zippered sleeping bag compartment with removable divider
- Internal hydration reservoir sleeve with center back exit port
Last update on 2026-04-05 / Affiliate links / Images from Amazon Product Advertising API

- Lightweight, easy to use portable water filter removes harmful bacteria, protozoa, cysts, sediment, And 100% of microplastics; Perfect for outdoor adventures, travel, or emergency preparedness
- The Sawyer Squeeze Filter is reusable and easy to clean, lasting up to 100,000 gallons. The fiber walls inside Sawyer’s hollow fiber membrane filters are thicker, making them stronger than other typical hollow fiber membrane which allows for more rigorous backwashing.
- The Cnoc 2 liter (64 ounce) bladder is made from extra-durable TPU with a wide mouth opening for fast, easy filling.
- The system weighs less than 6 ounces and includes a cleaning coupling and cleaning plunger, TPU pouch is BPA and PVC Free.
- 100% of squeeze units individually tested three times to performance standards by sawyer
Last update on 2026-04-05 / Affiliate links / Images from Amazon Product Advertising API

- One-Step Auto Ignition: New turn and click knob igniter works like a home stove to automatically produce a cooking flame; Stainless steel burner does not require a match or lighter to ignite
- Safe-Touch Zones: Color-coded, rubberized area stays cool during use, providing a comfortable and secure grip when cooking
- Improved Locking System: Features three locking points and visual indicators for a confident and secure pot to burner connection
- Lightning Fast Boil Time: Personal camp stove boils 16 ounces of water in 2 minutes for quick hot meals on camping and hiking trips; Insulated cozy keeps water hot longer
- Compact & Lightweight Design: Stove components and a 100 g JetPower fuel canister (sold separately) pack into the 1 liter cook cup to save space and keep your gear organized; Bottom cup doubles as a measuring cup or a bowl
Last update on 2026-04-05 / Affiliate links / Images from Amazon Product Advertising API

- POWERFUL LIGHT OUTPUT: Delivers up to 400 lumens of brightness for reliable visibility as a headlight/headlamp for hiking gear, camping gear, night running gear, and emergency use. The powerful beam helps illuminate trails, campsites, and dark environments with ease. Ideal for camping supplies and hiking essentials.
- WATERPROOF & DURABLE DESIGN: Built to handle the elements, this adult torchlight features a rugged housing with waterproof construction. Perfect for adventures in rain, snow, or challenging outdoor conditions, dependable outdoor camping gear / equipment and accessories for men and women.
- CUSTOMIZABLE LIGHTING MODES: Offers multiple brightness settings and proximity modes so that you can adjust from full-power spotlight to softer ambient lighting. Features a red night-vision mode for discreet use and preservation of night vision. Great for a work around the house, mechanics, emergencies, reading, walking, running, hiking, hunting, skiing, and work.
- EASY ADJUSTMENT & BATTERY OPTIONS: Features a simple button interface and an adjustable headband for comfort on your forehead. Runs on 3x AAA batteries (Included) or can be upgraded with the rechargeable BD 1500 Li-ion battery and charger (sold separately) for a rechargeable headlamp option.
- LIGHTWEIGHT & COMFORTABLE FIT: Compact design with an adjustable headband provides a secure, all-day wear fit. The low-profile construction keeps the headlamp stable during active pursuits without adding bulk. Perfect gift or present for camping accessories, cycling, and as a quick work headlamp for tasks around the house or an emergency flashlight for a car kit.
Last update on 2026-04-05 / Affiliate links / Images from Amazon Product Advertising API
- Portable & Lightweight 2-Person Tent: The backpacking tent is only 3.96lb,Ideal tent for camping, backpacking, hiking, beaching, fishing, and weekend music festivals
- Easy Minutes Set-Up: No particular skills are needed, one person also could set up the tent easily in 3 minutes.this dome camping tent can be taken to anywhere easily
- Great Ventilation : Double-layer dual-purpose design on the top and unlike the other 2 person tents, our tent can be opened or closed windows from the inside
- 2 Person Backing Tent: Assembled size 7ft x 5ft x 42 inches, spacious tent for 2 people, Fits well with 1 to 2 sleeping pads and sleeping bags individually with roomy space to store backpack aside with you
- After Sale Service: UNP camping tent offer you a risk-free purchase, If you have any questions about the tents,and we’ll give you a satisfactory solution in 12 hrs
Last update on 2026-04-06 / Affiliate links / Images from Amazon Product Advertising API
No products found.

- Included raincover made with PFAS-free DWR and bluesign approved materials
- Curved zip access on one side of panel
- Floating top lid with lash points
- Zippered sleeping bag compartment with removable divider and removable sleeping pad straps keep your sleep system secure
Last update on 2026-04-06 / Affiliate links / Images from Amazon Product Advertising API
- Lightweight, easy to use portable water filter removes harmful bacteria, protozoa, cysts, sediment, And 100% of microplastics; Perfect for outdoor adventures, travel, or emergency preparedness
- The Sawyer Squeeze Filter is reusable and easy to clean, lasting up to 100,000 gallons. The fiber walls inside Sawyer's hollow fiber membrane filters are thicker, making them stronger than other typical hollow fiber membrane which allows for more rigorous backwashing.
- The Cnoc 2 liter (64 ounce) bladder is made from extra-durable TPU with a wide mouth opening for fast, easy filling.
- The system weighs less than 6 ounces and includes a cleaning coupling and cleaning plunger, TPU pouch is BPA and PVC Free.
- 100% of squeeze units individually tested three times to performance standards by sawyer
Last update on 2026-04-06 / Affiliate links / Images from Amazon Product Advertising API

- One-Step Auto Ignition: New turn and click knob igniter works like a home stove to automatically produce a cooking flame; Stainless steel burner does not require a match or lighter to ignite
- Safe-Touch Zones: Color-coded, rubberized area stays cool during use, providing a comfortable and secure grip when cooking
- Improved Locking System: Features three locking points and visual indicators for a confident and secure pot to burner connection
- Lightning Fast Boil Time: Personal camp stove boils 16 ounces of water in 2 minutes for quick hot meals on camping and hiking trips; Insulated cozy keeps water hot longer
- Compact & Lightweight Design: Stove components and a 100 g JetPower fuel canister (sold separately) pack into the 1 liter cook cup to save space and keep your gear organized; Bottom cup doubles as a measuring cup or a bowl
Last update on 2026-04-06 / Affiliate links / Images from Amazon Product Advertising API
- POWERFUL LIGHT OUTPUT: Delivers up to 400 lumens of brightness for reliable visibility as a headlight/headlamp for hiking gear, camping gear, night running gear, and emergency use. The powerful beam helps illuminate trails, campsites, and dark environments with ease. Ideal for camping supplies and hiking essentials.
- WATERPROOF & DURABLE DESIGN: Built to handle the elements, this adult torchlight features a rugged housing with waterproof construction. Perfect for adventures in rain, snow, or challenging outdoor conditions, dependable outdoor camping gear / equipment and accessories for men and women.
- CUSTOMIZABLE LIGHTING MODES: Offers multiple brightness settings and proximity modes so that you can adjust from full-power spotlight to softer ambient lighting. Features a red night-vision mode for discreet use and preservation of night vision. Great for a work around the house, mechanics, emergencies, reading, walking, running, hiking, hunting, skiing, and work.
- EASY ADJUSTMENT & BATTERY OPTIONS: Features a simple button interface and an adjustable headband for comfort on your forehead. Runs on 3x AAA batteries (Included) or can be upgraded with the rechargeable BD 1500 Li-ion battery and charger (sold separately) for a rechargeable headlamp option.
- LIGHTWEIGHT & COMFORTABLE FIT: Compact design with an adjustable headband provides a secure, all-day wear fit. The low-profile construction keeps the headlamp stable during active pursuits without adding bulk. Perfect gift or present for camping accessories, cycling, and as a quick work headlamp for tasks around the house or an emergency flashlight for a car kit.
Last update on 2026-04-05 / Affiliate links / Images from Amazon Product Advertising API

- PLENTY OF ROOM. Comfortably fits most campers up to 5 FEET, 11 INCH tall. SEZE: 31.5 by 86.6 inches (W x D). Our sleeping bag can be used in 3 seasons with a design temperature of 50℉- 68℉(10℃-20℃). Recommended limit temperature: 41℉-77℉
- GOOD QUALITY WITH AFFORDABLE PRICE. The stitching and material feels neat and comfotable. Outer Cover Material: Polyester, Waterproof and Breathable Fabrics; Lining Material: Pongee; Fill-Material: hollow cotton. WARM AND SKIN-FRIENDLY
- A THOUGHT OUT DESIGN. Drawstring allows you to tighten hood and KEEP YOU HEAD NICE AND WARM. The idea of having a zipper at the foot to allow more warm or cool air to enter or exit the bag in different times of the season
- LIGHTWEIGHT AND COMPACT DESIGN. Pack Weight is 3.3lbs, the compressed packing size is 7.9''-14.2'' and would take up less space. Convenient to carry along for any outdoor adventures, class camping trip, the aquarium, summer camp, couch surfing, jam bags, office crashing, and as an em3rgency blanket for vehicles
- SERVE ITS PURPOSE FOR YOU AND YOUR KIDS. Wipes clean easily. This camping bags also have a weather-resistant and waterproof design to keep you warm,prevent you from any dampness
Last update on 2026-04-06 / Affiliate links / Images from Amazon Product Advertising API

- OSHA-Compliant Emergency Kit: Includes supplies including bandages, gauze, butterfly closures, burn cream packets, antibiotic ointment, BZK antiseptic towelettes, disposable gloves, scissors, and tweezers
- Convenient Packaging: An ideal office first aid kit, home first aid kit, or car first aid kit, this set of safety-oriented office essentials comes in a durable plastic case complete with easy slide latches
- Easy Access: This convenient and versatile work, home and car emergency kit features a clear cover and individual compartments that keep supplies neatly organized and easy to locate
- Versatile: Ideal for homes, offices, construction vehicles, and more, this home and workplace first aid box helps you stay prepared for potential emergencies
- HSA Eligible and FSA Eligible First Aid Kit: Stay prepared and prioritize your safety with this convenient FSA and HSA eligible first aid kit
Last update on 2026-04-06 / Affiliate links / Images from Amazon Product Advertising API
- 【17-in-1】Our multitools includes 17 functionality : needle-nose & regular pliers, pocket knives, saw, scissors, phillips screwdriver, flat screwdriver (3,5,6mm), YG12 wire cutter, ruler, file, bottle & can openers, rope cutter, wire stripper, threading needle. The all in one tool construction are packed into the frame very closely, like scientific instrumentation.
- 【440A STAINLESS STEELS】This survival multitool features high-alloy 440A steel giving an exceptional blend of hardness and durability to the edge, allowing for a precise and sharp edge. The edc multitool has a hardness of 54 +/- 2 on the Rockwell Hardness Rating and is also excellent rust-resistant. And the wire cutter is made of Tungsten YG12, so it can cut through mild steel hardware surprisingly well.
- 【SAFE SELF-LOCKING】PERWIN multiherramienta with side lock design, every tools and knife (except the pliers heads) will be self-locking when fully open, which is useful to prevent accidentally closing during operation.
- 【SLIM DESIGN】This multi-tool measures 4.3 inches long, 1.57 inches wide, 0.78 inches thick, and weighs 0.66 pounds, you can access and open the multi tool pocket knife with a single hand. We offer a hard-wearing nylon sheath for convenient carrying it on a belt or a pack strap. The pocket multitool a high-grade metal rivet snap closes tightly and keeps your tool secure.
- 【CAMPING ACCESSORIES】If you're an adventure seeker, or if you want to up your emergency-preparedness game, we bet you'll like this pocket tool. It is a utility tool for outdoor activities like camping, fishing, hiking, cooking, picnics, DIY, and more. It is also a practical helper for men, fathers and boyfriends for festivals.
Last update on 2026-04-06 / Affiliate links / Images from Amazon Product Advertising API

- SWING-UP HANDLES: Easy to for carrying and lifting
- CUP HOLDERS WITH DRAIN: Molded into the lid to keep drinks from spilling; fit up to a 30-oz. tumbler
- HIGH CAPACITY: Accommodates up to 80 cans
- HAVE-A-SEAT LID: Closed lid supports up to 250 lb., perfect for camping, festivals or sporting events.
- Durable & Leak-Proof: Perfect for on-the-go adventures, from the backyard to the beach.
Last update on 2026-04-06 / Affiliate links / Images from Amazon Product Advertising API
Your Essential Camping Supplies List: The 5-Layer System Overview
An essential camping supplies list organizes your gear into five core categories — shelter, kitchen, clothing, safety, and trip-specific items — so you arrive prepared for any condition. The Leave No Trace Ten Essentials framework recommends every outdoor trip include navigation, sun protection, insulation, illumination, first aid, fire, repair tools, nutrition, hydration, and emergency shelter (Leave No Trace, 2024). This guide covers all five layers so you can build your packing list in under 20 minutes.
The Leave No Trace Ten Essentials framework recommends every outdoor trip include navigation, sun protection, insulation, illumination, first aid, fire, repair tools, nutrition, hydration, and emergency shelter (Leave No Trace, 2024).
What competitors like REI, Coleman, and NPS all miss is that camping gear has a dependency structure. You cannot optimize your sleep system without first selecting shelter. You cannot plan food without knowing your cooking setup. You cannot choose clothing without knowing your shelter’s warmth and the expected nighttime temperatures. The 5-Layer System reflects this logic — and that’s what makes it more useful than a flat checklist.
For a deeper dive into tent-specific gear, see our essential tent camping gear checklist and our camping checklist for first-time campers.
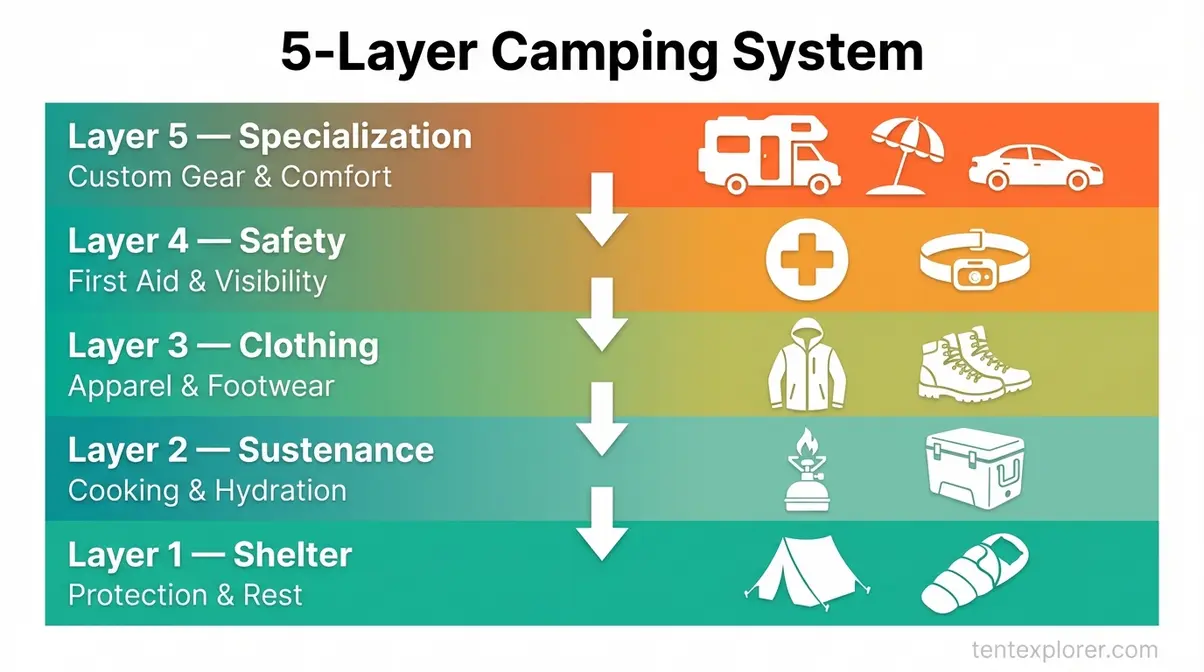
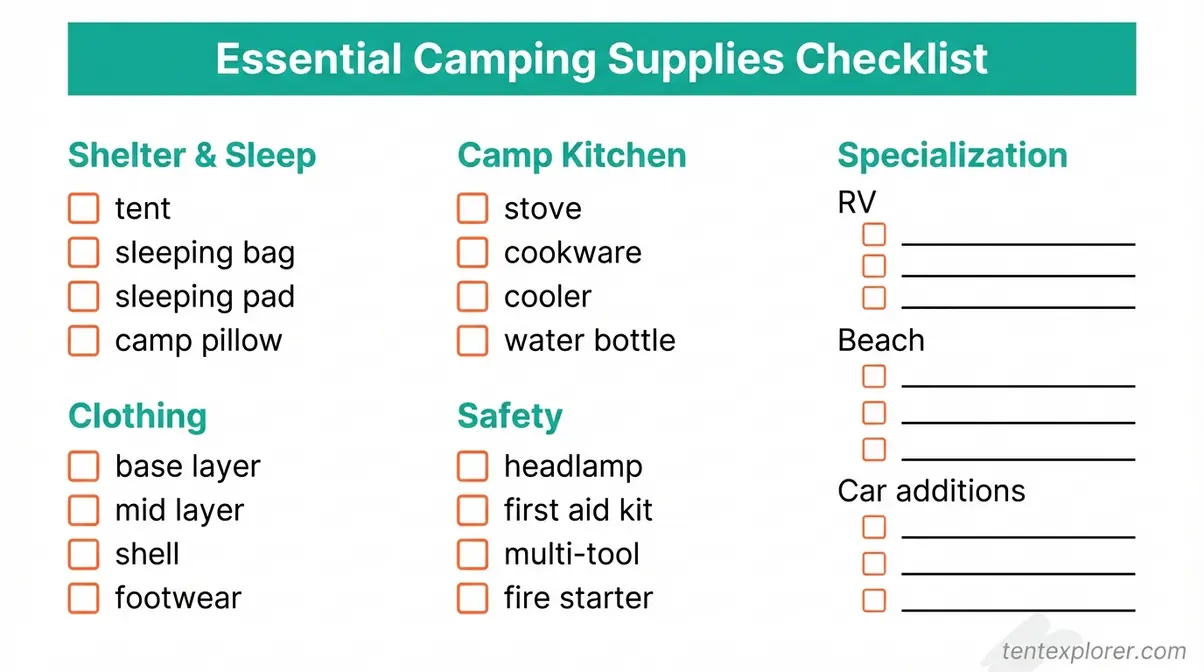
What the 5-Layer Camping System Covers
The essential camping supplies list is most useful when treated as a layered system rather than a flat inventory. Here are the five layers in dependency order:
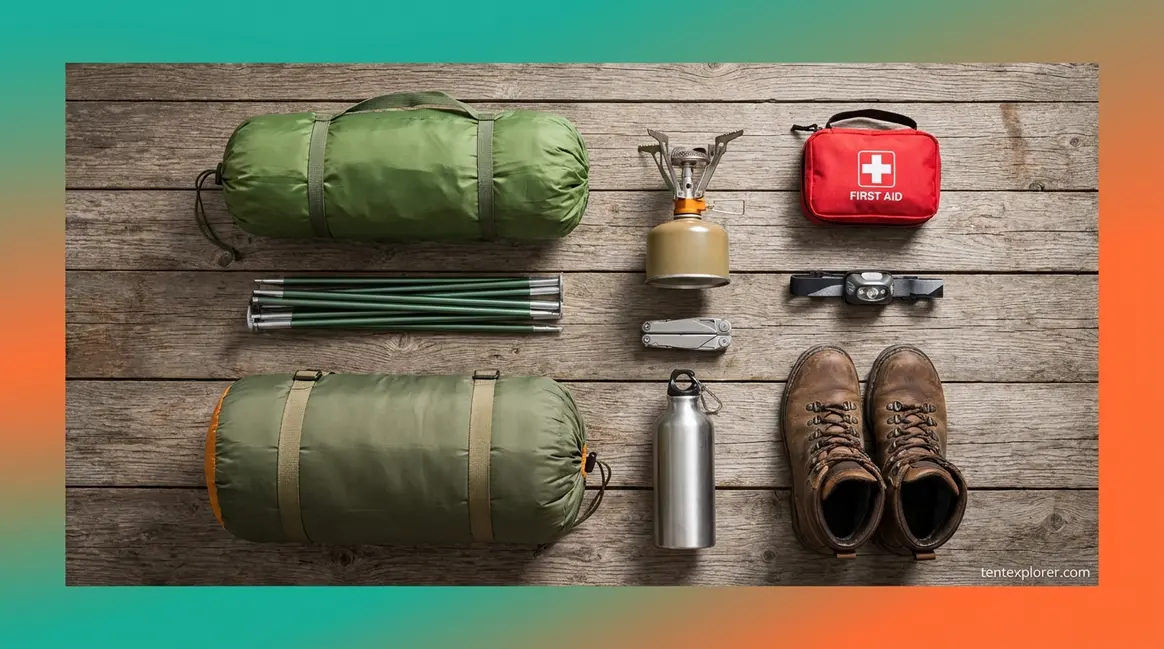
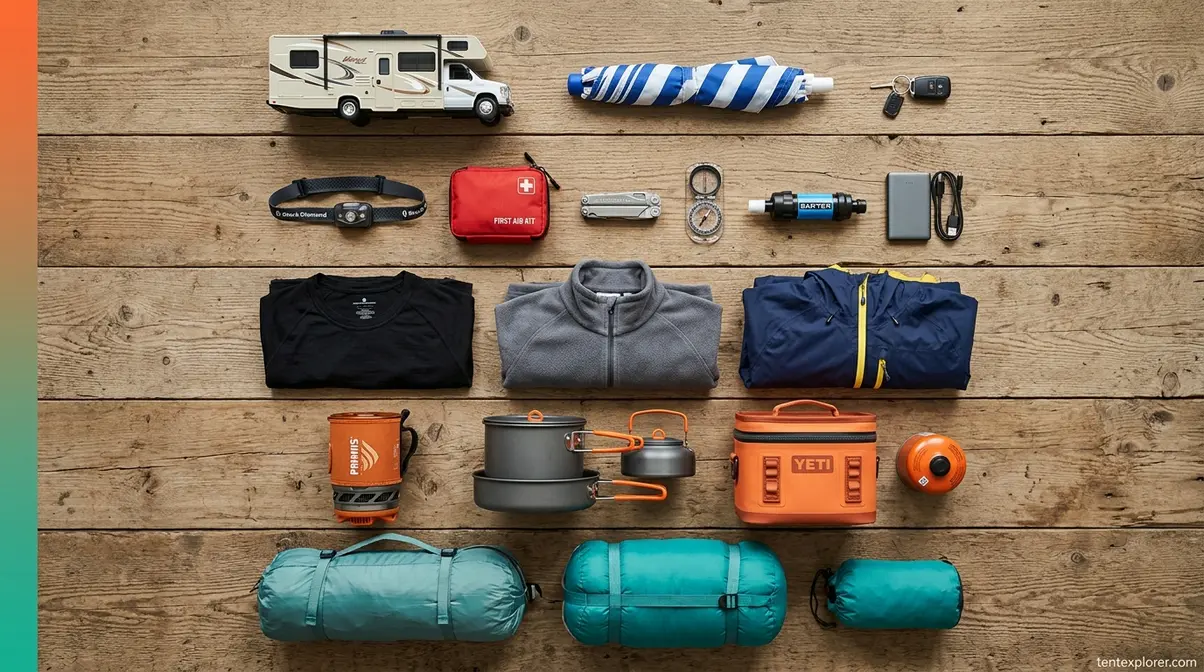
- Layer 1 — Shelter: The foundation of every trip. Your tent, sleeping bag, and sleeping pad. Every other gear decision flows from what you choose here.
- Layer 2 — Sustenance: Your camp kitchen — stove, cookware, cooler, water management, and food. Depends on Layer 1 because a car camper with a large tent can bring a full kitchen setup; a backpacker with a bivy cannot.
- Layer 3 — Clothing: Base layers, insulating layers, waterproof shell, footwear, and hygiene. Depends on Layer 1 (shelter warmth) and your trip planning answers (nighttime lows, weather forecast).
- Layer 4 — Safety: Lighting, first aid, multi-tools, and emergency preparedness. Unique in that it does not depend on the layers above — it’s constant across every trip type.
- Layer 5 — Specialization: The adaptations your specific camping environment requires. RV camping, beach camping, and car camping each modify your Layer 1–4 choices in predictable ways.
Why does dependency order matter? Consider this: a car camper using a rooftop tent (Layer 1) can bring a heavier cooler and full camp kitchen (Layer 2) because weight isn’t a constraint. A backpacker using a two-person tent makes the opposite trade-off. If you choose an ultralight bivy instead of a tent, your Layer 3 clothing needs change dramatically — you need a warmer sleeping bag and more insulation layers. The framework prevents this mismatch before you start pulling gear off shelves.
Transition: Before building your list layer by layer, run through five quick trip-planning questions — they determine which items are must-haves vs. nice-to-haves for your specific trip.
The 10 Essentials Every Camper Needs
The essential camping supplies list has a non-negotiable core. According to the Leave No Trace Plan Ahead principle, LNT’s first principle, Plan Ahead and Prepare, includes packing the Ten Essentials for comfort, safety, and Leave No Trace qualities (Leave No Trace, 2024). Here’s what each essential means in practice:
Most first-time campers nail nutrition and hydration. The items they consistently forget are repair tools and emergency shelter — the two categories that matter most when things go wrong.
“Here are some of the few things that you would need when you go camping: Tent, sleeping bag, water bottle, fire starter, first aid kit, food, and a pocket …”
Those seven items are your starting point. The 5-Layer System shows you what surrounds them — and why each surrounding layer matters.
- Navigation: Topographic map + compass + downloaded offline GPS app. Phone GPS fails without signal.
- Sun protection: SPF 30+ sunscreen, UV-blocking sunglasses, wide-brim hat. Reapply sunscreen every two hours.
- Insulation: Extra base layers and a rain jacket beyond what you expect to need. Temperatures drop faster than forecasts suggest.
- Illumination: Headlamp (not a flashlight — you need both hands free) with lithium batteries that hold charge in cold temperatures. Always pack spare batteries.
- First aid supplies: A stocked kit including adhesive bandages, gauze, blister treatment, and personal medications. Covered in depth in the Safety section.
- Fire: BIC lighter as primary, waterproof matches as backup. Fire starter cubes for wet conditions.
- Repair tools: Multi-tool or knife plus duct tape. The Ten Essentials framework includes repair tools and simple items for fixing gear (Leave No Trace, 2024) — this is the category most skipped.
- Nutrition: Extra food beyond planned meals — minimum one full extra day’s supply.
- Hydration: Water plus a purification method (filter, UV pen, or chemical tablets). Never assume a water source is safe.
- Emergency shelter: Space blanket or emergency bivy. Weighs two ounces; irreplaceable if you’re caught in unexpected weather.
Before You Pack: Your Trip Planning Checklist
Your answers to these five questions determine which version of this essential camping supplies list you actually need. A family of four on a 3-night developed campground trip in June needs a very different list than two adults doing a 1-night backcountry trip in October. Both use the 5-Layer System — but these five questions determine every choice.
- Campsite type — developed or backcountry? Developed campgrounds (with water taps and toilet facilities) reduce your water carry and hygiene gear needs. Backcountry sites require you to carry everything in, including a water filter and trowel.
- Weather forecast for your dates. Check the 7-day forecast and, critically, the nighttime lows. Temperature determines your sleeping bag rating and how many clothing layers you need.
- Group size and ages. Families with young children need extra safety items, comfort gear, and entertainment. Solo campers prioritize weight reduction across every layer.
- Trip duration. One night vs. five nights changes food quantity, clothing changes needed, and battery consumption dramatically. A 1-night trip can get away with less redundancy; a 5-night trip cannot.
- Planned activities. Hiking, fishing, kayaking, or campfire-only? Each adds specific gear to Layer 5. A fishing trip adds tackle and a fishing license. A kayaking trip adds a dry bag and PFD.
With your trip profile established, build from the ground up: Layer 1 is shelter and sleep — the single most important investment in your camping comfort.
Shelter & Sleep Systems: Your Foundation for Every Night Out
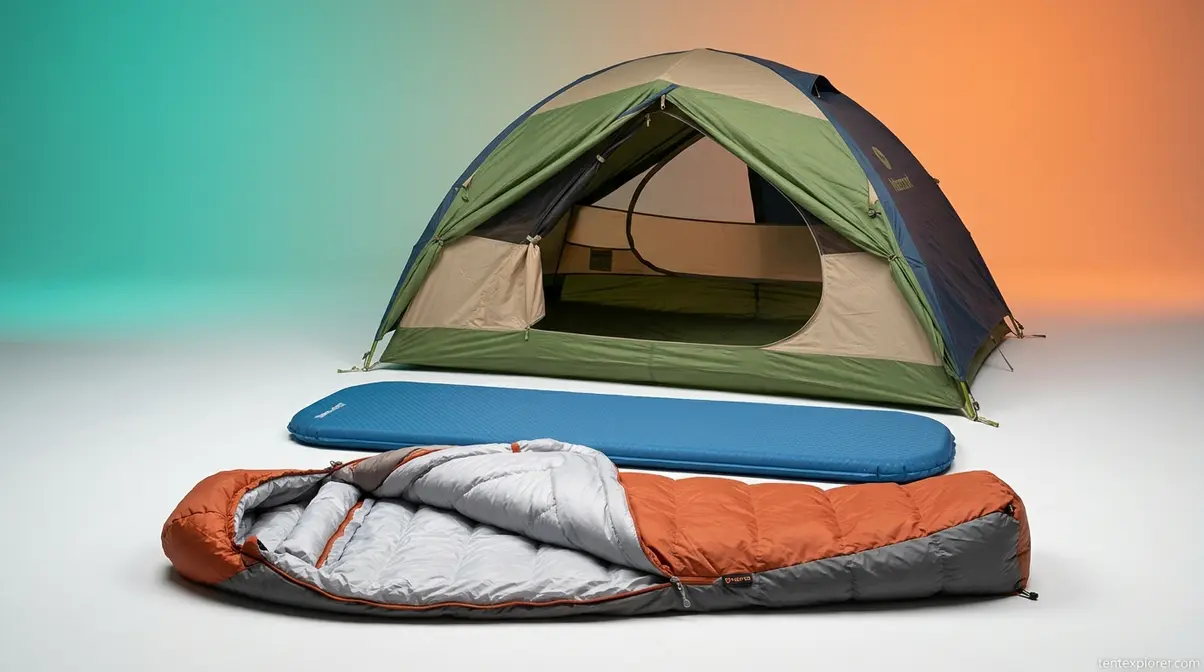
The most common complaint from first-time campers isn’t about food or lighting — it’s waking up cold at 3 a.m. because their sleeping bag wasn’t rated for the actual temperature. Shelter and sleep gear are the highest-stakes decisions on your essential camping supplies list. Get Layer 1 right, and every other layer is easier to optimize. Get it wrong, and no amount of good food or warm clothing fully compensates.
This section covers Layer 1 of the 5-Layer System. Your shelter choices directly constrain every decision in Layers 2–5 — from how much kitchen gear you can carry to how many clothing layers you need.
According to Leave No Trace planning principles, Leave No Trace emphasizes planning shelter choices around expected conditions and group skill level to ensure safety and minimal environmental impact (Leave No Trace, 2024).
Not sure whether a tent footprint is worth it? Our guide to tent footprints breaks down five proven reasons to use one.
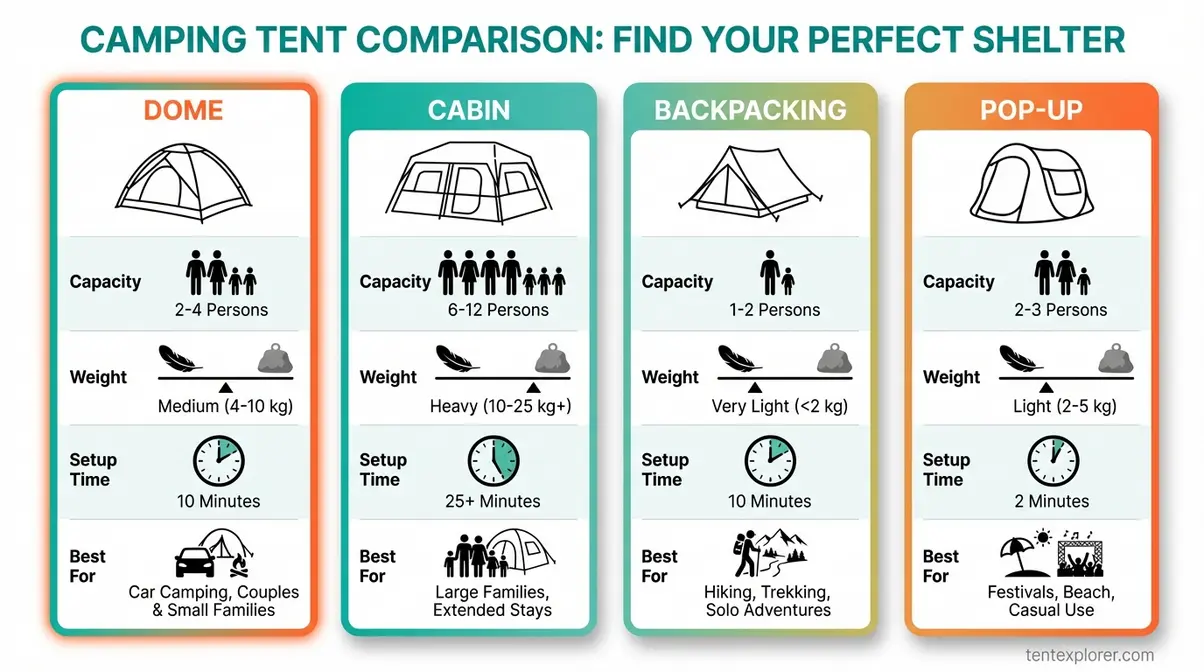
Choosing the Right Tent for Your Trip
Your tent is Layer 1’s foundation. The four main tent types each serve a specific scenario — choosing the wrong one creates problems that nothing else in your kit can fix.
| Tent Type | Capacity | Weight | Setup Time | Best For |
|---|---|---|---|---|
| Dome | 2–4 person | Medium | 10–15 min | Car camping, developed campgrounds |
| Cabin | 4–8 person | Heavy | 20–30 min | Families at established sites |
| Backpacking | 1–2 person | Ultralight | 5–10 min | Any trip where you carry gear |
| Pop-up | 2–4 person | Light | Under 1 min | Festival or casual 1-night trips only |
Three critical selection criteria every buyer must check:
- Season rating. A 3-season tent handles spring through fall — wind, rain, and temperatures above freezing. A 4-season tent handles winter and high wind. Most campers need 3-season.
- Capacity. Manufacturer ratings assume a tight, shoulder-to-shoulder fit. Add one person to the stated capacity for comfortable sleeping. A “4-person” tent comfortably sleeps three adults with gear.
- Rainfly coverage. A full-coverage rainfly is non-negotiable. Partial-coverage rainflies fail in sideways rain — a common condition in mountain and coastal environments.
Tent footprint necessity: A footprint protects your tent floor from abrasion, extends the tent’s life by years, and adds a moisture barrier between you and wet ground. It’s not always included with the tent — check before purchasing. See our guide to tent footprints for a full breakdown.
For a family of four, look at 6-person dome or cabin tents (using the 4+2 comfort rule) with a full rainfly and a separate footprint. A reliable 3-season option from Coleman or REI Co-op runs $150–$400.
Mistake to avoid: Never skip the stakes. A freestanding tent can still blow away without stakes — always stake it down even in calm weather. This is one of the most common and easily preventable camping mistakes experienced campers see repeatedly.
Once your tent is selected, your sleeping bag becomes the next critical decision — and the temperature rating system trips up more campers than any other gear choice.
Sleeping Bags: Temperature Ratings Explained
Your sleeping bag handles temperature from above. Understanding the rating system prevents the most common sleep mistake: buying a bag that’s warm enough for the catalog photo but not for your actual campsite at 2 a.m.
- The EN/ISO temperature rating system works in three tiers:
- Comfort rating: Temperature at which a standard woman sleeps comfortably. This is your real-world target.
- Lower Limit: Temperature at which a standard man sleeps comfortably — typically 5–10°F warmer than Comfort.
- Extreme: Survival rating only. Do not use this number for trip planning.
The reliable rule: buy a bag rated 10–15°F colder than your expected nighttime low. If nights drop to 45°F, choose a 30°F rated bag.
Three fill types with real trade-offs:
- Down fill (700+ fill power): Lightest, most compressible, warmest for its weight. Loses insulation when wet. Best for dry climates and backpacking.
- Synthetic fill: Retains warmth when damp. Heavier and bulkier than down. Best for humid or wet conditions, coastal camping, and spring shoulder season.
- Hybrid fill: Down core with a synthetic outer shell. Best of both worlds — at a noticeable price premium.
Shape options affect both warmth and comfort. Mummy bags (tapered toward the feet) are the warmest and most weight-efficient — they’re the standard choice for any trip with cold nights. Rectangular bags offer more room to move and are best for warm-weather camping. Semi-rectangular bags split the difference.
For a June camping trip where nighttime lows reach 45°F, a 30°F rated mummy bag with synthetic fill is a reliable choice — it handles unexpected temperature drops and any morning dew without losing warmth.
Your sleeping bag handles temperature from above. Your sleeping pad handles what the bag can’t — insulation from the cold ground below you.
Sleeping Pads vs. Air Mattresses: What You Actually Need
R-value is a measure of thermal resistance — higher R-value means better insulation from cold ground. According to REI’s expert sleeping pad guidance, R-value recommendations by season are (REI, 2026):
| Season | Conditions | Recommended R-Value |
|---|---|---|
| Summer | Nighttime lows 50°F+ | R-1 to R-2 |
| 3-Season | Nighttime lows 20°F–50°F | R-3 to R-4 |
| Winter | Nighttime lows below 20°F | R-5+ |
Three pad types with honest trade-offs:
- Closed-cell foam pads: Indestructible, lightest, cheapest ($20–40). No insulation risk if punctured. Bulky to carry — typically strapped outside a pack.
- Inflatable sleeping pads: Most comfortable, most packable, highest R-values ($60–200). Can puncture, so carry a patch kit.
- Self-inflating pads: Open-cell foam plus air. Middle ground in comfort, weight, and price ($50–150). A strong choice for car camping.
Air mattress vs. sleeping pad: This is where many campers make a costly mistake. Air mattresses offer more comfort for car camping but provide almost zero insulation — the air inside the mattress equilibrates to ground temperature. You’ll be cold even inside a warm sleeping bag if the mattress is cold. For any camping below 60°F, a sleeping pad is the safer choice.
Car campers who prioritize comfort can use a self-inflating pad (R-3) as a base layer under an air mattress — combining the comfort of the mattress with the ground insulation of the pad. For a full comparison, see our guide on choosing between air mattresses and sleeping pads.
Pad and bag are covered. The final sleep system piece is often skipped by first-timers but makes a measurable difference: a dedicated camp pillow and a few sleep extras.
Camp Pillows and Sleep Extras Worth Packing
A compressible camp pillow ($15–40) packs down to fist-size and outperforms the stuffed-jacket substitute that most first-timers attempt. NBC News camping gear coverage specifically highlights camp pillows as a frequently forgotten item — and experienced campers consistently confirm it’s one of the highest comfort-to-weight-ratio additions you can make.
Sleep extras worth the weight:
- Sleeping bag liner: Adds 5–15°F of warmth, keeps your bag cleaner between washes, and doubles as a standalone blanket in warm weather. Silk liners are lightest; fleece liners add the most warmth.
- Earplugs: Campgrounds are louder than expected at night — other campers, wildlife, and generators all contribute. A $2 pair of foam earplugs is one of the best investments in your sleep quality.
- Eye mask: Sunrise at 5:30 a.m. in summer is beautiful and also unrelenting. An eye mask adds 60–90 minutes to your morning sleep.
- Small white noise app: For hot nights in crowded campgrounds, a white noise app on your phone (downloaded offline) can make the difference between restful sleep and a miserable night.
Mistake to avoid: Don’t use your home pillow — it compresses into a useless lump inside a stuff sack and takes up half your bag.
Shelter and sleep are locked in. Layer 2 of the 5-Layer System is sustenance — and a well-planned camp kitchen is the difference between eating well and eating poorly.
Camp Kitchen & Food Management: Eating Well in the Wild
A well-organized camp kitchen requires four categories of gear: a heat source, cookware, food storage, and water management. Each category has a right choice for your trip type — and the University of Rochester Medical Center advises campers to plan water use carefully and store medications in waterproof containers as part of campground safety preparation (URMC, 2024).
This is Layer 2 of the 5-Layer System — Sustenance. Your Layer 1 choices determine how much Layer 2 gear you can realistically bring. A car camper has no weight limit; a backpacker counts every ounce.
Camp Stoves: Types, Fuel, and Cooking Basics
Your camping stove choice determines your entire cooking experience. Here are the four main types with honest assessments of each:
| Stove Type | Best For | Fuel | Cooking Capacity | Portability |
|---|---|---|---|---|
| Two-burner propane (e.g., Coleman Classic) | Car camping | 16 oz propane canisters | Two pots simultaneously | Bulky/heavy |
| Single-burner canister (e.g., MSR PocketRocket) | Backpacking, ultralight car camping | Isobutane/propane mix | One pot at a time | Very light |
| Camp grill/griddle | Families, full meals | Propane | Pancakes, burgers, full meals | Car camping only |
| Wood-burning rocket stove | Dry conditions, no fuel budget | Dry wood | Variable | Moderate |
Essential cookware list: A 2-quart pot with lid, a 10-inch skillet, a camp coffee percolator or pour-over, a lightweight spatula and spoon, a cutting board, and a small camp knife. Nested cookware sets save significant pack space and are worth the modest premium over buying pieces separately.
Fuel planning: Burn time varies significantly by stove BTU output, heat setting, and weather conditions. Real-world testing and REI’s stove fuel guidance both confirm that a 16 oz propane canister provides roughly 1–2 hours of high-heat cooking on a two-burner stove, or up to 3–4 hours on medium heat with a single-burner setup (REI Expert Advice, 2026). For a 3-night trip with two hot meals per day, bring 2–3 canisters as a baseline — adjust based on your stove’s stated burn time.
Critical safety rule: Never use a camp stove inside a tent or enclosed space. Carbon monoxide builds up rapidly in enclosed areas, even with a small opening. Always cook at least 10 feet from your tent — this is a non-negotiable safety protocol covered in detail in the Safety section.
Mistake to avoid: Wood-burning rocket stoves are prohibited in fire-restricted areas — and fire restrictions cover a significant portion of popular camping destinations during summer and fall. Check current fire restrictions for your campground before packing one.
With your heat source selected, the cooler is your next critical kitchen decision — and how you pack it determines whether your food is safe to eat on day three.
Coolers and Food Storage: Keeping Food Safe
Cooler selection comes down to three criteria:
- Size: Use 1 quart of cooler capacity per person per day as a starting rule. A 45-quart cooler works for three people for three days.
- Ice retention: Standard coolers retain ice 1–2 days. High-performance coolers (Yeti, RTIC, similar roto-molded designs) retain ice 5–7 days, making them worth the investment for trips longer than two nights.
- Hard-sided vs. soft-sided: Hard-sided coolers are bear-resistant and more durable. Soft-sided coolers are lighter and more portable — better for day trips than multi-night base camping.
Ice packing strategy for maximum retention:
- Pre-chill the cooler with ice 24 hours before packing. A warm cooler melts its first batch of ice before you leave the driveway.
- Place block ice on the bottom, layer food in the middle, then add crushed ice on top to fill gaps.
- Pack drinks in a separate smaller cooler — this one gets opened most frequently, which accelerates ice melt in your food cooler.
- Keep the food cooler in shade. Never store it in the car trunk in summer heat, where temperatures can exceed 130°F.
Food safety: The USDA’s 2-hour rule applies outdoors — perishable food left above 40°F for more than 2 hours should be discarded. When outdoor temperatures exceed 90°F, that window drops to 1 hour (USDA, 2024). This applies to meat, eggs, dairy, and prepared dishes.
Mistake to avoid: Don’t drain cooler water — cold water keeps remaining ice frozen longer. Drain only when ice is fully melted.
Food safety managed — now the item most campers underplan: water. How much do you need, and what happens when the tap runs out?
Water Management: Bottles, Jugs, and Purification
Water is the most critical item on your camping supplies list. The National Park Service recommends drinking at least 2 liters of water per day while camping, with more required in hot climates or during active use (NPS, 2024). REI’s hydration guidance aligns with the broader outdoor consensus: plan for approximately 0.5 liters per person per hour of moderate activity (REI Expert Advice, 2026). For a 3-night car camping trip with moderate activity, plan 3–4 liters per person per day for drinking, plus additional for cooking and dishwashing.
Container options:
- Reusable water bottles or insulated tumblers (32–64 oz): Individual hydration. Insulated tumblers keep water cold for 24+ hours — a meaningful advantage on hot days.
- 5-gallon water jug with spigot: Base camp water supply for cooking and washing. Essential if your campsite has no potable water tap.
- Hydration bladder (2–3 liter): For hiking from camp. Hands-free hydration via drinking tube keeps you moving without stopping to reach for a bottle.
Purification options for backcountry or uncertain water sources:
- Pump filter (e.g., MSR MiniWorks): Reliable, works in any temperature, treats large volumes. Best for group use.
- UV pen (e.g., SteriPen): Fast (90 seconds per liter), no taste change. Requires charged batteries — carry a spare.
- Chemical tablets (iodine or chlorine): Cheapest and lightest option. Requires a 30-minute wait and leaves a mild taste.
- Gravity filter (e.g., Sawyer Squeeze): Hands-free filtration for group use. Hang it, fill it, and collect clean water below.
At developed campgrounds with potable water, bring one 32 oz insulated tumbler per person plus a 5-gallon jug for camp use. At backcountry sites, add a pump filter or UV pen — never assume a stream or lake is safe without treatment, even in remote areas. The University of Rochester Medical Center advises campers to plan water use carefully and store it safely, particularly when potable water sources are uncertain (URMC, 2024).
Hydration planned. The final kitchen element — meal planning — is where most campers either pack twice as much food as they need or run out of ideas by day two.
Meal Planning for Different Trip Lengths
Meal planning is the competitor gap this guide fills that no other top-10 camping resource addresses. REI’s meal planning guidance recommends 1.5–2 lbs of food per person per day for most camping trips, scaling up toward 2.5 lbs for strenuous activity or cold conditions (REI Expert Advice, 2026). Here’s a practical framework by trip duration:
| Trip Length | Meal Strategy | Food Weight Target |
|---|---|---|
| 1 night | Pre-made meals, 1 hot dinner + breakfast | 2–3 lbs per person |
| 2–3 nights | 2 hot meals per day, mix of pre-made and simple cook-from-scratch | 4–6 lbs per person |
| 4–7 nights | Mix freeze-dried with fresh food (fresh first 2 days) | 1.5–2 lbs per person per day |
Foods that travel well: Hard cheeses, cured meats, eggs (transported in a hard case), root vegetables, apples, peanut butter, instant oatmeal, ramen, pasta, and rice.
Foods to avoid: Anything in glass containers (heavy and breakable), highly perishable items like raw chicken or fresh fish unless consumed on day one, and anything requiring continuous refrigeration below 40°F.
A family of four on a 3-night trip should plan 9 meals total — 3 dinners, 3 breakfasts, and 3 lunches — plus snacks. That’s roughly 30–40 lbs of food total for the group, fitting in one large cooler and a dry goods bag.
Kitchen and food: covered. Layer 3 of the 5-Layer System is the category that surprises most campers — the right clothing choices matter more than most people realize, especially after dark.
Clothing, Footwear & Personal Hygiene: Comfort in Any Condition
What should you wear camping? The answer depends on one principle: avoid cotton, layer everything else. Cotton absorbs moisture and loses all insulating ability when wet — a dangerous combination in cold or wet conditions. Everything else — your specific items, weights, and quantities — flows from your trip profile answers.
This is Layer 3 of the 5-Layer System. Your shelter’s warmth rating and the nighttime temperatures from your trip planning checklist directly determine how many mid-layers you need.
The Virginia DCR outdoor weather guidance recommends packing emergency items including a blanket, flashlight, and batteries as part of outdoor severe weather preparedness (Virginia DCR, 2024) — items that overlap with both your clothing and safety layers.
The Layering System: Base, Mid, and Outer Layers
The camping layering system works because each layer has a specific job. Combine all three correctly and you stay comfortable across a wide temperature range. Wear any single layer alone and you’re likely to be too cold, too hot, or too wet.
Three layers, three specific jobs:
- Base layer (next to skin): Moisture-wicking synthetic (polyester, nylon) or merino wool. Never cotton. Its job is to move sweat away from your skin before it can cool you down. Examples: merino wool T-shirt, synthetic long underwear.
- Mid layer (insulation): Fleece jacket or down puffy. Its job is to trap warm air. A 200-weight fleece pullover works when damp; down is warmer but loses insulation when wet — choose based on your expected conditions.
- Outer layer (shell): Waterproof and windproof jacket with sealed seams. Its job is to block rain and wind while letting moisture escape. Gore-Tex or similar breathable membranes prevent the “sweating inside your rain jacket” problem that plagues cheaper shells.
Why cotton fails: Cotton garments can absorb up to 27 times their weight in water (Heddels, 2020), and they dry extremely slowly. When wet cotton clings to your skin, it dramatically accelerates heat loss through evaporative cooling. This is why “cotton kills” is a universal rule in outdoor education — it’s not hyperbole, it’s physiology.
Dedicated sleepwear: Pack a separate, dry set of base layers used only for sleeping. This preserves warmth (your sleep clothes are dry and uncontaminated by daytime sweat) and keeps your sleeping bag cleaner between washes. For a fall camping trip with 40°F nights: merino wool base layer + 200-weight fleece + waterproof shell + a dry set of thermals for sleeping.
Layers protect your core. Your feet need equal attention — the wrong footwear choice is the second most common source of camping discomfort after poor sleep.
Footwear for Camp and Trail
Three footwear categories cover every camping scenario:
- Hiking boots (mid or high-cut): Ankle support, waterproof construction, durable soles. Essential for rocky or rooted trails, river crossings, and uneven terrain. Break them in before the trip — new hiking boots on a first day of hiking cause blisters every time.
- Trail runners: Lighter and faster drying than boots, with less ankle support. Best for well-maintained trails and campers comfortable with less stability. They also dry overnight if you get them wet.
- Camp sandals (Chacos, Crocs, or similar): For around the campsite, creek crossings at camp, and campground shower facilities. They give your feet a break from boots after a long day on trail. Never hike trails in camp sandals.
Socks matter as much as boots. Moisture-wicking wool or synthetic socks prevent blisters. Pack two pairs per day of hiking — one to wear, one to dry. Never wear cotton socks. A single wet cotton sock on a 5-mile day can create a blister that ruins the rest of your trip.
Gaiters are an underrated addition for muddy trails, early-season snow, or tick-prone areas. They fit over boot tops and lower pants to keep debris, water, and insects out.
Boots and layers sorted — the final piece of Layer 3 is personal hygiene, which requires a different approach outdoors than at home.
Personal Hygiene Essentials for the Outdoors
Camping hygiene requires different products and different rules than home hygiene. The core principle: use biodegradable products, and keep all soap use at least 200 feet from water sources, trails, and campsites.
Core hygiene checklist:
- Biodegradable soap (for body, dishes, and hair — never use conventional soap near water sources, even “natural” ones)
- Hand sanitizer (60%+ alcohol) — use before eating, after bathroom use, and after handling raw food
- Toilet paper in a zip-lock bag — plus a trowel for backcountry use (bury waste 6–8 inches deep, at least 200 feet from water)
- Dental care: Toothbrush and toothpaste (note: mint scent can attract bears — store in a bear canister or hang with your food bag)
- Feminine hygiene products — pack out all waste, never bury
- Wet wipes / microfiber camp towel — microfiber dries fastest; wet wipes work as a “camp shower” for backcountry trips
- Sunscreen (SPF 30+ minimum) — reapply every two hours, more often near water or at altitude
- Insect repellent — DEET 20–30% or picaridin for proven effectiveness
Leave No Trace hygiene rule: All soap use, even biodegradable, should happen at least 200 feet from water sources. Scatter wastewater widely rather than dumping it in one spot.
Shower options: Solar camp showers (a 5-gallon black bag left in direct sun heats to approximately 100°F in 3–4 hours) work well at developed sites. For backcountry trips, a strategic wet-wipe “shower” gets the job done without impacting water sources.
Shelter, food, and clothing covered. Now the layer most campers treat as an afterthought — until something goes wrong: Layer 4, Safety.
Lighting, Tools & Safety Essentials: Never Be Caught Unprepared
A headlamp dies at midnight. A first aid kit sits in the car instead of at camp. An approaching storm goes unnoticed because no one checked the forecast. These are three of the most common safety failures on camping trips — and all of them are preventable with the right preparation before you leave home.
Safety is the only layer that doesn’t depend on trip type. Whether you’re car camping at a developed site or backcountry hiking, Layer 4 is identical. This section is also the deepest competitive gap in camping content: zero top competitors cover advanced safety protocols including wildfire evacuation, wildlife encounters, carbon monoxide risks, or weather monitoring in any meaningful depth.
For our full review of the best lighting options, see our guide to best camping lights for your tent. For broader safety protocols, our essential tent camping safety tips covers preventative measures in detail.
Lighting Solutions: Headlamps, Lanterns, and Backup Options
A headlamp is the non-negotiable primary light for every camping trip. Hands-free lighting is essential for cooking, setting up camp in the dark, and navigating at night. When evaluating headlamps, look for 200+ lumens, a red-light mode (which preserves night vision and doesn’t disturb other campers), and water resistance rated at IPX4 minimum. Lithium batteries outperform alkaline in cold temperatures — a meaningful difference when you’re camping below 40°F. Always pack at least one full set of spare batteries.
Three lighting categories for a complete camp lighting setup:
- Headlamp: Primary light. Hands-free, essential, non-negotiable. See our guide to best camping lights for your tent for specific model recommendations.
- Propane lantern or LED lantern: Area lighting for the campsite table, gathering area, and tent vestibule. Coleman propane lanterns provide bright, warm light — but they use an open flame and require fuel. LED lanterns are safer (no open flame), battery or rechargeable, and increasingly bright. Use lanterns outside only — never inside a tent.
- Backup flashlight: A compact LED flashlight stored in your sleeping bag pocket. Easy to find in the dark, and a critical redundancy if your headlamp fails.
- Battery management strategy:
- Use lithium batteries in cold weather — they hold charge reliably down to -40°F, where alkaline batteries lose 50–70% of their capacity.
- Pack two full sets of spare batteries per device.
- For car camping where a power bank is available, rechargeable USB-C headlamps eliminate the spare battery burden entirely.
Solar lanterns charge during the day and provide 6–8 hours of light at night. No fuel, no batteries, no ongoing cost. Their limitation: performance depends on sun exposure during the day, making them unreliable in cloudy mountain or coastal environments.
Mistake to avoid: Never rely on your phone flashlight as your primary light source. A dead phone in the backcountry is an emergency, not an inconvenience.
Lighting keeps you functional after dark. The next safety category is the one you hope never to use but must have ready: your first aid kit.
First Aid Kit: What to Include and Why
A camping first aid kit is the most under-packed item on most campers’ lists. Pre-assembled kits from drug stores are a starting point, not a complete solution. According to UAB emergency room physician Dr. Brandon Buchel, a well-stocked camping first aid kit should include adhesive bandages in various sizes, sterile gauze, and adhesive tape as core components (UAB News, 2024).
Core first aid kit contents — ER-physician verified:
- Adhesive bandages in multiple sizes (small, medium, large, knuckle)
- Sterile gauze pads (2×2 and 4×4 inch)
- Adhesive tape (medical-grade)
- Blister treatment — moleskin or blister pads (blisters are the #1 camping injury by frequency)
- Antiseptic wipes and antibiotic ointment
- Pain relievers (ibuprofen, acetaminophen)
- Antihistamines (for allergic reactions to insects, plants, or food)
- SAM splint and elastic bandage (for sprains and strains)
- Tweezers (for splinters and tick removal)
- CPR face shield
- Emergency whistle
Personalization beyond the standard kit: Add personal prescription medications (7-day supply minimum), an EpiPen if anyone in your group has severe allergies, altitude sickness medication if camping above 8,000 feet, and any trip-specific items like water purification tablets as a backup.
Storage and access: Store your first aid kit in a waterproof container — a recommendation explicitly made by the University of Rochester Medical Center for campground safety preparation (URMC, 2024). Keep the kit at camp, not in the car. Everyone in your group should know exactly where it is before you need it.
Mistake to avoid: Check expiration dates on all medications before every trip. Expired medications lose potency and may be ineffective in an emergency.
First aid handles injuries. Multi-tools and repair gear handle equipment failures — and equipment fails more often than most campers expect.
Multi-Tools, Repair Kits, and Emergency Gear
A quality multi-tool is non-negotiable for any camping trip. A Leatherman Wave or comparable multi-tool consolidates a knife blade, pliers, screwdrivers, can opener, scissors, and file into one pocket-sized package — replacing 8–10 separate items. This is one of the Ten Essentials that experienced campers consistently report as the most-used item on any trip where something goes wrong.
Repair kit essentials:
- Duct tape (wrap a short length around a water bottle to save space — you’ll never use a full roll)
- Tent pole repair sleeve (splints broken poles — most tent brands include one in the stuff sack)
- Seam sealer (for waterproofing seams that have dried out over seasons of use)
- Extra tent stakes (always lose a few; always need them)
- Safety pins and zip ties (universal repair tools for gear, clothing, and improvised solutions)
- Gear repair patches (for sleeping pads and air mattresses)
Communication and navigation tools:
- Fully charged mobile phone with offline maps downloaded before departure
- Backup battery/power bank (20,000 mAh provides 3–5 full phone charges)
- Whistle (three blasts is the universal distress signal — audible far beyond a shouting voice)
- Emergency space blanket (reflects 90% of body heat, weighs 2 oz, packs to the size of a deck of cards)
- Fire starter (BIC lighter as primary, waterproof matches as backup)
A broken tent pole at 10 p.m. in the rain is a genuine emergency without a repair sleeve. A dead phone with no power bank when you need to navigate out is equally serious. These items weigh almost nothing combined — there’s no reasonable excuse to leave them behind. See our essential tent camping safety tips for a full emergency preparedness framework.
Tools and repair gear handle the predictable. Advanced safety protocols handle the unpredictable — the scenarios that require preparation before you leave home.
Advanced Safety: Weather, Wildlife, and Emergency Protocols
Weather monitoring: Per National Weather Service campground safety guidance, NWS recommends designating a weather watcher in your group — one person responsible for checking forecasts every morning and monitoring conditions throughout the day (NWS, 2024). Have multiple alert methods: a weather app plus a battery-powered NOAA weather radio. Know your campground’s severe weather shelter location before you need it.
Wildlife protocols: Food storage is the foundation of wildlife safety. Use bear canisters or hang food at least 10 feet high and 4 feet from the trunk of a tree. Never cook or eat inside your tent — food smells penetrate tent fabric and attract wildlife regardless of how well you seal your food bags. For wildlife encounters: stay calm, make yourself appear large, back away slowly. Specific protocols vary by species and region — research the wildlife native to your specific camping area before departure.
Emergency planning: Cal OES camping safety guidance advises campers to plan evacuation routes and inform a loved one of their plans before any camping trip (Cal OES, 2024). Before leaving home: share your itinerary with someone not on the trip, know your campsite number and nearest ranger station phone number, plan two evacuation routes from your campsite, and know the wildfire evacuation signal for your campground.
Carbon monoxide risk: Never use camp stoves, propane heaters, or generators inside tents or enclosed spaces. CO is odorless and colorless — there is no warning before symptoms begin. A CO detector is strongly recommended for any enclosed camping structure, including RVs and cabin tents with closed rainflies. This is one of the most preventable camping fatalities.
Layer 4 — universal safety — is set. The final layer adapts everything you’ve packed to your specific camping environment. Here’s how your list changes for RV, beach, and car camping.
Specialized Camping Gear: RV, Beach & Car Camping
Layer 5 of the 5-Layer System is specialization. RV camping, beach camping, and car camping each require 8–12 additions or substitutions to your core camping list. Here’s exactly what changes — and what stays the same — for each environment.
According to South Carolina Fire Safe camping guidelines, SC Fire Safe recommends having an emergency plan, packing a first-aid kit, staying hydrated, wearing sunscreen, using bug spray, and avoiding feeding wildlife for camping safety (SC Fire Safe, 2024) — principles that apply across all three specialized camping types.
Choosing a tent for your car camping trip? See our roundup of best tents for car camping including spacious SUV shelters.
RV Camping Supplies List: What Changes from Tent Camping
Your RV camping supplies list is built on a different foundation than tent camping. The RV itself handles Layer 1 (shelter) and partially handles Layer 2 (kitchen). But RV camping introduces a category of infrastructure gear that tent campers never need — and first-time RV campers consistently forget.
RV-specific infrastructure items:
- Water hookup kit: Drinking water hose (white, food-grade — never use the gray utility hose for drinking water), water pressure regulator, and inline water filter. The water pressure regulator is critical: campground water pressure frequently exceeds 60–80 PSI, while most RV plumbing systems are rated for 40–50 PSI. Multiple RV experts and Camping World’s technical guidance confirm that connecting to campground water without a pressure regulator risks leaks, burst fittings, and plumbing damage costing hundreds of dollars (Camping World, 2026). A $10–15 regulator prevents a $500+ repair.
- Electrical: 30-amp or 50-amp power cord (know your RV’s amp rating before you arrive — mismatched connections are a common first-timer error), surge protector, and a 50-foot extension cord.
- Sewage: Sewer hose with fittings, latex gloves for connection/disconnection, and a sewer hose support to maintain the proper drainage angle.
- Leveling: Leveling blocks or chocks, plus a bubble level. RV refrigerators require level operation to function correctly — a slightly off-level RV can damage the refrigerator compressor over time.
RV comfort additions: Outdoor mat (keeps sand and dirt out of the RV), portable outdoor furniture, awning lights (string lights for the awning area), and a portable grill for outdoor cooking to supplement the RV kitchen.
What doesn’t change: Layers 3 and 4 of the 5-Layer System are identical for RV camping. Your clothing choices depend on weather, not your camping style. Your safety gear — with two additions: a CO detector (non-negotiable in any enclosed RV space) and a fire extinguisher check (verify your RV’s existing extinguisher is current) — is the same as tent camping.
- Quick RV-specific checklist:
- White food-grade water hose + pressure regulator + inline filter
- Power cord (correct amp rating) + surge protector
- Sewer hose kit + gloves
- Leveling blocks + bubble level
- CO detector
- Propane leak detector
- Fire extinguisher (check existing)
- Outdoor mat
RV camping adds infrastructure complexity. Beach camping adds environmental complexity — sand, sun, saltwater, and marine layer cold create a unique set of challenges.
Beach Camping Supplies List: Sun, Sand, and Surf Prep
Beach camping is one of the most rewarding camping experiences available — and one of the most gear-destructive. Sand infiltrates everything, saltwater corrodes metal gear, and marine layer cold surprises campers who expect warm nights at the coast. Your beach camping supplies list must address all three.
Sand management — beach camping’s #1 frustration:
- Sand-free beach mat: Sand falls through the mesh rather than piling up. Essential for any beach campsite.
- Sand stakes (wider anchor stakes): Standard tent stakes pull out easily in soft sand. Sand-specific stakes are wider and designed for soft ground — this is a non-negotiable substitution.
- Waterproof bags for electronics, clothing, and food: Sand plus moisture destroys electronics and contaminates food. Pack everything in dry bags or waterproof stuff sacks.
- Tent with fine mesh: Standard tent mesh (often 40+ denier) allows fine beach sand to infiltrate. Look for 15–20 denier mesh or purchase mesh covers. For top beach tent options, see our guide to top beach tents for shade.
Sun protection — more critical at the beach than inland:
- Sunscreen (SPF 50+ recommended at beach — UV reflection off water and sand increases exposure significantly)
- UPF-rated sun shirt for prolonged beach exposure
- Wide-brim hat and UV-blocking sunglasses
- Shade shelter or beach umbrella — essential for midday hours between 10 a.m. and 2 p.m.
Marine layer and temperature management: Coastal nights are frequently 20–30°F colder than afternoon temperatures. The marine layer rolls in fast and damp. Pack an extra mid-layer and a waterproof shell beyond what inland camping at the same latitude would require.
Saltwater gear care: Rinse metal gear (stakes, cookware, tools) with fresh water after each beach day to prevent saltwater corrosion. Dry all gear completely before storing — salt accelerates rust and mold.
- Beach-specific checklist additions:
- Sand stakes (replace standard stakes)
- Sand-free mat
- Waterproof bags/dry bags for all electronics and food
- SPF 50+ sunscreen (larger quantity than inland camping)
- Shade shelter or beach umbrella
- Extra mid-layer + waterproof shell
- Fresh water rinse container for gear
- Extra towels (sand management)
RV camping adds infrastructure complexity. Beach camping adds environmental complexity. Car camping takes a different approach entirely — it’s the sweet spot where comfort and adventure meet.
Car Camping: The Sweet Spot Between Comfort and Adventure
Car camping is the most popular camping style for good reason: proximity to your vehicle removes nearly every weight and space constraint from Layers 1–4. That freedom changes your gear decisions in specific ways.
What car camping unlocks across each layer:
- Layer 1 (Shelter): You can bring a larger, heavier tent — a 6-person cabin tent for a family of four, or a rooftop tent for vehicle-based adventures. Comfort over weight.
- Layer 2 (Kitchen): A full two-burner propane stove, a 60-quart hard-sided cooler, a full cookware set, and a camp table. No compromise on cooking capability.
- Layer 3 (Clothing): Pack extra clothing changes. The weight penalty of an extra fleece or a second pair of hiking pants is zero when it’s in the car.
- Layer 4 (Safety): Your car is a backup shelter, a power source for charging devices, and an emergency exit. This reduces some risk — but doesn’t eliminate the need for a full safety kit at camp.
Car camping comfort additions beyond the core list:
- Camp chairs (one per person — a camp chair is the item experienced car campers consistently call “worth every cubic foot”)
- Camp table (keeps your kitchen organized and off the ground)
- Outdoor rug or mat (defines the campsite living area, keeps dirt out of the tent)
- Portable power station (charges phones, runs a small fan, powers LED lights)
- Camp shower (solar shower bag or portable pump shower for multi-night trips)
- Hammock (if trees are available at your site)
What doesn’t change for car camping: Layer 4 (Safety) is identical — your first aid kit, headlamp, multi-tool, and emergency protocols remain constant. The proximity of your car is not a substitute for proper safety preparation.
The car camping advantage is simple: when weight isn’t a constraint, you can optimize every layer for comfort rather than weight. For the best shelter options, see our roundup of best tents for car camping.
With your full essential camping supplies list built across all five layers, one final step before you pack: avoid the five mistakes that derail even well-prepared campers.
Common Camping Packing Mistakes (and How to Avoid Them)
Our team evaluated the most frequent gear failures across camping communities, expert sources, and the five gear categories above. The pattern is consistent: most camping trips go wrong not because of missing gear, but because of predictable, avoidable mistakes made during the packing process. Here’s how to sidestep them.
The 5 Most Common Packing Mistakes
1. Overpacking food. The most common beginner mistake. Most first-timers pack for worst-case hunger rather than realistic consumption. REI’s guidance of 1.5–2 lbs per person per day is a reliable ceiling for most camping trips — not a floor. Pack to that target, not beyond it.
2. Forgetting spare batteries. Headlamps, lanterns, weather radios, and GPS devices all require batteries. Experienced campers consistently report that a dead headlamp at midnight is the most common preventable equipment failure they witness. Pack two full sets of spare batteries for every battery-powered device.
3. Wearing cotton clothing. Cotton absorbs up to 27 times its weight in water and dries slowly — a combination that causes hypothermia risk in cold or wet conditions (Heddels, 2020). This mistake is most common on spring and fall trips where daytime temperatures feel warm but nights drop below 40°F.
4. Skipping the tent footprint. A tent footprint protects your tent floor from abrasion and adds a moisture barrier. Campers who skip it often find their tent floor worn through or damp from ground moisture — an expensive and uncomfortable discovery mid-trip.
5. Leaving the first aid kit in the car. A first aid kit stored in the car is not accessible when you need it at camp. Keep it at your campsite, in a clearly marked waterproof container, with every group member knowing its location.
When to Choose Different Gear or Approaches
The 5-Layer System is a framework, not a rigid rulebook. Certain scenarios call for different approaches:
Solo vs. group camping: Solo campers should weight every ounce and prioritize redundancy in safety gear over comfort additions. A solo camper with a twisted ankle 3 miles from the trailhead has no backup — carry the emergency shelter and communication tools that a group might share across members.
Car camping vs. backpacking: The car camping gear list in this guide is not appropriate for backpacking. If you’re carrying your gear more than a mile, weight becomes the primary decision variable for every layer. Consult a dedicated backpacking gear list — the principles are the same, but the products are different.
Developed campgrounds vs. backcountry: Developed campgrounds with facilities change your water, hygiene, and toilet supply requirements significantly. Don’t overpack for a site with flush toilets and potable water taps — but don’t assume those facilities exist without verifying with the campground directly.
Hot weather vs. cold weather: The 5-Layer System’s clothing layer scales in both directions. In hot weather, your mid-layer may be unnecessary; in winter camping, you may need two mid-layers and a 4-season tent. The system adapts — your trip planning answers from the Before You Pack checklist determine the specifics.
Frequently Asked Questions
What is the most essential item to bring camping?
Shelter is the single most essential camping item — specifically, a tent appropriate for your conditions plus a sleeping bag rated for expected nighttime temperatures. Without adequate shelter and sleep, every other aspect of a camping trip becomes secondary. The Leave No Trace Ten Essentials framework reinforces this: emergency shelter appears on every outdoor safety authority’s non-negotiable list (Leave No Trace, 2024). After shelter, a headlamp with spare batteries and a first aid kit round out the absolute minimum safety-critical items.
How much water should I bring camping?
Plan for approximately 0.5 liters of water per person per hour of moderate activity, according to REI’s hydration guidance (REI Expert Advice, 2026). For a 3-night car camping trip with moderate activity, that translates to roughly 3–4 liters per person per day for drinking, plus additional water for cooking and dishwashing. The National Park Service recommends a minimum of 2 liters per day in base camp conditions, with significantly more in hot climates or during strenuous activity (NPS, 2024). At backcountry sites without potable water, always carry a purification method — pump filter, UV pen, or chemical tablets.
What’s the difference between car camping and backpacking gear?
Car camping gear prioritizes comfort over weight; backpacking gear prioritizes weight over comfort. For car camping, weight and volume are irrelevant — bring a large tent, a full two-burner stove, a 60-quart cooler, and camp chairs without hesitation. Backpacking gear requires every item to justify its weight: a 1–2 person ultralight tent, a single-burner canister stove, a 25-liter pack, and a sleeping pad that weighs under 20 oz. The 5-Layer System applies to both — but the specific products within each layer are entirely different. Never use a car camping gear list for a backpacking trip.
How do I pack a cooler to keep food cold longer?
Pre-chill your cooler 24 hours before packing to extend ice life significantly. Place block ice on the bottom, layer your food in the middle (with the most temperature-sensitive items — meat, dairy — buried deepest in the cold zone), then add crushed ice on top to fill gaps. Pack drinks in a separate smaller cooler, since it will be opened most frequently. Keep the food cooler in shade and never store it in a hot car trunk. The USDA’s 2-hour rule applies outdoors: discard any perishable food left above 40°F for more than 2 hours, or 1 hour when temperatures exceed 90°F (USDA, 2024).
What RV camping supplies do first-timers most often forget?
A water pressure regulator is the most commonly forgotten RV camping supply among first-time RV campers. Campground water pressure frequently exceeds 60–80 PSI, while most RV plumbing systems are rated for 40–50 PSI — connecting without a regulator risks burst fittings and expensive plumbing repairs (Camping World, 2026). Beyond that, experienced RV campers consistently report forgetting: a food-grade white drinking water hose (the gray utility hose is not safe for drinking water), leveling blocks (required for refrigerator function), and a CO detector (non-negotiable in any enclosed RV space).
Putting It All Together: Your Complete Camping Supplies List
Every essential camping supplies list becomes more useful when organized into a system rather than a pile. The 5-Layer Camping System delivers that structure: Layer 1 (Shelter) creates the foundation, each subsequent layer builds on the decisions made before it, and Layer 5 (Specialization) adapts the whole framework to your specific camping environment.
The 5-Layer Camping System in practice: Start with shelter and sleep — a 3-season tent, a sleeping bag rated 10–15°F below your expected nighttime low, and a sleeping pad with the right R-value for your season. Build your kitchen around your shelter choice: car campers get a full two-burner setup; backpackers get a single-burner canister stove. Choose clothing based on your shelter’s warmth and the nighttime temperatures from your trip planning checklist. Apply Layer 4 — safety — identically regardless of trip type. Then add Layer 5 based on whether you’re in an RV, on a beach, or car camping.
The five most common packing mistakes — overpacking food, forgetting spare batteries, wearing cotton, skipping the footprint, and leaving the first aid kit in the car — are all preventable with the framework you now have. Run through the Before You Pack checklist, answer the five trip-planning questions, and build your list layer by layer.
Your next step: download the printable checklist from our essential tent camping gear checklist, customize it to your trip profile, and start packing with confidence. The goal isn’t perfection — it’s arriving at camp with everything you actually need and nothing you don’t.
