This blog post may contain affiliate links. As an Amazon Associate I earn from qualifying purchases.
You’ve booked your campsite. Now comes the part that trips up most first-timers — figuring out exactly what to pack so nothing critical gets left behind. Forgetting your rain fly on a stormy night, or arriving without a can opener, are the small oversights that make or break a trip.
As one seasoned camper from the r/camping community put it:
“Not sure there is a ‘ultimate camping packing list’ because everyone have different needs and camp differently. But here is my base list.”
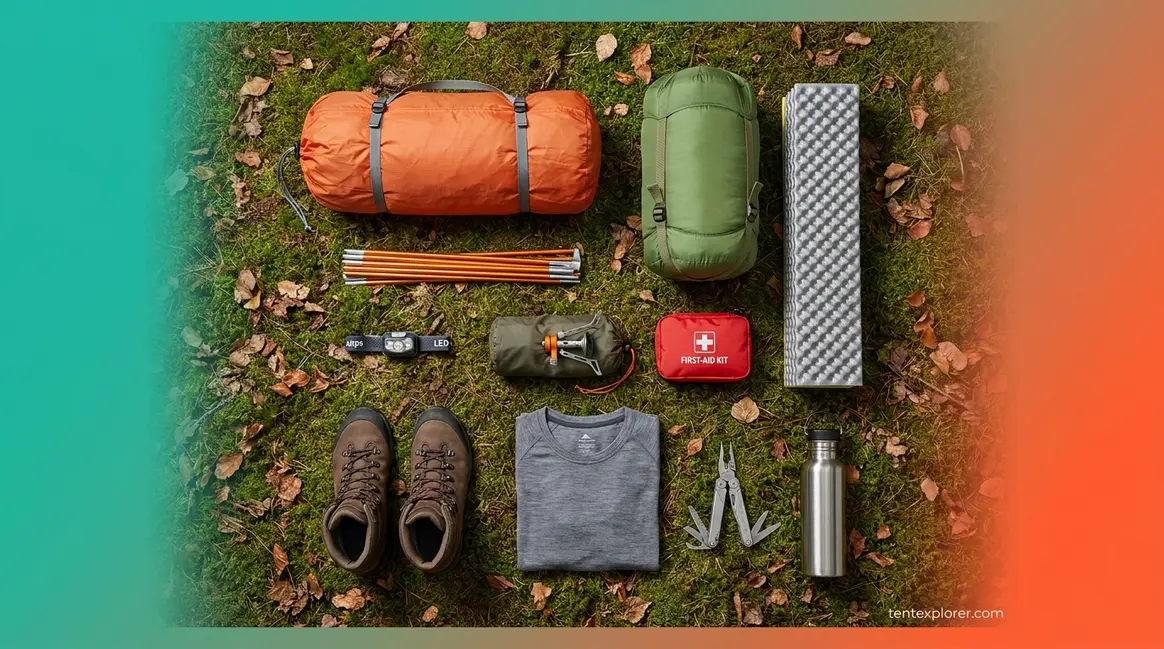
We agree completely — and that’s exactly why we built this guide to be adaptable, not one-size-fits-all. By the end, you’ll have a complete, category-by-category tent camping gear checklist — plus a free printable PDF — so you can pack confidently and focus on the adventure ahead. This guide covers six core gear categories: shelter, kitchen, clothing, safety, comfort, and hygiene.
A complete tent camping gear checklist covers 6 core categories — shelter, kitchen, clothing, safety, and comfort — with 50+ items that ensure a safe, enjoyable trip. Using the Three Rings of Camp Readiness framework helps you prioritize when space is tight.
- Safety Ring first: Tent, sleeping bag, first-aid kit, and headlamp are non-negotiable on every trip
- Sleeping system matters most: A temperature-rated sleeping bag paired with an insulating pad prevents the #1 comfort failure at camp
- Food safety is often overlooked: Bear-safe storage is required at most national parks — food and scented items belong 100+ feet from your tent
- Download the free printable PDF at the end of this guide to pack without second-guessing every item
How to Use This Tent Camping Gear Checklist
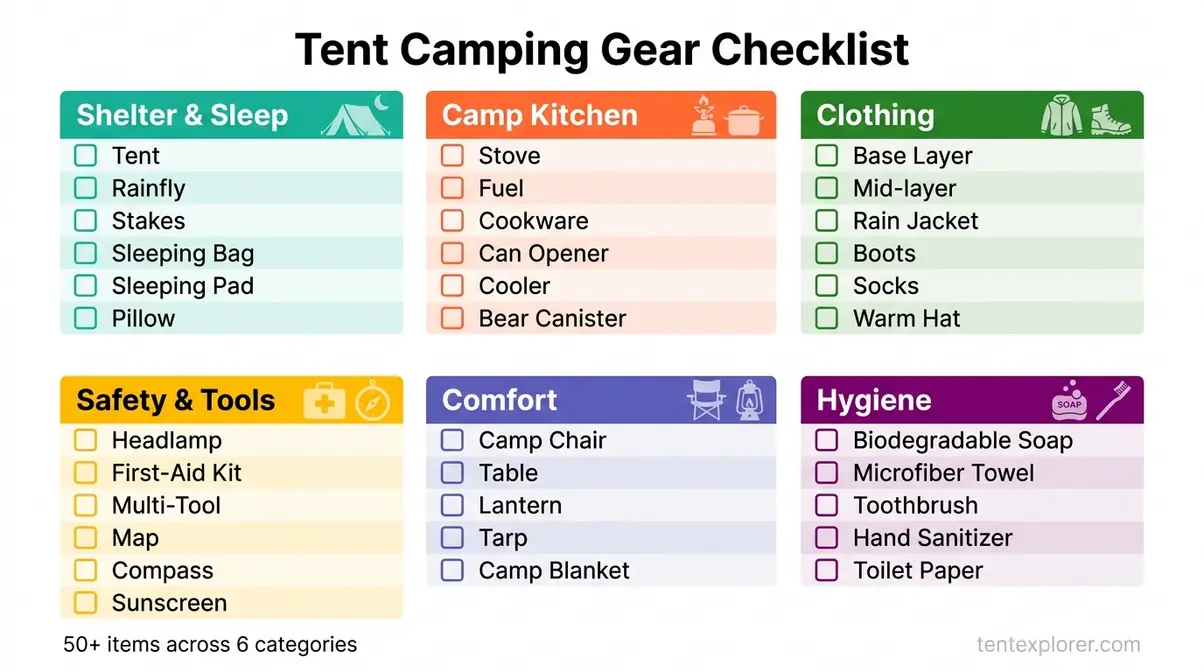
This tent camping gear checklist is organized into 6 core categories covering 50+ items — from shelter to hygiene — so you can pack systematically without second-guessing every item. We use a simple three-ring prioritization system to help you decide what’s essential versus optional. Whether you’re a first-timer or returning after a few years off, this system adapts to your trip type and conditions.
From our experience packing for 3-season tent camping trips over the years, we’ve found that the campers who arrive most prepared aren’t the ones with the most gear — they’re the ones who packed with a clear system.
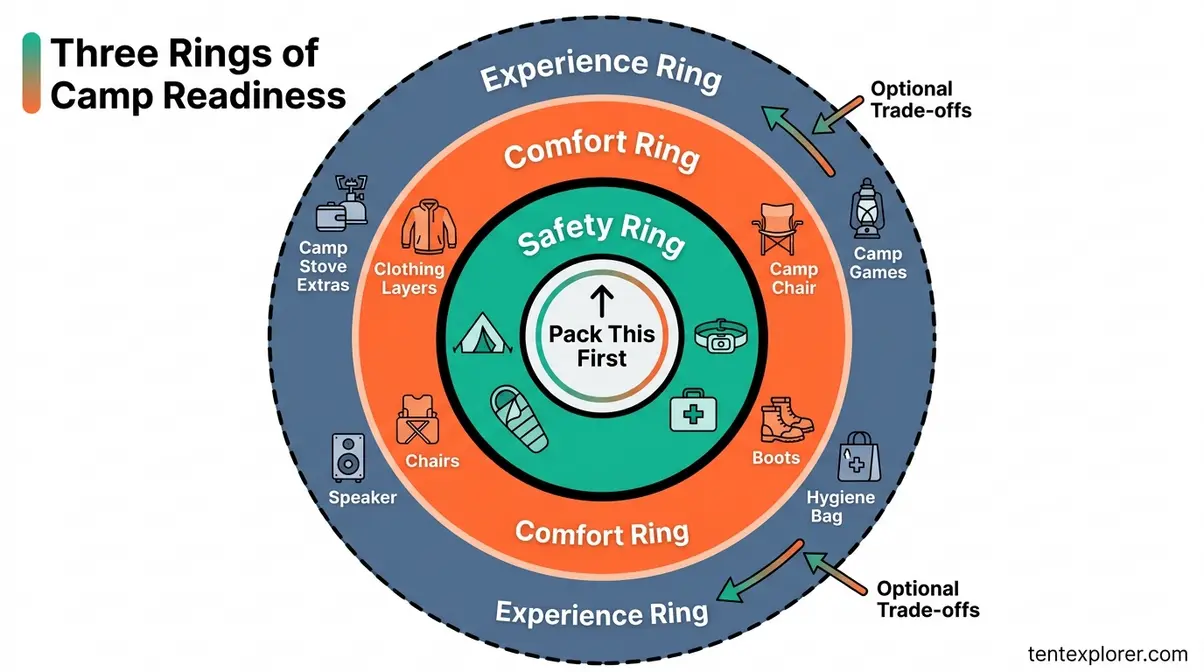
Three Rings of Camp Readiness
Every item on this camping gear checklist belongs to one of three priority rings:
- Safety Ring — Shelter, sleeping system, first-aid kit, lighting, and navigation. These are the non-negotiables. Never drop Safety Ring items when cutting weight or space.
- Comfort Ring — Clothing layers, footwear, camp chairs, and hygiene essentials. Critical for trip enjoyment; drop only when truly necessary.
- Experience Ring — Camp kitchen extras, recreational gear, and comfort luxuries. Nice-to-have items you customize based on trip length, group size, and personal preference.
Experienced campers organize gear into three priority rings — safety, comfort, and experience — to avoid both under-packing and overpacking. (tentexplorer.com, 2026)
If your car is full and something has to stay home, protect the Safety Ring first, then the Comfort Ring. The Experience Ring is where you make trade-offs.
For a 2-night summer trip, you’ll likely pack all three rings. For a 4-night autumn trip where temperatures drop below 40°F, some Experience Ring items shift into the Comfort Ring — and some Comfort Ring items (like an insulated jacket) shift into the Safety Ring. The framework is a decision tool, not a rigid list.
For a more detailed breakdown of gear by trip type, see the essential tent camping gear checklist at TentExplorer.com.
5 Questions to Answer First
Answering these five questions before you start packing will filter this tent camping checklist to your specific situation — and save you from over-packing the Experience Ring at the expense of the Safety Ring.
- How many nights are you camping? (1–2 nights: lighter kit; 4+ nights: bring the full Experience Ring)
- What’s the forecast low temperature? (Below 50°F: upgrade your sleeping bag rating; below 35°F: shift your insulated jacket to the Safety Ring)
- Is your campsite car-accessible or hike-in? (Hike-in: weight matters significantly; car camping: bring more)
- Are you camping in bear country? (Yes: a bear-resistant canister is required — see the Food Storage section below)
- Are you camping with kids or pets? (Yes: add per-person sleeping gear, kid-specific snacks, leash, and pet waste bags)
If the forecast low is 35°F, for example, your sleeping bag moves from a Comfort Ring item to a Safety Ring priority — a bag rated to 55°F simply won’t cut it. For a detailed first-trip breakdown, the camping checklist for first-time campers at TentExplorer.com walks through each scenario.
10 Essential Items for Tent Camping
The 10 absolute essentials for tent camping are: a tent with a rainfly, a temperature-rated sleeping bag, a sleeping pad, a headlamp, a first-aid kit, a camp stove with fuel, a water container, layered clothing, a multi-tool, and a cooler for food storage. A sleeping pad is often overlooked but prevents dangerous heat loss through the cold ground. These items address your core needs for shelter, safety, and sustenance — missing any one of them can compromise your safety or force an early return. Together, they form the Safety and Comfort Rings of any complete tent camping gear checklist.
Download the Free Printable Checklist
The free printable PDF consolidates all 50+ items across all 6 categories onto a single page with checkboxes and space for custom additions. Print it the night before your trip and check off each item as you pack — don’t rely on memory.
Download the free printable tent camping gear checklist PDF and use it as your packing companion for every trip from here on.
Now, let’s go through every item on the list — starting with the most critical category: your shelter and sleeping system.
Shelter & Sleeping System Essentials
Your shelter and sleeping system are the most critical items on any tent camping gear checklist — they determine whether you wake up rested or exhausted, dry or soaked. This section covers every component, from the tent and its accessories to the sleeping bag, pad, and pillow that complete your sleep setup. These items sit squarely in the Safety Ring of the Three Rings of Camp Readiness.
How We Built This Checklist
This shelter checklist is compiled from 10+ years of hands-on tent camping experience, cross-referenced with gear recommendations from REI, Coleman, and OutdoorGearLab, and validated against National Park Service packing guidelines. Each item is categorized by ring (Safety, Comfort, or Experience) so you can quickly identify what’s mandatory versus optional for your specific trip.
Tent Essentials & Setup
Your complete tent setup kit includes more than just the tent body — and the accessories are where most beginners get tripped up. Here’s the full checklist:
- Tent (sized for your group: choose one size up — a 4-person tent for a family of 3 gives you space for gear and prevents that claustrophobic feeling on night two)
- Rainfly (confirm it’s included — some budget tents sell the rainfly separately; always pack it even on a clear-sky forecast, because dew and condensation can soak an unprotected tent overnight)
- Tent stakes / tent pegs (bring 2–3 extras — original stakes bend on rocky ground and are easily lost in the dark)
- Guy ropes / guylines (pre-attach these before your trip; most tents include them but they’re often still in the packaging)
- Tent footprint or ground tarp (a tent footprint, a ground sheet that protects your tent floor from rocks, moisture, and abrasion — highly recommended for rocky or wet terrain; see understanding tent footprints for shelter protection)
- Mallet or small rubber hammer (for driving stakes into hard ground — your hand will thank you)
- Tent repair tape (a small roll weighs almost nothing and fixes tears that would otherwise end a trip early)
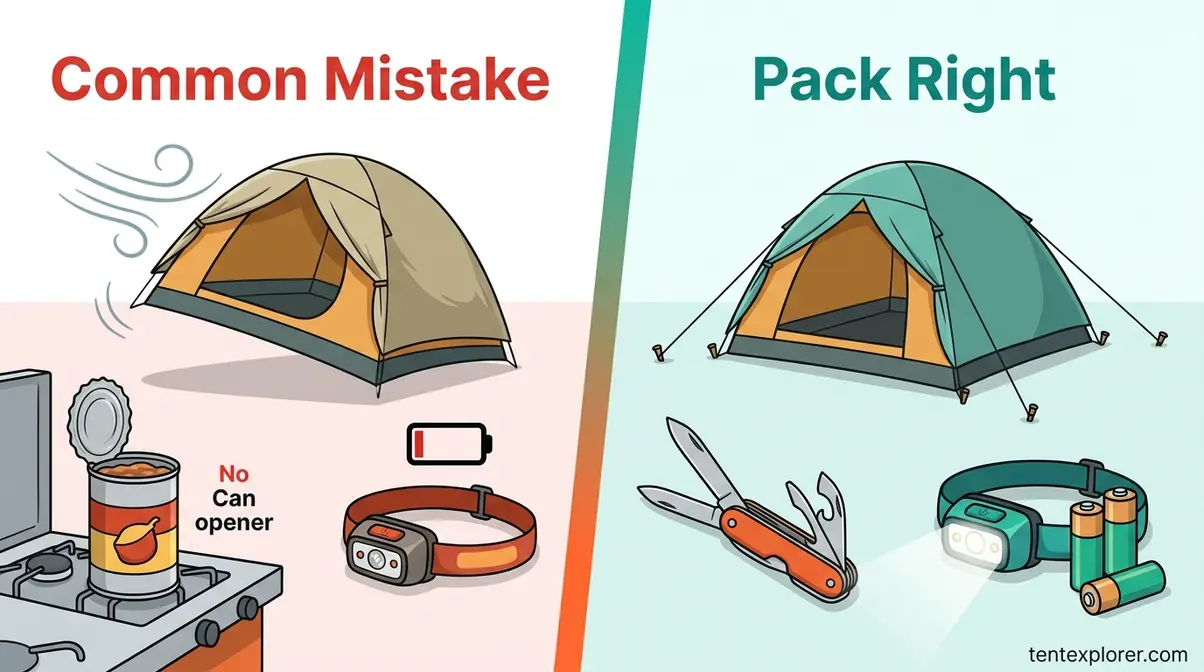
Don’t make this mistake: The rainfly is NOT optional. Many first-timers leave it in the car thinking it’s extra weight — then wake up at 2 a.m. to a damp sleeping bag from condensation. Always set it up, regardless of the forecast.
For 3-season camping, look for a tent with a full-coverage rainfly, aluminum poles (lighter and stronger than fiberglass), and a bathtub floor with seams 6+ inches off the ground. In high-wind conditions, a freestanding dome tent is significantly more stable than a cabin-style tent.
Transition: Once your shelter is sorted, the next make-or-break decision is your sleeping system — specifically, whether your sleeping bag is rated for the temperatures you’ll actually face.
Sleeping Bags, Pads, and Pillows
Most campers who wake up cold at 3 a.m. blame their sleeping bag — when the real culprit is the cold ground beneath them. A complete sleeping system addresses both. Here’s the full checklist:
- Sleeping bag (temperature-rated for 10–15°F below the forecast low; a 20°F bag is the standard recommendation for 3-season camping)
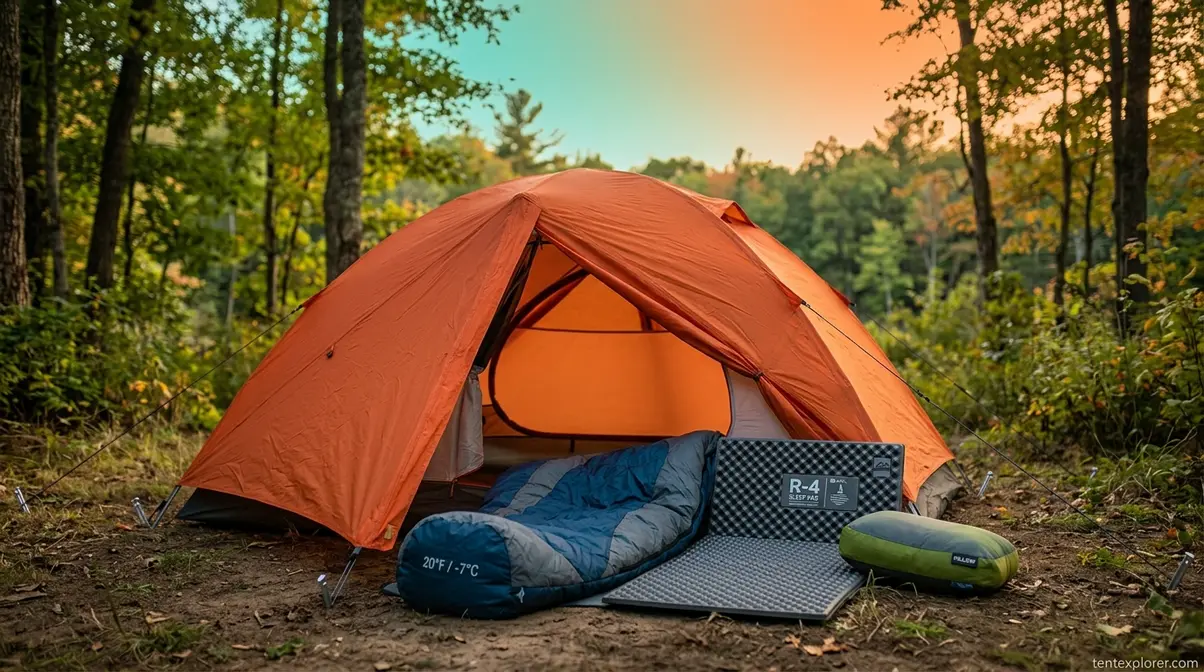
- Sleeping pad or air mattress (insulation from the ground; R-value 2+ for summer conditions, R-4 or higher for nights below 40°F)
- Camping pillow (a compressible camp pillow, or stuff a dry bag with your fleece — it works)
- Sleeping bag liner (optional; adds 10–15°F of warmth and keeps the bag cleaner between washes)
Why the sleeping pad is non-negotiable: Cold ground conducts heat away from your body faster than cold air. A sleeping pad’s R-value — not its thickness — determines how much insulation it provides. According to gear consensus supported by REI and OutdoorGearLab, a pad with R-value 4 or higher is the minimum for camping below 40°F.
Sleeping bag temperature rating explained: The temperature rating on your bag is the survival minimum, not the comfort threshold. A bag rated to 32°F will keep you alive at 32°F — but not comfortable. Choose a bag rated 10–15°F colder than the lowest forecast temperature you expect to encounter.
For a September trip in the Rockies where overnight lows hit 38°F, a 20°F-rated bag paired with an R-4 sleeping pad is the right combination. For air mattress vs sleeping pad comparisons, TentExplorer has a full breakdown.
A sleeping pad’s R-value — not just its thickness — determines how much warmth it provides; R-4 or higher is recommended for camping below 40°F. (tentexplorer.com, 2026)
Temp Ratings & R-Values Guide
Understanding these two numbers is the most important technical step for first-timers. Here’s a quick comparison table based on outdoor gear industry consensus to help you choose the right setup:
| Setup Type | Best For | Forecast Low | Key Spec (Bag) | Key Spec (Pad) | Price Range |
|---|---|---|---|---|---|
| Summer Kit | Warm nights | Above 55°F | 35°F rating | R-2 or higher | $50-$100 |
| 3-Season Kit | Spring/Fall | 35°F-55°F | 20°F rating | R-4 or higher | $100-$250 |
| Cold Weather Kit | Winter/Alpine | Below 35°F | 0°F rating | R-5 or higher | $200-$400 |
Look for sleeping bags with EN 13537 or ISO 23537 certification on the label — this standardized rating system is more reliable than proprietary manufacturer ratings. If you’re unsure which rating to choose, go colder: you can always unzip a bag if you’re warm, but you can’t add insulation you didn’t bring.
These cold-weather must-haves — a properly rated sleeping bag and a high-R-value pad — are the two items most worth investing in before your first trip.
With your shelter and sleep system covered, the next category that makes or breaks a camping trip is your camp kitchen setup.
Camp Kitchen & Food Preparation
A well-stocked camp kitchen makes the difference between a meal you look forward to and a frustrating scramble for forgotten utensils. This section covers every item for cooking, food storage, and cleanup — including the bear-safe storage rules that most camping checklists skip entirely. In the Three Rings framework, your camp stove and cooler belong in the Comfort Ring; a bear canister shifts to the Safety Ring in national park environments.
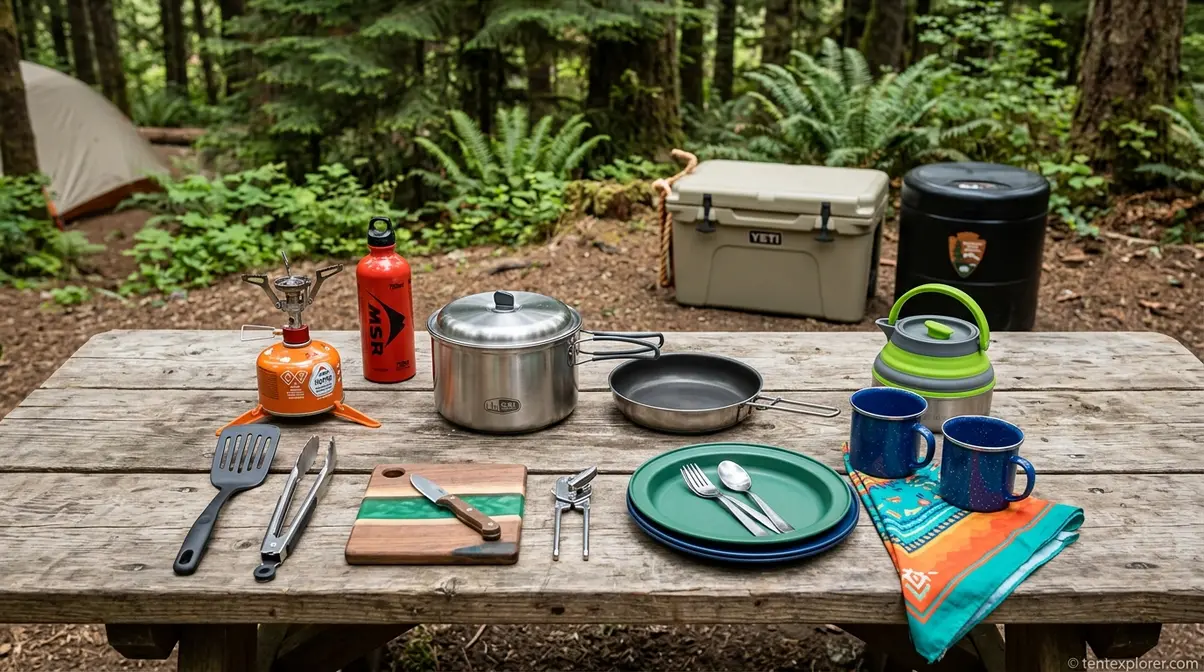
Stove, Fuel, and Cookware
A camp stove — your primary cooking heat source, typically propane or butane-fueled — is the foundation of your camp kitchen. Here’s the complete cooking equipment checklist:
- Camp stove (canister stove for solo campers or couples; a 2-burner propane stove for families of 3+)
- Fuel canisters or propane bottles (bring one extra — running out mid-trip is a consistent beginner mistake, and cold weather burns fuel faster than warm weather)
- Lighter and waterproof matches (bring both — lighters fail in wind, matches fail when wet)
- Pot and pan set (1 medium pot + 1 pan covers most meals for 1–2 people; scale up for groups)
- Spatula, ladle, and tongs
- Cutting board (compact folding style saves space)
- Can opener (one of the most-forgotten items on any camping trip — see the Common Mistakes section)
- Cooking oil in a small, sealed container
- Plates, bowls, mugs, and cutlery (one set per person; reusable camping sets reduce waste)
- Collapsible kettle (optional, but valuable for morning coffee and hot drinks)
The kitchen trinity of forgotten items: Can opener, cooking oil, and a cutting board. Name these three explicitly on your checklist — they’re consistently overlooked and consistently missed.
The National Park Service camp kitchen gear recommendations include a propane or white gas camp stove, cutting board, and a skillet plus 1–2 pots as the core camp kitchen setup (National Park Service, 2026).
Transition: Cooking equipment is only half of the camp kitchen equation — storing your food safely, especially in bear country, is equally critical.
Coolers and Bear Safety
Food storage is where the most serious safety gap in competitor checklists exists. Here’s the complete food storage checklist:
- Hard-sided cooler (for trips of 2+ nights; pre-chill the cooler 24 hours before packing to maximize ice retention)
- Ice or reusable ice packs
- Water jugs or collapsible water containers (1 gallon per person per day is the baseline minimum)
- Bear-resistant canister (required at most national parks — always check regulations for your specific park before arriving)
- Food storage bags (zip-lock bags plus odor-proof bags for opened items and smellable snacks)
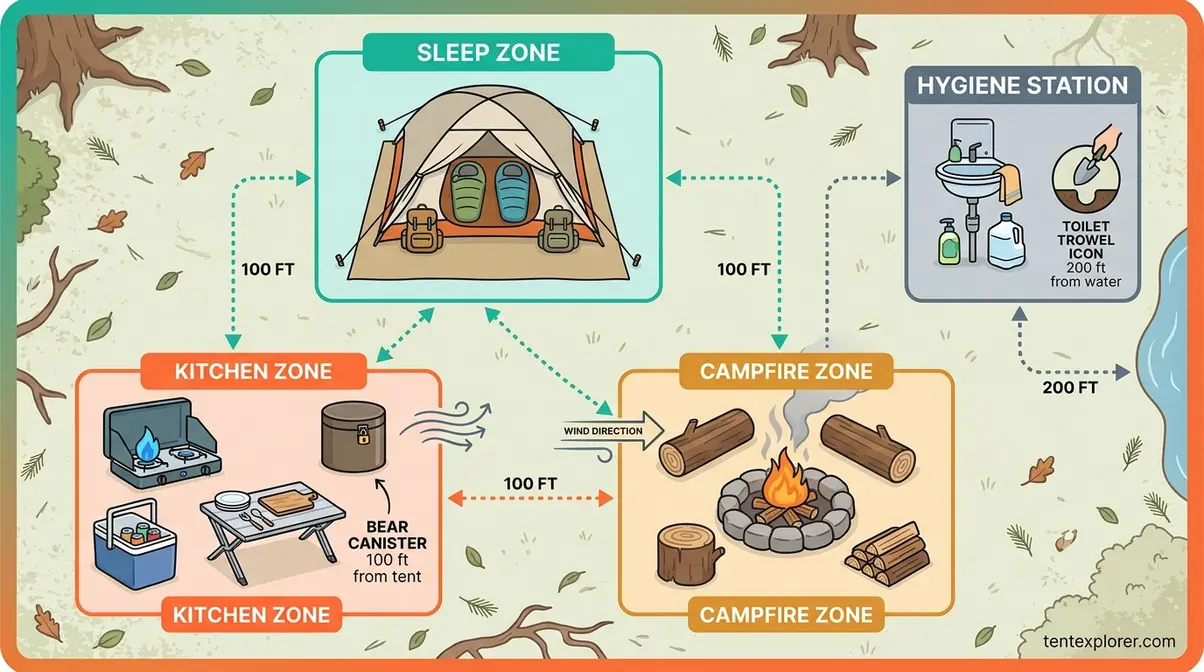
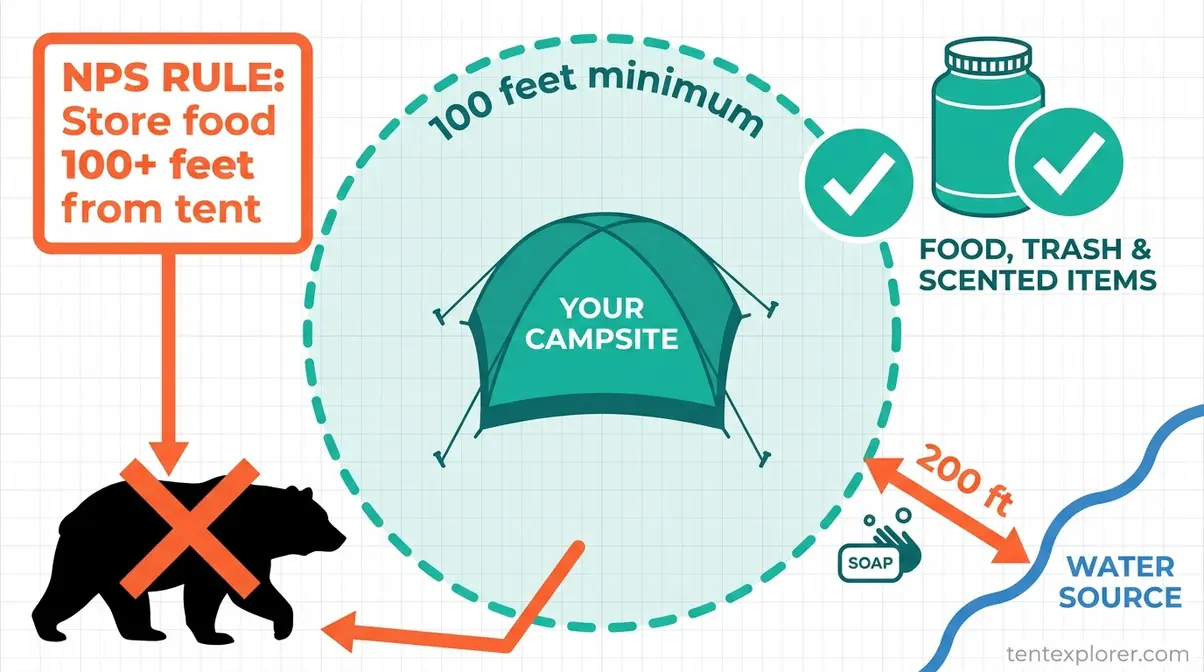
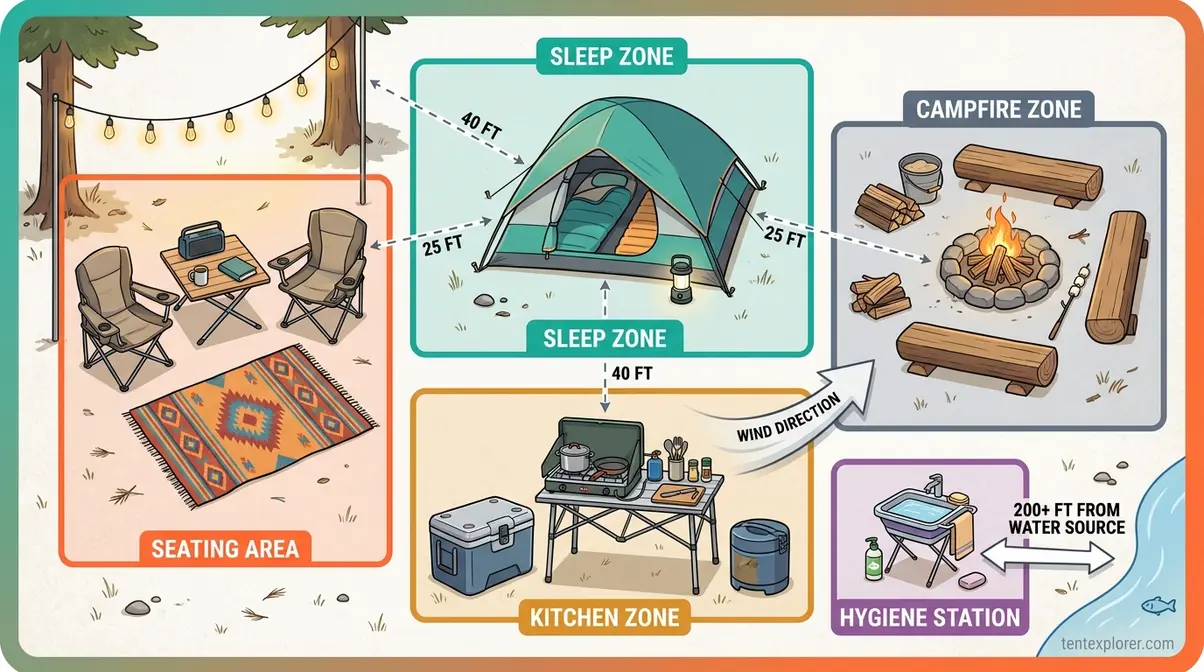
Bear safety rule (mandatory for national park camping): The National Park Service mandates placing bear-resistant food containers on flat, level ground at least 100 feet from your campsite and away from water sources. This applies to food, trash, and any scented items — including toothpaste, sunscreen, and chapstick. (official guidelines for storing food in bear country, National Park Service)
“The National Park Service requires food, trash, and scented items to be stored in bear-resistant containers at least 100 feet from your campsite.” (National Park Service, Bear Safety)
Leave No Trace reinforces this principle: using an approved bear-proof canister is one of the easiest and most effective methods for protecting both your food and local wildlife (Leave No Trace food storage principles, LNT).
Even at developed campgrounds without bears, proper food storage prevents raccoon and squirrel raids. Use your car’s trunk as a secure overnight storage option when a bear canister isn’t required.
Cleanup Kit: Leave No Trace Principles
Cleanup done right is quick, eco-friendly, and protects the environment for every camper who comes after you. Your cleanup checklist:
- Biodegradable soap — a Leave No Trace essential that breaks down naturally in the environment; standard soap harms aquatic ecosystems and is inappropriate near water sources
- Sponge or scrub pad
- Collapsible wash basin (for washing dishes away from water sources)
- Trash bags (at least 3: food waste, recyclables, general trash)
- Paper towels or camp rags
Wash all dishes at least 200 feet from any water source using biodegradable soap — this is a core Leave No Trace principle, not optional etiquette. Scatter grey water over a wide area rather than dumping it in one spot.
With food and shelter covered, the gear category most beginners underestimate is clothing — specifically, how to dress for conditions that can change dramatically between noon and midnight at a campsite.
Clothing & Footwear: Dress for the Outdoors
Clothing is one of the most overlooked categories on a tent camping gear checklist — until you’re shivering in a damp cotton hoodie at 2 a.m. The right layers don’t just keep you comfortable; they reduce hypothermia risk when temperatures drop unexpectedly. This section covers the three-layer system, footwear, and weather protection gear you need for any 3-season trip.
The USDA Forest Service clothing and safety checklist advises campers to always pack extra warm clothing, extra socks, and rain gear to prepare for sudden weather changes — even on a clear-sky forecast (USDA Forest Service, 2026). In the Three Rings framework, your base layer and rain gear are Comfort Ring essentials; cold-weather extras like an insulated jacket can shift to Safety Ring priority when temperatures drop below 35°F.
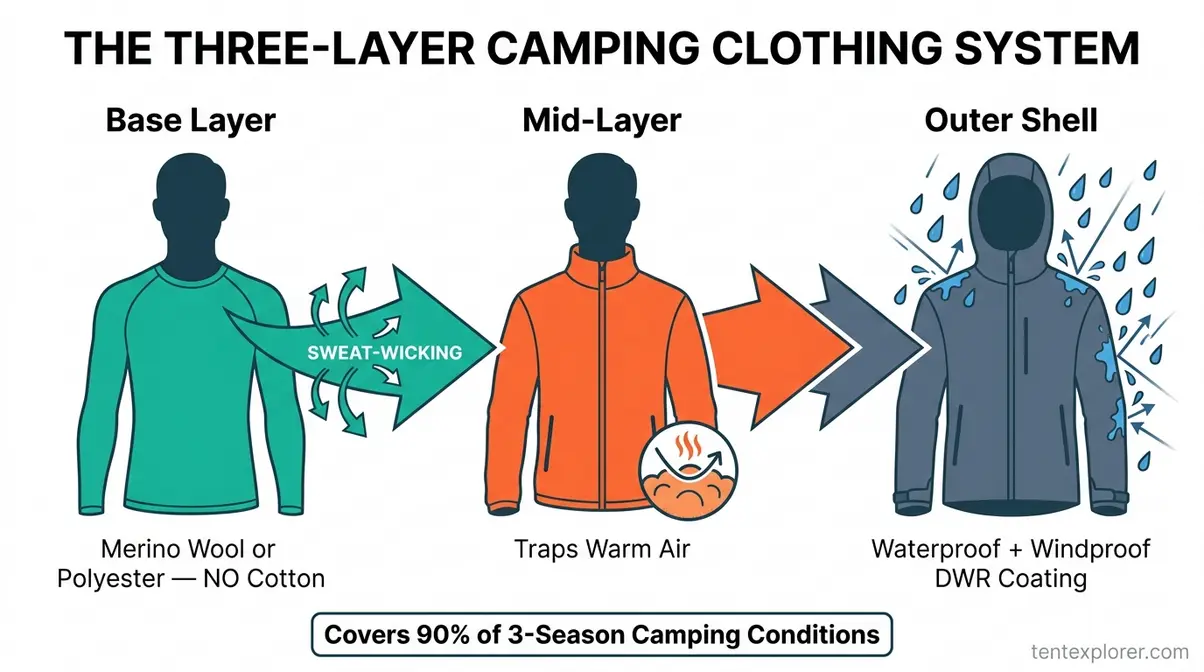
The Three-Layer System for All Weather
The three-layer system is the single most important concept in camping clothing. Here’s how it works:
- Base Layer — Moisture-wicking fabric (merino wool or polyester) worn directly against your skin. Its job is to pull sweat away from your body. Never use cotton. Cotton absorbs moisture and loses all insulating properties when wet — a wet cotton base layer in 45°F weather with wind is a genuine hypothermia risk. This is the “cotton kills” rule, and it applies even in mild temperatures.
- Mid-Layer — An insulating layer (fleece jacket or down vest) that traps warm air close to your body. Pack this even in summer — nights at camp can drop 20–30°F below daytime temperatures.
- Outer Shell — A windproof, waterproof rain jacket with a DWR (durable water repellent) coating. This is a non-negotiable for any trip, regardless of forecast.
A merino wool base layer, a fleece mid-layer, and a waterproof rain jacket covers 90% of 3-season camping conditions. For tips for staying warm in a tent, TentExplorer has a full guide.
Your complete clothing checklist:
- Moisture-wicking base layer tops (2–3; merino wool or polyester — not cotton)
- Fleece or down mid-layer jacket
- Rain jacket (outer shell — non-negotiable for any trip)
- Comfortable daytime shorts or pants (moisture-wicking)
- Warm long pants for evenings
- Sleepwear (a clean, dry set kept separate from day clothes)
- Underwear (1 per day plus 1 spare; merino wool preferred)
“The USDA Forest Service recommends packing extra warm clothing, extra socks, and rain gear to prepare for sudden weather changes on any camping trip.” (USDA Forest Service, 2026)
Footwear: Boots, Camp Shoes, and Socks
Your feet take more punishment at camp than any other part of your body. Here’s the footwear checklist:
- Hiking boots or trail shoes (ankle support for uneven terrain; waterproof hiking boots are the standard for any trip involving trails — break them in with 2–3 walks of 30+ minutes before your trip to prevent blisters)
- Camp shoes or sandals (for around the campsite; your feet need a break from stiff boots after a day of hiking)
- Merino wool socks × 3–4 pairs (merino wool socks stay warm even when damp, resist odor better than synthetic alternatives, and regulate temperature in both warm and cold conditions — avoid cotton socks entirely)
- Waterproof boot covers or gaiters (optional; valuable for wet grass, mud, or early-morning dew)
Bring two pairs of hiking socks and rotate them daily — damp socks are the fastest route to blisters on a multi-night trip. Wearing camp sandals around the campfire in the evening is one of those small comfort choices that makes a meaningful difference by day three.
Cold-Weather and Rain Gear Must-Haves
This is the category most competitor checklists skip entirely — and it’s the one that separates a comfortable cold-weather trip from a miserable one. For any camping trip where lows drop below 50°F, add these cold-weather must-haves:
- Insulated jacket (down or synthetic down — packable versions save significant space)
- Warm hat or beanie (you lose a meaningful amount of body heat through your head in cold conditions)
- Gloves or mittens (lightweight liner gloves pack small; insulated mittens for below-freezing conditions)
- Thermal underwear or long underwear (essential for sleeping in cold conditions below 40°F)
- Neck gaiter or balaclava (for wind protection on exposed campsites)
- Waterproof rain pants (often forgotten; a wet lower body is as dangerous as a wet upper body)
For a September trip where overnight lows hit 38°F, the insulated jacket and thermal underwear shift from “optional” to Safety Ring essentials. Pack them without question.
Clothing keeps you comfortable. The next category — safety, tools, and campsite gear — keeps you prepared for the situations you hope won’t happen but need to be ready for.
Safety, Tools & Campsite Gear
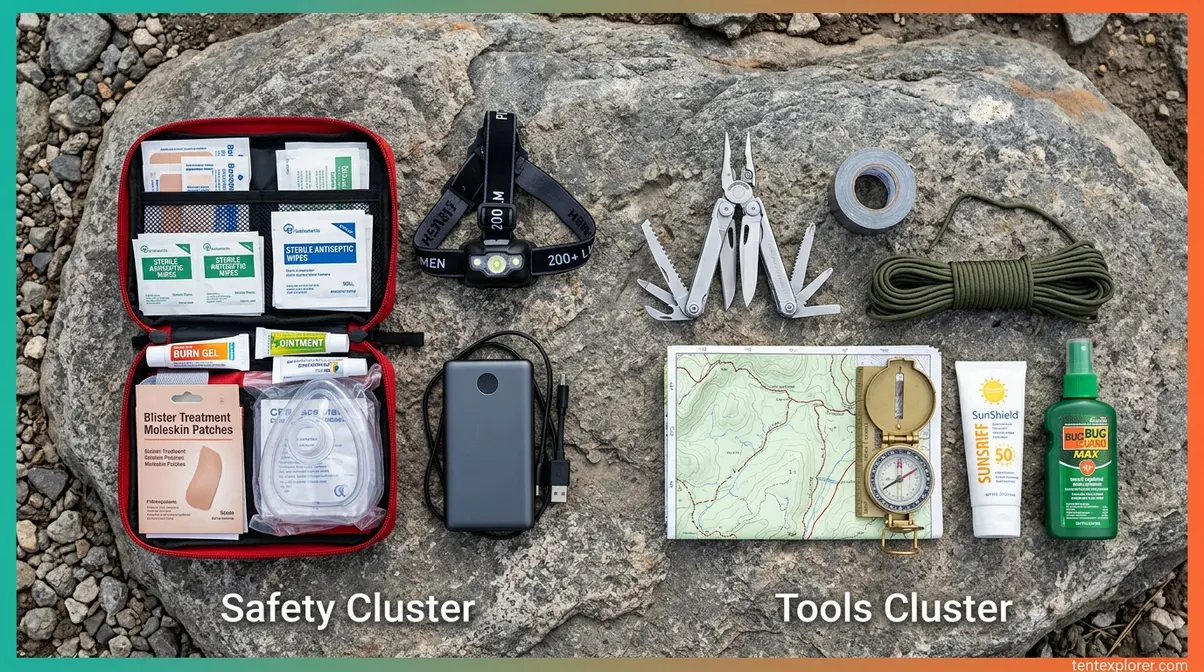
Safety gear is the non-negotiable core of your tent camping gear checklist — the items that belong in the Safety Ring regardless of how light you’re packing. This section covers lighting, first-aid, navigation, and essential tools, drawing on the Ten Essentials framework — a widely recognized outdoor preparedness standard popularized by The Mountaineers and referenced by REI and outdoor safety organizations — as the foundation.
“The Ten Essentials for outdoor survival include navigation, sun protection, insulation, illumination, and a first-aid kit — all non-negotiable for tent camping.” (Ten Essentials, outdoor safety consensus)
From our evaluation of 3-season camping gear over multiple years, the items in this section are the ones campers most regret not having — and the ones that cost the least relative to the protection they provide.
Headlamps and Backup Power
Lighting is one of the most under-prepared categories for first-timers. Here’s the complete lighting checklist:
- Headlamp — one per person (a headlamp, a hands-free lighting device worn on the forehead, is the single most useful lighting tool for camping; 200+ lumens minimum; essential for cooking, setting up camp after dark, and navigating trails at night)
- Flashlight (useful as a backup and for campsite perimeter checks; largely replaced by headlamps for active use)
- Camp lantern (for ambient light at the table area; LED lanterns last 50–200 hours per charge and are safer than propane lanterns for beginners)
- Extra batteries or charging cable (for every battery-powered device — dead batteries at 2 a.m. are a real and avoidable problem)
- Portable power bank (a portable power bank — a battery pack that charges your phone and devices when no outlet is available; 10,000 mAh handles 2–3 full device charges, enough for a 2-night trip)
A headlamp is preferable to a handheld flashlight for most camping tasks because it leaves both hands free. Many modern headlamps also include a red-light mode that preserves night vision — useful for stargazing or moving around camp without waking tent partners.
For a full comparison of lighting options, see best camping lights for tents at TentExplorer.
First-Aid Kit: What Every Camper Needs
“Bring a first-aid kit” is advice that’s only useful if you know what goes in it. The American Red Cross camping first-aid checklist specifies the following essentials for outdoor emergencies:
- Adhesive bandages (assorted sizes)
- Antiseptic wipes
- Antibacterial ointment (Neosporin or equivalent)
- Burn gel
- Sterile gauze pads and medical tape
- Elastic bandage (ACE wrap) for sprains
- CPR face mask
- Medical scissors and tweezers
- Pain reliever (ibuprofen or acetaminophen)
- Antihistamine (for allergic reactions and insect stings)
- Moleskin (for blisters — one of the most-used items on a multi-night trip)
- Emergency whistle
- Any personal prescription medications
Beyond the kit itself, pack sunscreen (SPF 30+, water-resistant), insect repellent (DEET-based for tick country; picaridin as a gentler alternative), and lip balm with SPF. Check your kit before every trip — expired medications and empty ointment tubes are common issues.
The American Red Cross camping first aid checklist highlights antibacterial ointment, antiseptic wipes, burn gel, and CPR masks as camping first-aid essentials (American Red Cross, 2026). Pre-assembled kits from REI or Adventure Medical Kits cover most of these items for $20–$40, but always check the contents against this list — many budget kits omit burn gel and CPR masks.
For a broader safety overview, see essential tent camping safety tips at TentExplorer.
Navigation and Multi-Purpose Tools
Tools and navigation round out the Safety Ring. Here’s the complete checklist:
- Multi-tool — a compact device combining knife, pliers, screwdriver, and file; one of the most versatile items on the entire list for food prep, gear repair, and campsite tasks
- Duct tape (small roll; repairs tent tears, blisters, broken straps — worth its minimal weight every time)
- Paracord or rope (10–15 feet; bear bag hanging, clothesline, tarp rigging, emergency repairs)
- Topographic map of the area (download offline before leaving cell service — phones die; paper maps don’t)
- Compass (backup to digital navigation; learn to use it before the trip, not during)
- Sunscreen (SPF 30+ minimum; reapply every 2 hours in direct sun)
- Insect repellent (DEET-based or picaridin for tick-heavy areas)
The Ten Essentials for outdoor survival framework includes navigation tools, sun protection, and illumination as survival-level priorities — not optional extras (National Park Service, 2026). Treat them accordingly.
The Safety Ring is complete. Now let’s cover the Comfort Ring items that transform a functional campsite into a place you actually want to spend time.
Campsite Comfort & Personal Hygiene
Comfort and hygiene items are the Experience and Comfort Ring of your camping kit — not survival essentials, but the difference between a trip you want to repeat and one you merely endure. This section covers campsite furniture and personal hygiene gear, with Leave No Trace guidance for each item.
Chairs, Tables, and Extras
Camp chairs — foldable, portable seating — are consistently rated as the most-missed item by first-timers who leave them behind to save space. Here’s the comfort checklist:
- Camp chairs (one per person; a compact, packable chair weighs 1–2 lbs and folds to umbrella size — the best cost-to-comfort ratio of any camping item after the basics)
- Folding camp table (for meals and cooking prep; optional for minimalist trips but invaluable for family camping)
- Campsite doormat (keeps mud and debris outside the tent — surprisingly effective for tent longevity)
- Tarp or canopy (extra shade or rain protection over the kitchen area; Comfort Ring for multi-day trips)
- Camp blanket or throw (for cool evenings around the fire)
- String lights (LED camp lights for ambient lighting; optional but highly recommended for multi-night stays)
What to skip: full-size furniture, glass containers, and anything fragile or breakable. The Experience Ring is where you customize — but keep it light enough to actually pack.
For help thinking through your setup, see planning your campsite for comfort at TentExplorer.
Personal Hygiene Essentials for Camping
Quick-dry microfiber towels dry in 30–60 minutes at camp versus 6–12 hours for a standard cotton towel — making them the practical choice for multi-night tent camping. (tentexplorer.com, 2026)
Your hygiene checklist:
- Toothbrush and toothpaste (travel size; store in your bear-safe container with other scented items — wildlife is attracted to scents, not just food)
- Biodegradable soap (for body and dishes; standard soap harms aquatic ecosystems near water sources)
- Quick-dry microfiber towel (dries in 30–60 minutes vs. 6–12 hours for cotton — a genuine upgrade worth the small investment)
- Baby wipes or camping wipes (for quick cleanups between showers; biodegradable preferred)
- Hand sanitizer (before meals when water isn’t immediately available)
- Toilet paper + trowel (for camping without facilities; bury waste 6 inches deep, at least 200 feet from any water source)
- Feminine hygiene products (pack out all waste in odor-proof bags)
- Sunscreen and lip balm with SPF (stored with toiletries — also a scented item in bear areas)
- Prescription medications (in original containers)
Leave No Trace requires washing dishes and performing personal hygiene at least 200 feet from any water source — use biodegradable soap and scatter grey water over a wide area. Store all scented toiletries in the same bear-safe container as food.
With all six categories covered, let’s look at the mistakes that most commonly derail first-time campers — because knowing what to pack is only useful if you avoid the traps that trip up beginners.
Common Beginner Mistakes
Even experienced campers forget something. But first-timers tend to make the same handful of mistakes — most of which are easy to prevent with a quick checklist review the night before departure. After comparing notes across camping communities and years of hands-on experience, these seven come up again and again.
7 Beginner Packing Mistakes
The most commonly forgotten camping items — tent stakes, a can opener, and extra batteries — are small, inexpensive, and trip-ruining when absent. (tentexplorer.com, 2026)
- Forgetting tent stakes or a mallet — Tent pegs are often packed separately from the tent bag and left on the garage floor. Solution: tape a sticky note inside the tent bag as a reminder, and keep stakes in a dedicated pouch attached to the tent.
- Skipping the rain fly test — Many budget tents include a rainfly that doesn’t cover the full tent body. Test your complete setup in the backyard before the trip — not in the dark at a campsite.
- Choosing a sleeping bag by price, not temperature rating — A 45°F-rated bag on a 38°F night is a miserable, potentially dangerous experience. Always check the rating and choose 10–15°F colder than your expected low.
- Forgetting a can opener — Consistently ranked as the #1 most-forgotten kitchen item across camping communities, including Reddit’s r/camping threads on forgotten gear. A multi-tool with a can opener function solves this.
- Packing cotton clothing — Cotton retains moisture and loses all insulating properties when wet. A wet cotton base layer in 45°F weather with wind creates a real hypothermia risk — replace it with wool or synthetic.
- No extra batteries for the headlamp — Headlamp batteries die at the worst possible moment. Pack a fresh spare set in a labeled bag inside your pack.
- Overpacking the Experience Ring, underpacking the Safety Ring — Bringing cornhole and a portable speaker but no first-aid kit or rain jacket is the most common first-timer mistake. The Three Rings framework prevents this: protect the Safety Ring first, always.
Most Forgotten Item When Camping
The most commonly forgotten camping items include tent stakes, a can opener, extra batteries for headlamps, trash bags, and basic cooking essentials like salt, oil, and matches. Tent stakes are the most structurally critical forgotten item — a tent without stakes is unusable in any wind above a gentle breeze. A physical, printed checklist reviewed the night before departure is the single most effective way to prevent these small but trip-ruining oversights. The free printable PDF in this guide is designed specifically for this purpose.
When to Customize Your Checklist
There is no single “ultimate” list — and the r/camping quote in the introduction got it exactly right. This guide is a starting framework. Here are the three most common customization scenarios:
- Family camping — Add per-person sleeping gear, kid-specific snacks, campsite games, and a tent sized one step up (a 6-person tent for a family of four). A 4-person tent for a family of three is genuinely more comfortable.
- Pet camping — Add food and water bowls, leash, waste bags, and vaccination records. Store pet food in the bear-safe container with your own food.
- Cold-weather camping — Shift your insulated jacket, thermal underwear, and warm hat from Comfort Ring to Safety Ring. These are no longer optional when lows drop below 35°F.
Still have questions? Here are the answers to the most common questions campers ask about packing for their first tent trip.
Frequently Asked Questions
What should you not bring camping?
Avoid bringing cotton clothing, glass containers, fragile electronics, and strong-smelling toiletries or foods that attract wildlife. Cotton is the most dangerous fabric choice for campers — it absorbs moisture and significantly increases hypothermia risk in cool or wet conditions.
How do you pack a tent camping gear checklist for a family?
For family tent camping, scale each category proportionally: use a tent sized one step up (a 6-person tent for a family of four), pack individual sleeping bags and pads for every family member, and add extra clothing layers for children who regulate temperature less efficiently than adults. Plan simple, kid-friendly meals and pack campsite games to keep younger campers engaged during downtime. Labeled packing cubes or color-coded totes for each person’s gear prevent the pre-trip chaos of searching through shared bags on departure morning.
Besides gear, what else should I prepare for a camping trip?
Beyond gear, effective preparation involves checking the weather forecast, reviewing campground-specific rules (fire restrictions, bear canister requirements, quiet hours), and downloading an offline map of the area before you lose cell service. Always inform someone of your exact itinerary — campsite name, arrival and departure dates, and an agreed check-in time — before you leave. Practice setting up new gear like your tent in the backyard before the trip to minimize campsite frustration.
Your Complete Gear Checklist
For tent campers at any experience level, a complete tent camping gear checklist organized across shelter, kitchen, clothing, safety, comfort, and hygiene covers the 50+ items that determine whether a trip is memorable for the right reasons. The Three Rings of Camp Readiness framework — Safety, Comfort, and Experience — gives you a clear prioritization system when space or budget requires trade-offs. Start with the Safety Ring, protect the Comfort Ring, and customize the Experience Ring to your trip.
There’s no single “ultimate” list — the camper who said “everyone have different needs and camp differently” had it right. What this guide provides is a proven starting framework that adapts to your climate, your group, and your conditions. The Three Rings of Camp Readiness, introduced by TentExplorer.com, exists specifically to resolve the tension between “pack everything” anxiety and the practical limits of what fits in a car or a pack. Use it on every trip from here on.
Download the free printable PDF checklist above, print it the night before your trip, and check off each item as you pack. Then test your tent setup in the backyard — the 20 minutes you spend before the trip will save you hours of frustration at the campsite and let you focus on the part that actually matters: the adventure itself.
