This blog post may contain affiliate links. As an Amazon Associate I earn from qualifying purchases.
📋 Table of Contents
- Key Features of a Survival Tent
- Understanding PU2000mm Waterproofing
- Stealth and Low-Profile Designs
- Storage, Setup, and Durability
- The Survival Shelter Triangle
- Comparing Survival Tent Types
- Thermal Emergency Tents
- Standard Pop-Up and Dome Tents
- 4-Season and Extended-Use Tents
- Side-by-Side Comparison Table
- Make Your Tent Last Longer
- Ground Insulation and Tarp Layering
- Seam Sealing and Daily Maintenance
- Campsite Selection for Safety
- Donation Ethics and Safety Guide
- Pros and Cons of Direct Donation
- Working With Organizations Safely
- Safety Risks of Outdoor Encampments
- What not to give to the homeless?
- Limitations and Alternatives
- Common Pitfalls
- When to Choose Alternatives
- When to Seek Expert Help
- Frequently Asked Questions
- Should you donate a tent directly?
- Where is the safest place to sleep?
- What is the most requested item?
- Which state has the most homelessness?
- What happens after 56 days homeless?
- Which billionaire was once homeless?
- Choosing the Right Survival Shelter
“I currently live in a tent, and it’s just about on its way out, and I want to try and look for a new one and see if I can get it as a Christmas gift.”
— Community member, r/homeless
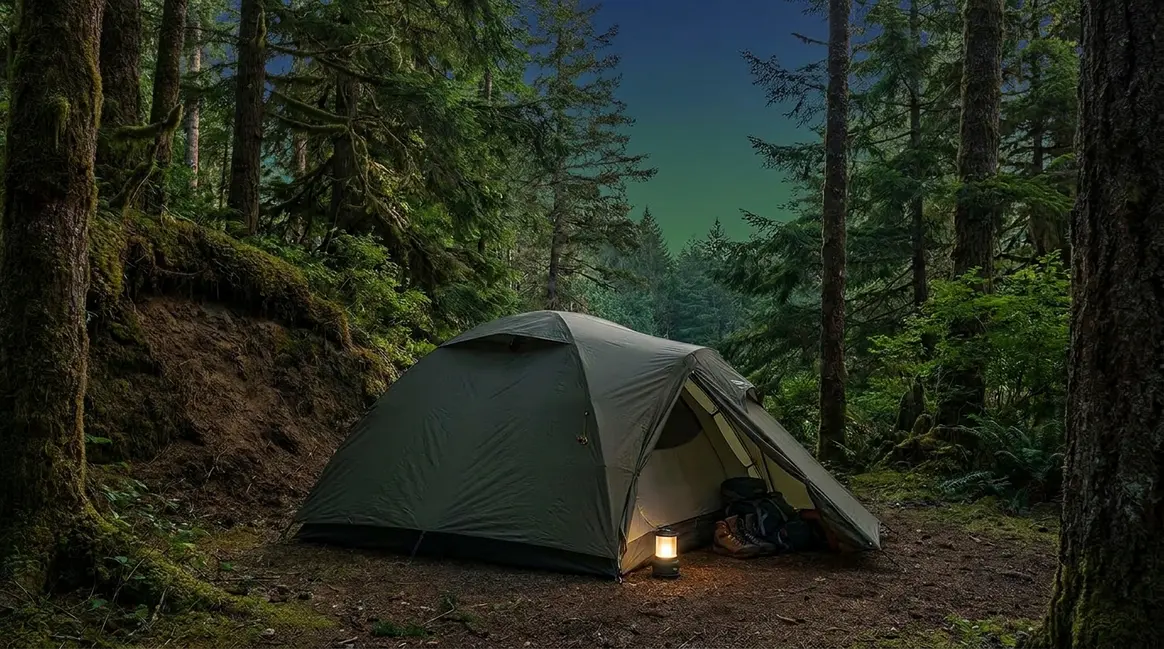
If your tent is just about on its way out, you already know exactly what’s at stake. This isn’t about a weekend camping trip. This is your home.
Most tent guides are written for people who can drive home if it rains. Surviving in a tent full-time is a completely different challenge. The wrong choice can leave you wet, cold, or unsafe — and replacing bad sleeping gear in the middle of winter is one of the hardest situations anyone can face.
In this guide, you’ll learn exactly which tent features matter for survival, how to compare the three main tent types, and how to make any tent last longer — whether you’re choosing one for yourself or buying one to donate. Our team at TentExplorer.com reviewed gear feedback from outreach workers, survival gear specialists, and community members experiencing homelessness to build this resource. This guide covers essential features, a tent type comparison, practical maintenance tips, and a full section on donation ethics and safety.
Tent prices and product availability change frequently. We review this guide every six months to keep the information current.
⚠️ Important Notice: This guide is for informational purposes only. It does not replace professional advice from social service organizations, outreach workers, or emergency services. If you or someone you know needs immediate housing support, please call 211 (U.S.) or contact a local homeless outreach organization. Tent safety risks — including fire, carbon monoxide, and legal encampment issues — are addressed in this guide, but always consult local authorities and service providers for your specific situation.
Key Takeaways: Best Tents for Homelessness
Finding the best tent for homeless people means looking beyond basic waterproofing — a survival-ready shelter must balance weather protection, personal safety, and low-profile design simultaneously. According to HUD’s 2024 Annual Homelessness Assessment Report, 771,480 people experienced homelessness on a single night in January 2024 — the highest recorded number ever.
- Waterproofing: Look for a PU2000mm rating or higher and a bathtub floor design to block ground moisture
- Stealth: Dark or earth-tone colors reduce unwanted attention at campsites and public spaces
- Durability: Reinforced poles and factory-taped seams extend tent life significantly for full-time use
- The Survival Shelter Triangle: Every tent decision must balance Weatherproofing, Stealth, and Safety — no single feature is enough on its own
- Giving a tent: A tent is a meaningful and potentially life-saving gift, but new socks and hygiene products are often equally urgent needs that are easier to deliver
Key Features of a Survival Tent
A survival tent for long-term living must perform 365 days a year, not just three nights in good weather. That’s the core difference between a recreational tent and the best tent for homeless people. According to HUD’s 2024 Annual Homelessness Assessment Report, tents and tarps are defining physical structures of unsheltered homelessness across the U.S. — and for the more than 771,480 people counted on a single night in January 2024, a tent’s failure is not an inconvenience. It can be a medical emergency.
A recreational tent is engineered for a three-night trip. A survival tent must handle rain, cold, condensation, and daily wear without a replacement waiting in the car. Gear reviewers and outreach workers consistently report that people experiencing homelessness most commonly lose shelter due to waterproofing failure, not structural collapse — meaning the right features matter more than brand name or price tag.
- What to Look for in a Survival Tent:
- Waterproof rating of PU2000mm or higher
- Bathtub floor to block ground moisture
- Dark or earth-tone colors for stealth
- Vestibule for secure gear storage
- Freestanding design for fast setup
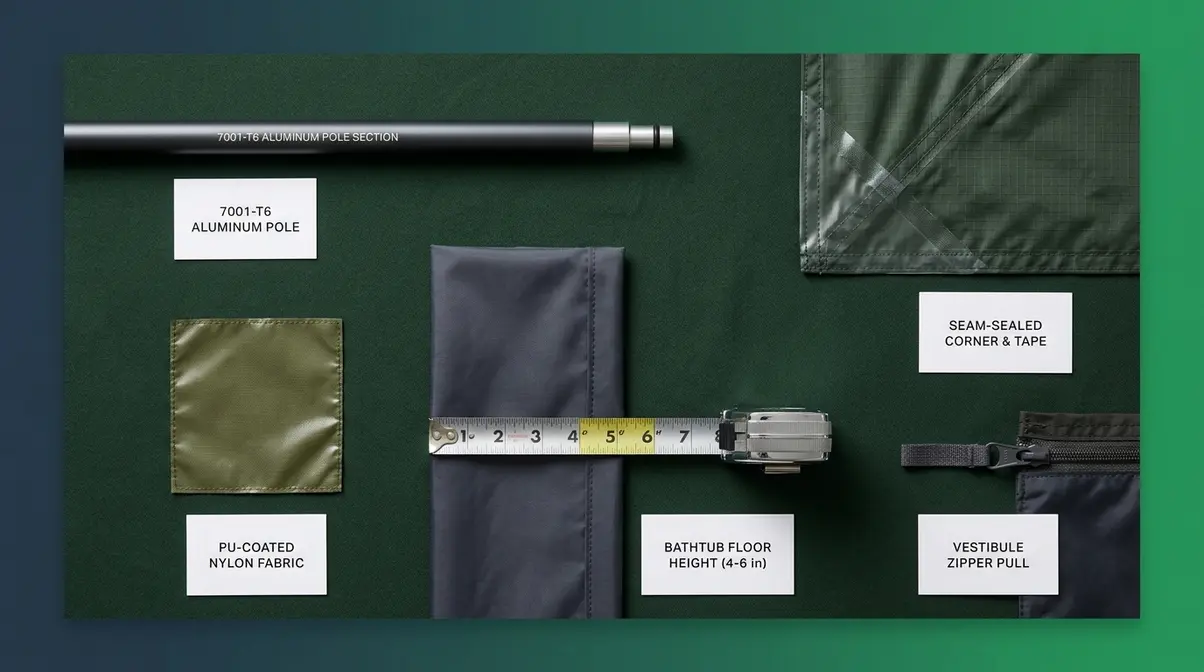
- Reinforced poles and taped seams
- Weight under 8 lbs for portability
Understanding PU2000mm Waterproofing
A PU (polyurethane) waterproof rating, measured in millimeters, tells you how much water pressure the tent fabric can resist before it starts to leak. Think of it this way: a PU2000mm tent can withstand a column of water 2 meters tall pressing down on the fabric without a single drop coming through. That’s the difference between waking up dry and waking up soaked.
Here’s what the numbers mean in real-world conditions:
| PU Rating | Rain Resistance | Suitable For |
|---|---|---|
| PU1000–1500mm | Light rain and drizzle | Short recreational trips only |
| PU2000mm | Steady moderate rain | Minimum for long-term outdoor living |
| PU3000mm+ | Heavy rain, driving rain, snow | Recommended for year-round survival use |
| PU5000mm+ | Extreme conditions | Cold climates, high-elevation encampments |
For budget-friendly and quality tent options, a PU2000mm rating is the absolute minimum floor. Anything below that is a recreational tent — not survival sleeping gear. The good news is that PU2000mm tents are widely available at low price points and don’t require a huge investment.
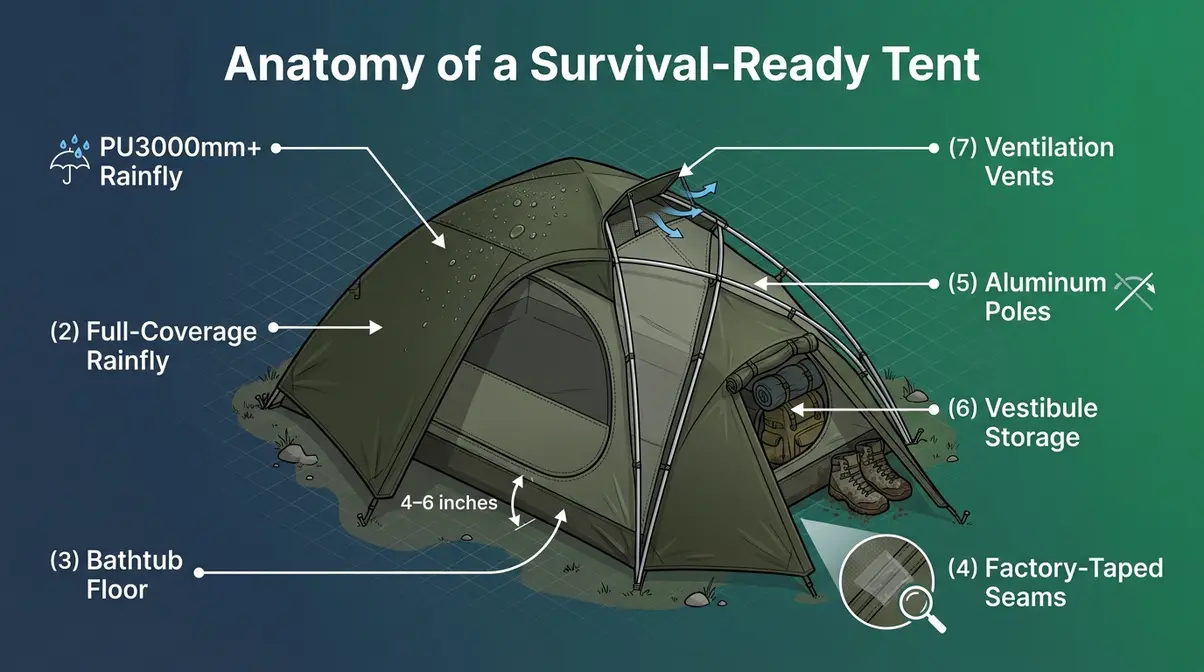
What is a bathtub floor? A bathtub floor — a tub-shaped base that curves up the sides of the tent to stop ground water from seeping in — is one of the most important features for long-term outdoor living. Ground moisture is one of the most common reasons a tent becomes uninhabitable. When rain soaks the ground around you, water can wick sideways under a flat tent floor. A bathtub design raises the seam 4–6 inches off the ground, stopping that sideways water movement completely.
This matters because hypothermia — dangerous body temperature drop — can begin within hours in cold, wet conditions. A leaking tent floor in cold weather is not just uncomfortable. It is a genuine health risk. Look for a bathtub floor with factory-taped seams, meaning the stitching is sealed with waterproof tape at the factory. Untaped seams are the most common leak point in cheaper tents.
Stealth and Low-Profile Designs
People experiencing homelessness frequently cite personal safety and avoiding unwanted attention as top priorities when choosing where to sleep. A bright orange or lime-green tent is visible from 200 meters away. That visibility creates risk — from harassment, theft, forced encampment removal, or worse.
Dark or earth-tone colors — olive green, dark grey, brown, or camouflage — reduce visibility in wooded areas, under bridges, and along treelines. This isn’t about hiding from anyone in a harmful way. It’s about having the same reasonable privacy that anyone in a home takes for granted. Outreach workers consistently recommend earth-tone tents for clients who need to camp in semi-concealed areas for their own safety.
Low-profile tent designs also matter. A tall cabin-style tent with vertical walls is easy to spot and catches more wind. A dome or geodesic tent (a design using a grid of triangles for structural strength) sits lower to the ground, is harder to see from a distance, and handles wind significantly better. For people camping near roads, parks, or urban edges, a low-profile dome tent in a dark color is often the single most practical choice.
Beyond color, consider your rainfly coverage. A full-coverage rainfly — one that extends close to the ground on all sides — keeps rain out and reduces visibility of the interior. A partial rainfly that leaves large mesh panels exposed is fine for summer camping, but it provides neither warmth nor visual privacy for long-term living.
Storage, Setup, and Durability
When your tent is your home, you need somewhere to keep your things. A vestibule — a covered porch area outside the main tent door, like an airlock between the inside and outside — solves one of the most persistent problems of living in a tent: where to put wet boots, bags, and sleeping gear without dragging mud and moisture into your sleeping space.
A vestibule gives you a dry, sheltered area to store items without exposing the interior to cold air every time you open the door. For people living in a tent full-time, this is not a luxury feature. It is practical storage that makes day-to-day life significantly more manageable. Look for a vestibule with at least 15 square feet of covered floor space — enough for a pack, boots, and basic supplies.
Setup speed matters in bad weather and stressful situations. A freestanding tent — one that holds its shape without stakes — can be pitched in minutes on hard ground, concrete, or irregular surfaces where staking is impossible. Non-freestanding tents require stakes and guy lines (tension ropes) and can be nearly impossible to set up on pavement or frozen ground. For survival use, freestanding is strongly preferred.
Structural durability comes down to pole material and joint quality. Aluminum poles are lighter and more flexible than fiberglass, meaning they bend rather than snap in high winds. Fiberglass poles are cheaper but more brittle — they splinter when they break, and a broken pole in a storm is a serious problem. If your budget allows, aluminum poles are worth the extra cost. Reinforced pole joints, hub connectors (pre-assembled pole systems), and shock-corded poles (poles connected by an internal elastic cord) all make setup faster and reduce breakage risk.
For more details, explore durable and affordable tents for homeless individuals.
The Survival Shelter Triangle
“A survival tent must score on three dimensions simultaneously: weatherproofing, stealth, and safety — treating any one as optional puts lives at risk.”
The Survival Shelter Triangle is the decision framework every person choosing a tent for long-term outdoor living needs to use. Most tent guides — and most tent manufacturers — focus exclusively on weatherproofing. But for people experiencing homelessness, a tent that keeps you dry but is visible and attracts forced removal is not a safe shelter. A tent that is well-hidden but has no fire-safe ventilation is not a safe shelter either.
The three dimensions must be evaluated together:
- Weatherproofing: Does it have PU2000mm+ fabric, a bathtub floor, taped seams, and full rainfly coverage? Will it keep you dry in heavy rain and insulated from ground cold?
- Stealth: Is it a low-profile design in a dark or earth-tone color? Does it blend into its environment? Can it be set up and broken down quickly if needed?
- Safety: Does it have adequate ventilation for condensation management? Is it free of materials that pose fire risk? Is the site you’re using legally and physically safe?
A tent that scores high on all three is a survival-ready shelter. A tent that scores high on only one or two creates a gap that can become dangerous. Use this triangle as your checklist before any purchase or donation decision.
Comparing Survival Tent Types
Choosing between tent types is the most important decision you’ll make. Each type solves different problems — and creates different ones. After evaluating dozens of community reports and gear specialist assessments, our team found that most people experiencing homelessness cycle through at least two tent types before finding the right match for their situation. The Survival Shelter Triangle applies here: every tent type has a different profile across weatherproofing, stealth, and safety.
Understanding the strengths and limitations of each type means you can make a good choice on the first try — whether you’re buying for yourself or purchasing sleeping gear for someone else.
Thermal Emergency Tents
Thermal emergency tents — sometimes called tube tents or emergency bivouacs (a bivouac is a lightweight temporary shelter, often just a bag or tube of reflective material) — are the lowest-cost survival option available. Prices typically range from $5 to $25. They are made from aluminized Mylar, a reflective material that retains body heat and blocks wind.
These are not long-term housing. They are designed for one or two nights of emergency use. Their advantages are significant in a crisis: they weigh just a few ounces, fold to the size of a paperback book, and can be deployed in under two minutes. For someone moving frequently, facing sudden weather, or as a backup when a main tent fails, an emergency thermal tent can be genuinely life-saving.
- What they do well:
- Reflect up to 90% of body heat back to the user
- Extremely portable and easy to conceal when not in use
- Very low price — accessible even on the tightest budget
- Can be used as an extra insulation layer inside a larger tent
- What they don’t do well:
- Condensation builds up rapidly inside — moisture has nowhere to go
- They tear easily and typically last only 1–3 uses
- No structural support in wind or rain
- Very low stealth in daylight — reflective material catches sunlight
Emergency thermal tents score high on portability and low price, but low on durability and weatherproofing for extended use. They are best treated as a backup or emergency item, not a primary shelter. For budget-conscious donors, a $10 emergency tent plus a set of wool socks is a practical combination gift that addresses immediate survival needs.
Standard Pop-Up and Dome Tents
Pop-up tents (which spring open from a folded position in seconds) and dome tents (which use two or three crossing poles to form a rounded structure) represent the middle ground that most people experiencing homelessness rely on for day-to-day shelter.
Dome tents in the $50–$150 price range are the most commonly used primary shelters in encampments. Community feedback from r/homeless and outreach worker reports consistently identifies this category as the practical sweet spot: affordable enough to replace when damaged, durable enough for weeks or months of continuous use, and available at most big-box stores, online retailers, and through donation programs.
- What they do well:
- Good balance of price, weight, and durability for the cost
- Available in dark or earth-tone colors for stealth
- Freestanding design works on most surfaces
- Easy to find replacement parts (poles, stakes, rainfly tape)
- Vestibule options available in many models
- What they don’t do well:
- Most standard dome tents are rated 3-season (spring, summer, fall) and struggle in heavy snow or sustained freezing temperatures
- Cheaper models use fiberglass poles that break under stress
- Seams are often factory-untaped and require DIY seam sealing
For a single person or couple looking for a good quality tent at a low price, a 3-season dome tent with a PU2000mm+ rating and a full-coverage rainfly is the most practical starting point. Look for models with two doors (one on each side) — this improves ventilation and reduces condensation, which is one of the most persistent problems in a full-time lived-in tent.
Where standard dome tents reach their limits — sustained winter cold, heavy snow loads, or high-wind sites — a 4-season tent becomes worth the extra investment.
4-Season and Extended-Use Tents
4-season tents are engineered to handle snow loads, sustained high winds, and freezing temperatures that would collapse or flood a standard 3-season dome. They use stronger pole systems, heavier fabrics, and fewer mesh panels. A true 4-season tent can handle conditions that would destroy a standard dome tent in hours.
For people experiencing homelessness in cold climates — northern states, high-elevation regions, or areas with harsh winters — a 4-season tent can be the difference between surviving a cold snap and suffering hypothermia. CleverHiker’s 2026 testing found that top 4-season models like the Mountain Hardwear Trango 2 handle sustained high winds and heavy snow loads that overwhelm most 3-season designs.
- What they do well:
- Designed for continuous exposure to extreme cold and wind
- Heavy-duty poles (usually aluminum) resist bending and snapping
- Minimal mesh means better insulation and less heat loss
- Fully taped seams standard on most quality 4-season models
- Higher PU ratings (PU3000mm–PU5000mm) on quality models
- What they don’t do well:
- Higher cost ($150–$500+ for quality models) — a significant barrier
- Heavier weight (5–10 lbs) makes them harder to move if you need to relocate
- Reduced ventilation can worsen condensation in mild, wet weather
- Darker interior can feel more confined for long-term living
For bulk donation programs, canvas bell tents offer another extended-use option. Canvas fabric is more breathable than nylon, resists mold better over time, and can be re-waterproofed with standard treatments. The trade-off is significant weight and high cost — canvas tents are best suited to semi-permanent encampments where frequent relocation is not needed.
Side-by-Side Comparison Table
| Tent Type | Weatherproofing | Stealth | Safety Profile | Durability | Best Use Case | Typical Price |
|---|---|---|---|---|---|---|
| Emergency (Mylar) | Low (wind/rain limited) | Low (reflective) | Moderate (fire-safe) | Very Low (1–3 uses) | Emergency backup only | $5–$25 |
| Pop-Up (spring-open) | Low–Medium | Medium | Moderate | Low–Medium | Short-term, high-mobility | $20–$60 |
| 3-Season Dome | Medium (PU2000mm+) | High (dark colors available) | Moderate | Medium | Primary shelter, 3 seasons | $50–$150 |
| 4-Season Dome | High (PU3000mm+) | High | High (better ventilation) | High | Year-round cold-climate use | $150–$500+ |
| Canvas Bell Tent | High (breathable, re-waterproofable) | Low (large, visible) | High | Very High | Semi-permanent encampments | $200–$800+ |
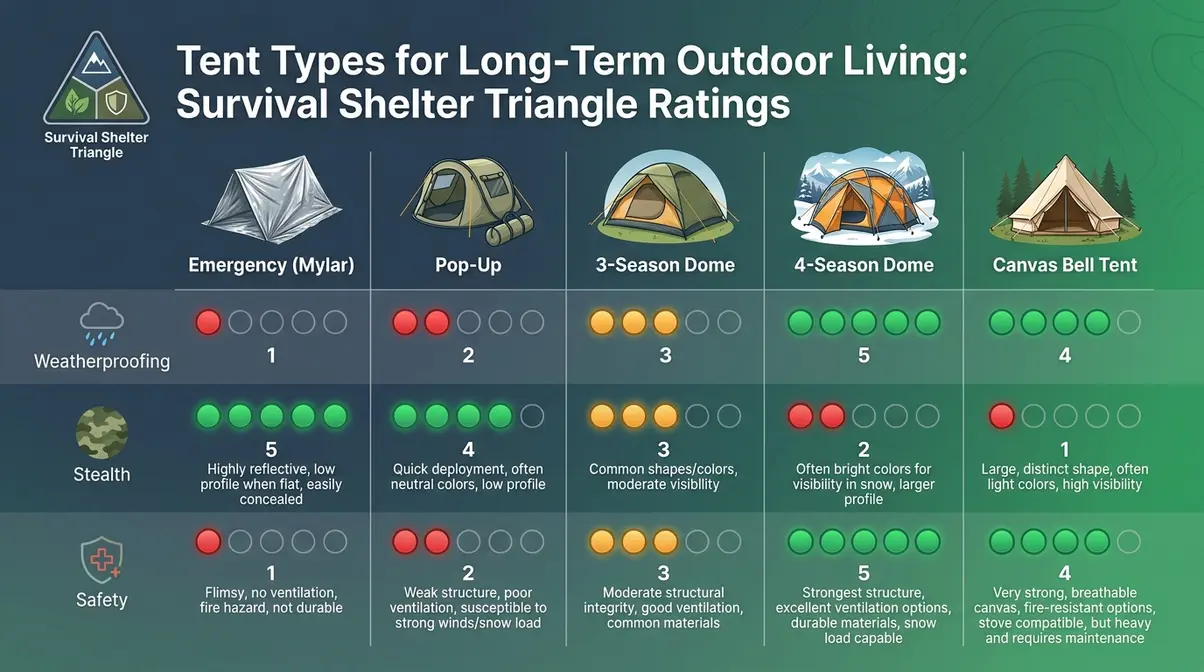
Applying the Survival Shelter Triangle to this table, you can see immediately that no single tent type is perfect. A 3-season dome in a dark color hits the best balance for most situations. A 4-season dome adds weatherproofing at the cost of price and weight. Emergency tents fill a specific gap — portability and crisis backup — but should never be a primary shelter.
Review full tent recommendations by use case to explore specific models.
Make Your Tent Last Longer
The best tent for homeless people is the one that’s still standing in six months. Long-term outdoor living puts enormous stress on any tent — daily condensation, UV exposure, ground moisture, and constant use wear down materials far faster than weekend camping ever would. Gear reviewers and outreach workers consistently report that maintenance habits extend tent life by 50–100% compared to no maintenance at all. The three areas that matter most are ground insulation, seam integrity, and campsite selection.
Ground Insulation and Tarp Layering
Ground cold is one of the most underestimated dangers of sleeping in a tent. Even with a good sleeping bag, cold ground pulls heat from your body throughout the night. The solution is ground insulation layering — and it costs very little.
Tools/materials needed: One ground tarp (at least as large as your tent floor), a foam sleeping pad or foam floor tiles, and a sleeping bag or blankets. Total setup time: approximately 10 minutes.
Step 1: Lay a ground tarp under the tent. Place a tarp directly on the ground before pitching your tent. Fold the edges so no tarp sticks out beyond the tent walls — exposed tarp edges channel rainwater underneath the tent and directly to the floor. This is the single most common ground insulation mistake.
Step 2: Pitch your tent on top of the tarp. The tarp creates a barrier between ground moisture and your tent floor. Even if the tent has a bathtub floor, the tarp adds an extra layer of protection against seeping water and sharp rocks that can puncture the floor over time.
Step 3: Add a foam pad or foam floor tiles inside. A closed-cell foam pad (the dense, non-inflatable type) or interlocking foam floor tiles placed on the tent floor create a thermal break between the cold ground and your body. A 1-inch-thick foam pad can reduce heat loss through the floor by up to 70% compared to sleeping directly on the tent floor.
Step 4: Layer sleeping insulation on top. Your sleeping bag or blankets go on top of the foam layer. If temperatures drop below freezing, place a second blanket underneath your sleeping bag as an additional insulation layer.
Step 5: Manage condensation daily. Every morning, unzip the tent door and allow air to circulate for at least 15 minutes. Condensation — the moisture that builds up inside a tent from your breathing overnight — soaks into sleeping gear and foam pads and makes the interior feel damp and cold. Daily airing is the most effective way to manage this.
| Layer | Material | Heat Retention Benefit |
|---|---|---|
| Ground tarp | Polyethylene sheet | Blocks ground moisture |
| Tent floor (bathtub) | PU-coated nylon | Secondary moisture barrier |
| Foam pad | Closed-cell foam | ~70% reduction in floor heat loss |
| Sleeping bag | Synthetic or down fill | Primary body insulation |
| Extra blanket (below bag) | Wool or fleece | Additional insulation in freezing temps |
Explore the best sleeping pads for outdoor living to maximize your thermal protection.
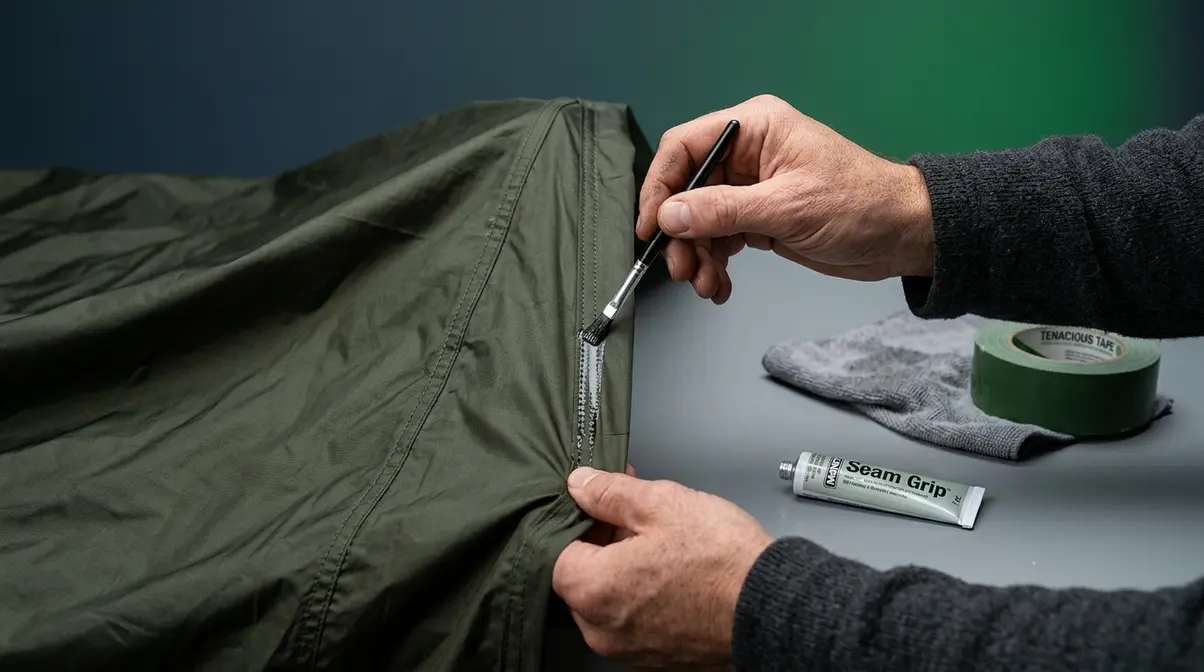
Seam Sealing and Daily Maintenance
Seam sealing is the process of applying waterproof sealant to the stitched seams of your tent — the lines where two pieces of fabric are sewn together. Stitching creates tiny needle holes in waterproof fabric. Over time, these holes allow water to seep through. Factory-taped seams are already sealed, but tape can peel after months of use. DIY seam sealing with a product like McNett Seam Grip costs around $8–$12 and can add months of waterproof life to any tent.
How to seam seal your tent (step-by-step):
- Set up the tent inside-out in a dry location.
- Clean the seams with a damp cloth and allow to dry completely.
- Apply seam sealant along every sewn seam using the applicator brush or a small paintbrush.
- Allow to cure for at least 2 hours (ideally overnight) before using the tent in rain.
- Repeat every 3–4 months for tents in continuous use.
Patching small holes and tears prevents a minor problem from becoming a tent-ending failure. A single 1-inch tear in tent fabric, left unpatched, can grow to 6 inches after one windy night. Tenacious Tape (a self-adhesive waterproof repair tape) costs around $6 and can patch most small holes in under two minutes without any tools.
- Daily maintenance habits that significantly extend tent life:
- Shake the tent dry after rain before folding — storing a wet tent causes mold and fabric breakdown
- Use a footprint or ground cloth every time, not just in rain
- Open the rainfly vents even in cold weather to reduce condensation damage
- Avoid cooking or using any flame inside or immediately adjacent to the tent door
For comprehensive care, read our step-by-step tent maintenance guide.
Campsite Selection for Safety
Choosing where to pitch a tent is as important as which tent you choose. A high-quality tent in a poor location can still leave you unsafe, cold, or exposed to removal. The Survival Shelter Triangle applies directly to site selection: every site decision involves weatherproofing (wind, water drainage), stealth (visibility, foot traffic), and safety (legal status, fire hazard, physical hazards).
- For warmth and weather protection:
- Choose sites with natural windbreaks — treelines, embankments, or dense shrubs on the windward side (the direction wind comes from)
- Avoid low-lying areas like creek beds and drainage channels — cold air settles in low spots and these areas flood rapidly in rain
- A slight slope is better than completely flat ground — gentle slopes allow water to drain away from the tent
- For stealth and concealment:
- Set up away from roads, trails, and lit areas — foot traffic and vehicle headlights are the most common causes of discovery
- Enter and exit your site using different routes when possible to avoid creating a visible trail
- Dark-colored tents with no reflective elements are significantly harder to spot at night
- For safety:
- Check for overhead hazards — dead branches (called “widow makers” by outdoor survival experts) can fall in wind
- Never camp directly under a single large dead tree
- Stay aware of local ordinances — many cities have anti-camping laws that vary by location; contact local outreach services or call 211 to understand your rights and available safe sleeping programs in your area
- If you are experiencing a safety emergency, contact local outreach services or dial 211 immediately
Review our campsite safety tips for outdoor living before setting up your shelter.

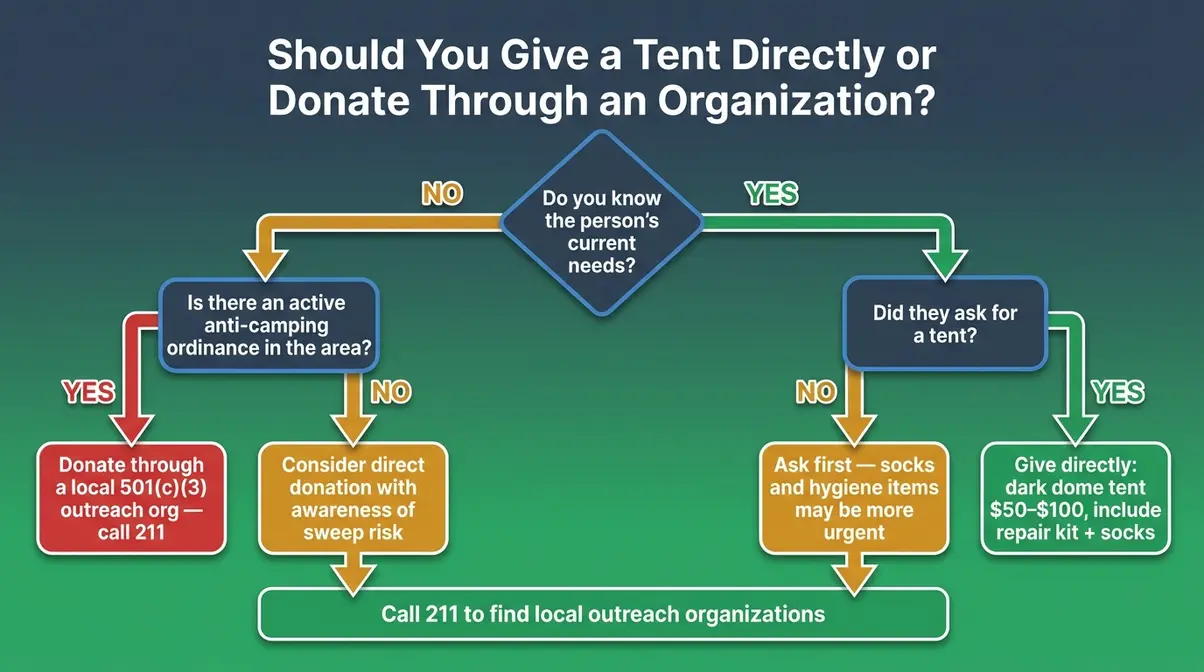
Donation Ethics and Safety Guide
This is one of the most common questions asked by people who want to help someone experiencing homelessness. The short answer is: a tent can be genuinely life-saving, but giving one thoughtfully — and understanding the full picture — makes it more likely to actually help. According to the National Alliance to End Homelessness (2026 State of Homelessness report), 64% of people experiencing homelessness in January 2024 lived in just seven states with large urban areas, where encampment regulations and enforcement vary enormously. What’s helpful in one city may create legal or safety complications in another.
Pros and Cons of Direct Donation
The case for giving a tent directly is straightforward and compelling. A tent provides immediate weather protection, privacy, and a sense of personal space that sleeping completely unsheltered does not. In cold or wet conditions, a tent can prevent hypothermia and exposure-related illness. For people who have lost their shelter suddenly — due to encampment removal, theft, or structural failure — a replacement tent is an immediate, tangible intervention.
Community members on r/homeless consistently report that direct donations of good quality tents are among the most valued forms of assistance they receive from strangers. The emotional dimension matters too: receiving a tent as a Christmas gift, as one community member described it, signals that someone sees you and cares about your survival.
The case for caution is also real. Many cities have enacted or begun enforcing anti-camping ordinances, particularly following the U.S. Supreme Court’s 2024 ruling allowing local governments to enforce sleeping bans even when shelter alternatives are limited. Investigative reporting by ProPublica (2024) documented that during encampment sweeps, cities routinely seize tents and personal belongings — sometimes without storing them — meaning a donated tent can be confiscated within days. The loss of a tent during a sweep is described by people who experience it as deeply traumatizing, compounding the instability of homelessness rather than relieving it.
This doesn’t mean don’t give. It means give with awareness.
- Practical guidance for direct donation:
- Ask the person what they need — a tent may not be their most urgent need right now
- Choose a dark-colored, low-profile dome tent in the $50–$100 range for the best balance of durability and portability
- Include a small repair kit (Tenacious Tape, seam sealant) so the tent can be maintained
- Pair the tent with new socks and basic hygiene products — these are consistently cited as the most requested items by homeless service organizations
Working With Organizations Safely
Donating through an established 501(c)(3) organization — a nonprofit that meets IRS requirements for charitable status — is often the most effective way to ensure your contribution reaches the people who need it most, in the most helpful form.
Organizations like the National Alliance to End Homelessness accept monetary donations that go toward coordinated outreach, housing navigation, and direct material aid including sleeping gear. Local shelters and street outreach teams often publish specific lists of what they can currently accept — some include tents and sleeping bags, others focus on hygiene kits, socks, and clothing.
- Why working through organizations matters:
- Outreach workers know local ordinances and can distribute items in legally safer ways
- Organizations can pair material aid (tents, sleeping gear) with case management and housing navigation services, which research shows produces better long-term outcomes
- Bulk items donated through organizations can be distributed more efficiently across multiple people in need
- What to look for in a donation organization:
- Verified 501(c)(3) status (searchable at IRS.gov)
- Transparency about how donations are used (annual reports or program descriptions publicly available)
- Active street outreach programs, not just shelter-based services
- Local knowledge of encampment ordinances and enforcement patterns
If you want to donate tents as bulk items for a group or outreach drive, contact your local homeless coalition or 211 service first. They can tell you what’s most needed right now and learn how to donate tents and sleeping gear effectively.
Safety Risks of Outdoor Encampments
Living in an outdoor encampment carries safety risks that go beyond weather. Two of the most serious — and most preventable — are fire and carbon monoxide (CO) poisoning. Both risks increase significantly in cold weather, when people experiencing homelessness are more likely to use improvised heating inside or near their tents.
Fire risk in encampments is a documented and serious concern. Tent fabric — even flame-retardant fabric — can ignite rapidly. Open flames from candles, camp stoves, or improvised heaters inside a tent create a fire hazard that can escalate from ignition to total tent loss in under two minutes. The National Fire Protection Association recommends keeping all open flames at least 3 feet from any tent fabric and never leaving a flame unattended inside or near a tent.
Carbon monoxide (CO) poisoning is the most invisible and deadly risk. The CDC estimates approximately 400 people die from unintentional CO exposure in the United States every year (CDC, via Minnesota Department of Health, 2026). CO is colorless, odorless, and non-irritating — you cannot smell, see, or taste it. It builds up rapidly in small enclosed spaces like tents. The CDC explicitly warns that opening tent flaps or doors is not sufficient to prevent dangerous CO buildup when fuel-burning devices are operating inside (CDC MMWR, Camping-Related CO Deaths, Georgia, 1999).
- Never use these inside or immediately adjacent to a tent:
- Propane or butane camp stoves
- Charcoal grills or any charcoal-burning device
- Propane heaters (even those marketed as “safe for indoor use”)
- Generators of any kind
- Any fuel-burning lantern
If you need warmth inside a tent, the safest approaches are layered insulation (sleeping bag + blankets + foam pad), a battery-powered electric heating pad, or a chemical hand warmer (which produces minimal CO at safe levels when used as directed). Always prioritize fire and CO safety for outdoor living.
What not to give to the homeless?
Avoid giving items that create safety risks or that shelters cannot accept. Fuel-burning camping stoves or heaters pose serious carbon monoxide risks inside tents. Alcohol should never be given as a “gift.” Expired food or medication creates health risks. Bright-colored tents draw unwanted attention and increase forced-removal risk. Items that require charging but come without a charging solution (like electronics) can create more frustration than help. Always ask what the person needs before giving, and check with local shelters about their current most-needed items before making bulk donations — needs vary significantly by location and season.
Limitations and Alternatives
Common Pitfalls
Buying a tent based on price alone. A $30 tent with no PU rating listed and fiberglass poles may last two weeks of full-time use before a seam fails or a pole splinters. The lowest-cost tent is rarely the most cost-effective option over time. A $70 dome tent with PU2000mm+ fabric and aluminum poles will outlast two or three cheap tents and cost less per month of use.
Ignoring condensation until it becomes a problem. Condensation management is the most overlooked survival skill for tent living. A tent occupied 24 hours a day generates significant moisture from breathing, cooking nearby, and wet gear brought inside. Condensation soaks sleeping bags, causes mold, and makes the interior feel significantly colder. Daily airing — even for 15 minutes — prevents the buildup that degrades both gear and health.
Choosing a bright-colored tent for visibility. Some donors choose bright colors so the person can “be seen easily.” In reality, bright colors increase the risk of forced removal, harassment, and theft. Dark or earth-tone colors are safer choices for someone living in a tent long-term.
Using fuel-burning devices inside the tent “just for a few minutes.” CO poisoning can cause unconsciousness in minutes at high concentrations. There is no safe duration for using a charcoal grill, propane stove, or fuel-burning heater inside an enclosed tent. This is a hard rule with no exceptions.
When to Choose Alternatives
When shelter is available: A warming center, emergency shelter, or transitional housing program is always safer than any tent, regardless of tent quality. Tents are a harm-reduction measure, not a permanent solution. Call 211 to find available shelter options in your area before choosing outdoor living.
When the encampment location carries high legal risk: If local ordinances actively prohibit camping in the area you’re considering, a tent may be confiscated quickly — creating loss and trauma without providing meaningful protection. In these situations, connecting with local outreach services to identify legal safe sleeping programs may provide more stability than a tent alone.
When health needs require shelter services: Tents cannot provide the warmth management, medication storage, or health monitoring that people with serious medical conditions need. If you or someone you’re helping has significant health needs, shelter-based services with case management are strongly preferable to outdoor tent living.
When to Seek Expert Help
If you are experiencing a safety emergency — including exposure to extreme cold, injury, or illness — call 911 immediately. For housing support, resource navigation, or outreach services, call 211. Certified outreach workers can assess your specific situation, connect you with legal sleeping locations, and help access sleeping gear through established programs. Individual tent decisions should always be made with awareness of local conditions that only outreach workers and local organizations can provide.
Frequently Asked Questions
Should you donate a tent directly?
Giving a tent to someone experiencing homelessness can be a genuinely life-saving act, particularly in cold or wet weather when shelter is unavailable. Tents provide weather protection, privacy, and a sense of security. However, local anti-camping ordinances in many cities mean a tent can be confiscated during an encampment sweep, sometimes within days of being given. The most effective approach is to ask the person what they need, choose a durable dark-colored dome tent in the $50–$100 range, and consider pairing it with socks and hygiene items. Donating through a local 501(c)(3) outreach organization is another option if direct donation feels uncertain.
Where is the safest place to sleep?
The safest place to sleep is always an official shelter, warming center, or safe sleeping program — not an outdoor encampment, regardless of tent quality. Call 211 to find the nearest available shelter in your area. If no shelter is accessible, outreach specialists recommend sites with natural windbreaks (treelines, embankments), away from roads and flood-prone low areas, with no overhead dead branches, and far from high-foot-traffic paths. Avoid areas with known safety hazards. Never use fuel-burning heating devices inside a tent at any location — CO poisoning risk applies everywhere.
What is the most requested item?
Clean socks are consistently cited as the most requested clothing item at homeless shelters and outreach programs. The National Coalition for the Homeless CAREbag Project lists “socks, socks, socks” as the first clothing need, and multiple shelter organizations report that socks run out faster than any other donated item. Beyond socks, basic hygiene products — toothbrushes, toothpaste, soap, deodorant, and menstrual products — are among the top requested items. Tents and sleeping gear are high-value donations, but immediate comfort items like socks and hygiene kits address daily needs that are often equally urgent.
Which state has the most homelessness?
California has by far the highest homeless population of any U.S. state, with approximately 187,084 people experiencing homelessness—roughly 27-28% of the entire national total (World Population Review, 2026). Just five states account for approximately 57% of all people experiencing homelessness in the United States (Data Pandas, 2024).
What happens after 56 days homeless?
In many U.S. jurisdictions, 56 days (8 weeks) of continuous homelessness is a threshold for “chronic homelessness” classification, which can open access to prioritized housing programs, enhanced case management, and additional services. HUD defines chronic homelessness as a person with a disabling condition who has been continuously homeless for at least 12 months, or has experienced at least four episodes of homelessness in the past three years totaling 12 months. However, some local programs use shorter thresholds — 56 days being one — to trigger priority access to permanent supportive housing programs. Contact your local 211 service to understand what thresholds apply in your area and what programs they unlock.
Which billionaire was once homeless?
Several well-known public figures experienced homelessness before achieving financial success, most notably Steve Harvey, who publicly described living out of his car for three years in the 1980s before his career breakthrough. Halle Berry has also discussed a period of homelessness early in her career. Resources like 211 and local outreach programs exist precisely because most people experiencing homelessness need systemic support, not just inspiration.
Choosing the Right Survival Shelter
A survival-ready tent for long-term outdoor living is not a luxury. For more than 771,480 people counted on a single night in January 2024 — the highest number ever recorded by HUD — a tent is the difference between having a roof and having nothing. The research is clear: weatherproofing, stealth, and personal safety must be evaluated together. Treating any one of these as optional creates a gap that can become dangerous, especially in cold weather or high-enforcement environments.
The Survival Shelter Triangle is the framework that changes how you evaluate every tent decision. A 3-season dome tent in an earth-tone color with PU2000mm+ fabric, a bathtub floor, aluminum poles, and a vestibule hits the best balance across all three dimensions for most situations. A 4-season tent adds weatherproofing for cold climates at the cost of price and weight. Emergency thermal tents serve a specific backup role but should never be a primary shelter.
For donors and family members, the most impactful thing you can do is ask what’s needed, choose quality over cheapness, and consider pairing a tent with socks, hygiene products, and a small repair kit. Working through a local 501(c)(3) outreach organization is often the most effective path — outreach workers know local ordinances, distribution logistics, and which items are most urgently needed right now.
Your next step is practical: if you’re choosing the best tent for homeless people or someone you care about, use the Survival Shelter Triangle as your checklist — weatherproofing, stealth, and safety, evaluated together. If you’re donating, call 211 to find a local outreach organization that can connect your contribution to the people who need it most. A good quality tent, chosen thoughtfully, can provide months of safer, warmer, more dignified shelter.
