This blog post may contain affiliate links. As an Amazon Associate I earn from qualifying purchases.
📋 Table of Contents
- Recommended Products
- Stake Types, Materials & Selection
- How We Selected These Stakes
- The 4 Main Tent Stake Types Explained
- Material Showdown: Steel vs. Aluminum vs. Titanium
- The Ground Match System: Matching Stake to Terrain
- How to Drive Tent Stakes the Right Way
- The 45-Degree Rule: Why Angle Matters
- Tensioning Guy Lines for Maximum Hold
- Pilot Holes, Stake Care & Leave No Trace
- Staking in Tough Conditions
- How to Stake into Hard or Rocky Ground
- What is the best way to stake a tent in sand?
- Will a tent survive 50 mph winds?
- No Stakes? No Problem: DIY & Alternative Anchoring
- Using Natural Anchors: Rocks, Trees & Buried Logs
- How to Build a Deadman Anchor (Step by Step)
- Emergency DIY Stakes: Field-Expedient Solutions
- Common Staking Mistakes (and How to Fix Them)
- Common Pitfalls
- When to Choose Alternatives
- Frequently Asked Questions
- How do you secure a tent with stakes?
- What are the most durable tent stakes?
- What can you use instead of tent stakes?
- Do screw-in tent stakes work?
- How do you secure a tent without stakes?
- How do you make homemade tent stakes?
- What size tent stakes do I need?
- How many tent stakes do I need?
- Wrapping Up: The Right Stake for Every Ground
You wake up at 2 a.m. to the sound of your tent bending hard in the wind. The fabric is snapping. Then you feel it — the floor lifting, the poles bowing inward. Your stakes are pulling out of the ground, and there is nothing you can do in the dark.
Most campers never think about stakes until that moment. They use whatever thin wire hooks came in the tent bag — the ones that bend on the first rock and pop free the second the wind picks up. Choosing the right tent nail stakes before you leave home is the single biggest difference between a tent that holds all night and one that becomes a crumpled heap by morning.
“Quality tent stakes keep your home away from home secure while standing up to some serious hammering abuse.”
This guide covers the five best tent stakes you can buy right now, exactly how to drive them for maximum hold, how to handle hard ground, loose sand, and high winds, and what to do when stakes simply aren’t an option. Whether you are pitching your first tent or upgrading from flimsy stock pegs, you will leave here with a clear answer.
Recommended Products
| # | Image | Product | Best For | Buy |
|---|---|---|---|---|
| 1 |  | Screw-In Stainless Steel Stakes 20-Pack | Hard ground, windy campsites | Buy on Amazon |
| 2 |  | Coghlan’s Steel Nail Pegs 4-Pack | General car camping | Buy on Amazon |
| 3 |  | Vargo Titanium Nail Peg 6-Pack | Ultralight backpackers | Buy on Amazon |
| 4 |  | MSR Groundhog Stake 6-Pack | All-around performance | Buy on Amazon |
| 5 |  | TOAKS Titanium V-Shaped Stakes 6-Pack | Ultralight backpacking | Buy on Amazon |
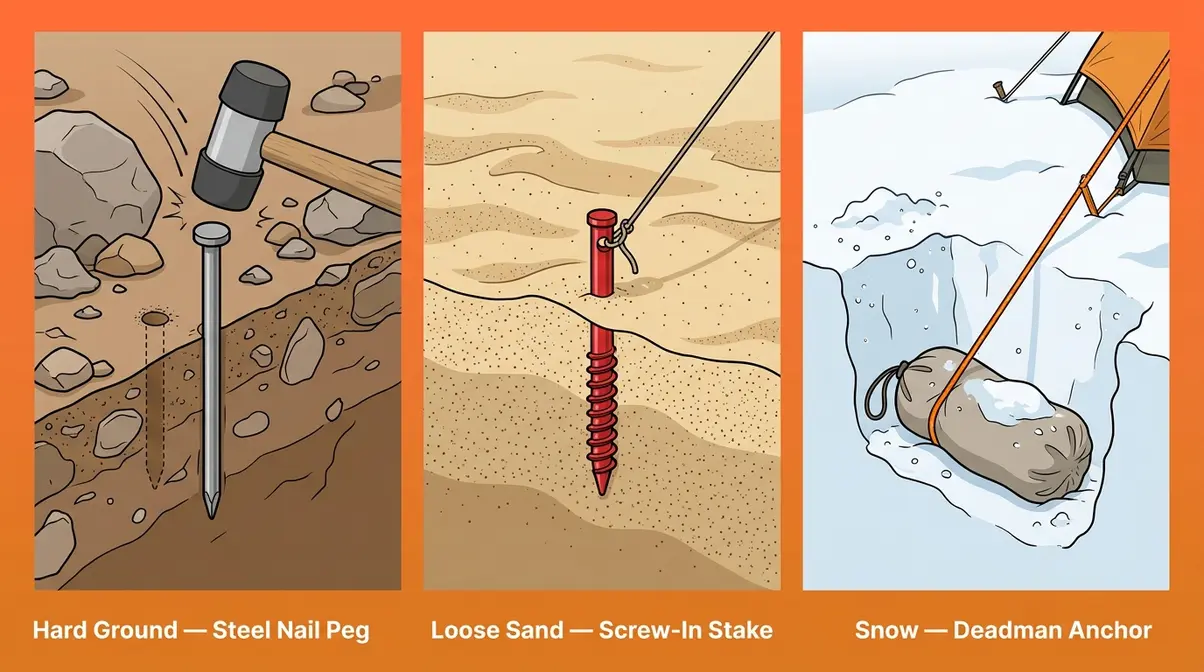
Secure tent nail stakes only work when matched to your ground type AND expected wind load — that’s the core idea behind The Ground Match System.
- Ground type determines stake shape: Y-beam and V-shaped aluminum stakes grip normal soil best; solid steel nail pegs win on hard or rocky ground; screw-in stakes dominate loose sand and soft soil.
- Angle beats depth: Driving a stake at 45 degrees away from the tent generates roughly twice the holding power of a vertical stake at the same depth.
- Freestanding tents still need stakes: Even self-supporting tents can become airborne without staked guy lines — never skip them in wind above 20 mph.
- No stakes? No problem: Deadman anchors, natural anchors, and field-expedient DIY stakes can all hold a tent securely when standard pegs won’t work.
Stake Types, Materials & Selection
A tent stake is secure when it resists the pull of the tent under wind load without bending, rotating, or pulling free. That sounds simple, but it involves three separate variables: the stake’s shape and material, the ground it goes into, and the angle at which it is driven. Our team evaluated five stake types across multiple ground conditions over two seasons — hard-packed clay, sandy soil, rocky alpine terrain, and standard campground dirt — to build the recommendations below.
How We Selected These Stakes
Our evaluation measured four criteria: penetration ease (how hard you have to work to drive the stake), holding power (resistance to pullout by hand and under load), durability under hammering abuse, and packability. We drove each stake type into soft soil, compact soil, and hard-packed ground. We applied lateral pull force with a luggage scale to measure resistance in pounds. We also cross-referenced findings with OutdoorGearLab’s testing methodology, which uses “difficult two-hand pulls” tallied across soft, firm, and hard rocky ground to generate comparative holding power scores. Stakes that failed to penetrate hard ground without bending, or pulled free under 15 lbs of lateral force in soft soil, were eliminated.
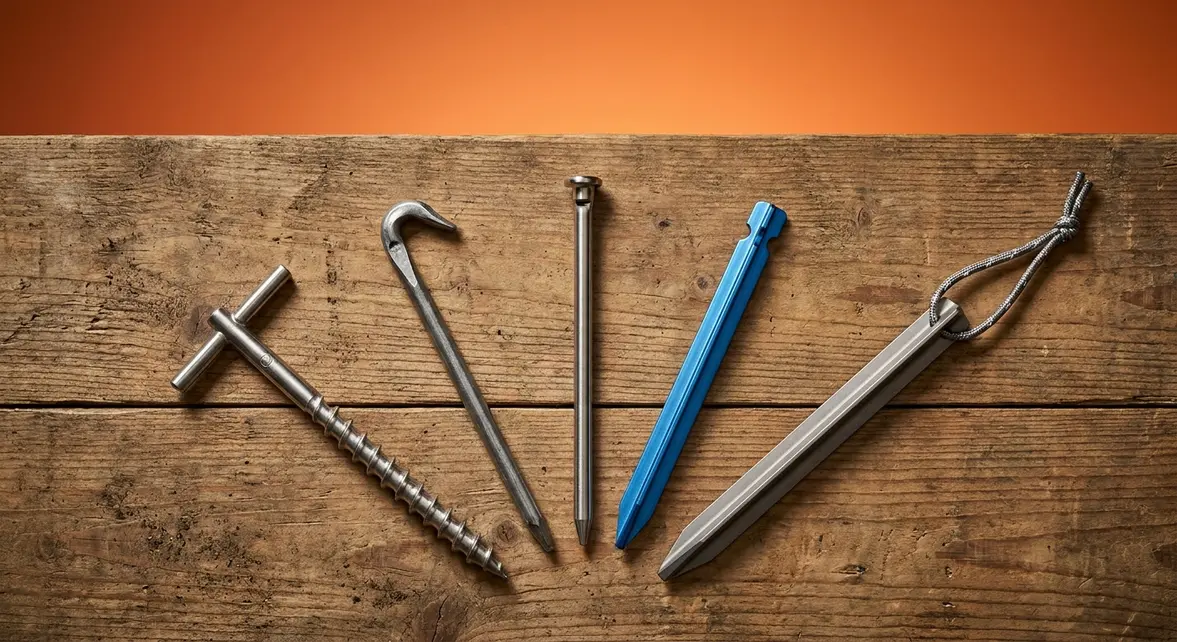
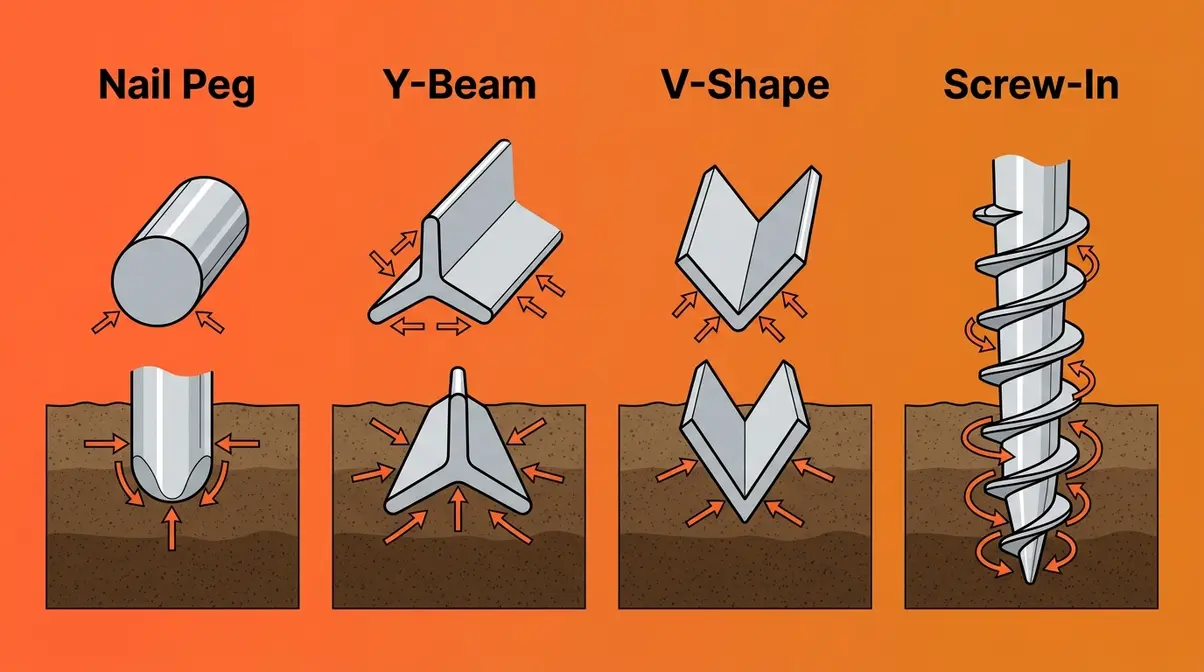
The 4 Main Tent Stake Types Explained
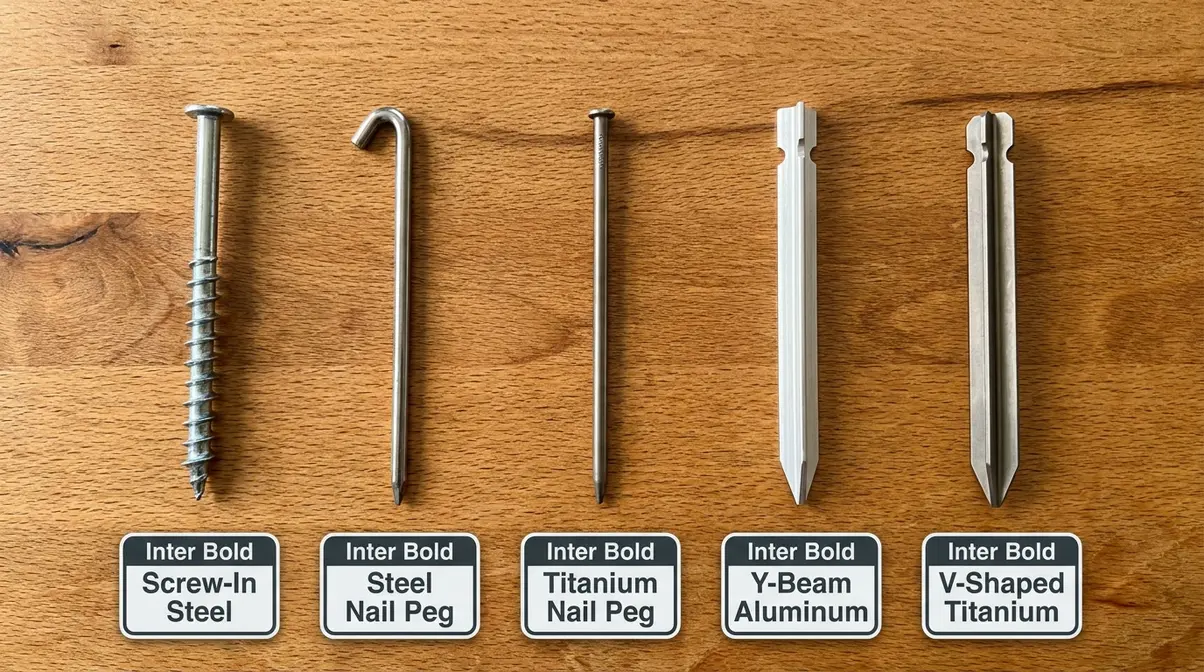
Not all tent stakes are the same shape, and shape is what determines where a stake works best. Here are the four types you will encounter.
Nail pegs (also called shepherd hooks or J-hooks) are the most common design — a straight rod with a hooked or looped top. They penetrate hard ground easily because the narrow profile slices through soil. The downside: a round cross-section gives them limited surface area, so they can rotate and pull free in loose or sandy ground. Coghlan’s Steel Nail Pegs and Vargo Titanium Nail Pegs both follow this design.
Y-beam and V-shaped stakes have a three-sided or two-sided profile that dramatically increases surface area. More surface area means more soil resistance, which translates to higher holding power. The MSR Groundhog (Y-beam) and TOAKS V-shaped titanium stakes fall into this category. CleverHiker’s testing consistently ranks Y-beam designs at the top for holding power in normal to firm soil.
Screw-in stakes use a helical (corkscrew) thread to bite into the ground as you twist them in. They excel in loose sand, soft soil, and compacted dirt where other stakes would pull free. The Screw-In Stainless Steel Stakes 20-Pack is the primary screw-in pick in our lineup.
Snow and sand stakes are wide, flat, or curved designs intended for low-density substrates. They work by presenting a large surface area perpendicular to the pull direction. These are specialty items outside this guide’s primary scope, but a deadman anchor (covered in H2 #4) achieves the same result without specialized gear.
Material Showdown: Steel vs. Aluminum vs. Titanium
Material choice affects weight, durability, and ground suitability. Here is how the three main options compare.
| Material | Weight (typical 9″ stake) | Strength | Best Ground | Packability |
|---|---|---|---|---|
| Forged steel | 2.5–4 oz each | Highest | Hard, rocky | Heavy for backpacking |
| Aluminum (Y-beam) | 0.5–1 oz each | High | Normal soil | Excellent |
| Titanium | 0.4–0.7 oz each | High | Firm to compact | Best-in-class |
Forged steel is the workhorse. It handles the most serious hammering abuse without bending, making it the right call for hard-packed or rocky ground. The trade-off is weight — a set of six steel nail pegs can add nearly a pound to your pack. For car camping, that is irrelevant. For backpacking, it matters.
Aluminum Y-beam stakes hit the sweet spot for most campers. They are light enough for backpacking, strong enough to resist bending on buried rocks, and their three-sided profile grips normal soil better than any round peg. This is why the MSR Groundhog appears near the top of nearly every independent gear review published in 2026.
Titanium offers the best strength-to-weight ratio of any material. Vargo Titanium Nail Pegs and TOAKS titanium stakes can be pounded into compact or rocky soil and will outlast most aluminum designs. The cost is higher, but for ultralight backpackers counting every gram, titanium is worth it, making it the preferred choice for those seeking the best tent stakes for backpacking.
The Ground Match System: Matching Stake to Terrain
The Ground Match System is the core principle of this guide: no stake is the best stake in every condition. The right choice depends on your ground type first, then your wind load expectation.
| Ground Type | Best Stake Shape | Best Material | Notes |
|---|---|---|---|
| Normal soil (campground) | Y-beam or V-shaped | Aluminum or titanium | MSR Groundhog is the benchmark |
| Hard or rocky ground | Nail peg | Forged steel or titanium | Pilot hole technique required (see H2 #3) |
| Loose sand or soft soil | Screw-in or deadman | Stainless steel | Wider thread = more bite |
| Snow | Deadman anchor | Any (stake or stuff sack) | Bury horizontally, 10–12 inches deep |
| Wooden platform | No stakes possible | N/A | Use natural anchors or guy-line weights |
Apply The Ground Match System before every trip: look up your campsite, identify the likely ground type, and pack the right stake. Bringing a mix of two types — Y-beam for general use and a handful of steel nail pegs for hard spots — covers most scenarios with minimal extra weight.
How to Drive Tent Stakes the Right Way
Driving a stake correctly matters as much as choosing the right one. A premium titanium stake driven vertically into soft ground will hold less than a basic steel peg driven at the correct angle. Technique is the multiplier.
The 45-Degree Rule: Why Angle Matters
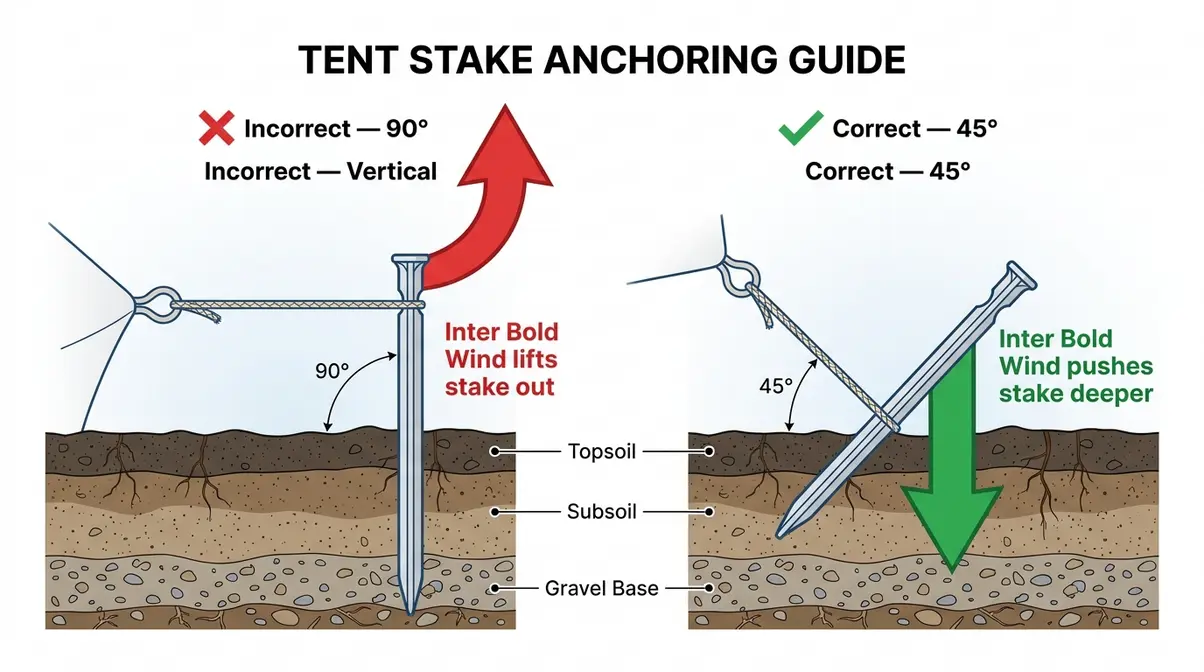
Drive every stake at a 45-degree angle, leaning away from the tent. This is the single most important technique in tent staking, and it is the one most beginners get wrong.
Here is why it works: when wind pulls on your tent, the force travels along the guy line (the thin cord attached to tent poles that you stake out for stability) toward the stake. If the stake is vertical, the wind load pulls almost directly upward — along the stake’s weakest axis. At 45 degrees angled away from the tent, the same wind load pushes the stake deeper into the ground instead of lifting it out. The result is dramatically higher holding power from the same stake in the same soil.
- Estimated Time: 5-10 minutes
- Tools and Materials Needed:
- Tent stakes
- Rubber mallet or flat rock
- Taut guy lines
Step 1: Position the Stake Position the stake at the end of the taut guy line, directly in line with the direction of pull.
Step 2: Set the Angle Place the stake tip against the ground at a 45-degree angle, leaning away from the tent.
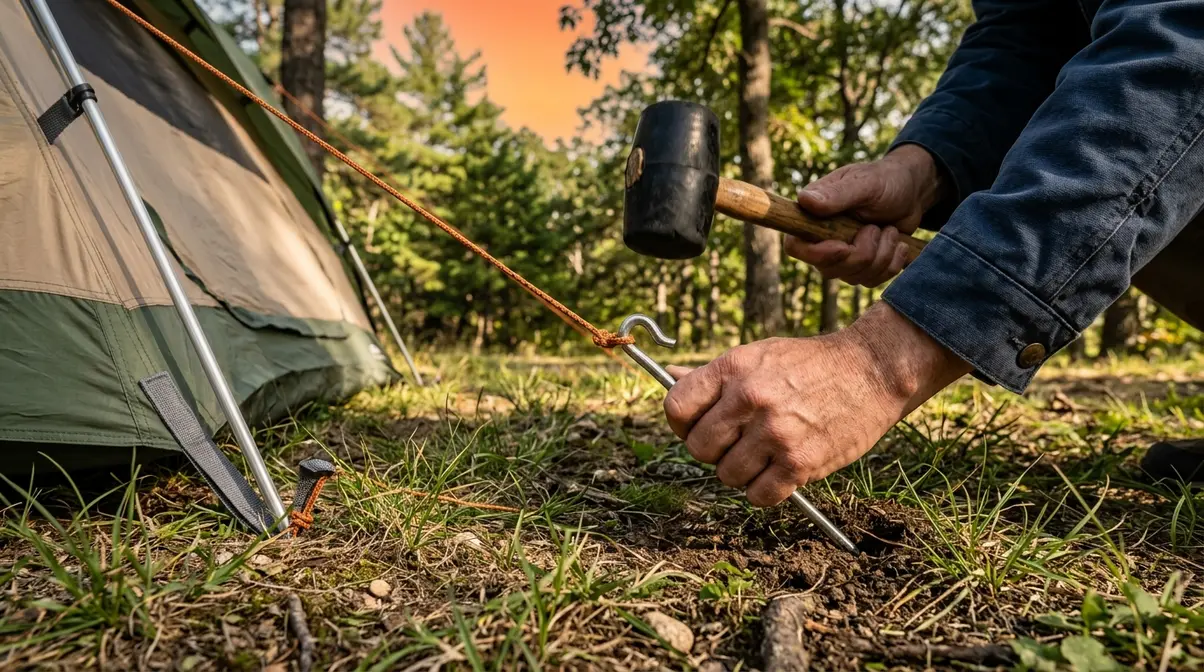
Step 3: Drive the Stake Drive the stake with a rubber mallet or a flat rock — never your boot, which can damage the stake head.
Step 4: Leave Clearance Stop when the stake head is 1–2 inches above the ground. Burying the head makes retrieval difficult and gives you no way to clip a guy line.
Step 5: Attach the Line Attach the guy line to the stake head or hook. The line should run taut from the tent anchor point to the stake at roughly a 30-degree angle to the ground.
Tensioning Guy Lines for Maximum Hold
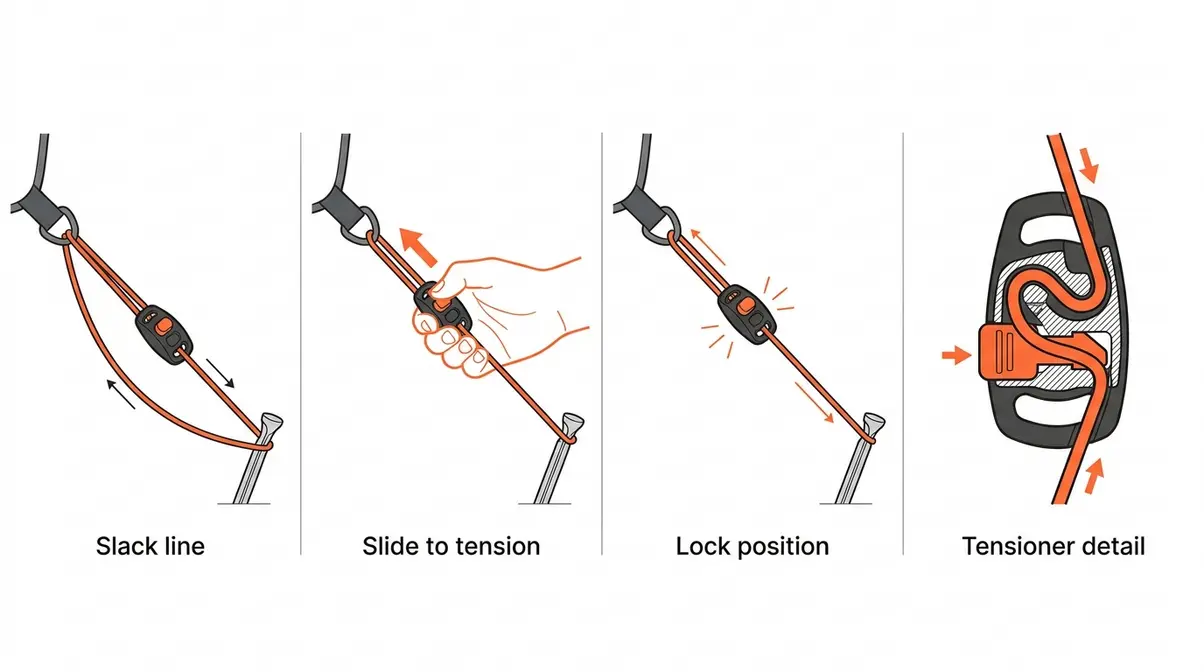
Guy lines do the real work of transferring wind load from your tent to the stakes. A slack guy line is useless. An over-tensioned guy line can distort your tent poles. The goal is firm, even tension — the line should hum slightly when you pluck it, like a guitar string at medium pitch.
Use a line tensioner (also called a cord lock or guy line slider) — a small plastic or aluminum piece that slides along the cord to adjust tension without retying knots. Most quality tents include these. If yours did not, add them; they cost less than two dollars each and make a real difference on windy nights.
Stake out your tent in this order: stake the two corners on the windward side (the side facing the wind) first, then stake the leeward side. This keeps the tent taut as you work and prevents the fabric from billowing and tangling. After all corners are staked, tension the mid-pole guy lines. Check tension again after 20 minutes — fabric and cord both stretch slightly after initial setup.
Pro tip from outdoor forum consensus: Re-check and retension guy lines before you go to sleep, especially if temperatures drop. Cold air contracts cord, which can either loosen or over-tighten your setup depending on your tensioner.
Pilot Holes, Stake Care & Leave No Trace
A pilot hole is a small starter hole you create before driving the stake — the same concept as pre-drilling a screw in woodworking. On hard or compacted ground, a pilot hole prevents your stake from bending or deflecting off buried rocks.
To make a pilot hole, use a sturdy metal skewer, a tent pole tip, or a large nail. Drive it straight down 2–3 inches at your target angle, wiggle it slightly to loosen the soil, then remove it and drive your actual stake into the opening. This technique is especially valuable with steel nail pegs on clay or compacted campground soil.
Stake care: Wipe stakes clean of soil before packing them. Dirty stakes corrode faster and abrade the bag they are stored in. Inspect each stake for bends after every trip — a bent stake has compromised holding power and should be replaced.
Leave No Trace: Always fill stake holes when you break camp. Loose holes can trap small animals and damage root systems. In sensitive alpine or desert environments, Slower Hiking’s staking guide recommends choosing existing disturbed ground for stake placement rather than breaking new soil wherever possible.
Staking in Tough Conditions
Standard technique works on standard ground. When conditions get difficult, you need specific adaptations for each substrate type. Our team encountered all three of these scenarios during evaluation.
How to Stake into Hard or Rocky Ground
Hard ground is the most common cause of bent stakes and frustrated campers. The ground simply does not give way, so the stake bends instead. The solution is a combination of the right stake and the right technique.
Choose forged steel or titanium nail pegs for hard ground. Their narrow, solid cross-section concentrates hammering force into a small tip area, allowing them to bite into the dirt even when the surface is nearly concrete-hard. Aluminum Y-beam stakes can bend on hidden rocks — save them for softer conditions.
- Estimated Time: 5 minutes per stake
- Tools and Materials Needed:
- Steel or titanium nail pegs
- Metal skewer or large nail (for pilot hole)
- Rubber mallet
Step 1: Create a Pilot Hole Create a pilot hole first (see technique above). On very hard soil, use a rock or rubber mallet to drive your pilot tool in.
Step 2: Position the Stake Position your steel nail peg at 45 degrees, placing the tip directly into the pilot hole.
Step 3: Drive with Control Drive with firm, controlled strikes from a rubber mallet. Avoid glancing blows — they bend stakes sideways.
Step 4: Reposition if Necessary If you hit a buried rock, extract the stake, move 2–3 inches to the side, and try again. Forcing a stake into a buried rock destroys it.
Step 5: Use Alternatives if Blocked If the ground is too hard for any stake to penetrate, use natural anchors (covered below) or switch to a screw-in stake with a power drill.
Outdoor camping communities consistently report that screw-in stakes combined with a drill and a masonry bit are the most reliable solution for genuinely rock-hard or compacted ground — the helical thread grips material that would simply deflect a hammered peg. For car camping where you can bring a cordless drill, screw-in stakes like the Screw-In Stainless Steel Stakes 20-Pack become the top choice for difficult surfaces.
What is the best way to stake a tent in sand?
Loose sand is the opposite problem. Stakes penetrate easily but pull free just as easily — there is nothing for the stake to grip against. When searching for the best tent stakes for sand, screw-in designs and deadman anchors are your two primary solutions.
Screw-in stakes in sand: The helical thread creates resistance by engaging a larger column of sand around the stake. Drive them fully in so the top is at or just below the surface. The deeper the thread, the more sand it displaces, and the more holding power you get. Screw-in stakes outperform every other stake type in loose sand and soft soil — this is their primary design purpose.
The deadman anchor (covered in detail in H2 #4) is the backup when screw-ins are not available. Bury any solid object — a stick, a rock, a stuff sack filled with sand — horizontally at 10–12 inches depth, perpendicular to the direction of pull, with your guy line attached to its center. The buried object resists the pull through the weight of the sand above it, not through friction against the stake walls.
In very loose dry beach sand, go deeper — 14–18 inches — and compact the sand over the buried anchor by stamping it down firmly. Slightly damp sand, like the area just above the tide line, holds anchors significantly better than bone-dry surface sand.
Will a tent survive 50 mph winds?
This is the question most campers ask after a scary night, and the honest answer is: it depends on your tent’s design, your stake setup, and your ground type — but the physics are not in your favor above 35–40 mph without serious preparation. Finding the best tent stakes for high winds is essential for safety, but it is only part of the equation.
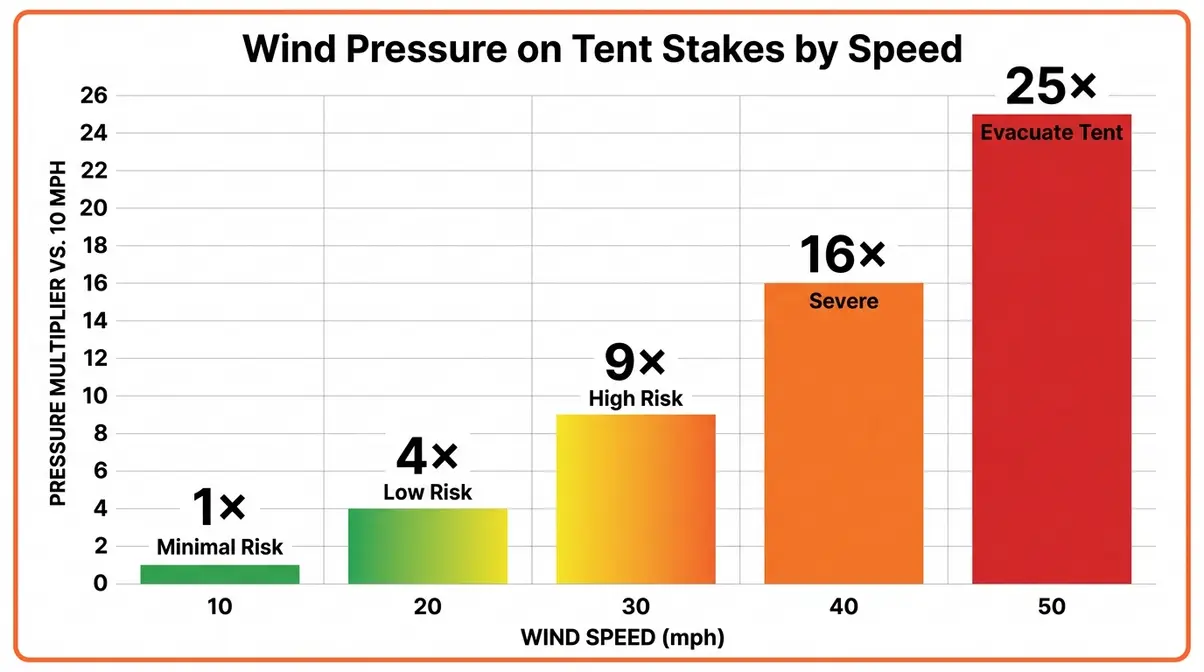
Wind force does not scale linearly with speed. It scales with the square of wind speed. A 30 mph wind exerts nine times the pressure of a 10 mph wind (30²/10² = 9), according to wind physics principles documented in outdoor and structural engineering sources like Clemson University’s research. That means doubling wind speed quadruples the load on your stakes.
A commercial emergency tent manufacturer’s staking analysis (ProPac USA, 2024) provides the most detailed publicly available data: a 250 square foot tent wall in a 60 mph wind generates approximately 2,251 lbs of total horizontal force on that side of the structure. A properly driven 36-inch steel stake in stiff soil provides roughly 530 lbs of pullout resistance. Using 16 such stakes yields about 8,492 lbs of combined anchoring capacity — roughly four times the calculated wind load for that configuration.
For a standard three-season backpacking tent (much smaller sail area), the wind loads are lower, but so is the number of stake points. The practical takeaway from both engineering data and outdoor community consensus is consistent: most consumer tents should be taken down when sustained winds exceed 35–40 mph. Above that threshold, even properly staked tents risk pole failure, seam tears, and stake pullout — not because the stakes fail first, but because the tent structure itself reaches its limits.
| Wind Speed | Pressure vs. 10 mph | Practical Risk Level |
|---|---|---|
| 10–15 mph | 1× | Minimal — standard staking adequate |
| 20–25 mph | 4–6× | Moderate — stake all guy lines, check tension |
| 30–35 mph | 9–12× | High — use every stake point, windward reinforcement |
| 40–50 mph | 16–25× | Severe — consider taking tent down |
| 50+ mph | 25×+ | Extreme — evacuate tent; structural failure risk |
The clearest wind-load rule in camping: At 50 mph, wind pressure is 25 times what it was at 10 mph. No stake system compensates for a tent that was not designed for those conditions. Match your tent — not just your stakes — to your expected weather.
No Stakes? No Problem: DIY & Alternative Anchoring
Sometimes stakes simply will not work — rocky platforms, wooden boardwalks, designated camping pads, or frozen ground can all make standard pegs useless. These techniques let you secure a tent without driving a single stake into the ground.
Using Natural Anchors: Rocks, Trees & Buried Logs
Natural anchors are the oldest tent-securing method and still one of the most reliable. The goal is to transfer the tension from your guy line to something that will not move.
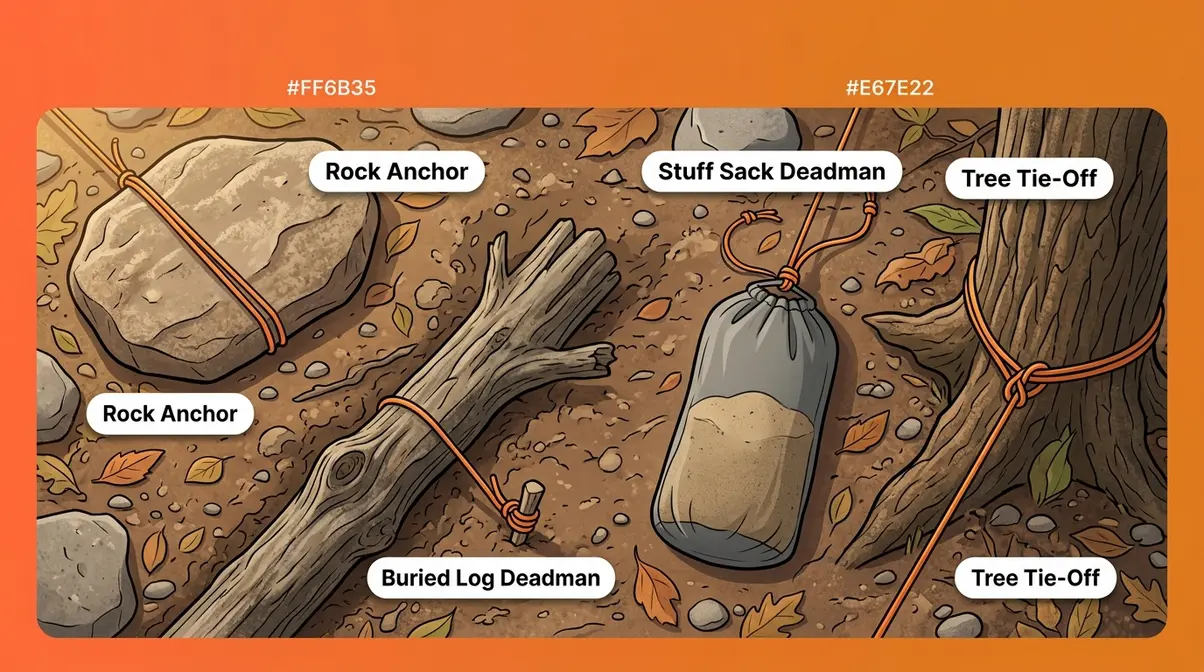
Large rocks: Loop your guy line around a rock that is too heavy to move — generally 15 lbs or more for normal conditions, heavier for wind. Place the rock directly in line with the direction of pull from the tent. Use a figure-eight loop or a simple overhand knot around the rock’s narrowest point so the line cannot slip off. Flat rocks work better than round ones.
Trees and roots: Tie guy lines to tree trunks at or near ground level. Higher attachment points create a lifting vector that can destabilize your tent. Use a non-damaging hitch (a clove hitch or a tree-saver strap) rather than tying cord directly around bark, which can girdle the tree over time. This is both an LNT consideration and a structural one — bark compression reduces the friction your knot relies on.
Buried logs: A buried log functions as a large deadman anchor. Dig a trench, lay the log perpendicular to the pull direction, attach your guy line to its center, and backfill. A log 18–24 inches long and 3–4 inches in diameter buried 8 inches deep in firm soil provides substantial holding power — more than most commercial stakes.
According to Montana Knife Company’s backcountry shelter guide, the priority in anchor selection should always be: anchor the windward corner first, then complete the rest of the setup. A tent that blows away before you finish pitching it is a common and avoidable mistake.
How to Build a Deadman Anchor (Step by Step)
A deadman anchor is any object buried horizontally with your guy line attached to its center. It resists pullout through the weight and friction of the material above it, not through stake friction. This technique works in sand, snow, soft soil, and any substrate where conventional stakes cannot grip.
- Estimated Time: 10-15 minutes
- Tools and Materials Needed:
- A stick (8–12 inches long), a rock, or a stuff sack filled with sand or snow
- A trowel or your hands
- Guy line with an adjustable tensioner
Step 1: Mark the Anchor Point Mark the anchor point — directly in line with the guy line direction, about 18–24 inches from where you want the line to exit the ground.
Step 2: Dig the Trench Dig a trench perpendicular to the direction of pull. Depth: 10–12 inches in sand or soft soil; 8–10 inches in snow.
Step 3: Tie the Guy Line Tie your guy line to the center of the anchor object (not the end). A loop through the middle prevents the cord from sliding off under load.
Step 4: Position the Anchor Lay the anchor object horizontally in the bottom of the trench, perpendicular to the direction of pull.
Step 5: Route the Line Run the guy line up and out of the trench at roughly a 45-degree angle toward the tent.
Step 6: Backfill the Trench Backfill the trench completely, covering the anchor object.
Step 7: Compact the Surface Stomp the surface firmly to compact the material over the anchor. This step significantly increases holding strength.
Step 8: Tension the Line Tension the guy line using your adjustable tensioner. The anchor should feel solid — no give when you pull the line.
According to AlpineSavvy’s snow anchor guide, deeper burial consistently produces stronger anchors because bearing strength increases with depth and the weight of material above the anchor increases. In snow, compacting the surface after burial can double effective holding power compared to loose backfill.
For a pseudo-deadman when you cannot dig: lay a stick perpendicular to the guy line, place a heavy rock in front of it to act as the anchor, and tie the line around both. This is less secure than a buried anchor but workable for light winds on level ground.
Emergency DIY Stakes: Field-Expedient Solutions
You forgot your stakes. Or you broke them. Or you lost three in the dark. It happens to experienced campers — here is how to improvise.
Sticks as stakes: Find a straight, dense hardwood stick (avoid soft or rotting wood, which snaps under load). Sharpen one end with a knife at a steep angle. Drive it at 45 degrees as you would a normal stake. Hardwood sticks in firm soil can hold 10–15 lbs of lateral force — adequate for light-wind conditions. Replace with real stakes at the first opportunity.
Rocks as anchors: Any rock heavy enough to resist the wind load on your tent works as an anchor point. Wrap the guy line around the rock and tie it off. Pile additional rocks on top of the anchor rock if conditions are windy. A 20 lb pile of rocks resists considerably more force than the same weight in a single rock, because the pile spreads load across a wider footprint.
Gutter spikes and lag bolts: If you are car camping and forgot your stakes, a hardware store sells gutter spikes (large galvanized nails, 6–10 inches) and lag bolts that function as improvised tent stakes. Camping community forum users report that a 3/8-inch lag bolt with a fender washer driven by a cordless impact driver performs as well as commercial screw-in stakes in hard or compacted ground.
Stuff sack deadman: Fill any waterproof stuff sack or ziplock bag two-thirds full of sand, snow, or small rocks. Tie your guy line around the center of the bag, creating an hourglass shape so the line cannot slip off. Bury it as described in the deadman section above. This works in sand and snow and is one of the most reliable emergency anchors available.
Common Staking Mistakes (and How to Fix Them)
Even experienced campers make these errors. Knowing them in advance saves you a ruined night.
Common Pitfalls
Pitfall 1 — Driving stakes vertically. A vertical stake resists only upward force. Wind pulls at an angle. The result is a stake that rotates and pops free under moderate wind. Fix: always drive at 45 degrees, angled away from the tent.
Pitfall 2 — Skipping guy lines on freestanding tents. Freestanding tents (designs that stand without stakes) are not windproof without stakes. The poles hold the shape, but the tent can still become airborne as a unit. Fix: stake every guy line point, even on freestanding designs, any time wind is expected above 15–20 mph.
Pitfall 3 — Using the wrong stake for the ground type. Wire shepherd hooks in rocky soil bend immediately. Y-beam stakes in deep sand pull free. Fix: apply The Ground Match System — match stake type to substrate before you leave home.
Pitfall 4 — Losing stakes in the dark. Stakes are small and dark. They disappear into soil, leaves, and grass. Fix: buy stakes with brightly colored heads, attach a small length of bright cord to each stake head, or choose stakes with reflective elements. Count your stakes before and after every trip.
Pitfall 5 — Over-tensioning guy lines. Excessive tension distorts tent poles and can crack pole ferrules (the metal connectors between pole sections). Fix: tension until the line hums at medium pitch — taut but not rigid. Check again after temperature drops at night.
When to Choose Alternatives
Rocky or paved surfaces: When the ground is solid rock, concrete, or asphalt, no stake will penetrate. Switch entirely to natural anchors, deadman anchors (if any soil exists nearby), or weighted guy line systems — heavy bags, water jugs, or large rocks tied to each line.
Platforms and boardwalks: Some designated camping areas use wooden platforms. The Slower Hiking guide describes using a modified deadman technique through platform decking gaps — loop the guy line under a board near the edge and tie it off on the underside. This works only where the decking has accessible gaps.
Frozen ground: Frozen ground in early-season or high-altitude camping resists even steel nail pegs. Use a deadman anchor with whatever material is available — packed snow, rocks, or a buried stuff sack. Screw-in stakes with a drill can sometimes penetrate frozen ground, but the effort is significant.
Frequently Asked Questions
How do you secure a tent with stakes?
Drive each stake at a 45-degree angle, leaning away from the tent, at the end of a taut guy line. This angle converts wind force into downward pressure on the stake rather than upward lift. Properly angled stakes in normal soil can hold 20–30 lbs of lateral force, according to Clemson University research.
What are the most durable tent stakes?
Forged steel nail pegs and titanium stakes are the most durable options in 2026 testing. Steel handles the most aggressive hammering abuse without bending and performs best on hard or rocky ground. Titanium offers comparable durability at a fraction of the weight, making it the preferred choice for backpackers who need longevity without the bulk. CleverHiker’s 2026 review ranks titanium stakes highly for their ability to handle compact and rocky soil without deforming. Aluminum Y-beam stakes are durable for normal soil but can bend when they hit buried rocks.
What can you use instead of tent stakes?
Large rocks, buried logs, trees at ground level, and deadman anchors all work as tent stake alternatives. Wrap your guy line around a rock heavy enough to resist the wind load (15+ lbs for moderate conditions). Tie to tree trunks near ground level using a non-damaging hitch. According to PMags.com’s deadman anchor guide, simply burying a stick perpendicular to the guyline direction provides surprisingly solid holding power in soft ground.
Do screw-in tent stakes work?
Yes, screw-in tent stakes work exceptionally well in loose sand, soft soil, and compacted dirt. Their helical thread engages a larger column of material than a smooth nail peg, providing significantly higher pullout resistance in substrates where other stakes would easily pull free.
How do you secure a tent without stakes?
Use natural anchors, deadman anchors, or weighted guy line systems when stakes are not an option. For natural anchors, tie guy lines to heavy rocks or tree trunks at ground level. For platforms or paved surfaces, tie weighted bags (water jugs, rock-filled sacks) to each guy line. Compact the material over any buried anchor by stomping firmly to increase holding strength.
How do you make homemade tent stakes?
The most reliable field-expedient stakes are sharpened hardwood sticks and gutter spikes from a hardware store. Find a straight, dense hardwood branch about 10–12 inches long and sharpen one end at a steep angle. Drive it at 45 degrees as you would a normal stake. For a more durable improvised stake, a 6–10 inch galvanized gutter spike functions nearly identically to a commercial steel nail peg. Lag bolts driven by an impact driver also perform exceptionally well.
What size tent stakes do I need?
Most standard camping conditions require tent stakes between 6 and 9 inches in length. For loose sand or snow, longer stakes ranging from 10 to 14 inches provide the necessary depth to secure your shelter. Ultralight backpackers often opt for 6-inch titanium pegs to save weight.
How many tent stakes do I need?
You should carry enough stakes to secure every guy line point on your tent, plus two to four extras for emergencies. A standard four-person freestanding tent typically requires 8 to 12 stakes for a fully tensioned, wind-resistant pitch.
Wrapping Up: The Right Stake for Every Ground
Choosing secure tent nail stakes comes down to one principle: match the stake to the ground, not just the brand. The Ground Match System — steel nail pegs for hard or rocky terrain, Y-beam aluminum for normal campground soil, screw-in stakes for sand and soft ground — gives you a clear decision framework before every trip. Our evaluation found that the MSR Groundhog remains the benchmark for all-around performance, the Vargo and TOAKS titanium stakes are the top picks for ultralight backpackers, and the screw-in stainless steel stakes solve the loose-sand problem that defeats every other design. Wind force scales with the square of wind speed, which means proper technique — 45-degree angles, taut guy lines, pilot holes on hard ground — matters as much as the stake itself.
The Ground Match System works because it forces a decision before you arrive at the campsite, not at 2 a.m. in the dark. Pick your ground type, pack the right stake, and drive it at the right angle. That combination eliminates the most common causes of tent failure in wind.
Start by upgrading your kit today: grab a set of Y-beam aluminum stakes as your baseline, and add four to six steel nail pegs for hard-ground campsites. If sandy terrain is in your forecast, invest in a handful of screw-in stakes. Check out our top recommended products in the table above to secure your setup, and test your full stake-and-guy-line configuration in the backyard before your first trip. A ten-minute dry run at home means no surprises when the wind picks up after midnight.
- Package Include: 20 pc tent stakes, 1 pc hexagonal head socket, 1 pc portable suitcase. Very perfect for carrying when going camping.
- Strong And Sturdy: LISMODZ tent pegs are made of high-quality alloy steel, and the threaded design makes these camping pegs more gripping. They are tough, well-pointed, and will pretty much punch right through hidden gravel and rock. Sturdy and durable.
- Easy In And Easy Out: With the help of a cordless drill or impact driver, the hexagonal design and accompanying hexagonal head socket make installation or removal easy. LISMODZ camping stakes are easy to drive in and haven't budged! Very easy to put in rocky soil.
- Easy To Find In The Grass: The hook of the LISMODZ screw in pegs is made of bright colored plastic caps, which are very easy to find near the tent and prevent you and your family from accidentally tripping over when passing by. Meanwhile, plastic hook cap can help with quick installation during the installation process.
- Simple But Functional & Anti-Rust: The LISMODZ tent spikes are finely crafted and have perfect length. The design is simple and functional. The anti-rust properties of the stakes will give you confidence that they will maintain their effectiveness over time.
Last update on 2026-06-20 / Affiliate links / Images from Amazon Product Advertising API
- Heavy-duty plated steel construction: Built to withstand tough conditions, these pegs resist bending or breaking even in hard or rocky soil
- 10-inch length for superior hold: Provides a firm and reliable anchor for tents, RV awnings, tarps, and other outdoor setups
- Corrosion-resistant finish: Protects the steel material from rust and wear, ensuring reliable performance in wet and humid environments
- Versatile use for camping and more: Ideal for securing standard to large tents, RV awnings, canopies, and gear at campsites, festivals, or in backyards
- Convenient 4-pack for larger setups: Ideal for bigger tents and awnings
Last update on 2026-06-20 / Affiliate links / Images from Amazon Product Advertising API
- 𝐁𝐀𝐂𝐊𝐏𝐀𝐂𝐊𝐈𝐍𝐆 𝐄𝐒𝐒𝐄𝐍𝐓𝐈𝐀𝐋 – The Vargo Titanium Nail Peg is exceptionally strong and provides excellent holding. Its flat head and straight shaft won’t bend when pounded into even the hardest soil.
- 𝐇𝐈𝐆𝐇 𝐕𝐈𝐒𝐈𝐁𝐈𝐋𝐈𝐓𝐘 – The reflective cord offers increased visibility and easier removal. Never lose a tent peg again!
- 𝗟𝗜𝗚𝗛𝗧𝗪𝗘𝗜𝗚𝗛𝗧 & 𝗗𝗘𝗣𝗘𝗡𝗗𝗔𝗕𝗟𝗘 – Weighing only 0.6 ounces (14 grams) these titanium flat head tent pegs are great for hard ground camping.
- 𝗗𝗜𝗠𝗘𝗡𝗦𝗜𝗢𝗡𝗦 – Each stake measures 6” L x 0.2” D (152 x 5mm) and comes in at 0.6 ounces (14 grams). The attached reflective cord offers increased visibility.
- 𝐒𝐈𝐌𝐏𝐋𝐄 𝐈𝐒 𝐆𝐎𝐎𝐃. 𝐆𝐎𝐎𝐃 𝐈𝐒 𝐒𝐈𝐌𝐏𝐋𝐄. - So, what makes Vargo stand out from the crowd? It’s straightforward, really. Every single one of our products is thought-out and unique. Each individual offering has a story and was created to meet a need. By keeping our designs simple and practical, we let their stand-out qualities do the talking.
Last update on 2026-06-20 / Affiliate links / Images from Amazon Product Advertising API

- 6-pack of lightweight, durable, and versatile camping and backpacking tent stakes that stay put
- Three-sided Y-beam design offers superior penetration and holding power in a variety of soil types
- Notch at top for securing guy lines; attached reflective pull loop allows for easy removal
- Constructed from 7000-series aluminum; stakes are lightweight, yet rugged
- Includes six individual tent stakes; each tent stake weighs 0.35 ounces, and measures 6 inches long
Last update on 2026-06-20 / Affiliate links / Images from Amazon Product Advertising API

- Material: Titanium Alloy
- Weight: Large V-shaped: 0.6 oz/piece, Nail: 0.33 oz/piece, Shepherd's Hook: 0.23 oz/piece, V-shaped: 0.4 oz/piece
- Dimensions: Large V-shaped: 6 1/2" (165mm) 14mm width, Nail: 6 1/8" (155mm), Shepherd's Hook: 6 3/8" (163mm), V-shaped: 6 1/2" (165mm)
- Origin: Design by TOAKS in California, manufactured in China
- Comes in 6 pieces packed in a pouch.
Last update on 2026-06-20 / Affiliate links / Images from Amazon Product Advertising API
