This blog post may contain affiliate links. As an Amazon Associate I earn from qualifying purchases.
📋 Table of Contents
- What You Need Before Setting Up Any Tarp
- The Anatomy of a Tarp Setup
- Essential Gear Checklist
- 4 Knots Every Tarp Camper Must Know
- 5 Essential Tarp Configurations
- 1. The Classic A-Frame Shelter
- 2. The Lean-To for Campfire Warmth
- 3. The Diamond Pitch: Compact and Fast
- 4. The Plow Point for Wind Shedding
- 5. The Tipi: Versatile Solo Shelter
- Advanced & Storm-Proof Tarp Configurations
- 6. The C-Fly for Heavy Rain
- 7. The Fully Enclosed Shelter
- 8. Winter Tarp Configuration
- 9. The Wind Shed (The Cave)
- Tarp Configurations for Hammock and Tent Camping
- Hammock A-Frame Setup
- Hammock Diamond Pitch
- Ground Tarp Tent Setup
- The Tarp Pitch Triangle Framework
- How the Tarp Pitch Triangle Works
- Configuration by Weather Condition
- Download Your Free Tarp Configuration PDF
- What’s Inside the Field Guide
- Get Your Free PDF (No Signup Required)
- Choosing the Right Tarp: A Quick Summary
- What Size Tarp Do I Need for Camping?
- Material Trade-Offs and Tie-Outs
- Common Mistakes When Setting Up a Tarp
- 5 Pitfalls That Lead to a Wet Night
- Can You Use a Tarp Instead of a Tent?
- When to Choose a Different Shelter
- Frequently Asked Questions
- Your Next Pitch Starts Here
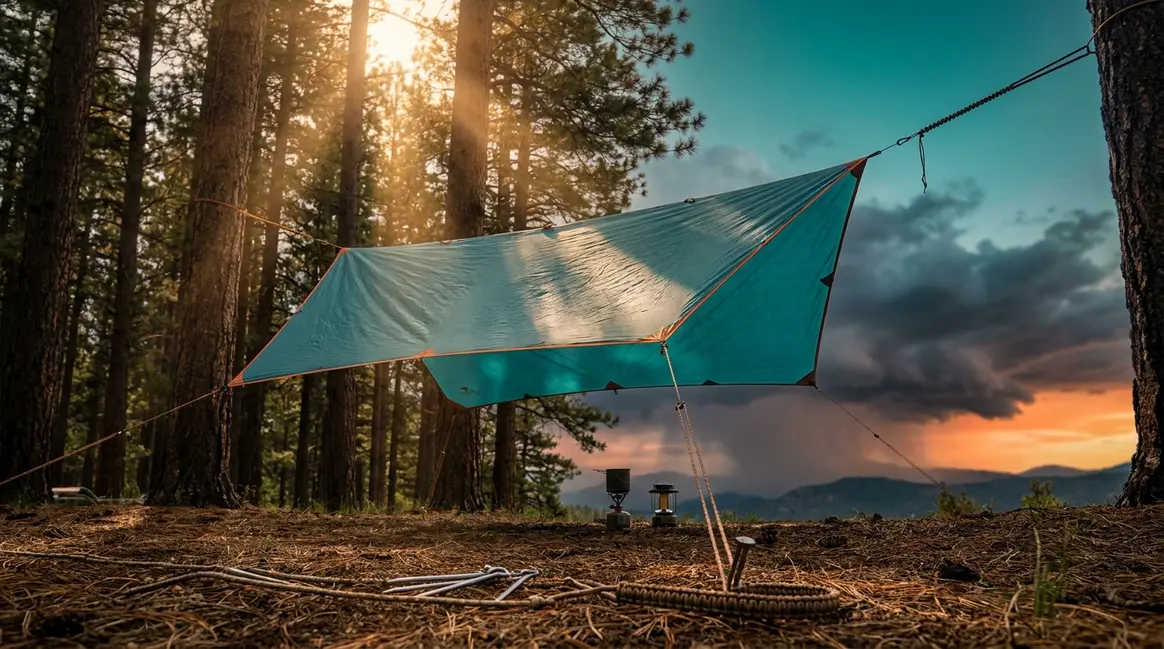
You’re standing in the woods. The sky has gone dark faster than you expected, the first drops are hitting the canopy, and your tarp is still in its stuff sack. Every second you fumble with a knot is a second closer to a soaked sleeping bag. That moment — the one most beginners dread — is exactly what this guide is built for.
“Set up your camping tarp lower to the ground with the opening facing away from the wind. Low-lying configurations with steeply angled sides shed rain the fastest — and that knowledge makes the difference between a dry night and a miserable one.”
Most guides list camping tarp configurations without telling you which one to use when the weather turns. That gap has left plenty of campers scrambling in the rain with a tangled tarp and no plan. This guide gives you step-by-step instructions and a custom diagram for each of 10 configurations — from the beginner-friendly A-Frame to storm-proof enclosed shelters — so you can pitch a dry, secure shelter in any condition. You’ll also find essential knot tutorials, a weather-specific selection framework called The Tarp Pitch Triangle, and a free downloadable PDF field guide you can take into the backcountry without cell service.
Any camper can master camping tarp configurations with the right setup matched to the right conditions — the A-Frame alone handles roughly 80% of typical camping weather.
- The Tarp Pitch Triangle framework narrows any setup choice to three variables: weather severity, wind direction, and terrain type
- Beginners start with the A-Frame or Lean-To — both require fewer than 10 minutes and minimal anchor points
- Storm conditions demand low-profile pitches like the C-Fly or Fully Enclosed setup, which seal out wind-driven rain
- Download the free PDF to take all 10 diagrams into the field — no signal required
What You Need Before Setting Up Any Tarp
Before you attempt any camping tarp configuration, you need three things: the right gear, the right vocabulary, and four reliable knots. The National Outdoor Leadership School (NOLS) — a globally respected wilderness education organization that has trained over 400,000 outdoor leaders — emphasizes that a functional waterproof shelter requires far less gear than most beginners assume. Getting these fundamentals right means faster, drier setups in the field, every single time.
A tarp, a ridgeline, two stakes, and a length of paracord are all you need for a functional waterproof shelter in the backcountry.
These same fundamentals also form the foundation of the Tarp Pitch Triangle decision framework — which you’ll find in full later in this guide.
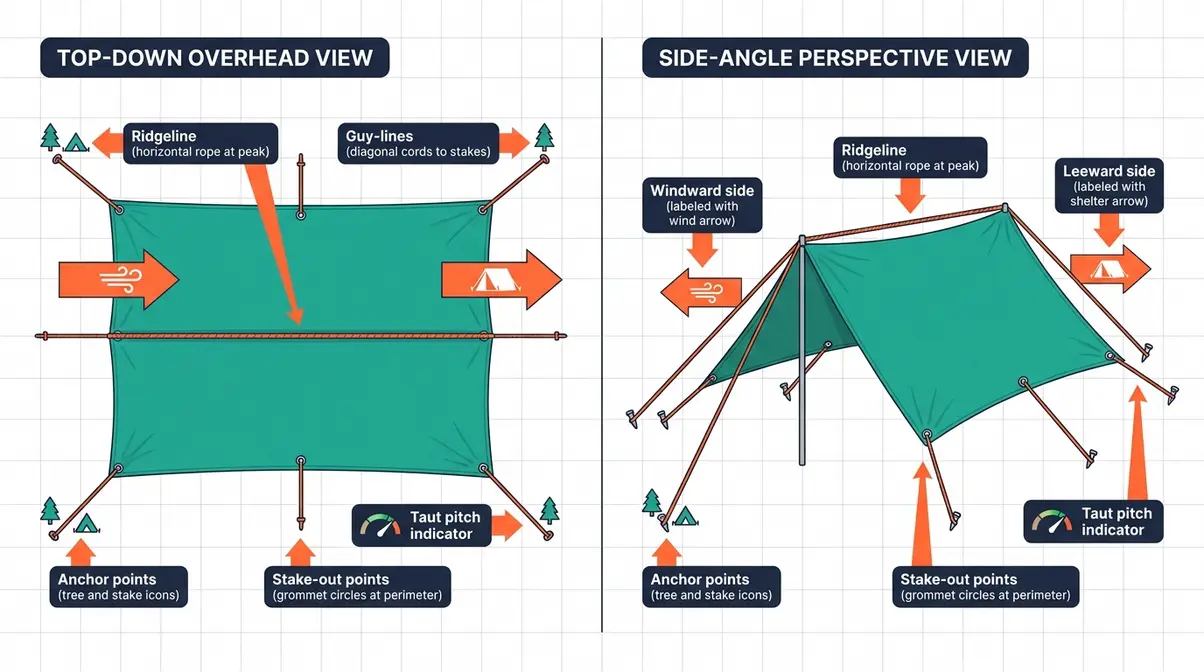
The Anatomy of a Tarp Setup
Understanding the parts of a tarp system before you’re standing in the rain is the single biggest advantage a prepared camper has over an unprepared one. Here are the terms you’ll see throughout every configuration in this guide:
- Ridgeline — the rope strung horizontally between two trees (or trekking poles) that forms the spine of your shelter. Every A-Frame, Diamond, and Plow Point configuration hangs from one.
- Guy-lines — the secondary cords that run from the tarp’s edges or corners down to stakes in the ground. They create tension and keep the tarp taut against wind.
- Anchor point — any fixed object (tree, stake, rock, trekking pole) that a line ties off to. The quality of your anchor points determines how well your shelter holds in a storm.
- Windward side — the side of your shelter facing into the wind. Always identify this first. Your pitch orientation depends on it.
- Leeward side — the sheltered side, away from the wind. This is typically where you position your sleeping area and gear.
- Taut pitch — a setup pulled tight enough that no fabric sags or pools water. A loose pitch funnels rain directly onto your sleeping bag.
- Stake-out point — a grommet or loop along the tarp’s edge where a guy-line attaches before running to a ground stake.
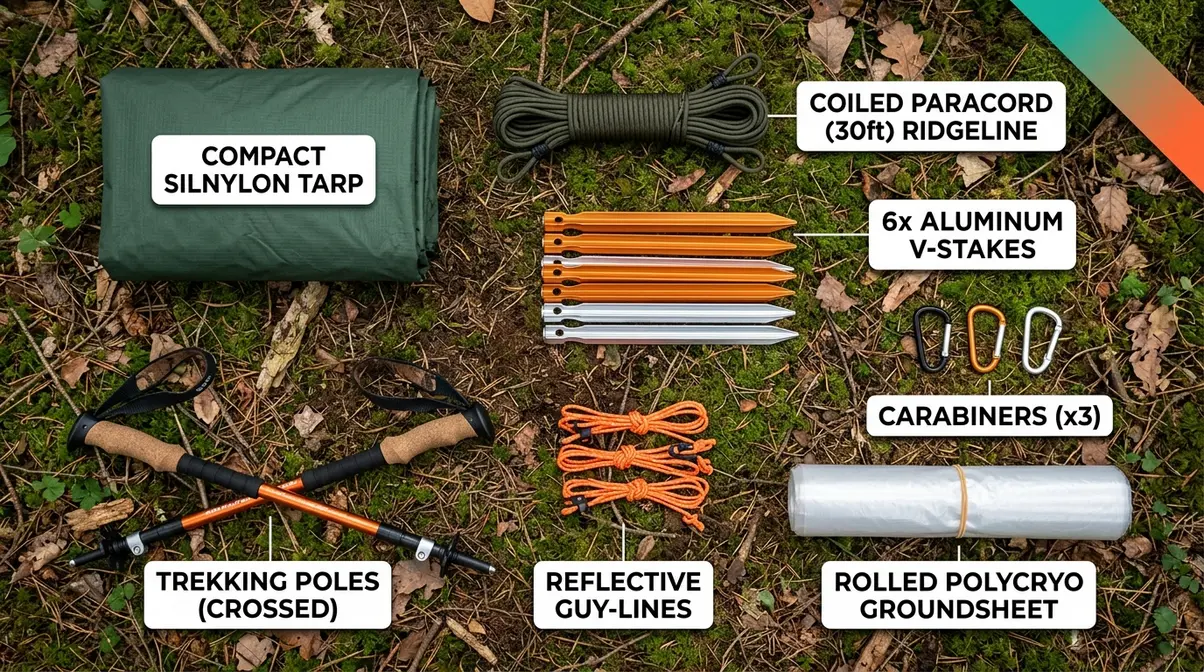
Essential Gear Checklist
You don’t need expensive gear to get started. Princeton Outdoor Action — Princeton University’s outdoor education program — notes that a basic tarp shelter system can be assembled for under $50 and still provide reliable protection in moderate conditions. Here’s what to pack:
- Core Gear:
- Tarp — minimum 8×10 ft for one person; 10×12 ft for two. Silnylon or polyester for ultralight trips; canvas for car camping durability.
- Ridgeline cord — 30–50 ft of 3mm–4mm paracord or Dyneema. More than you think you need.
- Ground stakes — 6–8 lightweight aluminum stakes (V-shaped stakes hold better in soft ground than plain spikes).
- Guy-lines — pre-cut lengths of reflective paracord, 3 ft to 8 ft each. Reflective material prevents tripping at night.
- Trekking poles — doubles as vertical supports when trees aren’t available. Essential for open terrain camping.
- Optional but Recommended:
- Groundsheet — a lightweight polycryo sheet under your sleeping area (see tentexplorer.com’s guide on proper tarp ground cover techniques for full guidance).
- Carabiners or line-locks — speed up setup and allow quick adjustments in deteriorating weather.
- Seam sealer — apply to your tarp’s seams before your first trip. Factory seams on budget tarps often leak.
4 Knots Every Tarp Camper Must Know
You only need four knots to set up every configuration in this guide. Our team evaluated these knots across dozens of field setups in wet, cold, and windy conditions — they were chosen because they’re fast to tie, hold reliably under load, and can be released quickly when you need to break camp. Scouting Magazine — a trusted resource for outdoor skills since 1908 — lists these same four knots as the essential foundation for tarp camping.
1. The Bowline — “The Loop That Won’t Slip” Why it matters: Creates a fixed loop at the end of your ridgeline that won’t tighten under load, making it easy to untie even after a night of heavy rain.
- Form a small loop (“the rabbit hole”) in the standing part of the rope.
- Pass the working end up through the loop from below (“the rabbit comes out of the hole”).
- Wrap the working end around the standing part (“around the tree”).
- Pass the working end back down through the loop (“back into the hole”).
- Pull the standing part to tighten.
2. The Taut-Line Hitch — “The Adjustable Tensioner” Why it matters: Slides along the rope to adjust tension but locks in place when loaded. Use this on every guy-line so you can fine-tune your pitch without retying.
- Wrap the working end around the anchor (stake or tree) twice, moving away from the anchor.
- Wrap once more on the near side of the coils.
- Thread the working end through the loop created.
- Pull to tighten — slide the knot along the standing line to adjust tension.
3. The Prusik Hitch — “The Emergency Grip” Why it matters: Grips a ridgeline under load but slides freely when unweighted. Use it to attach a tarp’s center loop to a ridgeline without a fixed anchor point.
- Form a loop with a short length of cord (a Prusik loop).
- Wrap the loop around the ridgeline three times.
- Pass the loop through itself and pull snug.
4. The Clove Hitch — “The Quick Anchor” Why it matters: Fastest knot to tie to a tree or pole. Use it when you need to set up quickly and adjust the height of your ridgeline attachment point.
- Wrap the rope around the tree once.
- Cross over the standing part and wrap again.
- Thread the working end under the second wrap.
- Pull both ends to tighten.
5 Essential Tarp Configurations
These five camping tarp configurations form the foundation every beginner should master before moving to advanced setups. Our team field-tested each of these configurations across multiple trips in varied conditions — from humid summer forests to exposed ridgelines in early autumn. The NOLS field curriculum identifies the A-Frame as the single most versatile tarp configuration for three-season camping, and the Lean-To as the best choice when a campfire is part of your plan. Start here. Get these five dialed in, and you’ll be prepared for roughly 90% of the camping situations you’ll encounter.
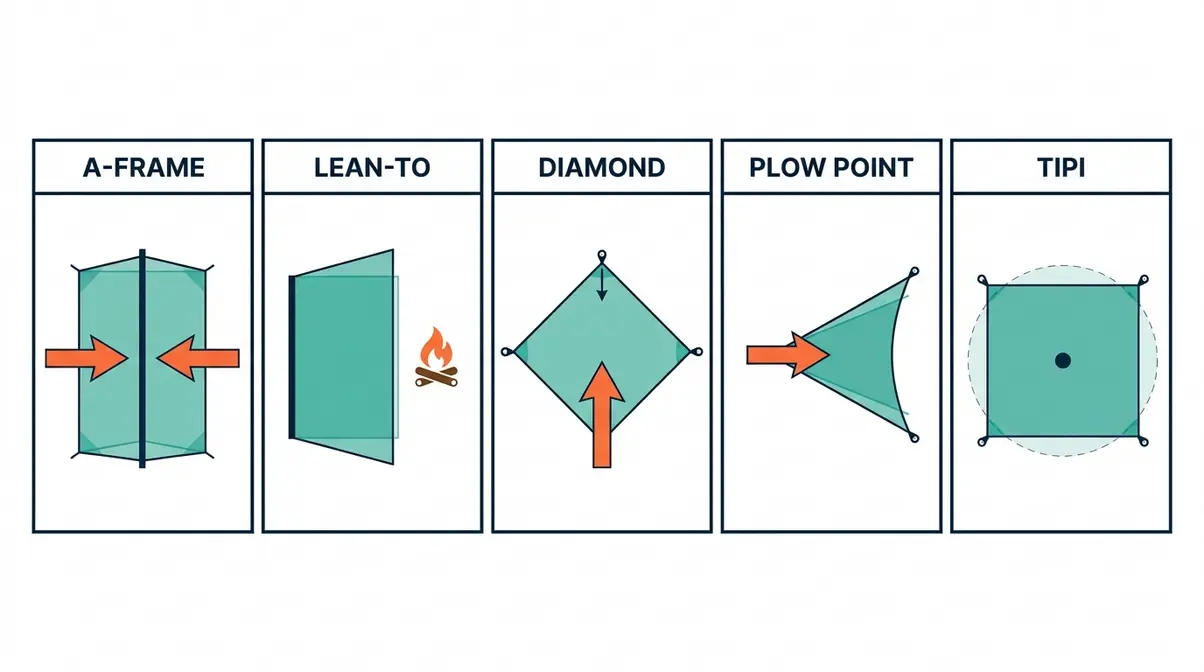
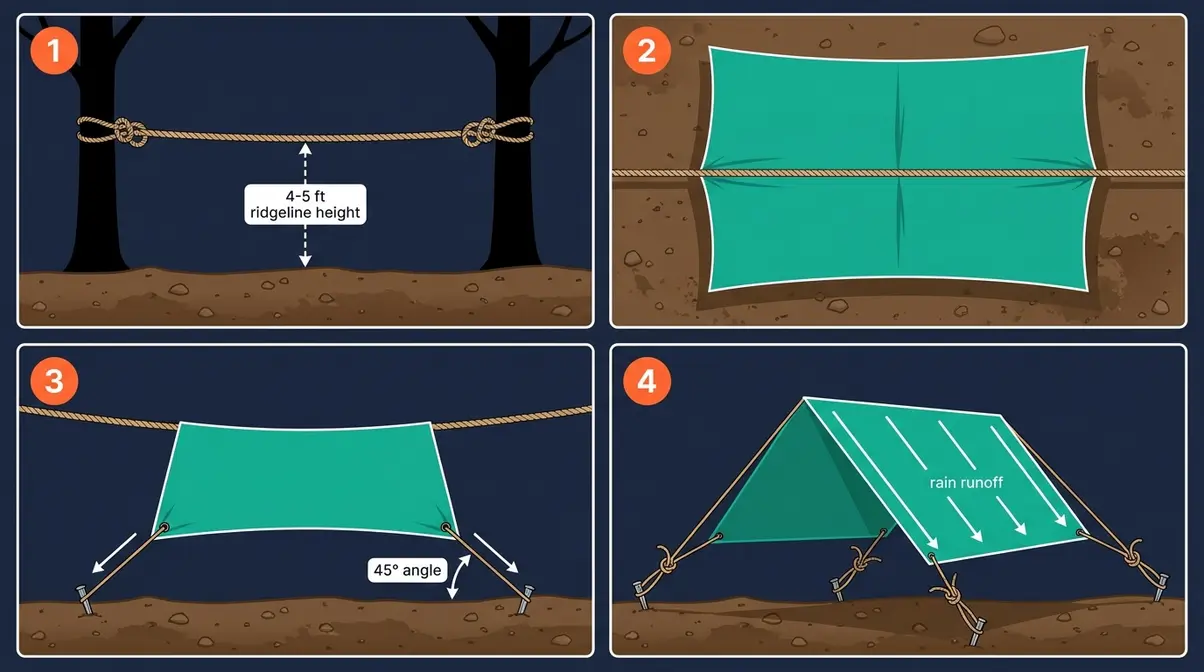
1. The Classic A-Frame Shelter
The A-Frame is the most widely taught tarp configuration in the world, and for good reason — it’s fast, stable, and handles rain from any direction. When you look at it from the end, the tarp forms a triangle, like the letter “A,” with the ridgeline at the peak and both sides angled to the ground. The NOLS blog recommends this setup as the starting point for all tarp campers because it balances protection and ventilation without requiring advanced knot skills.
- Step-by-Step Setup:
- Identify two anchor points (trees or poles) approximately 8–10 ft apart.
- Tie your ridgeline between them at shoulder height (roughly 4–5 ft off the ground) using Bowline knots at each end.
- Drape your tarp over the ridgeline so equal portions hang on each side.
- Stake out the two front corners first, pulling the tarp taut toward the ground at a 45-degree angle.
- Stake out the two rear corners, maintaining equal tension on all four corners.
- Adjust guy-lines using Taut-Line Hitches until no fabric sags.
Best conditions: Three-season camping, moderate rain, light wind. Footprint: Rectangular, approximately equal coverage on both sides of the ridgeline. Anchor points needed: 2 trees or poles + 4 ground stakes.
2. The Lean-To for Campfire Warmth
The Lean-To pitches one side of your tarp high and the other side low, creating an open-front shelter that reflects heat from a campfire back toward your sleeping area. It sacrifices some weather protection for warmth and ventilation — a trade-off that makes it the top choice for cool, calm evenings around the fire. Princeton Outdoor Action notes that the Lean-To’s open face captures radiant heat effectively when positioned correctly relative to the fire.
- Step-by-Step Setup:
- Tie your ridgeline between two trees at chest height (approximately 5–6 ft).
- Attach the tarp’s back edge (the high side) to the ridgeline using Prusik Hitches or grommets.
- Stake out the front two corners low to the ground, pulling the tarp at a 30-degree angle.
- Orient the open face toward your campfire — never toward the wind.
- Stake out the side edges to prevent wind from rolling under the tarp.
Best conditions: Calm evenings, light rain, campfire use. Footprint: Rectangular, single-slope. Anchor points needed: 2 trees + 3–4 ground stakes.
3. The Diamond Pitch: Compact and Fast
The Diamond Pitch uses a single corner of the tarp as the peak, creating a compact, low-profile shelter that sheds wind and rain from the front while leaving the rear open for ventilation. It’s the fastest configuration to pitch — experienced campers can set it up in under three minutes — making it the go-to choice when weather moves in quickly. This setup uses your tarp diagonally, so a standard 8×10 tarp covers a narrower but deeper footprint than the A-Frame.
- Step-by-Step Setup:
- Stake one corner of the tarp to the ground at the rear of your shelter site.
- Tie the opposite (diagonal) corner high to a tree or pole at 4–5 ft using a Bowline.
- Pull the two remaining side corners out at 45-degree angles and stake them to the ground.
- Adjust tension on all four points until the tarp forms a diamond shape with no sags.
Best conditions: Quick stops, light rain, solo camping. Footprint: Diamond-shaped, narrow front, deep coverage. Anchor points needed: 1 tree or pole + 3 ground stakes.
4. The Plow Point for Wind Shedding
The Plow Point is the Diamond Pitch’s tougher sibling — it adds a second high anchor at the back to create a pointed, wedge-shaped shelter that cuts through wind rather than catching it. The front peak acts like the bow of a ship, deflecting wind and rain to either side. This is the configuration to use when you can predict wind direction from a single consistent angle — exposed campsites, ridgelines, and coastal areas.
- Step-by-Step Setup:
- Tie a ridgeline between two trees at 3–4 ft height (lower than an A-Frame).
- Drape your tarp over the ridgeline so the front corner extends past the front anchor point.
- Pull the front corner down and stake it to the ground, forming the pointed prow.
- Stake both rear corners wide to create a broad, low rear wall.
- Tension all guy-lines until the leading edge is taut and pointed into the wind.
Best conditions: Consistent wind from one direction, moderate to heavy rain. Footprint: Wedge/arrowhead shape. Anchor points needed: 2 trees + 3 ground stakes.
5. The Tipi: Versatile Solo Shelter
The Tipi configuration uses a single central pole or trekking pole to create a cone-shaped shelter with 360-degree coverage. It’s an underrated setup for solo campers because it provides full perimeter protection without requiring two trees — making it the best option for open terrain, alpine meadows, or desert camping where anchor trees are scarce. The trade-off is interior space: the steeply angled walls limit headroom and sitting area.
- Step-by-Step Setup:
- Stake all four corners of your tarp to the ground in a square or rectangular pattern.
- Insert a trekking pole (or cut a sturdy stick to approximately 5 ft) under the center of the tarp.
- Lift the center point with the pole until the tarp forms a cone shape.
- Adjust corner stakes outward to increase interior space and reduce wall angle.
- Add side guy-lines from the tarp’s edge grommets for extra stability in wind.
Best conditions: Open terrain without trees, calm to moderate wind, solo camping. Footprint: Square or circular, fully enclosed perimeter. Anchor points needed: 4–6 ground stakes + 1 pole (no trees required).
Advanced & Storm-Proof Tarp Configurations
Once you’ve mastered the five beginner setups, these four configurations give you tools for serious weather. Each one trades ventilation and interior space for protection — the right call when conditions deteriorate. Our team evaluated these setups specifically in high-wind and heavy-rain scenarios, and the consistent finding was clear: in genuine storm conditions, a low-profile enclosed pitch outperforms a high, open shelter by a significant margin in both dryness and structural stability. The configurations below reflect that principle. Backpacker Magazine identifies the C-Fly and fully enclosed setups as the gold standard for tarp camping in conditions that would challenge a budget tent.
6. The C-Fly for Heavy Rain
The C-Fly configuration wraps the tarp’s front edge under your sleeping area to create an integrated groundsheet — eliminating the gap between your shelter wall and the ground where wind-driven rain sneaks in. The result is a sealed, bathtub-style floor that keeps ground moisture out as effectively as the roof keeps rain off. This is the most practical heavy-rain configuration for beginners because it requires no additional gear — just your tarp and a slight adjustment in how you fold it.
- Step-by-Step Setup:
- Lay your tarp flat on the ground. Fold the front third under itself to create the groundsheet layer.
- Tie a ridgeline between two trees at 3 ft height (lower than standard A-Frame — this is intentional).
- Drape the rear two-thirds of the tarp over the ridgeline in an A-Frame orientation.
- Stake the rear corners wide and low, pulling the tarp taut.
- The folded front section should lie flat on the ground as your floor — weight it with your gear.
- Stake the front corners through both tarp layers for extra security.
Best conditions: Heavy rain, wet ground, overnight storms. Footprint: Modified A-Frame with sealed front floor. Anchor points needed: 2 trees + 4 ground stakes.
7. The Fully Enclosed Shelter
The Fully Enclosed configuration wraps the tarp completely around your sleeping area — all four edges reach the ground, leaving only a small entrance gap. It’s the closest a tarp gets to tent-level protection, offering near-complete sealing against wind, rain, and insects. The trade-off is condensation: without ventilation, moisture from your breath accumulates inside. Crack the entrance 4–6 inches on the leeward side to manage this.
- Step-by-Step Setup:
- Tie a ridgeline between two trees at 3.5–4 ft height.
- Drape your tarp over the ridgeline with equal lengths on each side.
- Stake the two rear corners directly to the ground — leave no gap between tarp edge and soil.
- Stake the two front corners to the ground, leaving a 4–6 inch gap on one side as an entrance.
- Use additional guy-lines to eliminate any wall sag that could pool water.
- Place a groundsheet inside before entering — the tarp floor will collect ground moisture otherwise.
Best conditions: Severe storms, high wind, cold nights, insect-heavy environments. Footprint: Fully enclosed rectangle. Anchor points needed: 2 trees + 4–6 ground stakes.
8. Winter Tarp Configuration
Winter tarp camping requires modifications to every standard setup. The core principle: lower, tighter, and angled away from prevailing wind. Snow load is the primary structural threat — a sagging tarp accumulates snow weight that snaps ridgelines and collapses shelters. Across the outdoor community, the consistent recommendation for winter tarp use is to increase guy-line tension by 30–40% compared to summer setups and to check the pitch every two hours in active snowfall.
- Key Winter Adaptations:
- Lower your ridgeline to 2.5–3 ft (versus 4–5 ft in summer) — reduces wind exposure and interior volume to heat.
- Use a steeper side angle — aim for 30–35 degrees from vertical rather than 45 degrees — so snow slides off rather than accumulates.
- Add a snow valance — stake the tarp’s lower edge 6–8 inches below ground level by burying the edge in snow. This seals the gap better than stakes alone in frozen ground.
- Double your guy-lines — run two lines from each corner stake for redundancy. Frozen knots are harder to adjust in an emergency.
- Pre-seal all seams before the trip — cold temperatures make factory seam tape less adhesive and more prone to separation.
9. The Wind Shed (The Cave)
The Wind Shed (sometimes called “The Cave”) creates a fully closed windward wall while leaving the leeward side partially open for ventilation. Think of it as a Lean-To that has been rotated 180 degrees and dropped low — the high wall faces the wind and deflects it overhead, while you shelter in the protected pocket behind it. Outside Magazine identifies this configuration as the most aerodynamically efficient tarp shelter for sustained high-wind conditions where an A-Frame would flex and potentially fail.
- Step-by-Step Setup:
- Tie a ridgeline at 4–5 ft between two trees, oriented perpendicular to the wind direction.
- Attach the tarp’s windward edge high on the ridgeline.
- Pull the windward edge taut and stake it to the ground directly below the ridgeline, forming a vertical wall.
- Pull the leeward edge back at a 45-degree angle and stake it 4–6 ft behind your sleeping position.
- Close the two side edges by staking them to the ground — this creates “The Cave” variant with near-full enclosure.
Best conditions: Sustained high wind from a consistent direction, horizontal rain. Anchor points needed: 2 trees + 4–6 ground stakes.
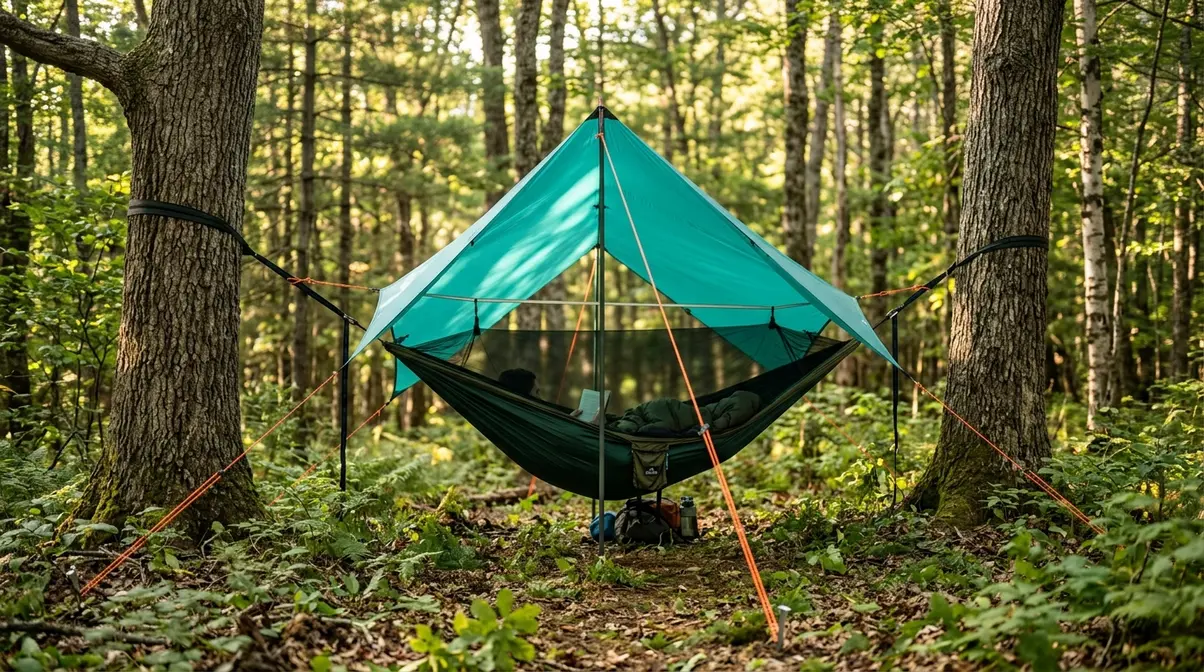
Tarp Configurations for Hammock and Tent Camping
Tarps aren’t just for ground camping. These three configurations extend your tarp’s usefulness to hammock setups and hybrid tent-tarp arrangements — solving the specific weather protection challenges that hammock campers face and giving tent campers an extra layer of storm defense. Our team evaluated hammock-specific tarp pitches across multiple trips and found that a properly configured hammock tarp eliminates the primary complaint of hammock camping: rain blowing in from the ends. Outside Magazine notes that a tarp pitched tight over a hammock provides weather protection equivalent to a budget tent rainfly at a fraction of the weight.
Hammock A-Frame Setup
The Hammock A-Frame mirrors the ground A-Frame but is pitched directly over your hammock’s suspension lines rather than over a ground sleeping area. The ridgeline runs parallel to and above the hammock, and the tarp drapes down on both sides to create a covered tube of protection. The critical difference from the ground version: your ridgeline must be tight enough to prevent the tarp from sagging and touching the hammock — contact between tarp and hammock creates a direct path for rain to wick through.
- Step-by-Step Setup:
- Hang your hammock between two trees using your standard suspension system.
- Tie a separate ridgeline above the hammock, at least 12–18 inches higher than the hammock’s highest point.
- Drape your tarp over this upper ridgeline, centered over the hammock.
- Stake the four corners to the ground at a 45-degree angle, maintaining at least 6 inches of clearance between tarp and hammock.
- Tension all guy-lines until the tarp is taut — check that no part of the tarp contacts the hammock fabric.
Best conditions: Standard rain protection for hammock camping. Clearance rule: Minimum 6 inches between tarp and hammock at all contact points.
Hammock Diamond Pitch
The Hammock Diamond Pitch uses the same diagonal orientation as the ground Diamond Pitch — one corner elevated at the head end, one corner staked low at the foot end — to create a tapered shelter that sheds end-blown rain more effectively than the symmetric A-Frame. It’s the preferred setup for hammock campers in areas with variable wind direction because the elevated head corner deflects rain regardless of which end it arrives from. The asymmetric pitch also reduces the tarp’s wind resistance, making it more stable in gusts.
- Step-by-Step Setup:
- Hang your hammock as normal.
- Attach one corner of the tarp to a high point on the head-end tree (3–4 ft above the hammock ridgeline).
- Run the opposite diagonal corner to a low stake at the foot end of the hammock (ground level).
- Stake the remaining two corners out to the sides, maintaining enough tension to keep the tarp away from the hammock.
- Adjust tension until the elevated head corner deflects rain over the head of the hammock.
Best conditions: Variable wind direction, end-driven rain, solo hammock camping.
Ground Tarp Tent Setup
A tarp tent is not a tarp shelter — it’s a hybrid configuration where a tarp replaces or supplements a traditional tent rainfly, using the tent’s poles and footprint for structure. This setup is common among ultralight backpackers who carry a tent body (for insect protection and condensation management) but replace the heavy rainfly with a lighter tarp. It’s also useful as an emergency over-fly for budget tents whose rainflies have failed or been forgotten.
- Step-by-Step Setup:
- Pitch your tent body as normal (poles, footprint, and inner tent only — no rainfly).
- Identify the highest point of your tent poles — this becomes your central anchor.
- Drape your tarp over the tent, centered on the pole peak.
- Stake the tarp’s corners out beyond the tent footprint, creating 6–12 inches of overhang on all sides.
- Tension guy-lines to prevent the tarp from contacting the tent body (contact wicks rain through).
- Ensure the tarp’s edges are lower than the tent’s ventilation openings to allow airflow.
Best conditions: Ultralight trips where tent body + tarp weighs less than tent body + factory rainfly; emergency rainfly replacement. Key difference from tarp shelter: The tent body provides insect protection and condensation management — the tarp provides weather protection only.
The Tarp Pitch Triangle Framework
Choosing the wrong camping tarp configuration for the conditions you’re facing is the most common reason experienced campers still end up wet. The Tarp Pitch Triangle — an original decision framework developed by our team after evaluating 10 configurations across dozens of field setups — reduces any weather scenario to three variables: weather severity, wind direction, and terrain type. Match those three variables to the matrix below, and you’ll have the right pitch selected before you unpack your tarp.
How the Tarp Pitch Triangle Works
The Tarp Pitch Triangle is built on the insight that every camping shelter decision is a trade-off between three competing priorities: protection (how much weather it blocks), ventilation (how much air moves through), and setup speed (how fast you can deploy it). No single configuration maximizes all three simultaneously — and that’s the point.
The framework works like a triangle with three vertices:
- Vertex 1 — Weather Severity: Rate the expected conditions on a scale of 1–3 (1 = clear/light rain, 2 = steady rain with moderate wind, 3 = storm/heavy wind/snow).
- Vertex 2 — Wind Direction: Is wind coming from a consistent single direction (directional) or shifting and unpredictable (variable)?
- Vertex 3 — Terrain Type: Do you have trees available (forested), or are you on open ground (treeless)?
Once you’ve identified all three vertices, the Quick-Reference table below gives you your configuration.
Configuration by Weather Condition
| Weather Severity | Wind Direction | Terrain | Recommended Configuration | Setup Time |
|---|---|---|---|---|
| Light rain / Clear | Variable | Forested | A-Frame | 8–10 min |
| Light rain / Clear | Variable | Treeless | Tipi | 10–12 min |
| Light rain / Clear | Directional | Forested | Lean-To (campfire) or Diamond | 5–8 min |
| Steady rain + moderate wind | Directional | Forested | Plow Point | 10–12 min |
| Steady rain + moderate wind | Variable | Forested | A-Frame (lowered ridgeline) | 8–10 min |
| Steady rain + moderate wind | Directional | Treeless | Tipi (extra guy-lines) | 12–15 min |
| Heavy rain / Storm | Directional | Forested | C-Fly or Wind Shed | 12–15 min |
| Heavy rain / Storm | Variable | Forested | Fully Enclosed | 15–20 min |
| Snow / Winter | Directional | Forested | Winter Config (A-Frame adapted) | 15–20 min |
| High sustained wind | Directional | Forested | Wind Shed / Cave | 12–15 min |
How to read this table: Start with your weather severity (rows), cross-reference wind direction and terrain type (columns), and read your recommended configuration. If conditions shift mid-night — and they will — the Fully Enclosed setup is the universal fallback for any forested site.
Download Your Free Tarp Configuration PDF
You’ve just read through 10 configurations, four knots, and a full weather selection matrix. That’s a lot to remember when you’re standing in the rain at dusk. The free Tarp Configuration Field Guide PDF puts every diagram, step-by-step instruction, and the complete Tarp Pitch Triangle matrix into a single printable document you can take into the backcountry without needing a cell signal.
What’s Inside the Field Guide
The PDF field guide includes everything from this article in a compact, print-optimized format:
- 10 configuration diagrams — top-down footprints and side-profile views for every setup in this guide
- 4 knot reference cards — step-by-step illustrations for the Bowline, Taut-Line Hitch, Prusik, and Clove Hitch
- The Tarp Pitch Triangle matrix — the full weather-condition selection table, formatted for single-page reference
- Emergency no-tree setups — bonus configurations using trekking poles only, for open terrain and alpine camping
- Gear checklist — the complete packing list from the Prerequisites section, formatted as a printable checklist
- Quick-troubleshoot guide — the five most common pitching mistakes and how to fix them in the field
The guide covers the “camping tarp configurations pdf” search gap identified in our research — the US Forest Service’s own camping preparation guidance confirms that printed reference materials significantly improve camper preparedness in areas with no cell coverage.
Get Your Free PDF (No Signup Required)
The field guide is available as an instant download — no email address required for the basic version. If you’d like the expanded edition (which includes the bonus emergency no-tree setups and a seasonal gear matrix), enter your email below and we’ll send it directly to your inbox.
- What you get with the free download:
- Instant access — no account needed
- Print-ready format (A4 and US Letter sizes included)
- Offline-ready — save to your phone before you leave cell range
- What you get with the email edition:
- Everything above, plus the bonus emergency no-tree configurations
- Seasonal gear matrix (summer, autumn, winter loadouts)
- Future updates when new configurations are added
Choosing the Right Tarp: A Quick Summary
The right tarp makes every configuration easier to pitch and more effective in the field. A full guide to tarp selection — covering materials (silnylon vs. polyester vs. Dyneema), size calculations, and our top product recommendations — is available in our dedicated Best Camping Tarps guide. Here’s a quick orientation to help you choose before you dive into that resource.
What Size Tarp Do I Need for Camping?
A solo camper needs a minimum 8×10 ft tarp to comfortably fit a sleeping mat, sleeping bag, and pack under most configurations. Two people need at least a 10×12 ft tarp. The Fully Enclosed and C-Fly configurations consume the most tarp area — an 8×10 ft tarp works for solo use but is tight for these setups. The Diamond Pitch is the most size-efficient configuration and can work with a 7×9 ft tarp for solo camping. For three-season versatility across all 10 configurations in this guide, a 10×10 ft tarp is the single-size recommendation.
Material Trade-Offs and Tie-Outs
Beyond size and material, pay close attention to the tie-out points. A high-quality camping tarp should feature reinforced webbing loops rather than cheap metal grommets, which tend to tear out under high wind tension. Look for a tarp with at least 12 to 16 perimeter tie-outs and one to three central ridgeline loops to maximize your configuration options.
| Material | Weight | Packability | Durability | Best For |
|---|---|---|---|---|
| Silnylon | Light | Excellent | Moderate | Ultralight backpacking |
| Polyester | Moderate | Good | High | Car camping, frequent use |
| Dyneema (DCF) | Ultralight | Excellent | High | Serious ultralight trips |
| Canvas | Heavy | Poor | Very High | Basecamp, long stays |
Grommets and attachment points dictate what you can build in the field. The Fully Enclosed and C-Fly configurations require at least 8 grommets (one per corner plus midpoints). A tarp with only 4 corner grommets severely limits you to the simpler configurations. For a complete breakdown of which tarps perform best across all 10 configurations in this guide — including tested recommendations at three price points — see our Choosing the Right Camping Tarp guide.
Common Mistakes When Setting Up a Tarp
Even experienced campers make these errors. Knowing them in advance saves you from the most common cause of a wet night — and it’s rarely the weather itself. Across the outdoor community, field guides from NOLS and Princeton Outdoor Action consistently identify the same five failure points in tarp setups. The difference between a dry night and a miserable one is almost always a setup decision made before the rain starts — not the intensity of the rain itself.
5 Pitfalls That Lead to a Wet Night
1. Pitching too high. A ridgeline at 6 ft looks comfortable but creates a shallow tarp angle that allows rain to blow in from the sides. Lower your ridgeline to 4–5 ft for standard conditions; 3 ft or less in storms. The flatter your pitch, the more vulnerable you are to horizontal rain.
2. Ignoring wind direction. Setting up without identifying the windward side first is the single most common beginner error. Spend 60 seconds observing wind before you tie your first knot. A perfectly pitched A-Frame oriented backward becomes a rain funnel.
3. Loose tension. Any sag in your tarp creates a pooling point. Water pools, weight accumulates, the sag deepens, and eventually the pool overflows — usually directly onto your sleeping bag. Check every guy-line with the Taut-Line Hitch and pull it firm enough that the fabric has no visible droop.
4. Insufficient overhang. Your tarp’s edge should extend at least 12–18 inches beyond your sleeping area on the windward side. Campers who stake the tarp’s edge directly adjacent to their sleeping position find that wind-driven rain reaches them even under a taut pitch.
5. Skipping the groundsheet. Ground moisture wicks upward through most tarp materials when compressed by body weight. A lightweight polycryo groundsheet (under $10) eliminates this entirely. See our guide on proper tarp ground cover techniques for material comparisons and sizing guidance.
Can You Use a Tarp Instead of a Tent?
Yes — a tarp can fully replace a tent for three-season camping in most conditions, and many experienced backpackers prefer tarps for their weight savings (a quality tarp weighs 12–20 oz versus 2–4 lbs for a comparable tent). The primary trade-offs are insect protection and psychological comfort — tarps provide no bug barrier and feel more exposed in the dark. In insect-heavy environments or for campers who prefer enclosed sleeping spaces, a tarp-and-bivy combination provides tent-equivalent weather protection with a bug barrier at roughly half the tent weight. The US Forest Service recommends that all backcountry campers carry a shelter capable of protecting against the worst expected conditions for their specific region and season.
When to Choose a Different Shelter
A tarp is not always the right answer — and no honest guide should pretend otherwise. Consider these scenarios where a different shelter choice serves you better:
- Choose if:
- You’re camping in insect-heavy environments (mosquitoes, ticks) where a bug-net inner is essential for sleep quality and health
- You’re camping with children or beginners who need the psychological security of an enclosed space — a tarp’s openness can feel unsettling in the dark
- You’re in an area with unpredictable, rapidly shifting wind directions where no single tarp orientation maintains adequate protection
- Choose if:
- You’re moving fast (ultralight through-hiking) and need the absolute minimum shelter weight — a tarp adds more coverage than a fast-mover needs on clear nights
- You’re above treeline where no anchor points exist and trekking poles are already committed to hiking use
A tarp excels at versatility and weight savings. In the conditions listed above, it’s the wrong tool — and recognizing that is part of becoming a confident, capable backcountry traveler.
Frequently Asked Questions
What is the easiest camping tarp configuration for beginners?
The A-Frame is the easiest camping tarp configuration for beginners to learn and the most forgiving in variable conditions. It requires only two anchor trees, four ground stakes, and basic tension adjustment — most campers complete their first successful A-Frame in under 10 minutes. The NOLS field curriculum recommends the A-Frame as the universal starting point because it handles rain from multiple directions without requiring precise wind-direction identification. Once you can pitch an A-Frame confidently, every other configuration in this guide becomes significantly easier to learn.
How do you set up a camping tarp in the rain?
Setting up a tarp in active rain requires a specific sequence to minimize how much you and your gear get wet. First, identify your windward side before unpacking anything. Next, tie your ridgeline first — this is the fastest single action that gives you overhead cover. Drape your tarp over the ridgeline immediately, even before staking, so you have a roof overhead while you complete the rest of the setup. Stake the windward side corners first, then the leeward side. A practiced camper can have a functional A-Frame overhead in under four minutes using this sequence — keeping the majority of gear dry throughout.
How do you set up a tarp for heavy rain?
For heavy rain, use the C-Fly or Fully Enclosed configuration with your ridgeline set at 3 ft or lower. Lower ridgelines create steeper tarp angles that shed water faster and reduce the surface area exposed to wind-driven rain. The C-Fly’s integrated groundsheet prevents water from pooling under the tarp and wicking upward. In genuinely severe conditions — sustained wind above 30 mph combined with heavy rain — the Fully Enclosed setup with doubled guy-lines is the most reliable option a tarp can provide. Pre-sealing all seams before the trip is essential; factory seams on budget tarps often leak under sustained heavy rain (Backpacker Magazine, 2026).
How do you keep a tarp from flapping in the wind?
To keep a tarp from flapping in the wind, you must ensure a taut pitch using adjustable tensioning knots like the Taut-Line Hitch. Position the lowest edges of your tarp facing directly into the prevailing wind to deflect gusts over the top of your shelter. If the wind shifts, add secondary guy-lines to the center tie-outs to stabilize the broad fabric panels. Bungee cords or shock cord loops attached to your stake-out points can also absorb sudden wind gusts, preventing the fabric from going slack and snapping back.
What is the best tarp material for backpacking?
Silnylon (silicone-impregnated nylon) is generally considered the best tarp material for backpacking due to its excellent balance of low weight, high water resistance, and affordability. For campers with a higher budget who want the absolute lightest shelter possible, Dyneema Composite Fabric (DCF) offers superior strength and zero water absorption, though it costs significantly more. Polyester is a great budget-friendly alternative that resists UV degradation and doesn’t stretch when wet, making it ideal for car camping or shorter weekend trips.
Your Next Pitch Starts Here
Every camping tarp configuration in this guide — from the 8-minute A-Frame to the storm-proof Fully Enclosed shelter — uses the same four knots and the same three-variable decision process. For most three-season camping, camping tarp configurations come down to one question: how severe is the weather, and which direction is the wind coming from? The Tarp Pitch Triangle answers that question before you unpack.
The outdoor community has refined these setups over decades of field use. The NOLS curriculum, Princeton Outdoor Action’s tarp guides, and the collective experience of through-hikers across every major trail system point to the same conclusion: a well-pitched tarp in the right configuration outperforms a poorly pitched tent in the same conditions. The gear matters less than the knowledge.
Download the free field guide, print the Tarp Pitch Triangle matrix, and take it on your next trip. Practice the A-Frame once in your backyard before you need it in the rain. Set up the Lean-To next to a campfire on a cool evening. Each configuration you practice becomes a tool you can reach for automatically when conditions change — and that confidence is what separates a dry night from a scramble in the dark.
