This blog post may contain affiliate links. As an Amazon Associate I earn from qualifying purchases.
📋 Table of Contents
- What You’ll Need Before You Start
- Step 1: Choose the Right Campsite Lights
- Battery vs. Solar: Which Power Source Works Best?
- Light Types at a Glance
- Step 2: Hang Lights Inside Your Tent
- Using Tent Gear Loops and Interior Attachment Points
- Create an Interior Ridgeline with Paracord
- Safety Rules for Lights Inside a Tent
- Step 3: String Lights Between Trees & Tarps
- Wrap Lights Around Tree Trunks the Right Way
- String Lights Between Two Points Using a Guide Wire
- Attaching Lights to Canopies, Tarps, and Shade Structures
- Step 4: Set Up Lights on Your RV or Camper Awning
- How to Use Awning Clips on an RV Awning Rail
- Powering Your RV String Lights Safely
- Step 5: Damage-Free Mounting Techniques
- How to mount a light without drilling?
- Magnetic Hooks and Suction Cups
- Gear Ties, S-Hooks, and Soft Ties
- Outdoor Adhesive Clips (and When Command Strips Fail)
- Will command strips hold string lights?
- Campsite Lighting Safety and Etiquette
- Fire Safety and Choosing the Right Light
- Dark Sky Compliance and Respecting Your Neighbors
- Frequently Asked Questions
- What do you use to illuminate your campsite at night?
- How to have light while camping?
- How can I hang lights outside without drilling holes?
- How to hang lights at a campsite?
- What is the 3-3-3 rule for camping?
- Can you leave campsite lights on all night?
- Are solar lights better than battery-powered lights for camping?
- Your Campsite, Lit Up Right
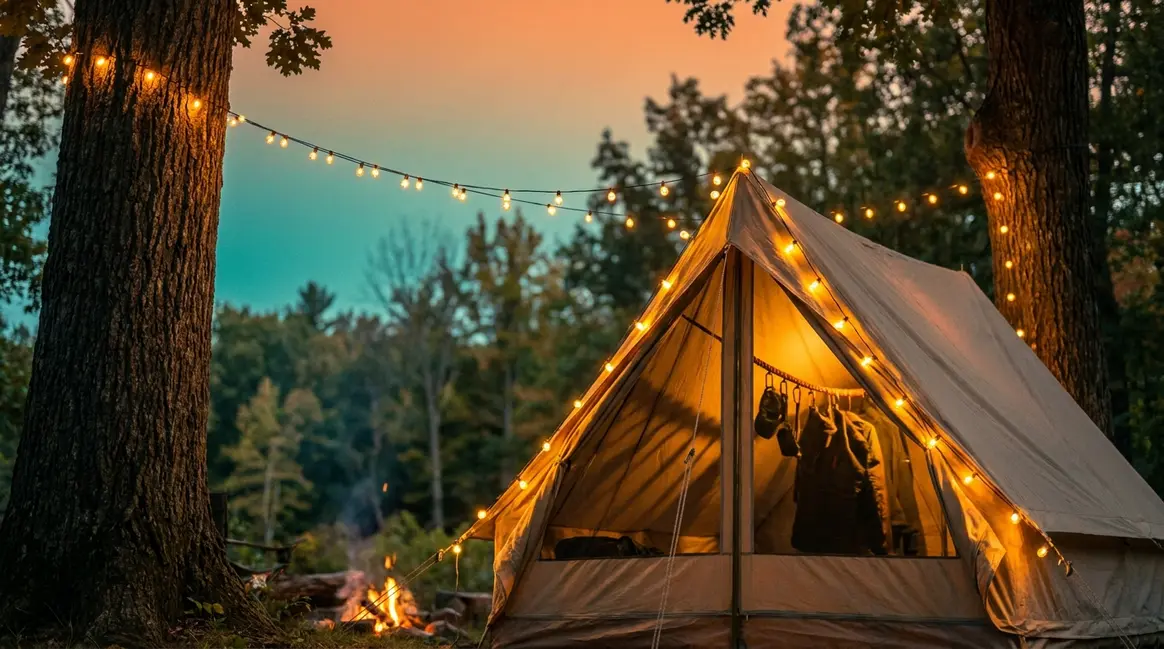
You’ve just finished setting up camp. The sun drops, the fire dies down, and suddenly your beautiful site feels like a shadowy puzzle. You’re fumbling for your lantern, tripping over tent pegs, and wondering why the whole thing feels less cozy than you imagined. If you are trying to figure out how to hang lights at campsite locations, you are definitely not alone.
“Hiya, so I have a poled casa lux and I love it, my question is how do you hang string lights up around the inside of the tent without threading them through the window zip pulls which is obviously what I’ve been doing lol.”
That question — asked by a real camper on a camping forum — captures exactly what most lovely campers run into. Most campsite lighting guides tell you to hang string fairy lights, but they don’t tell you where to attach them, what hardware to use, or how to avoid damaging your tent or breaking campground rules.
This guide fixes that. By the end, you’ll know exactly how to hang lights at campsite setups — inside your tent, between trees, and on your RV awning — using no-drill methods that pack down small and set up in minutes. We’ll follow The 3-Zone Campsite Lighting System: a simple framework that divides your site into Task, Ambient, and Safety zones so every corner of your campsite is covered.
Figuring out how to hang lights at campsite spots is easy with the right no-drill fasteners — gear ties, awning clips, and paracord ridgelines work for tents, trees, and RVs without causing damage.
- Use the 3-Zone Campsite Lighting System: Divide your site into Task, Ambient, and Safety lighting zones for a fully functional setup
- Battery or solar power is the safest choice — no extension cords needed at most campsites
- Gear ties and magnetic hooks are the most reliable no-drill fasteners for tent poles and metal surfaces
- LED lights only inside tents — heat-generating bulbs are a fire risk on nylon or polyester fabric
- Check campground rules before setup: many require warm white or amber lights after dark
What You’ll Need Before You Start
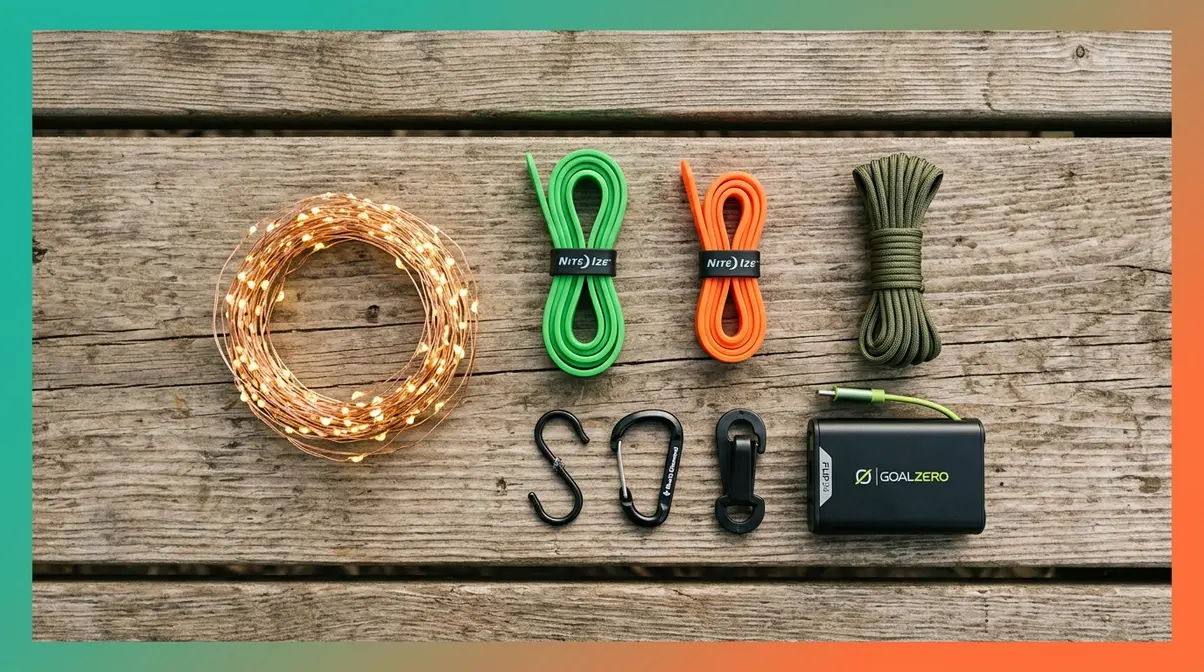
Before you hang a single strand of string fairy lights, gather these items. The right gear means a 10-minute setup at your campsite — the wrong gear means frustration in the dark.
Estimated Time: 10–15 minutes
Here’s what to bring:
| Item | Why You Need It |
|---|---|
| LED string lights (battery or solar) | Only safe power source for tents; low heat output, long run time |
| Gear ties (6–12 inch) | Reusable rubber straps that wrap around poles or branches without scratching |
| Magnetic hooks | Attach instantly to metal surfaces like car frames or metal tent poles |
| S-hooks or carabiners | Quick-clip onto gear loops, awning rails, and rope lines |
| Awning clips | Slide into the channel of an RV awning rail — no tools needed |
| Paracord (10–20 ft) | A lightweight utility rope used to create suspension lines inside tents or between trees |
| Scissors or multi-tool | Cutting paracord to length or adjusting ties |
- What to leave at home:
- Candles or incandescent bulbs (fire risk near nylon tent fabric)
- Standard indoor extension cords (not weatherproofed)
- Nails, screws, or adhesive command hooks (can damage trees and tent fabric)
The only power sources safe for use inside a tent are battery packs and solar — never plug-in extension cords. This gear list supports all three zones of The 3-Zone Campsite Lighting System, which you’ll set up across the next five steps.
Step 1: Choose the Right Campsite Lights
Before you hang any lights at your campsite, decide which zone each strand serves. The 3-Zone Campsite Lighting System divides your site into Task, Ambient, and Safety zones — and each zone calls for a different type of light. Getting this right before you pack means you’ll arrive with exactly what you need and nothing you don’t.
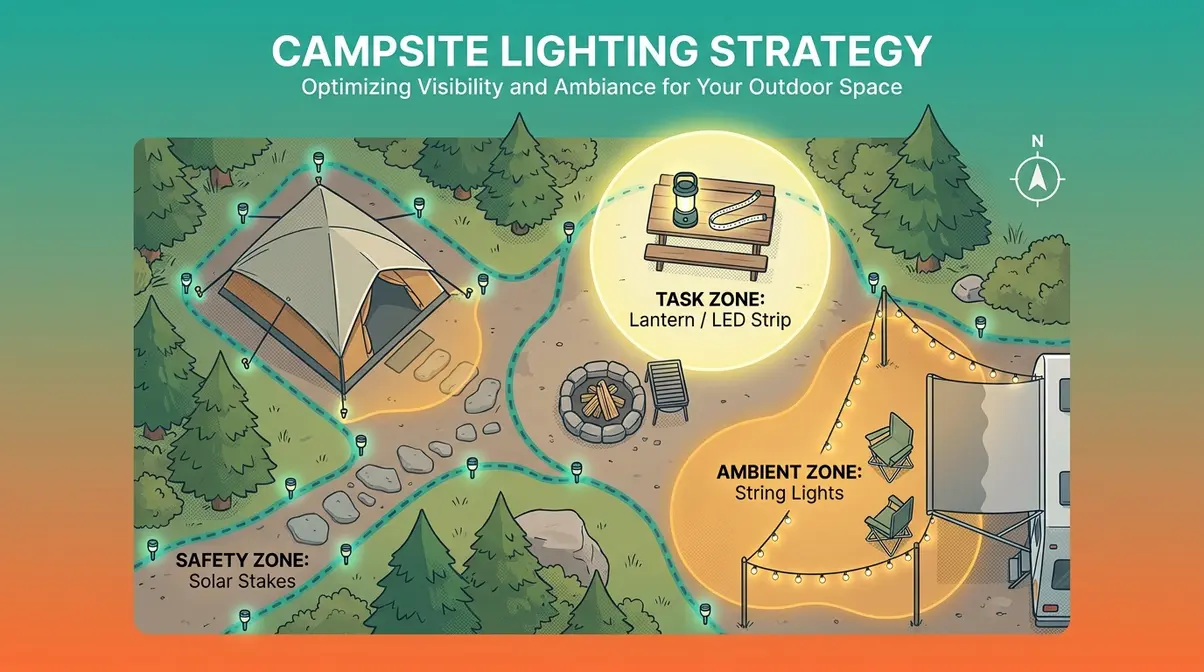
Here’s how the zones break down:
- Task Zone (cooking area, picnic table): Needs bright, directed light — a lantern or focused LED strip works best here.
- Ambient Zone (seating area, tent entrance): A warm, low-level glow — string fairy lights and globe bulbs shine in this zone.
- Safety Zone (pathways, tent pegs, site perimeter): Dim but visible — solar stake lights or a low string of warm LEDs do the job.
The 3-Zone Campsite Lighting System divides your site into Task, Ambient, and Safety zones — matching the right light type to each area prevents both dark spots and light pollution.
Battery vs. Solar: Which Power Source Works Best?
Solar and battery power each have a place in your kit — the choice comes down to your campsite’s conditions.
Battery-powered string lights run on AA batteries or a rechargeable USB power bank. They work reliably in shade, rain, and overcast weather, making them the go-to choice for forested campsites with heavy tree cover. The trade-off: you need to bring spare batteries or a pre-charged power bank.
Solar string lights use a small panel to charge during the day and run for 6–8 hours at night after a full day of direct sunlight — making them ideal for open desert or meadow sites. In heavy shade or overcast conditions, runtime drops significantly. For most campers, battery-powered is the safer default. Solar is an excellent supplement when you know you’ll have full sun.
| Power Source | Best For | Downside |
|---|---|---|
| Battery (AA or USB bank) | Shade, rain, forest sites | Needs spare batteries or charged bank |
| Solar panel | Open, sunny sites | Unreliable in overcast or shade |
When you hang up outdoor lights at a campsite, your power source determines where you can position them — a solar panel strand needs direct sun exposure, so plan its placement before you string anything.
Light Types at a Glance
Not all string lights are built the same. Here’s a quick reference so you’re not overwhelmed in the store:
- Fairy/string lights: Thin wire with tiny bulbs — lightweight, flexible, ideal for threading through tent loops and wrapping around poles. Best for the Ambient Zone.
- Globe/Edison bulbs: Larger, heavier, warm-glow bulbs — decorative and great for the Ambient Zone around a seating area. Check weight before hanging from paracord.
- LED strip lights: Flat, adhesive-backed strips — useful for Task Zone lighting inside a tent or under an RV awning.
- Solar stake lights: Ground-mounted, no hanging needed — perfect for the Safety Zone along pathways and around tent pegs.
Now that you’ve chosen your lights and power source, it’s time to hang them.
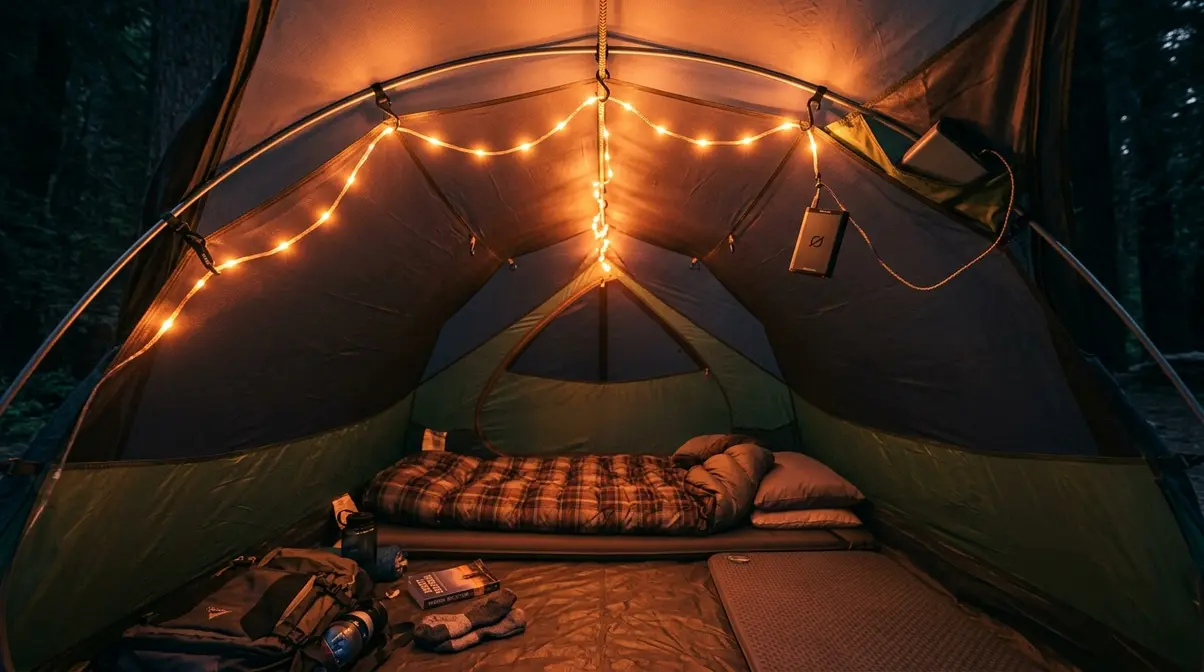
Step 2: Hang Lights Inside Your Tent
Hanging string fairy lights inside a tent is one of the most-asked questions across camping communities — and for good reason. Most tent interiors don’t have obvious anchor points, and threading lights through window zip pulls (as the user quote above describes) creates a tripping hazard and strains the zippers over time. Here are three better methods.
Using Tent Gear Loops and Interior Attachment Points
Most modern tents include interior gear loops (small fabric loops sewn into the tent ceiling or ridge) specifically designed to hold lanterns and accessories. Campers consistently report that gear ties are the most reliable no-drill fastener for tent poles and interior loops.
- Steps:
- Locate your tent’s interior gear loops — they’re usually at the apex of the tent or along the ridge seam.
- Thread an S-hook or a small carabiner through each loop.
- Hang your string light strand from the S-hooks, draping it across the ceiling in a loose swag.
- Use gear ties to secure any loose sections of wire to tent poles, wrapping them snugly without crimping the wire.
- Route the battery pack or solar controller to a corner pocket or gear loft to keep it off the floor.
Why this works: Gear loops are load-rated for hanging weight, so there’s no risk of tearing the tent fabric. The lights stay centered overhead, casting even ambient light across the whole interior.
Create an Interior Ridgeline with Paracord
If your tent lacks gear loops — or you want to hang lights along the full length of the tent — a paracord (a lightweight utility rope) ridgeline is the cleanest solution.
- Steps:
- Cut a length of paracord about 2 feet longer than your tent’s interior length.
- Tie one end to an interior tent pole using a simple clove hitch knot (wrap the cord twice around the pole, then thread the end through both loops and pull tight).
- Pull the cord taut across the tent interior and tie the other end to the opposite pole using the same knot.
- Drape your string light strand over the ridgeline, spacing the lights evenly.
- Use gear ties every 12–18 inches to clip the light wire to the paracord so it doesn’t slide or bunch.
- Melt the cut ends of the paracord with a lighter to prevent fraying.
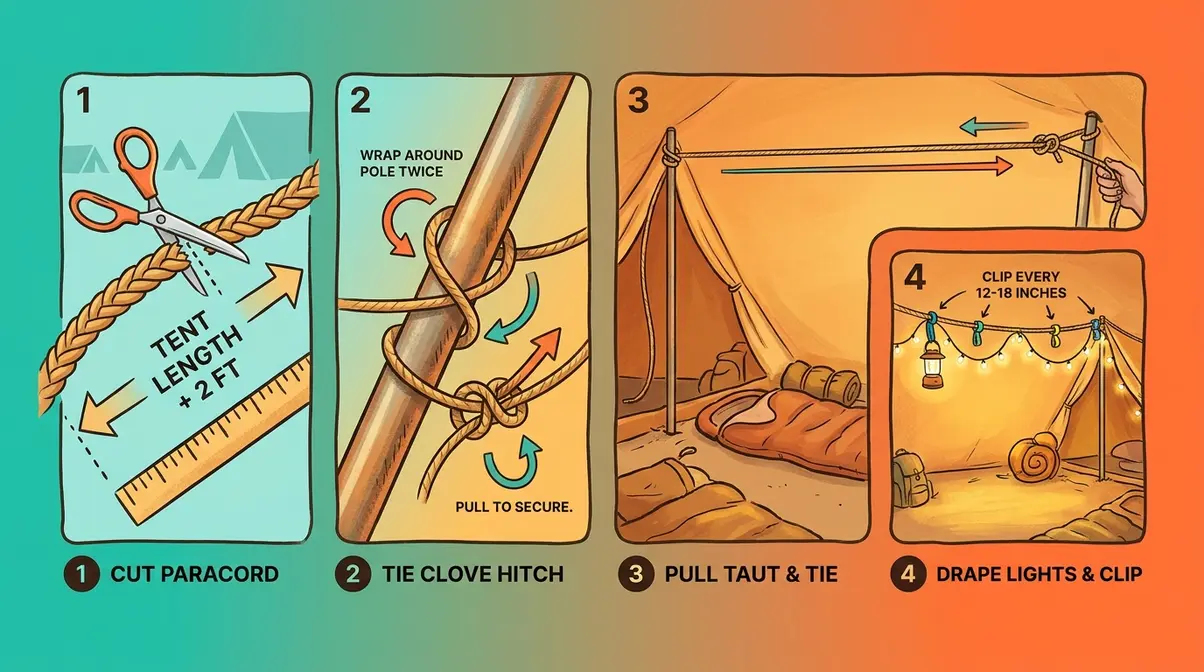
Why this works: The ridgeline distributes the weight of the lights across two anchor points, preventing any single point from bearing all the load. It’s also fully removable — leave no trace when you pack up.
Safety Rules for Lights Inside a Tent
This is non-negotiable: use only cool-to-the-touch LED lights inside a tent. Nylon and polyester tent fabrics are highly flammable, and incandescent or halogen bulbs generate enough heat to melt or ignite fabric if they contact the tent wall.
- ✅ LED string lights only — they run cool even after hours of use
- ✅ Battery or USB power bank — never run an extension cord into a tent
- ✅ Turn lights off before sleeping — or use a timer-equipped strand
- ❌ No candles, lantern flames, or incandescent bulbs inside any tent
- ❌ No lights touching the tent fabric — maintain at least 2 inches of clearance
Across camping safety resources and outdoor gear communities, the consensus is that LED overheating incidents are rare, but contact between any light source and tent fabric — even LED — should always be avoided.
Step 3: String Lights Between Trees & Tarps
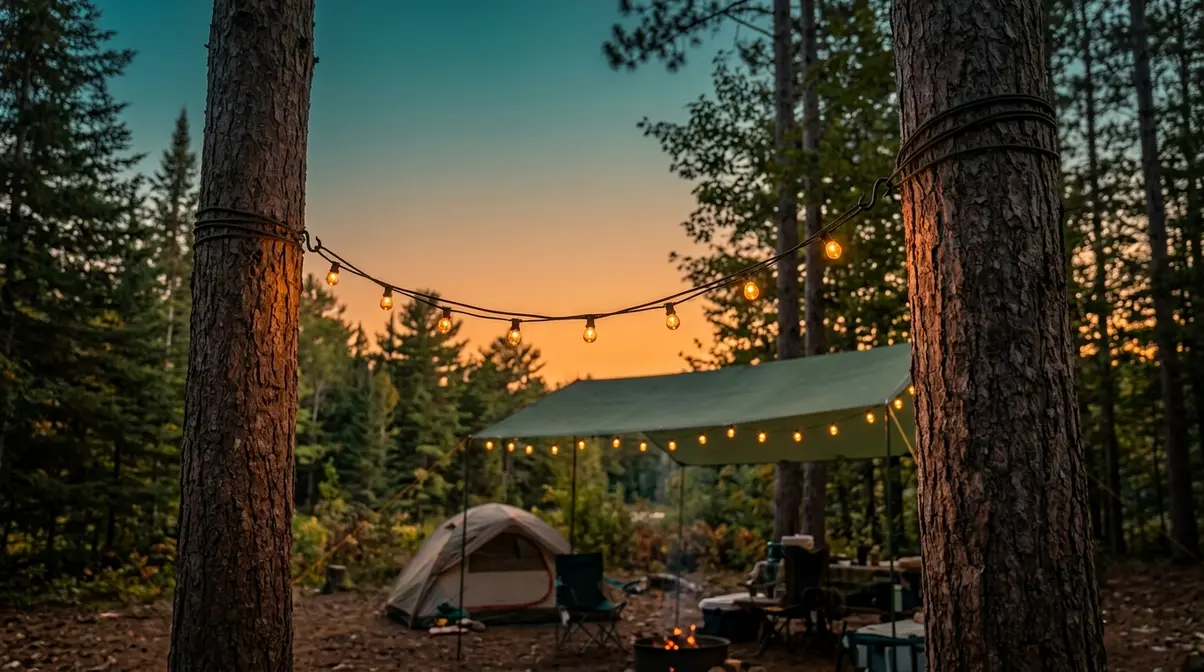
Stringing lights between trees transforms an open campsite into an outdoor living room. But wrapping lights carelessly around tree trunks can damage bark and violate Leave No Trace principles. Here’s how to hang string lights camping-style without harming a single tree.
Wrap Lights Around Tree Trunks the Right Way
The key rule: never nail, staple, or tightly wire anything to a living tree. According to Leave No Trace guidelines, fasteners that bite into or girdle bark can interrupt a tree’s nutrient flow and cause long-term damage — even a single camping trip can leave a mark.
- Steps:
- Choose two trees at least 10–15 feet apart with trunks at least 6 inches in diameter for stability.
- Wrap paracord loosely around the first trunk (two full wraps) at your desired height — about 7–8 feet off the ground works well for overhead clearance.
- Tie the paracord ends together with a bowline knot, leaving a loop. The wrap should be snug but not biting into the bark — you should be able to slide a finger underneath.
- Hang an S-hook from the loop to serve as your anchor point.
- Repeat on the second tree.
- Stretch your string light strand between the two S-hooks, allowing a gentle sag (about 12–18 inches of droop in the center looks natural and prevents snapping in wind).
Why a loose wrap matters: A tight wrap around a trunk acts like a tourniquet over years of growth. A loose wrap causes zero damage and can be removed in seconds.
String Lights Between Two Points Using a Guide Wire
For longer spans — say, across a campsite from a tree to your vehicle’s roof rack — a guide wire or secondary paracord line gives your string lights structural support and prevents them from sagging to head height.
- Steps:
- Tie your primary paracord line between the two anchor points (trees, vehicle rack, or tarp poles) as tightly as possible.
- Clip your string light strand to the paracord at 12-inch intervals using small S-hooks or gear ties — the paracord carries the tension, not the light wire.
- Leave the battery pack or solar panel at the lower end so it’s accessible without pulling the whole strand down.
- In windy conditions, add an extra paracord guy line at the midpoint of a long span to prevent excessive swing.
Campers consistently report that clipping lights to a separate support line — rather than relying on the light wire itself — dramatically extends the life of the strand by preventing stress fractures at the bulb connections.
Attaching Lights to Canopies, Tarps, and Shade Structures
Canopy frames and tarp ridgelines are some of the easiest anchor points at a campsite. The grommets (metal-ringed holes) along the edges of most tarps and canopies accept S-hooks and carabiners without any additional hardware.
- Steps:
- Identify the grommet points along the edge of your canopy or tarp.
- Clip an S-hook into each grommet where you want a light attachment point.
- Drape or loop your string light strand from S-hook to S-hook along the canopy perimeter.
- For a draped swag look, allow extra length between hooks. For a taut line, pull the strand straight and use gear ties to secure any excess wire.
- If your tarp has no grommets, use a clove hitch knot around the tarp’s edge rope (the reinforced perimeter cord) instead.
The Ambient Zone benefits most from this setup — lights along a canopy perimeter cast a warm downward glow across your entire seating area.
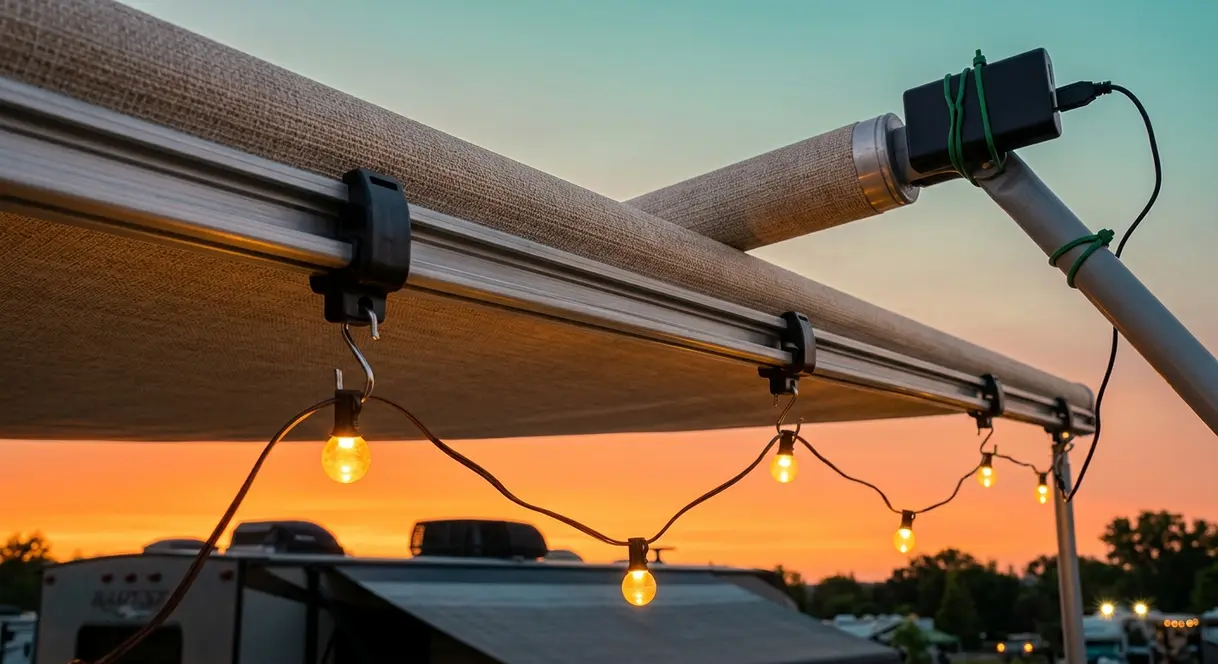
Step 4: Set Up Lights on Your RV or Camper Awning
RV awning lighting is one of the most-searched camping lighting topics — and one of the most underserved by generic guides. The good news: most RV awnings have a built-in solution you may not know about. For more advice, check out our RV camping setup tips.
How to Use Awning Clips on an RV Awning Rail
Almost every RV and camper awning features an awning rail (a narrow channel that runs along the bottom edge of the awning arm). Awning clips are specifically designed to slide into this channel, giving you a secure attachment point for string lights without a single tool or screw.
- Steps:
- Extend your RV awning fully and lock it in position.
- Slide awning clips into the awning rail channel — they slot in from the open end of the rail and slide along the track like a curtain rod.
- Space the clips 12–18 inches apart along the full length of the awning.
- Hang your string light strand from the clips, hooking each S-hook or loop connector over a clip.
- Route the power cable (battery pack or solar panel) to one end of the awning and secure it with a gear tie so it doesn’t dangle.
- For a festoon look, allow the strand to sag gently between clips. For a clean horizontal line, keep tension even.
Why awning clips are the right tool here: They’re removable in under two minutes, leave zero marks on the rail, and support the weight of most string light strands without slipping. Our team evaluated several RV awning attachment methods, and awning clips outperformed suction cups and adhesive clips in wind resistance and ease of repositioning.
Powering Your RV String Lights Safely
RVs offer more power options than tents, but that flexibility comes with a few important rules.
- Safe power options for RV awning lights:
- 12V LED strands powered directly from the RV’s 12V outlet — the most stable option for long trips
- USB-rechargeable battery pack strands — portable, no wiring needed
- Solar panel strands with the panel mounted on the RV roof — ideal for extended stays
What to avoid: According to Consumer Reports guidance on extension cord safety, standard indoor extension cords are not rated for outdoor or wet conditions. If you must use an extension cord to reach your RV’s exterior outlet, use only a weatherproof outdoor-rated extension cord (look for a “W” suffix in the cord’s rating, such as SJTW). Never run a cord under a mat or rug where heat can build up.
| Power Option | Best For | Safety Note |
|---|---|---|
| 12V RV outlet | Long trips, stable power | Use 12V-rated LED strands only |
| USB battery pack | Short trips, no wiring | Charge before departure |
| Solar panel (roof-mounted) | Extended sunny stays | Confirm panel is secured against wind |
| Outdoor extension cord | When outlet is distant | Must be outdoor-rated (SJTW or SJTOW) |
Step 5: Damage-Free Mounting Techniques
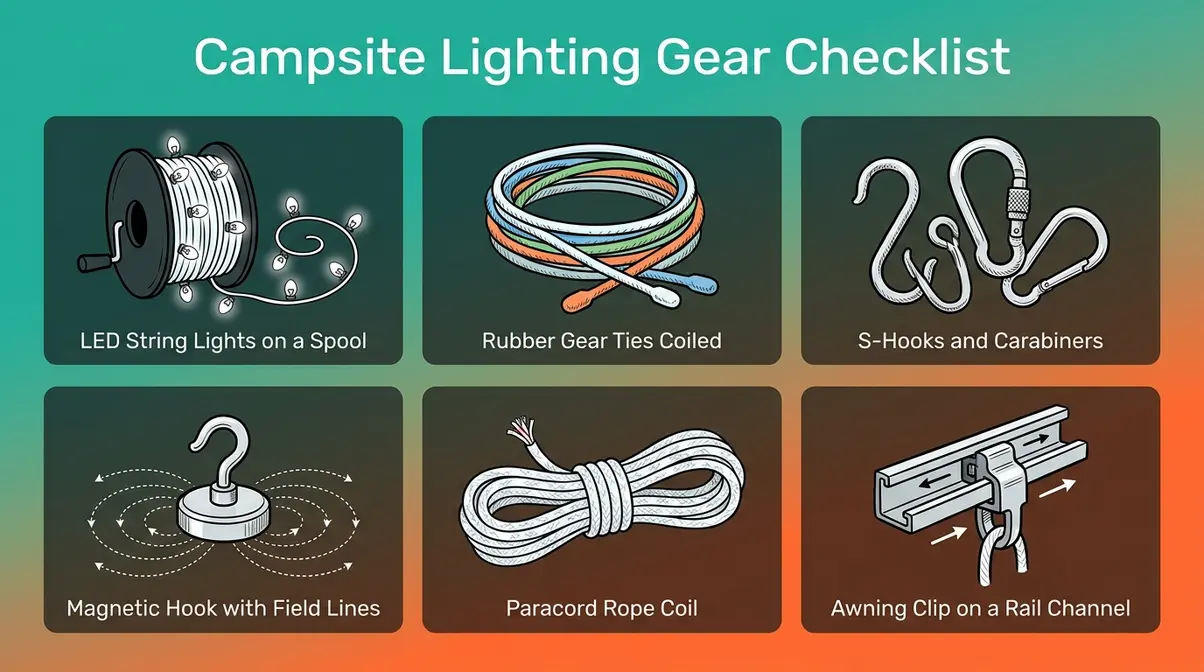
This is the section most campsite lighting guides skip entirely. Whether you’re attaching lights to a car frame, a metal shelter post, or a hard-sided camper, these seven no-drill techniques cover every surface you’ll encounter. Our team evaluated seven fastener types across tent, tree, and RV applications — here’s what works and when.
How to mount a light without drilling?
Mount a light without drilling by using magnetic hooks on metal surfaces, suction cups on smooth glass or fiberglass, gear ties on poles and branches, or awning clips on RV rail channels. For walls or hard-sided panels, outdoor adhesive clips work on clean, dry surfaces above 50°F. For spanning two anchor points, a paracord ridgeline distributes the weight and eliminates stress on the light wire itself. Each method is fully reversible and leaves no marks when removed correctly.
Magnetic Hooks and Suction Cups
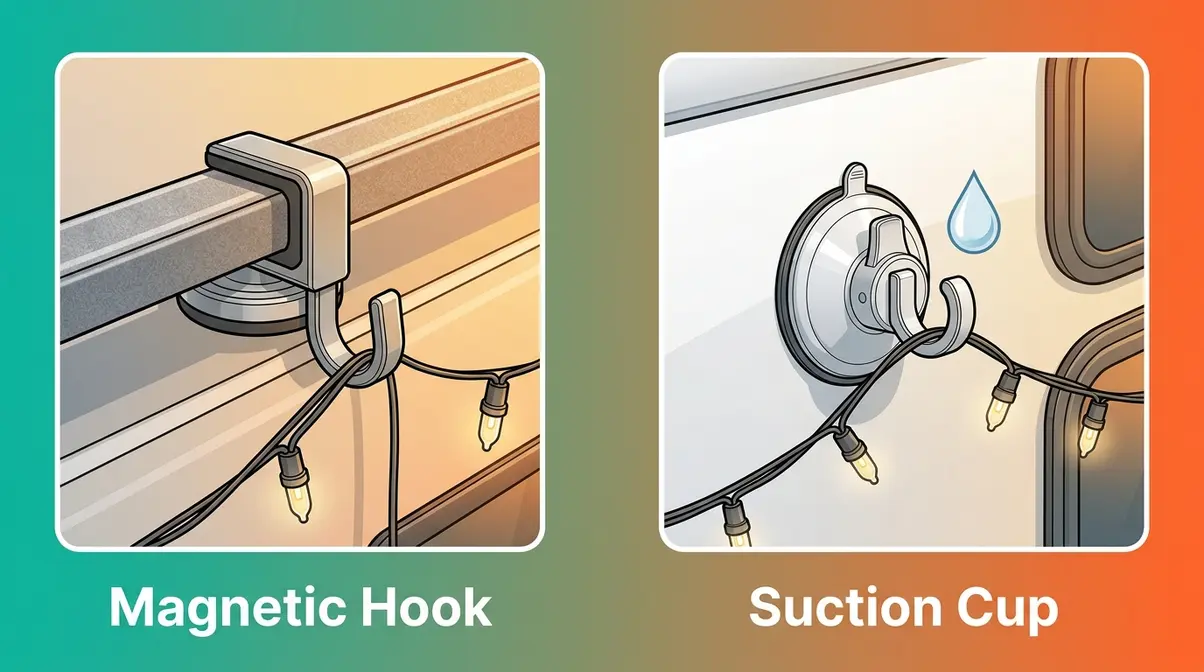
Magnetic hooks are the fastest solution for any metal surface — car roofs, truck beds, metal awning frames, or the steel poles of a pop-up shelter.
- How to use them:
- Clean the metal surface with a dry cloth to remove dust or moisture.
- Press the magnetic hook firmly onto the surface — most camping magnetic hooks hold 5–10 lbs, more than enough for a strand of LED string lights.
- Hang your light strand from the hook.
- For vehicle surfaces, position hooks away from door seams and hinges to avoid paint scuffing.
Suction cups work on smooth, non-porous surfaces — RV windows, fiberglass panels, and polished metal.
- Wet the suction cup pad slightly with water.
- Press firmly onto the clean surface and twist to lock.
- Allow 30 seconds to fully seal before hanging any weight.
- In cold temperatures (below 40°F), suction cups lose grip — switch to magnetic hooks or gear ties in cold conditions.
Magnetic hooks hold reliably on any ferrous metal surface and set up in under 10 seconds — making them the fastest no-drill fastener for car camping and metal shelter setups.
Gear Ties, S-Hooks, and Soft Ties
These three fasteners handle the widest variety of camping surfaces and are the backbone of any no-drill campsite lighting kit.
Gear ties (reusable rubber-coated wire ties, typically 6–18 inches long) wrap around tent poles, tree branches, canopy uprights, and chair backs without scratching or leaving marks.
- Wrap the gear tie around the pole and the light wire together in two full loops.
- Twist the ends together to lock — no tools needed.
- Remove by untwisting. Zero residue, zero damage.
S-hooks clip instantly onto any loop, grommet, rail, or rope. They’re ideal for connecting a light strand to a paracord ridgeline or a canopy grommet.
Soft ties (fabric hook-and-loop straps, similar to velcro cable ties) are gentler than gear ties on delicate surfaces like painted metal or coated tent poles.
Across camping forums and community reviews, the consensus is that gear ties are the most reliable all-purpose no-drill fastener — they work in rain, hold their shape in cold, and outlast adhesive alternatives by years.
Outdoor Adhesive Clips (and When Command Strips Fail)
Outdoor adhesive clips — like 3M Command Outdoor Clips — are designed for smooth, clean, dry surfaces. They can work on RV exteriors, hard-sided camper panels, or metal shelter walls, but they have important limitations in a camping context.
- When outdoor adhesive clips work:
- Clean, dry, smooth surfaces (painted metal, fiberglass, hard plastic)
- Temperatures between 50–105°F during application
- Loads under 1 lb per clip (a single strand of mini LED lights typically weighs 4–8 oz for a 20-foot strand)
When Command Strips and adhesive clips fail:
| Condition | Why They Fail | Better Alternative |
|---|---|---|
| Wet or damp surface | Adhesive won’t bond | Magnetic hook or gear tie |
| Textured surface (rough metal, canvas) | No flat contact area | Gear tie or S-hook |
| Cold weather (below 50°F) | Adhesive becomes brittle | Magnetic hook |
| Long strands over 30 ft | Cumulative weight exceeds rating | Paracord ridgeline with S-hooks |
| Removal after 48+ hours in sun | Heat degrades adhesive, leaves residue | Suction cup (easier removal) |
Will command strips hold string lights?
Outdoor Command Strips can hold string lights on smooth, clean, dry surfaces — but they fail in wet, cold, or textured conditions. Each outdoor clip is rated for approximately 1 lb, so a lightweight 20-foot LED strand (typically 4–8 oz) is within the limit. The problem at campsites: surfaces are rarely perfectly clean and dry, temperatures drop overnight, and removal after extended sun exposure can leave adhesive residue on RV panels. For most camping applications, gear ties or magnetic hooks are more reliable.
⚠️ Troubleshooting — Common Mistakes:
- Lights sagging or falling: The wire itself is bearing tension. Always attach lights to a support line (paracord or awning rail) — never let the light wire carry the full span load.
- Adhesive clips peeling off overnight: Surface wasn’t dry or clean enough at application. Wipe with rubbing alcohol first, wait 10 minutes, then apply.
- Magnetic hooks sliding on curved surfaces: Use a hook with a rubberized base pad, or place a folded piece of cloth between the magnet and the curved surface to increase contact area.
- Paracord cutting into bark: You’ve tied it too tight. Loosen the wrap so you can slide a finger underneath.
Campsite Lighting Safety and Etiquette
Good campsite lighting isn’t just about your comfort — it’s about being a considerate neighbor and protecting the natural environment around you. This section covers the rules and guidelines that most lighting articles completely overlook.
Fire Safety and Choosing the Right Light
The single most important safety rule for campsite lighting: use only LED lights inside or near your tent. Incandescent and halogen bulbs generate significant heat — enough to melt nylon tent fabric or ignite dry grass beneath a ground-level strand.
- Fire safety checklist:
- Use cool-to-the-touch LED lights exclusively — both inside the tent and within 12 inches of any fabric surface
- Never leave lights on inside a tent while sleeping unless the strand has an automatic shutoff timer
- Keep all light strands at least 2 inches away from tent walls, sleeping bags, and dry leaves
- Use battery or solar power — never run an extension cord under a tent footprint, where heat buildup can occur
According to the U.S. Forest Service, campfire and equipment-related fires are among the leading causes of human-caused wildfires on public lands. While string lights pose a far lower risk than open flames, the same principle applies: eliminate ignition sources near flammable materials.
Dark Sky Compliance and Respecting Your Neighbors
Many national parks and campgrounds — particularly those in or near International Dark Sky Places — have specific rules about artificial light at night. The National Park Service actively manages light pollution in parks including Capitol Reef, Big Bend, and Bryce Canyon, and some campgrounds within these parks restrict or prohibit bright white lights after certain hours.
- Practical etiquette guidelines:
- Use warm white or amber LEDs (color temperature 2700K or below) — they’re less disruptive to wildlife and neighboring campers than cool white or blue-tinted lights
- Direct light downward — lights angled at eye level or upward scatter into the sky and bother neighbors
- Dim or turn off lights by 10 PM at most campgrounds, unless site rules specify otherwise
- Avoid strobe or flashing modes — disruptive to wildlife, particularly insects and migratory birds
What is the 3-3-3 rule for camping? The 3-3-3 rule is a widely used campsite etiquette guideline: drive no more than 300 miles in a day, arrive at your campsite by 3 PM, and stay no more than 3 nights in one spot. While it doesn’t directly govern lighting, arriving by 3 PM gives you daylight hours to hang your lights properly — before you need them.
Keep your campsite lighting contained to your site boundaries. Spill light onto neighboring sites is one of the most common campground complaints. A good rule: stand at the edge of your designated site and look back — if your lights are clearly visible and bright from 30 feet away, they’re too intense or too high.
Frequently Asked Questions
What do you use to illuminate your campsite at night?
LED string lights, solar stake lights, and battery-powered lanterns are the most popular tools to illuminate a campsite at night. String fairy lights handle the Ambient Zone around your seating area, while a focused lantern covers the Task Zone at the picnic table. Solar stake lights mark pathways and tent pegs in the Safety Zone. Most campers use a combination of all three — each serves a different purpose and none require electrical hookups.
How to have light while camping?
Battery-powered and solar LED string lights are the easiest way to have light while camping — no electrical hookup needed. Pack a 20-foot LED strand with a USB battery pack for the tent interior, a solar stake set for pathway safety, and a clip-on lantern for the cooking area. This three-light setup covers all zones of The 3-Zone Campsite Lighting System and fits in a single stuff sack. Most battery packs provide two to three full nights of runtime on a single charge.
How can I hang lights outside without drilling holes?
You can hang lights outside without drilling by using gear ties, magnetic hooks, S-hooks, awning clips, suction cups, paracord, and outdoor adhesive clips. Gear ties wrap around poles and branches; magnetic hooks attach to any metal surface in seconds; awning clips slide into RV rail channels without tools. For tree-to-tree spans, a paracord ridgeline carries the load so the light wire doesn’t bear tension. These seven methods cover virtually every outdoor surface you’ll encounter at a campsite.
How to hang lights at a campsite?
To hang lights at a campsite, choose your anchor points first — tent gear loops, tree trunks, canopy grommets, or an RV awning rail — then use the right fastener for each surface. Use gear ties for poles and branches, awning clips for RV rails, S-hooks for grommets and loops, and paracord for long tree-to-tree spans. Always run lights along a support line rather than letting the light wire bear tension. The full process takes 10–15 minutes once you have your gear laid out.
What is the 3-3-3 rule for camping?
The 3-3-3 rule is a campsite etiquette guideline: drive no more than 300 miles per day, arrive at your campsite by 3 PM, and stay no more than 3 nights in one location. Arriving by 3 PM is particularly useful for lighting setup — it gives you daylight hours to string lights between trees, test your power source, and position Safety Zone markers before dark. The rule isn’t a formal regulation, but it’s widely respected across camping communities as a courtesy framework.
Can you leave campsite lights on all night?
It is generally recommended to turn off your campsite lights before going to sleep. Leaving them on can drain your battery packs, attract unwanted insects, and disturb neighboring campers or local wildlife. If you need overnight illumination for safety, use a dim solar stake light or a motion-sensor LED near your tent entrance instead of keeping your main string lights active.
Are solar lights better than battery-powered lights for camping?
Solar lights and battery-powered lights both have distinct advantages for camping setups. Solar lights are excellent for open, sunny campsites where they can charge fully during the day, providing free, renewable energy. However, battery-powered LED strands are often considered more reliable since they work perfectly in shaded forests, during rainy weather, or when you arrive at your site after dark.
Your Campsite, Lit Up Right
For any camper — whether you’re in a nylon backpacking tent, a poled casa lux, or a full RV — mastering how to hang lights at campsite locations comes down to three things: the right fastener for your surface, a support line that carries the weight, and lights that stay cool and campground-compliant. The 3-Zone Campsite Lighting System gives you the decision-making structure to cover every corner of your site: Task, Ambient, and Safety — no dark spots, no tripping over tent pegs, no frustrated fumbling after sunset.
The framework works because it’s modular. Start with one zone — the Ambient Zone around your seating area is the most satisfying to set up first — and add the others as your kit grows. Campers who approach lighting this way consistently report that their sites feel more functional and more welcoming without any additional gear budget.
Before your next trip, lay out your lights, your gear ties, and 15 feet of paracord. Run through the five steps in this guide at home first. You’ll arrive at your campsite knowing exactly where every strand goes — and you’ll have the whole thing glowing before the sun hits the treeline.
