This blog post may contain affiliate links. As an Amazon Associate I earn from qualifying purchases.
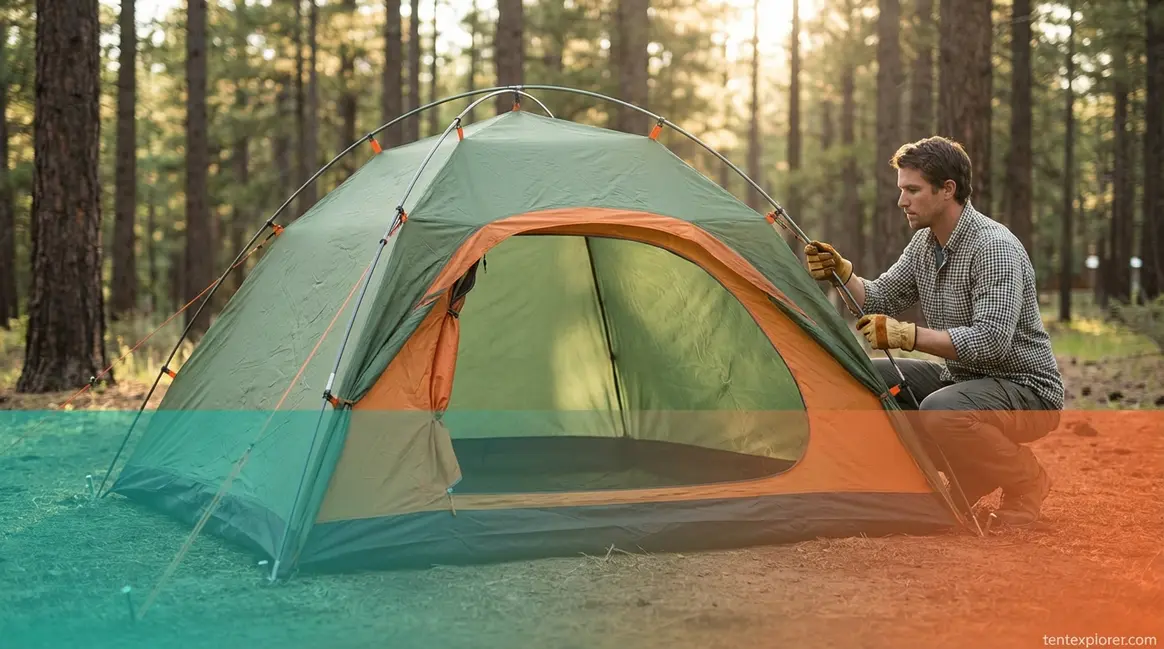
Most beginners can pitch a tent in under 30 minutes — but only after learning the three setup errors that send first-timers scrambling in the dark. The good news: once you know them, you’ll never make them again.
Arriving at a dark, rain-soaked campsite with a tent you’ve never touched is one of the fastest ways to turn an exciting trip into a miserable one. Waking up in a puddle at 2 a.m. because your groundsheet was too large — or discovering a missing pole sleeve because you never practiced at home — isn’t a matter of bad luck. It’s a matter of skipping the preparation steps that experienced campers treat as non-negotiable. These tent setup tips for beginners exist precisely to close that gap.
By the end of this guide, you’ll know exactly how to apply the tent setup tips for beginners that experienced campers rely on — so you can pitch confidently, stay dry, and actually enjoy the outdoors. We’ll walk through four phases: pre-trip prep, campsite selection, step-by-step pitching, and weatherproofing — plus the most common mistakes and how to fix them.
Tent setup for beginners takes under 30 minutes when you follow four phases: prepare at home, select your campsite, pitch step by step, and weatherproof. The Dry Camp Method — sizing your groundsheet correctly and tensioning guylines before rain arrives — is the difference between a dry night and a soggy one.
- Practice at home first to find missing gear before your trip
- Apply the 3-3-3 Rule for a safe, daylight campsite arrival
- Size your groundsheet smaller than the tent base — never larger
- Stake at 45 degrees and tension guylines for wind resistance
- Never store food in your tent — it attracts wildlife and insects
Before You Leave: Gear Prep and Home Practice
The most effective tent setup tip for beginners isn’t about technique at the campsite — it’s what you do three days before you leave. A 30-minute home practice run is the single most effective preparation step you can take: it reveals missing components, builds muscle memory for pole assembly, and eliminates the panic of encountering an unfamiliar tent in fading light.
Dome tents offer the most interior space with the least material of any tent design (U.S. National Park Service), making them the ideal first tent for beginners who want easy setup with maximum comfort. The four-phase approach we call The Dry Camp Method starts before you ever leave home — and this section covers Phase 1.
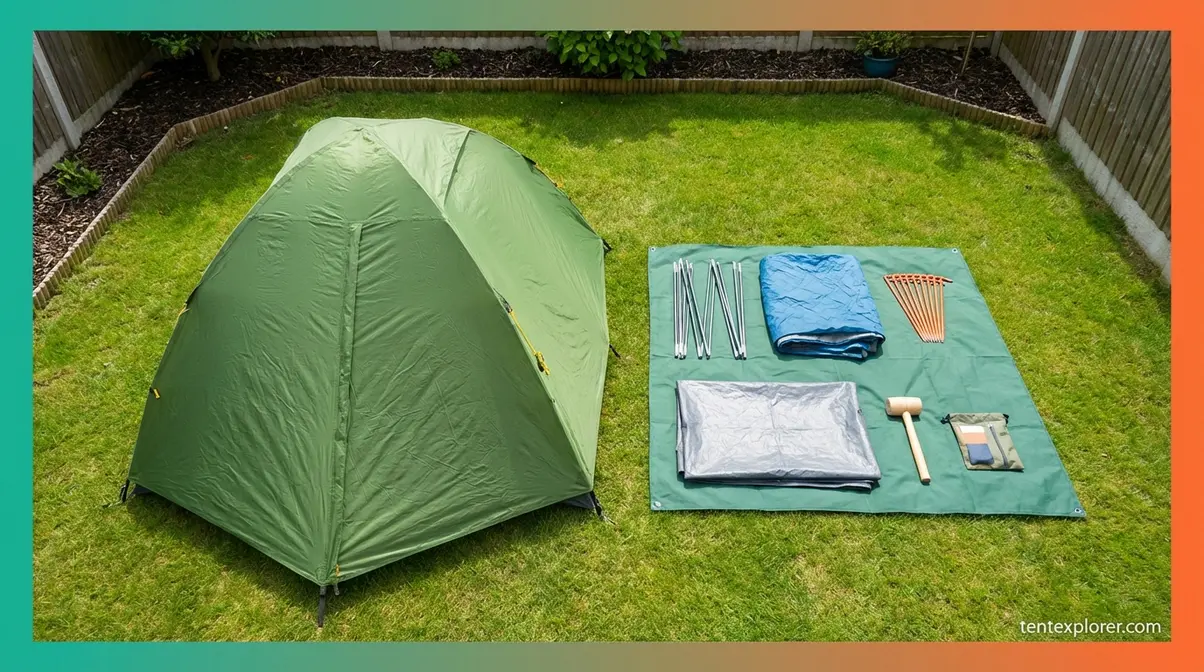
Caption: Lay every component flat before your first practice run — missing parts surface at home, not at the campsite.
With your gear packed and your tent rehearsed, the next step is picking the right spot — because the best setup in the world won’t save you from a flooded or hazardous campsite.
Practice Your Setup at Home First
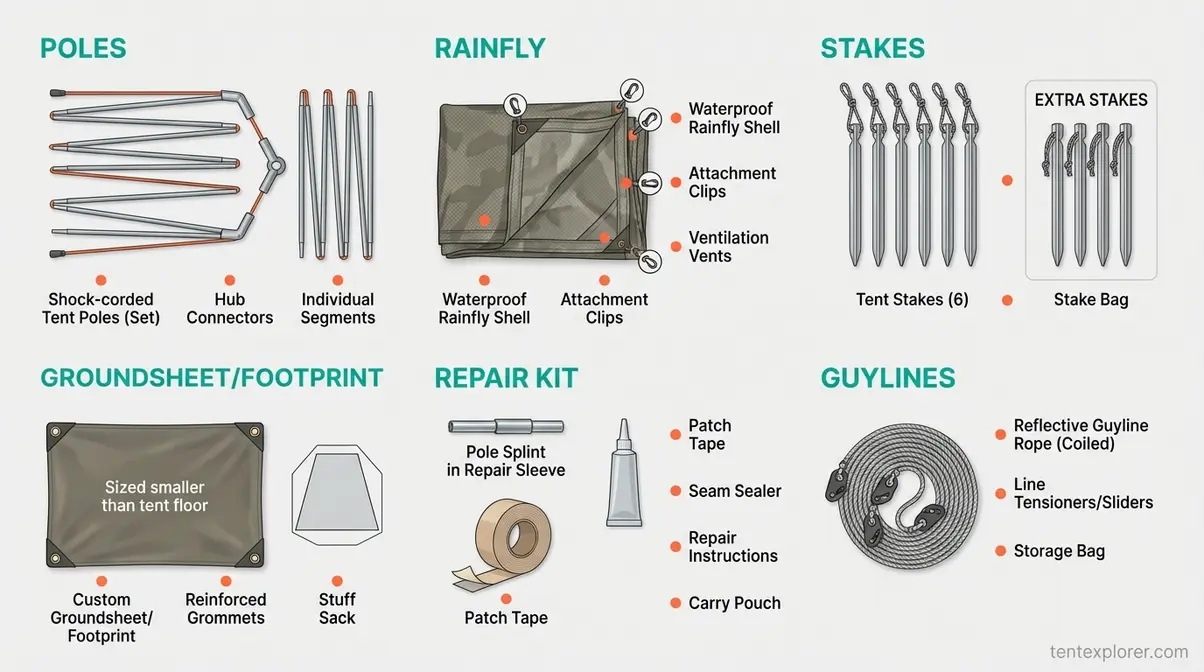
Before your trip, clear a patch of floor or lawn and unpack every component. Cross-check each item against the tent’s packing list: poles, stakes, rainfly — the waterproof outer layer that shields your tent from rain — groundsheet, and repair kit. Pay particular attention to the shock cord — the elastic bungee inside each pole section that connects them — because a frayed or broken shock cord is the most common cause of pole failure in the field.
Assemble the tent fully, time yourself, then disassemble and repack it. Knowing how to compress the tent quickly matters more than most beginners realize: in a downpour, a two-minute repacking advantage keeps your sleeping bag dry. The NPS beginner camping overview notes that setup becomes faster and easier with each repetition — most beginners cut their setup time in half after a single practice run.
Identify which poles are which by color or length. Many beginner tents use a color-coded sleeve system. If yours does, note which color goes where during the dry run — and write it on a piece of tape stuck inside your tent bag if you’re worried about forgetting. As a practical benchmark: if you can pitch your tent in your backyard in 20 minutes, you can do it at a campsite in 30, even in fading light.
Once you know your tent inside out, the next priority is making sure you haven’t left anything crucial at home — here’s the checklist that experienced campers swear by.
Build Your Essential Gear Checklist
The 7 C’s of camping — care, caution, courtesy, cleanliness, cooperation, conservation, and common sense (the 7 C’s of camping guidelines) — all start with preparation. Here’s the checklist:
- Core structural items:
- Tent body (with all zippers tested)
- Poles (shock cords intact — flex-test each section)
- Rainfly (check all clips and velcro tabs)
- Groundsheet or footprint — a custom-cut ground cloth that protects your tent floor from abrasion and moisture
- Stakes (bring 4–6 extras beyond the included count)
- Guylines — the stabilizing ropes that anchor your tent against wind
The three most-forgotten items (reported consistently across experienced camping communities):
- Mallet or rubber hammer — most beginners try to drive stakes with a rock, which bends the stake head and reduces holding power in hard-packed or rocky ground
- Repair kit — pole splints, seam sealer, and patch tape; a single bent pole mid-trip can collapse your shelter
- Reflective guylines — standard guylines are invisible in low light and are a common tripping hazard at night; reflective versions cost only a few dollars more
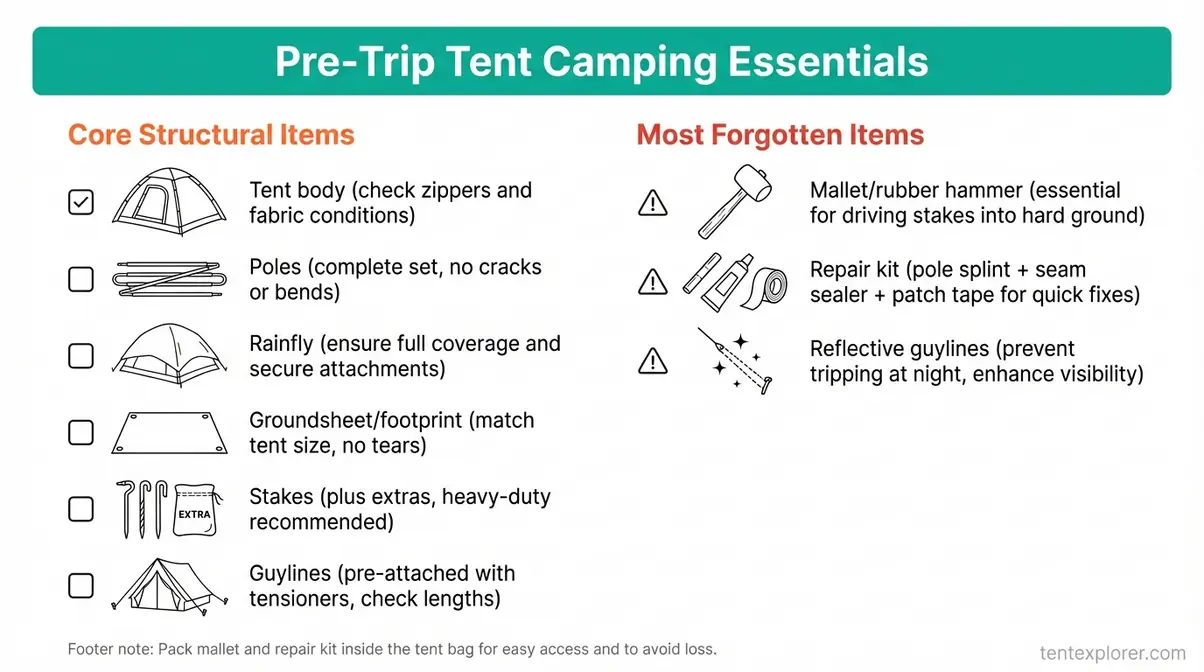
Caption: Print or screenshot this checklist before every trip — the mallet and repair kit are the two items most often left behind.
The NPS advice on choosing dome tents recommends dome tents for beginners specifically because they offer the most interior space with the least material, making them easier to pitch and pack. For a complete printable packing list, see our essential camping gear checklist for first-time campers.
Gear packed, tent rehearsed — now it’s time to choose the right campsite. This is where most beginners make their second-biggest mistake: focusing on the view and ignoring the ground beneath their feet.
Step 1: Choose Your Campsite Safely
Choosing the right campsite is the first physical step in any successful tent setup — and the most consequential decision you’ll make on arrival. The National Forest Foundation notes that staying safe at a campground requires knowing your gear, practicing situational awareness, and understanding the local environment — see National Forest Foundation safety practices for a full breakdown. A 60-second ground scan before you unpack can prevent a flooded tent, a broken night’s sleep, and a genuine safety hazard.
The Dry Camp Method begins at the campsite — a dry, level, hazard-free pitch location is the foundation of everything that follows.
Safety Note: This guide provides general campsite selection principles. Always check local weather forecasts, campground rules, and ranger advisories before pitching. Conditions vary significantly by location and season.
Level ground plus an overhead scan plus flood awareness equals a safe campsite. Your campsite is chosen and cleared — now comes the part most beginners dread. But with the right sequence, it’s simpler than it looks. Here’s how to pitch your tent step by step.
Find Level, Dry Ground
Before unpacking anything, run a 60-second ground scan using these four checks:
- Is the ground level enough to sleep on? A slight slope is acceptable if it runs away from where your head will be — never sleep with your head downhill.
- Is it dry? Look for signs of water pooling, drainage channels, or discolored soil indicating past saturation.
- Is it clear of sharp hazards? Remove or note exposed rocks, roots, and debris that could puncture the tent floor.
- Does it use natural windbreaks? Trees and boulders can shield you from wind — just check what’s above them first.
One practical test experienced campers use: lie down on the ground before pitching. If it’s uncomfortable to lie on for 10 seconds, it’ll be miserable for 8 hours. Additionally, the Leave No Trace principles for durable surfaces recommend camping on bare soil, rock, or dry grass to minimize environmental impact and avoid destabilizing soft or wet ground.
Once you’ve found level, dry ground, the 3-3-3 Rule tells you whether you’ve given yourself enough time to set up properly.
Apply the 3-3-3 Rule for Site Selection
The 3-3-3 Rule is a pacing framework that gives beginners the daylight and margin they need to set up safely. As defined by RVshare, the 3-3-3 rule for travel pacing means: drive no more than 300 miles per day, arrive at your campsite by 3 p.m., and stay at least 3 nights in one location.
“The 3-3-3 Rule — drive no more than 300 miles, arrive by 3 p.m., stay at least 3 nights — gives beginners the daylight and time needed to select and prepare a safe campsite (RVshare).”
Why does the 3 p.m. arrival matter so specifically? It gives you 2–4 hours of usable daylight to walk the site, run your ground scan, clear debris, and pitch without rushing. Arriving after dark with an unfamiliar tent is one of the most common causes of setup errors, bent poles, and missed stake placements. Experienced camping communities consistently report that most setup mistakes happen in the last hour of light — arriving by 3 p.m. removes that pressure entirely.
The rule also accounts for energy. Rushing a long drive means arriving exhausted, which leads to shortcuts in setup — skipped stakes, loose guylines, a rainfly attached on the wrong side. Campers who arrive by 3 p.m. have time to walk the site, choose the best spot, do a ground scan, and set up without stress.

Caption: The 3-3-3 Rule is a pacing framework, not a rigid schedule — adjust mileage for mountain driving, weather delays, or stops.
Arriving by 3 p.m. gives you daylight for one more critical task before you even unpack: scanning overhead for widow-makers.
Scan for Widow-Makers and Flood Risks
Widow-makers — dead or unstable tree limbs that can fall without warning — are responsible for serious campsite injuries and must be identified before you pitch. According to the Oklahoma Department of Wildlife Conservation, widow-makers are dead or detached branches hanging in a tree that pose serious hazards to campers (identifying hazardous widowmaker branches). Spot them by looking for dead branches, cracked or missing bark, leaning trunks, woodpecker holes, fungal growth, and any fresh debris on the ground beneath a tree — which indicates recent falls.
The rule of thumb: never pitch under a tree that shows dead wood overhead, regardless of how convenient the shade looks.
Flood risk deserves equal attention. Avoid low-lying areas, dry riverbeds, and drainage channels even if they look dry — rain upstream can flood a campsite rapidly. Look for water stains on rocks and exposed roots as evidence of past flooding. Camping in exposed areas without shade increases hyperthermia risk — dangerous overheating from sun exposure and dehydration — while pitching in low, damp ground increases hypothermia risk overnight (CDC guidelines for treating hypothermia).
Caption: Run all four checks before unpacking — overhead hazards and drainage signs are easy to miss when you’re eager to set up.
For a deeper dive into campsite hazards, read our guide on important tent camping safety tips.
Step 2: How to Set Up a Tent for Beginners
Here’s the sequence outdoor educators and experienced campers consistently recommend — not because it’s the only order, but because it’s the one that prevents the most common errors. Each step builds on the last. Skipping or reordering them is where bent poles and collapsed walls come from.
REI and the Appalachian Mountain Club align on this core sequence: foundation first, poles second, body third, stakes and guylines fourth, rainfly last. After evaluating multiple setup guides and the most frequently reported beginner errors across camping communities, this five-step sequence covers every critical action in the right order.
Lay the Foundation: Tarp and Footprint
Before the tent body touches the ground, your foundation goes down. Place your groundsheet or footprint on the cleared area — critically, it must be smaller than the tent’s floor dimensions. A groundsheet that extends beyond the tent’s edges acts as a funnel: it catches rainwater running off the tent walls and channels it directly underneath you. This is the single most common reason beginners wake up wet even with a waterproof tent.
Fold or trim any excess tarp inward so it sits flush within the tent’s perimeter. Smooth out wrinkles and remove any remaining pebbles or twigs from beneath it. If your tent came with a manufacturer footprint, use that — it’s pre-sized to fit.
Transition: “With the foundation down, pole assembly is next — and this is where most beginners lose 10 minutes they didn’t need to.”
Assemble Your Tent Poles Correctly
Tent poles — the shock-cord-connected rods that give your tent its structure — connect in sections. Lay all sections flat and connect them gently, following the color-coding or length markings from your home practice run. Never force a connection or bend a section to make it fit.
The most common pole error: pulling sections apart instead of pushing them together. The shock cord creates tension that helps the sections stay connected — work with it, not against it. Experienced campers consistently report that most bent poles happen during rushed assembly, not during storms — working slowly and deliberately is the most effective prevention.
Caption: Connect sections by pushing, not pulling — forcing apart a shock-cord joint is the most common cause of pole damage.
Where do the poles go on a tent? Most dome tents use two or three crossing poles that thread through sleeves sewn into the tent body, or clip onto rings along the exterior. Check your tent’s specific manual — some use a combination of sleeves and clips. Your home practice run should have already answered this for your specific model.
Raise the Tent Body and Clip the Poles
With poles assembled and fed through their sleeves, place the pole tips into the grommets at each corner of the tent base. Bow the poles gently upward until the tent body rises and takes shape. Work from one end to the other — don’t try to raise all corners simultaneously.
Once the frame is standing, clip any remaining attachment points along the pole length to the tent body. These clips keep the tent fabric taut and prevent the walls from sagging inward. A properly clipped tent should feel firm and symmetrical — if one side sags noticeably, check whether a clip is missed or a pole tip has slipped its grommet.
Caption: Bow the poles from one end to the other — simultaneous corner raising is a two-person job and often misaligns the frame.
Drive Stakes and Tension the Guylines
Stakes go in before you attach the rainfly — a tent body under tension is easier to stake correctly. At each corner anchor point, drive your stake at roughly a 45-degree angle, leaning away from the tent. This angle increases holding power in standard soil conditions by maximizing the stake’s surface contact with the ground. Use your mallet — not a rock — to drive stakes flush to the soil surface.
After staking all corners, attach the guylines — the guy ropes that stabilize your tent in wind — to their designated loops on the tent body or rainfly. Pull each guyline taut and stake it out at an angle away from the tent, roughly perpendicular to the wall it’s attached to. A tent with properly tensioned guylines resists wind significantly better than one relying on stakes alone. In open or exposed sites, this step is not optional.
Caption: Stake angle and guyline direction work together — a correctly angled stake with a slack guyline still fails in strong wind.
Attach the Rainfly Correctly
The rainfly — your tent’s waterproof outer shell — goes on last. Drape it over the tent body, aligning the door openings with the tent’s doors. Most rainflies have color-coded or labeled attachment points; match them to the corresponding clips or buckles on the tent poles.
Pull the rainfly taut on all sides before clipping it down. A loose rainfly flaps in wind, creates noise that disrupts sleep, and — critically — touches the inner tent wall when wet, transferring moisture inside. There should be a visible gap between the rainfly and the tent body on all sides. Once attached, retension the corner guylines to account for the added weight and surface area of the fly.
Caption: The gap between the rainfly and inner tent wall is not cosmetic — it’s your primary defense against condensation transfer.
Step 3: Weatherproof and Set Up for Comfort
A tent that’s properly pitched but poorly weatherproofed will still leave you wet. This phase — the final element of The Dry Camp Method — addresses the two issues zero competitor guides cover: tarp sizing errors that funnel water underneath you, and condensation that soaks your sleeping bag from the inside out. Addressing both takes under 10 minutes and makes the difference between waking up refreshed and waking up miserable.
Caption: The Dry Camp Method is a four-phase checklist — skipping Phase 4 (weatherproofing) is the most common reason a well-pitched tent still fails.
Tarp Sizing — Why Smaller Is Better
The most widespread beginner mistake in weatherproofing isn’t a missing rainfly — it’s an oversized groundsheet. As Backpacker Magazine explains, footprints are generally sized to be slightly smaller than the actual dimensions of your tent specifically because when it rains, water runs down the tent walls and fly directly into the ground. If the groundsheet extends beyond the tent’s edges, that water is caught and channeled beneath you instead.
“Always put a tarp between the ground and your tent. Keeps the bottom of your tent safer from tears and provides a moisture barrier.”
This advice from experienced camping communities is correct — with one critical qualifier: the tarp must stay inside the tent’s perimeter. If you’re using a universal tarp rather than a custom footprint, fold the excess inward and tuck it under the tent. Never let the groundsheet extend outward, regardless of how tempting it is to protect more ground area.
Caption: An oversized groundsheet is worse than no groundsheet — it collects and holds water directly beneath your sleeping area.
For a custom footprint, REI’s guide on tent footprints recommends 250 denier or higher material if you’re prioritizing durability over weight. A purpose-made footprint is the cleanest solution — it’s pre-sized, pre-shaped, and eliminates the folding problem entirely. For a full breakdown of footprint materials and sizing, read our guide on understanding if you need a tent footprint.
Stop Condensation Before It Starts
Condensation is the silent cause of wet sleeping bags that beginners almost universally blame on a leaking tent. It forms when warm, moist air from your breath and body contacts the cooler inner surface of the tent wall — and it’s entirely preventable with two simple adjustments.
REI’s expert advice on condensation prevention is clear: ventilate, ventilate, ventilate. Keep at least one vent open at all times, even in cold weather. On calm, dry nights, roll back the rainfly vestibule slightly to increase airflow. The goal is to allow moisture-laden air to escape before it condenses on the tent walls.
Three additional steps that experienced campers consistently recommend:
- Keep wet gear outside. Damp boots, wet rain jackets, and wet towels inside the tent dramatically increase interior humidity.
- Cook outside the tent. Boiling water and cooking produce significant steam — even a camp stove used inside a vestibule raises interior moisture levels.
- Choose a slightly elevated or forested site. Pitching under trees rather than in open fields reduces the temperature differential that drives condensation. Avoid low-lying areas where cold air pools overnight — experienced campers consistently find that slightly elevated or forested sites reduce condensation buildup significantly.
Condensation is not a tent defect — it’s a ventilation and moisture management issue that every camper can solve before the first night.
Caption: Condensation peaks in the early morning hours — leaving a vent cracked overnight is the single highest-impact prevention step.
Set Up for a Good Night’s Sleep
With the tent weatherproofed, spend five minutes on interior setup. Place your sleeping pad — the most important comfort item, and the answer to “what is the comfiest thing to sleep on when camping?” — directly on the tent floor. A quality sleeping pad insulates you from ground cold more effectively than sleeping bag loft alone. For help deciding between options, see our comparison of choosing between an air mattress and a sleeping pad.
Orient your sleeping position with your head slightly uphill if on a slope, and position your pack near the door so you’re not climbing over it in the dark. Keep a headlamp, water bottle, and any medication within arm’s reach inside the tent. Store all food, snacks, and scented items outside the tent in a bear canister or hung bag — never inside.
Common Tent Setup Mistakes and How to Fix Them
Even with good preparation, certain errors appear repeatedly in first-time camper reports. Across camping communities and outdoor educator feedback, these five pitfalls account for the vast majority of beginner problems — and each has a straightforward fix.
Five Pitfalls Beginners Should Avoid
1. Skipping the home practice run. Arriving at a campsite with an unfamiliar tent and diminishing light is the most reliable way to make every other mistake on this list. Fix: one 30-minute dry run at home, minimum.
2. Oversizing the groundsheet. As covered in the tarp sizing section, a groundsheet that extends beyond the tent’s perimeter collects and channels water underneath you. Fix: fold excess tarp inward or use a purpose-made footprint sized to your tent model.
3. Skipping guylines in calm weather. Conditions change overnight. A tent without tensioned guylines that seems fine at 9 p.m. can collapse or flap violently by 2 a.m. Fix: always stake and tension guylines as part of setup, regardless of the forecast.
4. Attaching the rainfly loosely. A loose rainfly touches the inner tent wall when wet, wicking moisture inside. It also creates noise that disrupts sleep. Fix: pull the fly taut on all sides and clip every attachment point before calling setup complete.
5. Driving stakes with a rock. Rocks bend stake heads, reducing holding power and making stakes difficult to remove. Fix: carry a rubber mallet or use the back of a purpose-made stake puller.
Caption: All five mistakes are easily avoided — most require only a 30-second check during setup, not additional gear.
When a Different Setup Makes Sense
Some situations genuinely call for a different approach or additional support. If you’re camping in conditions with sustained winds over 30 mph, a standard dome tent may not provide adequate stability — a lower-profile tunnel tent or a four-season tent with additional guyline points is a better choice. Ask your local outdoor retailer or ranger station for site-specific recommendations before committing to a setup in extreme conditions.
If you’ve run your home practice and still can’t confidently assemble your poles or attach your rainfly, consider attending a beginner camping clinic — REI and the Appalachian Mountain Club both offer hands-on instruction. For a more detailed walkthrough of each step, see our step-by-step guide to setting up your tent. There’s no benefit in troubleshooting a novel tent for the first time in the field. A 90-minute clinic eliminates that uncertainty entirely.
For campsite-specific hazards — flooding risk, fire restrictions, wildlife activity — always check in with the local ranger station before arrival. General guidance like this article provides the framework; site-specific conditions require local knowledge.
Frequently Asked Questions
What are the 7 C’s of camping?
The 7 C’s of camping are care, caution, courtesy, cleanliness, cooperation, conservation, and common sense (Passport to Texas). These principles function as a mental framework for responsible outdoor behavior — not just ethics, but practical habits. Care and caution apply directly to campsite selection and tent setup: checking for widow-makers, avoiding fragile ground, and leaving a site as you found it. Starting your prep with these principles in mind reduces both safety risks and environmental impact.
How do you set up a tent for beginners?
Setting up a tent for beginners follows five steps: lay your groundsheet smaller than the tent floor, assemble poles by connecting sections gently along the shock cord, raise the tent body and clip poles to attachment rings, drive stakes at 45 degrees and tension guylines, then attach the rainfly taut with a visible gap between the fly and inner wall. Practicing this sequence at home before your first trip cuts campsite setup time roughly in half. The AMC and REI both confirm this five-step sequence as the standard approach for dome tents.
What Not to Forget When Tent Camping?
The three most commonly forgotten items are a mallet, a repair kit, and reflective guylines. Beyond those, experienced campers report that seam sealer, extra stakes, and a groundsheet are frequently left behind. A complete checklist includes: tent body, poles with intact shock cords, rainfly, footprint, stakes (plus extras), guylines, mallet, repair kit (pole splint, patch tape, seam sealer), and a headlamp. For a downloadable version, see our camping checklist for first-time campers.
Where do the poles go on a tent?
Tent poles thread through fabric sleeves sewn along the exterior of the tent body, or clip onto attachment rings, depending on the tent design. Most dome tents use two crossing poles that run diagonally from corner to corner, with tips seated into grommets at each base corner. Some tents combine sleeves and clips. Your tent’s manual will show the exact routing — and your home practice run should confirm it before you’re in the field. Color-coded pole sections and sleeves make this straightforward on most beginner models.
What is the 3-3-3 rule in camping?
The 3-3-3 rule means driving no more than 300 miles per day, arriving at your campsite by 3 p.m., and staying at least 3 nights in one location (RVshare). For tent campers specifically, the 3 p.m. arrival is the most critical element — it gives you 2–4 hours of daylight for site selection, a ground scan, and setup without rushing. Arriving after dark with an unfamiliar tent is one of the most common causes of setup errors and missed stake placements.
What is the most forgotten item when camping?
The most forgotten item is a mallet or rubber hammer for driving stakes. Most beginners assume they can use a rock, which bends the stake head and reduces holding power significantly. The repair kit — pole splints, patch tape, and seam sealer — is the second most frequently left behind item, and the one with the highest consequence: a bent pole without a splint can end a trip early. Pack both in a small zippered pouch stored inside the tent bag so they’re never separated from the tent itself.
Should I put a tarp under my tent?
Yes — but it must be smaller than your tent’s floor dimensions, never larger. A groundsheet that extends beyond the tent’s edges catches rainwater running off the tent walls and channels it directly underneath you, causing the wet sleeping scenario it’s meant to prevent. Fold excess tarp inward so it stays within the tent’s perimeter, or use a purpose-made footprint pre-sized to your tent model. The Backpacker Magazine guide on tent footprints confirms this sizing principle as standard practice.
Comfiest Thing to Sleep on When Camping?
A quality sleeping pad is the most important comfort item for tent camping — more impactful than sleeping bag fill weight or pillow choice. Sleeping pads insulate you from ground cold, which drains body heat far more efficiently than cold air. Self-inflating foam pads balance comfort and insulation for most three-season camping. Air pads are lighter and more comfortable but require inflation. Foam closed-cell pads are the most durable and never fail — experienced campers often use them as a backup layer beneath an air pad in cold conditions.
Four-Phase Setup Complete: Your Next Steps
For beginner campers, tent setup is one of the few outdoor skills that rewards deliberate practice more than natural talent. The sequence covered here — prepare at home, choose your campsite safely, pitch step by step, weatherproof before the rain arrives — removes the variables that turn a first trip into a frustrating one. Across camping communities, the consensus is clear: the campers who wake up dry and rested are the ones who did a backyard practice run, sized their groundsheet correctly, and tensioned their guylines before dark.
The Dry Camp Method — sizing your groundsheet inside the tent’s perimeter, ventilating overnight to prevent condensation, and completing setup before you lose daylight — isn’t advanced technique. It’s the foundational discipline that separates a good night’s sleep from a wet, sleepless one. Every element of this framework connects back to that single outcome: staying dry, staying safe, and actually enjoying the outdoors.
Your next step: unpack your tent this week, set it up in your backyard, and time yourself. Note any missing components, practice repacking it efficiently, and run the four-point ground scan on your lawn. By the time you reach your first campsite, the sequence will be automatic — and you’ll spend your first evening at camp enjoying it, not scrambling through it.
