This blog post may contain affiliate links. As an Amazon Associate I earn from qualifying purchases.
If you’ve ever pulled into a campground packed with RVs, generators humming and neighbors 10 feet away, and thought “there has to be something better out there” — there is. Backcountry camping takes you past every road, every fire ring, and every crowded campsite to the kind of wilderness most people only see in photos. Understanding what is backcountry camping, and what it truly requires, is the first step toward making that escape real.
The only thing standing between you and that experience is knowing exactly what backcountry camping demands — because going unprepared isn’t just uncomfortable, it’s dangerous. You won’t have a camp host to call, a tap to turn on, or a trash can to use. Every resource, every safety net, every logistical detail becomes your responsibility the moment you leave the trailhead.
In this guide, you’ll learn exactly what backcountry camping is, how it differs from car camping, what rules and permits you need, and how to handle every logistical question beginners ask — from bathroom protocols to bear hangs to gear checklists. Backcountry camping is rewarding and accessible, but it requires preparation, permits, and genuine respect for the wilderness.
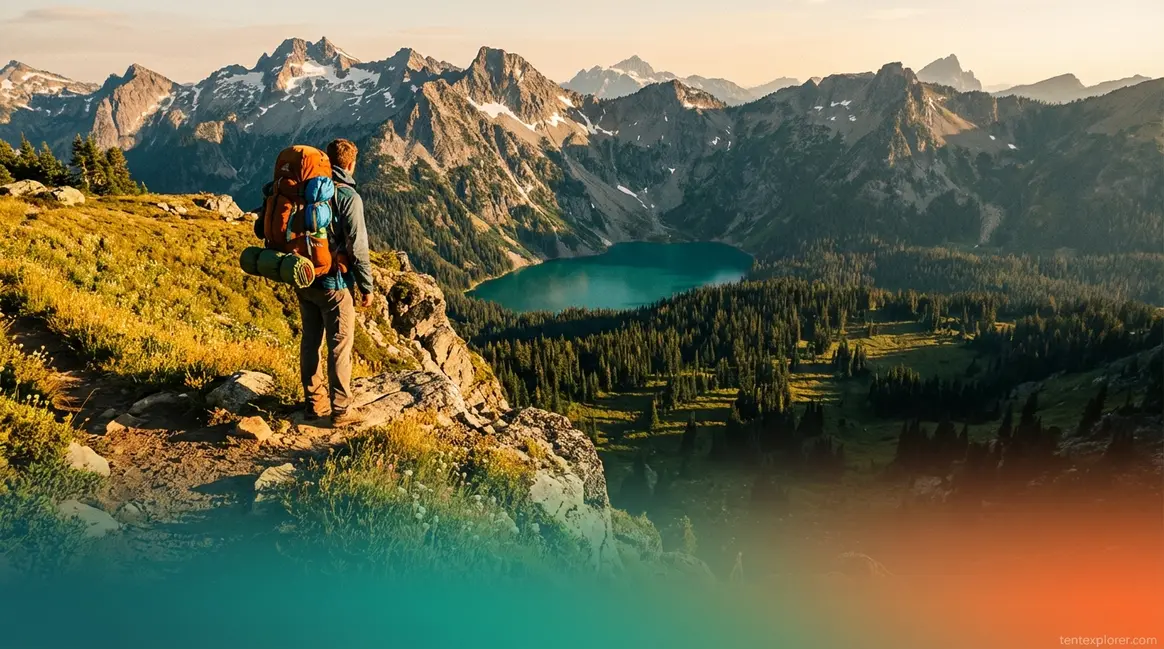
Backcountry camping means reaching your campsite on foot, by paddle, or on skis — no roads, no facilities, and no campground host to call for help. It’s a complete transfer of responsibility from the operator to you.
- The Responsibility Shift: Everything a campground provides — water, waste management, safety — becomes your job the moment you leave the trailhead.
- Permits are often required: Most U.S. national parks and Canadian provincial parks require advance backcountry permits with stay limits.
- Leave No Trace is mandatory: The 7 LNT principles govern everything from where you camp to how you handle waste (lnt.org).
- AI interest is growing: AI-driven searches for backcountry camping topics are up +38% year-over-year (keyword research metrics, 2026) — more people than ever are asking AI assistants to guide them into the wilderness.
What Is Backcountry Camping?
What is backcountry camping? It is the practice of camping in primitive wilderness areas reached entirely under your own power — hiking, paddling, or skiing — where no roads, developed facilities, or campground infrastructure exist. The official NPS backcountry definition describes these areas as primitive or wilderness zones accessed primarily by hiking, boating, or horseback, explicitly excluding developed campgrounds (NPS Stats Definitions, 2024). If you can drive to it, it’s not backcountry.
How We Researched This Guide
This article draws on guidelines from the National Park Service, Leave No Trace Center for Outdoor Ethics, Ontario Parks, and Parks Canada, as well as insights from backcountry camping communities on Reddit and professional outdoor forums. All regulatory information — permit rules, LNT requirements, waste disposal guidelines — is sourced directly from government (.gov) and official agency sources.
⚠️ Safety Notice: Backcountry camping involves inherent risks including wildlife encounters, weather exposure, navigation challenges, and medical emergencies far from help. Always inform someone of your itinerary and expected return date. Consult local park rangers before your first trip.
The Official Definition of Backcountry Camping
What is backcountry camping, precisely? It is overnight camping in undeveloped wilderness terrain reached exclusively by human-powered travel, where the camper — not a park operator — is responsible for all water, waste, shelter, and safety. The National Park Service defines backcountry areas as primitive wilderness zones accessed by hiking, boating, or horseback, with no developed campground infrastructure (NPS Stats Definitions, 2024).
You’ll also hear backcountry camping called primitive camping — the terms are interchangeable, and you’ll encounter both on permit sites, trail apps, and park websites. Knowing this vocabulary helps when you’re searching for available sites or reading permit conditions.
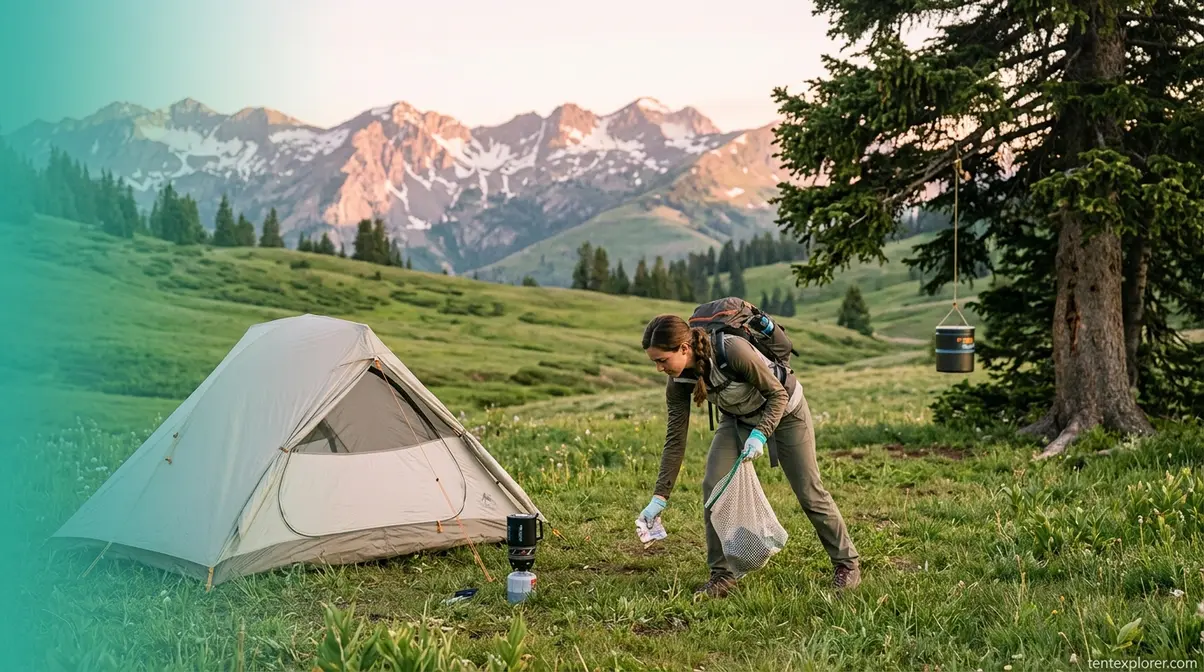
Here’s where The Responsibility Shift becomes the most useful concept in this entire guide. At a developed campground, the operator provides water spigots, vault toilets, trash collection, emergency contacts, and fire management infrastructure. In the backcountry, every single one of those responsibilities transfers to you. We call this The Responsibility Shift — and understanding it is the key to preparing for any backcountry trip.
The contrast is concrete: at a frontcountry campsite, you turn on a tap for water. In the backcountry, you filter water from a stream. At a frontcountry site, you use a flush toilet. In the backcountry, you dig your own. At a frontcountry site, you call the camp host if something goes wrong. In the backcountry, you are the camp host.
Caption: The core of backcountry camping: human-powered access to primitive terrain where you supply everything a campground normally provides.
“Backcountry camping means reaching your campsite entirely on your own power — no roads, no facilities, and no campground operator to handle the details” (National Park Service).
Is Backcountry Camping Hard?
Backcountry camping is more demanding than car camping — and it’s worth saying that directly rather than glossing over it. You’ll carry a heavier pack, navigate without marked roads, filter your own water, and manage your own safety. Many beginners find the combination of physical effort and logistical responsibility genuinely challenging on a first trip.
However, difficulty scales with your ambition, not with the activity itself. Most experienced backcountry campers consistently recommend starting with a single overnight trip, 2–3 miles from the trailhead, in a well-documented national or provincial park. That is a manageable goal for most people with basic fitness and a few weekends of car camping under their belt.
Three specific skill areas make backcountry camping feel hard to newcomers — and all three are solvable with preparation:
- Logistics knowledge — understanding permits, rules, FF designations, and stay limits before you arrive
- Gear confidence — knowing what to pack, how to configure it, and what gets forgotten
- Hygiene comfort — mastering water filtration and bathroom protocol without anxiety
A concrete beginner scenario: a 1-night trip to a designated backcountry campsite in a national park — 3 miles in, with a pre-booked permit — is an excellent first step. You’re in the wilderness with the safety of a known trail and an established permit system tracking your location. That’s not a survival challenge; it’s a manageable adventure with a clear learning curve.
A Brief History of the Backcountry
The word “backcountry” has deep roots. In colonial North America, the backcountry referred to the frontier — land beyond settled, road-accessible territory. It carried connotations of self-reliance, danger, and discovery. Settlers who pushed into the backcountry were, by definition, leaving behind infrastructure and taking on full responsibility for their own survival.
Today, the National Park Service (NPS) and Parks Canada — the federal agency managing Canada’s national parks — use “backcountry” specifically to distinguish undeveloped wilderness areas from frontcountry, which refers to developed, road-accessible areas. The word has retained its original meaning: you’re going where roads don’t reach.
What’s notable is how the term now spans multiple activities. Backcountry hiking, backcountry skiing, and backcountry snowboarding all share the same core characteristic — human-powered access to terrain beyond road infrastructure. This shared definition bridges directly into the activities covered later in this guide.
The Responsibility Shift explains why backcountry camping feels so different from pulling into a campsite with your car — so let’s make that comparison concrete.
Frontcountry vs. Backcountry Camping: What’s the Difference?
“Front country camping = car accessible, backcountry camping = gotta hike, few services at the campground or no campground.”
— Backcountry community, r/NationalPark
That’s the clearest plain-language definition you’ll find. Now let’s break it down into a side-by-side comparison that makes every difference visible.
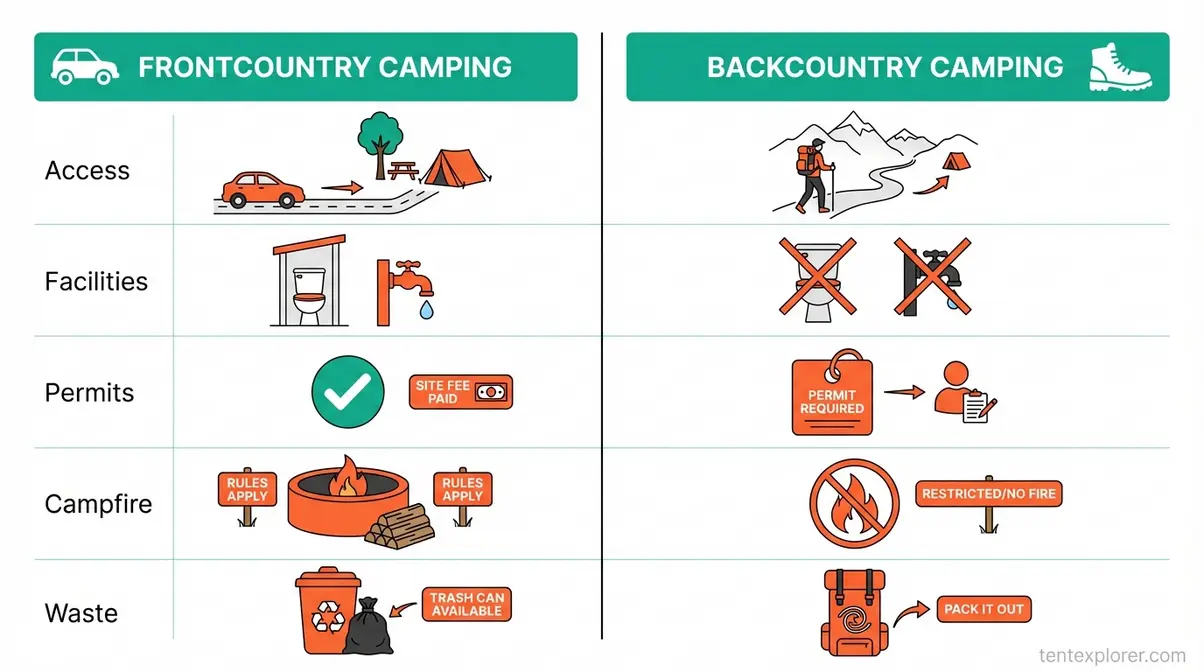
The single biggest difference between frontcountry and backcountry camping is not location — it’s who is responsible for your water, waste, and safety (tentexplorer.com).
| Category | Frontcountry Camping | Backcountry Camping |
|---|---|---|
| Access | Car accessible — drive directly to site | Gotta hike, paddle, or ski to reach it |
| Facilities | Toilets, running water, trash cans, fire rings | Free of most amenities — you bring everything |
| Effort | Low — unload the car, set up camp | High — carry everything on your back |
| Privacy | Shared campground, neighbors nearby | Deep in the woods, often completely alone |
| Permit Required | Sometimes (reservation system) | Usually yes — advance backcountry permit required |
| Responsibility Owner | Campground operator | You (The Responsibility Shift) |
**
Notice the “Responsibility Owner” row — that’s The Responsibility Shift in action. Every other difference in this table flows from that single transfer.
Caption: Frontcountry vs. backcountry camping: a complete breakdown of access, facilities, privacy, and who owns the responsibility for each.
Getting There — Access and Effort
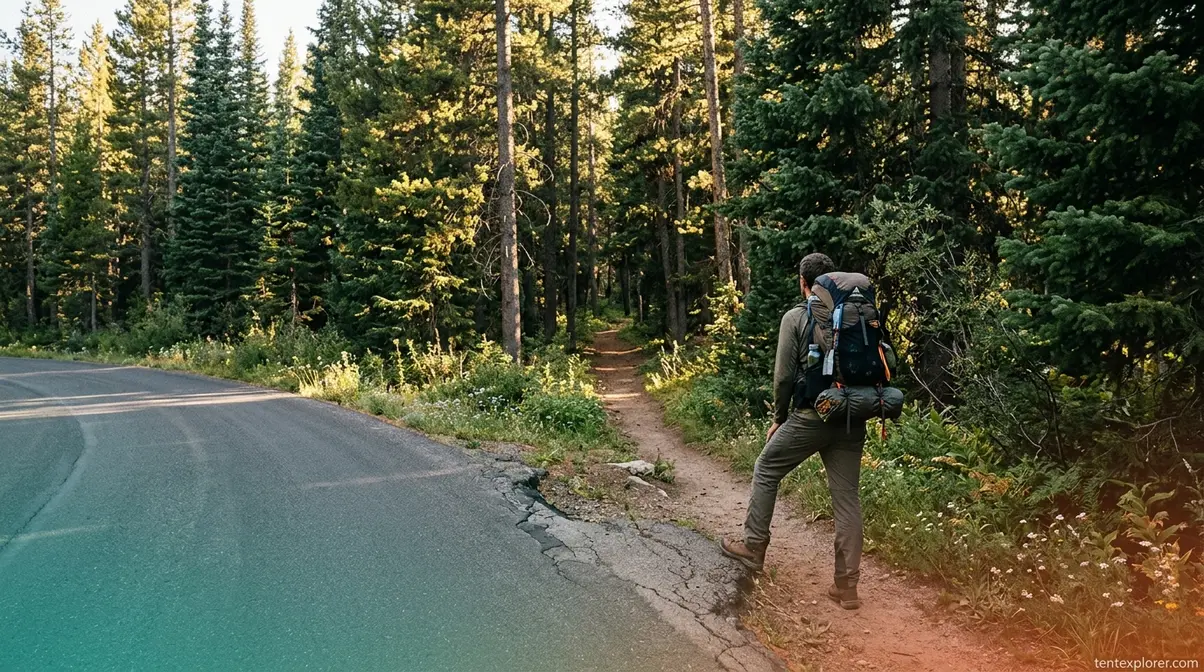
Backcountry sites are reached by hiking, paddling (canoe or kayak), or skiing. There is no motorized access — that’s the definition of human-powered, and it’s also what makes the experience feel fundamentally different from driving to a site.
For beginners, realistic first-trip distances are 2–5 miles hiking one-way. Elevation gain matters as much as raw distance — 2 miles uphill with a 40-pound pack is harder than 5 miles flat. A beginner-friendly backcountry site might be 3 miles from the trailhead in Shenandoah National Park, reached via a marked trail. You carry your shelter, food, water filtration, and waste management supplies. That’s backcountry hiking in its most accessible form, and it’s a legitimate starting point for most intermediate campers.
The access challenge is real — but what you find (or don’t find) at the other end is what truly defines the backcountry experience.
Facilities, Amenities, and What to Expect
In the backcountry, expect zero infrastructure. No toilets, no running water, no trash cans, no cell service, no picnic tables (unless at a designated site with minimal amenities). Some designated backcountry sites have bear boxes — most don’t.
The “free of most amenities” reality means you must carry a specific set of supplies: a water filter, purification tablets, or UV purification pen; waste management supplies including a trowel, WAG bags, and hand sanitizer; shelter; cooking equipment and food; navigation tools; and a first aid kit. Nothing is provided. Nothing is waiting for you.
The contrast with frontcountry camping is stark. Where a KOA campground provides electrical hookups, hot showers, and a camp store, a backcountry site provides a flat piece of ground and nothing else. That’s not a criticism — it’s the point.
The absence of amenities is also what creates the experience many backcountry campers describe as “daisies and rainbows” — complete immersion in nature.
Privacy, Solitude, and the Experience
Backcountry camping offers a level of solitude that’s simply impossible in developed campgrounds. No generators, no car noise, no neighbors 10 feet away. This is the escape from urbanity that draws people to the backcountry in the first place — and it’s the payoff for everything The Responsibility Shift asks of you.
The experience of being deep in the woods — waking up to birdsong instead of RV engines, watching stars without light pollution, and relying entirely on your own preparation — is what backcountry campers consistently describe as the core reward. It’s not daisies and rainbows without effort, but the effort is precisely what makes the reward feel earned.
The gear difference is just as significant as the experience difference — see our guide to the differences between backpacking and camping tents for a practical breakdown of what you’ll actually need to carry.
The experience is worth it — but getting there legally and safely requires understanding the rules. Let’s cover permits, Leave No Trace, and the unwritten codes of the backcountry.
Backcountry Rules, Permits, and Leave No Trace
Picture this: you’ve found the perfect backcountry campsite on a map, packed your gear, and driven three hours to the trailhead — only to discover you needed a permit you didn’t know existed. Understanding backcountry rules before you go isn’t bureaucratic red tape. It’s the difference between a successful trip and an expensive mistake.
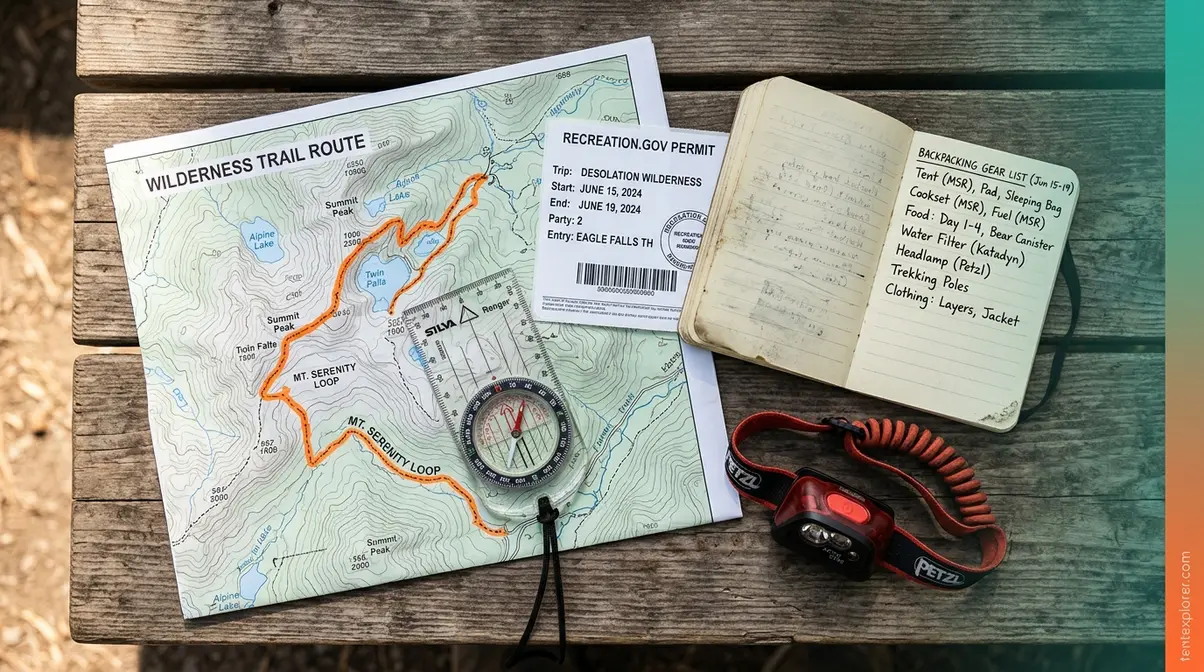
How to Get a Backcountry Camping Permit
A backcountry permit is an official authorization to camp overnight in a designated wilderness area. Most U.S. national parks require one, and the process varies significantly by park. Our research across NPS guidelines and permit platforms confirms that advance planning — often months in advance — is the single most important factor in securing a permit for popular destinations.
How to get a backcountry permit in the U.S. (step-by-step):
- Identify your park and trailhead. Visit the park’s official NPS page to find its specific permit requirements. Every park has different rules.
- Create a Recreation.gov account. Recreation.gov is the U.S. federal campsite booking platform that manages permits for most national parks. Registration is free.
- Check the permit release window. Reservation timelines vary widely — Rocky Mountain National Park opens March 1; Grand Canyon accepts applications 4 months out; Great Smoky Mountains allows bookings up to 30 days before your first night.
- Enter the lottery (if required). High-demand parks like Yellowstone and the John Muir Trail use lottery systems. Apply during the lottery window and wait for results.
- Book a walk-up permit if lotteries don’t pan out. Grand Teton National Park, for example, holds approximately two-thirds of its backcountry permits for walk-up distribution — available one day before your start date at visitor centers.
- Pay the permit fee. Fees vary. Grand Teton charges $20 flat plus $7 per person per night. Grand Canyon has its own fee structure. Always confirm current pricing on the park’s official page.
- Print or download your permit. Carry it in the field — rangers will check it. Some parks require you to display it visibly at your campsite.
For Canadian campers: Ontario Parks — Canada’s largest provincial park system — requires backcountry permits booked online at ontarioparks.com or by phone at 1-888-668-7275. As of 2026, fees are $11.00 per adult per night plus HST. Popular parks like Algonquin book out within hours of opening; experienced Ontario campers recommend reserving 5–6 months in advance. Parks Canada manages Canada’s national parks with a similar advance-booking system, and their reservation platform added a “Notify Me” feature for 2026 to alert campers when sold-out sites become available.
What is backcountry camping Ontario? It follows the same fundamental model as U.S. parks — human-powered access, advance permits, LNT compliance — but uses Ontario Parks’ reservation system rather than Recreation.gov.
Most U.S. national parks cap backcountry stays at 2 consecutive nights per site and 14 nights total — exceeding these limits can result in fines or permit revocation (National Park Service, Shenandoah).
For a deeper look at what shelter to bring once you’ve secured your permit, our guide on tent selection for backcountry trips covers the key decisions.
The 3-3-3 and 2-2-2 Camping Rules Explained
The 3-3-3 rule is a trip-planning guideline, originally popularized in the RV community and now widely adopted by backcountry campers, that structures your travel pace for safety and enjoyment: drive no more than 300 miles in a day (or hike no more than a manageable daily distance), arrive at your campsite by 3 PM, and stay a minimum of 3 nights at each location (Cruise America, via camplanda.com). Applied to backcountry hiking, the spirit translates directly — don’t overextend your first day, arrive early enough to set up camp before dark, and give yourself enough nights to genuinely decompress rather than constantly breaking camp.
The 2-2-2 rule is the gentler variation: drive or hike no more than 200 miles (or a shorter daily distance), arrive by 2 PM, and stay at least 2 nights at each site (Camp Landa, 2026). Backcountry communities consistently recommend the 2-2-2 rule as the better framework for absolute beginners — arriving by 2 PM gives you enough daylight to find your site, set up shelter, filter water, hang your bear bag, and still eat dinner before dark. Rushing into camp as the sun sets is one of the most common beginner mistakes.
Neither rule is a legal regulation — they’re practical heuristics. But across backcountry communities, the consistent advice is to treat them seriously on your first few trips.
Caption: The 3-3-3 and 2-2-2 rules give beginners a practical pacing framework — the 2-2-2 version is the safer starting point for first-time backcountry campers.
What Does “FF” Mean at a Campground?
FF stands for First-Come, First-Served — a designation on booking platforms indicating that a campsite or permit cannot be reserved in advance and is awarded to whoever arrives first. You’ll see “FF” listed on Recreation.gov, Ontario Parks, and state park reservation systems.
For backcountry campers, FF sites require a different strategy. You show up at the ranger station or trailhead permit office before they open — often before dawn for popular destinations — and take your place in line. If permits run out before you reach the window, you don’t get one. The New York State Department of Environmental Conservation (NY DEC) uses a similar first-come designation for many Adirondack backcountry zones, where no advance booking exists and campers self-register at the trailhead.
The practical implication: never assume an FF site will be available, especially on summer weekends. Have a backup plan — either an alternate site or a reservable permit as insurance.
Leave No Trace — The 7 Principles Every Backcountry Camper Must Know
Leave No Trace (LNT) is the outdoor ethics framework whose 7 principles govern all backcountry travel. Leave No Trace is The Responsibility Shift applied to environmental stewardship — when you enter the backcountry, you take on the campground’s waste management responsibilities, and LNT tells you exactly how to handle them. The Leave No Trace Center for Outdoor Ethics publishes the full principles at lnt.org.
| # | LNT Principle | What It Means in Practice |
|---|---|---|
| 1 | Plan Ahead and Prepare | Know the regulations, weather, and terrain before you go |
| 2 | Travel and Camp on Durable Surfaces | Camp on rock, gravel, or established sites — not vegetation |
| 3 | Dispose of Waste Properly | Pack it in, pack it out — including all food waste and human waste |
| 4 | Leave What You Find | Don’t pick flowers, move rocks, or take anything from the wild |
| 5 | Minimize Campfire Impacts | Use a camp stove when possible; follow fire ban rules |
| 6 | Respect Wildlife | Store food properly; never feed animals; observe from distance |
| 7 | Be Considerate of Other Visitors | Keep noise down; yield on trails; respect other campers’ solitude |
The NPS’s Leave No Trace guidance reinforces that these aren’t suggestions — in most backcountry zones, violating LNT principles (particularly waste disposal rules) can result in permit revocation and fines. “Pack it in, pack it out” is the foundational rule: if you carried it in, you carry it out. No exceptions.
Backcountry Gear, Hygiene, and Trip Preparation
The gear question is where most beginners feel most overwhelmed — and where The Responsibility Shift becomes most tangible. Every item a campground normally provides (water, waste infrastructure, emergency communication) must fit in your pack. Backcountry communities consistently report that first-time packers either over-pack (bringing car camping luxuries) or under-pack (forgetting hygiene essentials). Both mistakes are avoidable.
The Essential Backcountry Gear Checklist for Beginners
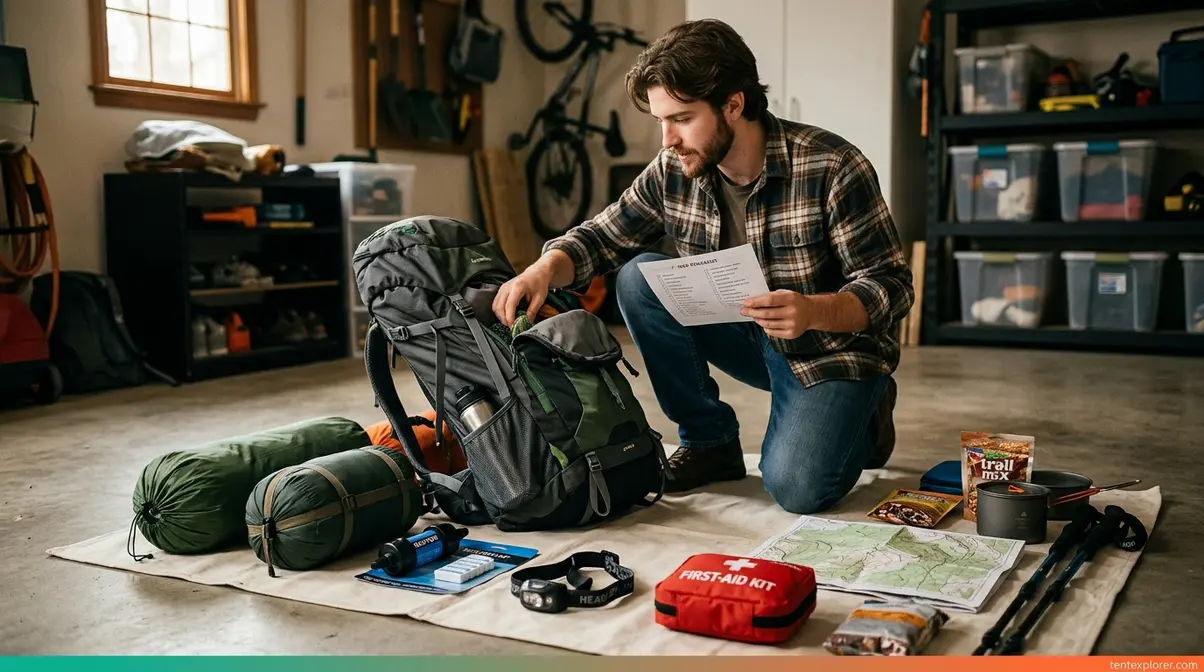
After evaluating REI’s backpacking checklist, Sawyer’s gear guide, and Backcountry.com’s essential items list alongside community consensus from backcountry forums, the core beginner gear list breaks into five functional categories:
- Shelter & Sleep System
- Backpacking tent (not a car camping tent — weight matters)
- Sleeping bag rated for the expected low temperature
- Sleeping pad (insulation from the ground is critical)
- Tent stakes and guylines
- Water & Nutrition
- Water filter (Sawyer Squeeze or similar) or purification tablets
- Cooking pot and camp stove with fuel
- Food for all planned meals plus one emergency day
- Bear canister or bear hang supplies (rope, bag, carabiner)
- Navigation & Safety
- Topographic map of your route (paper — phone batteries die)
- Compass
- Headlamp with fresh batteries
- First aid kit (blister care, wound closure, pain relief, emergency blanket)
- Satellite communicator (Garmin inReach or SPOT) — strongly recommended
- Clothing (Season-Appropriate)
- Moisture-wicking base layers
- Insulating mid-layer (fleece or down jacket)
- Waterproof rain jacket and pants
- Sturdy hiking boots broken in before your trip
- Waste & Hygiene
- Trowel (for cat holes — covered in the next section)
- WAG bags (for parks requiring pack-out of solid waste)
- Biodegradable soap
- Hand sanitizer
- Toilet paper in a sealed bag
- Wet wipes (backcountry hikers consistently rate these as essential and often forgotten)
For season-specific adjustments: summer trips require sun protection and insect repellent; shoulder-season trips demand warmer sleeping bags and rain gear; winter backcountry requires avalanche safety equipment and specific cold-weather layers.
How to Go to the Bathroom in the Backcountry (The Cat Hole Method)
This is the question most beginners are embarrassed to ask — and the one that matters most for environmental protection. The cat hole method is the LNT-approved standard for solid human waste disposal in the backcountry, as confirmed by the Leave No Trace Center and the NPS Leave No Trace guidelines.
Tools needed: Trowel, toilet paper (in sealed bag), hand sanitizer, WAG bag (in parks requiring pack-out). Estimated time: 5 minutes.
Step-by-step cat hole method:
- Walk at least 200 feet (approximately 70 adult steps) from any water source, trail, or campsite. This distance protects water quality and ensures other hikers don’t encounter your waste site.
- Choose a spot with organic soil (not gravel or rock), ideally in a sunny location where decomposition happens faster.
- Dig a hole 6–8 inches deep and 4–6 inches wide. A trowel makes this straightforward. In snow, go 6 inches deeper to account for snowmelt spreading.
- Do your business in the hole.
- Use toilet paper minimally. In most backcountry zones, pack all used toilet paper out in a sealed bag — do NOT bury it, as it decomposes extremely slowly and animals dig it up.
- Cover the hole completely with the original soil. Tamp it down and disguise the surface with natural materials (leaf litter, a stick, a small rock).
- Sanitize your hands immediately with hand sanitizer before touching any food or gear.
Some national parks — including Grand Canyon and heavily trafficked wilderness zones — require campers to use WAG bags (Waste Alleviation and Gelling bags) to pack out all solid waste. Always check your specific park’s requirements before your trip. The NY DEC primitive camping guidelines and Shenandoah’s backcountry camping rules both specify waste disposal requirements in detail.
For liquid waste: urinate on rocks, gravel, or bare soil — never on vegetation, which attracts salt-craving animals that will dig up and destroy plants.
The Most Forgotten Items When Backcountry Camping
Across backcountry communities and gear checklists reviewed for this guide, certain items appear on “forgot it” lists with striking consistency. These aren’t obscure pieces of kit — they’re the things that seem obvious until you’re 4 miles from the trailhead and realize they’re still at home.
The most commonly forgotten backcountry items:
- Wet wipes — Backcountry hikers consistently rate these as the single most life-improving forgotten item. They substitute for showers, clean hands before meals, and handle hygiene in the absence of running water.
- Headlamp batteries (fresh set) — People pack the headlamp and forget that the batteries inside are from last season.
- Trowel — Easy to overlook until you need it and don’t have it.
- Rain gloves — Rain jackets get packed; hands get forgotten. Cold, wet hands in the backcountry are a safety issue, not just a comfort one.
- Bear spray — In grizzly and mountain lion country, bear spray is critical. It’s heavy enough that some people leave it behind to save weight — a mistake.
- Permit (printed or downloaded offline) — Rangers will ask for it. Cell service may be nonexistent at the trailhead.
- Repair kit — A small kit with duct tape, tent pole sleeve, and seam sealer weighs almost nothing and has saved countless trips.
Before every trip, experienced backcountry campers recommend doing a final check the night before using a printed checklist — not a mental one.
What Is Cowboy Camping?
Cowboy camping is the practice of sleeping outdoors without a tent — just a sleeping bag (and often a sleeping pad) under the open sky. No shelter, no rainfly, no walls. The name comes from the tradition of cattle drivers sleeping under the stars on the open range.
In the backcountry, cowboy camping is a legitimate choice on clear nights in dry climates, and it’s significantly lighter than carrying a full tent. The trade-offs are real: you’re exposed to weather changes, dew, insects, and curious wildlife. Most backcountry campers who cowboy camp do so only after checking forecasts carefully and in areas where sudden rain is unlikely.
If you’re on your first backcountry trip, bring the tent. Cowboy camping is a technique to explore once you’re comfortable with the basics.
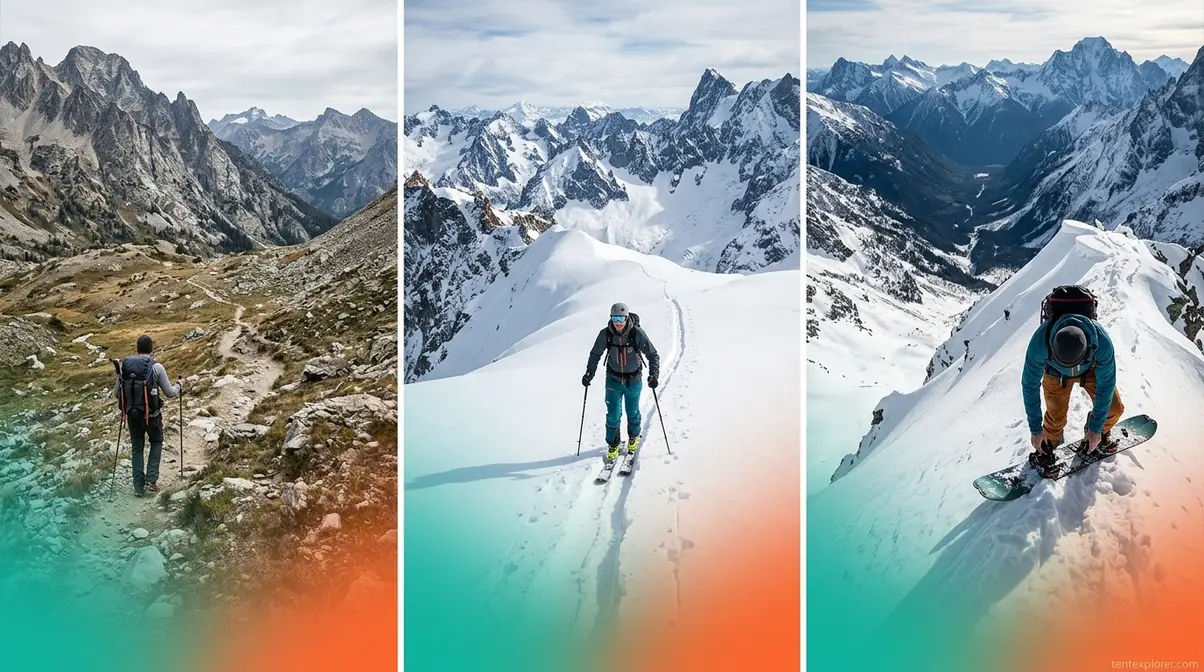
Beyond Camping — Backcountry Hiking, Skiing, and Snowboarding
Backcountry camping is one expression of a broader outdoor philosophy: human-powered access to terrain beyond road infrastructure. That same philosophy drives backcountry hiking, skiing, and snowboarding — activities that share the same core demands (self-sufficiency, navigation skill, respect for wilderness conditions) and the same core reward (solitude in terrain most people never reach).
What Is Backcountry Hiking?
Backcountry hiking is trail travel in undeveloped wilderness areas without maintained infrastructure — no paved paths, no trail markers every 50 feet, no emergency call stations. It’s the activity that most commonly connects to backcountry camping, since hiking is usually how you reach your campsite.
What distinguishes backcountry hiking from a day hike at a popular trailhead is the combination of distance, remoteness, and self-reliance. You’re navigating with a topo map and compass (or a GPS device with downloaded offline maps), managing your own water supply, and making decisions about weather and terrain without a ranger nearby. Experienced backcountry hikers consistently recommend starting on well-documented trails with reliable trail reports — places like Shenandoah National Park, the Boundary Waters Canoe Area Wilderness, or Ontario’s Algonquin Provincial Park — before venturing into truly remote terrain.
The physical demands are real: a full backpacking setup typically weighs 25–45 pounds for beginners, and elevation gain compounds that challenge quickly. Building base fitness through day hikes with a weighted pack before your first overnight is a strategy backcountry communities consistently endorse.
What is backcountry hiking at its core? It’s the act of traveling through wilderness on your own terms, with everything you need on your back, and no infrastructure waiting at the other end.
What Is Backcountry Skiing?
Backcountry skiing is skiing in unmarked, ungroomed, unpatrolled terrain outside the boundaries of any ski resort. As REI’s Expert Advice defines it: “Backcountry skiing is any type of skiing done outside the patrolled boundaries of a ski area” — which means no ski patrol, no avalanche control, no groomed runs, and no lifts (REI Expert Advice, 2026).
The defining difference from resort skiing is access. Backcountry skiers reach their terrain under their own power, typically using climbing skins — adhesive strips that attach to the bottom of skis and allow uphill travel. You hike up, then ski down through untracked snow. The uphill effort is significant; a 3,000-foot vertical gain on skis with a loaded pack is a serious physical undertaking.
The risks are equally significant. Backcountry terrain carries genuine avalanche hazard — terrain that no avalanche control team has managed. Before venturing into backcountry ski terrain, completing an avalanche safety course (such as an AIARE Level 1 certification) is strongly recommended. Consult a certified guide service or local avalanche center before your first backcountry ski day. The Pinkham Notch backcountry information from NPS provides region-specific guidance.
Backcountry skiing is the highest-search-volume topic in this entire guide (search volume: 1,000/month as of 2026 keyword research) — which reflects how rapidly interest in human-powered winter access has grown as resort crowds and lift ticket prices have increased.
What Is Backcountry Snowboarding?
Backcountry snowboarding follows the same principles as backcountry skiing — unpatrolled, ungroomed terrain beyond resort boundaries — but uses a snowboard for the descent. The primary challenge for snowboarders has historically been the uphill: snowboards don’t accommodate climbing skins the way skis do.
The solution is the splitboard — a snowboard that literally splits down the middle into two ski-like halves for the ascent (with climbing skins attached and bindings in a touring mode), then locks back together as a single board for the ride down. Splitboarding has transformed backcountry access for snowboarders and has seen significant growth in adoption over the past decade.
Like backcountry skiing, splitboarding carries avalanche risk and requires the same safety preparation: beacon, probe, shovel, and ideally an avalanche safety course. The backcountry snowboarding community shares a deep culture of self-reliance and terrain awareness — skills that take time and mentorship to develop properly.
If backcountry snowboarding interests you, connecting with a local splitboard club or guide service before your first tour is the safest starting point.
Limitations, Risks, and When to Stay Frontcountry
Backcountry camping is genuinely rewarding — but a balanced perspective requires acknowledging where it goes wrong, especially for beginners who underestimate what The Responsibility Shift actually demands.
Common Pitfalls for First-Time Backcountry Campers
Pitfall 1: Arriving without a permit. This is the most common and most preventable mistake. Popular backcountry zones at parks like Yosemite, Grand Canyon, and Algonquin require advance permits that sell out months ahead. Showing up without one means turning around at the trailhead. Solution: book early, use Recreation.gov or Ontario Parks, and always have a backup destination.
Pitfall 2: Overestimating your first-day distance. A 10-mile first day with a 40-pound pack sounds achievable until mile 6 when your feet are blistering and daylight is fading. Backcountry communities consistently report that overambitious first trips are the leading cause of emergency calls. Solution: plan your first trip at half the distance you think you can handle.
Pitfall 3: Ignoring water filtration. Drinking unfiltered backcountry water — even from clear, fast-moving streams — risks Giardia and other waterborne illness. Always filter or treat water before drinking. Solution: carry a Sawyer Squeeze or similar filter and use it every time, no exceptions.
Pitfall 4: Improper food storage. Leaving food unsecured at camp attracts wildlife — from raccoons to black bears to, in some regions, grizzlies. This is both dangerous and illegal in most backcountry zones. Solution: use a bear canister or a properly hung bear bag every night.
Pitfall 5: No communication plan. Cell service is nonexistent in most backcountry areas. If you’re injured or lost, no one knows where you are unless you told them before you left. Solution: file a detailed trip plan with a trusted contact — trailhead, route, campsite locations, and expected return time. A satellite communicator is worth the investment.
When to Stay Frontcountry Instead
Backcountry camping is not the right choice for every situation. There are specific scenarios where frontcountry camping is the smarter decision — and recognizing them is part of wilderness competence.
Stay frontcountry if: you haven’t done a single overnight with a full backpack before; if you’re camping with young children on their first outdoor experience; if the forecast shows severe weather, high avalanche hazard, or active fire warnings; or if anyone in your group has a medical condition that requires proximity to emergency services.
Seek expert guidance if: you’re planning a winter backcountry trip (avalanche risk, cold weather survival, and navigation in snow require specialized training); if your route crosses glaciers or technical terrain; or if you’re unfamiliar with the specific region’s wildlife and hazards. Consult a local park ranger or certified guide service — they have current, site-specific knowledge that no article can fully replace.
Frequently Asked Questions About Backcountry Camping
What is the meaning of backcountry camping?
Backcountry camping means camping in primitive wilderness areas reached entirely by human-powered travel — hiking, paddling, or skiing — where no roads, developed facilities, or campground infrastructure exist. The National Park Service defines backcountry zones as primitive wilderness areas accessed by hiking, boating, or horseback, excluding developed campgrounds (NPS Stats Definitions, 2024). The key distinction from regular camping is The Responsibility Shift: in the backcountry, every resource a campground normally provides — water, waste management, safety — becomes your responsibility.
What is the 3-3-3 rule for camping?
The 3-3-3 rule is a trip-pacing guideline that recommends driving or traveling no more than 300 miles in a day, arriving at your campsite by 3 PM, and staying a minimum of 3 nights at each location (Cruise America, via camplanda.com). Applied to backcountry hiking, it translates to setting a manageable daily distance, arriving early enough to set up camp before dark, and giving yourself multiple nights to rest rather than constantly breaking camp. It’s a practical heuristic, not a legal regulation — but backcountry communities consistently endorse it for beginners.
What is the difference between backcountry camping and regular camping?
The core difference is infrastructure responsibility. Regular (frontcountry) camping means driving to a developed site where the campground operator provides toilets, running water, trash collection, and emergency contact infrastructure. Backcountry camping means reaching your site by hiking, paddling, or skiing — with none of that infrastructure waiting for you. You bring all your water filtration, waste management, shelter, and safety equipment. The comparison table earlier in this guide breaks down six specific categories: access, facilities, effort, privacy, permit requirements, and who owns the responsibility.
Is backcountry camping hard?
Backcountry camping is more demanding than car camping — but the difficulty scales with your ambition, not with the activity itself. A 1-night trip, 3 miles from the trailhead, in a well-documented national park is a manageable first step for most people with basic fitness. The three skill areas that make it feel hard — logistics knowledge, gear confidence, and hygiene comfort — are all learnable before your first trip. Many beginners find that proper preparation removes most of the anxiety, and the experience far exceeds their expectations.
What is the 2-2-2 rule for camping?
The 2-2-2 rule is the beginner-friendly version of the 3-3-3 rule: travel no more than 200 miles (or a shorter daily hiking distance), arrive at your campsite by 2 PM, and stay at least 2 nights at each location (Camp Landa, 2026). For backcountry beginners, the 2-2-2 framework is particularly valuable — arriving by 2 PM gives you enough daylight to locate your campsite, set up shelter, filter water, and hang your bear bag before dark. Rushing into camp at dusk is one of the most common and most preventable first-trip mistakes.
How do you go to the bathroom when backcountry camping?
The standard method is the cat hole: dig a hole 6–8 inches deep, at least 200 feet (70 adult steps) from any water source, trail, or campsite; do your business; pack out all toilet paper in a sealed bag; and cover the hole completely (Leave No Trace Center, lnt.org). In some parks — including Grand Canyon — regulations require using WAG bags to pack out all solid waste. Always check your specific park’s rules before your trip. Hand sanitizer immediately after is non-negotiable. The full step-by-step process is detailed in the gear section above.
What does FF mean at a campground?
FF stands for First-Come, First-Served — a designation indicating that a campsite or permit cannot be reserved in advance and is awarded to whoever arrives first. You’ll see “FF” on Recreation.gov, Ontario Parks, and state park systems like the NY DEC’s Adirondack backcountry zones. For FF backcountry sites, the strategy is straightforward but demanding: arrive at the ranger station or trailhead permit office before they open, often before dawn on busy weekends. Always have a backup site in mind — FF availability is never guaranteed, especially during peak summer season.
What is the most forgotten item when backcountry camping?
Wet wipes are the most consistently forgotten backcountry essential — and the most appreciated item once people start packing them. Beyond wet wipes, backcountry communities report forgetting fresh headlamp batteries, trowels, rain gloves, bear spray (in bear country), a printed or offline copy of their permit, and a small repair kit. The pattern across gear checklists is clear: it’s not the big-ticket items (tent, sleeping bag) that get left behind — it’s the small hygiene and safety items that seem minor until you’re miles from the car.
Your First Backcountry Trip Starts With One Decision
For curious intermediate campers ready to take the plunge, backcountry camping delivers exactly what crowded campgrounds can’t: genuine solitude, unfiltered wilderness, and the quiet satisfaction of being entirely self-sufficient. Our research across NPS guidelines, LNT principles, and backcountry community consensus confirms that the gap between car camping and wilderness camping is smaller than it feels — it’s primarily a knowledge gap, not a skill gap.
The Responsibility Shift is the framework that makes this all make sense. Every rule, every gear item, every hygiene protocol in this guide exists because something a campground normally handles for you now falls to you. Name that shift, prepare for it specifically, and the backcountry stops feeling intimidating and starts feeling like exactly the escape from urbanity you were looking for.
Your next step is concrete: identify one backcountry-permitted park within driving distance, check Recreation.gov or Ontario Parks for available dates, and book a 1-night permit for a site 2–3 miles from a marked trailhead. Don’t wait until you feel “ready” — book the permit, then get ready. That single reservation is what turns curiosity into a trip.
