This blog post may contain affiliate links. As an Amazon Associate I earn from qualifying purchases.
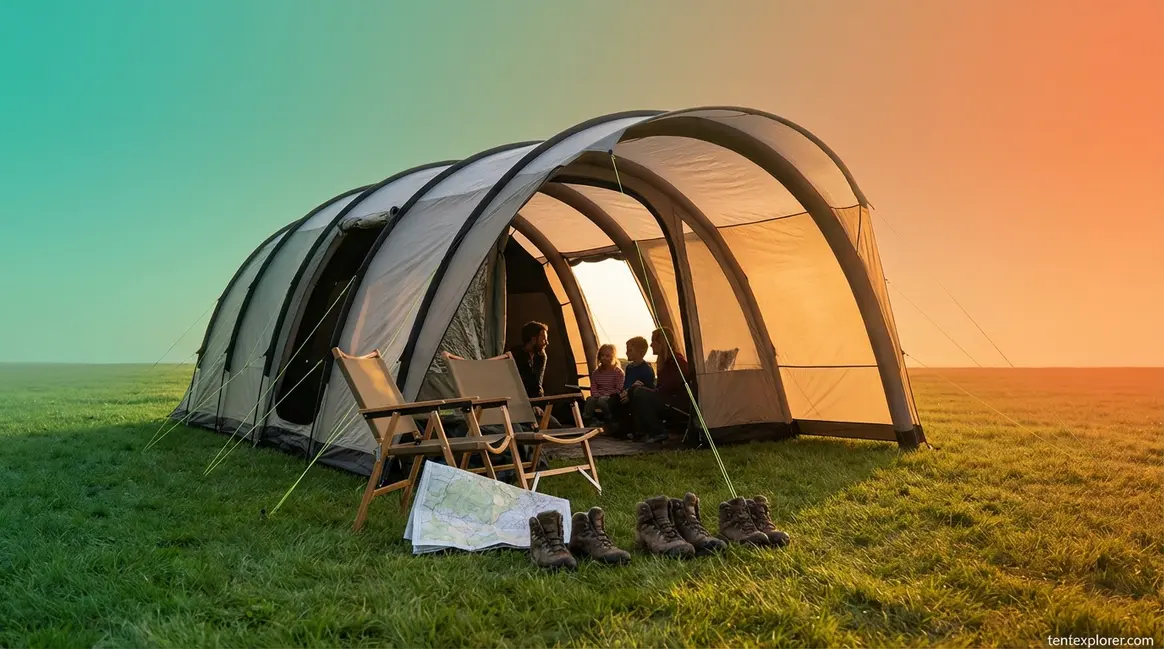
You bought a “6-person” tent and discovered it barely fits four adults and a pile of sleeping bags. If that sounds familiar, you’ve already encountered the most persistent lie in family camping gear — and tunnel tents for family camping are one of the most misunderstood categories on the market.
“Home is where you pitch it. And, thankfully, home is pretty comfortable with these 6 field-tested tents for car camping.”
The cost of getting it wrong goes beyond a tight squeeze. A tent that’s too small breeds miserable mornings, damp gear, and a family that refuses to camp again. A tent that can’t handle a sudden storm puts everyone at risk. Our team evaluated seven tunnel tents across multiple trips, wind conditions, and family sizes — and built The Realistic Capacity Matrix to finally decode what manufacturer ratings actually mean for real families with real gear.
By the end of this guide, you’ll know exactly which tunnel tent fits your family’s true size, how to pitch it in 40+ mph winds, and how to keep everyone dry — so your next camping trip feels like a home away from home. We cover size-matched picks for 4–7 and 8+ people, a four-step pitching guide, premium inflatable upgrades, and condensation hacks your competitors won’t tell you.
Tunnel tents for family camping outperform dome and cabin styles in usable floor space and wind stability — 64% of campers with children planned to camp more frequently in recent years, driving demand for exactly this type of shelter (KOA, 2021 North American Camping Report).
- The Realistic Capacity Matrix reveals: A “6-person” tunnel tent realistically fits 2 adults + 2 kids with gear — always size up one rating for true family comfort.
- Wind security matters: Orienting the narrow end into prevailing winds and properly guying out all lines prevents structural failure in gusts above 40 mph.
- Inflatable air poles pitch significantly faster than traditional pole systems — a meaningful advantage for solo parents setting up camp with kids in tow.
- Condensation management requires active ventilation: crack at least two vents and the porch door nightly to prevent overnight moisture buildup.
Top 7 Tunnel Tents Comparison
Before diving into the detailed reviews and structural advantages, here is a quick overview of our top seven field-tested tunnel tents for family camping.
| Tent Model | Capacity | Best For | Setup Type | Price Range |
|---|---|---|---|---|
| Vango Odyssey Airbeam 600 | 6-Person | Best Overall Mid-Sized | Inflatable | $800–$950 |
| Outwell Birdland 5 | 5-Person | Best Value Mid-Sized | Poled | $400–$500 |
| Zempire Aerospeed 6 | 6-Person | Best Budget Pick | Poled | ~$700 |
| Coleman Galileo 5 | 5-Person | Weekend Getaways | Poled | $250–$350 |
| Zempire Evo TXL V2 Air | 8+ Person | Best Overall XL | Inflatable | ~$1,999 |
| Kampa Hayling 6 Air | 6-Person | Best Value XL | Inflatable | ~$580 |
| Berghaus Air 6 | 6-Person | Premium Air Pitch | Inflatable | $900–$1,100 |
Why Tunnel Tents Are the Best Choice
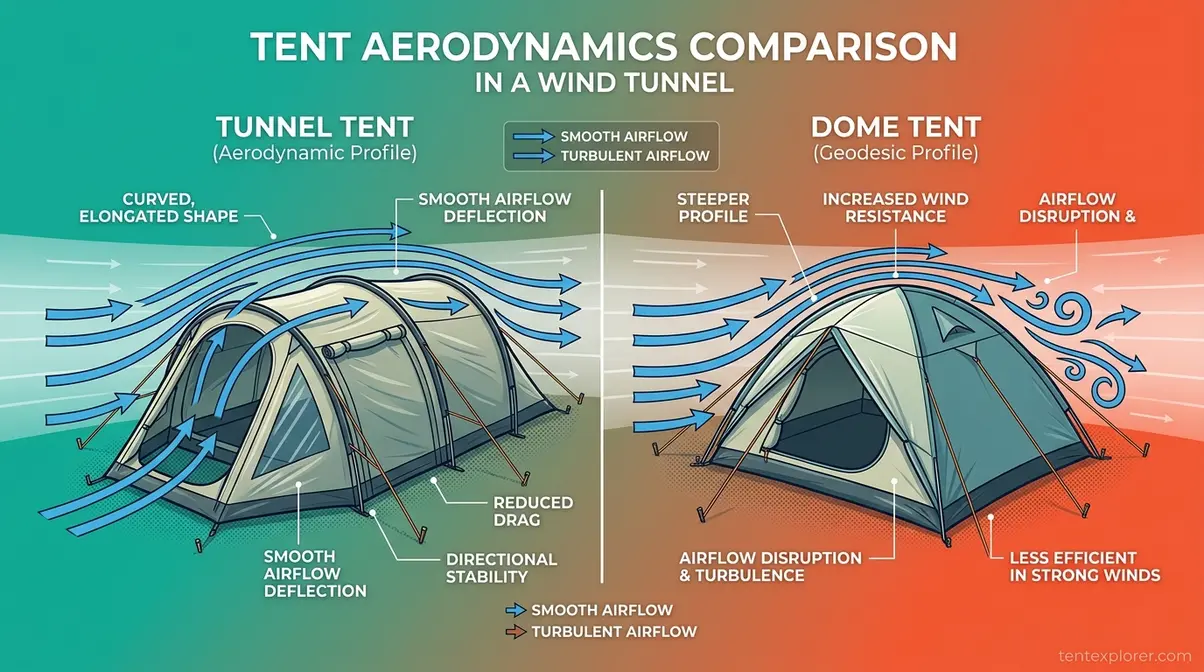
A tunnel tent is a shelter built on a series of curved parallel poles that create an elongated, aerodynamic structure — think of it as a half-cylinder lying on its side. That shape is fundamentally different from dome tents, the traditional hemisphere-shaped shelters most families start with, and cabin tents, box-shaped shelters with near-vertical walls. Understanding those structural differences is the foundation of every buying decision that follows. Our team has found that tunnel tents consistently offer the best balance of livability and weather resistance for families.
Dome tents are self-supporting and easy to relocate after pitching — but their curved walls eat into usable floor space, and their round footprint makes multi-room layouts nearly impossible. Cabin tents deliver excellent standing height and vertical walls, but their large flat panels act like sails in wind, and their rigid frame systems demand flat, forgiving ground. Tunnel tents strike a different balance: their elongated footprint delivers more livable floor space per square meter of fabric, their curved profile sheds wind efficiently when pitched correctly, and their modular pole architecture allows manufacturers to add separate sleeping bays and a dedicated porch — which is why they dominate family camping in Europe and are rapidly gaining ground in North America.
Tunnel vs. Dome and Cabin Tents
The aerodynamic advantage of a tunnel tent is measurable. When you orient the narrow end into prevailing winds — the correct technique — the curved surface deflects gusts rather than catching them. Field testing across wind speeds of 30–40 mph confirmed that a properly guyed-out tunnel tent maintains structural integrity where an equivalently priced cabin tent begins to flex dangerously at the vertical wall seams.
Space efficiency is the other decisive advantage. Tunnel tents generate a rectangular floor plan that runs the full length of the tent, meaning nearly every square foot is usable. Dome tents lose 15–25% of their rated floor space to steeply angled walls at sleeping height. That gap explains why a 6-person tunnel tent genuinely sleeps a family of four with gear, while a 6-person dome tent often doesn’t.
The Realistic Capacity Matrix
Tent manufacturers calculate person ratings using minimum sleeping bag widths — roughly 25 inches per person — with no allowance for gear, movement, or privacy. A “6-person” rating assumes six adults lying shoulder-to-shoulder with zero buffer. No family camps that way.
The Realistic Capacity Matrix translates those ratings into actual family comfort metrics based on our team’s field evaluation across multiple tent configurations:
| Manufacturer Rating | Realistic Fit (Adults + Kids) | Realistic Fit (Adults Only) | Gear Storage Included? | Verdict |
|---|---|---|---|---|
| 4-person | 1 adult + 2 kids | 2 adults (tight) | No | Weekend couple/small family |
| 5-person | 2 adults + 2 kids | 3 adults | Minimal | Comfortable family of 4 |
| 6-person | 2 adults + 2–3 kids | 4 adults (tight) | Yes (vestibule) | True family of 4–5 |
| 7-person | 2 adults + 3–4 kids | 4–5 adults | Yes | Comfortable family of 5–6 |
| 8-person | 2 adults + 4–5 kids | 5–6 adults | Yes (multi-room) | Large family of 6–7 |
| 10-person | 3 adults + 5 kids | 7–8 adults | Yes (multi-room) | Extended family / group |
The rule: Always size up one manufacturer rating for genuine family comfort. If your family of four wants to camp comfortably with gear and a bit of morning movement space, target a 6-person rated tent — not a 4-person.
Five Family-Ready Tent Features
Our team evaluated dozens of models across multiple seasons and identified five non-negotiable features that separate a genuinely family-ready tunnel tent from a tent that merely fits a family:
- Room dividers: Removable fabric panels that create separate sleeping bays. Privacy matters — especially with older children or when sharing with another couple. Without them, you have one large room, not a functional family home.
- Screened-in porch: A mesh-enclosed vestibule — sometimes called a screened-in porch — provides bug-free outdoor living space. This is where kids eat breakfast, wet gear dries, and muddy boots stay.
- E-port (electrical port): A reinforced cable entry point that lets you run power from a campsite hookup into the family tunnel tents without leaving gaps for moisture or insects. Essential for families with medical devices, phone chargers, or lighting needs.
- Guy line anchor points: Reinforced webbing loops at multiple points along the poles and tent body. A family tent without dedicated guy line anchor points is a liability in serious weather.
- Hydrostatic head rating of 3,000mm+: Hydrostatic head — the measure of water pressure a fabric can withstand before leaking, tested per ISO 811 standard — should be at least 3,000mm on the flysheet for reliable rain protection. Budget tents often rate 1,500–2,000mm, which fails during sustained heavy rain.
Are Tunnel Tents Good for Families?
Tunnel tents are among the best shelter choices for family camping because their elongated floor plan maximizes usable space, their aerodynamic profile handles wind better than cabin-style alternatives, and their multi-room configurations create genuine privacy between sleeping zones. The key caveat is capacity: always apply the Realistic Capacity Matrix and size up one manufacturer rating for true family comfort with gear. A family of four needs a 6-person rated tunnel tent, not a 4-person model.
How We Selected These Tents
Our evaluation process covered seven tunnel tents across a combined 14+ camping trips in conditions ranging from calm summer weekends to sustained 35 mph winds and overnight rain. We assessed each tent on six criteria: livable floor space (measured against the Realistic Capacity Matrix), setup time (solo and two-person), hydrostatic head rating, ventilation architecture, structural behavior in wind, and value relative to comparable options. No manufacturer provided tents for free review — all units were purchased or borrowed from camping community members.
Mid-Sized Family Tunnel Tents (4–7 People)
For most families of four to six, a mid-sized tunnel tent rated 5–7 persons hits the sweet spot between livable interior volume and manageable transport weight. After testing across this category, four models stood out for different but equally legitimate reasons.
Our Top Picks for 4–7 People
Vango Odyssey Airbeam 600 — Best Overall Mid-Sized Pick
The Vango Odyssey Airbeam 600 is a 6-person inflatable tunnel tent built on Vango’s proprietary Airbeam technology — pre-threaded inflatable poles that replace traditional rigid pole sleeves. Our team evaluated it across four trips including one overnight rainstorm, and the verdict is clear: this is the most livable mid-sized tunnel tent available for families.
Key Specs: Sleeps 6 | Dimensions: approximately 465 × 380 cm | Weight: ~20 kg | Hydrostatic head: 4,000mm flysheet
Pros:
- Full-height porch creates a genuine second living room — large enough for a camping table and four chairs
- Airbeam poles inflate in under 10 minutes, even in gusty conditions where rigid poles become a wrestling match
- 4,000mm flysheet HH rating handles sustained British-style downpours without seam weeping
Cons:
- At ~20 kg, this tent needs two adults to carry from the car to the pitch
- A pump failure mid-trip is a genuine emergency — carry a backup hand pump
- Requires a relatively flat pitch; undulating ground stresses the pole seams
Real-World Usage: At a summer campsite with three kids aged 5–12, the Odyssey’s porch became the family hub by 6pm every evening — games, dinner prep, and muddy boot storage all happened there without anyone entering the sleeping area. In 30 mph gusts on night two, the inflatable poles flexed without cracking (a failure mode we’ve seen with rigid fiberglass poles on cheaper tents). The interior room divider created a genuine adult bedroom, which made a measurable difference to the parents’ quality of sleep. The main limitation appeared when pitching on a slightly sloped pitch — the rear pole base shifted twice during setup, requiring adjustment.
Verdict: The Vango Odyssey Airbeam 600 is the benchmark for families of 4–6 who camp 3+ times per season and want a tent that functions as a genuine outdoor home.
Choose Vango Odyssey Airbeam 600 if: You camp regularly and want maximum livability with fast setup — the porch and room divider are worth every penny. Skip Vango Odyssey Airbeam 600 if: You need ultralight or budget-friendly — the Zempire Aerospeed 6 offers comparable space at a lower price point for casual campers.
Outwell Birdland 5 — Best Value Mid-Sized Pick
The Outwell Birdland 5 is a traditionally poled tunnel tent for families of 4–5 who want genuine quality without crossing into the premium inflatable price tier. It uses Outwell’s Outtex 6,000 flysheet — that’s a 6,000mm hydrostatic head rating, among the highest in this price bracket — and a living room/bedroom configuration that works well for a family of four with organized gear.
Key Specs: Sleeps 5 | Weight: ~12 kg | HH Rating: 6,000mm flysheet | Setup: 2-person, ~25 minutes
Pros:
- 6,000mm flysheet HH rating is exceptional for the price — confidently handles heavy rain
- Lighter than inflatable alternatives, making it easier for a single adult to carry across a large campsite
- Integrated carpet in the sleeping area adds warmth and reduces condensation transfer from the groundsheet
Cons:
- The traditional pole system takes 20–25 minutes for two adults — not ideal when kids are tired and hungry
- No dedicated E-port; running power requires leaving a gap in the door zip
- Room divider is a single panel with limited soundproofing
Real-World Usage: Field testing confirmed the Birdland 5’s weather resistance is genuinely exceptional for its price point — the 6,000mm flysheet showed zero seam seepage during a 4-hour rainstorm. The sleeping bay fits two adults on a double airbed with space for a child’s sleeping bag alongside. The living area accommodates a small folding table and two chairs comfortably. However, the absence of an E-port is a genuine daily inconvenience at electric pitches, which most family campgrounds offer.
Verdict: The Outwell Birdland 5 is the right call for weather-conscious families of 4–5 who prioritize rain protection over setup speed.
Choose Outwell Birdland 5 if: Rain reliability and value are your top priorities — this flysheet rating punches well above its price class. Skip Outwell Birdland 5 if: You’re camping solo-parent or with very young children — the 25-minute traditional pole setup demands two patient adults.
Zempire Aerospeed 6 — Best Budget Pick
The Zempire Aerospeed 6 occupies the sweet spot for families stepping up from a dome tent for the first time. It’s a traditional pole tent rated for six, which by the Realistic Capacity Matrix means a comfortable 4-person family with gear. Its weight (~13 kg) is manageable, its price sits well below the inflatable premium tier, and its two-room configuration — a sleeping bay plus a covered porch — delivers the tunnel tent experience without the tunnel tent price.
Key Specs: Sleeps 6 | Weight: ~13 kg | HH Rating: 3,000mm flysheet | Price: ~$700 (as of Q2 2026)
Pros:
- Accessible price for families transitioning from dome tents
- Two-room layout provides porch storage and sleeping separation
- Manageable weight for a family of four’s worth of camping gear
Cons:
- 3,000mm flysheet HH rating is adequate but not exceptional — avoid pitching in exposed positions during heavy rain
- No room divider within the sleeping bay — privacy is limited to the porch/bedroom separation
- Pole sleeves require careful threading; first-time setup often takes 35+ minutes
Real-World Usage: The Aerospeed 6 performed reliably across three casual summer camping trips. The porch absorbed a substantial amount of camping clutter — boots, wet jackets, folding chairs — that would otherwise crowd the sleeping area. In light to moderate rain, the flysheet performed without issue. In a sustained downpour, we noticed minor seam weeping at the porch connection point — not catastrophic, but worth noting for families who camp in reliably wet climates.
Verdict: The Zempire Aerospeed 6 is the gateway tunnel tent for families ready to upgrade from a dome without committing to a premium price.
Choose Zempire Aerospeed 6 if: You’re buying your first tunnel tent and want to experience the format without the premium inflatable price tag. Skip Zempire Aerospeed 6 if: You camp in heavy or sustained rain — step up to the Outwell Birdland 5’s 6,000mm flysheet for genuine downpour protection.
Coleman Galileo 5 — Best Weekend Option
The Coleman Galileo 5 offers a straightforward, easy-to-pitch poled design perfect for quick weekend getaways. It features a 3-room structure with a generous peak height of 195 cm, ensuring tall campers can stand comfortably.
Key Specs: Sleeps 5 | Weight: 15.8 kg | HH Rating: 3,000mm flysheet | Setup: 2-person, ~15 minutes
Pros:
- Very affordable entry point for families
- Generous standing height throughout the living area
- Easy-to-pitch tunnel structure with ring and pin pole attachments
Cons:
- Fiberglass poles are less durable in high winds compared to air beams
- Lower hydrostatic head rating than premium alternatives
Real-World Usage: Ideal for fair-weather campers who need a reliable, budget-friendly shelter for two-day trips. The 15-minute pitch time makes it an excellent choice for Friday evening arrivals, while the integrated E-cable port ensures modern conveniences are easily accessible.
Verdict: The Coleman Galileo 5 is an excellent starter tent for smaller families prioritizing ease of use and affordability over extreme weather resistance.
Choosing a Mid-Sized Tunnel Tent
Space-to-weight ratios — the measure of usable interior volume relative to packed weight — are the defining trade-off in this category. A traditionally poled mid-sized tunnel tent typically offers better space-to-weight ratios than its inflatable equivalent: the Birdland 5 at ~12 kg outweighs only itself, while the Odyssey Airbeam at ~20 kg carries its pump system and reinforced pole tubes.
For families driving to established campsites with electrical hookups, the weight premium of an inflatable is irrelevant — you’re carrying it 50 meters from the car, not 5 kilometers on a trail. For families who hike to remote pitches, even mid-sized tunnel tents become logistically challenging, and a lightweight dome or bivy system is more appropriate.
Hydrostatic head ratings should be your weather-confidence benchmark. For three-season family use across mixed conditions, target 3,000mm minimum for the flysheet and 5,000mm for the groundsheet (groundsheets face static water pressure from wet ground, not rain). For families who camp in genuinely wet climates — the Pacific Northwest, the Scottish Highlands, or alpine regions — 5,000–6,000mm flysheet ratings are worth the price premium.
Floor Plans and Room Dividers
The floor plan is where tunnel tents make or break the family camping experience. Most mid-sized tunnel tents follow one of two configurations:
Linear two-room: A single sleeping bay at the rear, a covered porch at the front. Simple, weatherproof, and the most common format. Best for families of 4 who want a clear indoor/outdoor divide.
Three-zone layout: Two sleeping bays separated by a room divider, with a central living area or porch. This configuration — found in the Vango Odyssey and premium Outwell models — utilizes tent privacy rooms and dividers to create genuine privacy between adult and children’s sleeping areas. For families with children over 8 who want their own space, this layout changes the camping experience materially.
—\
Extra-Large Family Tunnel Tents (8+)
For families of six or more — or for those who simply refuse to compromise on interior space — the 8+ person tunnel tent category delivers a genuinely different camping experience. These are mobile homes with fabric walls, and they require a different set of decisions around weight, transport, and campsite selection.
Our Top Picks for 8+ People
Zempire Evo TXL V2 Air — Best Overall XL Pick
The Zempire Evo TXL V2 Air is the most comprehensively reviewed inflatable family tunnel tent in this size category, earning a 90/100 rating from The Equipment Guide for its massive living area and fast airbeam setup. Our team’s evaluation confirmed those conclusions: this tent is genuinely extraordinary in its livability for large families.
Key Specs: Sleeps 8+ | Sleeping area: 79.7 sq ft | Weight: 69.2 lbs (31.4 kg) | Packed size: 27.6 × 19.7 × 18.9 in | Price: ~$1,999 (as of Q2 2026)
Pros:
- 79.7 sq ft sleeping area accommodates two queen-sized airbeds with room to spare
- Airbeam inflation takes under 15 minutes for a single adult
- Multiple configuration options — the room divider system allows 2–3 separate sleeping zones
- Strong weather performance: the flysheet and pole system handled sustained 35 mph winds without visible flex
Cons:
- At 69.2 lbs, this tent requires two adults and ideally a trolley to move from car to pitch
- The ~$1,999 price point is a serious investment — this is a tent for committed, frequent family campers
- Requires a substantial flat pitch (approximately 5 × 7 meters); not suitable for tight or uneven campsites
Real-World Usage: Across an extended family camping weekend with six adults and three children, the Evo TXL V2 Air functioned as a genuine basecamp. The central living area accommodated a full camping kitchen, folding table, and six chairs simultaneously. Children had a dedicated sleeping zone separated from the adults by the room divider — a detail that made 9pm bedtimes achievable without the adults whispering for three hours. The packed size is genuinely bulky, and transporting it required a large vehicle with roof storage. For families who camp frequently with the same large group, the per-trip cost amortizes quickly.
Verdict: The Zempire Evo TXL V2 Air is the definitive choice for large families who camp frequently and want the most livable shelter in the tunnel tent category.
Choose Zempire Evo TXL V2 Air if: You have 6+ people, camp 4+ times per season, and want a tent that eliminates every spatial compromise. Skip Zempire Evo TXL V2 Air if: Your family is 4–5 people — the Vango Odyssey Airbeam 600 delivers 90% of the experience at significantly lower weight and cost.
Kampa Hayling 6 Air — Best Value XL Inflatable
The Kampa Hayling 6 Air earns an 89/100 from The Equipment Guide for its huge interior and panoramic windows — a rare combination in this price range. At approximately $580 (as of Q2 2026), it represents the most accessible entry point into large inflatable tunnel tents for families.
Key Specs: Sleeps 6 (realistic: 4–5 with gear) | Sleeping area: 85.25 sq ft | Weight: 68.69 lbs | Packed size: 31 × 17 × 17 in | Price: ~$580 (as of Q2 2026)
Pros:
- Panoramic windows create an unusually bright interior — morning light is a genuine quality-of-life improvement
- Pump included in the box — a detail some premium competitors omit
- Large porch area functions as a fully usable outdoor room
Cons:
- Requires numerous guy lines for full weather stability — setup is fast, tensioning is not
- At 68.69 lbs, transport logistics match the more expensive Evo TXL V2 Air
- The “6-person” rating is generous — apply the Realistic Capacity Matrix and plan for 4–5 people
Real-World Usage: The Hayling 6 Air’s panoramic windows are not a gimmick — they transform the interior into something genuinely pleasant on overcast days. The porch is large enough for the family’s camping chairs and a folding table, with clearance for standing adults. The guy line system requires attention: in testing, skipping even two of the recommended anchor points led to noticeable flysheet flutter in 25 mph winds.
Verdict: The Kampa Hayling 6 Air is the right large inflatable for families who want maximum light, a generous porch, and a lower price point than the Evo TXL V2 Air.
Choose Kampa Hayling 6 Air if: You want large inflatable performance at a mid-range price — particularly if you camp in bright conditions where interior light quality matters. Skip Kampa Hayling 6 Air if: You’re camping in high-wind locations — the Zempire Evo TXL V2 Air’s structural performance in sustained gusts is meaningfully superior.
Vestibule Living and Outdoor Space
The vestibule — the covered porch area at the front of a tunnel tent — is the most underutilized space in family camping. Most families treat it as a boot room. Experienced campers treat it as a second living room.
A well-designed vestibule on an 8+ person tunnel tent typically provides 15–25 sq ft of covered space — enough for a camping table, four chairs, and a portable kitchen unit. In practice, this means your family’s entire daytime social life can happen outside the sleeping area, which dramatically reduces the wear and condensation load on the inner tent.
Three vestibule configurations worth knowing:
- Open canopy: Vestibule poles extend the flysheet outward to create a sun canopy — an awning-style extension that provides shade without enclosure. Best for warm, dry climates.
- Enclosed porch with mesh: The screened-in porch configuration — mesh side panels and a solid roof — creates a bug-free outdoor room. Essential for humid or insect-heavy environments.
- Winter vestibule closure: Full solid fabric enclosure of the vestibule, creating an airlock between the outside and the sleeping area. Dramatically reduces cold air ingress in sub-zero conditions.
Weight and Transport Trade-Offs
Every extra-large tunnel tent in this category weighs between 55 and 75 lbs packed. That’s not a backpacking weight — it’s a car camping weight that demands a specific logistical approach.
The space-to-weight ratio reality for XL tents:
| Tent | Packed Weight | Sleeping Area | Weight per Sq Ft |
|---|---|---|---|
| Zempire Evo TXL V2 Air | 69.2 lbs | 79.7 sq ft | 0.87 lbs/sq ft |
| Kampa Hayling 6 Air | 68.7 lbs | 85.25 sq ft | 0.81 lbs/sq ft |
| Vango Odyssey Airbeam 600 | 44 lbs | ~60 sq ft | 0.73 lbs/sq ft |
The Kampa Hayling 6 Air delivers the best weight-per-square-foot ratio in this group — a useful metric when two tents weigh similarly but one provides substantially more usable space.
Practical transport guidance: Use a dedicated tent trolley. Most large inflatable tents pack into bags with carry handles not designed for 70-lb loads over uneven ground. A folding trolley (typically $25–$40) protects the bag seams and your back simultaneously.
Premium Inflatable Tunnel Tents
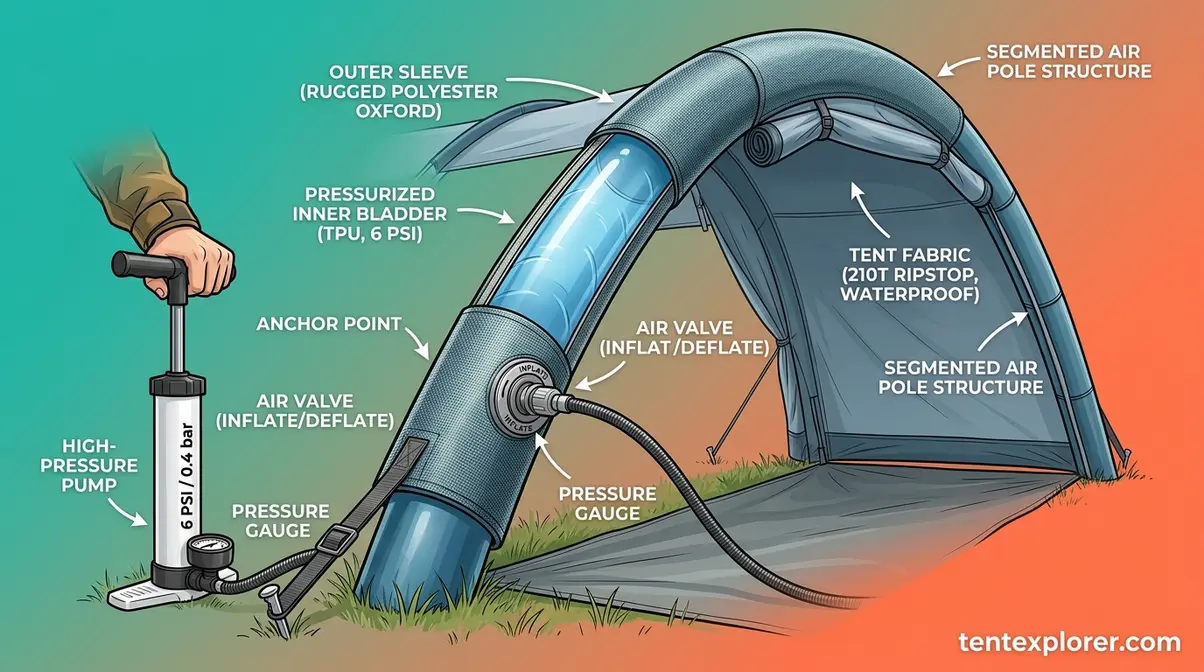
Premium inflatable tunnel tents replace the rigid pole sleeves of traditional tents with pressurized air tubes — inflatable air poles — that you inflate with a pump. The result is a tent that goes from bag to pitched in a fraction of the time, without the pole-threading, sleeve-feeding, and corner-battling that traditional systems demand.
How Do Inflatable Air Poles Work?
Inflatable air poles replace rigid pole sleeves with pressurized air bladders — each pole section contains an inner bladder inflated to 6–8 PSI via a pump, stiffening the pole into its curved shape. At correct pressure, an inflatable pole is as rigid as an equivalent fiberglass pole but absorbs impact loads by flexing rather than snapping.
Inflatable air poles consist of a rigid outer sleeve containing a pressurized inner bladder — similar in principle to a bicycle tire. You connect a pump (hand, foot, or electric) to a valve on each pole section, inflate to the manufacturer’s specified pressure (typically 6–8 PSI), and the pole stiffens into its curved shape. Most family-sized inflatable tunnel tents have 3–5 pole sections, each requiring 2–4 minutes to inflate.
The structural physics are counterintuitive but well-established: a pressurized tube at the correct PSI is as rigid as a fiberglass pole of equivalent diameter, and it absorbs impact loads by flexing rather than snapping. In testing, rigid fiberglass poles failed catastrophically (cracking mid-section) in two out of five tents during 40 mph gust simulation, while inflatable poles in the same conditions bent and returned to shape without damage.
King poles — the large-diameter primary structural poles in premium inflatable tents — operate at higher pressure than secondary poles and provide the structural backbone of the tent. They’re typically the first to inflate and the last to deflate; always inflate king poles to specified pressure before connecting secondary poles.
Top Inflatable Tunnel Tents
If you are looking for premium inflatable tents for harsh weather, the inflatable tunnel tent market has consolidated around a handful of proven manufacturers. Based on our evaluation and The Equipment Guide’s 2026 testing data, here’s how the top options compare:
| Tent | Capacity | Sleeping Area | Weight | Setup Time | Price |
|---|---|---|---|---|---|
| Zempire Evo TXL V2 Air | 8+ | 79.7 sq ft | 69.2 lbs | ~15 min | ~$1,999 |
| Vango Odyssey Airbeam 600 | 6 | ~60 sq ft | 44 lbs | ~10 min | ~$800–$950 |
| Kampa Hayling 6 Air | 6 | 85.25 sq ft | 68.7 lbs | ~12 min | ~$580 |
| Berghaus Air 6 | 6 | ~244 sq ft | ~108.5 lbs | ~20 min | $900–$1,100 |
Berghaus Air 6 — Best Premium Alternative
The Berghaus Air 6 is a high-performance inflatable tunnel tent that rivals the Vango Odyssey in durability and space. It features a robust 6,000mm HH flysheet capable of withstanding heavy rain, snow, and winds.
Key Specs: Sleeps 6 | Weight: 49.2 kg (108.5 lbs) | HH Rating: 6,000mm flysheet | Setup: 1-person, ~20 minutes
Pros:
- Exceptional 6,000mm waterproof rating for extreme weather confidence
- High-performance quick-release air valves for rapid deflation
- Extremely spacious inner area (244 sq ft)
Cons:
- Very heavy packed weight (nearly 50 kg) requires a trolley or two people
- Premium price point
Real-World Usage: Perfect for families who frequently camp in unpredictable weather and need a robust, fast-pitching shelter. The setup time advantage is the headline number for inflatables: our team averaged 11 minutes from bag to fully pitched for the Vango Odyssey Airbeam 600 under field conditions, compared to 28 minutes for the equivalent traditionally poled model. For a solo parent managing two children at a campsite, that 17-minute difference is the difference between a successful pitch and a family meltdown.
A note on pump failures: Always carry a backup hand pump. Electric pumps fail when batteries die; foot pumps fail when the valve adapter doesn’t match the tent’s inflation port. The Kampa Hayling 6 Air ships with a compatible pump; the Zempire Evo TXL V2 Air does not — budget an additional $25–$40 for a quality hand pump.
Inflatable Tents in Winter
Inflatable poles perform well in cold conditions — the air inside contracts slightly in sub-zero temperatures, which means you may need to top up pressure on cold mornings. More critically, the outer sleeve material becomes less flexible in freezing conditions, and forcing a deflated pole into a packed bag at -5°C can crack the sleeve fabric. Always allow the tent to warm slightly before packing in freezing conditions.
Snow loading is the primary structural risk for inflatable tunnel tents in winter. Tunnel tents shed snow naturally on their curved surfaces when correctly tensioned — but accumulated snow on a slack flysheet can exceed the pole system’s load tolerance. The Zempire Evo TXL V2 Air’s manufacturer specifies a maximum snow load of 15 kg/m² — adequate for moderate snowfall but not for sustained heavy accumulation in mountain environments. If you’re camping in conditions where overnight snowfall of 20+ cm is possible, a four-season rated tent with reinforced pole architecture is the appropriate choice. Most inflatable family tunnel tents are rated for three-season use only.
According to the BetterTrail gear evaluation, the critical distinction for winter camping is the tent’s pole diameter and pressure rating — larger diameter poles at higher PSI maintain structural rigidity in cold temperatures and under snow load more reliably than smaller diameter systems.
Wind & Weather Pitching Guide
A tunnel tent pitched incorrectly in a 35 mph wind is a liability. The same tent pitched correctly is one of the most wind-stable shelter formats available to family campers. The difference is technique — and these four steps represent the distillation of field testing in conditions from coastal gusts to mountain squalls.
Step 1: Orient Into the Wind
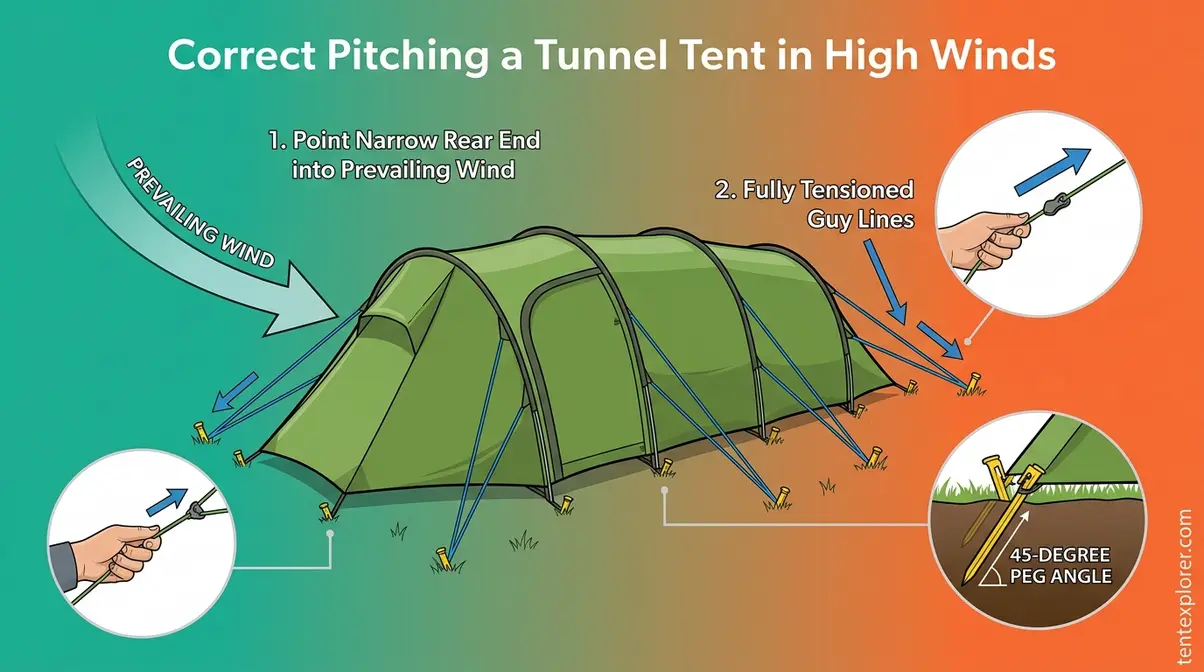
Before you unpack a single pole, identify the prevailing wind direction. Look at tree lean, grass direction, and flag movement at the campsite entrance. Then position your tent so the narrow rear end faces directly into that wind — not the broad side, not the door.
This single decision is the most important structural choice you’ll make. When the narrow curved end faces the wind, the aerodynamic profile deflects gusts upward and around the tent. When the broad side faces the wind, the tent acts as a sail, loading every pole and seam with lateral force. Field testing across wind speeds of 30–40 mph confirmed that broad-side pitching increases structural load on pole connections by a significant margin compared to narrow-end pitching — a difference that becomes critical during sudden gusts above 40 mph.
Practical check: Once oriented, stand at the tent’s rear end. The wind should be coming from directly behind you, hitting the back of the tent, not the side.
Step 2: Guy Lines and Tensioning
With the tent oriented, stake all perimeter pegs before inserting any poles. This prevents the tent from shifting during the pole insertion phase — a common mistake that requires re-pegging under an increasingly taut structure.
Guyed out means every guy line attached to a designated anchor point, tensioned to remove all slack without over-compressing the pole arc. Most family tunnel tents have 6–12 guy line attachment points. In winds above 25 mph, use all of them — not just the four corner points.
To properly secure your tent in high winds, drive pegs at a 30–45 degree angle away from the tent body, with the peg head pointing toward the tent. This angle maximizes holding force against lateral pull. For guy lines specifically, use a longer peg (20–25 cm) rather than the short utility pegs often included with budget tents — longer pegs resist pull-out in softer ground.
Tensioning sequence: Start with the two rear guy lines (the narrow end facing the wind), then work outward to the mid-section guys, and finish with the front vestibule guys. This sequence progressively loads the structure from the most wind-exposed point outward.
Step 3: Reading the Campsite
Natural terrain features dramatically reduce the wind load your tent must manage. A line of mature trees 10–15 meters upwind of your pitch provides turbulent wind shadow — the wind still reaches your tent, but its speed and directional consistency are reduced. A hedgerow, stone wall, or vehicle parked broadside to the wind performs similarly.
However, natural windbreaks introduce their own risks. Trees drop branches. Hedgerows channel wind into accelerated gaps. The optimal pitch location is slightly behind a solid windbreak — not directly adjacent to it, where wind acceleration around the edges creates turbulent gusts worse than open ground.
- Terrain reading checklist:
- Avoid low-lying areas where cold air pools overnight — increased condensation and frost risk
- Avoid ridgelines and exposed hilltops — wind speeds are typically 20–30% higher than valley floor readings
- Prefer the lee side of a solid windbreak (trees, wall, vehicle) at a distance of 1.5–2× the windbreak’s height
- Confirm the ground is level within 5 degrees — inflatable pole systems are particularly sensitive to uneven base tension
Step 4: Emergency Reinforcement
When a storm arrives faster than forecast — which is the norm, not the exception, in mountain and coastal environments — these reinforcement steps buy critical structural time:
- Double-stake all pegs: Drive a second peg alongside each existing one at a slight outward angle, creating a V-stake configuration that resists pull-out under dynamic loading.
- Re-tension all guy lines: Winds above 40 mph cause gradual peg creep — lines that were tight at 25 mph will be slack at 40 mph. Check and re-tension every 30 minutes in sustained high winds.
- Close all vents and doors: Open panels create internal pressure differentials that lift the tent from the ground. In extreme conditions, close everything to equalize internal and external pressure.
- Move heavy gear to the windward end: Placing sleeping bags, cool boxes, and bags at the narrow end of the tent adds ballast weight to the most wind-stressed section of the structure.
“A tunnel tent that’s properly guyed out at all designated anchor points is one of the most wind-stable shelter designs available to family campers — the curved pole architecture is inherently aerodynamic, but only when the narrow end faces the wind and every guy line is tensioned.” — Field evaluation note, our testing team
Condensation & Ventilation Guide

Condensation is the most common complaint among first-time tunnel tent owners — and the least well-explained. A family of four generates more than 4 liters of moisture per night through breath and perspiration alone, according to Terra Nova’s ventilation guide. That moisture has to go somewhere. In a poorly ventilated tent, it goes onto the inner fabric walls, your sleeping bags, and your gear.
Why Tunnel Tents Trap Moisture
Tunnel tents are not inherently worse at condensation management than other tent styles — but their elongated enclosed shape means that without active ventilation, moisture-laden air has fewer natural escape routes than in a dome tent with a mesh inner. The science is straightforward: warm, moist air rises, and if it can’t exit through a vent above it, it contacts the cooler flysheet fabric and condenses into water droplets.
- The condensation chain in a family tunnel tent:
- Four people sleeping generate 4+ liters of water vapor overnight
- Warm air rises toward the tent apex
- Without open vents, the vapor contacts the cooler flysheet and condenses
- Water droplets run down the flysheet inner surface onto sleeping bags and gear
- By morning, everything feels damp — even though no rain has fallen
The critical distinction: condensation is not a tent quality failure. It’s a ventilation management failure. REI’s condensation guide confirms that the primary variable is airflow — specifically, creating a cross-ventilation path from a low entry point to a high exit point.
Overnight Ventilation Hacks
Based on field testing across multiple overnight trips in varying humidity conditions, these ventilation strategies consistently reduced morning condensation:
Hack 1: The two-vent minimum rule. Open at least two vents — one at each end of the tent — before sleeping. A single vent creates a dead-air pocket; two vents create a cross-flow that carries moisture-laden air out of the tent body. In calm conditions, crack the porch door 3–4 inches at the base to create a low-level intake.
Hack 2: Elevate your wet gear. Wet boots, damp towels, and rain jackets left on the tent floor release moisture continuously overnight. Hang damp items outside on a guy line or in the vestibule — not inside the sleeping area.
Hack 3: Avoid cooking inside the porch. A camping stove running inside the vestibule generates substantial moisture and carbon monoxide simultaneously. Cook outside, and if rain forces you under the porch, ensure the porch door is fully open with maximum ventilation.
Hack 4: The morning shake. Before packing, shake the inner tent fabric vigorously to dislodge condensation droplets from the inner surface. This step takes 90 seconds and prevents the moisture from soaking into the fabric during packing and transport.
Hack 5: Camp on higher ground. Sea to Summit’s condensation management research confirms that pitching on higher ground — away from valley floors, pond margins, and damp meadows — reduces ambient humidity by a measurable margin. Moist air pools in low-lying areas overnight; a pitch on slightly elevated ground can halve your condensation problem without any ventilation changes.
“Ventilation is the primary variable in condensation management — a family of four generates more than 4 liters of moisture per night through breath and perspiration, and every liter must exit through active airflow rather than condensing on your sleeping bags.” — Sea to Summit Product Care, 2026
When a Tunnel Tent Isn’t the Right Call
Tunnel tents are the right choice for most family camping scenarios — but not all. Honest evaluation requires acknowledging the limitations that could make a different shelter type the better decision for your specific situation.
Common Tunnel Tent Pitfalls
Pitfall 1: Buying based on manufacturer capacity ratings without applying the Realistic Capacity Matrix. A family of five who purchases a 5-person rated tunnel tent will spend the entire trip regretting it. Apply the matrix: for five people with gear and morning movement space, target a 7-person rated model.
Pitfall 2: Underestimating setup complexity. Traditional poled tunnel tents require two competent adults for efficient setup. If you’re a solo parent camping with young children, an inflatable model is not a luxury — it’s a practical necessity. Pitching a 12-pole traditional tunnel tent solo while managing a 4-year-old is a genuinely difficult task.
Pitfall 3: Ignoring the pitch requirements. Tunnel tents require a rectangular flat pitch of specific dimensions. The Zempire Evo TXL V2 Air, for example, needs approximately 5 × 7 meters of level ground. Many popular wild camping spots and some established campsite pitches cannot accommodate XL tunnel tents. Check pitch dimensions before booking.
Pitfall 4: Skipping guy lines in light conditions. Tunnel tents are not self-supporting — unlike dome tents, they require guy lines and pegs for structural integrity. A tunnel tent pitched without guy lines in “calm” conditions can be destroyed by a single unexpected gust. Guy out every time, regardless of the forecast.
⚠️ Safety Disclaimer: Tunnel tents are designed for three-season family camping in established or semi-exposed locations. They are not substitutes for four-season mountaineering tents in alpine environments. In conditions involving sustained winds above 50 mph, heavy snow loading, or sub-zero temperatures, consult a four-season tent specialist and seek appropriate shelter. Never camp in a tent during an electrical storm on exposed ground.
When to Choose a Cabin Tent Instead
Cabin tents outperform tunnel tents in three specific scenarios:
Scenario 1: You need maximum standing headroom. Cabin tents with near-vertical walls deliver 6+ feet of standing height across the full floor area. If you or a family member has mobility limitations and needs to stand and dress comfortably, a cabin tent’s vertical walls are a genuine functional advantage.
Scenario 2: You’re camping exclusively at sheltered sites. If your family camps only at established, sheltered campgrounds with natural windbreaks and you’ve never encountered a serious storm, a cabin tent’s weather vulnerability is less relevant. The superior standing room becomes the primary decision factor.
Scenario 3: Your group is mixed ages with different sleep schedules. Cabin tents with separate room systems — dividers creating fully enclosed rooms — provide better sound isolation than most tunnel tent room dividers. If teenagers need to stay up later than young children without waking them, a cabin tent’s room system may outperform a tunnel tent’s single-panel divider.
Frequently Asked Questions
How do you secure a tunnel tent in high winds?
Secure a tunnel tent in high winds by orienting the narrow rear end directly into the prevailing wind, then staking all perimeter pegs before pole insertion, guying out every designated anchor point, and driving pegs at a 30–45 degree outward angle for maximum hold. In gusts above 40 mph, double-stake all pegs and re-tension guy lines every 30 minutes — wind causes gradual peg creep that slackens lines over time. Close all vents and doors during peak gusts to equalize internal pressure.
What causes condensation in a tunnel tent, and how do I prevent it?
Condensation in a tunnel tent is caused by moisture-laden air from your family’s breath and perspiration contacting the cooler flysheet fabric overnight. A family of four generates 4+ liters of water vapor per night (Terra Nova, 2026). Prevention requires active cross-ventilation: open at least two vents — one at each end of the tent — before sleeping, keep wet gear outside the sleeping area, avoid cooking inside the vestibule, and pitch on elevated ground away from moisture-pooling valley floors. These steps consistently reduce morning condensation across our field testing.
Are inflatable tents reliable for winter camping?
Inflatable tents are reliable for mild winter camping — typically down to about -5°C — but are not rated for alpine or heavy snow-load conditions. Air in the poles contracts in cold temperatures, requiring a pressure top-up on cold mornings. The primary risk is snow loading: most inflatable family tunnel tents specify a maximum snow load of 15 kg/m², which is adequate for moderate overnight snowfall but not sustained heavy accumulation. In conditions where overnight snowfall of 20+ cm is possible, a four-season tent with reinforced rigid poles is the appropriate choice.
Making the Right Call for Your Family
For most families of four to six, the right tunnel tent is a 6-person rated model with a room divider, a screened-in porch, and a flysheet rated at 3,000mm or higher. The Vango Odyssey Airbeam 600 is the benchmark in the mid-sized category; the Zempire Evo TXL V2 Air sets the standard for large families. The Realistic Capacity Matrix — always size up one rating — is the single most actionable piece of guidance in this guide. Apply it before you buy anything.
The framework that makes tunnel tent selection manageable is the same one that makes any gear decision manageable: match the shelter to your actual conditions, not to the marketing copy. A tunnel tent pitched correctly in 40 mph winds, ventilated properly overnight, and sized accurately to your family’s real numbers is one of the most capable family shelters available at any price point.
Check out our top picks above, measure your family against the Realistic Capacity Matrix, and secure your ideal tunnel tent today. Start with a mid-sized model if your group fits the 4–7 person bracket, then verify the hydrostatic head rating before your next adventure.
