This blog post may contain affiliate links. As an Amazon Associate I earn from qualifying purchases.
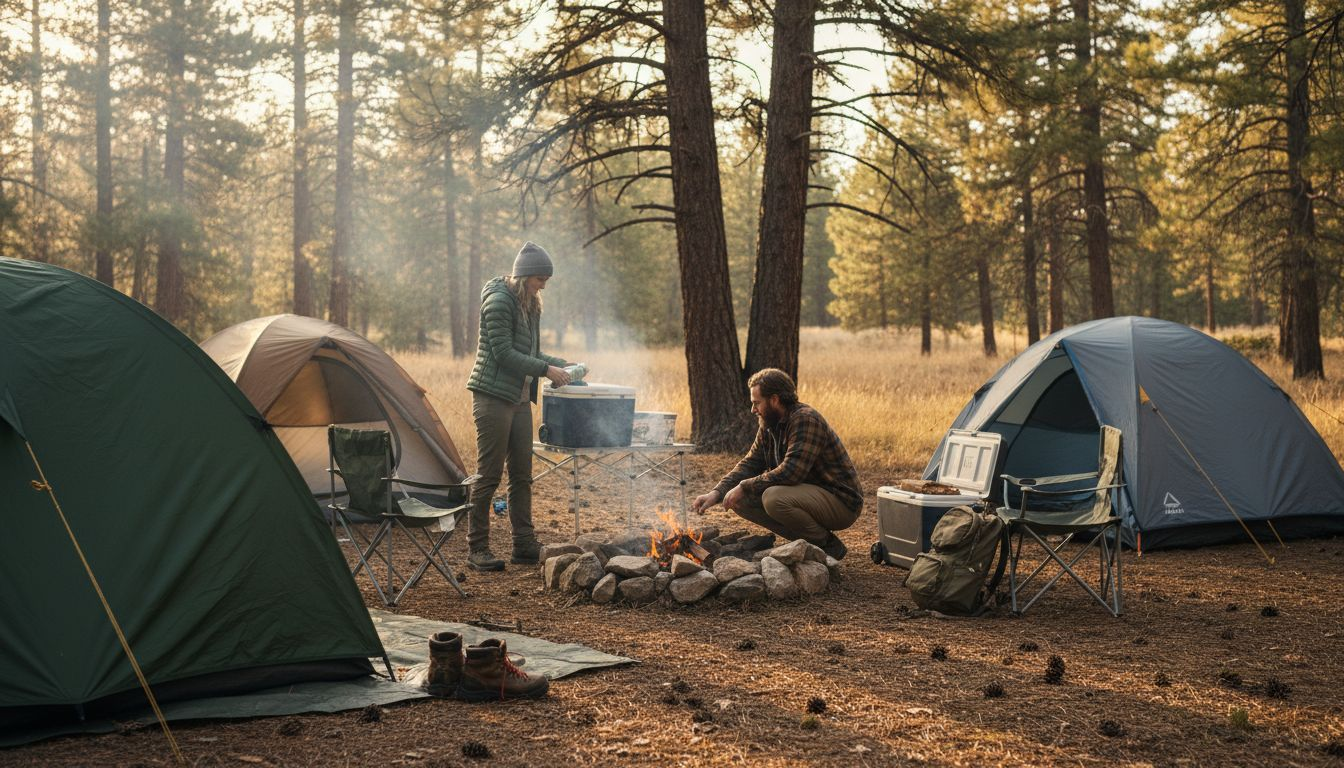
Setting up your campsite layouts quickly turns into a puzzle when you want comfort, safety, and a sense of community. Without a deliberate plan, tents get crowded, meal prep zones become chaotic, and families can struggle to find safe space for kids to play. The layout you choose has a big impact on your camping experience, whether you’re going solo or bringing the whole crew.
The right campsite layout gives you more than just organized space. It helps you make the most of natural features, preserves privacy, and supports everything from late-night campfires to peaceful mornings with a view. You’ll learn smart ways to cluster tents, create defined activity zones, and design setups that suit every group size.
Get ready to discover practical layout strategies that transform your next camping trip. Each idea on this list delivers a specific benefit, from building a close-knit group site to claiming a tranquil spot just for yourself.

- 【360° Lighting Coverage】Adopts 6+1 high-intensity LED chips, energy efficient/with wide range of visibility. Doubles as both a lantern & as a flashlight, adjust the brightness by how high up you pull up the lantern, providing tons of light at full open, easily light up an entire room.
- 【Lightweight & Portable】Collapsible design, as small as a phone when collapsed, easy to carry. With folding handle, can be hang it on tents or tree, free your hands. The extremely lightweight design also fit for young child, everyone can have a reliable light to access when needed.
- 【Durable & Waterproof】Made of high quality ABS material, ensures a long-time durability and water resistant, heat-resistant, freeze resistant, trouble-free in tough environment. More than 25 hours Long Last Lighting when fully charged, perfect for indoor or outdoor activities.
- 【Two Charging Methods】Built-in 1600mAh rechargeable battery, the upgrade led lantern with two charging methods: Solar charging and USB Charging. Automatic power-off protection, Don’t worry about overcharging.
- 【Multipurpose Use】A necessary Survival Equipment for outdoor activities, great kit for camping, hiking, fishing, hunting or night walking. A perfect emergency lights for home power failure in the Hurricanes, Storms. No matter where you live, everyone needs this reliable light.
- So easy, it’s like lighting a birthday candle! Just simply place the mini fire square in the desired location, ignite the corner of the camping fire starter cube, and watch it burn for up to 6-8 minutes! Perfect for camping trips, backyard barbecues, or even cozy nights by the fireplace
- Safe and natural! Nvkrvks clean-burning fire starter squares are made from food-grade, recycled wood fiber and wax, making them safe for cooking and won’t change your food’s flavor. Our fire cubes for wood stoves emit up to 80% less carbon monoxide than traditional fire starters! So making them a great choice for cooking and outdoor grilling
- Lasting power! Our waterproof & lightweight fire starters burn longer and hotter than other fire starters on the market, providing up to 8 minutes of warm & steady flames that can withstand even damp, wet or windy conditions
- The ultimate outdoor & indoor companion! Whether you’re roasting marshmallows with friends or cooking up a feast on the grill, Nvkrvks safe & odourless fire starters pack are the perfect addition to any indoor cooking and outdoor adventure. Small, lightweight, and easy to pack, they’re a must-have for any camping or hiking trip
- Get your fire started in no time! With 64 cubes in each pack, you’ll have plenty of fire-starting power to last you all season long! Plus, the BBQ fire starters for fireplace are easy to carry, you just need to determine the number of fire cubes you need based on your fire-starting needs
- Fast-Acting USB Heating & Supreme Comfort: SunnyFeel Heated Camping Chair: This heated rocking camping chair do not come with power bank battery. You’ll need to buy battery separately.Enjoy warmth anywhere with advanced USB-powered heating (battery not included). The heated pad warms up to 115°F at the push of a button, relaxing your muscles. The generously padded headrest provides excellent neck and head support.
- Spacious Design & Highly Portable: Enjoy ample room with generous open dimensions of 62 x 39 x 26 Inch. Sets up and folds down quickly, compacting into the included carry bag with a convenient storage size of 39 x 11.4 x 8.7 Inch. Easy to transport and store in your car trunk, RV, or closet, with a total product weight of 18.7 lbs .
- Heavy-Duty Construction & Superior Weight Capacity: Engineered for stability and safety, this double chair supports up to 300 lbs per seat, with a total capacity of 600 lbs for two adults. The reinforced steel frame and scientifically designed structure keep the chair stable on any surface—grass, sand, or patio—providing a reliable resting spot wherever your adventures take you.
- Thoughtful Design with Convenient Features: We’ve integrated practical functionality into every detail. The oversized deep cup holder (9.5″””” × 15″””” interior) securely holds beverages, water bottles, and phones without spilling. The integrated bottle opener on the armrest lets you enjoy refreshing drinks anytime, making every outdoor gathering more enjoyable and convenient.
- Versatile Use for Any Occasion: Perfect for camping, outdoor concerts, picnics, backyard parties, RV travel, sporting events, or as extra indoor seating. Its durable design, comfort features, and two-seater capacity make it an ideal choice for couples, families, and friends enjoying the outdoors or relaxing at home.

- ULTRA BRIGHT & SAFE: Designed with 30 energy-efficient LED for 360 degree lighting (97 sq.ft coverage), the latest COB technology features 350 lumens, emits softer and brighter light than other LED lantern; Use 3 AA batteries (not included), is safe to touch the fixture with low temperature
- RELIABLE CONSTRUCTION: Made of military-grade and water-resistant plastic, the durable, portable and lightweight build allows you to hang or carry it to anywhere, hard enough to resist external shock
- COMPACT & COLLAPSIBLE: Features foldaway handles for easy suspension and portability, collapsible to store when not in use; Pull up the handles to turn it on or control the brightness, no switches required
- PERFECT GIFT: Ideal gift for children, family or friend, survival kits for Hiking, Camping Trips, Emergencies, Backpacking, Fishing, Storms, Shop; Emergency kits for Car, Home, Outages, Attic, Garage, Backyard, etc.
- ENHANCED ERGONOMICS: Precision-engineered handle and lantern case designed for ergonomic perfection, ensuring a visually striking product that is not only comfortable to hold but also effortless to carry

- Natural Safe Ingredients: Made with natural biodegradable plant extracts for gentle hand washing.
- Portable and Convenient: Hand soap sheets perfect for travel, camping, hiking, BBQs and outdoor activities.
- Easy to Use: Simply dissolve a sheet in water, rub hands together and rinse thoroughly.
- Sweet Scent: Rose fragrance leaves hands smelling fresh and clean away from bacteria.
- Packaging: Comes in a box of 200 sheets, perfect for gifting, camping, parties and more.
Last update on 2026-02-20 / Affiliate links / Images from Amazon Product Advertising API
Quick Summary
| Takeaway | Explanation |
|---|---|
| 1. Group tents in a cluster layout | Organizing tents closely fosters support, communication, and community within the group while retaining privacy and safety. |
| 2. Design distinct activity zones for families | Separate areas for sleeping, cooking, and play reduce chaos and ensure everyone can enjoy their camping experience safely. |
| 3. Optimize solo camping for efficiency | Compact setups with essential gear allow solo campers to maximize comfort and manage their campsite effectively from a central point. |
| 4. Prioritize fire safety area placement | Properly positioning fire and cooking areas ensures safety by maintaining significant distance from tents and flammable materials. |
| 5. Position your site for scenic views | Aligning your tent and gathering spaces to enjoy natural landscapes enhances relaxation and overall satisfaction during your camping trip. |
1. Classic Tent Cluster Layout for Group Camping
A classic tent cluster layout is your blueprint for organized group camping. This approach groups multiple tents closely together in designated areas while preserving open space for communal activities, fire pits, and shared facilities.
When you’re camping with a group, proximity matters for both practical and social reasons. Clustering tents allows everyone to support each other quickly if issues arise, makes communication easier, and strengthens the group’s sense of community. The key is intentional planning that balances togetherness with individual privacy and safety.
Why clustering works for groups:
- Creates natural neighborhood feel within your campsite
- Reduces the total footprint needed for your group
- Makes it easier to monitor entry points and security
- Simplifies utility access like water and waste management
- Enhances group cohesion and shared experiences
Tent clustering maximizes usable communal space while keeping your group connected and coordinated throughout the camping experience.
How to set up your cluster:
Start by designating a central gathering area, then arrange tents in a circular or semi-circular pattern around it. This creates natural sightlines so group members can see each other and the shared space. Leave at least 6-10 feet between tent entrances to prevent overlap and allow comfortable foot traffic.
Position tents to face inward toward the center when possible. This orientation creates a sense of community while keeping the cluster’s outer edges more private from the surrounding environment. The research on tent cluster design for groups shows that thoughtful spatial planning maintains both privacy and access while enhancing comfort and safety.
Keep larger communal items like tables, cooking areas, and fire pits in your central gathering zone. Place vehicle parking and storage on the outer edge of your cluster to minimize disruption to tent residents. This separation keeps noise and activity away from sleeping areas while keeping everything accessible.
Practical considerations:
Ensure you have clear pathways leading in and out of your cluster. These pathways prevent people from cutting between tents unnecessarily. Check local regulations about fire safety zones and clearances from your fire pit to tents. Most guidelines recommend at least 10-15 feet between open flames and tent fabric.
Pro tip: Create a simple map or diagram of your tent cluster before arriving at the campsite, assigning specific tent locations to group members so setup stays organized and everyone knows where they’re camping.
2. Family-Friendly Layout with Activity Zones

A family-friendly campsite layout divides your space into distinct zones for different activities and purposes. This approach keeps kids engaged, gives parents peace of mind, and ensures everyone enjoys their camping experience without stepping on each other’s toes.
When families camp together, chaos happens without intentional planning. By creating separate zones for sleeping, eating, playing, and gathering, you give each activity its own designated space. This organization reduces conflicts, makes supervision easier, and allows different family members to do what they enjoy simultaneously.
Key zones to include:
- Sleeping area with tents arranged for easy access
- Cooking and dining zone away from sleeping tents
- Play and recreation area for children
- Gathering space for family meals and bonding
- Bathroom and water access point centrally located
Your sleeping zone should be quiet and removed from activity areas. Position tents in a loose circle or line where parents can easily monitor the space and children can safely move between them. Keep this area away from your cooking area to prevent food odors from attracting wildlife.
Well-organized activity zones transform family camping from stressful to memorable, giving parents confidence while letting kids explore safely.
Creating functional activity zones:
Designate your cooking and dining area at least 15-20 feet from sleeping tents. This distance protects your tent from food smells and keeps nighttime activity from disturbing sleepers. Use a picnic table or folding table as your centerpiece, arranging coolers and cooking gear in a logical flow.
Your play zone should be highly visible from your main gathering area. Family activity zones designed for all ages should include open space for games, nature exploration, and creative play. Keep this zone relatively flat and clear of obstacles so parents can watch comfortably while children run around.
Establish a central gathering space between your zones. This is where your family meets for meals, tells stories, and connects each evening. A fire pit or lantern in the center creates a natural gathering point.
Practical setup tips:
Mark zone boundaries with rope, lanterns, or natural markers so everyone understands the layout. Give children simple rules about which zones they can access independently versus where they need parental supervision. Post bathroom and water locations clearly so kids know where to go without asking every time.
Pro tip: Draw your activity zone layout on paper before arriving at the campsite, then walk through it mentally to identify potential issues like poor sightlines or unsafe pathways before setup begins.
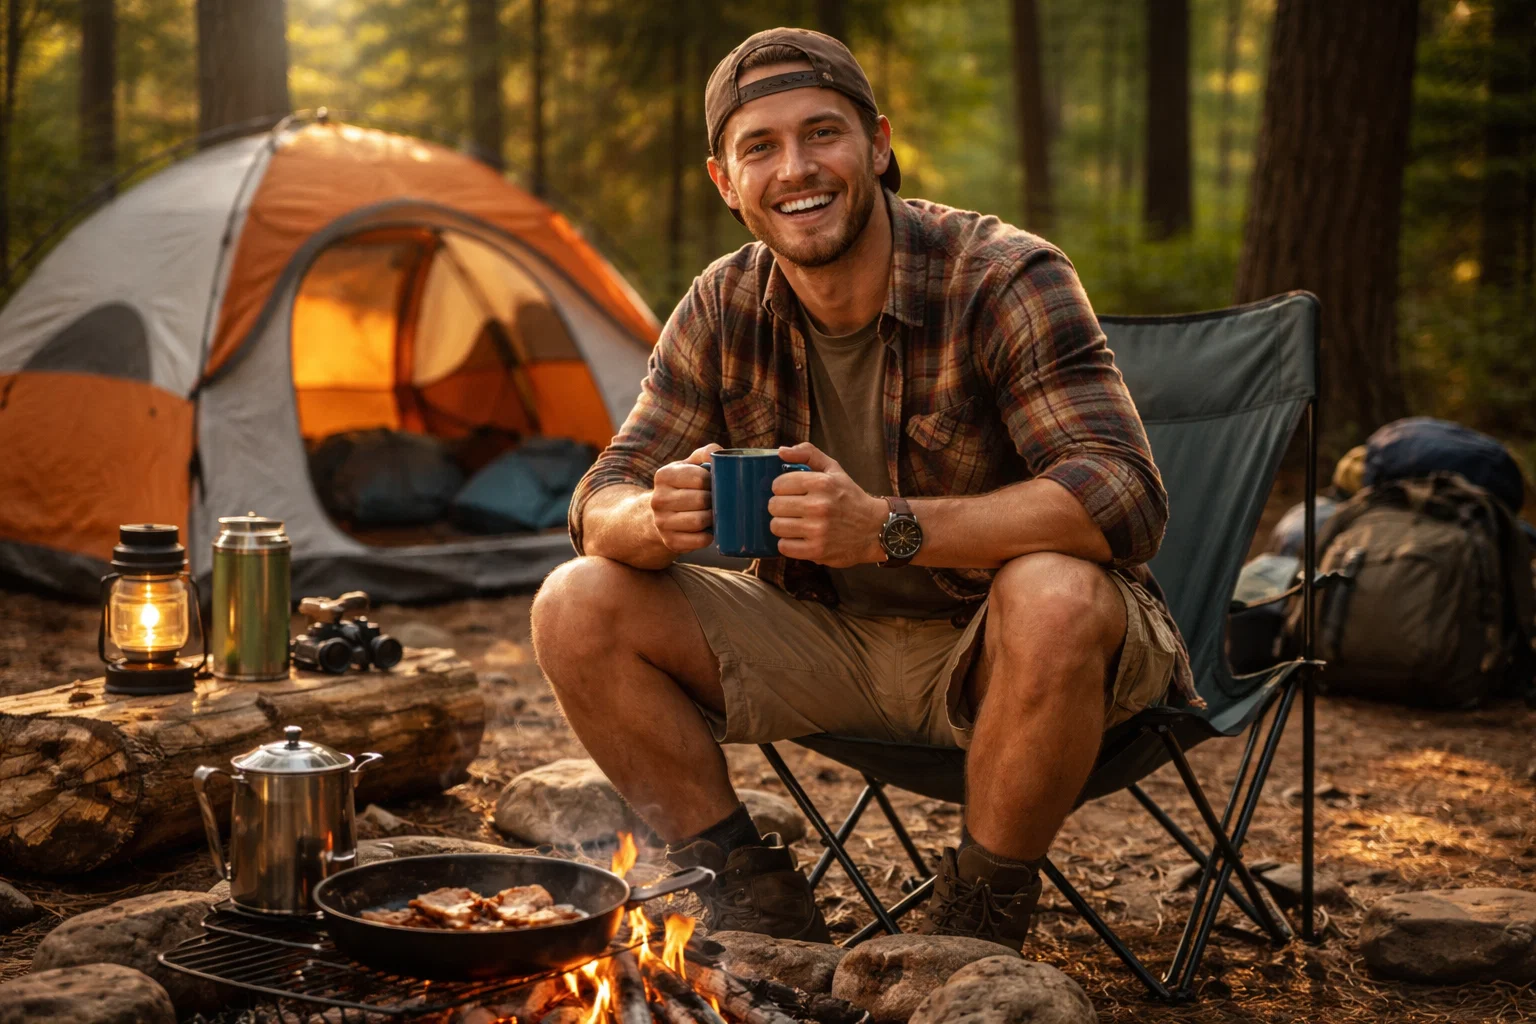
3. Solo Camper Efficient Space Design
Solo camping demands a different approach than group layouts. When you’re camping alone, your goal is creating a compact, functional setup that maximizes comfort while keeping everything within arm’s reach.
Solo campers benefit from tight, intentional spacing that eliminates wasted ground. Unlike group campsites where you spread across a large area, solo designs nestle your tent, cooking area, and storage close together in a single efficient zone. This proximity reduces walking distances and makes it easy to manage your entire campsite from a central vantage point.
The beauty of solo camping is simplicity. You answer to no one but yourself, which means you can customize every element of your layout. Your setup becomes a personal operation designed exactly for your needs and preferences.
The core elements of solo space design:
- Tent positioned for morning sun exposure and wind protection
- Cooking area 10-15 feet away for safety but within sight
- Storage consolidated in one spot for easy access
- Sitting area between tent and cooking zone
- Waste disposal at the edge of your site
Position your tent slightly elevated or on level ground that drains well. Point the entrance toward your cooking area so you maintain natural sightlines while cooking or relaxing. This orientation keeps you aware of your entire campsite without turning constantly.
Solo camping layouts succeed when every element serves multiple purposes and nothing exists beyond reach of your main activity zone.
Maximizing your minimal footprint:
Keep your cooking setup lean and functional. A single portable stove, cooler, and small prep surface is all you need. Efficient campsite organization for solo use means placing your cooler within arm’s reach of cooking and keeping utensils organized in one container.
Your sitting area doesn’t need furniture. A camping chair positioned between your tent and cooking area gives you a command post where you can relax and monitor everything. This single chair becomes your outdoor living room.
Consolidate storage by using your tent’s vestibule or a single storage container outside. Keep frequently used items like headlamps, maps, and toiletries accessible. Everything else stays packed and organized.
Smart spacing for solo comfort:
Maintain at least 10-15 feet between your tent and fire pit or cooking area for safety. If you use a lantern instead of a fire pit, you can position it closer. Keep your waste container downwind and at least 20 feet away to discourage wildlife.
Arrange your site in a logical circle or triangle. Standing in your tent entrance, you should be able to see your cooking area and sitting spot. This visibility makes solo camping feel less isolated and more controlled.
Pro tip: Create a shadow diagram of your campsite layout at different times of day to spot shade for afternoon relaxation and ensure morning sunlight reaches your tent for quick morning heating.
4. Minimalist Layout for Maximum Relaxation
A minimalist campsite layout strips away unnecessary elements to create a serene, uncluttered space focused purely on rest and nature. This approach removes distractions and excess gear, leaving only what you truly need for comfort and safety.
Minimalism in camping means letting go of the urge to bring everything. When you limit your setup to essentials, you create mental and physical space for relaxation. Fewer items mean less to organize, clean, and manage, allowing you to focus on actually enjoying your time outdoors.
This layout works best when you’re seeking solitude and restoration. It’s perfect for experienced campers who understand what they genuinely need and want to disconnect from complexity. The result is a calm, peaceful campsite that promotes deep rest.
What minimalist camping actually requires:
- One quality tent positioned for protection and views
- Simple ground sleeping pad and blanket
- Single portable stove for meals
- Water container and basic cookware
- Natural gathering spot (no fire pit required)
Start by positioning your tent in the most beautiful spot available. Choose a location with good views, natural windbreaks, and decent drainage. Your tent becomes your focal point, so place it where you want to spend most of your time gazing out.
Minimalist layouts succeed by removing everything except what makes you happy, creating space for peace rather than filling space with things.
Designing your relaxation zone:
Create a small cooking area just 10 feet from your tent using a portable stove. Skip the elaborate setup. A single pot, pan, and utensil set are all you need. Keep your cooler minimal and use it only for essentials like water and basic food.
Your relaxation area is simply where you sit. One folding camp chair or a ground-level sitting spot facing a beautiful view becomes your meditation space. Minimalist campsite design principles emphasize open space and natural surroundings, which means resisting the urge to add extra furniture or decorations.
Allow plenty of empty space around your tent. Open ground creates the feeling of vastness and freedom. Your campsite should feel spacious even though you’re using minimal gear.
Practical minimalist principles:
Eliminate storage containers. Keep everything in your tent or in one small daypack. Use natural storage like rocks for hanging items or nearby branches for gear. Embrace impermanence and simplicity.
Skip elaborate fire pit setups unless necessary for warmth. Eat simple meals and use cold water for washing when possible. Let the environment provide your atmosphere rather than trying to recreate home comforts.
Pro tip: Spend one night at home using only what would fit in your tent to experience true minimalist camping and identify what you actually miss before your trip.
5. Safety-Focused Fire and Cooking Area Placement
Fire and cooking areas are the heart of any campsite, but they demand careful placement. Where you position your fire pit and stove directly impacts how safely your camping trip unfolds.
Placement isn’t arbitrary or convenience-driven. Every foot of distance matters when managing fire risk near tents and sleeping areas. Proper positioning protects your group from burns, property damage, and uncontrolled fire spread.
Think of your fire and cooking area as a distinct safety zone. This zone has clear boundaries, designated traffic patterns, and strategic distance from everything flammable. Getting this right makes the difference between a fun gathering spot and a potential disaster.
Critical distance requirements:
- Minimum 15 feet from all tents and sleeping areas
- 10-15 feet from cooking equipment and food storage
- Clear line of sight from your main gathering area
- 20 feet from dry brush, leaves, and overhanging branches
- Away from vehicle parking and fuel storage
Position your fire pit on bare mineral soil or established fire rings. The National Park Service emphasizes that campfires must be situated properly to contain flames and prevent spread. If no fire ring exists, clear a 10-foot diameter circle down to dirt.
Keep your cooking area adjacent to but separate from your fire pit. This prevents smoke and sparks from affecting your food prep. Place your stove on a level, stable surface away from foot traffic and tent guy lines.
Proper fire placement isn’t just about following rules—it’s about respecting fire’s power and protecting everyone in your campsite.
Designing your cooking and fire zone:
Establish clear entry and exit paths to your fire area. Mark these pathways mentally or with natural markers so people don’t accidentally trip into the pit or cooking area. Keep this zone organized with all tools, fuel, and extinguishing equipment immediately accessible.
Position water and fire extinguishment supplies right at the edge of your fire zone. A bucket of water or sand should be within arm’s reach of anyone tending the fire. Never force someone to search for extinguishing supplies during an emergency.
Keep cooking supplies and food storage upwind of your fire when possible. This prevents ash and smoke from contaminating your meals and keeps food scents away from sleeping areas, which helps reduce wildlife attraction.
Layout considerations for groups:
In group settings, position your fire zone where everyone can gather without crowding. Create a natural semicircle of seating around the fire, keeping people at least 6 feet back from open flames. This distance allows people to feel warmth without risk.
Mark fuel storage clearly and keep it away from sleeping tents and activity zones. Propane, firewood, and charcoal should be in a designated spot away from your main gathering area. This prevents accidental tipping or fuel leaks near where people sleep.
Pro tip: Before building any fire, check wind direction and position the fire pit so smoke blows away from tents and gathering areas, then always have water or sand ready before striking the first match.
6. Scenic Layout for Enjoying Nature Views

A scenic layout prioritizes views over convenience. This approach positions your tent, gathering areas, and pathways to maximize exposure to the landscape’s best features, whether that’s mountains, water, forests, or valleys.
Why settle for a view of trees when you could wake to a mountain vista? Scenic layouts acknowledge that the view IS part of your camping experience. Positioning yourself to enjoy natural beauty directly impacts your mental relaxation and overall trip satisfaction.
This layout works best when you have campsite choices and can scout locations before setup. You’re making intentional decisions about where every element goes based on what you want to see from your tent entrance, your cooking area, and your gathering spot.
Key elements of scenic positioning:
- Tent entrance facing the best view
- Gathering area oriented toward distant vistas
- Pathways connecting different viewpoints
- Minimal structures blocking sightlines
- Natural features used for privacy and framing
Start by identifying your campsite’s best views. Walk the property and note where you see mountains, water, or interesting landscape features. Stand in different spots and note how the view changes based on your position. These observations guide everything else.
Scenic layouts transform camping from merely being in nature to actively experiencing and enjoying nature’s beauty throughout your entire stay.
Positioning your tent strategically:
Orient your tent entrance to face your primary scenic view. This means you see the vista first thing when waking and last thing before sleeping. Even a modest view becomes special when it’s the first thing you experience each morning.
Position your tent slightly elevated if possible, which improves both drainage and views. Avoid placing it in a depression where your sightlines get blocked. Maximizing natural scenic features involves using the landscape’s topography to your advantage.
Place your tent where afternoon shade arrives naturally but morning sun warms your tent entrance. This balances comfort with view enjoyment. The ideal spot often sits between a natural windbreak and an open vista.
Creating your scenic gathering space:
Position your seating and fire area to face the view as well. A fire pit that backs toward beautiful scenery means you can gather around the flames while still enjoying the landscape. This dual focus creates a magical atmosphere during evenings.
Create pathways that lead to viewpoint spots if your campsite is large enough. Small walking trails that showcase different aspects of the landscape encourage exploration and give you multiple places to sit and enjoy nature. These paths should feel natural rather than engineered.
Practical scenic layout tips:
Use natural features like rocks, fallen logs, or vegetation to frame your views. These elements create visual interest and natural privacy without blocking sightlines. A tree positioned to one side frames a mountain view better than open air.
Avoid cluttering your scenic sightlines with excessive gear or equipment. Keep supplies organized behind your tent or in designated storage areas away from your view corridors. The cleaner your sightline, the more immersive the scenic experience.
Pro tip: Scout your campsite during different times of day before setting up, noting how light, shadows, and colors change, then position your tent entrance and gathering area during peak aesthetic hours for maximum scenic enjoyment.
Below is a comprehensive table summarizing the various campsite layouts and setups discussed in the article, outlining their descriptions, benefits, and configurations.
Discover Perfect Campsite Layouts With Expert Guidance
Designing your ideal campsite layout can feel challenging when balancing space, comfort, and safety. Whether you aim to create a close-knit tent cluster, a family-friendly activity zone, or a serene minimalist setup, understanding key concepts like fire and cooking area placement or scenic orientation is essential for a rewarding outdoor experience. The article highlights these important considerations and shows that intentional planning transforms camping from stressful to memorable.
Take control of your campsite setup today by exploring detailed tips, gear reviews, and step-by-step guides tailored to your camping style at Tent Explorer. Don’t wait to make your next camping trip safer and more comfortable. Visit Tent Explorer now to unlock practical advice on choosing the right tent and mastering campsite layouts that bring your outdoor dreams to life. Start planning smarter and camp better with trusted expertise right at your fingertips.
Frequently Asked Questions
What is a classic tent cluster layout for group camping?
A classic tent cluster layout groups multiple tents closely together while preserving space for communal activities. To set it up, designate a central gathering area and arrange tents in a circular or semi-circular pattern around it to enhance group cohesion and ease of communication.
How do I create a family-friendly campsite layout?
A family-friendly layout divides the campsite into distinct zones for sleeping, cooking, and play areas. To set this up, keep the cooking and dining area at least 15-20 feet away from sleeping tents and designate a central gathering space for meals and bonding.
What are the essential elements for a solo camper’s site design?
A solo camper’s site should include a tent, cooking area, and storage all within close proximity for efficiency. Position your tent for morning sun exposure and keep the cooking area 10-15 feet away to maintain safety while still being visible from your tent.
How can I design a minimalist campsite layout?
A minimalist campsite focuses on creating an uncluttered space with just the essentials for comfort and safety. Start by setting up a single quality tent and a small cooking area, eliminating excess gear to maximize relaxation and connection with nature.
What distances should I maintain for fire and cooking area placement?
Your fire pit and cooking areas should be at least 15 feet away from tents and sleeping areas to ensure safety. Establish clear paths leading to the fire zone and have extinguishing supplies close by to maintain a secure environment during your camping trip.
How can I maximize scenic views in my campsite layout?
To maximize scenic views, position your tent entrance and gathering areas to face the best views available. Scout the location for optimal sightlines before setting up, ensuring your chosen spots enhance your overall camping experience.
