Choosing Weather-Resistant Camping Materials: 2026 Guide
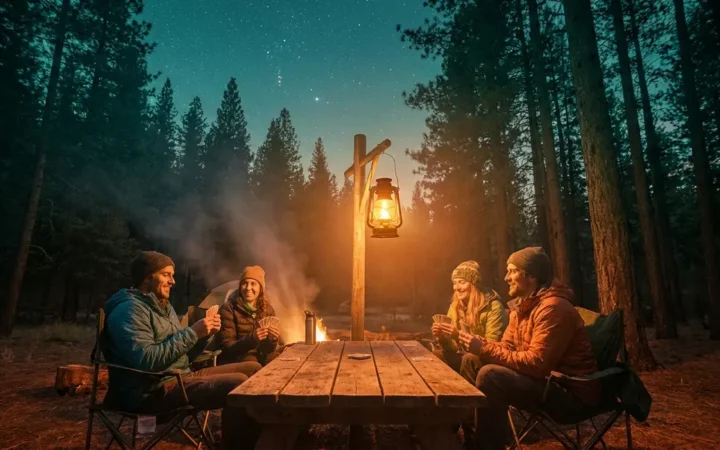
You’ve found the perfect campsite, packed everything you need — and then the sky opens up. When choosing weather resistant materials for your campsite, making the wrong choice doesn’t just mean a damp jacket. It means a soaked sleeping bag, a sagging tent, and a weekend that ends 24 hours early.
“It’s rains pretty often where I live but I’d still like to be able to stay outside and not get drenched. I know things like a tarp are obvious but are …”
— A beginner camper on r/camping
That question gets asked constantly, and the honest answer is: the right material depends on your climate, your camping style, and — critically — which part of your campsite you’re covering. By the end of this guide, you’ll know exactly which weather-resistant camping materials fit your setup and how to build a campsite that stays dry no matter what the forecast says. We’ll cover the top materials, decode confusing specs like Denier and Hydrostatic Head, walk through a 5-step waterproofing process, and answer the most common beginner questions.
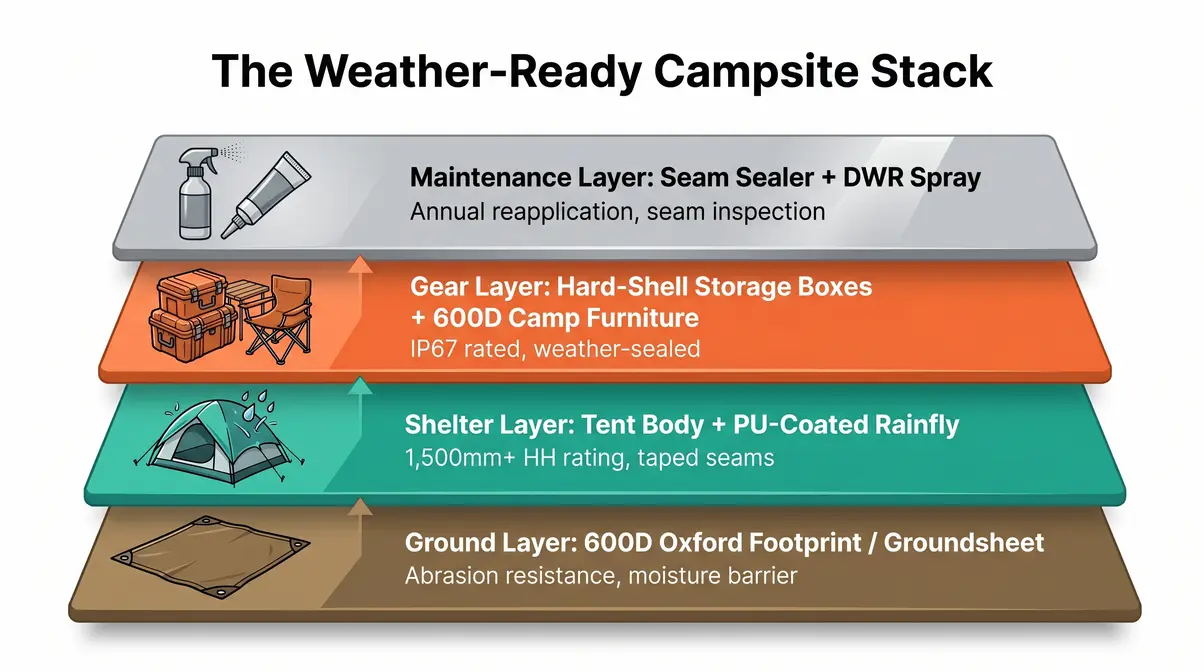
When choosing weather resistant materials for your campsite, success means matching fabric type, Denier rating, and waterproof coating to your specific climate — a system we call The Weather-Ready Campsite Stack.
- Polyester resists UV and holds its shape; best for family car camping
- Nylon is lighter and stronger per thread; best for backpacking
- Canvas breathes naturally but weighs more; best for basecamp setups
- Denier (D) measures fabric thickness — higher = more durable but heavier
- The Weather-Ready Campsite Stack covers shelter, ground, gear, and maintenance layers
Top Weather-Resistant Materials for Your Campsite
Imagine walking into a gear store for the first time. The wall of tents is labeled with numbers and abbreviations that mean nothing to you — “210D Oxford,” “40D ripstop nylon,” “12oz canvas.” Most beginner guides focus on the tent and stop there. But choosing weather-resistant materials for your campsite is a whole-campsite decision, not a single-product one.
That’s the core idea behind The Weather-Ready Campsite Stack — a layered framework that treats weather protection as a system with four parts: (1) Shelter Layer (tent, tarp, rainfly), (2) Ground Layer (footprint, groundsheet), (3) Gear Layer (storage boxes, weather-resistant furniture), and (4) Maintenance Layer (seam sealing, re-waterproofing sprays). Get all four right, and you stay dry. Miss one, and the others can’t compensate.
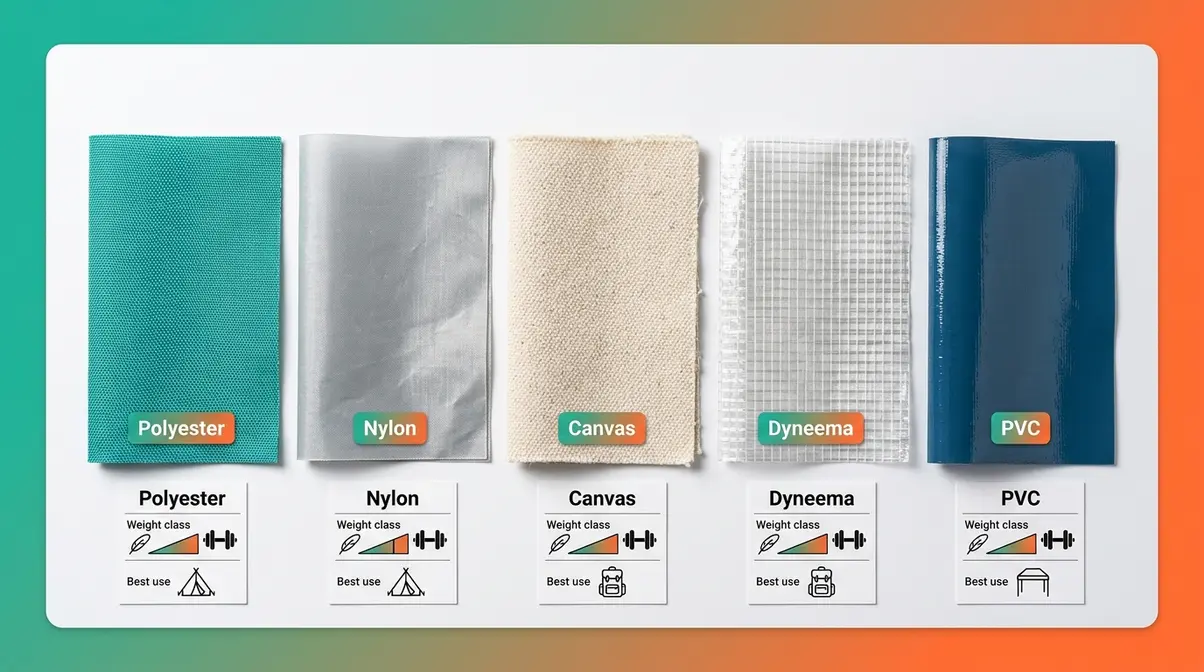
For most recreational campers, the top three material options are Polyester, Nylon, and Canvas (Cotton). Two advanced options — Dyneema and PVC — round out the field for specialized needs. Here’s how they compare:
| Material | Water Resistance | Weight | Breathability | UV Resistance | Best For | Avg. Cost |
|---|---|---|---|---|---|---|
| Polyester | High (with PU coating) | Medium | Low | High | Family car camping, sunny climates | Low–Mid |
| Nylon | High (with PU/Si coating) | Light | Low–Medium | Lower (degrades faster) | Backpacking, alpine trips | Mid |
| Canvas (Cotton) | Medium (with DWR treatment) | Heavy | High | Medium | Basecamp, glamping, cool climates | Mid–High |
| Dyneema (DCF) | Very High | Ultra-light | Low | High | Ultralight backpacking | High |
| PVC-coated | Very High | Very Heavy | Very Low | High | Fixed shelters, event canopies | Mid |
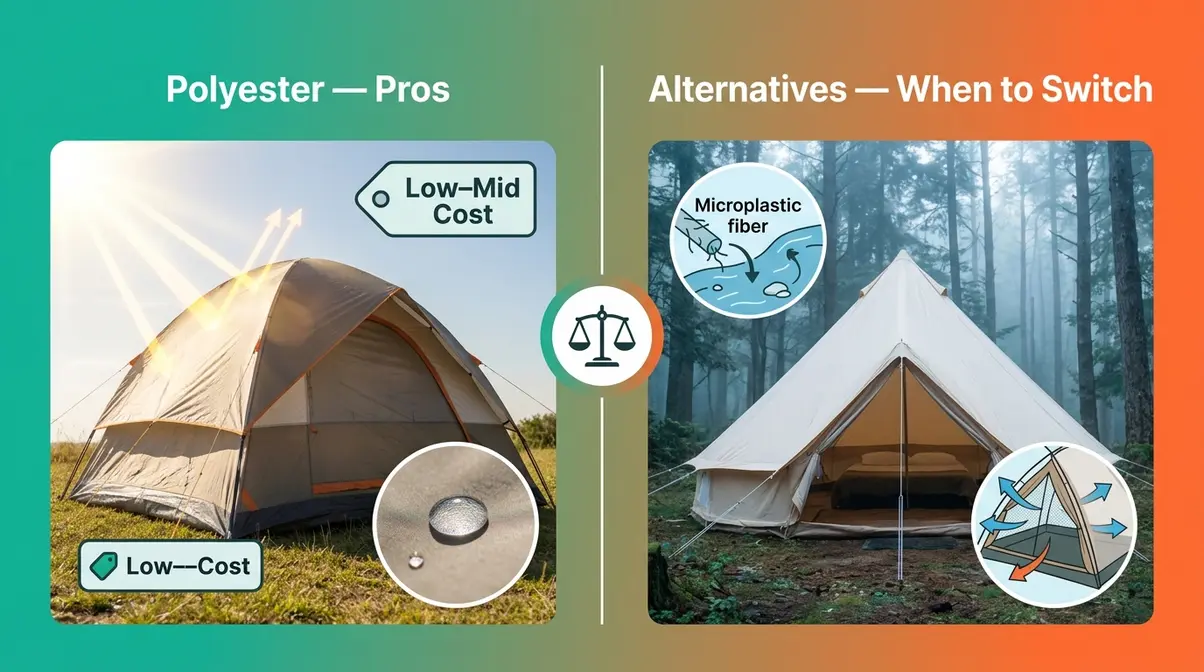
Polyester: The Affordable All-Rounder
Polyester is a synthetic, petroleum-based fabric used in most mid-range camping gear. It’s the default choice for family tents, budget tarps, and camp chairs — and for good reason.
Polyester holds its shape when wet, which matters more than most beginners realize. Unlike nylon, it doesn’t absorb moisture and sag under tension when it rains. It also resists UV degradation better than any other synthetic option, making it the right call for desert camping, summer festivals, or any setup that sits in direct sun for days at a time. According to REI’s gear guides, polyester typically retains 80–90% of its tensile strength after prolonged UV exposure, compared to nylon which can degrade more noticeably under the same conditions.
Why this matters for you: If you’re car camping on weekends and your tent lives outside for a full week at a stretch, polyester’s UV stability will extend your gear’s lifespan significantly.
- Best climate scenarios for polyester:
- Sunny desert or coastal camping with high UV exposure
- Family weekend trips where weight isn’t a concern
- Budget-conscious setups that need durability over multiple seasons
Nylon: The Backpacker’s Choice
Nylon is polyester’s lighter and stronger synthetic cousin. Gram for gram, nylon outperforms polyester on tensile strength — meaning it resists tearing under the same load at a lower weight. That’s why most ultralight and backpacking tents default to nylon.
The trade-off is moisture absorption. Nylon absorbs a small amount of water and can stretch slightly when wet, which occasionally causes a properly pitched tent to sag during heavy rain. A silicone (Si) coating addresses this for most backpacking applications. For alpine and high-wind conditions, nylon’s strength-to-weight ratio is hard to beat.
- Best climate scenarios for nylon:
- Multi-day backpacking trips where every ounce counts
- Alpine or above-treeline camping with high wind loads
- Pacific Northwest trips where you need lightweight rain protection
Canvas (Cotton): The Breathable Classic
Canvas is a natural, cotton-based fabric favored for breathability and insulation. It’s the oldest camping material on this list and still earns its place in specific setups. Canvas “breathes” — meaning moisture vapor (from your body heat and breath) passes through the fabric rather than condensing on the inside walls. This dramatically reduces the clammy condensation problem that plagues synthetic tents in cold weather.
The downsides are real: canvas is heavy (a canvas bell tent can weigh 20–40 lbs versus 3–6 lbs for a comparable nylon tent) and requires more maintenance. It also needs to “weather” before it becomes fully water-resistant — new canvas tents should be set up and wetted down once before their first trip to swell the cotton fibers and close micro-gaps.
- Best climate scenarios for canvas:
- Basecamp setups where you drive in and stay for multiple nights
- Cool, humid climates where condensation is a bigger problem than rain
- Glamping or family camp setups where comfort outweighs portability
Advanced Options: Dyneema and PVC
Two materials sit outside the mainstream but are worth knowing about.
Dyneema Composite Fabric (DCF) is an ultralight material used in premium backpacking gear. It combines a Dyneema fiber grid with thin polyester film layers, producing a fabric that’s stronger than steel by weight and nearly impervious to water. A DCF tarp weighing under 5 oz can outperform a 20 oz nylon tarp in a rainstorm. The cost is the barrier — DCF shelters typically run $400–$900+.
PVC (polyvinyl chloride) is a heavy-duty coated fabric used in industrial-grade shelters, event canopies, and fixed camp structures. It’s essentially impervious to water and UV, but its weight (often 12–20 oz per square yard) makes it impractical for anything you carry. Consider it only for semi-permanent basecamp canopies or event setups.
For a deeper look at tent-specific fabrics and how they affect your buying decision, see our guide to exploring tent materials.
Understanding Fabric Specifications
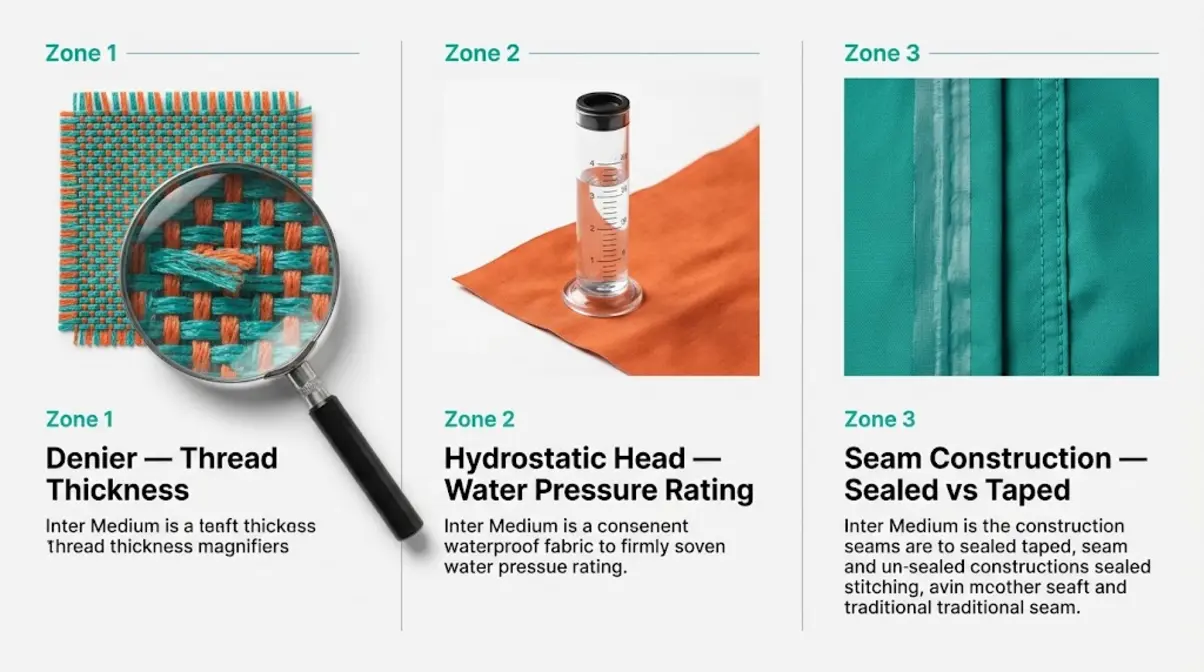
Here’s something most gear pages won’t tell you upfront: two tents can share the same material label — “210D polyester” — and perform completely differently in the rain. The difference comes down to three specs that most beginners skip right past: Denier, Hydrostatic Head rating, and seam construction. Understanding these numbers gives you the ability to compare products confidently, without relying on marketing copy.
Understanding Denier Ratings
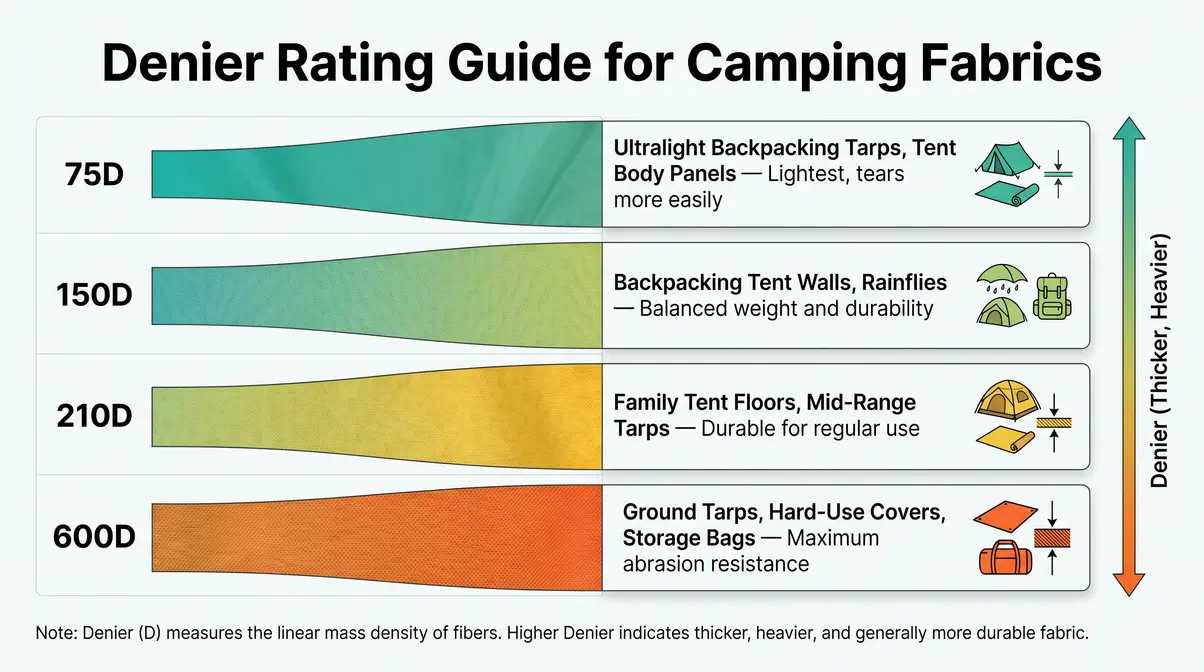
Denier (D) is a unit of measurement for fabric thread thickness. Specifically, it measures the weight in grams of 9,000 meters of a single fiber. A higher Denier number means thicker, heavier, more abrasion-resistant fabric. A lower Denier number means a lighter, thinner fabric that’s easier to tear but easier to carry.
Here’s how the common camping Denier ratings break down in practice:
| Denier | Thickness | Common Uses | Trade-off |
|---|---|---|---|
| 75D | Ultra-thin | Ultralight tarps, tent body panels | Lightweight, but tears more easily |
| 150D | Standard | Backpacking tent walls, rainflies | Good balance of weight and durability |
| 210D | Medium-heavy | Family tent floors, mid-range tarps | Durable for regular use, manageable weight |
| 600D | Heavy-duty | Ground tarps, hard-use covers, storage bags | Maximum abrasion resistance, significantly heavier |
Is 210D or 600D better? It depends entirely on the application. For a tent rainfly that only touches rain, 150D–210D is plenty. For a ground tarp that contacts rocks, roots, and wet soil all night, 600D earns its weight. Across camping communities, the consensus is: match Denier to the abuse level of the specific campsite layer, not a single number for everything.
Why this matters for you: A 75D rainfly on a $90 tent isn’t “bad” — it’s appropriate for the weight class. A 75D groundsheet on rocky terrain, however, will develop pinholes within a season.
Hydrostatic Head Ratings Explained
Hydrostatic Head (HH) is the standard measurement for how waterproof a fabric is. It’s tested by standing a column of water on top of the fabric (per AATCC TM127 test method) and measuring how many millimeters of water pressure the fabric withstands before it leaks. A higher number means more waterproof.
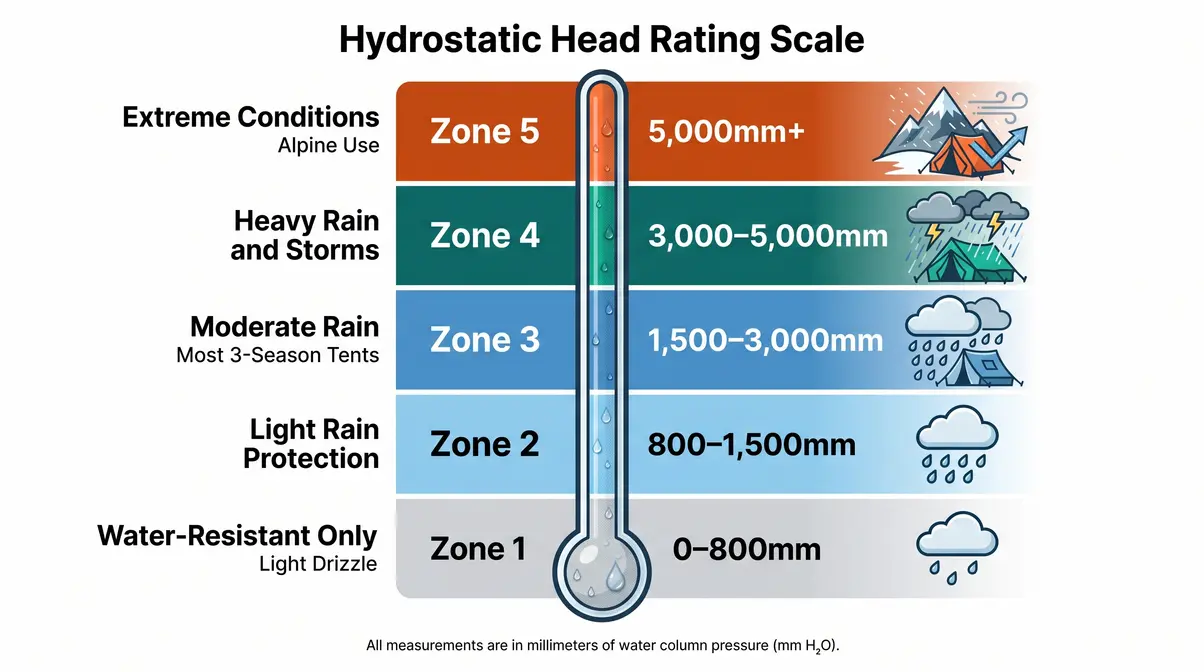
Here’s a practical guide to what the numbers mean on a campsite:
- Under 800mm: Water-resistant only. Fine for a brief drizzle, not a rainstorm.
- 1,500mm: The minimum most manufacturers recommend for a tent floor or rainfly. Handles moderate rain.
- 3,000mm: Solid all-weather protection. Appropriate for most 3-season camping in rain-prone climates like the Pacific Northwest.
- 5,000mm+: Heavy-duty alpine or storm conditions. Found on mountaineering tents and premium rainflies.
For most recreational campers, a PU-coated polyester or nylon tent rated at 1,500mm HH or higher provides the best balance of weather resistance, weight, and cost. Floors should be rated higher than walls — aim for 3,000mm+ on any floor panel that contacts wet ground.
Sealed Seams vs. Taped Seams
A tent can have a 3,000mm HH rating and still leak — because water enters through the needle holes left by stitching, not through the fabric itself. This is one of the most overlooked details in beginner gear buying.
Sealed seams means the manufacturer has applied a liquid sealant along every stitch line. Taped seams means a waterproof tape strip has been heat-bonded over the stitching (generally considered more durable than liquid sealing). Unfinished seams — found on many budget tents — leave those needle holes completely open.
Consumer Reports’ camping gear testing has consistently noted that unsealed seams are the most common cause of tent leaks, regardless of HH rating. The fix is simple: a tube of seam sealer (approximately $8–$12) applied before your first trip. For a step-by-step process, see our complete seam sealing guide.
Why this matters for you: Always check the seam spec before buying, especially on tents under $150. “Taped critical seams” means only the highest-stress points are sealed — not every stitch line. “Fully taped” or “fully sealed” is what you want for reliable rain protection.
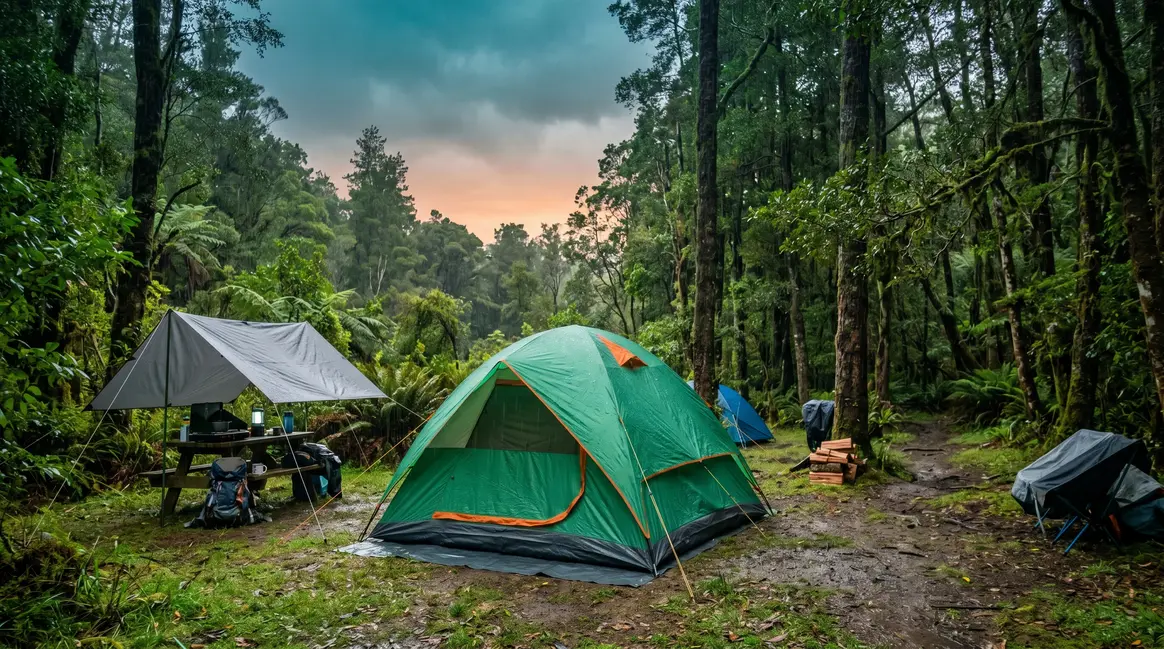
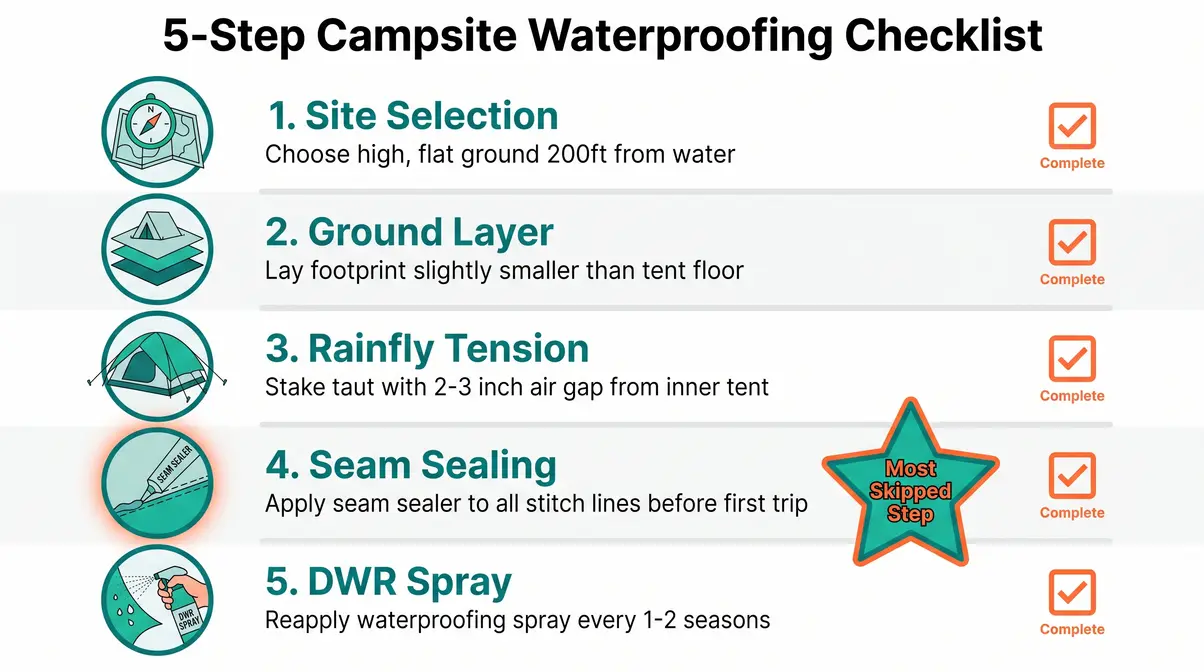
Campsite Waterproofing Step-by-Step
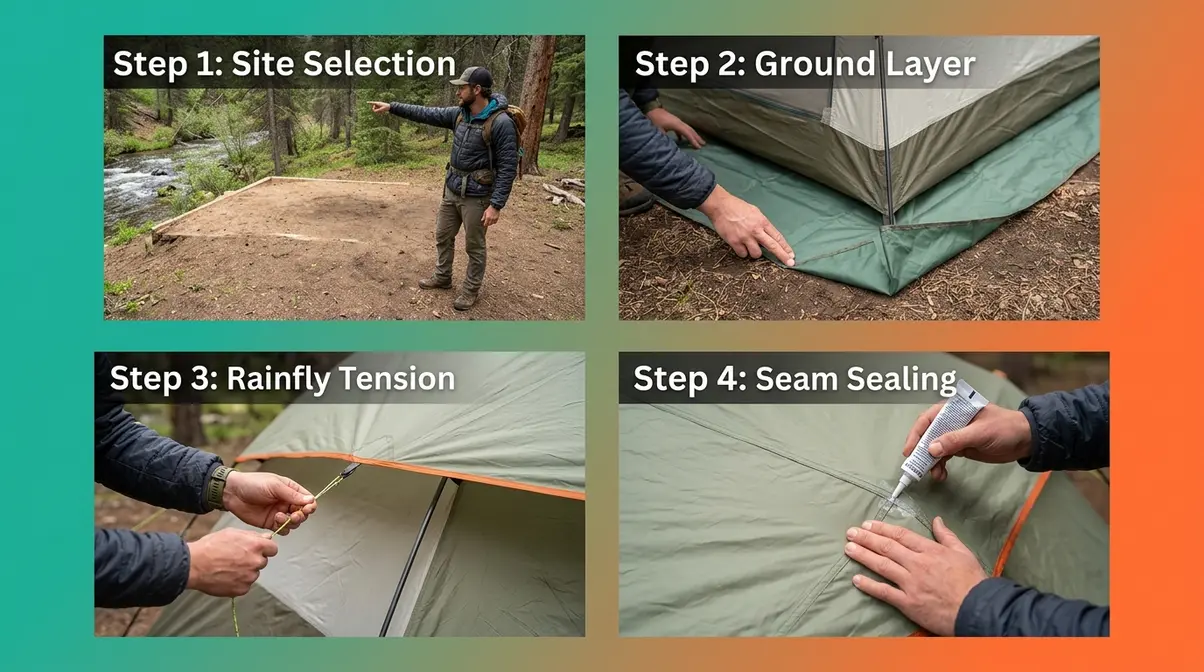
Even the best weather-resistant camping materials fail when setup is wrong. Across camping communities, the consensus is that poor pitch — not poor fabric — is the leading cause of wet tents. This section walks you through a 5-step process covering every layer of the Weather-Ready Campsite Stack, from site selection to final spray treatment.
You’ll need: Ground tarp or footprint, tent with rainfly, seam sealer, DWR waterproofing spray, guylines and stakes. Estimated total setup time: 30–45 minutes for a first-time setup.
Steps 1-2: Location and Ground Layer
Step 1: Choose a high, flat site away from water.
The National Park Service and Leave No Trace principles both recommend camping at least 200 feet (approximately 70 adult paces) from any water source — lakes, rivers, or streams. This isn’t just a conservation rule; low ground near water collects runoff and sits in the coldest air, making your campsite wetter and colder overnight. Look for a site with a slight natural crown (a gentle rise in the center) so water drains away from your tent floor rather than pooling beneath it. The Leave No Trace Travel & Camp on Durable Surfaces principle provides detailed guidance on site selection that protects both you and the environment.
Step 2: Lay your ground layer correctly.
A groundsheet or tent footprint (a cut-to-size tarp placed under your tent) is the single most underrated weather protection tool. Use 210D polyester or 600D Oxford fabric for your groundsheet — anything thinner will develop pinholes on rocky or rooted ground within a season. Critical rule: The groundsheet must be slightly smaller than your tent floor. If it extends past the tent edges, it acts as a funnel — channeling rainwater directly under your tent rather than away from it.
Steps 3-5: Tent Setup and Waterproofing
Step 3: Pitch your rainfly with proper tension.
A rainfly that sags or touches the inner tent wall will transfer moisture directly to the sleeping area. Stake out all guylines so the rainfly is taut and has at least 2–3 inches of air gap from the inner tent walls. In high-wind conditions, use all available stake points — not just the four corners.
Step 4: Seal your seams before the first trip.
Apply a liquid seam sealer (such as McNett Seam Grip or Gear Aid Seam Sealer) along every stitch line on your rainfly and tent floor. Work in a well-ventilated area, let the sealant cure for 4–6 hours before packing. This step adds maybe 20 minutes of prep time and can prevent leaks that ruin an entire trip.
Step 5: Apply a DWR (Durable Water Repellent) spray to the rainfly.
DWR (Durable Water Repellent) is a chemical finish applied to fabric surfaces that causes water to bead and roll off rather than soak in. Over time, washing and UV exposure degrade DWR coatings. Reapply a DWR spray like Nikwax TX.Direct or Gear Aid ReviveX every 1–2 seasons, or whenever you notice water no longer beading on the rainfly surface. For a full walkthrough of re-waterproofing sprays and when to use them, our campsite waterproofing techniques guide has you covered.
Hard-Shell Storage and Furniture
The Gear Layer of the Weather-Ready Campsite Stack often gets ignored, but wet gear outside the tent is just as much of a problem as a leaking tent. Consider these additions for a fully weather-proofed campsite:
Hard-shell storage boxes (like Pelican cases or HDPE camp boxes) keep electronics, food, and clothing dry even in sustained rain. Look for an IP67 rating (dust-tight and waterproof to 1 meter for 30 minutes) or a positive-seal gasket.
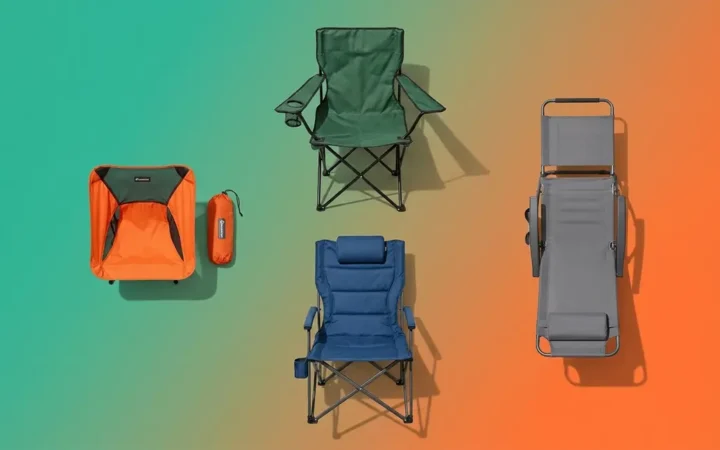
Weather-resistant camp furniture uses 600D polyester or PVC-coated Oxford fabric for seat panels and backs. Avoid chairs with raw cotton or canvas seats in wet climates — they stay damp for hours and develop mildew quickly.
Shade canopies and tarps over your cooking and social area extend your usable campsite in rain. A 210D polyester tarp with taped seams and a 2,000mm+ HH rating covers most 3-season conditions. For tips on choosing and positioning a backcountry tarp, Sea to Summit’s backcountry campsite guide is a solid reference.
Why Are Campers Avoiding Polyester?
Polyester is everywhere in camping gear — but lately, some campers have been asking harder questions about it. Understanding both sides helps you make a more informed choice.
Why Polyester Remains a Top Choice
Polyester’s dominance in camping gear comes down to a straightforward value equation. It’s affordable to manufacture, widely available, and performs reliably across most recreational conditions. PU-coated polyester resists UV degradation better than nylon, holds its shape when wet, and is easier to find in the mid-range price bracket where most campers shop.
For family car camping — the most common camping scenario — polyester delivers everything you need: adequate water resistance, good UV stability, and durability across multiple seasons without demanding special care. Common pain points reported by campers who’ve switched away from polyester often trace back to breathability complaints in warm, humid conditions, not waterproofing failures.
For most weekend and family campers, the evidence supports polyester as a practical, cost-effective default. The key is verifying the HH rating and seam construction — not assuming all polyester performs equally.
Why Campers Prefer Alternatives
The environmental case against polyester is real and worth understanding. Polyester is derived from petroleum (PET plastic), and research published in environmental science literature has found that polyester textiles shed microplastic fibers during washing — fibers that enter waterways and accumulate in aquatic ecosystems. For campers who prioritize Leave No Trace principles and environmental stewardship, this is a legitimate concern.
Additionally, polyester’s low breathability creates comfort issues in warm weather. When ambient temperatures climb above 75°F, a fully sealed polyester tent can feel noticeably warmer inside than a canvas or mixed-fabric alternative. Campers in humid summer climates — the Southeast US, for example — often report preferring tents with mesh inner walls and polyester rainflies, rather than full-polyester construction, for this reason.
UV degradation is the other documented concern. A NIH reviewed study on UV effects found that repeated UV exposure progressively weakens PU coatings, reducing waterproof performance over time. Storing your tent dry and out of direct sun between trips significantly extends its lifespan.
Essential Camping Rules for Beginners
Weather-resistant materials protect your gear. Camping rules protect you, your campsite neighbors, and the environment. These aren’t obscure regulations — they’re widely referenced guidelines that show up in gear forums, park signage, and online communities. Here’s what they actually mean.
The 200-Foot Rule Explained
The 200-foot rule (sometimes called the 200-foot guideline) comes from Leave No Trace’s Travel & Camp on Durable Surfaces principle. It states that you should camp, cook, and dispose of waste at least 200 feet — approximately 70 adult paces — from any lake, river, or stream.
The reasoning is twofold. First, camping too close to water sources increases the risk of contaminating them with soap, food scraps, and human waste. Second, low-lying areas near water collect cold air and runoff overnight, making your campsite significantly wetter and colder than a slightly elevated alternative. Following this rule isn’t just ethical — it’s a practical weather management decision. The National Park Service reinforces this guideline across most backcountry camping regulations.
The 3-3-3 and 10-Year Rules
The 3-3-3 rule is an informal planning guideline popular among RV and tent campers alike. It recommends: drive no more than 300 miles per day, arrive at your campsite by 3:00 PM, and stay at least 3 nights per location. The logic is straightforward — arriving early gives you daylight to set up properly, including staking out your rainfly and checking your ground layer before dark. Rushing a setup in fading light is one of the most common causes of poorly pitched tents and preventable wet nights.
The 10-year rule is a campground policy — not a universal law — applied by some private and state campgrounds to RVs and campers. It states that vehicles or trailers older than 10 years may be denied entry or assigned to specific sections. The rule exists because older rigs are more likely to have maintenance issues that affect neighboring campers (leaking fluids, deteriorating awnings, aging electrical systems). If you’re planning a trip with an older RV or trailer, check the campground’s specific policy in advance. This rule does not typically apply to tent campers.
Common Mistakes and Limitations to Know
Even well-chosen weather-resistant camping materials can fail when common setup or maintenance mistakes are made. Here are the most frequent issues — and how to avoid them.
Common Setup Pitfalls
Pitfall 1: Extending the groundsheet past the tent edges. This is the #1 beginner mistake. A groundsheet that sticks out beyond your tent floor channels rainwater directly under the tent. Always trim or fold your groundsheet so it sits 1–2 inches inside the tent perimeter.
Pitfall 2: Skipping seam sealing on a new tent. Most tents — even quality ones — are not fully seam-sealed from the factory. Skipping this step before your first rainy trip almost guarantees drips along the ridge pole and floor edges.
Pitfall 3: Relying on a single layer. The Weather-Ready Campsite Stack exists because no single product covers every failure point. A great rainfly won’t help if your groundsheet is too thin and your sleeping pad sits in a puddle. Build the full stack.
Pitfall 4: Ignoring DWR degradation. DWR coatings wear off. If water no longer beads on your rainfly surface — it just soaks in and darkens the fabric — your tent’s effective waterproof rating has dropped significantly. Reapply DWR spray before the season starts.
When to Choose Alternatives
When canvas beats synthetic: If you’re doing multi-night basecamp trips in cool, humid conditions and condensation is your main discomfort — not weight — canvas is the better call. The breathability advantage is real and meaningful for 4-season or shoulder-season camping.
When DCF beats everything else: If you’re a serious gram-counter doing solo backpacking trips of 5+ days, the weight savings of Dyneema Composite Fabric justify the cost. A DCF tarp that weighs 4 oz and handles driving rain has no synthetic equivalent at that weight.
When polyester isn’t right: In warm, humid conditions where breathability matters more than UV resistance, a mixed-fabric tent (mesh inner + polyester fly) outperforms a fully sealed polyester construction for comfort. See our choosing the right tent guide for a full breakdown.
Frequently Asked Questions
What material is best for camping?
Polyester is the best all-around material for most recreational campers — it balances UV resistance, water resistance, and cost better than any other option. Nylon is the better choice if you’re backpacking and every ounce matters, because it offers higher strength-to-weight performance. Canvas suits basecamp setups where breathability and insulation matter more than portability. For most beginners, a PU-coated polyester tent rated at 1,500mm HH or higher is the practical starting point.
Difference Between 75D and 150D?
75D (Denier) fabric is thinner and lighter than 150D, but tears more easily. Denier measures the weight of 9,000 meters of a single thread, according to REI’s fabric specifications — so a higher number means a thicker, heavier, more abrasion-resistant fabric. A 75D rainfly is appropriate for ultralight backpacking where weight savings matter most. A 150D fabric is the standard for most 3-season backpacking tents, offering a better balance of weight and durability. For ground contact layers, go higher — 210D or 600D.
Is 210D or 600D better?
Neither is universally better — the right Denier depends on the specific campsite layer. For a rainfly or tent wall that only contacts rain and wind, 210D polyester provides plenty of durability at a manageable weight. For a groundsheet or gear tarp that contacts rocks, roots, and wet soil all night, 600D Oxford fabric resists abrasion and pinholes far better. Across camping communities, the recommendation is: use 210D for overhead layers, 600D for ground contact layers.
How do you waterproof a campsite?
Waterproofing a campsite involves five steps: site selection, ground layer placement, rainfly tensioning, seam sealing, and DWR spray application. First, choose a high, flat site at least 200 feet from water sources. Second, lay a correctly sized groundsheet (slightly smaller than your tent floor). Third, pitch your rainfly taut with a 2–3 inch air gap from the inner tent. Fourth, apply seam sealer to all stitch lines before your first trip. Fifth, reapply DWR spray to the rainfly surface every 1–2 seasons.
What is the 200 rule for camping?
The 200-foot rule requires camping, cooking, and waste disposal at least 200 feet from any water source — lakes, rivers, and streams. This is a Leave No Trace principle enforced in most national parks and wilderness areas. Approximately 70 adult paces equals 200 feet. The rule protects water quality from contamination and, practically, keeps your campsite drier — low ground near water collects runoff and cold air overnight, making your setup wetter and colder.
What is the 3-3-3 rule for camping?
The 3-3-3 rule is an informal planning guideline recommending: drive no more than 300 miles per day, arrive by 3:00 PM, and stay at least 3 nights. It’s especially popular among RV campers but applies to tent camping too. Arriving by 3:00 PM gives you daylight to set up your tent, stake your rainfly properly, and check your ground layer before dark — reducing the chance of a rushed, poorly pitched setup that leaks overnight.
What is the 10-year rule at campgrounds?
The 10-year rule is a policy used by some private and state campgrounds that restricts RVs or trailers older than 10 years from booking certain sites. The policy exists because older vehicles are more likely to have maintenance issues — leaking fluids, deteriorating awnings, aging electrical connections — that affect neighboring campers. This rule does not apply to tent campers. If you’re planning a trip with an older rig, check the specific campground’s policy before booking, as enforcement varies widely.
Why are people avoiding polyester?
Some campers avoid polyester due to environmental concerns about microplastic fiber shedding and its petroleum-based origin. Research has found that polyester textiles release microplastic fibers when washed, which enter waterways. For campers who prioritize Leave No Trace ethics and environmental stewardship, this is a legitimate reason to consider alternatives like recycled polyester (rPET) or natural-fiber options. Others avoid it for comfort reasons — polyester’s low breathability can make tents feel warmer in summer. For most practical applications, however, polyester remains a sound and widely used choice.
Building Your Weather-Ready Campsite
Ultimately, choosing weather resistant materials for your campsite comes down to one key shift in thinking: stop treating it as a single product decision and start treating it as a layered system. For most beginners, that means a PU-coated polyester tent rated at 1,500mm HH or higher, a 600D groundsheet trimmed inside the tent perimeter, and a DWR spray reapplication every couple of seasons. Research from REI and outdoor testing communities consistently shows that setup quality — not price — is the strongest predictor of staying dry.
The Weather-Ready Campsite Stack is the framework that ties it all together. Cover all four layers — Shelter, Ground, Gear, and Maintenance — and you’ve addressed every common failure point before it becomes a wet sleeping bag at 2:00 AM.
Your next step: before your next trip, check your rainfly’s HH rating and run your finger along the seam lines. If they’re not sealed, pick up a $10 tube of seam sealer and spend 20 minutes before you leave. That single step closes the most common gap between a tent that looks waterproof on paper and one that actually keeps you dry when it counts. For more gear prep guidance, our complete campsite setup guide walks through the full process from the ground up.
David King
Field gear tester at Tent Explorer.