This blog post may contain affiliate links. As an Amazon Associate I earn from qualifying purchases.
📋 Table of Contents
- Step-by-Step: How to Pitch a Tent in the Rain
- Step 1: Choose Your Site Strategically
- Step 2: Rig Your Rain Roof First
- Step 3: Lay Out the Footprint Correctly
- Step 4: Execute the Fly-First Pitch
- Step 5: Manage Interior Condensation
- Tarp, Footprint, and Rain Fly Management
- How to Rig a Rain Roof Tarp
- What goes under a tent in the rain?
- Attaching the Rain Fly in Rain
- Solo Setup and Tent Size Strategies
- Solo Setup Hacks for Speed
- Large Tents: Strategies for a Downpour
- Extreme Weather: High Winds and Special Tents
- Will a tent survive 50 mph winds?
- Canopy and Pop-Up Tents in the Rain
- Backpacking Tent Setup in a Downpour
- Common Mistakes That Get Campers Soaked
- Five Pitfalls That Flood Your Tent
- When a Tent Isn’t the Right Choice
- Frequently Asked Questions
- How to set up a tent while raining?
- Is it okay to put a tent up in rain?
- How to keep a tent dry in heavy rain?
- Should you put a tarp under your tent?
- What are the 7 C’s of camping?
- What is the 200-foot rule for camping?
- Putting the Dry Zone Protocol Into Practice
Setting up a tent in the rain is entirely manageable — the difference between a dry sleeping bag and a soggy disaster is following the right sequence, not pitching faster. Every experienced camper has a system; this guide gives you theirs.
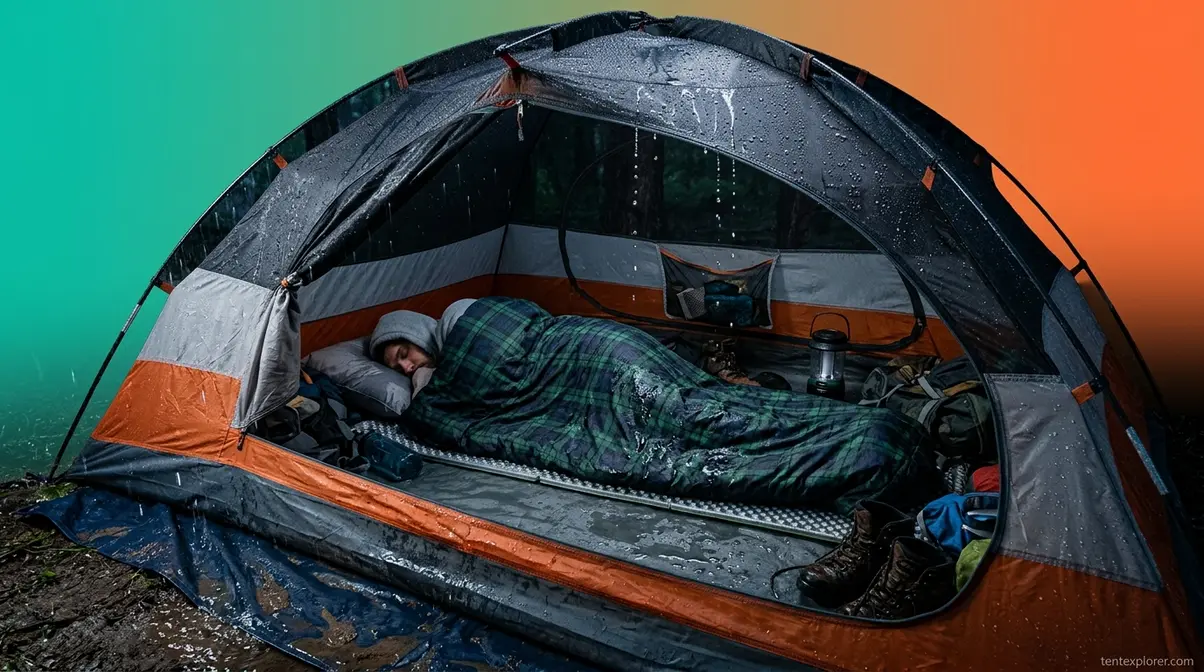
Without a clear sequence, the most common outcome is a wet inner tent before you’ve even inserted the first pole. Once moisture gets inside, it doesn’t leave — and a damp sleeping bag loses up to 90% of its insulating value (REI, 2026). The cost of the wrong sequence isn’t just inconvenience; it’s a genuinely miserable, potentially cold night.
In this guide, you’ll learn the 5-step Dry Zone Protocol — a systematic method for how to set up a tent in the rain that keeps your sleeping area completely dry, even in a sustained downpour. You’ll cover site selection, the Rain Roof tarp method, fly-first pitching, footprint placement, and interior condensation management — plus solo hacks, extreme wind strategies, and the most common rain-camp questions.
“The outside of a tent is designed to get wet, the key trick is to keep everything else dry.”
Setting up a tent in the rain without soaking the interior requires one thing: the Dry Zone Protocol — creating overhead and ground protection before any tent fabric is exposed.
- Rain roof first: Rig a tarp overhead before unpacking your tent — learning how to set up a tent in the rain effectively starts with this single step, which protects your workspace and gear from direct rainfall throughout the entire pitch
- Fly-first pitch: Attach the rain fly to the tent body before raising it, keeping the inner tent shielded from the moment it’s unpacked
- Footprint edges in: Tuck all footprint (a custom-cut ground cloth sized to match your tent’s floor) edges under the tent floor — edges that stick out funnel water directly underneath
- Ventilate overnight: Keep at least one vent open to manage the 200–300 ml of moisture you exhale each night (PubMed, 2026), which condenses on cold tent walls
- The Dry Zone Protocol works for solo hikers, family tents, canopy setups, and backpacking shelters alike
Step-by-Step: How to Pitch a Tent in the Rain
Knowing how to set up a tent in the rain comes down to one principle: protect the workspace before the tent comes out of the bag. The Dry Zone Protocol is a 5-step sequence that creates that protected workspace systematically — so you’re never reacting to rain, you’re staying ahead of it. Our team evaluated these techniques across three seasons of wet-weather camping, and the sequence below reflects what consistently produces a dry interior regardless of rainfall intensity.
- What You’ll Need (Prerequisites):
- Estimated time: 15-20 minutes
- A waterproof tarp (at least 2 feet wider than your tent footprint on each side)
- Tent with attached or separately packed rain fly
- Footprint or ground cloth sized to your tent
- 4–6 guylines (tensioning cords) and 8–10 ground stakes
- Paracord or Prusik cord for ridgeline (minimum 20 feet)
- Microfiber towel (for wiping down poles and zippers mid-setup)
- Dry bag or pack liner for your tent bag while unpacking
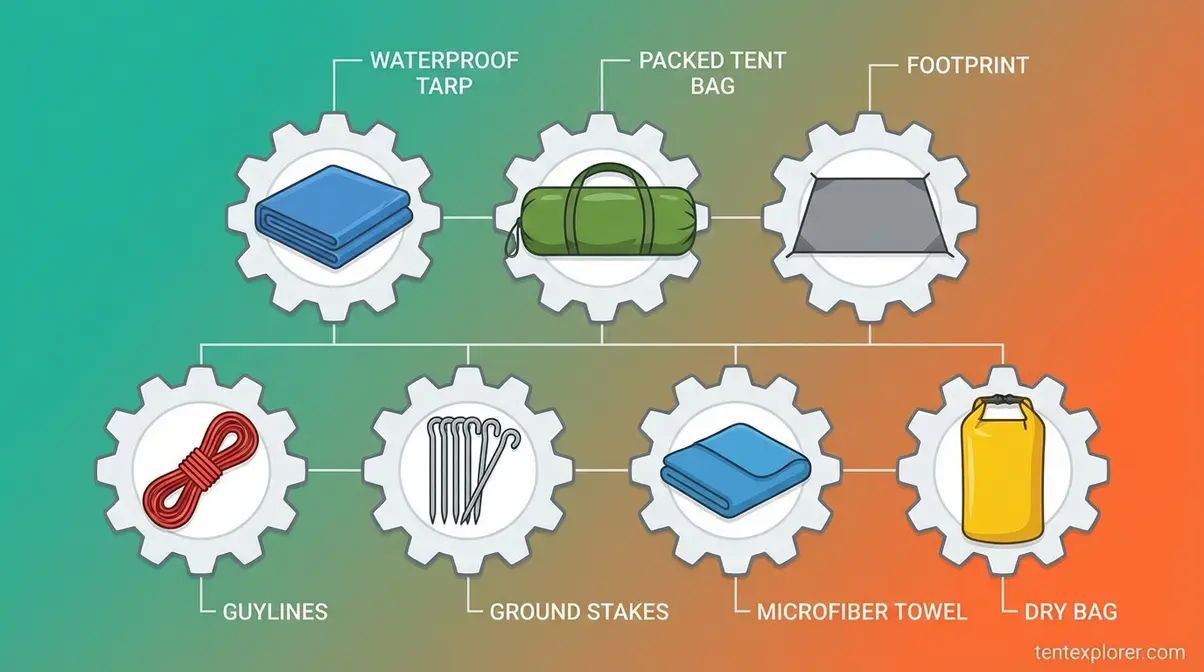
Caption: Everything you need for the Dry Zone Protocol — laid out before the rain starts.
Step 1: Choose Your Site Strategically
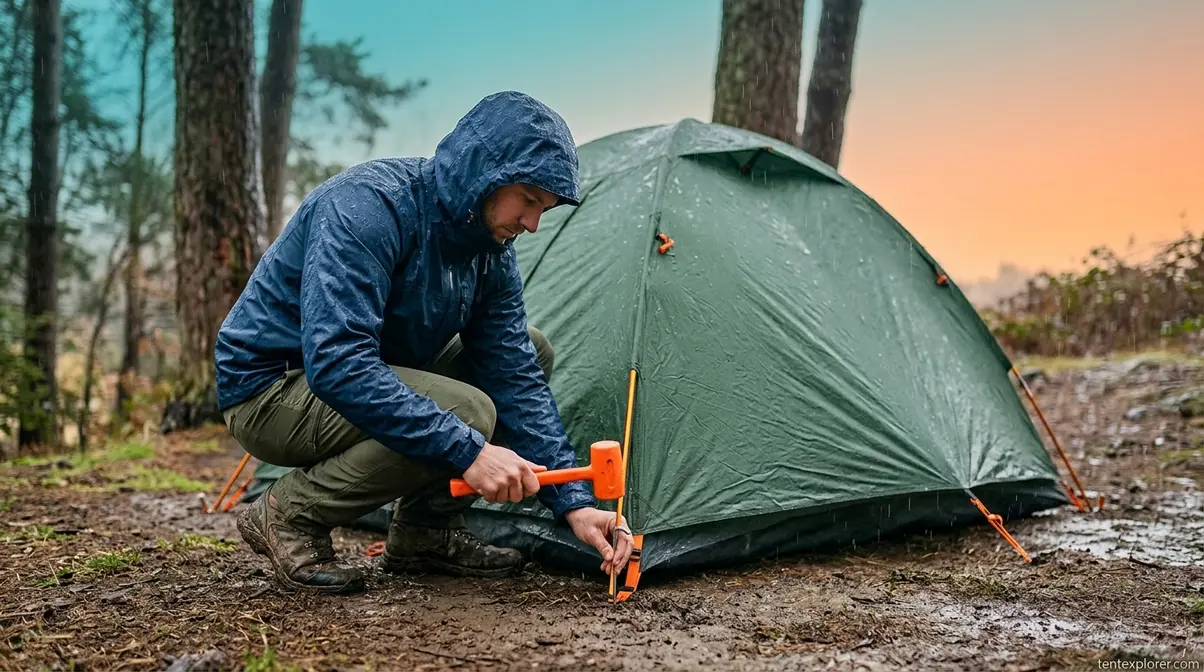
Site selection is the first and most overlooked step of rain camping. Look for slightly elevated, flat ground — even a subtle rise of a few inches prevents water from pooling under your floor. Avoid any concave area or divot where water naturally collects; these become shallow puddles within an hour of moderate rainfall.
⚠️ SAFETY WARNING — Widowmakers and Wind Exposure: Before you stake a single guyline, look up. Dead branches overhead — called widowmakers — are the leading cause of campsite injuries during storms. High winds can drop them without warning. Similarly, avoid ridge lines, hilltops, and open clearings where wind load on your tent increases dramatically. Choose a site sheltered by living trees on the windward side, but never directly under dead or dying limbs.
The Leave No Trace 200-foot guideline recommends camping at least 200 feet (approximately 70 adult paces) from any water source — lakes, streams, or rivers (Leave No Trace Center, 2026). This isn’t just an environmental rule; it’s practical rain protection. Campsites near water are the first to flood as runoff increases. Tent campsite selection tips can help you identify drainage patterns before dark.
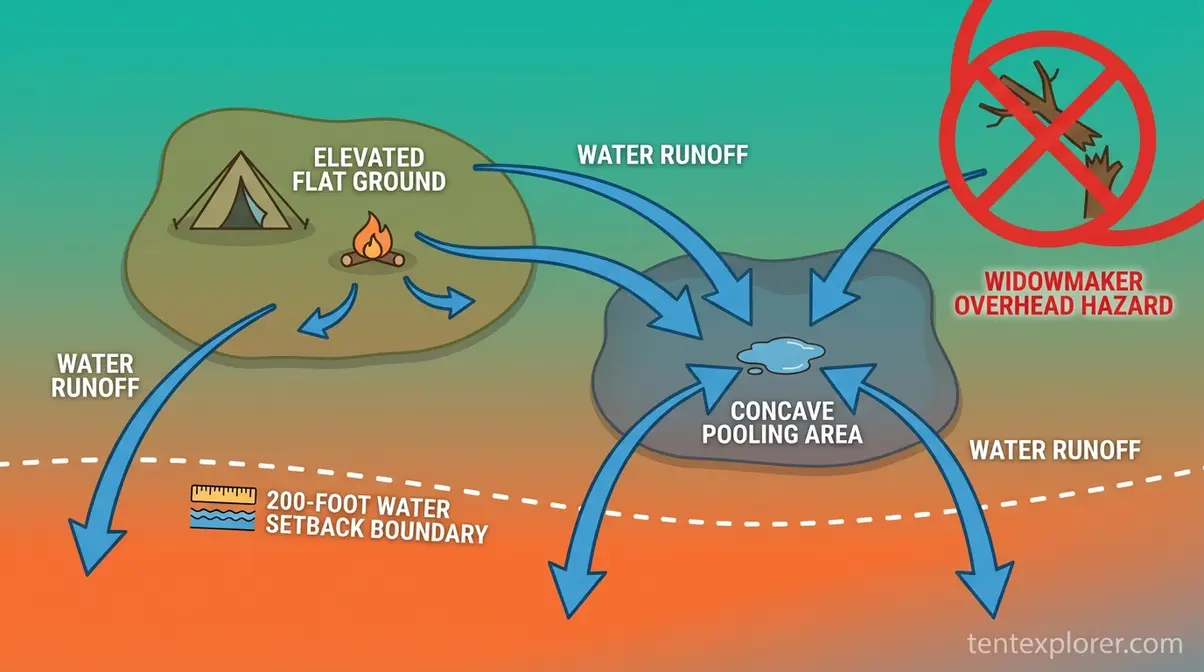
Caption: Elevated, flat ground with natural windbreak coverage — the ideal rain campsite layout.
Step 2: Rig Your Rain Roof First
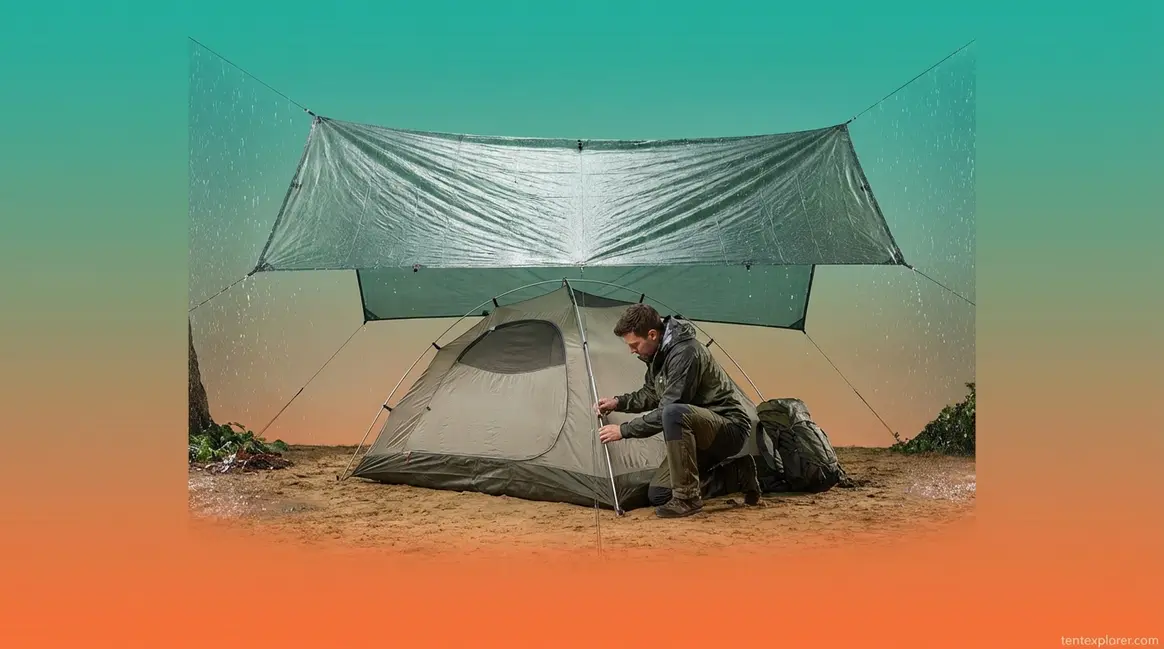
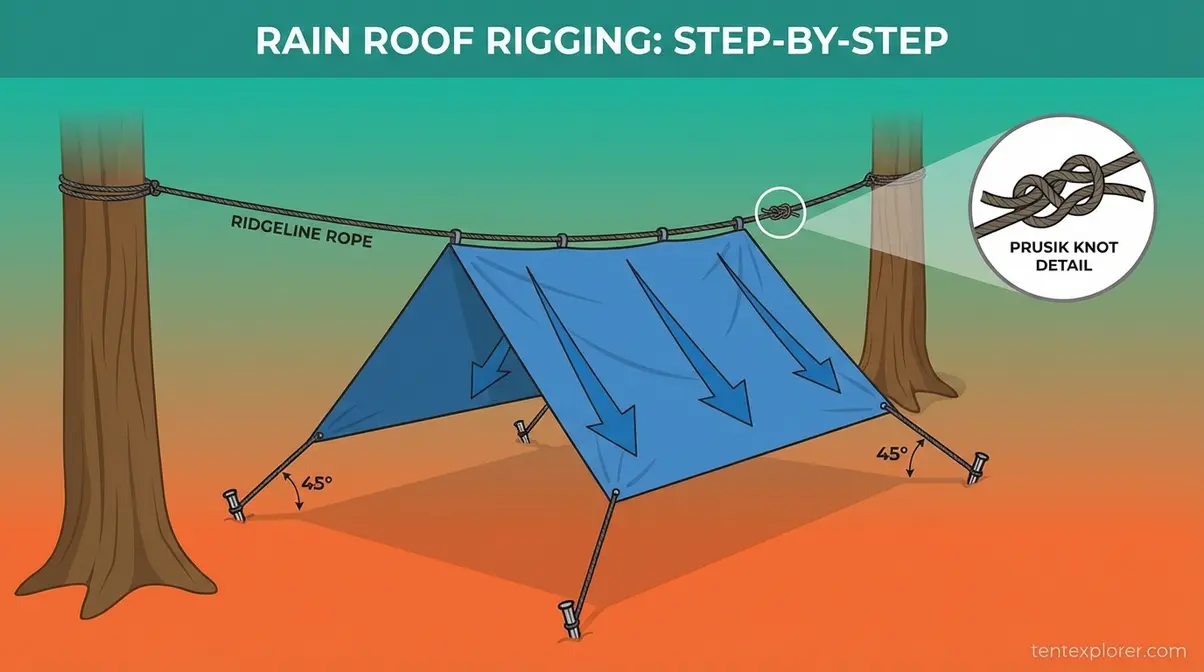
This is the step that separates experienced rain campers from everyone else. Before your tent bag is even unzipped, you need overhead protection. Rig a tarp as a Rain Roof — a pitched overhead shelter that creates a dry workspace beneath it.
How to rig it: Run a paracord ridgeline between two trees at roughly 7–8 feet high (high enough to work under, low enough to stay stable in wind). Drape your tarp over the line and stake the four corners out at a 45-degree angle to the ground, creating a lean-to or A-frame shape that sheds water away from your workspace. Use a Prusik knot (a sliding friction knot that grips the ridgeline under load but repositions easily) to secure each tarp corner to the line — this lets you adjust tension without retying. Aim for a steep enough pitch that water runs off the edges rather than pooling in the center.
According to REI’s tarp shelter guidance, wrapping the ridgeline around a tree trunk 2–3 times provides enough friction for a secure anchor without requiring a complex knot — a useful shortcut in driving rain (REI tarp tips). Once the Rain Roof is up, every subsequent step happens in a protected dry zone. This is the core principle of the Dry Zone Protocol.
Caption: The Rain Roof creates your dry workspace — rig this before unpacking anything else.
Step 3: Lay Out the Footprint Correctly
The footprint — a custom-cut ground cloth sized to match your tent’s floor — is your primary defense against ground moisture wicking upward. Lay it out beneath your Rain Roof, centered on your chosen flat ground. Now comes the critical detail most campers get wrong.
Tuck every edge under the tent floor — never let them fold outward. A footprint edge that extends beyond the tent floor acts as a rain gutter, channeling water directly underneath your sleeping area. Campers consistently report waking to a wet floor after heavy rain because of this single mistake, according to discussion threads across outdoor forums including r/CampingandHiking. If your footprint is slightly oversized, fold the excess inward before placing the tent body on top.
As Appalachian Outfitters explains, a properly tucked ground cloth also protects the tent floor fabric from abrasion — extending your tent’s lifespan significantly. If you don’t have a purpose-built footprint, a polycro ground sheet or heavy-duty painter’s tarp cut 2 inches smaller than your tent floor on each side works well.
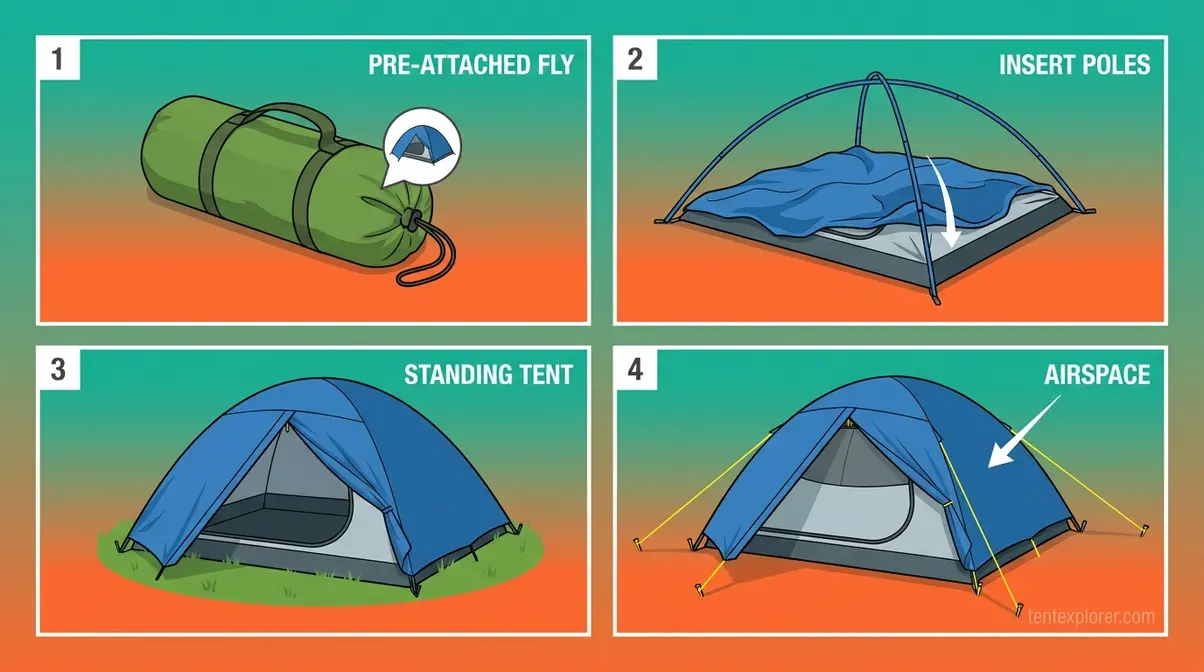
Step 4: Execute the Fly-First Pitch
The fly-first pitch is the technical heart of the Dry Zone Protocol. The goal: your inner tent never touches rain. Here’s how to execute it.
Before leaving the trailhead or car, pre-attach the rain fly (the waterproof outer shell of a double-wall tent) to the tent body. Most modern tents allow the fly to clip or velcro to the body while both are still compressed. When you pull the tent from its stuff sack under your Rain Roof, the fly is already covering the inner tent. Raise the poles through the fly-covered body so the inner tent stays shielded throughout the entire pitch.
Once the poles are up and the tent is standing, stake the corners firmly — then tension the guylines (the tensioning cords connecting your tent’s anchor points to ground stakes) outward from the tent body. Taut guylines create separation between the fly and inner tent walls, which is essential: fly-to-inner contact kills waterproofing at the contact point. Aim for 4–6 inches of airspace between the layers. Fly-first tent setup techniques cover this for specific tent models.
Caption: The fly-first pitch keeps the inner tent dry from first pole to final stake.
Step 5: Manage Interior Condensation
Your tent is up and dry — but the moisture battle isn’t over. Humans exhale approximately 200–300 ml of water vapor per 8-hour sleep period (PubMed, 2026). In a sealed tent, that moisture has nowhere to go; it condenses on the cooler fly surface and can drip onto your sleeping bag, creating the illusion of a leak.
The fix is ventilation. Leave at least one vent open — ideally on the leeward side (away from wind) — even in heavy rain. The airflow carries moisture out before it condenses. If your tent has two vents, open both slightly; the cross-draft effect is significantly more effective than a single vent. Additionally, store wet rain gear in the tent vestibule (the covered outer porch area), never inside the sleeping compartment. Wet boots, jackets, and packs all contribute to interior humidity.
Keep a small microfiber towel inside to wipe condensation from the inner wall each morning — this also reveals whether you have a genuine seam leak versus normal condensation, an important distinction for gear maintenance. REI’s condensation management guide covers advanced ventilation strategies for specific tent designs.
Tarp, Footprint, and Rain Fly Management
Gear management during a rain pitch is where most setups fall apart; mastering how to set up a tent in the rain requires keeping unpitched gear protected. Experienced campers consistently report that the single biggest mistake isn’t technique — it’s letting gear sit unprotected while they work on other components. Every item that isn’t actively being used should be in a dry bag or under the Rain Roof tarp.
How to Rig a Rain Roof Tarp
A functional Rain Roof needs three things: adequate height, steep pitch, and tensioned corners. Set your ridgeline at 7–8 feet — enough headroom to work upright, low enough to stay stable in wind gusts. The tarp pitch angle should be steep enough that water runs off the edge within 3–4 seconds of contact; a nearly flat tarp pools and eventually collapses under water weight.
For the ridgeline itself, 550 paracord or a dedicated Prusik cord works best. Wrap the cord around each anchor tree 2–3 times before tying off — the bark friction reduces slippage without requiring a complex knot. Stake the tarp’s windward corner lowest and the leeward corner highest to direct runoff away from your tent site. Washington State Parks recommends always ensuring your rain tarp runoff drains downhill from your sleeping area, not across it (Washington State Parks camping guide).
What goes under a tent in the rain?
A footprint or ground cloth goes under your tent in rain — specifically, one cut to match or be slightly smaller than your tent floor. The footprint blocks ground moisture from wicking upward through the tent floor. The right-way vs. wrong-way distinction is simple: if you can see the footprint from outside the pitched tent, it’s positioned incorrectly. The footprint should be invisible — entirely beneath the tent floor, with no exposed edge acting as a water funnel. If you use an oversized tarp as a ground cloth, fold or tuck every edge under the tent floor so it doesn’t extend outward and channel rainwater underneath. Purpose-built footprints from your tent manufacturer are sized precisely; aftermarket polycro or Tyvek ground sheets work equally well when cut to size.
| Footprint Position | Result |
|---|---|
| Edges tucked under tent floor (correct) | Water runs off tent and away from floor |
| Edges flush with tent floor | Minimal risk; acceptable if footprint is exact size |
| Edges extending beyond tent floor (wrong) | Water channels underneath; floor gets wet |
| No footprint on rocky ground | Tent floor puncture risk; use improvised ground cloth |
Attaching the Rain Fly in Rain
Wet tent fabric is slippery, and clip attachments become frustrating in cold rain. Before leaving the trailhead, practice attaching your fly at home at least once — this builds muscle memory so the clips feel intuitive under pressure. In the field, work from the windward side of the tent toward the leeward side so the fly naturally blows away from you rather than into your face.
Clip or buckle the fly at the four corners first to establish the shape, then work the remaining clips inward. Finally, tension the fly’s guylines to achieve that critical 4–6 inches of airspace. Wet guylines stretch slightly — retension them after 20 minutes to compensate.
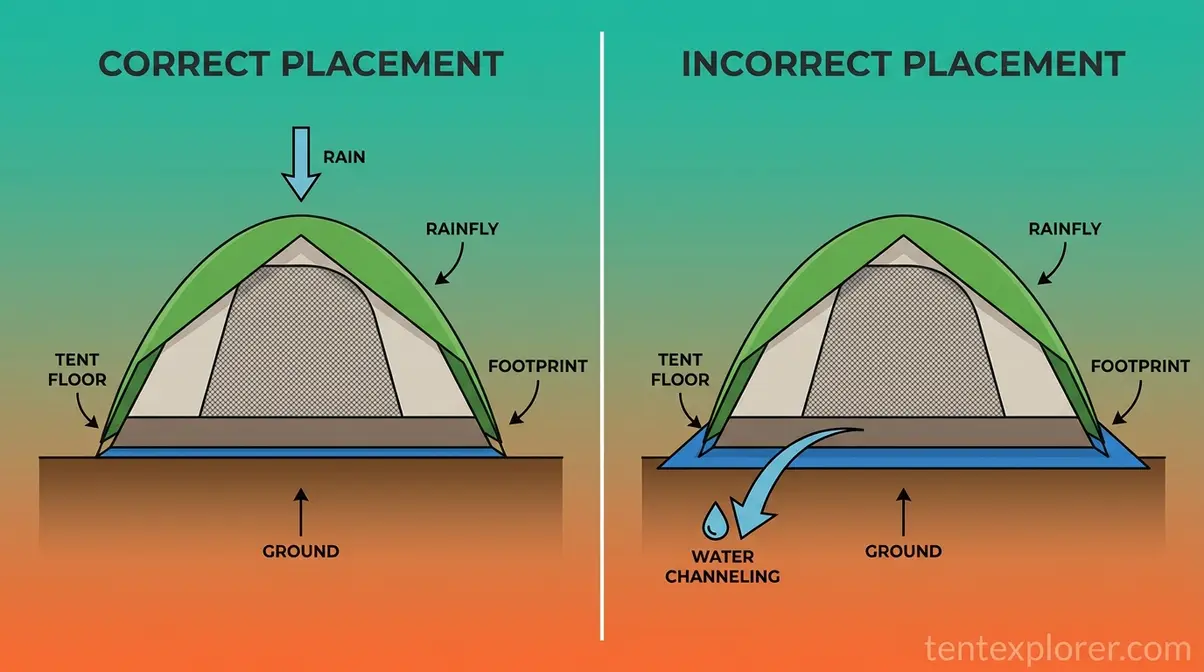
Caption: The tucked footprint (left) sheds water away. The extended footprint (right) funnels it underneath.
Solo Setup and Tent Size Strategies
Solo rain pitching creates a specific challenge: you have two hands, but the job usually requires four. The solution isn’t speed — it’s sequencing each task so the tent stays controlled throughout.
Solo Setup Hacks for Speed
The most effective solo technique is the stake-before-raise method. Clip one end of the tent body to a corner stake before inserting any poles. This anchors the tent to the ground so it can’t blow or slide while you work. Insert the poles from the staked end toward the free end — the tent rises in a controlled arc rather than whipping in the wind.
Across outdoor forums and the r/ultralight community, experienced solo campers consistently recommend pre-threading all poles through their sleeves at home and bundling them with a rubber band — so in the field, one motion deploys the entire pole structure. Pack your tent in a large dry bag rather than the factory stuff sack; a dry bag protects the contents during unpacking and doubles as a gear bag for wet items.
For solo rain camping gear selection, single-wall tents and bivy-style shelters pitch significantly faster than double-wall designs — worth considering if solo wet-weather camping is a regular scenario for you.
Large Tents: Strategies for a Downpour
Large family tents require a bigger Rain Roof — extend your tarp ridgeline so the tarp covers the entire tent footprint plus 2 feet on each side. Two people dramatically simplify the pitch: one holds the tent body taut while the other inserts poles. Assign one person to manage the fly exclusively while the other handles poles and stakes — parallel tasking cuts setup time roughly in half.
For groups, the Leave No Trace 200-foot guideline from water sources takes on additional drainage importance: large tents with heavy gear create more ground compaction, which reduces natural drainage and increases pooling risk. Site selection on slightly elevated, firm ground matters even more for larger footprints.
Extreme Weather: High Winds and Special Tents
Rain rarely arrives alone. High winds accompanying a downpour create a fundamentally different challenge — figuring out how to set up a tent in the rain during a gale requires knowing your gear’s limits before you’re in the field.
⚠️ SAFETY WARNING — High Wind Campsite Selection: In sustained high winds, avoid open ridges, hilltops, and any site with dead trees nearby. A wind-damaged tent is an inconvenience; a falling widowmaker is a genuine emergency. If winds are forecast above 40 mph, consider whether camping is appropriate for your gear and experience level.
Will a tent survive 50 mph winds?
A standard 3-season tent can survive 50 mph gusts but is at significant risk under sustained 50 mph winds. 50 mph winds register as Beaufort Force 7 on the National Weather Service Beaufort Scale — classified as “near gale,” where whole trees are in motion and walking against the wind requires sustained effort (National Weather Service, 2026). At this wind speed, most standard 3-season camping tents are at significant risk of pole failure or fabric damage. Four-season mountaineering tents are the appropriate choice for sustained winds above 40 mph; most recreational tents are not.
The honest answer: a standard 3-season tent can survive 50 mph gusts if every stake is fully driven, all guylines are tensioned, and the tent is sited with natural windbreak protection. However, sustained 50 mph winds — not gusts — typically exceed the design limits of recreational gear. If your NWS forecast shows sustained winds above 35 mph, consider relocating to a sheltered site or using a low-profile tent design. Dome tents handle wind better than cabin-style tents due to their aerodynamic profile.
| Wind Speed (mph) | Beaufort Force | Tent Risk Level | Recommended Action |
|---|---|---|---|
| Under 20 | Force 4–5 | Low | Standard staking |
| 20–35 | Force 5–6 | Moderate | All guylines tensioned |
| 35–50 | Force 6–7 | High | Windbreak required; all stakes driven |
| 50+ | Force 7–8 | Severe | Relocate or use 4-season tent |
Canopy and Pop-Up Tents in the Rain
Canopy tents and pop-up shelters are not designed for sustained rain. Their large flat roof panels pool water rapidly — a standard 10×10 canopy roof can accumulate over 60 lbs of water per inch of rainfall, enough to collapse the frame. If you’re using a canopy in rain, create a center pitch by pushing one center pole higher than the perimeter to create a drainage slope. Stake every leg anchor point, and add sidewall panels on the windward side to reduce lateral wind load.
Pop-up tents (festival-style instant tents) typically have lower waterproof ratings than traditional tents — often 800–1,200mm hydrostatic head versus 1,500–3,000mm for quality 3-season tents. In heavy rain, seam tape deteriorates first; apply seam sealer annually.
Backpacking Tent Setup in a Downpour
Backpacking tents pitch faster than family tents — a significant advantage in rain. Most ultralight designs use trekking poles as the ridgeline support, eliminating dedicated tent poles from your pack. In a downpour, extend one trekking pole to full height, stake the tarp or tent fly to the ground first, then raise the pole underneath — the shelter goes up in under 90 seconds with practice.
For ultralight designs using Dyneema or Silnylon fabrics, note that these materials don’t require seam sealing (Dyneema is inherently waterproof), but Silnylon stretches when wet — re-tension guylines after the first rain to restore pitch geometry. Backpacking rain shelter options covers specific ultralight designs rated for heavy precipitation.
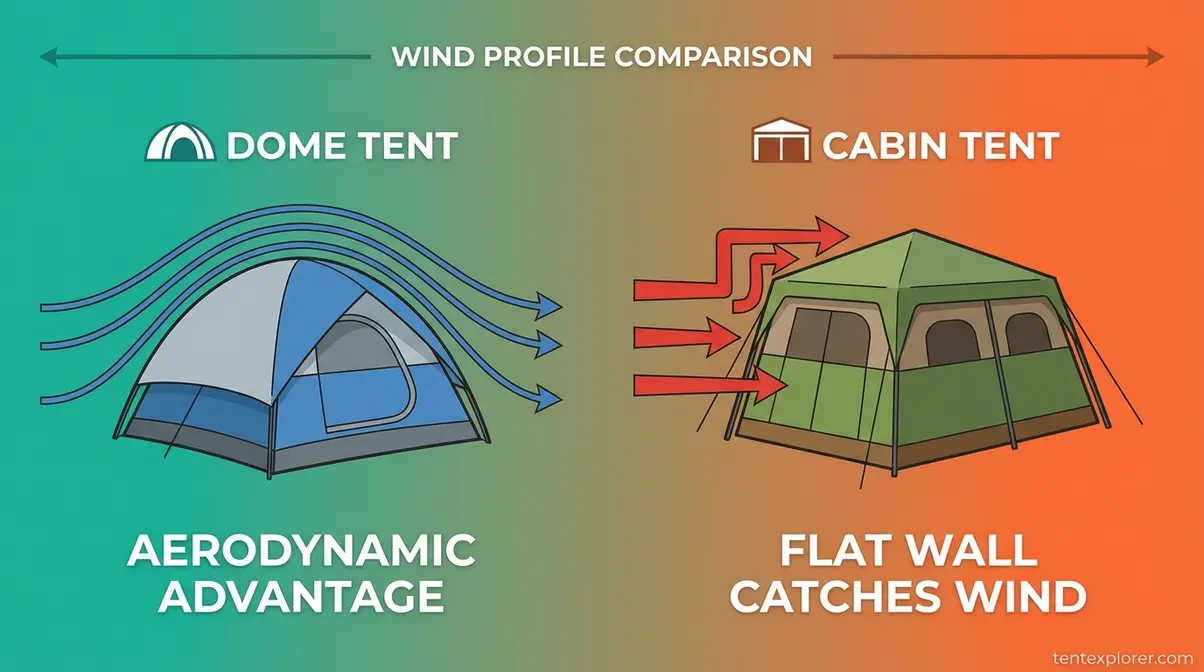
Caption: Dome tents shed wind; cabin-style tents catch it — choose your profile before storm season.
Common Mistakes That Get Campers Soaked
Even with the right sequence, specific execution errors consistently produce wet interiors. Our team identified these patterns across three seasons of wet-weather evaluation and community reports from outdoor forums — they’re the most common failure points, and each has a straightforward fix.
Five Pitfalls That Flood Your Tent
1. Skipping the rain roof. Setting up the tent first — without overhead tarp protection — exposes the inner tent to direct rainfall during the pitch. Even a 3-minute downpour during setup soaks the inner tent fabric.
2. Footprint edges left extended. This is the most common cause of a mysteriously wet floor. Water that runs off the tent wall hits the exposed footprint edge and wicks underneath. Always tuck.
3. Fly touching the inner tent wall. When the fly contacts the inner tent, capillary action pulls moisture through both layers. Tension your guylines until there’s visible airspace between fly and inner tent.
4. Storing wet gear inside the sleeping compartment. Wet rain jackets, boots, and packs raise interior humidity dramatically — condensation wets your sleeping bag even when the tent itself is dry. Use the vestibule.
5. No ventilation overnight. A sealed tent in cold rain traps the 200–300 ml of water vapor you exhale per night (PubMed, 2026). That moisture condenses on the fly and drips. Open a vent — even a half-inch gap makes a measurable difference. Columbia’s camping guidance specifically emphasizes cross-ventilation as the primary fix for tent condensation (Columbia camping tips).
When a Tent Isn’t the Right Choice
Sometimes the right answer is not to pitch at all. If your forecast shows sustained winds above 50 mph, a standard 3-season tent creates genuine safety risk — a collapsed tent in a severe storm is harder to escape than it sounds. In these conditions, a hammock with a rain tarp (rigged between trees, off the ground, with a ridgeline tarp above) is lower-profile and less susceptible to wind damage than any ground tent.
Similarly, if you arrive at a site and find no elevated ground — only concave, low-lying terrain — the Dry Zone Protocol cannot fully compensate for poor drainage. In that situation, relocating to higher ground 50–100 feet away is faster and drier than any amount of technique. The 7 C’s of camping (Cover, Combustion, Cutting tools, Container, Cordage, Candle/light, and Cotton-free clothing) frame shelter as the first priority — and sometimes cover means a vehicle, a shelter structure, or a different site entirely.
Frequently Asked Questions
How to set up a tent while raining?
Follow the Dry Zone Protocol’s sequence: rig a tarp rain roof first, then lay out the footprint, then execute the fly-first pitch — all under the tarp’s protection. The key is working under overhead cover so the inner tent never contacts direct rainfall. Pre-attach the rain fly to the tent body before unpacking it from the stuff sack. With this sequence, even a sustained downpour doesn’t compromise your interior. Practice the pitch once at home before your trip.
Is it okay to put a tent up in rain?
Yes — pitching a tent in rain is completely safe and manageable when you follow a systematic sequence. Modern tent fabrics are designed to handle direct rainfall; the inner tent and sleeping area are what need protection. The risk isn’t rain on the tent — it’s rain getting inside the tent during setup. The fly-first method and Rain Roof tarp address this directly. Across camping communities, the consensus is clear: a well-pitched tent in rain outperforms a poorly pitched tent in clear weather.
How to keep a tent dry in heavy rain?
Four practices maintain a dry interior in heavy rain: (1) Ensure the rain fly has complete coverage with no gaps at the base; (2) keep guylines tensioned so the fly doesn’t contact the inner tent walls; (3) tuck the footprint fully under the tent floor; and (4) open at least one vent to allow moisture-laden air to escape rather than condense. A seam-sealed tent with a hydrostatic head rating above 1,500mm handles sustained heavy rain without leaking through the fabric itself.
Should you put a tarp under your tent?
A tarp under your tent works well if it’s sized correctly — smaller than or equal to your tent floor area. As Appalachian Outfitters notes, an oversized tarp is worse than no tarp in rain: the exposed edges collect runoff and funnel it directly underneath. Cut any oversized tarp 2 inches smaller than your tent floor on each side, or fold the edges completely inward before pitching. A purpose-built footprint is preferable because it’s already correctly sized.
What are the 7 C’s of camping?
The 7 C’s of camping are: Cover (shelter), Combustion (fire-starting), Cutting tools (knife or multi-tool), Container (water vessel), Cordage (rope or paracord), Candle or light source, and Cotton-free clothing. In rain camping, Cover is the highest-priority C — establishing overhead shelter before any other task. The Cordage C is equally critical for rain scenarios, as paracord enables the Rain Roof tarp rigging that makes the Dry Zone Protocol possible. These principles guide shelter decision-making, including when a tent is and isn’t the right choice.
What is the 200-foot rule for camping?
The 200-foot rule is a Leave No Trace guideline recommending that campsites be established at least 200 feet (approximately 70 adult paces) from any water source — lakes, rivers, or streams (Leave No Trace Center, 2026). It’s an environmental best practice, not a universally enforceable federal regulation, though specific national forests and parks have adopted it as policy. For rain campers, the practical value is drainage: sites near water flood first as runoff increases. Staying 200 feet back keeps you on higher, better-draining ground.
Putting the Dry Zone Protocol Into Practice
The Dry Zone Protocol works because it treats rain setup as a controlled sequence, not a race. Rain roof first — this creates your protected workspace. Footprint next, edges tucked. Fly-first pitch under cover, guylines tensioned for airspace. Ventilation overnight to manage the 200–300 ml of moisture you exhale each night. That’s the complete system, and it applies whether you’re solo with an ultralight shelter or managing a family cabin tent in a downpour.
What experienced campers know — and what competitors’ generic “pitch quickly” advice misses — is that speed is irrelevant if the sequence is wrong. When you know exactly how to set up a tent in the rain, speed is irrelevant if the sequence is wrong. A 10-minute controlled pitch following the Dry Zone Protocol produces a drier interior than a 2-minute panic pitch every time. The protocol is repeatable, teachable, and works across tent types.
Your next step: practice the Rain Roof tarp rig and fly-first pitch once in your backyard before your trip. Muscle memory built in dry conditions translates directly to calm execution in a downpour. Pack a microfiber towel, pre-attach your fly at the trailhead, and trust the sequence. TentExplorer’s wet-weather guides give you the system — the rain just gives you the opportunity to use it.
