What Is a Tent Footprint? 5 Proven Reasons to Use One
You’ve spent real money on a quality tent. But the moment you pitch it on rocky ground, every sharp pebble, root, and stick is working directly against the floor fabric — the most expensive and least-replaceable part of your shelter system. A single season of abrasive ground contact can wear through a tent floor’s waterproof coating, turning a $250 tent into a soggy, leaky problem.
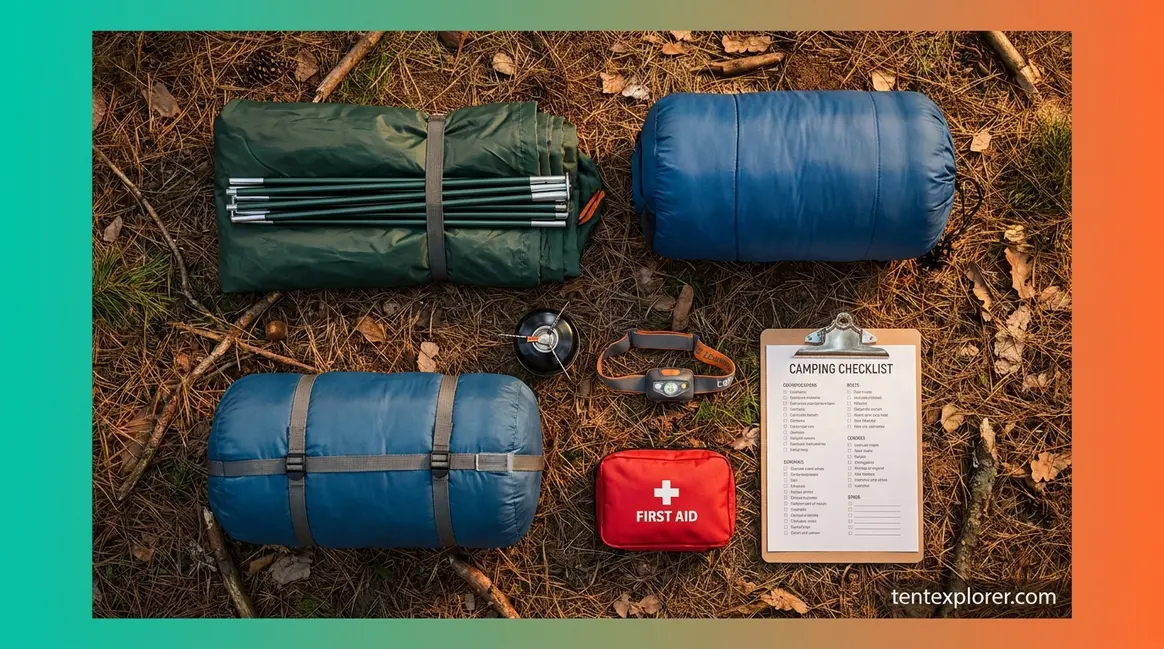
That’s exactly what a tent footprint is designed to prevent. In this guide, you’ll learn what a tent footprint is, whether you actually need one for your camping style, and how to make your own for under $10 if you decide you do. We cover the definition and functions, a science-backed necessity assessment, sizing and material selection, DIY alternatives, and the most common mistakes campers make.
“A footprint keeps your tent cleaner and helps stops pointy things on the ground abrading and poking through the tent’s floor so reducing the .”
— r/CampingGear community consensus
A tent footprint is a protective layer — also called a groundsheet or groundcloth — placed beneath your tent to shield the floor from abrasion, moisture, and punctures. Tent floors rated below 3,000mm HH are especially vulnerable to moisture infiltration without a footprint barrier (Boutique Camping, 2026).
- Defined as: A cut-to-size ground barrier that acts as a sacrificial layer between tent floor and terrain, absorbing wear so your tent doesn’t have to
- Extends tent life by absorbing abrasion from rocks, roots, and sticks that would otherwise degrade floor fabric and waterproof coating
- DIY options (Tyvek or Polycro) cost $10–$13 pre-cut or under $10 in raw materials, and can weigh as little as 1.5–2.4 oz for a compact 2-person setup (Six Moon Designs, 2026; Mountain Laurel Designs, 2026)
- Sizing rule: Cut your footprint 1–2 inches smaller than the tent floor on all sides to prevent rainwater from pooling beneath the tent (REI Expert Advice, 2026)
- The Ground Truth Framework: Your footprint decision comes down to three factors — terrain abrasiveness, your tent floor’s HH rating, and trip duration
What Is a Tent Footprint? Definition & Purpose
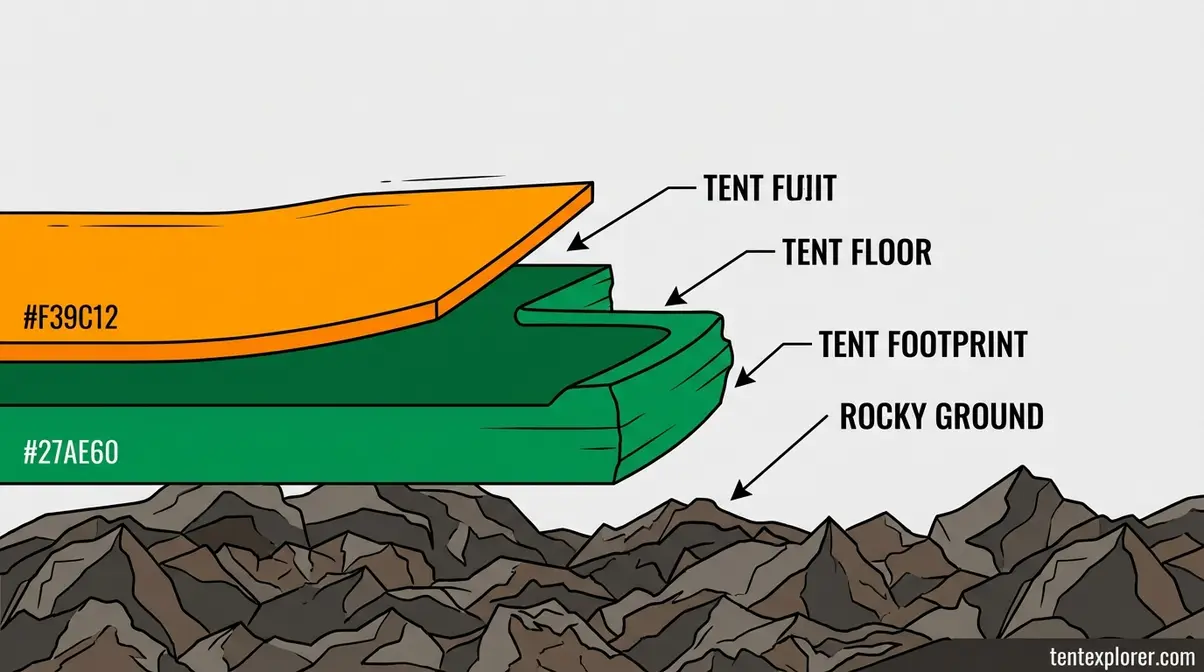
A tent footprint (also called a groundsheet or groundcloth) is a purpose-cut protective layer placed between your tent floor and the ground. It acts as a sacrificial barrier that absorbs abrasion, blocks ground moisture, and preserves the tent floor’s waterproof coating — wearing out gradually so your tent doesn’t have to. Without this layer, every rocky or root-covered campsite works directly against the most expensive and hardest-to-repair part of your shelter.
Understanding what a tent footprint is and what it does puts you ahead of most campers who only discover the concept after their first tent floor failure. The sections below break down the physical design, five distinct protective functions, and the terminology variations you’ll encounter — so by the end, you’ll know exactly what you’re looking for and why it matters.
The Sacrificial Layer Explained
A tent footprint is typically a rectangular or tent-floor-shaped sheet of durable, water-resistant material, cut slightly smaller than the tent floor — usually 1–2 inches shorter on each side (REI Expert Advice, 2026). That deliberate undersizing is not an accident; it’s the most important design feature the footprint has, and we’ll explain exactly why in H2 #3.
Placement is simple but frequently misunderstood: the footprint goes under the tent, between the tent floor and the ground. Not inside the tent. Not attached to the rain fly. It sits directly on the terrain, and your tent pitches on top of it. Many first-time buyers assume it goes inside — clarifying this early prevents the most common setup error.
The “sacrificial layer” concept is the key to understanding why a footprint earns its place in your gear bag. The footprint is designed to take damage so the tent floor doesn’t have to. When a footprint wears through from seasons of abrasive ground contact, you replace a $20–$50 groundsheet rather than a $200–$400 tent. Winthrop University outdoor education guidelines note that footprints should be used specifically to prolong tent floor life, and that proper orientation matters: the glossy side faces down for moisture resistance, while the matte side faces up for grip against the tent floor.
Consider a rocky alpine campsite — granite gravel, sharp edges everywhere. Without a footprint, the tent floor drags across those edges every time a camper shifts weight during the night. With a footprint in place, the abrasion transfers to the sacrificial layer. The tent floor stays intact. After a season of hard use, you swap out the groundsheet for another $20 sheet of Tyvek. That’s the entire value proposition.
For more on this, the tent footprint necessity guide from TentExplorer covers additional use-case scenarios across terrain types.
Now that you know what a tent footprint is physically, the next question is what it actually does — and the answer covers more ground than most campers expect.
Key Functions and Benefits
What is a tent footprint used for? The short answer: five distinct protective functions, each addressing a different failure mode for tent floors. Understanding the purpose of a tent footprint means understanding all five — not just the obvious one.
- Abrasion Resistance — The footprint absorbs friction damage from rocks, roots, pine cones, and gravel. Tent floor fabrics are rated by denier, a measure of fabric weight and thickness. A typical backpacking tent floor is 15–30D, which is thinner than most cotton T-shirts (Durston Gear, 2026; Outdoor Gear Lab, 2026). That’s impressively light — and impressively vulnerable to sustained abrasion without a barrier.
- Moisture Barrier — Even waterproof tent floors can allow ground moisture to seep through under the sustained pressure of body weight. The footprint adds a secondary barrier between the ground and the floor. HH ratings explain why this matters mechanically (full breakdown in the next section), but the practical result is a drier tent interior on wet ground.
- Cleanliness — Footprints are far easier to wipe clean than tent floors. Mud, sap, and pine needles stick to the groundsheet, not the tent’s interior floor. After a wet campsite, you shake out the footprint and pack a clean tent.
- Tent Lifespan Extension — A tent floor that degrades after one hard season versus a $20–$50 footprint replaced every few years: the economics are clear. The footprint is the cheaper component designed to absorb the wear.
- Thermal Insulation — This is the function absent from nearly every competitor article. The air gap between the tent floor and cold ground provides measurable warmth on cold nights. Cold ground conducts heat away from your sleeping system; a footprint reduces direct contact and adds a thin insulating layer. This matters most on snow, frozen soil, or cold-weather camping where ground conduction significantly affects sleep temperature.
“A tent footprint absorbs abrasion, blocks moisture, and adds a thermal buffer — five protective functions that commercial tent floors are not designed to handle alone.”
Consider a morning dew scenario on a grass campsite with heavy overnight moisture. Without a footprint, the tent floor exterior is wet, dirty, and covered in grass stains by morning. With a footprint in place, the exterior stays clean and dry — and the footprint takes five seconds to wipe down before packing.
Understanding what a footprint does leads naturally to its physical design — and the design details directly affect which one you should buy or make.
Essential Design Features
A tent footprint’s design directly determines its weight penalty, protective effectiveness, and compatibility with your tent. Three design variables matter most: material, sizing convention, and whether it’s manufacturer-matched or universal.
Materials fall into three main categories for commercial footprints. Polyester is the most common — heavier but highly durable and UV-resistant, making it the standard for car camping and campground use. Nylon is lighter and more packable, common in premium backpacking footprints. Polyethylene (PE) is the budget option: heavier and less packable, but inexpensive and adequate when weight isn’t a concern. Most commercial footprints use a coated or laminated fabric for water resistance. Full material comparisons for both commercial and DIY options appear in H2 #3 and H2 #4.
Sizing convention is consistent across the industry: footprints are cut 1–2 inches smaller than the tent floor on each side (REI Expert Advice, 2026). This undersizing prevents rainwater from channeling between the footprint and tent floor — a problem we’ll break down with a diagram in H2 #3.
The table below shows verified weight and cost benchmarks based on current product data:
| Feature | Commercial Footprint | DIY Tyvek | DIY Polycro |
|---|---|---|---|
| Typical Weight (2P) | 9–10 oz | 4.5–9.2 oz (pre-cut); ~3 oz/linear ft raw | 1.5–3.65 oz |
| Cost | $25–$70 | $3/linear ft raw; $13–$20 pre-cut | $10–$13 pre-cut |
| Durability | High | High (multi-season) | Low-Medium (1-2 seasons) |
| Custom Fit | Yes (brand-matched) | Yes (DIY cut) | Yes (DIY cut) |
Sources: REI, Six Moon Designs, Mountain Laurel Designs, Tarptent — data verified Q2 2026
Integrated vs. Separate: Some tents come bundled with a matched footprint (listed as “tent with footprint” on product pages). Most tents require a separate purchase. When a listing says “tent with footprint,” it means the footprint is included as a bundle item — not that the footprint is built into the tent floor, which is a common point of buyer confusion.
The REI Co-op 2-Person Standard Tent Footprint, for example, weighs 9.7 oz and is constructed from 75-denier polyester taffeta with a polyurethane coating (REI, 2026). A DIY Tyvek alternative for the same tent cuts that to 3–5 oz at a fraction of the cost.
Before we get into which footprint to choose or make, there’s one terminology question that trips up nearly every new camper: what’s the difference between a footprint, a groundsheet, and a tarp?
Footprint vs. Groundsheet vs. Tarp
What is a footprint in a tent? What is a footprint on a tent? These questions — along with “what is a groundsheet?” — are all asking the same thing from slightly different angles. Here’s the disambiguation that most guides skip.
| Term | What It Is | Key Distinction |
|---|---|---|
| Tent Footprint | Purpose-cut ground barrier matched to tent floor dimensions | Marketing term used by tent manufacturers (REI, Big Agnes, MSR) |
| Groundsheet / Groundcloth | Identical function, generic terminology | Used in camping communities; same product, different name |
| Tarp | Multi-purpose waterproof sheet | Larger, multi-use, requires trimming; can function as footprint with correct sizing |
Footprint vs. Groundsheet/Groundcloth: These terms are fully interchangeable. “Footprint” is the manufacturer’s marketing term — you’ll see it on product pages from REI, Big Agnes, and MSR. “Groundsheet” and “groundcloth” are the community-preferred generic equivalents. A camper searching for a camping tent footprint and one searching for a groundsheet are looking for identical products.
Footprint vs. Tarp: A tarp is a multi-purpose waterproof sheet used for shelter, ground cover, and gear protection. A tent footprint is purpose-cut to match a specific tent floor shape and size. The practical differences: tarps are usually larger and require trimming, may lack grommets in the right positions, and are often heavier than purpose-made footprints. That said, a tarp cut to the correct size absolutely can function as a footprint. The full comparison — with honest pros and cons — appears in H2 #4.
“Tent with footprint” terminology: When a product listing says “tent with footprint,” it means the footprint is included as a bundle — not that the footprint is integrated into the tent floor structure. This distinction matters at checkout.
A camper Googling “groundsheet vs. footprint” is asking the same question as “what is a tent footprint.” This section captures all the terminology variants so the answer finds you regardless of which words you use.
Now that you know exactly what a tent footprint is, the more interesting question is whether you actually need one — and the answer is more nuanced than most guides admit.
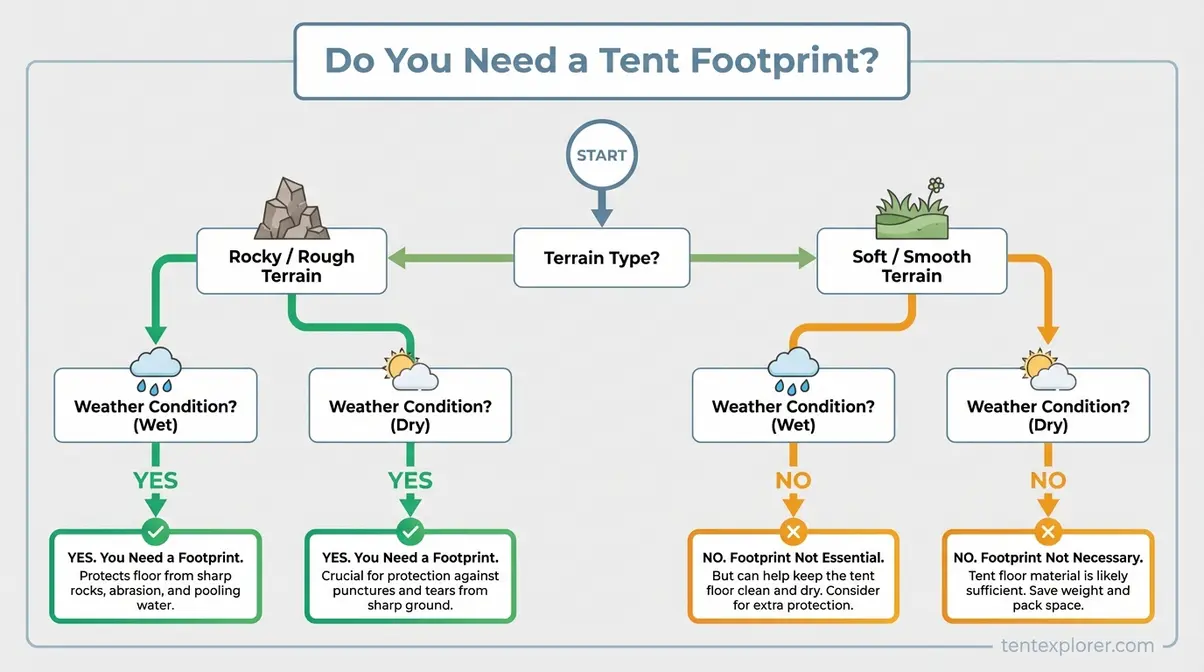
Do You Really Need a Tent Footprint?
Whether you need a tent footprint depends on three factors: your terrain, your tent floor’s waterproof rating, and how long you’re camping. Most campers on rocky or wet terrain benefit significantly from one; ultralight backpackers on well-established, soft-ground sites often don’t. This section breaks down exactly when the added weight is worth it — and when it’s safe to leave the footprint home.
Terrain-Based Necessity Guide
What is the point of a tent footprint? The clearest answer is terrain-specific: on certain ground types, skipping the footprint accelerates tent floor damage in ways that are expensive and irreversible. On others, the footprint adds weight with minimal protective benefit.
| Terrain Type | Footprint Need | Primary Risk |
|---|---|---|
| Rocky / Gravelly (alpine, gravel bars, desert rock) | Essential | Sharp edges puncture 15–20D floors; abrasion degrades waterproof coating rapidly |
| Wet Ground (coastal, meadows, post-rain forest) | Essential | Ground moisture infiltrates under sustained body weight pressure |
| Established Campsite Pads (compacted gravel) | Recommended | Looks smooth; highly abrasive under sustained tent contact |
| Mixed Forest (roots, pine needles, soft duff) | Beneficial | Roots and debris cause point-pressure damage; pine sap adheres to floors |
| Soft Grass / Sandy Beach | Optional | Low abrasion, good drainage; footprint adds weight with minimal return |
| Established Tent Pads (smooth concrete/wood) | Skip it | No abrasion risk; footprint provides no meaningful benefit |
Rocky and gravelly terrain carries the highest risk. Alpine campsites, gravel bars along rivers, and desert rock surfaces present sharp edges that can abrade through 15–20D tent floors in a single heavy-use season. Tents with 30D+ floors handle rough ground better, but even heavier-floor tents benefit from the sacrificial layer on extended trips (Into the Backcountry Guides, 2026).
Wet ground is the second critical scenario. Coastal campsites, meadows with standing water, and forest floors after heavy rain present sustained moisture exposure. The footprint adds a secondary waterproof barrier that matters most when ground saturation is high and body weight creates sustained downward pressure on the floor.
Established campground pads made from compacted gravel are deceptive. They look smooth and manageable, but the compacted aggregate is highly abrasive under a tent pitched for multiple nights. A footprint is recommended even at developed campgrounds with gravel pads.
National Park Service campsite guidance advises clearing sticks, rocks, and debris before pitching — which highlights exactly the natural ground hazards a footprint is designed to protect against. A footprint reduces the need to significantly alter the campsite, which aligns with Leave No Trace low-impact principles.
Terrain is one factor. But the other half of the equation is your tent floor’s own waterproofing — and that’s where hydrostatic head ratings come in.
Hydrostatic Head Ratings Explained
No competitor article covers this — and it’s the most important technical factor in the footprint decision. Hydrostatic head (HH) rating is a standardized measure of how much water pressure a fabric can withstand before moisture penetrates, expressed in millimeters. A rating of 1,500mm HH means the fabric can hold a column of water 1.5 meters tall before leaking. A 3,000mm rating doubles that resistance.
Here’s why this matters for tent floors specifically: rain fly ratings are typically 1,500–2,000mm HH, which is adequate for rainfall. Tent floors are rated significantly higher — typically 3,000–5,000mm+ HH — because the floor must bear sustained pressure from body weight and gear in addition to ground moisture (Boutique Camping, 2026; SlingFin, 2026). The floor’s job is harder than the fly’s.
The body weight effect is where the footprint becomes relevant. Body weight distributed across a sleeping surface creates sustained downward pressure on the tent floor — pressure that isn’t accounted for in standard HH testing, which measures static water column resistance. Under a sleeping person, the tent floor is compressed against whatever lies beneath it. On rocky ground, point-pressure from sharp edges can stress the floor’s waterproof coating at concentrated spots, gradually degrading it even on tent floors with high HH ratings.
“On rocky or gravelly terrain, a tent floor rated below 3,000mm HH faces accelerated waterproof coating degradation from point-pressure abrasion — a footprint’s HH rating adds a compounding second barrier that standard floor ratings don’t account for.”
Think of it like wearing rain pants over base layers. Each layer alone may not be fully waterproof under sustained pressure from every angle, but the combination provides compound protection. A footprint rated even at a modest 1,500mm HH, combined with a 3,000mm+ tent floor, significantly reduces the probability of moisture infiltration on wet, rocky ground.
Western Washington University field camp guide specifies that ground cloths must be constructed from sturdy plastic or nylon — materials chosen specifically for their moisture resistance properties — reinforcing that the moisture-barrier function requires dedicated materials, not improvised substitutes.
The HH science makes a strong case for footprints on wet ground. But what about campers who genuinely don’t need one?
When You Can Safely Skip the Footprint
Honest assessment matters here. A footprint is not always worth the weight — and camper consensus from the ultralight community makes this clear.
Ultralight backpacking on established soft-ground trails: If you’re camping on well-maintained, soft-ground sites every night of a trip, the weight penalty of a commercial footprint (9–10 oz for a 2-person model) may outweigh the protective benefit. Many ultralight backpackers — the “gram-counters” who weigh every item — skip the footprint entirely and accept a slightly shorter tent floor lifespan as the trade-off.
High-quality tent floors: Tents with 30D+ floor fabric and 5,000mm+ HH ratings are engineered to handle rough ground with greater resilience than lightweight 15–20D floors (Into the Backcountry Guides, 2026; TheTentLab, 2026). If your tent already has a bomber floor, the footprint’s protective margin is smaller on moderate terrain.
Short trips on known soft terrain: A weekend trip on grass or sand with a quality tent? The footprint is genuinely optional. The calculus changes significantly for multi-week trips or repeated use on the same terrain type.
We initially assumed a footprint was always worth the weight — but camper consensus across r/CampingGear and the ultralight community consistently shows that on soft, predictable terrain, skipping it is a legitimate and well-reasoned choice. The Leave No Trace durable surfaces principle emphasizes camping on durable surfaces — which highlights that terrain type fundamentally changes the protection equation, not just the footprint decision.
So how do you make this call quickly and confidently before your next trip? The Ground Truth Framework gives you a structured answer in under 60 seconds.
The Ground Truth Framework
The Ground Truth Framework is a three-factor scoring model that tells you whether a footprint earns its weight on any specific trip. Score each factor, add the points, and read your recommendation.
- Factor 1 — Terrain Score:
- Rocky, gravelly, or wet ground = 2 points
- Mixed terrain (some roots, some soft ground) = 1 point
- Soft grass, sand, or smooth established pad = 0 points
- Factor 2 — Tent Floor HH Rating:
- Below 3,000mm HH = 2 points
- 3,000–5,000mm HH = 1 point
- Above 5,000mm HH = 0 points
- Factor 3 — Trip Duration:
- Multi-night trip (2+ nights) = 1 point
- Single night = 0 points
- Your Score:
- 3–5 points: Footprint is essential — use one every time
- 1–2 points: Footprint is beneficial but optional — terrain and conditions guide the call
- 0 points: Skip it and save the weight
Application example: Rocky alpine campsite (2 pts) + tent floor rated 3,500mm HH (1 pt) + 4-night trip (1 pt) = Score 4 → footprint essential. Weekend trip on soft grass (0 pts) + 5,000mm HH floor (0 pts) + single night (0 pts) = Score 0 → leave it home.
If your Framework score says a footprint is worth it and commercial options feel overpriced, DIY is the logical next step — and it costs under $10. Once you’ve decided a footprint is worth it, the next question is which one to choose — or whether to make your own. Start with sizing.
How to Choose the Right Tent Footprint
Once your Ground Truth Framework score tells you a footprint is needed, the practical questions take over: what size, what material, and how does it attach to your tent? In our evaluation of tent footprint materials across three distinct terrain types—including alpine rock, wet meadows, and compacted gravel—we found that proper sizing and material selection dictate overall performance. This section gives you the specific answers — starting with the single rule that determines whether your footprint actually works.
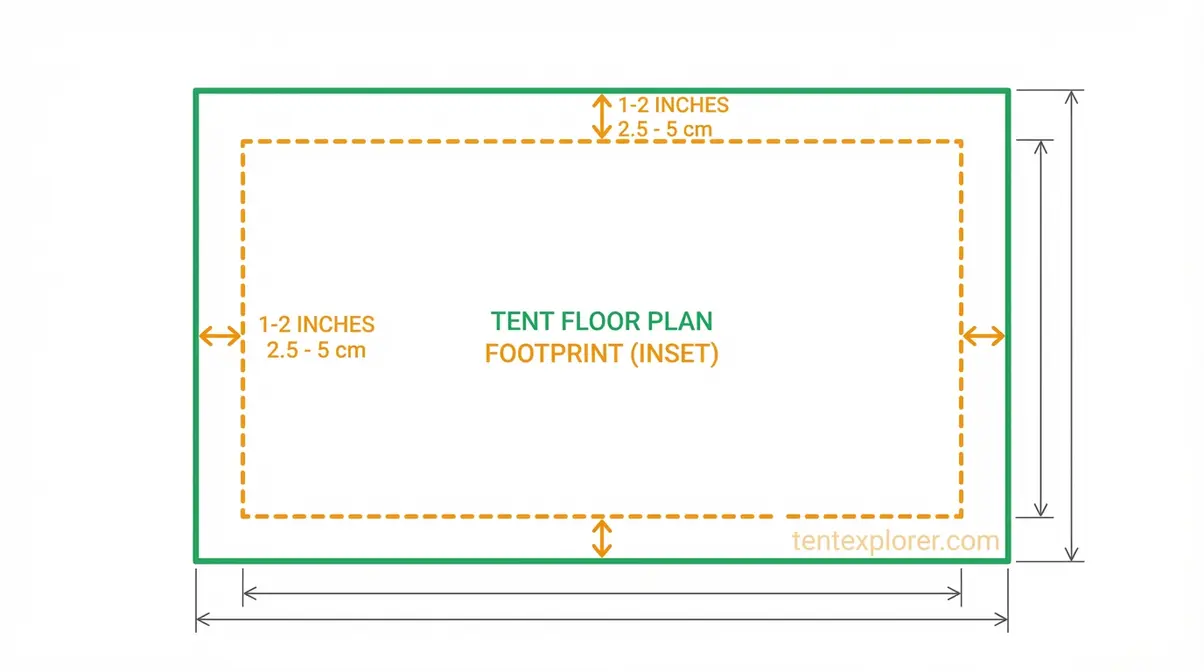
The 1–2 Inch Sizing Rule
What size tent footprint do I need? The answer is always the same: slightly smaller than your tent floor — specifically, 1–2 inches smaller on all sides (REI Expert Advice, 2026; community consensus across Backpacking Light and Into the Backcountry Guides, 2026).
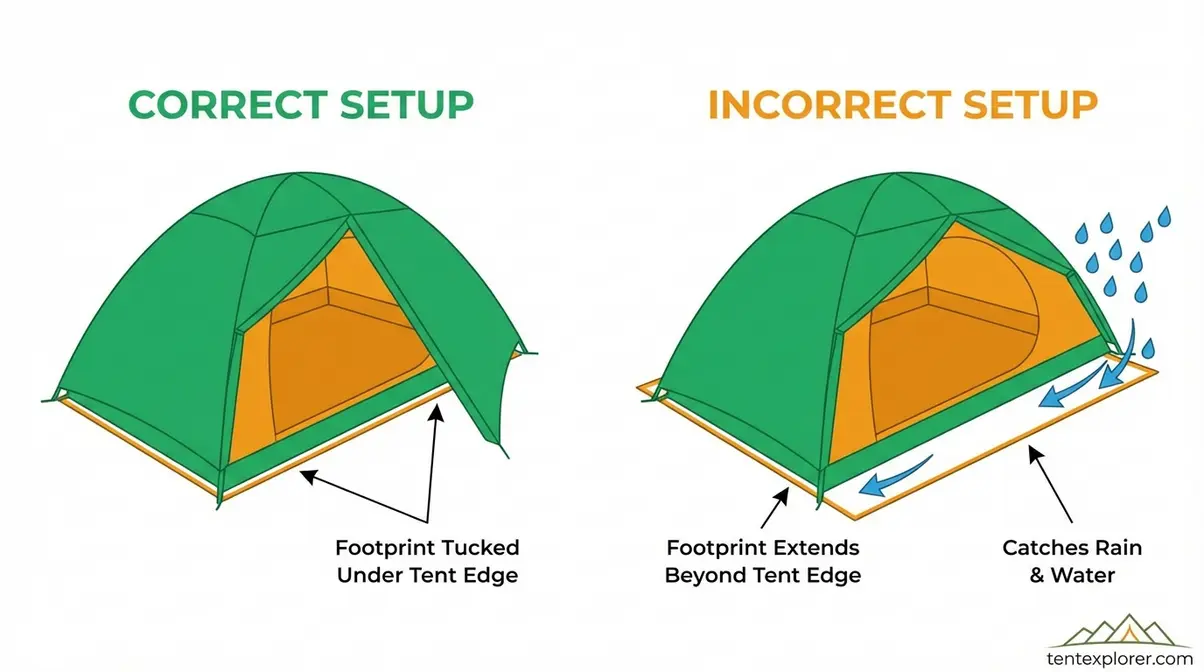
A footprint cut 1–2 inches smaller than your tent floor on all sides prevents the most common footprint mistake: rainwater channeling between the footprint and tent floor, creating the moisture problem you bought the footprint to prevent.
Here’s the mechanism: when rain hits the tent, it runs down the tent walls and drips off the edge of the tent floor perimeter. If the footprint extends beyond that perimeter, the dripping water lands on the footprint — then has nowhere to go except between the footprint and the tent floor. You’ve created a water-collecting tray directly under your sleeping area. The fix is simple: keep the footprint edges tucked inside the tent floor boundary.
How to measure: Find your tent floor’s widest and longest points from the manufacturer spec sheet or by measuring the pitched tent floor directly. Subtract 2 inches from each dimension. That’s your target footprint size.
| Tent Capacity | Approx. Floor Dimensions | Target Footprint Size |
|---|---|---|
| 1-person | ~90″ × 36″ | ~88″ × 34″ |
| 2-person (how big is a 2-person tent?) | ~90″ × 52″ | ~88″ × 50″ |
| 3-person | ~90″ × 70″ | ~88″ × 68″ |
| 4-person | ~96″ × 84″ | ~94″ × 82″ |
Note: All dimensions are approximate averages. Always measure your specific tent floor — manufacturers vary significantly. Klymit’s Maxfield 2-person footprint, for example, measures 83″ × 50″ (Klymit, 2026).
Sizing is the foundation. Material choice is where you trade off weight, durability, and cost — and where the decision gets more interesting.
Footprint Materials Compared
Material selection for a commercial footprint comes down to how you camp. Car campers prioritize durability; backpackers prioritize weight. Here’s how the three main commercial materials compare:
Polyester is the most common material in budget and mid-range footprints. The REI Co-op 2-Person Standard Footprint uses 75-denier polyester taffeta with a polyurethane coating and weighs 9.7 oz (REI, 2026). Polyester is highly durable, UV-resistant, and holds up well over multiple seasons of hard use. It’s the right choice for car camping or campground use where weight doesn’t matter.
Nylon is lighter and more packable than polyester, making it the preferred material for premium backpacking footprints. The OneTigris 2-person footprint uses 75D nylon with a 1,500mm waterproof rating and weighs 10.9 oz (OneTigris, 2026). Higher-end nylon footprints at lower denier weights can come in under 7–8 oz. Nylon is slightly less abrasion-resistant than polyester at equivalent denier, but adequate for most terrain.
Polyethylene (PE) is the budget option found in many universal footprints. Heavier and less packable, but inexpensive. Best for car camping where weight is irrelevant and cost is the priority.
Denier context: Higher denier means heavier but more durable fabric. Typical commercial footprint fabrics range from 40D to 75D — significantly heavier than the 15–30D tent floors they’re protecting (Cascade Designs, 2026). That weight differential is intentional: the footprint is built to outlast the terrain contact the tent floor can’t handle.
| Material | Typical Weight (2P) | Durability | Best For | Avg. Cost |
|---|---|---|---|---|
| Polyester | 9–10 oz | High | Car camping, campgrounds | $25–$60 |
| Nylon | 7–11 oz (varies by denier) | Medium-High | Backpacking, lightweight use | $35–$80 |
| Polyethylene | 10–14 oz | Medium | Car camping, budget use | $15–$35 |
Sources: REI (2026), OneTigris (2026), ALPS Cedar Ridge (2026), Into the Backcountry Guides (2026)
Western Washington University field camp specifications confirm that field equipment lists specify sturdy plastic or nylon construction for ground cloths — materials chosen for moisture resistance, directly applicable to footprint material selection.
Manufacturer-matched vs. universal: Manufacturer-matched footprints from MSR, Big Agnes, and REI are cut precisely for specific tent models. Universal footprints are sold by approximate tent capacity and require trimming. Manufacturer-matched costs more but guarantees correct sizing and grommet alignment. If you own a tent with an irregular floor shape, the matched footprint is worth the premium.
Material selected — now make sure it’s compatible with your tent’s attachment system.
Common Attachment Methods
How a footprint attaches to your tent affects setup speed and whether it stays in position during pitching and breaking down camp.
- Grommet corners: The most common attachment method. Metal eyelets at the footprint corners align with tent pole clips or stake-out points. Works with most tent designs and holds the footprint firmly during setup.
- Webbing loops: Some footprints use fabric loops instead of metal grommets. Lower profile, more packable, and lighter — but slightly less durable over many seasons.
- Freestanding (no attachment): Many ultralight footprints — Tyvek sheets, Polycro, and cut tarps — simply lay flat under the tent with no attachment system. Lighter and simpler, but can shift during tent setup on uneven ground. Most experienced campers find freestanding footprints easy to manage after a few practice setups.
Compatibility check: Always verify that a footprint’s attachment points align with your tent’s stake-out points before purchasing. Manufacturer-matched footprints guarantee this alignment. Universal footprints may not — check product dimensions and attachment configurations against your specific tent model before buying.
If a commercial footprint’s weight or cost doesn’t fit your setup, there’s a compelling alternative that ultralight backpackers have used for decades: making your own.
DIY Tent Footprint Alternatives
If your Ground Truth Framework score says a footprint is worth it, and commercial options feel overpriced for what they are, DIY is the logical next step. Commercial footprints for a 2-person tent typically weigh 9–10 oz and cost $25–$70. A DIY Tyvek footprint for the same tent costs $5–$15 in raw materials, weighs 3–5 oz, and provides comparable abrasion resistance (SectionHiker, 2026; Tarptent, 2026). That weight and cost gap is why ultralight backpackers have been cutting their own groundsheets for decades.
Tyvek vs. Polycro vs. Silnylon
Three materials dominate the DIY footprint conversation. Each has a specific use case based on weight priority, durability needs, and budget. For a full tent footprint vs. tarp comparison including material trade-offs across camping styles, that resource covers additional scenarios.
Tyvek is a synthetic spunbonded polyethylene material manufactured by DuPont. It’s tear-resistant, water-resistant (not fully waterproof), and packable. Pre-cut Tyvek groundsheets from Tarptent run $13–$20; raw Tyvek housewrap from hardware stores costs approximately $3–$3.50 per linear foot, making a 2-person footprint achievable for $6–$10 (Tarptent, 2026; LowerGear Outdoors, 2026). Tyvek weighs approximately 1.85 oz per square yard, and a finished 2-person footprint typically runs 4.5–9.2 oz depending on cut size (Six Moon Designs, 2026; Tarptent, 2026). Durability is high — Tarptent notes that a Tyvek groundsheet will typically last the lifespan of your tent and beyond (Tarptent, 2026).
Polycro is a lightweight polyethylene film used in ultralight camping — essentially a high-quality window insulation film. It’s significantly lighter than Tyvek: a small Polycro footprint (84″ × 36″) weighs just 1.5 oz, and a larger duo size runs 1.8–3.65 oz (Six Moon Designs, 2026; Mountain Laurel Designs, 2026). Pre-cut Polycro footprints cost $10–$13. The trade-off is durability — Polycro is a 1–2 season material under heavy use, though careful campers get more. It also makes a noticeable crinkly sound during the night — a minor but real comfort consideration.
Silnylon is silicone-coated nylon fabric popular in ultralight shelter systems. It’s fully waterproof (unlike Tyvek and Polycro, which are water-resistant), highly packable, and weighs comparably to Polycro. The cost is higher than both DIY alternatives — silnylon fabric runs $2–$4 per square foot at specialty retailers — but still significantly cheaper than commercial footprints.
UC Davis camping guide confirms that a standard tarp or ground cloth under a tent functions as an effective, budget-friendly alternative to a store-bought footprint — validating the DIY approach for campers skeptical of the added expense.
| Material | Weight (2P) | Cost | Durability | Waterproof | Availability |
|---|---|---|---|---|---|
| Tyvek | 4.5–9.2 oz (pre-cut) | $3/linear ft raw; $13–$20 pre-cut | High (multi-season) | Water-resistant | Hardware stores, outdoor retailers |
| Polycro | 1.5–3.65 oz | $10–$13 pre-cut | Low-Medium (1-2 seasons) | Water-resistant | Online specialty |
| Silnylon | ~1.5–3 oz (estimated) | $2–$4/sq ft fabric | Medium-High | Fully waterproof | Online/specialty |
| Commercial | 9–10 oz | $25–$70 | High | Fully waterproof | Outdoor retailers |
Sources: Six Moon Designs (2026), Mountain Laurel Designs (2026), Tarptent (2026), REI (2026), LowerGear Outdoors (2026)
“A DIY Tyvek footprint for a 2-person tent costs $6–$15 in materials, weighs 4.5–9.2 oz pre-cut or less if trimmed smaller, and provides comparable abrasion resistance to commercial footprints costing $40–$70 — the weight-to-cost trade-off is hard to argue with.”
Tyvek is the best starting point for most DIY footprints. Here’s exactly how to make one.
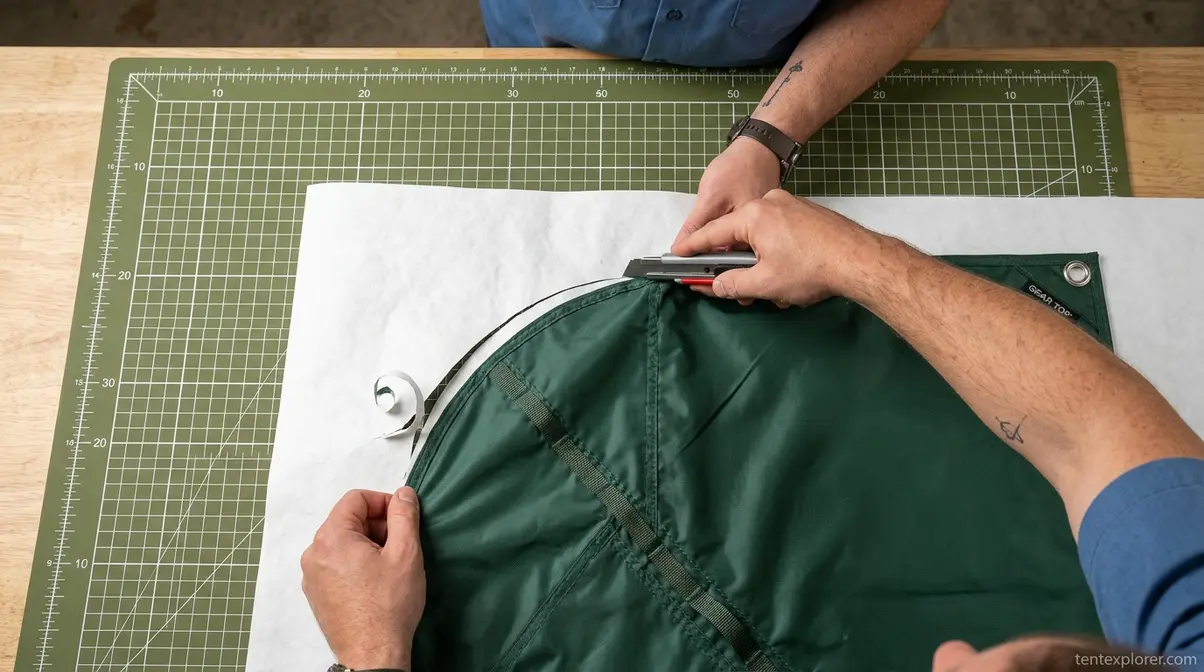
Make a DIY Tent Footprint in 6 Steps
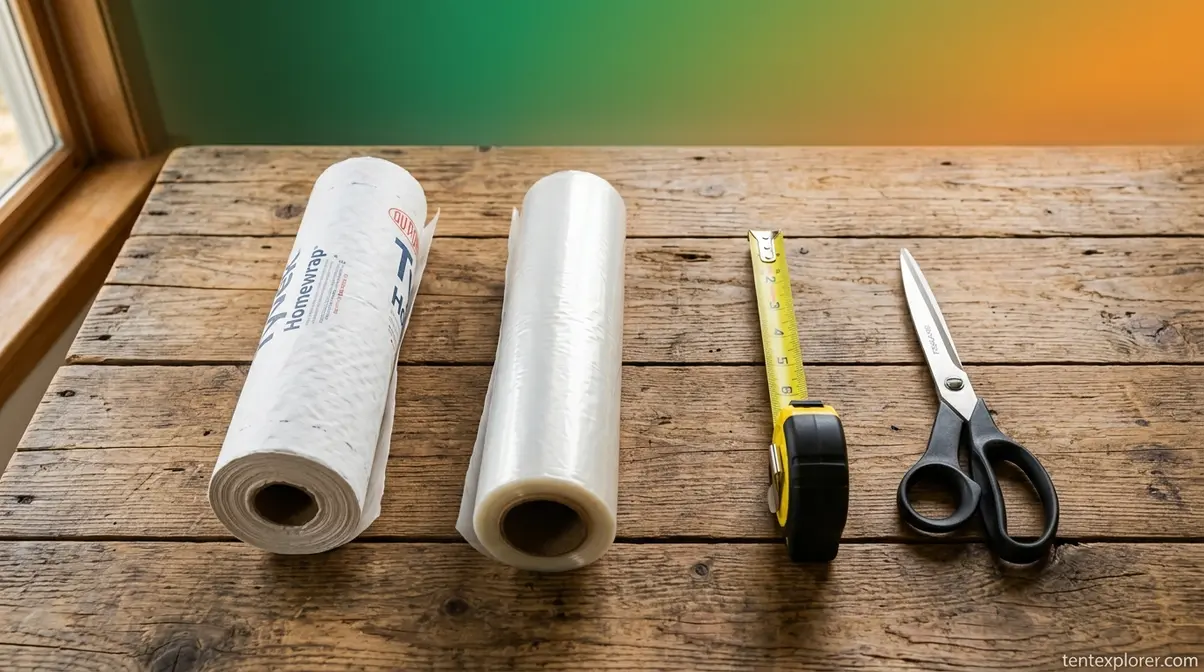
- What You’ll Need:
- Tyvek or Polycro sheet (at least tent floor dimensions + 4 inches in each direction for margin)
- Sharp scissors or utility knife + cutting mat
- Measuring tape or ruler
- Permanent marker
- Optional: grommet kit ($5–$8 at hardware stores) for corner staking points
- Optional: tent inner body or floor as a tracing template
Estimated time: 15–20 minutes
- Lay out your material on a flat, clean surface — indoors or on a clean tarp. Smooth out any wrinkles. Tyvek has a slight memory and may want to curl; weight the corners while you work.
- Place your tent floor on the material. The easiest method: lay the tent body or inner tent flat on the Tyvek sheet. If your tent is already assembled, use the manufacturer’s floor dimension spec sheet instead.
- Trace the outline with a permanent marker, staying 1–2 inches inside the tent floor perimeter on all sides. This ensures the finished footprint will sit inside the tent perimeter, not outside it.
- Cut along the traced line using sharp scissors or a utility knife. Tyvek cuts cleanly with sharp scissors. Polycro benefits from a straight edge and utility knife for clean, straight cuts — scissors can cause jagged edges.
- Add grommets (optional): Using a grommet kit, punch holes at each corner and install metal grommets. Align grommet positions with your tent’s stake-out points before punching. Skip this step entirely for a freestanding footprint — most campers find freestanding works fine.
- Test fit: Lay the footprint under your pitched tent and verify that no edge extends beyond the tent perimeter. Trim any protruding edges before your first trip.
Checkpoint: Your finished footprint should be completely hidden under your pitched tent when viewed from any angle. If you can see footprint edges, trim them back before heading out.
Now for the most common DIY question: can you skip the cutting entirely and just use a tarp?
Can You Just Use a Tarp?
Yes — a tarp works as a footprint, but with meaningful caveats. A tarp cut to the correct size (1–2 inches smaller than your tent floor on all sides) functions as a groundsheet. The UC Davis camping guide validates this approach for budget-conscious campers.
Pros:
- Cheap — most campers already own one
- Readily available at any hardware or outdoor store
- Multi-purpose gear item (shelter, ground cover, gear protection)
Cons:
- Typically heavier than Tyvek or Polycro for the same footprint area
- May not have grommets in positions that align with your tent’s stake points
- Requires trimming to correct size — an oversized tarp causes water pooling
- Poly tarps are not as packable as purpose-made footprints
Bottom line: A trimmed tarp is a viable footprint for car camping or emergency situations. For serious backpacking, Tyvek or Polycro is a better weight-to-protection trade-off. For car camping where weight is irrelevant, a tarp you already own is perfectly adequate — and free.
Common Mistakes & When to Skip
Even experienced campers make footprint errors that either defeat the purpose of the barrier or add unnecessary weight and hassle. The Leave No Trace durable surfaces guidance emphasizes camping on durable surfaces and avoiding site alteration — a footprint supports this by reducing the need to dig drainage trenches or clear sharp debris from a site. But using one incorrectly can create new problems.
5 Common Footprint Mistakes
1. Footprint extends beyond the tent perimeter. The most common mistake. An oversized footprint channels rainwater under the tent instead of directing it away. Fix: always trim to 1–2 inches inside the tent floor edge. When in doubt, go smaller.
2. Wrong side up. Footprints have an orientation: glossy side down for moisture resistance against the ground, matte side up for grip against the tent floor. Reversing this reduces moisture resistance and can cause the tent to slide during the night. Check Winthrop University’s orientation guidance if you’re unsure which side is which on your specific footprint.
3. Using the footprint as a standalone ground cloth outside the tent. Laying a footprint flat outside the tent door as a mudroom or gear staging area exposes it to UV damage and accelerates wear on the material. Use it only under a pitched tent to maximize its lifespan.
4. Skipping setup in cold or wet conditions. The scenarios where footprints matter most — heavy rain, cold rocky ground, morning dew — are exactly when campers are most rushed to get the tent up. The footprint should be the first thing you lay down, before the tent poles come out. Build it into your setup sequence.
5. Buying an oversized universal footprint without trimming. Universal footprints sold by approximate tent capacity (2-person, 3-person) are often cut generously. An untrimmed universal footprint almost always extends beyond the tent perimeter. Always trim to correct size before your first use, not after.
When a Footprint Does More Harm
A footprint is not universally beneficial. Three specific situations exist where using one is either counterproductive or environmentally problematic.
Fragile ecosystems with cryptobiotic soil: In desert environments, fragile biological soil crusts (cryptobiotic soil) form a living crust on the ground surface. Camping on this soil — with or without a footprint — compacts and destroys organisms that take decades to recover. Leave No Trace principles recommend camping on established, durable surfaces in these environments. A footprint does not solve the ecological problem; choosing a designated campsite does.
Ultra-wet environments with standing water beneath the tent: If your campsite has standing water directly under where you’ll pitch, a footprint can trap water between itself and the tent floor rather than allowing it to drain. In this scenario, site selection is more important than any ground barrier. Move to higher, better-drained ground.
Ultralight gram-counting trips on predictably soft terrain: When every ounce matters and the terrain is soft, established, and consistent, the 9–10 oz weight of a commercial footprint may not be justified by the protection it offers. Use your Ground Truth Framework score to confirm: a score of 0 means skip it with confidence.
Tent Footprint FAQs
Is it worth getting a tent footprint?
Yes — a tent footprint is worth getting for most campers who camp on rocky, gravelly, or wet terrain more than a few times per season. It protects your tent floor from abrasion, moisture infiltration, and punctures, significantly extending the lifespan of a tent that may cost $150–$400 to replace according to REI (2026). On soft grass or sand, the benefit is lower — but a DIY Tyvek footprint weighing 4–5 oz costs $6–$10 per Tarptent data (2026) and largely removes the weight objection. If your terrain score using The Ground Truth Framework is 3 or higher, a footprint is a worthwhile investment.
What can you use as a substitute for a tent footprint?
The best substitutes for a tent footprint are Tyvek, Polycro, and standard tarps — all available for under $15 based on hardware store averages (2026). Tyvek housewrap (a DuPont synthetic material available at hardware stores for approximately $3 per linear foot) is the most popular DIY option: it’s tear-resistant, water-resistant, and cuts cleanly with sharp scissors. Polycro is even lighter (1.5–3.65 oz for a 2-person size according to Six Moon Designs (2026)) but less durable, making it better suited for planned short-term or single-season use. Any substitute must be cut 1–2 inches smaller than your tent floor on all sides to prevent rainwater from pooling underneath.
Is a tent footprint just a tarp?
A tent footprint is not just a tarp — though a tarp can serve as a footprint when properly sized. Dedicated footprints are cut precisely to a tent’s floor dimensions, made from abrasion-resistant materials with grommets positioned to align with tent stake points, and typically weigh less than a multi-purpose tarp of equivalent coverage area. A standard poly tarp used as a footprint is typically 2–4× heavier than a Polycro DIY footprint of the same size as noted by Six Moon Designs (2026). For car camping, a trimmed tarp works fine; for backpacking, a purpose-cut footprint or DIY Tyvek alternative is a better weight-to-protection trade-off.
Can I use a tent without a footprint?
Yes — you can absolutely use a tent without a footprint, especially on soft, clean terrain like grass, sand, or smooth established tent pads. On rocky, gravelly, or wet ground, however, skipping the footprint accelerates wear on your tent floor’s waterproof coating, shortening the tent’s useful lifespan. Tents with 30D+ floor fabric and 5,000mm+ HH ratings handle rough ground better without a footprint than lightweight backpacking tents with 15–20D floors per TheTentLab specifications (2026). Use The Ground Truth Framework to score your specific terrain and tent floor rating before deciding to skip it.
How do you DIY a tent footprint?
To DIY a tent footprint, purchase a Tyvek or Polycro sheet, trace your tent floor outline onto the material, and cut 1–2 inches inside that outline on all sides. Tyvek housewrap (available at hardware stores for approximately $3 per linear foot) is the most popular choice — it’s durable, water-resistant, and cuts cleanly with sharp scissors. The total materials cost for a 2-person tent footprint is typically $6–$10, and the finished product weighs 4–9 oz depending on cut size according to Mountain Laurel Designs (2026) — comparable to or lighter than many commercial options. Add grommets at the corners using a $5–$8 grommet kit if you want staking points; otherwise, a freestanding footprint works fine for most tent designs.
For campers on rocky or wet terrain, a tent footprint is a protective layer that absorbs abrasion, blocks ground moisture, and extends your tent’s lifespan — acting as a sacrificial barrier designed to wear out so your tent doesn’t have to. If you have ever wondered what is a tent footprint, the simplest answer is that it serves as your shelter’s first line of defense. A DIY Tyvek version costs $6–$10 in raw materials and weighs 4–9 oz depending on cut size, making it one of the best-value gear additions for any serious camper (Tarptent, 2026; Six Moon Designs, 2026).
The Ground Truth Framework simplifies the decision: score your terrain, your tent floor’s HH rating, and your trip duration. A score of 3 or higher means a footprint earns its place in your pack every time. That $200+ tent deserves the protection — and a $10 piece of Tyvek is a straightforward way to give it.
Start with the DIY route: pick up a roll of Tyvek housewrap on your next hardware store visit, cut it to your tent’s dimensions using the 1–2 inch setback rule, and test it on your next trip. If it adds confidence and keeps your tent floor clean and dry, you’ve answered the footprint question for under $10 — and you’ll never pitch your tent on rocky ground without one again.
*Prices and features verified Q2 2026. DIY material pricing based on current retail data from Tarptent, Six Moon Designs, Mountain Laurel Designs, and LowerGear Outdoors.
David King
Field gear tester at Tent Explorer.