This blog post may contain affiliate links. As an Amazon Associate I earn from qualifying purchases.
📋 Table of Contents
- Do You Actually Need to Seal Your Tent Seams?
- Factory Tape vs. Manual Sealing
- 3 Signs Your Tent Needs Resealing Right Now
- Inside vs. Outside: Where to Apply the Sealer
- Do All Tents Leak in Heavy Rain?
- Choosing the Right Tent Seam Sealer
- Silicone vs. Polyurethane: Identifying Your Tent’s Coating
- Liquid Sealant vs. Seam Tape: When to Use Each
- Recommended Sealants by Fabric Type (Compatibility Table)
- What You’ll Need Before You Start
- Tools and Materials Checklist
- Setting Up Your Workspace
- How to Seal Tent Seams: Step by Step
- Step 1: Clean and Prep the Seams
- Step 2: Apply the Seam Sealer
- Step 3: Cure, Test, and Waterproof-Check
- DIY Seam Sealer Recipe (The 1:4 Silicone Mix)
- Sealing by Fabric Type
- Silnylon and Silicone-Coated Fabrics
- Polyurethane (PU) Coated Polyester and Nylon
- Canvas and Cotton Tents
- Bathtub Floors and Ground Panels
- Troubleshooting: When Your Seam Sealer Fails
- Seam Tape Peeling or Flaking Off
- Sealer Still Tacky After Drying
- How Long Should a Seal Last?
- When to Use a Professional Seam Sealing Service
- Brand-Specific Seam Sealers
- MSR and Cascade Designs Sealers
- Coleman and Budget-Friendly Options
- Where to Buy: UK, Decathlon, BCF, and Online
- Common Pitfalls to Avoid When Sealing Tent Seams
- Most Common Seam Sealing Mistakes
- When to Choose Alternatives
- Frequently Asked Questions
- Should You Seal Your Tent Seams?
- What Is the Best Seam Seal for Tents?
- How Long Does Tent Seam Sealer Last?
- Closing Thoughts
You wake up at 2am to a drip landing squarely on your sleeping bag — not from the sky, but from a seam running along the inside of your rainfly. Every stitched seam in a tent contains hundreds of micro needle holes that bypass waterproof coatings entirely, and even a “waterproof” tent is only as dry as its seams allow. Tent seam sealing is the repair that closes those holes for good.
Most failed DIY sealing jobs trace back to one mistake: using the wrong sealant for the fabric. The cost isn’t just a damp night — it’s a ruined trip, damaged gear, and a tent you can’t trust. This guide walks through fabric identification, sealant selection, step-by-step application, fabric-specific techniques, troubleshooting, and brand-specific recommendations — everything you need to complete the job correctly in a single afternoon.
Tent seam sealing creates a waterproof barrier over the thousands of needle holes left by stitching — and using the wrong sealant for your fabric is the #1 reason seals peel within a season.
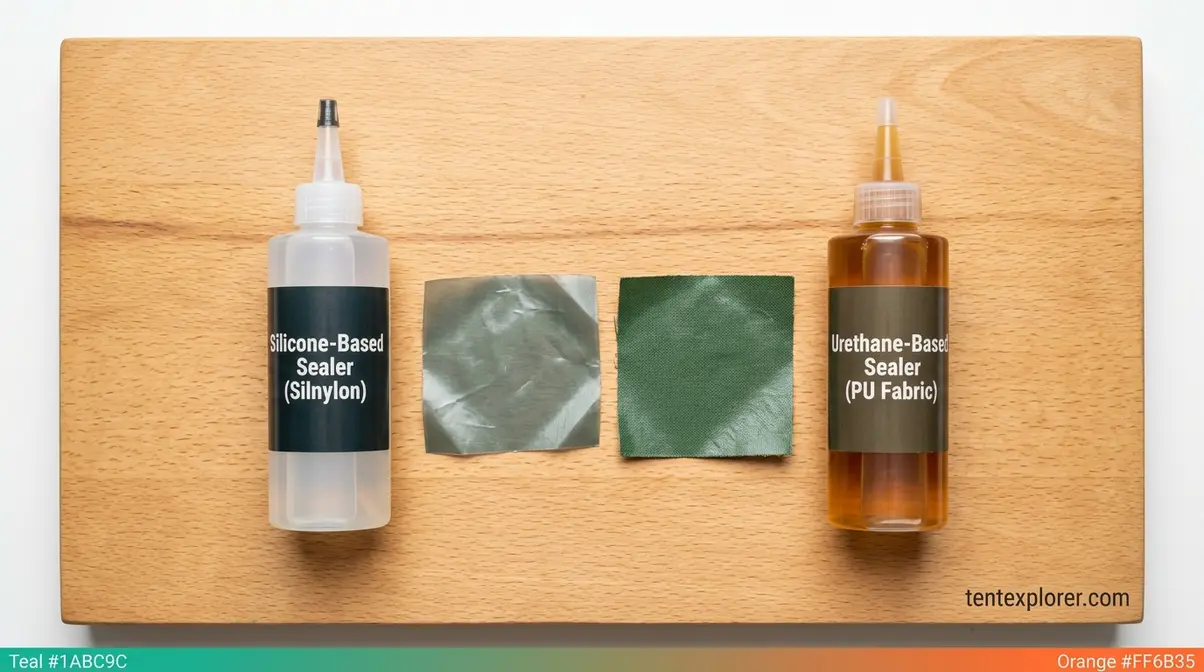
- Identify your fabric first: Silnylon (silicone-coated nylon) requires silicone-based sealers (e.g., Gear Aid Seam Grip SIL); PU-coated tents need urethane sealers (e.g., Seam Grip WP)
- The Fabric-First Rule: Mismatched chemistry = guaranteed peeling — no exceptions
- DIY option exists: A 1:4 silicone-to-mineral-spirits mix works for silnylon on a budget
- Inspect annually: A properly applied seal can last the functional lifetime of the tent’s coating with yearly checks
Do You Actually Need to Seal Your Tent Seams?
Most modern tents that ship with factory-taped seams don’t need immediate liquid sealing — but any ultralight silnylon shelter, any tent older than 3-5 years, or any tent where you’ve spotted a drip almost certainly does. The key is knowing which situation you’re in before spending an afternoon on a repair that wasn’t needed. You can learn the complete process for sealing tent seams to understand exactly where your tent falls.
Every stitched tent seam contains hundreds of micro needle holes that bypass waterproof coatings entirely — factory tape covers them from the outside, but liquid sealant seals them from the inside out, creating a chemical bond with the fabric threads themselves.
Before you open any sealant bottle, identifying your tent’s fabric coating is the single most important step. This is The Fabric-First Rule — the master framework that determines every decision that follows in this guide. Get it right here, and the rest of the process falls into place.
Factory Tape vs. Manual Sealing
Seam taping vs. seam sealing represent two different manufacturing and repair approaches that serve the same goal through different chemistry. Factory seam tape is a heat-bonded waterproof strip applied at the factory during manufacturing — it covers the needle holes created by stitching but sits on top of the fabric rather than penetrating it. Over years of UV exposure, compression during storage, and temperature cycling, this tape degrades and eventually lifts at the edges.
Liquid sealant — like Gear Aid Seam Grip, the most widely recommended liquid sealant in the backpacking community — penetrates the fabric threads and bonds chemically, creating a seal that works from within the seam rather than over it. This makes it the correct repair method when factory tape fails, or when tape was never applied at all.
Budget Coleman tents often ship without fully taped seams, leaving raw stitching exposed to rain from the first trip. All silnylon ultralight tents from manufacturers like Seek Outside or Six Moon Designs require liquid sealing from day one — tape adhesive simply won’t bond to a silicone-coated surface. MSR’s guide on seam taping vs. sealing explains that factory-taped seams do not require liquid sealer unless extra protection is desired or tape begins to peel (Cascade Designs, updated 2026).
Factory tape works until it doesn’t — here’s how to tell when your tent has crossed that line.
3 Signs Your Tent Needs Resealing Right Now
These three signs are diagnostic — if you spot any one of them, resealing is overdue:
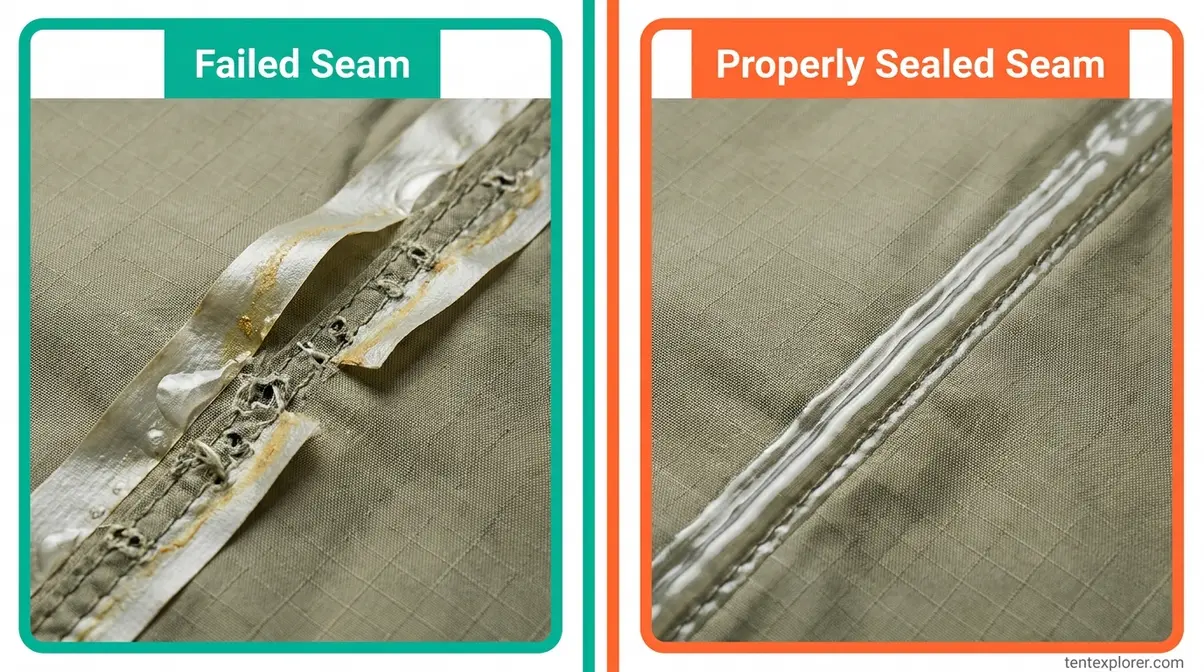
- Visible peeling, flaking, or bubbling along interior seam lines. This indicates the urethane (PU) coating is delaminating — a process called hydrolysis that accelerates in tents over five years old, especially those stored in warm, humid conditions. The coating breaks down chemically and loses adhesion.
- Water dripping through seam lines during a hose test, even when the tent fabric beads water. DWR (durable water repellency, the factory spray-on hydrophobic treatment) may still be working on the fabric face, but seams are unprotected. The drip comes through the needle holes, not the fabric itself.
- Factory tape lifting at edges or peeling back. Once any edge lifts, water wicks underneath the tape by capillary action, and the entire seam is compromised within one or two rain sessions.
To confirm the diagnosis, conduct a simple hose test: pitch the tent, run a hose at medium pressure across the fly for 60 seconds, then check all interior seam lines for drips. REI’s tent waterproofing guide recommends this exact method as the standard pre-season check (REI Expert Advice).
Once you’ve confirmed resealing is needed, the next step — and the one most people skip — is identifying what your tent is made of.
Inside vs. Outside: Where to Apply the Sealer

When wondering whether to apply tent seam sealer inside or outside, the question has a definitive answer — it depends entirely on your tent’s coating type.
Silnylon tents: seal from the outside. The silicone coating is bonded to the outer face of the fabric; the sealant needs to contact this coating to bond correctly. Applying silicone sealer to the inner face can cause it to peel away from the untreated inner nylon layer.
PU-coated tents: seal from the inside. The polyurethane coating is on the interior face of the rainfly; urethane sealers bond to this coating. The user-proven approach from the r/Ultralight community captures this precisely:
“I’d do a heavy coating on the inside. Flip it inside out, and really coat over the visible seam. After that dries/cures, flip it back to normal.”
— r/Ultralight community member
r/Ultralight community consensus confirms that sealing inside vs. outside depends entirely on the tent’s fabric coating type.
Do All Tents Leak in Heavy Rain?
Not all tents leak in heavy rain, but many can without proper maintenance. High-quality tents with factory-taped seams and intact waterproof coatings perform well in heavy rain, but coatings degrade over time and seams can fail as adhesive ages. Budget tents often ship without fully sealed seams and are more prone to leaking from the first heavy downpour. Regular seam sealing and annual DWR re-treatment are the most effective ways to keep any tent dry through sustained rain.
Now that you know whether your tent needs sealing and where to apply it, the most critical decision is which product to use — and this is where most DIY sealing jobs go wrong.
Choosing the Right Tent Seam Sealer
The single most common reason tent seam sealers peel within one season is chemistry mismatch — applying a silicone-based sealer to a PU-coated tent, or a urethane sealer to silnylon, prevents proper bonding entirely. Identifying your tent’s fabric coating before purchasing any product is The Fabric-First Rule, and it takes less than 60 seconds with a simple visual test. You can also explore top waterproofing sprays for tents if your issue extends beyond seams to the fabric face itself.
As confirmed by Six Moon Designs’ seam sealing guide, matching sealants with fabric coatings is non-negotiable: silicone-based sealers will not bond to polyurethane-coated fabrics — and urethane sealers will not cure properly on silicone-treated nylon.
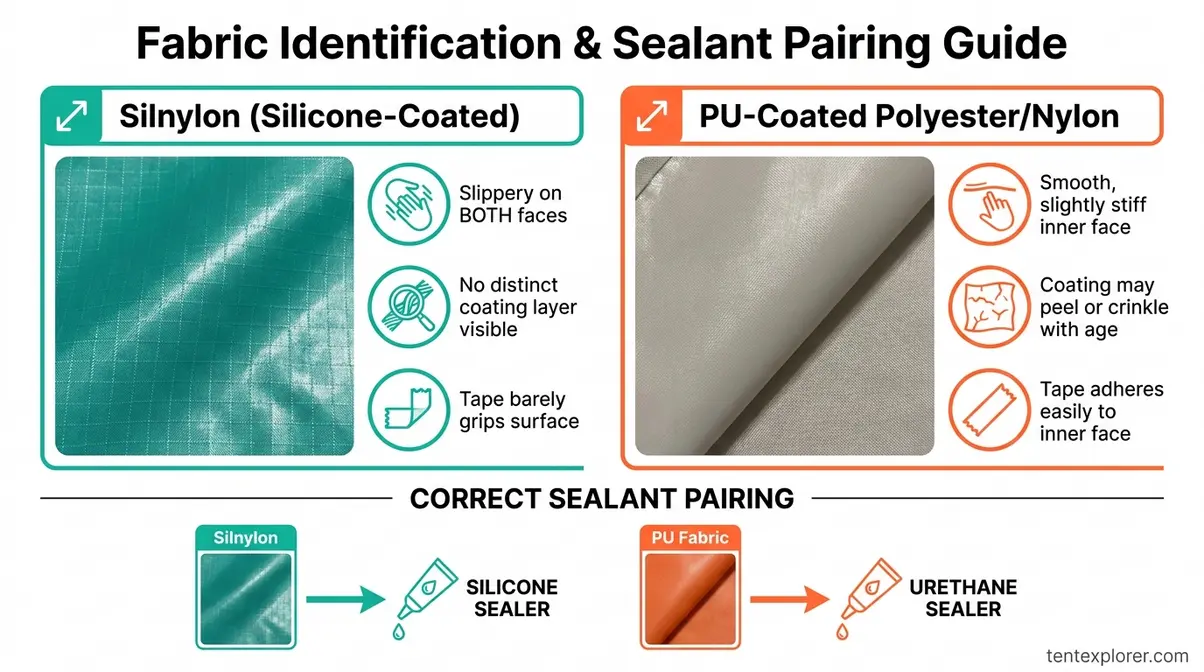
Silicone vs. Polyurethane: Identifying Your Tent’s Coating
Seam sealing tent silicone applications start with knowing whether your tent uses a silicone or polyurethane coating — two chemically incompatible surfaces that require different sealants. Here’s how to tell them apart with a quick visual and tactile check.
PU-coated tents (the most common type): The inner face of the rainfly has a slightly shiny, plastic-like coating. Run your finger across it — it feels smooth and slightly stiff. Over time, this coating peels, crinkles, or develops a musty smell (the result of hydrolysis). Brands in this category include most Coleman, REI Co-op, MSR Hubba series, Marmot, and Kelty tents.
Silnylon (silicone-coated nylon) tents: The fabric feels slightly slippery on both faces, with no distinct coating visible on either side. The silicone is impregnated into the fabric weave itself, not applied as a surface layer. Both sides look uniformly shiny. Brands include Seek Outside, Six Moon Designs, most ultralight cottage manufacturers, and the MSR Carbon Reflex series.
- Quick identification checklist:
- Check the hang tag or manufacturer website for terms like “SilNylon,” “SilPoly,” “PU coating,” or “polyurethane coating”
- Rub a drop of water on the inner face: PU-coated fabric shows a duller, more opaque surface; silnylon is uniformly shiny on both faces
- Try to stick a piece of tape to the inner face — it adheres easily to PU coating, but barely grips silnylon
Recommendations for sealing silicone-coated fabrics from Garage Grown Gear confirm that silicone-coated fabrics require dedicated silicone-based sealants to prevent water wicking through seams.
Once you know your coating, choosing the right product becomes straightforward — here’s exactly what to buy.
Liquid Sealant vs. Seam Tape: When to Use Each
Choosing between liquid sealant and best tent seam sealer tape options comes down to your fabric type and the condition of existing seams. Here’s the breakdown:
Liquid sealant (Gear Aid Seam Grip SIL, a silicone-based sealant formulated exclusively for silicone-coated fabrics; Gear Aid Seam Grip WP, the urethane-based counterpart for PU-coated polyester and nylon; or Sil-Net, a popular silicone sealer from McNett for silnylon tents) is the correct choice for silnylon tents where tape won’t adhere, for new sealing projects, and for resealing after removing old tape. The liquid penetrates fabric threads and creates a chemical bond.
Seam tape (iron-on or peel-and-stick) works for PU-coated tents where you’re replacing partially lifted factory tape — like for like. It applies faster but degrades more quickly than liquid sealant and requires a heat tool for iron-on variants.
When tape is never an option: Silnylon tents cannot use seam tape of any kind. The silicone surface prevents adhesive from bonding. Backpacker Magazine’s advice on cleaning seams recommends peeling old tape and cleaning seams with rubbing alcohol before resealing to prevent adhesion failure.
| Method | Best For | Adhesion | Lifespan | Silnylon Compatible? |
|---|---|---|---|---|
| Liquid Sealant (Silicone) | Silnylon, new projects | Chemical bond | Long (5-10+ years) | ✅ Yes |
| Liquid Sealant (Urethane) | PU polyester/nylon | Chemical bond | Long (5-10+ years) | ❌ No |
| Seam Tape (Iron-on) | PU tents, tape replacement | Heat bond | Medium (3-7 years) | ❌ No |
| Seam Tape (Peel-and-stick) | Emergency repair | Pressure bond | Short (1-3 years) | ❌ No |
Now that you know which type of sealant to use, here’s the definitive compatibility table for matching product to fabric.
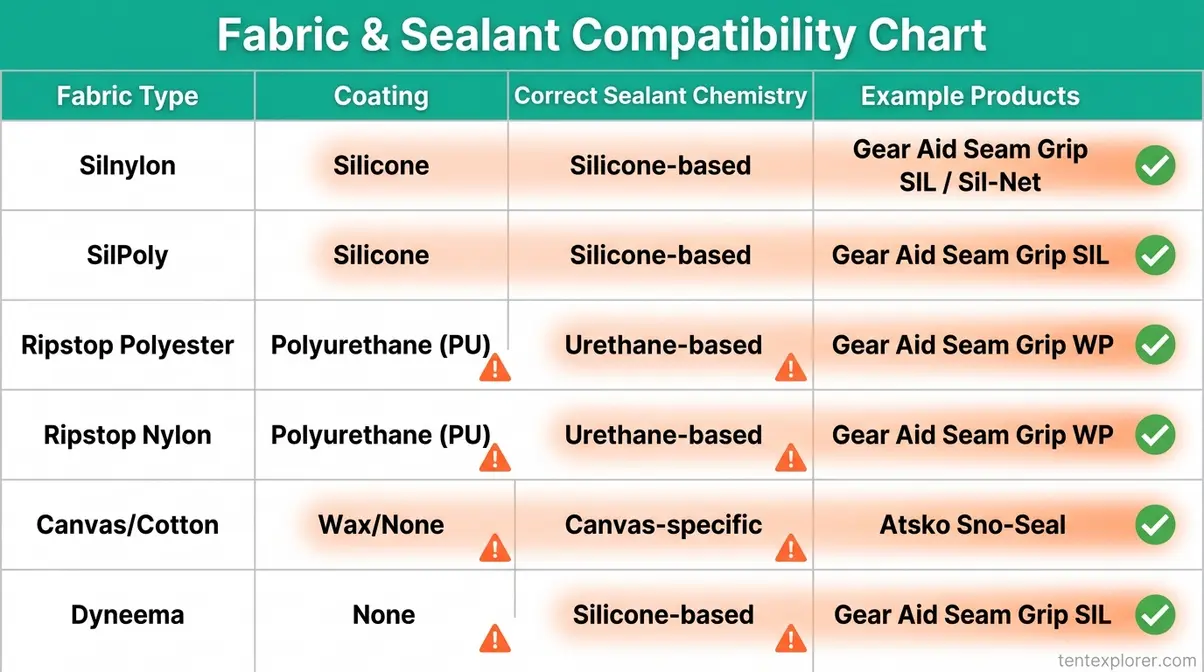
Recommended Sealants by Fabric Type (Compatibility Table)
This is the cornerstone of The Fabric-First Rule — a definitive fabric-to-product mapping that no single competitor guide provides in one place. Using the wrong product doesn’t just reduce effectiveness; it actively prevents bonding and guarantees peeling within one rain session. Trailspace seam sealer reviews confirm Gear Aid Seam Grip SIL as the leading recommendation for silnylon tarp and tent sealing.
A hiker who applies Seam Grip WP (urethane-based) to a silnylon tent will see the sealant bead up and peel within the first rain — the silicone surface chemically rejects urethane adhesion. Match the column exactly.
| Fabric Type | Coating | Correct Sealant | Example Products |
|---|---|---|---|
| Silnylon (SilNylon) | Silicone | Silicone-based | Gear Aid Seam Grip SIL, McNett Sil-Net |
| SilPoly | Silicone | Silicone-based | Gear Aid Seam Grip SIL |
| Ripstop Polyester (standard) | Polyurethane (PU) | Urethane-based | Gear Aid Seam Grip WP |
| Ripstop Nylon (standard) | Polyurethane (PU) | Urethane-based | Gear Aid Seam Grip WP |
| Canvas / Cotton | None / Wax | Water-based or canvas-specific sealer | Atsko Sno-Seal, canvas seam sealers |
| Dyneema Composite | None | Silicone-based (check manufacturer) | Gear Aid Seam Grip SIL |
With the right sealant in hand, gather these tools before you start — preparation determines 50% of the outcome.
What You’ll Need Before You Start
Having the right tools before you start isn’t optional — using the wrong applicator leads to uneven coverage, and sealing a tent in the wrong conditions (too cold, too humid) means the sealant won’t cure properly. Gather everything below before opening the bottle. For a deeper look at compatible products, discover the best sealers for different tent fabrics before you shop.
Before beginning tent seam sealing, confirm your workspace conditions: temperature between 50-80°F (10-27°C) and humidity below 70%. Seam Grip WP requires application above 40% relative humidity to cure — but above 70% RH, urethane sealers can surface-cure before the interior bonds, creating a tacky result (Gear Aid product specs, 2026).
Estimated Time: 2-3 hours (plus 12-24 hours cure time)
Tools and Materials Checklist
- Materials:
- Correct sealant for your fabric (see compatibility table above — this is non-negotiable)
- Isopropyl alcohol (IPA, 70%+) — for cleaning and degreasing PU-coated seams before application
- Mineral spirits (paint thinner) — for silnylon prep and the DIY mix only; NOT acetone, which degrades silicone chemistry
- Painter’s tape — to protect fabric adjacent to seam lines during application
- Tools:
- An acid brush (the small-bristled applicator preferred for precise seam work) — available at any hardware store for under $2
- OR a syringe with an angled tip — ideal for reaching interior seams without flipping the tent inside out
- Clean lint-free cloth for surface prep
- Drop cloth or tarp to protect your floor during application
Many experienced backpackers keep a “seam sealing kit” — a small zip bag with a 2oz bottle of Seam Grip, an acid brush, and a small bottle of IPA — for field repairs between full resealing sessions. This minimal kit weighs under 4oz and handles most in-the-field failures. You can discover the best sealers for different tent fabrics to stock it correctly for your tent type.
Setting Up Your Workspace
Sealing a tent properly starts with correct setup — a collapsed tent creates uneven folds that trap sealant in pools rather than distributing it evenly along the seam.
- Pitch the tent fully on a flat surface. Seams must be under slight tension for even sealant distribution. Guy-out points and cone areas — the highest-stress zones — need full tension to accept sealant evenly.
- Position for fabric type. For PU tents: flip the rainfly inside out, or work inside the pitched tent to access interior seam lines. For silnylon: work on the exterior of the pitched shelter.
- Check conditions. Apply between 50-80°F (10-27°C) with humidity below 70%. Avoid direct sunlight during application — it accelerates surface skinning before the sealant penetrates the fabric threads.
University of Alaska Southeast guidelines on taped seams confirm that fully pitching the tent before sealing ensures proper seam tension for even sealant application.
With your tent pitched and materials ready, here is the exact process — step by step.
How to Seal Tent Seams: Step by Step
Applying tent sealant is a one-afternoon project that pays dividends across years of camping. The process is the same whether you’re working on a $150 Coleman or a $600 ultralight silnylon shelter — the only variable is which sealant you’re using (The Fabric-First Rule applies here too). Work through these steps in order.
For a visual walkthrough of the full application process, watch this step-by-step demonstration:
REI’s tent waterproofing guide recommends setting up the tent and applying sealer to all seams systematically, allowing full cure time before packing (REI Expert Advice).
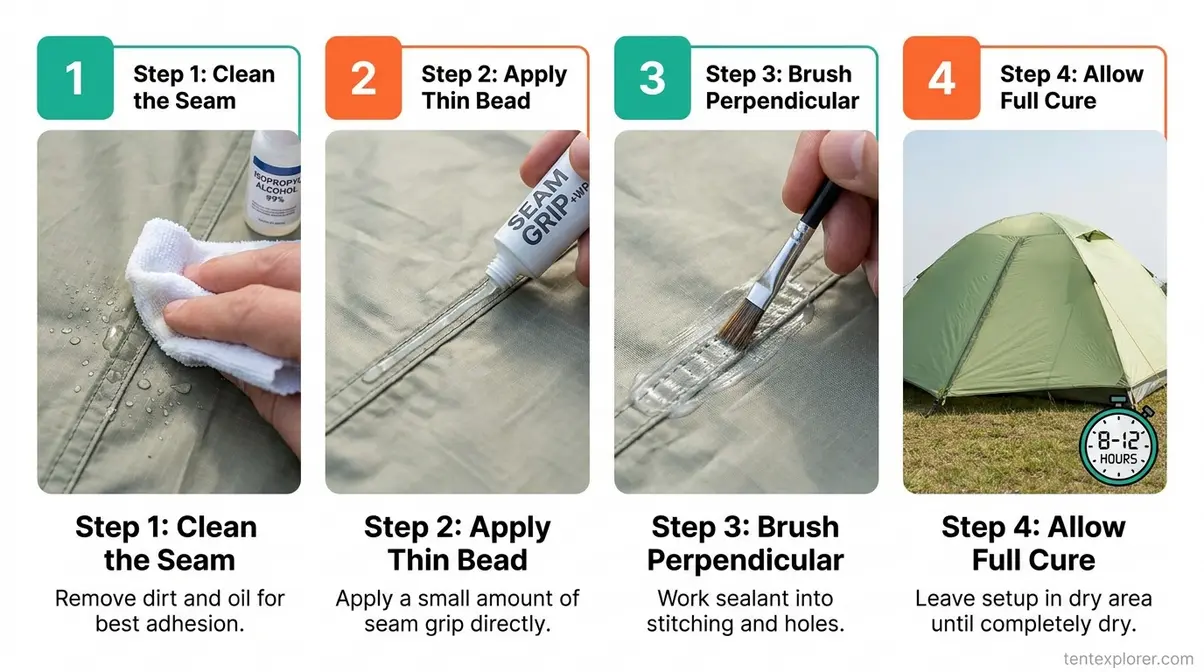
Step 1: Clean and Prep the Seams
Cleaning is the step most people skip — and the reason most resealing jobs fail within one season. Tent seam sealing bonds to clean fabric threads; any oil, residue, or old adhesive creates a barrier between the sealant and the fabric.
- For PU-coated tents:
- Wipe all seam lines with isopropyl alcohol (70%+) on a lint-free cloth
- Work in 12-inch sections, applying firm pressure to remove oils from handling, old coating residue, and sealant remnants
- Allow 5-10 minutes for full evaporation before applying any sealant — IPA must be completely dry
- For silnylon tents (resealing over old silicone):
- Lightly rub seam lines with mineral spirits to dissolve old sealant
- Allow 15-20 minutes for full evaporation — longer in cool conditions
- Do NOT use IPA on silnylon — it can affect the silicone surface treatment
- For peeling factory tape:
- Peel off all loose tape completely — never seal over lifting tape
- Scrub the exposed seam with isopropyl alcohol to remove adhesive residue
- Allow full evaporation before proceeding
Skipping the alcohol wipe on a PU tent means the new sealant bonds to skin oil and old coating residue rather than the fabric threads — it will peel in the first rain. Backpacker Magazine’s advice on cleaning seams confirms that scrubbing seams clean with rubbing alcohol before resealing is essential for maximum adhesion.
With clean, dry seams, you’re ready for the most technique-sensitive part of the process.
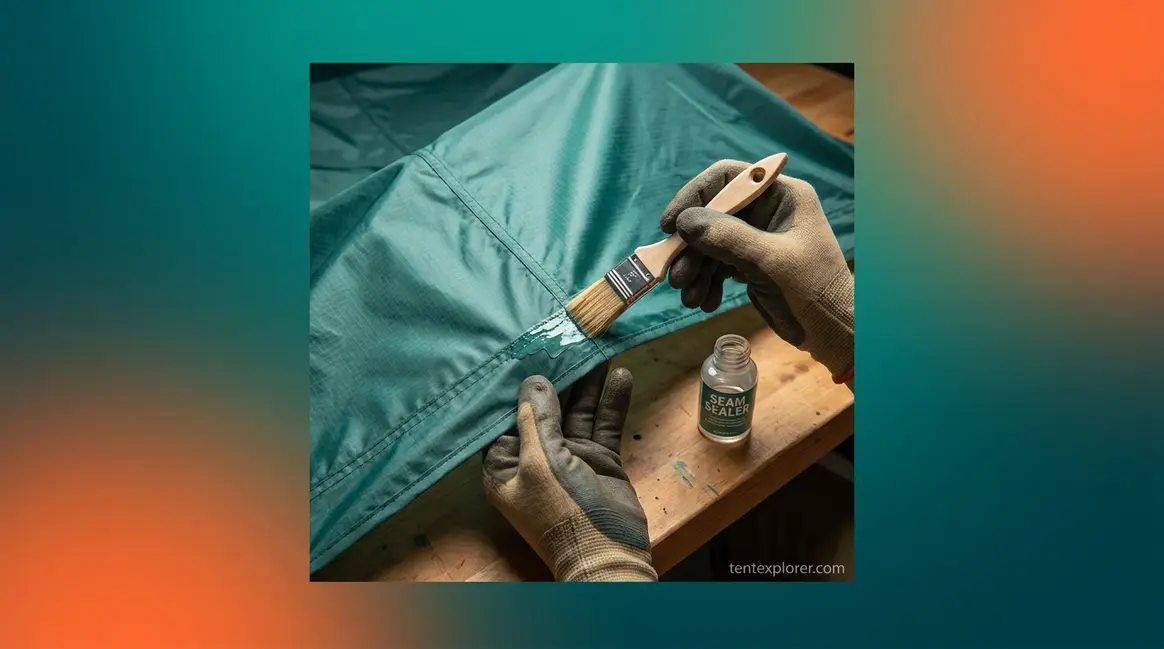
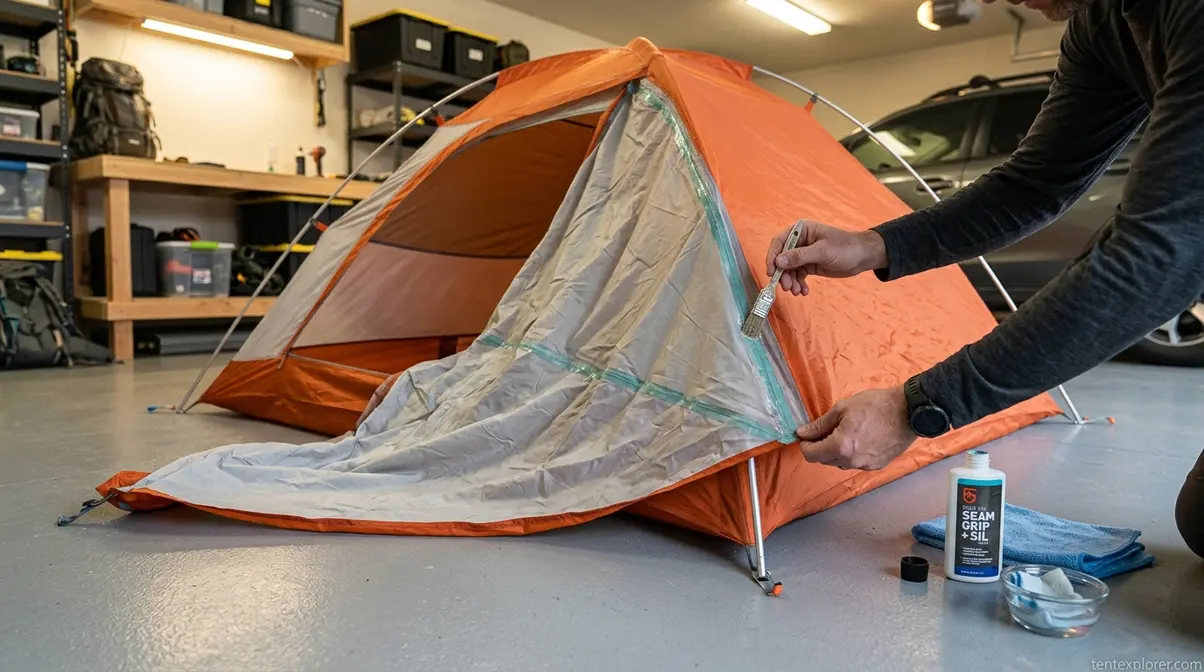
Step 2: Apply the Seam Sealer
Before opening the bottle, confirm you have the correct sealant for your fabric — The Fabric-First Rule applies at every step, not just at the store. Once confirmed, the application technique determines whether the sealant penetrates the needle holes or just coats the surface.
Application steps:
- Apply a thin bead of sealant directly onto the seam line using an acid brush or syringe with angled tip
- Work in 6-inch sections, brushing the sealant into the fabric with light strokes perpendicular to the seam — this pushes sealant into the needle holes rather than spreading it along the surface
- For silnylon exterior seams: apply a thin bead only — excess silicone creates a thick film that cracks when the tent flexes in wind
- For PU tent interior seams: a heavier coating is appropriate — the community-proven method captures this well:
“I’d do a heavy coating on the inside. Flip it inside out, and really coat over the visible seam. After that dries/cures, flip it back to normal.”
— r/Ultralight community member
- Cover ALL seam lines without exception: guy-out points, stake loops, zipper seam intersections, and floor-wall joins (the bathtub floor seam). If one seam fails, water finds every other seam within minutes.
For additional help with technique, understand and fix common seam sealing mistakes before your first application.
Once the sealant is applied, the curing process determines whether it holds for one season or ten.
Step 3: Cure, Test, and Waterproof-Check
Curing conditions matter as much as application technique. Compressed or disturbed sealant bonds to itself rather than the fabric, creating new failure points.
- Allow full cure time. Per Gear Aid’s official product specifications: Seam Grip WP (urethane) requires 8-12 hours at 60-100°F; Seam Grip SIL (silicone) cures in 3-6 hours under the same conditions. Do not pack the tent until fully cured.
- Leave the tent pitched during the entire cure period — or leave the fly inside out if that was your working position. Cold below 50°F significantly slows urethane cross-linking; move the tent indoors if temperatures drop.
- Conduct the hose test. After full cure, run a hose at medium pressure over all sealed seams for 60 seconds. Check interior seam lines for any drips. A drip means one spot needs a second coat — apply, re-cure, and test again.
Many experienced campers run a “pitch and spray” check before every multi-day trip. Two minutes of testing before you leave the driveway can prevent a three-day nightmare in the backcountry.
If you prefer to avoid commercial products entirely, there’s a proven DIY alternative that costs a fraction of the price.
DIY Seam Sealer Recipe (The 1:4 Silicone Mix)
No top competitor guide provides this recipe — it’s the standard recommendation across r/Ultralight and backpacking communities for silnylon tent owners, refined over thousands of applications (Backpacking Light community forums; Six Moon Designs Seam Sealing Guide). Note: this recipe works only for silnylon and silicone-coated fabrics — it is not a tent seam sealer alternative for PU-coated tents.
- Ingredients:
- 1 part 100% pure silicone caulk (GE Silicone I, clear — no additives, no mold-resistant formulas)
- 4 parts mineral spirits (paint thinner — NOT acetone, NOT naphtha, NOT isopropyl alcohol)
- Steps:
- Combine in a glass jar — do not use plastic, which mineral spirits can degrade
- Stir thoroughly until fully blended; the mixture should reach the consistency of thin cream
- Apply with an acid brush using the same perpendicular stroke technique as commercial sealant
- Allow 12-24 hours cure time — longer than commercial silicone due to solvent evaporation time
- Common DIY failures:
- Too thick — sealant skins over before penetrating; peels within weeks. Fix: add more mineral spirits.
- Wrong solvent — acetone dissolves silicone rather than thinning it; the mix never cures. Only mineral spirits works.
- Not 100% pure silicone — any additives (mold inhibitors, adhesion promoters) prevent bonding entirely.
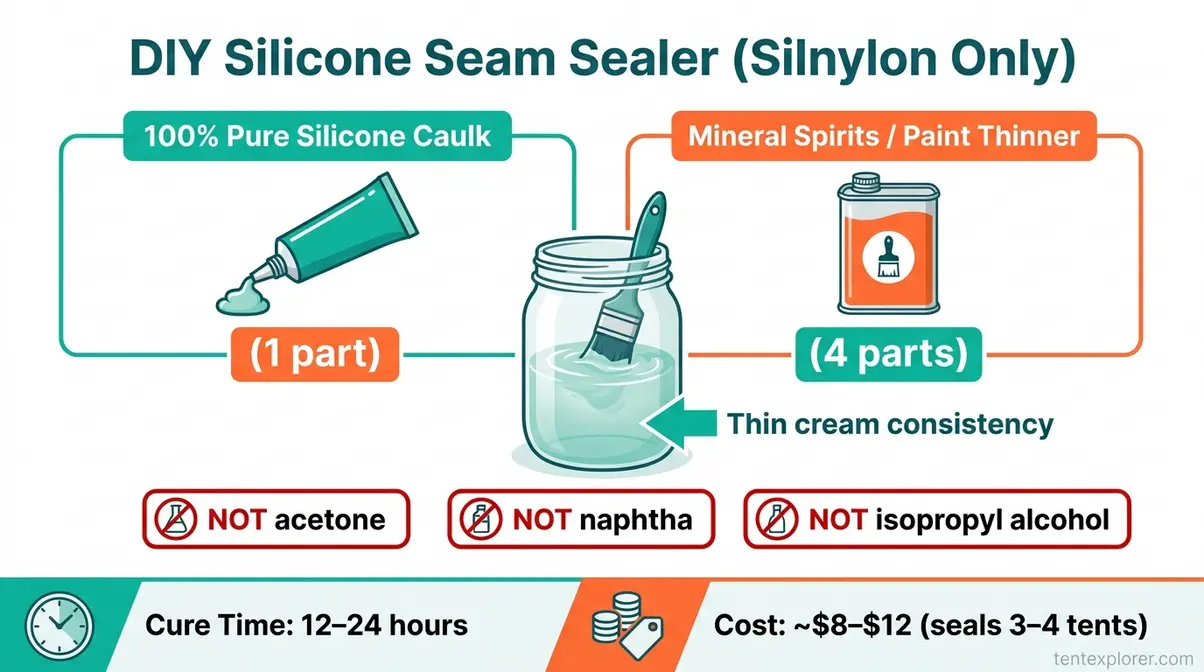
Cost comparison: approximately $8-12 total for enough mix to seal 3-4 tents vs. $9.95-$16.49 per tube of commercial sealant (Gear Aid pricing, as of April 2026). For silnylon tent owners sealing multiple shelters or resealing annually, the savings compound quickly. Explore top waterproofing sprays for tents if you need to address DWR failure alongside seam sealing.
The process above works for most tents — but specific fabrics require specific adjustments. Here’s what changes by material.
Sealing by Fabric Type
The correct sealant for your fabric type is non-negotiable — but technique also varies by material. Silnylon, PU polyester, canvas, and bathtub floors each have specific application nuances that determine whether your seal lasts one season or a decade. The Fabric-First Rule governs sealant selection; this section covers the technique differences that follow from it.
Silnylon and Silicone-Coated Fabrics
Sealing a silnylon tent differs from PU tent technique in two critical ways: application side and coat thickness. Always seal from the outside on silnylon — the silicone coating bonds to the outer face, and the sealant needs to contact this coating directly. Applying silicone sealer to the inner face risks peeling at the untreated inner nylon layer.
Apply a thin bead only — not the heavy coating appropriate for PU interiors. Excess silicone creates a thick film that cracks when the tent flexes in wind, undoing the seal at stress points like guy-out corners and zipper intersections. Work in 6-inch passes with an acid brush, using perpendicular strokes to push sealant into the weave.
Silnylon cannot use seam tape under any circumstances — the silicone surface prevents any tape adhesive from bonding. Liquid sealant is the only option for this fabric type. For sealers suitable for different tent materials, the silnylon-specific options are Gear Aid Seam Grip SIL and McNett Sil-Net.
The approach flips completely for PU-coated tents — here’s what changes.
Polyurethane (PU) Coated Polyester and Nylon
A seam sealer for polyester tent fabric must be urethane-based — this is the most common tent fabric category, covering most Coleman, REI Co-op, MSR Hubba, Marmot, and Kelty tents. The PU coating sits on the interior face of the rainfly, so urethane sealers must be applied from the inside to bond correctly.
Prep the seam with isopropyl alcohol (70%+) and allow full evaporation before applying Gear Aid Seam Grip WP or an equivalent urethane sealer. The “flip inside out” technique from the r/Ultralight blockquote is ideal for rainflys — it gives full access to interior seam lines without requiring you to crawl inside the pitched tent.
Seam sealing ripstop nylon with a PU coating follows the same process — the fabric weave type doesn’t change the chemistry requirement. The USDA Forest Service specifications for polyurethane coated nylon confirm PU-coated nylon as the standard material for professional shelter flies, requiring urethane-compatible sealants for seam maintenance.
Canvas tents require a completely different approach — water-based sealers and multiple coats.
Canvas and Cotton Tents
Sealing a canvas tent follows different rules than synthetic fabrics. Canvas does not use silicone or urethane sealers — use a dedicated canvas sealer such as Atsko Sno-Seal or a water-based canvas waterproofer formulated for natural fibers.
New canvas tents require a “seasoning” process before seam sealing. Pitch the tent and wet it thoroughly with a hose, then allow it to dry completely. This tightens the weave and reduces initial leaking. Seam sealing happens after seasoning — sealing an unseasoned canvas tent traps moisture in the weave.
Apply 2-3 coats of canvas sealer, allowing each coat to dry before the next. Canvas absorbs significantly more sealant than synthetic fabrics, and a single coat rarely achieves full waterproofing at the seams. Bell tents and canvas wall tents from brands like White Duck Outdoors or Kodiak Canvas typically require this multi-coat approach on all stitched seams before first use in heavy rain.
One seam location that all tent types share — and that most guides miss entirely — is the bathtub floor junction.
Bathtub Floors and Ground Panels
The bathtub floor seam — where the floor panel meets the tent wall — is the highest-stress seam in any tent. It bears ground moisture pressure from below, foot traffic from inside, and constant flex as the tent moves in wind. Yet it’s the seam most guides skip.
Seal from the inside at the floor-wall junction using the correct sealant for the floor material. Most tent floors use PU-coated polyester — use Gear Aid Seam Grip WP here. Apply a slightly heavier coat than on wall seams; this seam sees more mechanical stress and moisture exposure than any other point in the tent.
Many tent leaks attributed to “the floor is just wet” are actually floor-wall junction failures. Sealing this seam first, before addressing fly seams, eliminates the most common interior flooding scenario — and it’s the first place to check if your tent floor is damp despite a dry-looking fly.
Even a perfectly applied seal can fail over time. Here’s how to diagnose and fix every common failure mode.
Troubleshooting: When Your Seam Sealer Fails
Even correctly applied seam sealant can fail — but every failure mode has a specific cause. Peeling tape, tacky sealant, and seams that leak again within a season are all diagnosable and fixable. Here’s what went wrong and how to correct it.
Seam Tape Peeling or Flaking Off
Tent seam tape coming off is one of the most common issues campers encounter mid-season, and it’s almost always caused by age and UV degradation rather than application error. Factory tape typically lasts 5-10 years, after which UV exposure, compression during storage, and moisture cycling break down the adhesive layer.
- Fix — step by step:
- Peel off all loose tape completely — do not seal over lifting tape under any circumstances
- Scrub the exposed seam with isopropyl alcohol to remove all adhesive residue
- Allow full evaporation (5-10 minutes)
- Apply liquid sealant (correct type for your fabric — refer to compatibility table)
- Do not replace with new tape if the tent is silnylon — tape will not adhere
Sealing over peeling tape creates a bubble. The tape continues lifting underneath the new sealant, creating a larger failure point within one season. Full removal is always the correct first step.
If tape is peeling on a relatively new tent (under three years old), contact the manufacturer before resealing — this may be a warranty issue, and DIY repairs can affect warranty claims.
Peeling tape is visible — tacky sealant is the failure mode that surprises people most.
Sealer Still Tacky After Drying
Tacky when dry — a specific and frustrating outcome — has three distinct causes, each requiring a different fix:
- Cause A (DIY mix too thick): Too much silicone in the ratio causes the outer surface to skin over while the interior never fully cures. Fix: thin the remaining mix further with more mineral spirits; allow 48+ hours cure time in warm, dry conditions.
- Cause B (high-humidity application): Urethane sealers require moisture to trigger curing, but excess humidity above 70% RH causes the surface to cure before the interior bonds. Fix: move the tent to a dry, ventilated area; allow an additional 24-48 hours.
- Cause C (wrong sealant for fabric): Silicone sealer applied to PU-coated fabric never bonds and remains tacky indefinitely. Fix: remove with mineral spirits, allow full evaporation, then apply the correct urethane sealer.
Tacky seam sealant after 24+ hours of cure time almost always indicates either high-humidity application conditions or an incorrect solvent ratio in a DIY mix — not a defective product.
How Long Should a Seal Last?
How long tent seam sealer lasts depends on fabric type and storage conditions — but a properly applied seal can last many years, often matching the functional lifetime of the tent’s fabric coating itself.
Silicone sealers on silnylon typically outlast the tent. Urethane sealers on PU-coated tents degrade at a similar rate to the PU coating — typically 5-10 years depending on UV exposure, storage temperature, and compression habits. Tents stored fully compressed in a stuff sack degrade faster than those stored loosely in a mesh bag.
- Annual inspection cadence:
- Inspect seams each spring before camping season
- Look for lifting edges, discoloration, or surface cracking
- Run the 60-second hose test to confirm waterproofness
Key accelerators of seal degradation: UV exposure (store out of direct sunlight), compression storage (avoid crushing coated fabrics), and extreme temperature cycling between hot car trunks and cold nights.
If your tent’s seam damage is beyond DIY repair, a professional service is a legitimate option.
When to Use a Professional Seam Sealing Service
Professional seam sealing makes sense in three specific scenarios: extensive delamination across the entire fly, structural seam damage (not just sealant failure), or high-value expedition tents where DIY risk isn’t worth the consequence of a failed repair.
Professional services apply sealant under controlled conditions with professional-grade products and consistent technique. TarpTent offers full tent seam sealing service for $35 (as of 2026), and LightHeart Gear charges $38 for their models — competitive with the cost of materials for a DIY job on a large tent. For a $500+ expedition shelter, professional service is often the right call.
Forest Service standards for tent seam repair establish the professional threshold for when tent seam damage warrants repair vs. retirement — tents with seam damage that cannot be economically repaired should be retired, providing a practical benchmark for when replacement becomes the question.
Whether you’re using a commercial product or a brand-specific sealer, here’s what the major brands offer.
Brand-Specific Seam Sealers
Most major tent brands don’t manufacture their own seam sealers — they recommend Gear Aid products, or their own labeled versions of the same chemistry. Here’s what each major brand uses and where to find it. For a comprehensive overview, review top-rated seam sealing products before purchasing.
MSR and Cascade Designs Sealers
MSR tent seam sealing requirements vary by tent series — the correct product depends on the specific model’s fabric.
- MSR Hubba series and most MSR tents: PU-coated nylon. Use Gear Aid Seam Grip WP (urethane-based). MSR’s own seam sealer is formulated on the same urethane chemistry.
- MSR Carbon Reflex series: Silnylon. Requires Gear Aid Seam Grip SIL or Sil-Net. Factory-sealed at the seams but benefits from resealing after 2-3 seasons of heavy use.
- Model-specific guidance: Cascade Designs publishes tent-specific seam sealing instructions on their website — check your model before purchasing.
MSR’s guide on seam taping vs. sealing explains their seam taping vs. sealing approach and model-specific recommendations for MSR tents (Cascade Designs, updated 2026).
Budget tent owners have fewer options — but the right product is still straightforward to identify.
Coleman and Budget-Friendly Options
Coleman tent seam sealer selection is simple because Coleman tents universally use PU-coated polyester. Use Gear Aid Seam Grip WP, Coleman’s own branded seam sealer (a urethane-based product sold at Walmart and Target), or Tent Sure tent floor sealant for floor seams specifically.
- Critical warning: The DIY 1:4 silicone mix does NOT work for Coleman tents. These are PU-coated, not silnylon. Silicone sealer on PU coating will bead up and peel immediately.
- Pre-trip check: Budget tents often ship without fully taped seams. Inspect all seam lines before the first use in heavy rain — not after a wet night.
- Gear Aid Seam Grip WP (approximately $9.95-$16.49 per tube, as of April 2026) covers 12 feet of seams — typically enough for a full rainfly with one tube.
Wherever you’re shopping — online, in the UK, or at a major retailer — here’s where to find the right product.
Where to Buy: UK, Decathlon, BCF, and Online
- UK buyers: Gear Aid Seam Grip is available at Cotswold Outdoor, Ellis Brigham, and Amazon UK. Decathlon, the European outdoor retailer, stocks its own Quechua-branded tent repair products — check the product label for “silicone” or “urethane” compatibility with your fabric before purchasing, as Quechua branding doesn’t always specify chemistry clearly.
- Australia (BCF): BCF stocks Gear Aid Seam Grip and generic seam sealers. Confirm PU vs. silicone formulation on the label — the bottle color and product name differ between the two versions.
- Online: Amazon, REI.com, and GearAid.com are the most reliable sources for authentic Gear Aid products with clear fabric compatibility descriptions.
For a broader look at protective treatments beyond seam sealers, compare various brands of tent waterproofing sprays to address DWR failure alongside seam work.
Before you start, it’s worth knowing the common mistakes that can undermine even the best-planned sealing job.
Common Pitfalls to Avoid When Sealing Tent Seams
Most Common Seam Sealing Mistakes
User consensus across professional backpacking communities consistently surfaces the same five errors — each preventable with one piece of information you now have.
1. Using silicone sealer on a PU-coated tent (The Fabric-First Rule violation) Scenario: Buyer purchases Gear Aid Seam Grip SIL for a standard Coleman tent because “silicone sounds stronger.” What goes wrong: Silicone never bonds to the PU coating. The sealant beads up and peels within the first rain session, leaving the seam unprotected. How to avoid: Identify fabric type before purchasing. PU coating → Seam Grip WP. No exceptions.
2. Sealing over peeling tape without removing it first Scenario: Camper applies liquid sealant directly over factory tape that’s lifting at the edges to save time. What goes wrong: The tape continues lifting underneath the new sealant, creating a larger bubble failure within one season. How to avoid: Always peel off all loose tape and clean the seam with IPA before applying any new sealant. Get answers to frequently asked questions about tent seam sealing for more common scenarios.
3. Applying sealant in cold or high-humidity conditions Scenario: Sealing a tent in a cold garage in early spring (below 50°F) or during a humid day. What goes wrong: Urethane sealers fail to cross-link correctly in cold; high humidity causes surface cure before interior bonding. Result: tacky sealant that never fully dries. How to avoid: Apply between 50-80°F and below 70% relative humidity. Move indoors if needed.
4. Sealing without adequate ventilation Scenario: Sealing a tent in a small garage or bedroom with windows closed. What goes wrong: Mineral spirits (in DIY mix) and commercial sealant solvents produce significant fumes — both a health hazard and a fire risk near any ignition source. How to avoid: Work outdoors or in a well-ventilated area. Keep away from flames, pilot lights, and heat sources.
5. Using acetone as a thinner for the DIY silicone mix Scenario: DIYer substitutes acetone for mineral spirits because it’s already in the garage. What goes wrong: Acetone chemically degrades silicone rather than thinning it. The mix never cures correctly, producing a sticky residue rather than a waterproof seal. How to avoid: Use only mineral spirits (paint thinner) as the solvent. Acetone is for nail polish, not tent seams.
When to Choose Alternatives
Seam sealing is not always the right solution. These three scenarios call for a different approach:
- If the tent fabric itself (not the seams) is leaking: The DWR coating has failed, not the seam construction. Seam sealant won’t fix fabric-face leaking. Use a DWR re-treatment spray instead. Find answers to common waterproofing spray questions to choose the right product.
- If the PU coating is delaminating across the entire fly: Widespread delamination means the coating has failed systemically — seam sealing addresses needle holes, not coating failure. Contact the manufacturer for assessment or consider tent replacement.
- If the tent is under manufacturer warranty: DIY sealing may void the warranty on defects. Contact the brand first — they may repair or replace the tent at no cost if the failure is covered.
Frequently Asked Questions
Should You Seal Your Tent Seams?
Yes, you should seal your tent seams if your tent is a silnylon model, has peeling factory tape, or shows any signs of leaking. Many modern tents ship with factory-taped seams that hold up well initially, but silnylon ultralight shelters require liquid sealing from day one, and any tent over 5 years old should be inspected annually. Liquid seam sealer fills the thousands of needle holes created during stitching — holes that bypass even waterproof coatings entirely. If you’re unsure, the 60-second hose test confirms whether your seams are holding.
What Is the Best Seam Seal for Tents?
The best seam sealer depends entirely on your tent’s fabric: silicone-coated fabrics (silnylon) require Gear Aid Seam Grip SIL or Sil-Net, while polyurethane-coated fabrics (most standard tents) require Gear Aid Seam Grip WP. Using the wrong type prevents bonding, as silicone sealers will not adhere to PU-coated fabric, and urethane sealers will not cure on silicone-treated nylon. Gear Aid Seam Grip is the most consistently recommended product across professional backpacking communities and gear review sites, so check your tent’s hang tag or manufacturer website to confirm your fabric type before purchasing.
How Long Does Tent Seam Sealer Last?
A properly applied seam seal can last many years — often for the functional lifetime of the tent’s fabric coating. Silicone sealers on silnylon typically outlast the tent itself, while urethane sealers on PU-coated tents degrade alongside the PU coating, typically lasting 5-10 years. Inspect seams each spring before camping season and conduct a quick hose test to confirm waterproofness; if you notice peeling or new leaks, clean the old sealant off completely and apply a fresh coat.
Closing Thoughts
For tent owners dealing with leaking seams, tent seam sealing creates a durable waterproof barrier over the needle holes that stitching creates in every fabric — and the process takes one afternoon with the right materials. The critical variable is fabric type: silnylon requires silicone-based sealers applied from the outside, while PU-coated polyester and nylon require urethane-based sealers from the inside. Every other step follows from that single identification.
The Fabric-First Rule exists because chemistry mismatch is the #1 cause of seam sealer failure — not bad products, not poor technique, but using a silicone sealer on a PU tent or a urethane sealer on silnylon. Match the chemistry to the coating, follow the step-by-step process above, and your shelter will hold through seasons of heavy use.
Start by identifying your tent’s fabric using the visual test in this guide. Purchase the correct sealant — Gear Aid Seam Grip SIL for silnylon (approximately $9.95 per tube), Seam Grip WP for PU-coated tents — gather your tools, and set aside a dry afternoon with temperatures above 50°F. Run the hose test after the cure window closes. Your next rainy camp will be a dry one.
