This blog post may contain affiliate links. As an Amazon Associate I earn from qualifying purchases.
📋 Table of Contents
- Choosing the Right Type of Tent Air Conditioner
- Portable ACs: True Cooling
- Evaporative Coolers: Dry Climate Cooling
- Window AC Units: For Base Camp Setups
- Can you use a regular portable AC in a tent?
- Which Type Is Right for You?
- How to Size and Power Your Tent Air Conditioner
- Understanding BTU for Tent Cooling
- Tent AC Sizing Chart by Tent Size
- Battery Stations vs. Gas Generators
- Solar Generator Compatibility Guide
- Tent AC Installation and Efficiency Tips
- How to Vent a Portable AC in Your Tent
- Single-Hose vs. Dual-Hose Portable ACs
- 5 Tips to Maximize AC Efficiency
- Troubleshooting Common Tent AC Problems
- AC Isn’t Blowing Cold Air: Fixes
- Other Common Tent AC Problems
- Quick Troubleshooting Checklist
- Tent AC Safety and Limitations
- Generator Safety Rules for Campers
- When a Tent AC Isn’t the Right Fit
- Are tent air conditioners worth it?
- Frequently Asked Questions
- What size air conditioner do I need for my tent?
- How do you power an air conditioner while camping?
- How do you vent a portable air conditioner in a tent?
“Suggestions please. Looking to make our tent an air conditioned space. Especially at night. Portable ac unit? Pros/cons? One vent or two vents?”
You’re not alone — and the answer isn’t as complicated as the spec sheets make it look.
Camping in a 95°F tent isn’t just uncomfortable. It steals your sleep, drains your energy, and can turn a trip you planned for months into something you want to cut short. A wrong purchase — the wrong AC type, the wrong BTU rating, the wrong power source — means hauling heavy gear to a campsite where you’re still sweating at 2 a.m. The right setup, sized and matched correctly, makes any campsite genuinely comfortable.
By the end of this tent air conditioner guide, you’ll know exactly which type of tent air conditioner fits your climate, how to calculate the right BTU for your tent size, and how to power it reliably — whether you’re at a full-hookup site or 20 miles off-grid. We cover four areas: type selection, sizing and power, installation tips, and troubleshooting — structured around a framework called The Tent Cooling Stack that turns a confusing purchase into a three-step decision.
Key Takeaways: Tent Air Conditioner Guide
Welcome to our comprehensive tent air conditioner guide. Choosing the right setup comes down to three decisions — type, BTU size, and power source — a framework we call The Tent Cooling Stack.
- Climate first: Portable ACs cool any climate; evaporative coolers only work effectively below 60% humidity
- Size it right: Plan for 20 BTU per square foot + 380 BTU per additional person (standard industry sizing formula; verify with ENERGY STAR for your specific unit)
- Match your power: Most 8,000 BTU units draw 800–1,000 running watts with startup surges of 1,200–1,500W — verify your battery station or generator can handle both
- Vent it properly: Single-hose ACs need one opening; dual-hose units require two — sealing around the hose matters as much as routing it
- Don’t overpay: For family camping in humid climates, a 5,000–8,000 BTU portable AC covers most tents

- Powerful Inverter Cooling & Heating Stay comfy year-round with 6100 BTU cooling and 3000 BTU heating. Inverter technology ensures faster cooling, quieter operation, and lower energy bills. It also reduces starting current to protect battery life, making it the perfect high-efficiency solution for all seasons
- Smart App & 6 Versatile Modes Control your climate from anywhere via the smart app! Easily switch between turbo, Cool, Heat, Fan, sleep,and Dry modes. Set schedules and monitor temperatures remotely to ensure your room is perfect before you even arrive
- Maintenance-Free No-Drain System Forget the hassle of emptying water tanks. Our self-evaporating technology recycles moisture to cool the internal coils and vents it out automatically. Enjoy continuous, dry, and cool air with zero interruptions
- 60-Second "Flash" Installation Get cool in seconds! The single-hose design and tool-free window kit allow for instant setup. Simply connect without professional help needed. It's the ultimate plug-and-play comfort for apartments and home offices
- Lightweight & Ultra-Portable Move comfort from here to there! Weighing only 27lbs with a sturdy built-in handle, this compact, battery-free unit is easy to carry. Its sleek design fits anywhere, providing powerful climate control wherever you need it
Last update on 2026-06-15 / Affiliate links / Images from Amazon Product Advertising API

- All-in-One Efficient Cooling: This water-cooled tower fan delivers fast cooling with 90ml/h mist output, acting as a practical portable air conditioners option for home. It works as an efficient swamp cooler with max wind speed up to 7.5m/s, and serves as a perfect fans that blow cold air device for summer. The 700ml large water tank supports long-time use, providing steady and comfortable cooling for your room
- Quiet & Bedroom-Friendly Design: This fan runs at ≤45dB low noise, making it an ideal fan for bedroom for sleeping and working. Its slim body is a space-saving tower fan for bedroom, office and study. It also provides gentle cooling as a quiet portable ac without disturbance, bringing you peaceful comfort all day long
- Portable & Compact Convenience: This 2kg lightweight unit is easy to move, acting as a handy portable ac unit for any indoor space. It needs no complex installation and works as a simple portable air conditioner for apartments, dorms and offices. The compact design saves floor space while offering wide-range cooling for daily use
- Adjustable & Easy Operation: This cooler features 4 wind speeds, 8-hour timer and 45°-90° oscillation for personalized use. It is a flexible air conditioner portable device with touch panel and remote control. The oscillation distributes airflow evenly, making it a high-efficiency cooling fan for home and office
- Wide Application & Energy Saving: This low-power fan is ideal for bedroom, living room and office, helping save electricity bills. It works as an eco-friendly swamp cooler with durable ABS material. Stable performance makes it a practical cooling fan for summer. It combines portability, quietness and efficiency for all-day use
Last update on 2026-06-15 / Affiliate links / Images from Amazon Product Advertising API

- Instant Cooling Mini Air Cooler(3 Speeds + 3 Mist Modes): Take full control of your environment with 3 fan speeds and 3 distinct mist levels. Whether you need a gentle, hydrating breeze or an intensive cooling boost, this cooler adapts to your needs. Pro Tip: Add ice water to the 1500ML tank for an instant, deep-cooling effect—the perfect companion for your desk, bedside, or workspace.
- 1500ML Large Tank – Up to 12H Continuous Cooling: Stop worrying about frequent refills! Our upgraded 1500ML high-capacity water tank delivers up to 12 hours of uninterrupted, refreshing mist. Perfect for long work shifts, overnight sleep, or relaxing study sessions. The transparent water-level window lets you monitor capacity at a glance, ensuring you stay cool from morning to night.
- Exclusive Anti-Leak Design – Keep Your Desk Dry: Unlike ordinary air coolers, this unit features an enhanced sealed tank + anti-drip airflow system that prevents water leakage and condensation. Protect your laptop, keyboard, and workspace while enjoying cool air with confidence.
- Ultra-Quiet (≤35dB) + Smart Timer (2H/4H/8H): Designed for deep focus and sound sleep. Operating at a near-silent 35dB, this cooler provides the ultimate quiet comfort without noise distractions. The built-in 2H/4H/8H timer allows you to set it and forget it, automatically shutting off to save energy while you drift off into a peaceful environment.
- 4-in-1 Multifunctional Cooling System: Experience ultimate comfort with our all-in-one design: a powerful Cooling Fan, Refreshing Humidifier, Circulating Air Cooler, and 7-Color Mood Light. Whether you’re working in a stuffy office, relaxing in your bedroom, or camping outdoors, this versatile unit provides an instant, customizable breeze. Designed for your convenience, all settings—including fan speeds and light modes—can be adjusted effortlessly via the included Remote Control.
Last update on 2026-06-15 / Affiliate links / Images from Amazon Product Advertising API
- EFFICIENT CHARGING: Use the adapter included in the package to charge the power station from 0 to 80% in 2hrs, and use the this power supply to charge other devices at the same time while charging, which could be equivalent to a charging strip , improving the efficiency of uses. It can be charged efficiently with MARBERO's dedicated 30W or 60W solar panel, suitable for outdoor or backyard camping
- COMPACT & PORTABLE DESIGN: Super slim size(6.5 x 4.6 x 3.1 inches), the portable power station is about the size of a basic DSLR; With the strong yet lightweight(3.2lbs) plastic case, plus an ergonomic handle, it's quite suitable for outdoor camping, road trips, backyard camping, home, school, office,etc.
- MULTI-OUTPUT: There are 8 output ports could be used at the same time, and the built-in BMS system ensures stability and safety. The car DC charger output cable(included) will supply power to car refrigerators, vacuum cleaners, and air compressor in emergencies. USB and USB C PD ports are compatible for all the mobile phones(1hr full), tablets(1.5hrs full), laptops(2hrs full), it's an essential unit for road trips. The two AC output ports will power home appliances, such as small TVs, game consoles, projectors, inflatable beds, drones, etc.
- BRIGHT LED LIGHTS: With three levels of brightness, the portable power bank can be used as a large-capacity professional flashlight when needed, which is very suitable for use when the car breaks down, power outage at home, or a tent power supply. The 1st level can be used for 68hrs(light up a small room), the 2nd level can be used for 48hrs(lighting for walking at night), and the 3rd level can be used for 37hrs(light up the living room). In case of emergency, there is SOS flashing mode, use the international SOS frequency to call for help.
- SECURED & ASSURED: The Battery Management System (BMS) allows for voltage control, temperature control and more advanced safety operations. Designed with the cooling vents on the back to help this portable power supply keep the temperature constant, its internal electrical elements will not be damaged by high temperatures. When it comes to short circuit or overload, it automatically shuts off the power to protect itself and the powered devices. By using the cylindrical batteries which meets UL safety standards. UL drop tested (3 drops from 0.9m on any kind of surface).
Last update on 2026-06-15 / Affiliate links / Images from Amazon Product Advertising API

- 𝗣𝗼𝘄𝗲𝗿𝗳𝘂𝗹 𝗢𝘂𝘁𝗽𝘂𝘁 - 4400 peak watts and 3400 running watts, perfect for RV camping and home backup
- 𝗠𝘂𝗹𝘁𝗶-𝗢𝘂𝘁𝗽𝘂𝘁 𝗢𝗽𝘁𝗶𝗼𝗻𝘀 - Includes 2*120V AC ports, 1*12V DC port, 1*RV port
- 𝗟𝗼𝗻𝗴 𝗥𝘂𝗻𝘁𝗶𝗺𝗲: Runs for up to 14 hours at 25% load with ECO mode, 2 gallon fuel tank with fuel gauge, allows you to check fuel levels at a glance, keeping you prepared
- 𝐋𝐨𝐰 𝐍𝐨𝐢𝐬𝐞: Under 72 dBA from 23FT away, this generator provides steady power for your home during a power outage or RV nights
- 𝗟𝗶𝗴𝗵𝘁𝘄𝗲𝗶𝗴𝗵𝘁 𝗮𝗻𝗱 𝗣𝗼𝗿𝘁𝗮𝗯𝗹𝗲: Only 56lbs, easy to move around
Last update on 2026-06-15 / Affiliate links / Images from Amazon Product Advertising API

- 60 Seconds Set Up: You can set up the instant camping tent in under 60 seconds, thanks to its pre-installed poles and seamless construction. The quick and easy installation makes it the ideal companion for beginner campers, allowing you and your family to enjoy more time with nature
- Water-resistant & Windproof: The Camping tent is made from high-quality waterproof fabric. The bottom of the door zipper features a drainage channel, and the base is equipped with a tub-style drainage design. This not only effectively prevents water accumulation and leaks but also keeps insects out. The tent comes with sturdy tent stakes and adjustable guy lines, capable of withstanding winds of up to 35 mph
- Visibility & Ventilation: The tent for camping has mesh windows on all 4 sides, vents at the floor, and a mesh screen design at the ceiling, making the temperature inside the tent cooler in summer. Moreover, the windows and ceiling made of our mesh material let you experience the beautiful starry sky and the charming scenic nature on a quiet summer night
- Spacious Interior & Portable: This tent measures 120 in × 108 in. Industry standard: fits 6 people for sleeping only. Most comfortable: fits 3 people with camping gear. It can accommodate 1 Queen air mattress. Center height is 66 inches. The frame is sturdy yet lightweight at 16.8 lbs for easy portability
- Materials & Functional Design: The tent is equipped with SBS zippers, B3 mesh, and a carbon steel frame with protective sleeves. It includes a power cord entrance for external power access and built‑in mesh pockets for convenient small item storage
Last update on 2026-06-05 / Affiliate links / Images from Amazon Product Advertising API

- MADE FOR SOLAR GENERATOR--100W solar panel comes with a connector (can deliver 25A(max)current), 8mm/5.5*2.5mm/3.5*1.35mm/5.5mm*2.1mm DC adapter/Anderson Cable, compatible with most solar generators/portable power stations on the market. Includes different sizes of connectors perfect to charge our portable power stations as RV camping emergency power.
- HIGH CONVERSION EFFICIENCY--Convert sunlight into electricity using a powerful array of monocrystalline solar cells to generate up to 100W and 20V of on-the-go power. The solar cells receive the most effective sunlight, up to 23.5% efficiency. The built-in smart chip intelligently identifies your device and maximizes its charging speed while protecting your devices from overcharging and overloading, providing more energy and a longer lifecycle than conventional polycrystalline solar panels.
- FOLDABLE & PORTABLE-- Designed for portability and convenience, the 100W solar charger features a lightweight, bifold design with a built-in zippered accessory pouch. Once unfolded, two incorporated kickstands allow for easy positioning on any flat surface to give you instant charge from sunlight. Reinforced grommets provide additional mounting and tie-down capabilities, they can hang on your RV or tent. When folded, it looks like a briefcase easy to transport, and won't take up much room.
- COMBINE TWO PANELS FOR MORE POWER-- 100W solar panel supports series and parallel connections and you can expand your solar panel system to meet every need. Get up to double the power output by pairing your solar panel with another one to shorten charging times for portable power stations.
- DURABLE & WIDE USE: The solar battery charger is made from durable waterproof Oxford cloth and protected by a highly durable layer of ETFE lamination enhancing the cell performance and extending the lifespan of the 20v camping solar panel. Dust resistant, high temperature resistant, ideal for outdoor activities such as camping, hiking, picnics, caravan, RV, car, boat, and unexpected power outages.
Last update on 2026-06-15 / Affiliate links / Images from Amazon Product Advertising API

- ●【High Quality Shade Cloth】: This shade cloth is made of high-density polyethylene high-quality material,which can resist most of the sunlight,and at the same time,it can better keep the air circulation,so that you and your pets and plants can have a cozy and good environment!
- ●【Well-made】: Aluminum shade cloth adopting locking eye weaving technology to avoid opening and jamming phenomenon,the shade cloth adopts 12-pole thickening and encrypted six-lane car lines to increase the tensile strength and sturdiness of the shade net,and each edge of the shade net adopts a reinforced design to avoid opening the lines and preventing tearing,durable.
- ●【Multi-functionality of sunshade netting】: Shade cloth for garden balcony,lawn,swimming pool,dog house,chicken coop,garage, as long as you have the need to use it,it can well meet your needs,well protect your plants,pets from the sun's overheating and create a comfortable environment.
- ●【Features of sunshade netting】: This sunshade netting has the functions of sunshade,heat insulation,moisture proof, anti-freezing, cooling,etc.It is used for aging resistance,tear resistance,durability and easy to install.
- ●【Easy to use】: High reflective tarp, make sure you use the breathable fabric with beautiful color and easy to use,if you have any questions,please feel free to contact us,we will solve the problem for you as soon as possible!
Last update on 2026-06-15 / Affiliate links / Images from Amazon Product Advertising API

- SLEEPING MAT - The 1.25-inch-thick premium foam material offers superior comfort to ensure a restful night of sleep. At 72-inches-long, the cushy foam camping pad will easily fit on extra wide cots designed for people of all sizes.
- LIGHTWEIGHT AND PORTABLE - Weighing 3-pounds and only 9-inches-tall when rolled, the lightweight camping foam pad is convenient to transport to your next adventure. The carrying strap gives this handy piece of camping gear ultimate portability.
- QUALITY MATERIAL - The durable NBR foam has a non-slip texture that prevents the camp mat from moving as you rest, and the waterproof surface will help you keep warm by providing insulation from the cold, wet ground while you sleep.
- VERSATILE USE - This multipurpose foam mat can be used by itself as a floor pad, for car camping, or as a mattress topper in an RV. You can even take it with you to the gym or to a yoga class - the possibilities are endless.
- PRODUCT DETAILS - Material: NBR Foam. Dimensions: (L) 72” x (W) 24” x (H) x 1.25”; Rolled: (L) 24” x (W) 9” x (H) 9”. Weight: 3lbs. Includes Carrying Strap. Color: Dark Blue.
Last update on 2026-06-15 / Affiliate links / Images from Amazon Product Advertising API

- Electrochemical sensor technology detects CO gas
- Easy installation, no wiring needed, detects during a power failure by operating on 2-AA batteries (included); Install on a wall of your home or place on a tabletop
- Green LED indicates power to the carbon monoxide detector, while an 85-decibel alarm & a red LED indicates the presence of carbon monoxide
- Event Memory records the last time carbon monoxide was detected or when the unit was last tested
Last update on 2026-06-15 / Affiliate links / Images from Amazon Product Advertising API
Choosing the Right Type of Tent Air Conditioner
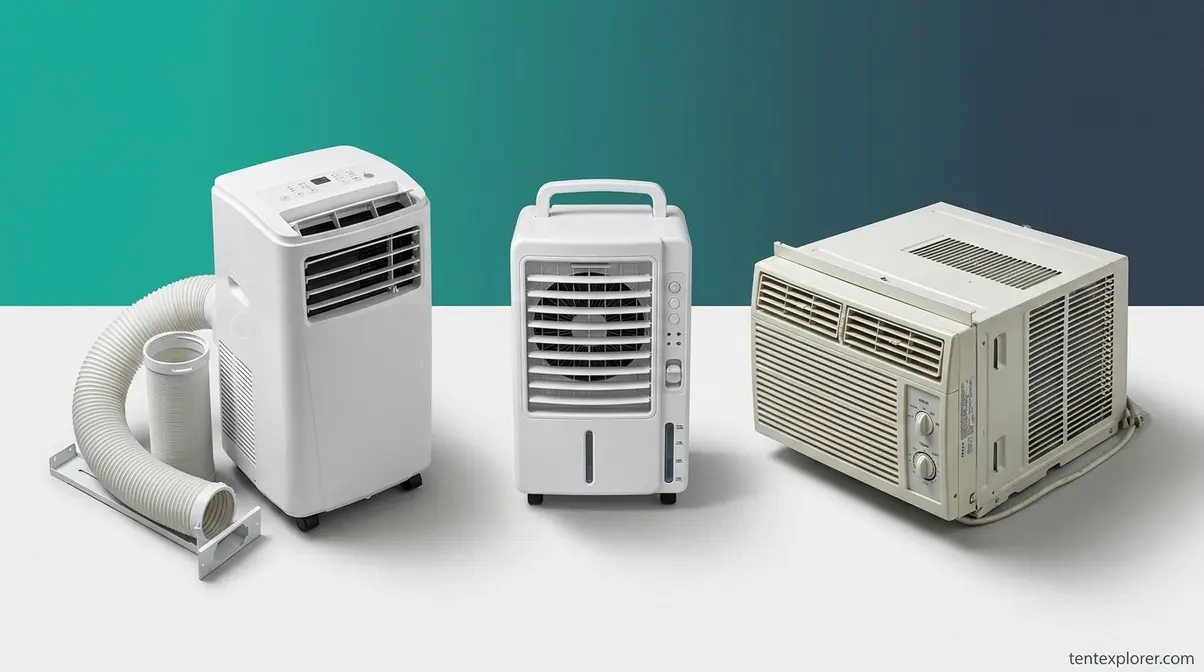
Three types of cooling systems work in tents: portable air conditioners, evaporative coolers, and window AC units. The most important factor in choosing between them isn’t price — it’s your campsite’s humidity. Evaporative coolers lose effectiveness above 60% relative humidity, making them useless in the American South or Pacific Northwest despite their low energy draw. Choose the wrong type and the unit runs all night without meaningfully cooling the tent.
User consensus across camping forums (Reddit r/CampingGear) confirms this is the most common — and most expensive — mistake campers make. The question isn’t just “which AC is cheapest?” It’s “which AC type actually works where I’m camping?”
Portable ACs: True Cooling
A portable air conditioner — often called a portable AC or spot cooler — works via a vapor-compression cycle. It draws warm, humid air from inside the tent, removes both the heat and the moisture, and exhausts the hot air outside through a flexible hose. This is fundamentally different from evaporative cooling: instead of adding moisture to cool the air, a portable AC removes heat and humidity together.
That distinction matters enormously for campers. Portable ACs work in any climate — humid coastal destinations, hot Midwestern summers, rainy Pacific Northwest trips — because they don’t depend on outside air conditions to function.
- Pros in a camping context:
- Cools effectively even in 95°F+ heat with high humidity
- Simultaneously dehumidifies the tent (major comfort factor)
- Works at any campsite with adequate power
- Wide BTU range (5,000–14,000 BTU) covers tents of all sizes
- Cons to plan around:
- Requires 700–1,500 watts of power (generator, power station, or shore power)
- Needs a vent hose routed outside the tent — requires an AC port or partial opening
- Heavier and bulkier than evaporative coolers (most units weigh 30–60 lbs)
- Higher cost ($300–$800+) compared to evaporative alternatives
For a camping-optimized example, the Zero Breeze Mark 2 — a purpose-built camping portable AC weighing 16.5 lbs — shows what’s possible when the form factor is designed for the outdoors. Standard home portable ACs like the Waykar 8,000 BTU unit also work well in tents with proper venting, at a lower price point. According to Department of Energy guidelines for room air conditioners, room air conditioners generally range from 5,500 to 14,000 BTU per hour, and proper sizing is essential because an oversized unit cools the space too quickly without adequately removing humidity (DOE, 2026).
For choosing the best portable tent air conditioner, our hands-on reviews compare top-rated units with real performance data.
Best for: Family camping in any climate, humid summer destinations, car camping where weight isn’t a constraint.
Portable ACs are the most reliable choice — but if you’re camping in a dry, low-humidity region and want to cut your power draw by up to 75%, evaporative coolers offer a compelling alternative.
Evaporative Coolers: Dry Climate Cooling
An evaporative cooler — also known as a swamp cooler — works by pulling warm air through water-saturated pads. Evaporation drops the air temperature by 15–40°F, using only a water pump and a fan. No compressor. No refrigerant. Power draw sits between 50–250 watts, compared to 700–1,500 watts for a portable AC.
The energy savings are real. According to the U.S. Department of Energy guide on evaporative coolers, evaporative coolers use up to 75% less energy than vapor-compression systems and provide a steady stream of fresh air (DOE, 2026). For campers running off a solar battery station, that difference is the gap between one night of cooling and three.
The critical limitation: Evaporative coolers lose effectiveness when outdoor relative humidity exceeds 60%. In humid climates — Florida, the Gulf Coast, the Pacific Northwest — the surrounding air already holds too much moisture for additional evaporation to occur. The unit runs, you hear the fan, but the air temperature barely moves. As the USGS map of effective evaporative cooling regions shows, evaporative coolers work best in the dry areas of the U.S. and are ineffective in highly humid regions (USGS).
Best For / Not For:
| Evaporative Cooler | |
|---|---|
| ✅ Best for | Arizona, Nevada, Utah, Colorado, New Mexico — arid Western states |
| ✅ Best for | Budget-conscious campers; runs on small battery stations |
| ✅ Best for | Dry mountain camping where the air at altitude is naturally low-humidity |
| ❌ Not for | Texas Gulf Coast, Florida, or any destination with summer humidity above 60% |
| ❌ Not for | Coastal Pacific Northwest camping |
| ❌ Not for | Anyone who needs guaranteed cooling regardless of weather |
Best for: Desert camping, dry mountain camping, budget-conscious campers in low-humidity regions.
If you’re camping in a humid region — or want the highest possible BTU output for a large family tent — a window AC unit offers a third option that many campers overlook.
Window AC Units: For Base Camp Setups
A window air conditioner — the same unit used in home windows — is not portable in the traditional sense. It requires a fixed opening: either a tent’s factory-cut AC port or a custom-framed panel. In exchange for that installation complexity, you get the most cooling power per dollar in the market. Units range from 5,000 to 25,000 BTU and typically cost $150–$500.
Window ACs make the most sense in specific camping scenarios. Base camp setups — canvas wall tents, large cabin tents, glamping structures that stay in one location for multiple nights — suit them well. So do campgrounds with shore power, where a continuous electrical supply removes any power-sizing concern.
The tradeoffs are real. Most window units weigh 25–50 lbs. They require a rigid, semi-permanent tent structure with a properly sized AC port. Moving camp daily is impractical. Backpacking is out of the question.
Common use cases include canvas hunting tents and glamping-grade canvas tents from brands like Kodiak Canvas and White Duck Outdoors, which often include factory-cut AC ports. The Waykar 6,000 BTU window unit is a popular choice for mid-size cabin tents — it delivers solid cooling capacity without the premium price of purpose-built camping units.
Best for: Base camp glamping, canvas wall tents, multi-night setups with shore power.
Can you use a regular portable AC in a tent?
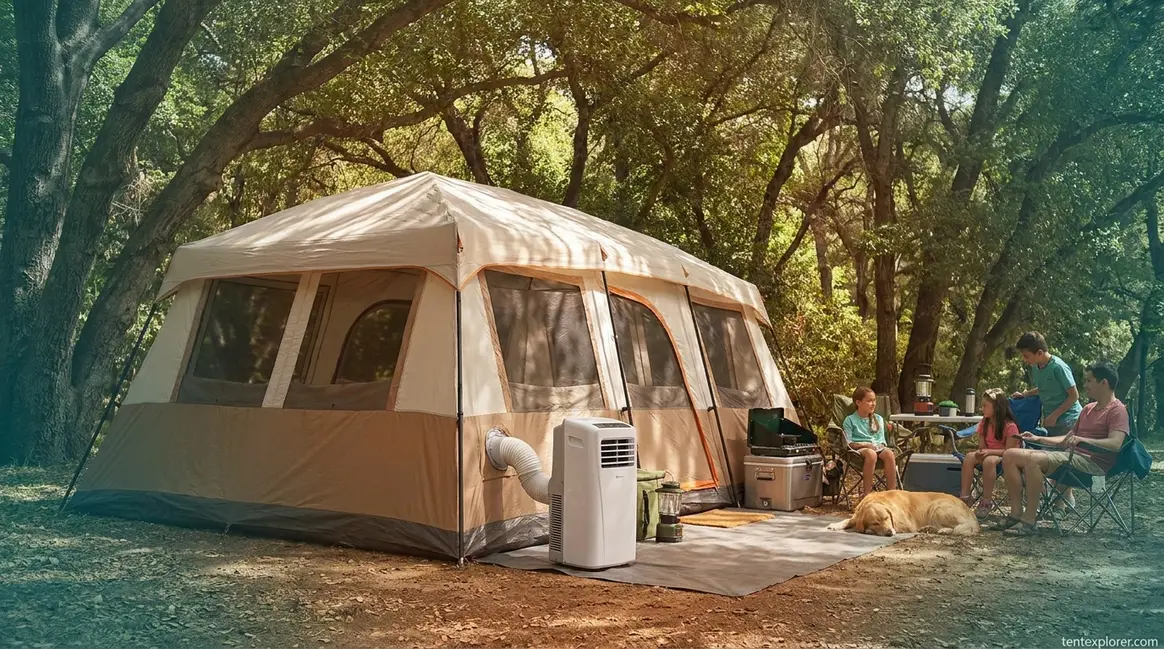
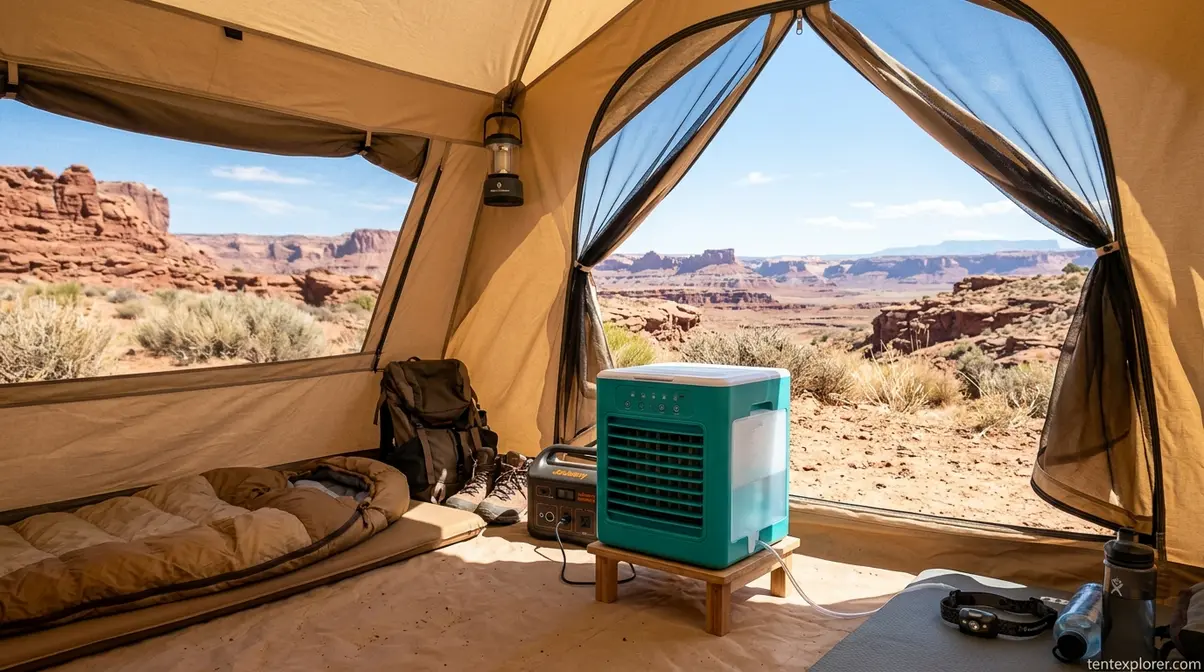
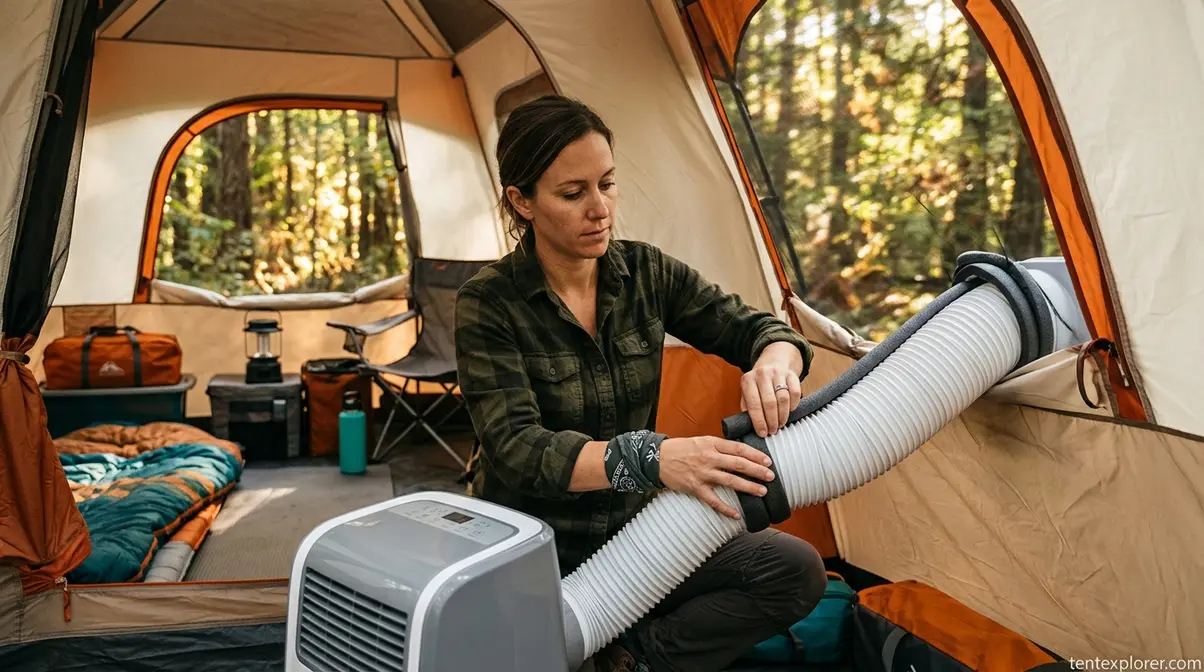
Yes — a regular portable air conditioner works in a tent, and it’s one of the most common tent cooling solutions. The key requirement is venting the hot exhaust hose outside the tent, either through a dedicated AC port (found on many camping tents) or through a slightly unzipped window or door opening. You’ll also need a sufficient power source — most portable ACs draw 700–1,500 watts, which requires a generator, large power station, or campsite hook-up. Seal around the hose with foam tape or fabric to prevent cool air from escaping and hot outside air from entering.
Which Type Is Right for You?
Use this table to finalize your AC type selection before moving on to BTU sizing. The “Best Climate” column is the most important factor — it overrides price and portability for most campers.
| AC Type | Best Climate | Power Draw | Portability | Typical Cost |
|---|---|---|---|---|
| Portable AC | Any (humid or dry) | 700–1,500W | Moderate (30–60 lbs) | $300–$800+ |
| Evaporative Cooler | Dry only (<60% humidity) | 50–250W | High (<15 lbs) | $50–$250 |
| Window AC | Any (with fixed port) | 500–1,500W | Low (25–50 lbs, fixed) | $150–$500 |
Still unsure which specific model to buy? Our hands-on reviews at choosing the best portable tent air conditioner compare the top-rated units with real performance data.
You’ve chosen your AC type. Now it’s time to determine the right size — and this is where most campers make their biggest mistake.
How to Size and Power Your Tent Air Conditioner
Buying a tent AC without calculating BTU first is the single most common — and most expensive — camping gear mistake. British Thermal Unit (BTU) is the standard measure of an AC unit’s cooling power: one BTU is the amount of heat needed to raise the temperature of one pound of water by 1°F (U.S. Energy Information Administration, 2026). For practical purposes, BTU tells you how much heat the AC removes from your tent per hour. The formula in plain English: multiply your tent’s square footage by 20 BTU, then adjust for occupants and sun exposure. Get this number wrong and you’ll either haul an oversized unit for nothing or arrive at camp with a unit that can’t keep up.
This section of our tent air conditioner guide covers the Capacity Layer and Power Layer of The Tent Cooling Stack — the two calculations that prevent the most common gear failures.
Understanding BTU for Tent Cooling
BTU cooling capability is the single number that determines whether your AC can actually cool your tent. According to the U.S. Energy Information Administration definition of a BTU, one British thermal unit is the amount of heat needed to raise the temperature of one pound of water by 1°F (EIA, 2026). In AC terms, a unit rated at 8,000 BTU removes 8,000 units of heat from your tent every hour.
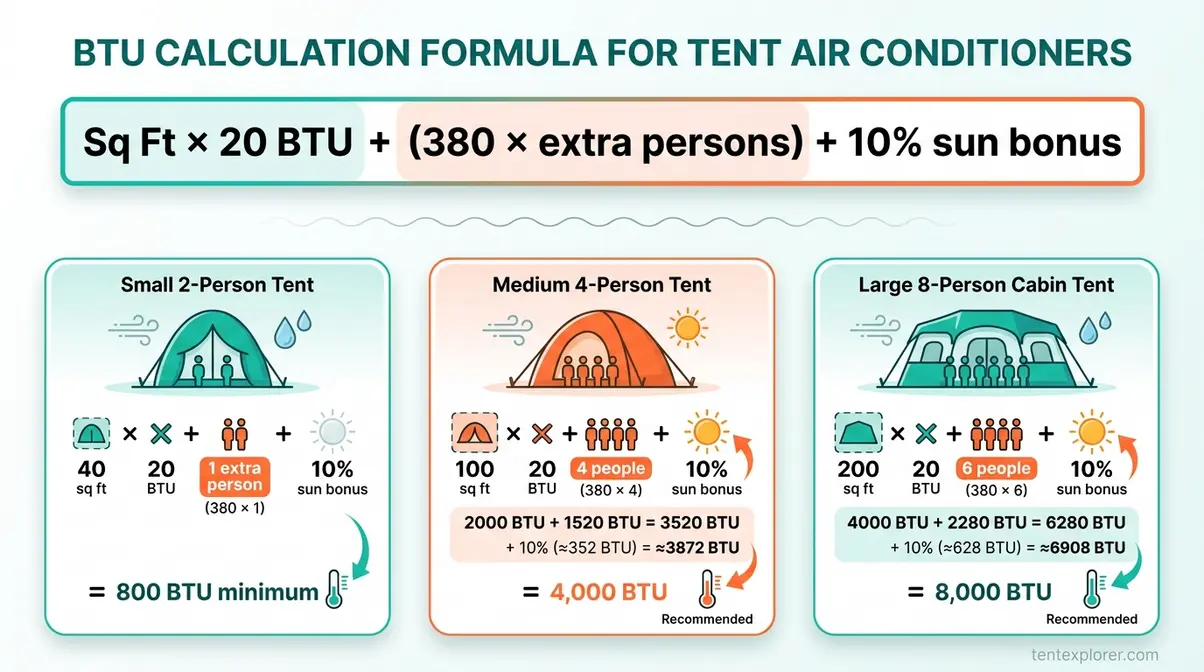
The practical formula:
sq ft × 20 BTU + (380 × additional persons beyond the first)
Add 10% if your tent sits in direct afternoon sun.
Here’s how that works across three real tent sizes:
- 2-person solo tent (~40 sq ft, 1 person, shade): 40 × 20 = 800 BTU minimum
- 4-person family tent (~100 sq ft, 4 people, partial sun): (100 × 20) + (380 × 3) + (3,140 × 0.10) = approximately 3,454 BTU → round up to 4,000 BTU minimum
- 8-person cabin tent (~200 sq ft, 6 people, direct sun): (200 × 20) + (380 × 5) + (5,900 × 0.10) = approximately 6,490 BTU → round up to a 6,000–8,000 BTU unit
Most online guides omit the person-count adjustment entirely, leaving families with an underpowered unit that runs continuously but never reaches target temperature. The 380 BTU per person figure reflects the heat each human body adds to the enclosed space — skip it and your calculation is wrong before you even start shopping.
One important nuance from DOE guidance: slightly oversizing is acceptable and often recommended. An oversized AC cycles on and off but won’t damage the tent. An undersized unit runs continuously, never achieves target temperature, and wears out faster. However, significantly oversizing can reduce humidity removal efficiency — the unit cools the space too quickly without running long enough to pull moisture from the air.
Now apply that formula to your specific tent size using the sizing chart below.
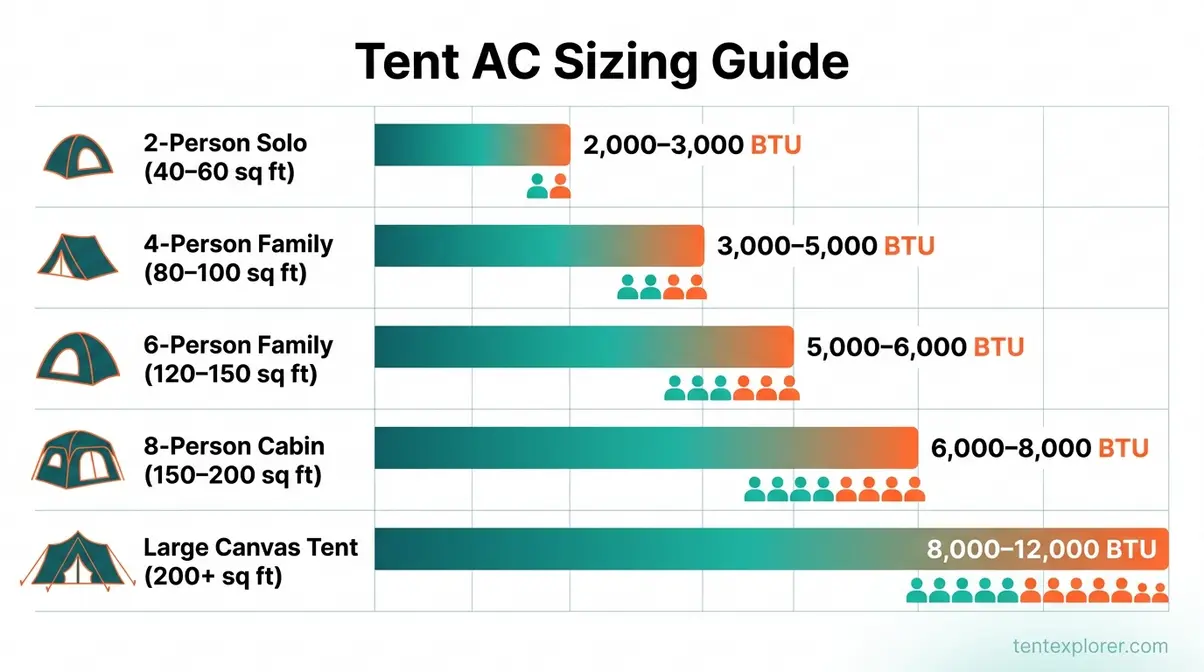
Tent AC Sizing Chart by Tent Size
All BTU values below assume moderate shade. Add 10% for direct afternoon sun exposure and 380 BTU per additional person beyond the first. According to ENERGY STAR room air conditioner sizing guidelines, a 150–250 square foot space requires a 6,000 BTU air conditioner as a baseline (ENERGY STAR, 2026).
| Tent Size | Sq Footage | Occupants | Min BTU | Recommended BTU Range |
|---|---|---|---|---|
| 2-person solo/couple | 40–60 sq ft | 1–2 | 800–1,200 BTU | 2,000–3,000 BTU (with buffer) |
| 4-person family tent | 80–100 sq ft | 3–4 | 2,000–2,800 BTU | 3,000–5,000 BTU |
| 6-person family tent | 120–150 sq ft | 5–6 | 3,200–4,200 BTU | 5,000–6,000 BTU |
| 8-person cabin tent | 150–200 sq ft | 6–8 | 4,000–5,560 BTU | 6,000–8,000 BTU |
| Large canvas/wall tent | 200+ sq ft | 8+ | 5,500+ BTU | 8,000–12,000 BTU |
For a deeper look at how these numbers translate to specific models, see our guide to understanding tent AC sizing and power options.
With your BTU target in hand, the next question is: how do you actually power a tent AC when you’re not plugged into the grid?
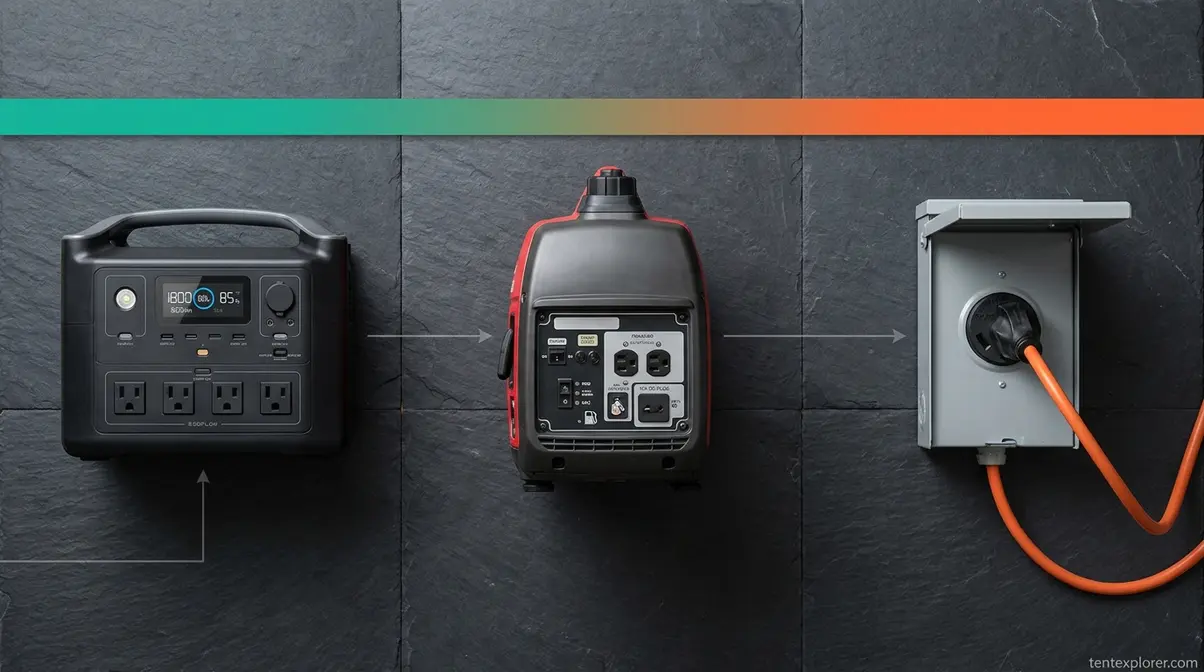
Battery Stations vs. Gas Generators
Matching your AC to the right power source is as important as matching it to the right BTU. An 8,000 BTU portable AC draws 800–1,000 running watts with startup surges reaching 1,200–1,500 watts (Bryan Hindman Electric, 2026) — a figure that eliminates many underpowered battery stations from consideration before you’ve even left the driveway.
Portable Power Stations (battery stations) are quiet, emissions-free, and rechargeable via solar panels or a car outlet. They’re ideal for campgrounds with noise restrictions. Capacity is measured in watt-hours (Wh): a 1,500Wh station running a 700W AC can theoretically run approximately 2.1 hours (1,500 ÷ 700), but real-world runtime is 1.5–1.8 hours due to inverter efficiency losses. For overnight cooling, pair a large station (2,000Wh+) with solar recharging during the day. The EcoFlow Delta Pro (3,600Wh) and Jackery Explorer 2000 Pro are common choices for tent AC use.
Gas generators offer higher capacity (2,000–7,000W) and can run an AC continuously for 8+ hours on a full tank. The tradeoffs: noise (50–80 dB), fuel storage requirements, and bans at many campgrounds. They’re best for remote off-grid camping where solar isn’t viable.
Shore power (electric hook-up) is available at most developed campgrounds via 30-amp or 50-amp service. The simplest and most reliable option — plug in and run the AC at full capacity indefinitely. Verify your campsite’s amperage before booking; most ACs need at least 15 amps at 120V.
⚠️ Generator Safety — Critical: Never operate a gas generator inside a tent, garage, or within 20 feet of any enclosed space. Carbon monoxide (CO) is colorless, odorless, and can be fatal within minutes. Always run generators outdoors with exhaust pointed away from the campsite. According to CPSC carbon monoxide safety warnings for portable generators, generators must be operated outside only, at least 20 feet away from homes or enclosed spaces (CPSC, 2026). The Wisconsin Department of Health Services generator safety guidelines reinforce this: never use a generator in an enclosed area, including tents, campers, or boats — always run it outside, at least 20 feet away (WI DHS).
For a visual walkthrough of power setup options, watch our video guide below — it covers battery station sizing and generator placement in real campsite conditions.
If you’re planning to use a portable power station or solar panels, one more calculation will save you from buying an undersized battery — matching your AC’s wattage to your station’s output.
Solar Generator Compatibility Guide
The detail most campers miss: startup surge wattage, not running wattage, is what determines whether your power station can handle your AC. Most portable ACs draw 1.5–2× their running wattage at compressor startup. A unit rated at 800W running draw may surge to 1,200–1,500W for the 2–3 seconds it takes the compressor to engage. Your power station’s inverter must handle that surge, not just the steady-state draw.
According to the Oklahoma State University explanation of cooling capacity, one ton of cooling capacity equals 12,000 BTUs — a key reference for matching generator output to AC cooling load (OSU Extension). Use this wattage reference table before purchasing a power station:
| BTU Rating | Running Watts | Startup Surge | Min. Power Station |
|---|---|---|---|
| 5,000 BTU | 400–500W | 800–1,000W | 1,500W inverter |
| 8,000 BTU | 800–1,000W | 1,200–1,500W | 2,000W inverter |
| 12,000 BTU | 1,000–1,200W | 1,800–2,200W | 2,500W inverter |
Note: Values are approximate — always verify with your specific unit’s spec sheet before purchasing.
The EcoFlow Delta 2 (2,400W surge capacity) handles most 8,000 BTU units comfortably; a basic 1,000W station cannot. A practical example: a 400W solar panel array can recharge a 1,500Wh station in approximately 4 hours of peak sun. Run the AC at night to draw down the battery, recharge during the day via solar — this off-grid cooling loop makes multi-night camping with AC genuinely viable.
You’ve got your BTU target and your power source confirmed. Now it’s time to make sure your AC actually works once it’s in the tent — which means getting the installation right.
Tent AC Installation and Efficiency Tips
Proper installation determines whether your tent air conditioner cools effectively or just runs loudly without results. The two most critical factors are venting the exhaust correctly and sealing the tent openings around it. Even a perfectly sized, well-powered unit will underperform if hot exhaust air leaks back inside the tent.
This is where The Tent Cooling Stack’s three layers come together in practice. You’ve chosen the right type (Climate Layer), calculated your BTU (Capacity Layer), and matched your power source (Power Layer). Installation is where those decisions pay off — or don’t.
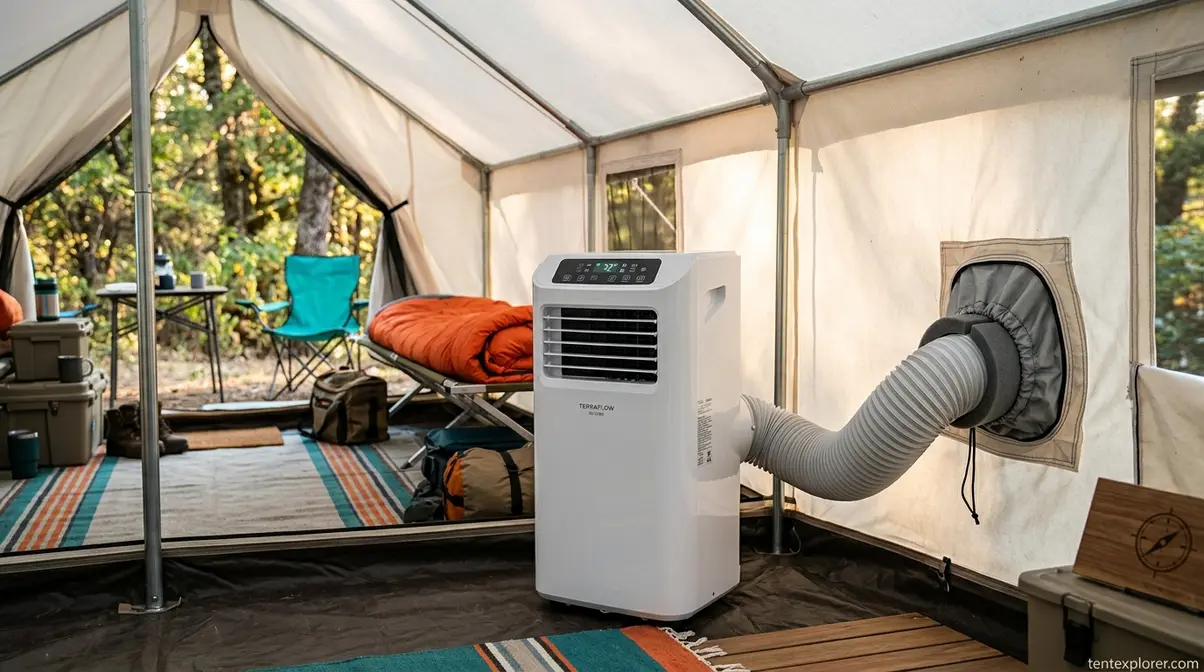
How to Vent a Portable AC in Your Tent
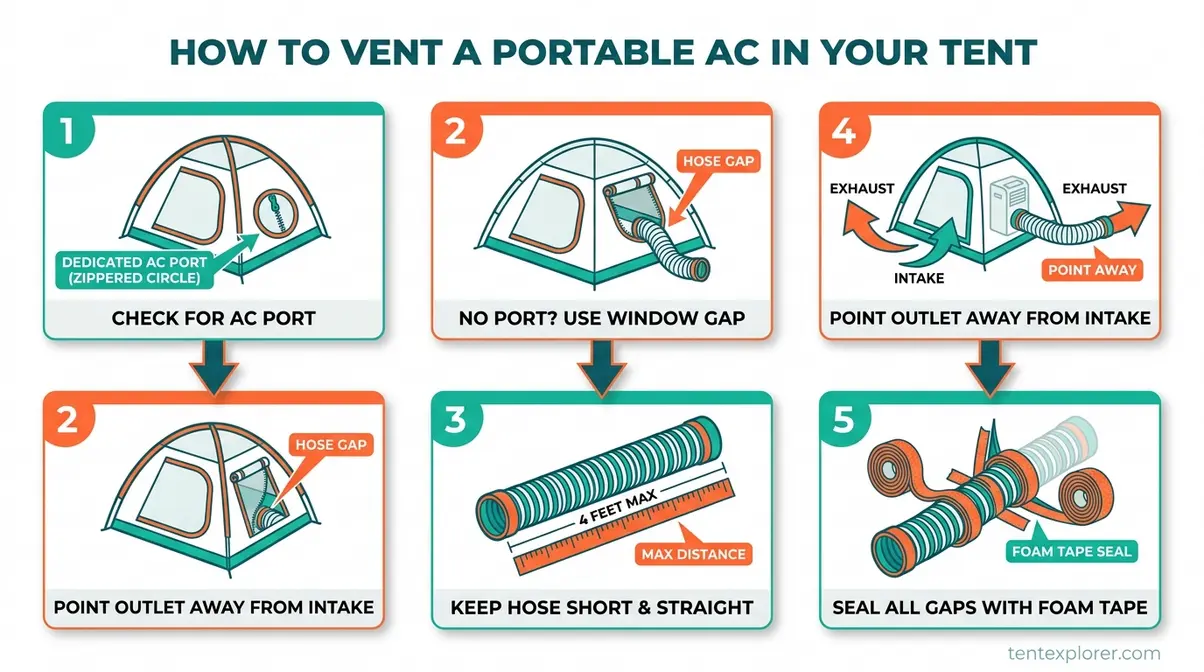
Whether you have a single-hose or dual-hose unit (more on that below) affects how many openings you’ll need. Either way, follow these steps to vent correctly:
- Check for a dedicated AC port. Many camping tents — including models from Ozark Trail, Coleman Sundome, and Kodiak Canvas — include a zippered, reinforced opening (typically 5–6 inches in diameter) designed for exactly this purpose. If yours has one, route the exhaust hose through and zip the port closed around it.
- If no AC port exists, partially unzip a window or door — just enough to fit the exhaust hose (typically 5–6 inches). Route the hose through the gap. Seal around the hose with foam pipe insulation, foam tape, or a folded towel to minimize air exchange between inside and outside.
- Keep the hose short and straight. Most portable AC exhaust hoses run 5–7 feet. Keep the unit within 4 feet of the vent opening. Every bend and every additional foot of hose reduces airflow efficiency — a kinked or extended hose is one of the most common causes of poor cooling performance.
- Point the hose outlet away from the tent and away from the AC’s air intake. Hot exhaust air recirculating back into the intake is the number-one cause of “AC running but not cooling” complaints in camping forums. Reposition the hose outlet if you notice the unit running continuously without achieving target temperature.
- For window AC units in tents with AC ports: Mount the unit in the port with the condenser side facing out. Seal any gaps around the unit frame with foam weatherstripping — even small gaps significantly reduce efficiency.
Condensation note: Place a small towel or shallow tray under the AC drain port to catch condensate. For a full guide to managing moisture inside your tent, see our resource on optimizing tent ventilation for comfort.
The number of hose openings you need depends on whether your unit is single-hose or dual-hose — a distinction that significantly affects cooling efficiency.
Single-Hose vs. Dual-Hose Portable ACs
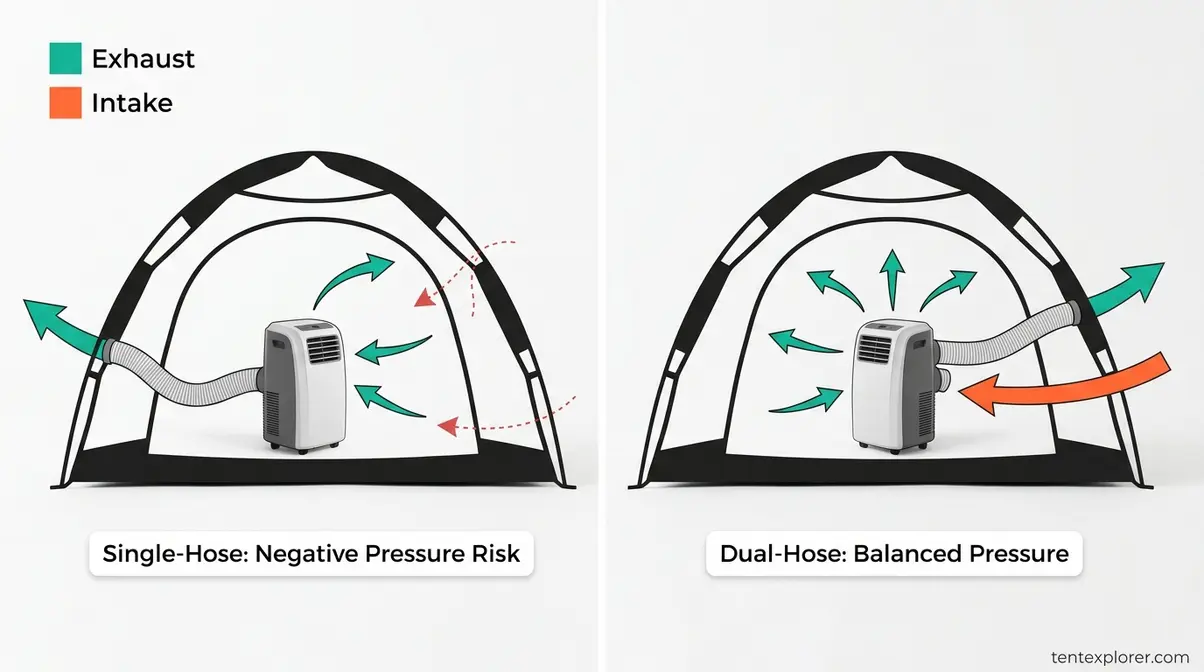
This is the direct answer to the question that started this guide: “one vent or two vents?”
A single-hose portable AC uses one hose for exhaust. It draws air from inside the tent, cools it, then exhausts the hot air outside. The problem: drawing air out creates slight negative pressure inside the tent, which can pull warm outside air in through any unsealed gap. Single-hose units are more common, lighter, and cheaper ($200–$500). They work well in small, well-sealed tents.
A dual-hose portable AC uses two hoses — one for exhaust (hot air out) and one for fresh air intake (outside air in). This maintains pressure balance inside the tent, eliminates the negative pressure problem, and improves efficiency. Dual-hose units are larger, heavier, and more expensive ($400–$800+). They’re the better choice for larger tents where sealing every gap is impractical.
Practical recommendation: For tents under 100 sq ft that you can seal reasonably well — single-hose is fine. For large cabin tents, canvas wall tents, or any setup where you can’t seal every zipper gap: dual-hose is worth the premium. The efficiency difference becomes most noticeable in peak afternoon heat when outside air temperature is highest.
For more on managing moisture that builds up in a well-sealed tent, our guide to preventing condensation in your camping tent covers the practical steps.
Beyond venting, five additional setup choices can dramatically improve how effectively your AC cools the tent — even in extreme heat.
5 Tips to Maximize AC Efficiency
User consensus across camping forums consistently identifies these five factors as the difference between a comfortable night and a frustrating one. According to Oklahoma State University’s explanation of cooling capacity, cooling efficiency depends on minimizing heat gain from all sources — solar radiation, occupant body heat, and air infiltration (OSU Extension).
- Pitch in the shade. Direct afternoon sun can increase a tent’s interior temperature by 20–30°F. Positioning under trees or on the shaded side of a campsite dramatically reduces the cooling load your AC has to overcome — and extends battery runtime if you’re running off a power station.
- Use a reflective tarp overhead. A silver emergency mylar tarp or reflective sunshade suspended above the tent reflects solar radiation before it heats the tent fabric. Cost: $10–$30. This is one of the highest-impact, lowest-cost efficiency upgrades available.
- Insulate the floor. Foam camping mats — like Therm-a-Rest Z Lites — under sleeping bags and gear reduce heat conducted up from the ground. Dark soil and asphalt camping pads absorb and radiate significant heat upward through the tent floor, especially after a full day of sun exposure.
- Pre-cool before sleeping. Run the AC 30–45 minutes before bedtime to bring the tent temperature down before you get in. Body heat adds approximately 380 BTU per person to the heat load — pre-cooling the space means the unit only has to maintain temperature rather than fight the combined heat of the tent and its occupants simultaneously.
- Seal all gaps. Foam pipe insulation, fabric tape, or a purpose-made AC window seal kit around any hose opening or vent gap eliminates warm air infiltration. Every unsealed inch allows cool air to escape and hot air to enter — sealing the exhaust hose opening with foam tape or fabric reduces cool air loss by preventing hot outside air from being drawn back into the tent.
Follow these five steps and you’ll get the maximum performance from your unit. But even well-installed ACs occasionally run into problems — here’s how to diagnose and fix the most common ones.
Troubleshooting Common Tent AC Problems
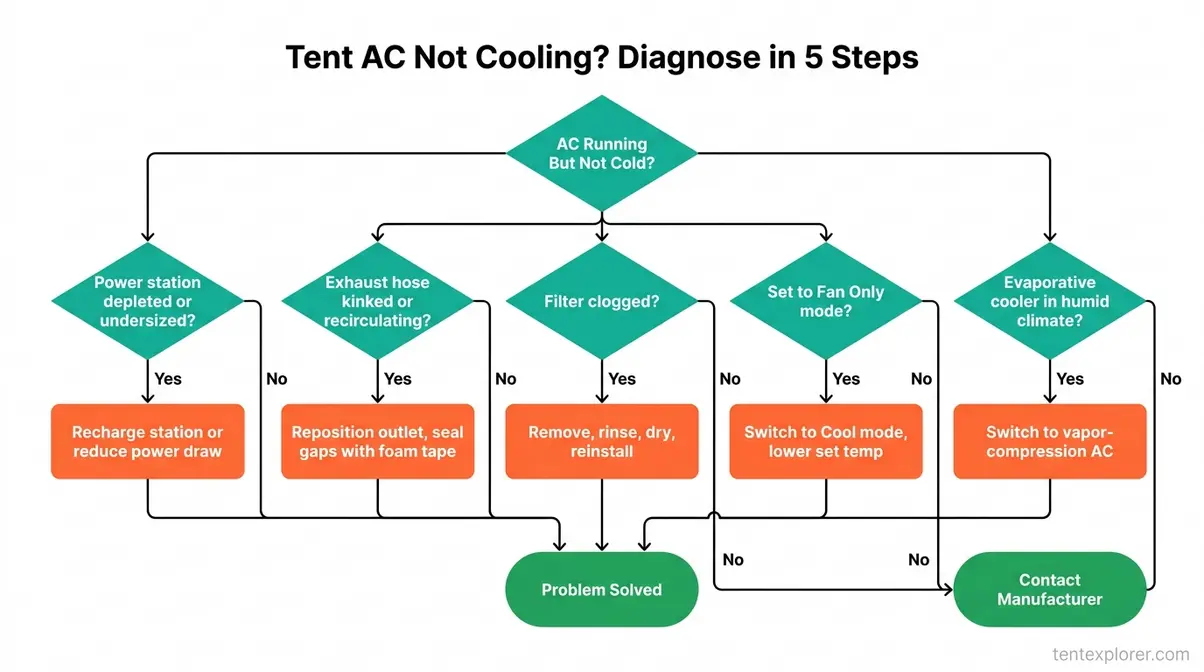
Most tent AC problems fall into three categories: insufficient power, a blocked or recirculating exhaust, and a clogged filter. Diagnosing which layer of The Tent Cooling Stack failed — power, installation, or the unit itself — takes less than five minutes with the checklist below.
The insight that most competitor guides miss: insufficient power is the most commonly overlooked cause of poor AC performance. Campers assume the AC is broken when their power station is simply undersized or near depletion. A unit running on insufficient wattage will hum and blow air — but the compressor won’t operate at full capacity, so the output air isn’t meaningfully cold.
AC Isn’t Blowing Cold Air: Fixes
If your air conditioner isn’t blowing cold air, work through these causes in order — most are fixable in under five minutes at the campsite.
Cause 1 — Insufficient power: The power station or generator is undersized or depleted. Symptom: AC turns on, compressor hums, but output air is only slightly cooler than ambient. Fix: Check your AC’s running wattage against your power station’s current output. If the station is near its limit, the compressor can’t run at full capacity. Solution: recharge the station, reduce other power draws, or switch to a lower-BTU unit.
Cause 2 — Exhaust hose recirculation: Hot exhaust air is being drawn back into the AC intake. Symptom: Unit runs continuously, never reaches target temperature. Fix: Reposition the hose outlet so it points away from the intake side of the unit. Seal any gaps around the hose opening in the tent wall with foam tape.
Cause 3 — Clogged air filter: Most portable ACs have a washable filter that collects dust and debris. A clogged filter restricts airflow dramatically. Fix: Remove the filter, rinse with water, let dry completely, reinstall. Check this first — it takes two minutes and resolves the problem more often than any other cause.
Cause 4 — Wrong mode or settings: AC set to “fan only” mode instead of “cool” mode, or temperature set higher than the current tent temperature. Fix: Verify settings on the control panel. This sounds obvious — but it’s the most frequently reported “problem” in camping forums.
Cause 5 — Evaporative cooler in humid conditions: If you’re using an evaporative cooler in a high-humidity environment, it physically cannot cool the air further — the surrounding air is already saturated with moisture. Fix: Switch to a true vapor-compression AC. No amount of troubleshooting will make an evaporative cooler work in Florida in August.
Beyond the “not cooling” issue, two other problems come up frequently — water leaks and units that won’t power on at all.
Other Common Tent AC Problems
Problem 1 — AC is leaking water: Some condensate dripping from the drain port is normal — route it outside the tent with a small tube or place a shallow tray underneath. Excessive water pooling on the tent floor usually means the unit is tilted (portable ACs require a level surface to drain correctly) or the drain port is blocked. Fix: Level the unit on a firm, flat surface; clear the drain port with a thin wire or pipe cleaner.
Problem 2 — AC won’t turn on: Check the power source first — is the battery station charged, the generator running, the shore power connected? Then check the circuit breaker on the AC unit itself; many portable units have a reset button on the power cord or control panel. Verify the power cord is fully seated at both ends. If the unit still won’t start, a thermal overload protection trigger may have activated — the unit shuts itself off after overheating or a voltage spike. Fix: Unplug for 10 minutes to allow the thermal protection to reset, then retry.
Problem 3 — AC is very loud or rattling: Loose panels, a vibrating exhaust hose, or an unlevel surface cause most noise issues. Fix: Tighten any loose panels by hand, secure the exhaust hose with a strap or velcro tie, and place the unit on a flat, firm surface. A foam camping mat or small wooden board under the unit prevents vibration from transferring to the tent floor.
If the unit checks out on all these points, use the quick checklist below before concluding it’s a hardware failure.
Quick Troubleshooting Checklist
Run through this list before packing up or calling for warranty support. Most tent AC problems resolve within the first five items:
- Is the power source running and supplying sufficient wattage?
- Is the AC set to “cool” mode — not “fan only”?
- Is the set temperature lower than the current tent temperature?
- Is the air filter clean? (Remove and inspect — rinse if dusty)
- Is the exhaust hose fully connected at both ends and free of kinks?
If those basic checks pass but the unit is still struggling, continue with these environmental and hardware verifications:
- Is the exhaust outlet pointing away from the AC’s air intake?
- Is the hose opening in the tent sealed around the hose with foam or fabric?
- Is the unit level? (Tilting causes water leaks and reduces efficiency)
- Have you checked the unit’s circuit breaker or reset button?
- If using an evaporative cooler: is the outdoor humidity below 60%?
If all 10 checks pass and the unit still fails, contact the manufacturer — most portable ACs carry a 1-2 year warranty that covers compressor and electrical failures.
Before you buy any tent AC, there are a few safety rules and real-world limitations worth knowing — especially if you’re planning to use a gas generator.
Tent AC Safety and Limitations
Generator Safety Rules for Campers
Carbon monoxide (CO) is colorless, odorless, and lethal. Gas generators produce CO continuously while running, and the gas accumulates rapidly in enclosed or semi-enclosed spaces. According to CPSC carbon monoxide safety warnings for portable generators, generators must be operated outside only, at least 20 feet away from homes or enclosed spaces — with exhaust directed away from any opening (CPSC, 2026).
⚠️ Carbon Monoxide Warning: Never operate a gas generator inside a tent, under a rain tarp, in a garage, or within 20 feet of any enclosed space. CO is odorless and can be fatal within minutes. Always run generators outdoors with exhaust pointed away from the campsite. Install a battery-operated CO detector inside the tent if using any combustion-powered equipment nearby.
Three specific mistakes campers make — and the reasons each one is dangerous:
- Running the generator just outside the tent door. Even one to two feet outside the entrance is still too close. CO drifts with air currents and can reach lethal concentrations inside the tent before any occupant notices. The 20-foot rule exists for this reason.
- Leaving the generator running overnight while sleeping. CO accumulates while you sleep and you won’t wake up to the smell — because there is none. If you need overnight power, use a battery station. Reserve the generator for daytime recharging.
- Using the generator under a tarp or rain shelter. Any overhead cover — even a simple tarp — creates enough of an enclosure to trap CO. A tarp shelter counts as an enclosed space for CO purposes.
When a Tent AC Isn’t the Right Fit
Knowing when not to use a tent AC saves you from hauling unnecessary gear — and from buying the wrong solution for your trip.
Backpacking and ultralight camping: Even the lightest camping-optimized portable AC (the Zero Breeze Mark 2 at 16.5 lbs) is impractical for multi-day backpacking. The power requirements alone rule it out. Better alternative: a battery-powered personal fan paired with moisture-wicking sleeping gear and a well-ventilated tent design.
High-altitude camping above 8,000 feet: Temperatures drop significantly at night even in summer at elevation. AC is unnecessary — and the weight and bulk are actively counterproductive. Better alternative: an insulating sleeping bag rated for the overnight low temperature.
Campgrounds with strict noise or generator rules: Many national parks, primitive sites, and dispersed camping areas prohibit generators and restrict electrical noise. Check campground rules before purchasing any AC setup. Better alternative: an evaporative cooler (near-silent at 50W) or a high-CFM battery fan for locations where you know humidity stays low.
Are tent air conditioners worth it?
For camping in hot or humid climates, a tent air conditioner is absolutely worth the investment — it transforms a miserable, sleep-depriving experience into a genuinely comfortable one. The value is highest for families with young children, anyone sensitive to heat, and campers who visit warm destinations repeatedly each season. The main costs are the unit itself ($200–$800+), a power source ($300–$1,500 for a quality power station), and the logistical effort of transport. For occasional summer camping in mild climates, a high-CFM battery fan may deliver 80% of the comfort at 10% of the cost — making tent AC most worthwhile for frequent hot-weather campers.
Frequently Asked Questions
What size air conditioner do I need for my tent?
The right tent AC size depends on your tent’s square footage — plan for 20 BTU per square foot as your baseline (according to ENERGY STAR guidelines). A small tent up to 100 sq ft needs 2,000–5,000 BTU; a medium tent of 100–200 sq ft needs 5,000–10,000 BTU; large tents over 200 sq ft need 10,000 BTU or more. Add 380 BTU per person beyond the first, and increase your target by 10% if the tent sits in direct afternoon sun. When in doubt, size slightly up — an overpowered unit cycles on and off, while an underpowered one runs constantly and never cools the tent.
How do you power an air conditioner while camping?
You can power a camping air conditioner using a portable power station (battery station), a gas generator, or a campsite electric hook-up (shore power). Portable power stations are the quietest option and can be recharged via solar panels during the day; gas generators provide the most capacity but must be operated at least 20 feet from any tent. Shore power at developed campgrounds is the simplest solution — just plug in and run the AC at full capacity. Always match your AC’s wattage to your power source’s continuous output rating, accounting for startup surge which can be 1.5–2× the running wattage.
How do you vent a portable air conditioner in a tent?
Venting a portable AC in a tent is done by routing the exhaust hose through a dedicated AC port, or through a partially unzipped window or door opening. Tents with built-in AC ports offer the easiest and most airtight solution; if yours lacks one, route the hose through the smallest possible gap and seal around it with foam tape, pipe insulation, or fabric. Keep the hose as straight and short as possible — every bend reduces airflow efficiency. Point the exhaust outlet away from the tent and away from the AC’s air intake to prevent hot air recirculation, which is the most common cause of poor cooling performance.
Prices and features verified as of April 2026.
For campers heading into hot or humid conditions, choosing the right tent air conditioner comes down to three decisions — and The Tent Cooling Stack makes each one systematic. Start with your climate to pick the right AC type, calculate your BTU needs using the square footage formula (sq ft × 20 BTU + 380 per person), then match your power source to the unit’s wattage requirements — including startup surge. Get all three right, and a comfortable night’s sleep at any campsite is entirely achievable.
As outlined throughout this tent air conditioner guide, The Tent Cooling Stack answers every part of the question that opened this discussion: type (Portable AC for any climate, evaporative for dry regions), BTU (use the sizing chart), power (battery station or generator at the right wattage), and venting (single-hose for small sealed tents, dual-hose for larger setups). That question — “portable ac unit? Pros/cons? One vent or two vents?” — has a specific, calculable answer. Now you have it.
Ready to see which specific models deliver the best BTU-per-dollar for camping? Our hands-on reviews at TentExplorer compare the top-rated tent ACs by cooling performance, noise level, and portability — so you can order with confidence before your next trip.
