This blog post may contain affiliate links. As an Amazon Associate I earn from qualifying purchases.
📋 Table of Contents
- Why Tent Ventilation Matters
- The Science of Tent Condensation
- Heat Buildup vs. Moisture
- Camping Tent Ventilation
- Built-In Ventilation Features
- How to Create a Cross-Breeze
- Managing Your Rainfly
- Should You Leave Vents Open?
- Using Battery-Powered Fans
- Site Selection & Moisture Control
- Grow Tent Ventilation & CFM Math
- Four Core Ventilation Components
- Calculating the Right Fan Size
- Where to Place a Carbon Filter?
- Installing Your Fan and Filter
- Understanding Negative Pressure
- Passive vs. Active Intake
- Common Ventilation Mistakes
- 5 Common Ventilation Mistakes
- When to Use Different Approaches
- Frequently Asked Questions
- Why Does My Tent Get Wet Inside?
- How to Calculate Grow Tent CFM?
- How to Achieve Negative Pressure?
- Your Ventilation Action Plan
You wake up at 5 AM. The tent ceiling is dripping. Your sleeping bag is clammy. Or maybe you check your grow tent and find your plants drooping under trapped heat and humidity — just when you thought you had everything dialed in. Setting up a fruiting chamber and not knowing where to start is one of the most common frustrations we hear from first-time growers.
This isn’t bad luck. It’s a predictable physics problem that gets worse every hour you ignore it. Wet gear, damaged plants, poor sleep, and failed harvests all trace back to the same root cause: trapped air with nowhere to go.
By the end of this tent ventilation guide, you’ll understand exactly why air gets trapped, how to fix it with your tent’s existing features, and — if you’re growing indoors — how to calculate the precise fan size your space needs. We’ll cover camping tent fundamentals first, then move into grow tent CFM math and step-by-step system setup.
Proper tent ventilation prevents condensation, heat buildup, and humidity problems — whether you’re camping in the woods or growing plants indoors. This tent ventilation guide shows you how one physics principle solves both.
- The Chimney-to-CFM Framework: Hot air rises and exits through high vents; cool air enters from below — this single principle governs both camping and grow tent ventilation
- For camping: Open all high and low vents simultaneously, create a cross-breeze, and always leave vents cracked — even at night in cold weather
- For grow tents: Your baseline CFM equals your tent’s cubic footage (L × W × H); add a 25% buffer for each additional component (carbon filter, long ducting, 90° bends)
- The #1 mistake: Sealing the tent shut to stay warm or control odors — this traps moisture and CO₂, creating worse conditions than the weather outside
Why Tent Ventilation Matters
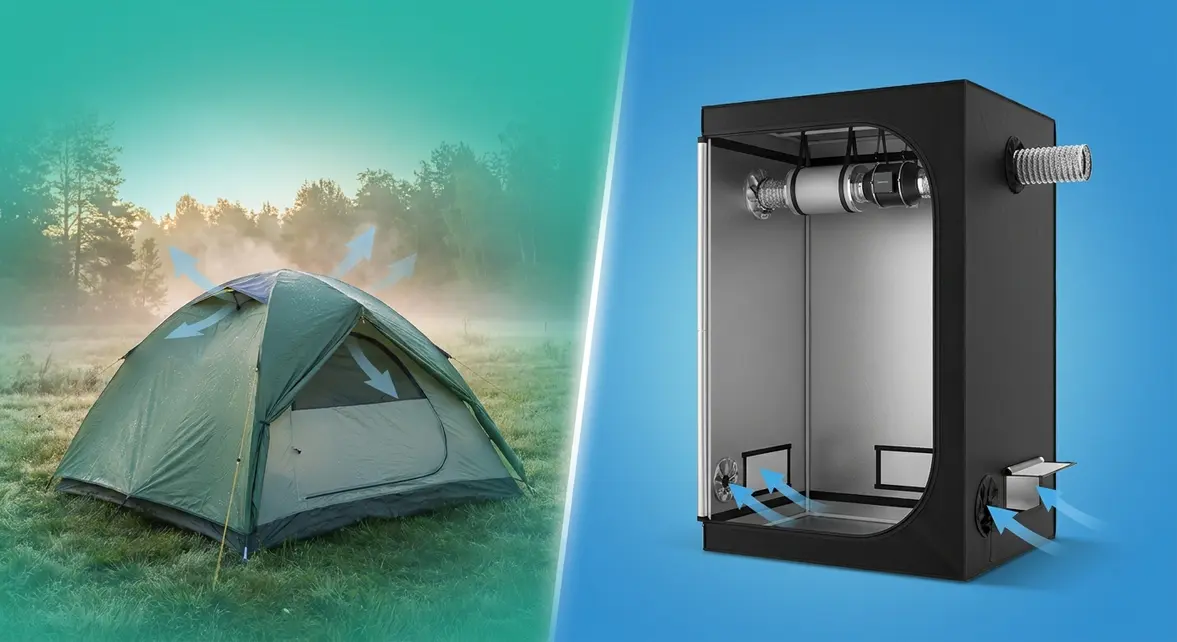
Tent ventilation works on a simple principle: hot air rises and exits through openings at the top while cooler, fresher air enters from below. This applies equally to a three-season backpacking tent and a 4×4 grow tent. When you understand this mechanism, every ventilation decision — where to open vents, where to place fans, how to size ducting — becomes logical rather than guesswork.
Every tent — camping or grow — ventilates by the same principle: hot air rises and exits from the top while cooler, fresher air enters from below.
The Science of Tent Condensation
Tent ventilation problems almost always start with condensation — the water droplets that form when warm moist air meets a cold surface. Here’s exactly why it happens.
When you sleep, your body and breath release warm, moist air at roughly 37°C (98.6°F). The tent fabric, meanwhile, cools down to near-outdoor temperature overnight. When that warm breath contacts the cold inner wall, the moisture drops out of the air — just like steam on a bathroom mirror after a hot shower. Same process, same physics.
The scale of the problem surprises most campers. Multiple outdoor gear sources, including SectionHiker and Redverz Gear, cite the widely used estimate that a single sleeping adult exhales approximately 1 liter of water vapor per night. Two people in one tent? That’s roughly 2 liters of moisture with nowhere to go.
A sealed tent makes this dramatically worse. Without airflow, moisture accumulates faster than any tent fabric can manage. By morning, that vapor has condensed on every cold surface — the ceiling, the inner walls, your gear. The result is the dripping tent ceiling you woke up to.
As the diagram below shows, warm air rises and contacts the cooler tent fabric, condensing into droplets that run down the walls.

Princeton University Outdoor Action advises brushing all snow off clothes and boots before entering a tent to significantly reduce interior condensation and water buildup — a practical illustration of how even small moisture sources compound quickly in a sealed space.
Now that you know why condensation forms, it’s worth understanding the second problem: heat. Both condensation and heat buildup share the same solution — and it’s simpler than you might think.
Heat Buildup vs. Moisture
A sealed tent acts like a small greenhouse. As this tent ventilation guide explains, tent fabric traps your body heat, and in grow tents, lights and equipment add even more. Community reports from grow tent forums consistently note that a sealed tent runs about 10°F warmer than the surrounding room — and that gap widens fast when ventilation is poor.
This is where the Chimney-to-CFM Framework — a unified mental model that applies the same airflow physics to both camping and grow tent ventilation — solves both problems at once. Hot air is less dense than cool air, so it naturally rises to the top of any enclosed space. Create an opening at the top (exhaust) and an opening at the bottom (intake), and air flows continuously — no fan required. This is the chimney effect.
Think of a fireplace. Hot smoke rises and exits the flue while cooler room air is drawn in at the base to replace it. Your tent works exactly the same way. In a camping tent, you trigger this by opening high vents and low doors simultaneously. In a grow tent, you install an exhaust fan at the top and open intake vents at the bottom. Same physics, different scale.
University of Florida IFAS Extension confirms that effective ventilation involves actively removing interior air and replacing it with outside air to control both temperature and humidity — the exact mechanism the Chimney-to-CFM Framework applies to tents.
With the Chimney-to-CFM Framework in mind, let’s apply it to the first use case: keeping a camping tent dry and comfortable.
Camping Tent Ventilation
Proper camping tent ventilation requires simultaneously opening high vents and low entry points to create a chimney-driven cross-breeze. When done correctly, this replaces the humid, stale air inside your tent with drier outside air — improving sleep quality, protecting your gear, and eliminating that stuffy, overheated feeling that ruins a good night in the woods.
- What You’ll Need:
- A tent with at least one roof vent or high-mounted mesh panel
- A rainfly (most three-season tents include one)
- Optional: a small battery-powered clip-on or hanging fan
- Tent footprint or ground tarp (for moisture prevention)
- Awareness of wind direction at your campsite
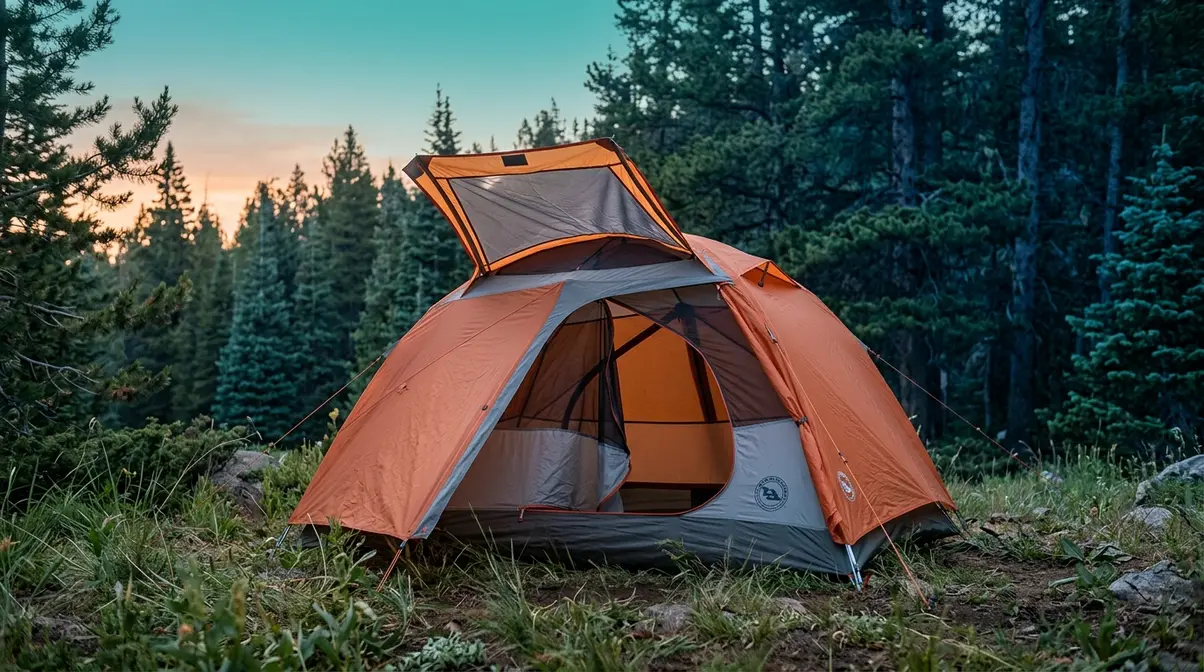
Built-In Ventilation Features
Before you can use your tent’s ventilation system, you need to know what’s in it. The first step in any tent ventilation guide is knowing your equipment. Most camping tents include several built-in features designed exactly for this purpose — but beginners often leave them all closed.
Roof vents are mesh or adjustable panels near the top of the tent. They’re your primary exhaust point — where hot, moist air exits. Even in rain, most roof vents sit under a protective rain cap that lets air out without letting water in.
Low mesh panels and doors serve as your intake points. They sit near the ground where cooler air collects. Opening these while the roof vents are open creates the chimney effect: cool air enters at the bottom, warm air exits at the top.
The rainfly — the waterproof outer layer that covers your tent — is the most misunderstood component. Many beginners zip it fully down to stay dry, which blocks airflow and traps moisture. We’ll cover this in detail in the rainfly section below.
Vestibules (the covered entryway area outside the inner tent door) can also be partially opened to increase airflow without exposing the interior to direct rain.
Appalachian Outfitters recommends opening mesh panels and positioning doors to capture the prevailing winds — the direction the wind is naturally blowing at your campsite. Knowing which way the wind is coming from lets you orient your tent to maximize natural cross-ventilation. Learn how to choose the right tent for your camping style
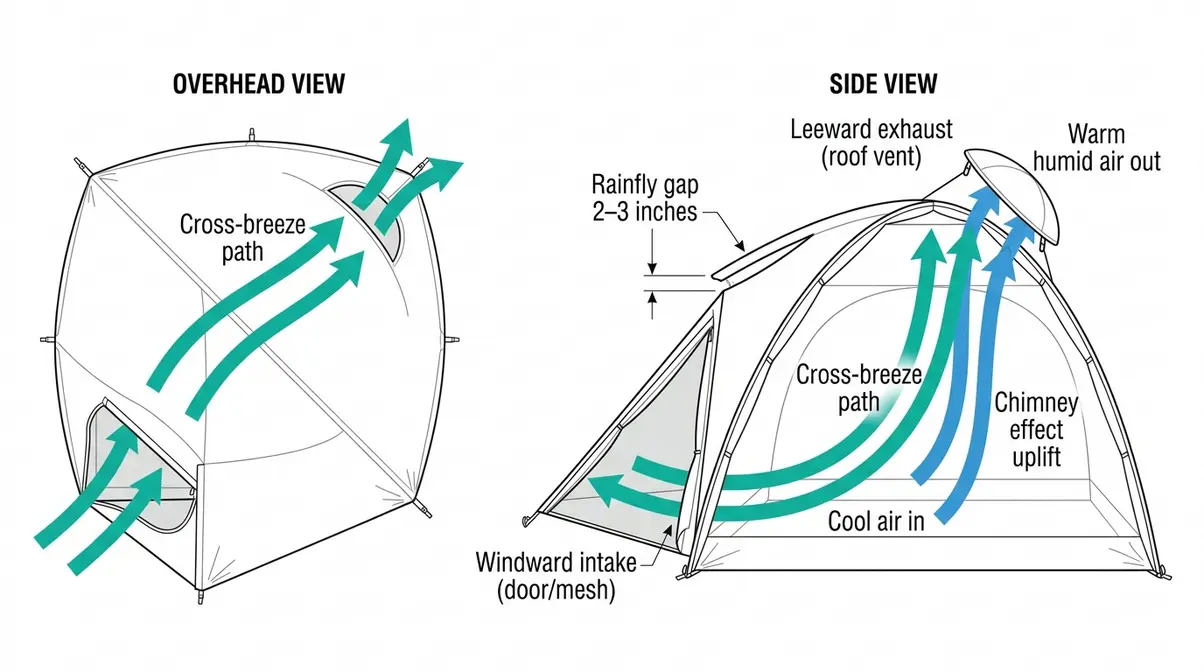
How to Create a Cross-Breeze
A cross-breeze is a current of air that flows through the tent from one opening to another. It’s the camping application of the Chimney-to-CFM Framework: air enters low, sweeps through the interior, and exits high. Here’s how to set it up.
Step 1: Identify the wind direction. Stand outside your tent and wet your finger. The cool side faces the wind. Note which side of your tent faces the breeze — this is your intake side.
Step 2: Open the low door or mesh panel on the windward side. This is where fresh air enters. Even a few inches is enough to start airflow. In buggy conditions, keep the mesh panel closed but unzip the rainfly vestibule.
Step 3: Open the roof vent or high-mounted mesh on the opposite (leeward) side. Hot air exits here. Opening the vent on the side away from the wind creates a pressure difference that pulls air through the tent.
Step 4: Unzip or raise the rainfly slightly on both sides. Even a 2–3 inch gap along the bottom of the rainfly dramatically increases airflow without letting rain in.
Step 5: Check for the “race track” pattern. Hold a piece of tissue near the low intake. It should flutter inward. Hold it near the roof vent — it should flutter outward. That movement confirms air is circulating in a loop through your tent.
Step 6: Adjust for conditions. In rain, close the door mesh but keep roof vents open. In cold weather, reduce openings to a crack rather than closing entirely — some airflow always beats none.
Managing Your Rainfly
The rainfly is the single most impactful variable most beginners get wrong. The instinct is to zip it completely closed to stay dry. The result is a sealed tent that traps every drop of moisture you exhale — and by morning, that moisture has condensed on every surface.
The fix is counterintuitive: leave the rainfly partially open, even in rain. Most modern rainflies are designed with a gap between the fly and the tent body. This gap is intentional — it lets moist interior air escape without exposing you to rain.
In dry conditions: Roll the rainfly back or stake it out with the built-in loops to maximize airflow. Leave at least the roof vent area completely unobstructed.
In light rain: Keep the rainfly down but leave a 2–3 inch gap at the bottom on the leeward (downwind) side. This allows air movement while the fly deflects rain.
In heavy rain: Close the fly but keep roof vents open if they have rain caps. Never seal every opening — a little moisture from ventilation is far better than the pooled condensation from a sealed tent.
At night in cold weather: This is where most campers make their biggest mistake. The cold outside air feels like a reason to seal everything. But cold air holds very little moisture — it’s actually drier than the warm air you’re exhaling. Keeping vents cracked at night is essential, not optional.
Vango recommends that campers always leave at least the roof vent partially open, regardless of weather conditions, to maintain the minimum airflow needed to prevent condensation buildup overnight.
Should You Leave Vents Open?
Yes — always leave at least one vent cracked, even in cold weather. Cold outside air is drier than the warm air you exhale, so ventilation reduces condensation even when temperatures drop. The instinct to seal everything for warmth backfires: a sealed tent concentrates moisture faster than the slight chill from a cracked vent. In very cold conditions, reduce vents to a small opening rather than closing them entirely.
Using Battery-Powered Fans
When natural cross-ventilation isn’t enough — a still night, a sheltered campsite, or a tent with limited vent placement — a small battery-powered fan solves the problem directly.
Modern rechargeable camping fans are safe for overnight use, quiet enough to sleep through, and surprisingly capable. Battery-powered and rechargeable fans designed for personal use draw very little power and don’t generate significant heat (Everything Summer Camp, 2026). Many models run 20–48 hours on a single charge at low speed.
Placement matters more than power. A fan that moves air in the wrong direction just circulates humid air around the tent. Follow these placement guidelines:
- Clip-on fans work best attached to a gear loop near the roof vent, blowing outward — they actively assist the chimney effect by pulling warm air up and out.
- Floor-standing fans work best pointing toward a low door or mesh panel, pushing fresh outside air in while the roof vent passively exhausts the warm air that rises.
- Hanging fans suspended from the tent’s center loop create a “race track” circulation pattern — air moves around the interior rather than through it, which reduces hot spots but doesn’t replace cross-ventilation.
A secondary benefit: a steady fan breeze makes it significantly harder for mosquitoes to navigate toward you. Air movement at low speed disrupts their flight path, providing practical bug deterrence without chemicals.
Site Selection & Moisture Control
Where you pitch your tent matters as much as how you ventilate it. Poor site selection introduces moisture sources that no amount of airflow can overcome.
Avoid low-lying areas. Cold air and moisture pool in valleys and hollows overnight. Pitching on even a slight rise — just 2–3 feet of elevation — places you above the coldest, most humid air layer.
Pitch on dry, firm ground. Wet soil releases moisture upward through the tent floor. A ground tarp or tent footprint creates a vapor barrier that blocks this source entirely.
Choose sites with natural airflow. Open meadow edges and ridgelines receive more consistent breeze than deep forest interiors. A slight, steady breeze is more valuable for tent ventilation than shade.
Orient the tent door toward prevailing winds. Check which direction the wind blows at your campsite before staking down. The windward door becomes your primary intake; the leeward roof vent becomes your exhaust. This simple orientation can make the difference between a dry tent and a wet one.
REI Expert Advice recommends pitching on dry ground, preferably under trees for temperature moderation, and ventilating early, often, and fully — combining site selection with active vent management for the best condensation control.
Grow Tent Ventilation & CFM Math
“I’m currently setting up a 5×5 tent for use as a fruiting chamber and need some guidance.”
This is one of the most common questions we receive from first-time indoor growers. Grow tent ventilation feels technical — CFM numbers, inline fans, carbon filters, ducting bends — but it follows the same Chimney-to-CFM Framework as camping ventilation. Hot air and humidity exit from the top; fresh, cooler air enters from the bottom. The difference is that you’re adding powered components to manage a more controlled environment.
Grow tent ventilation is a complete air management system that removes heat, humidity, and carbon dioxide (CO₂, the gas plants exhale in darkness and absorb in light) while maintaining the temperature and humidity ranges your plants need. Spider Farmer recommends that a grow tent’s air be fully exchanged every 1–3 minutes for optimal plant health.
- What You’ll Need:
- Inline fan (an exhaust fan that mounts inside ducting to pull air through)
- Carbon filter (an activated-charcoal cylinder that removes odors from exhausted air)
- Flexible ducting (the hose connecting fan to carbon filter and to the exhaust port)
- Duct clamps and zip ties
- Rope ratchets or adjustable hangers (for suspending the fan and filter)
- Measuring tape
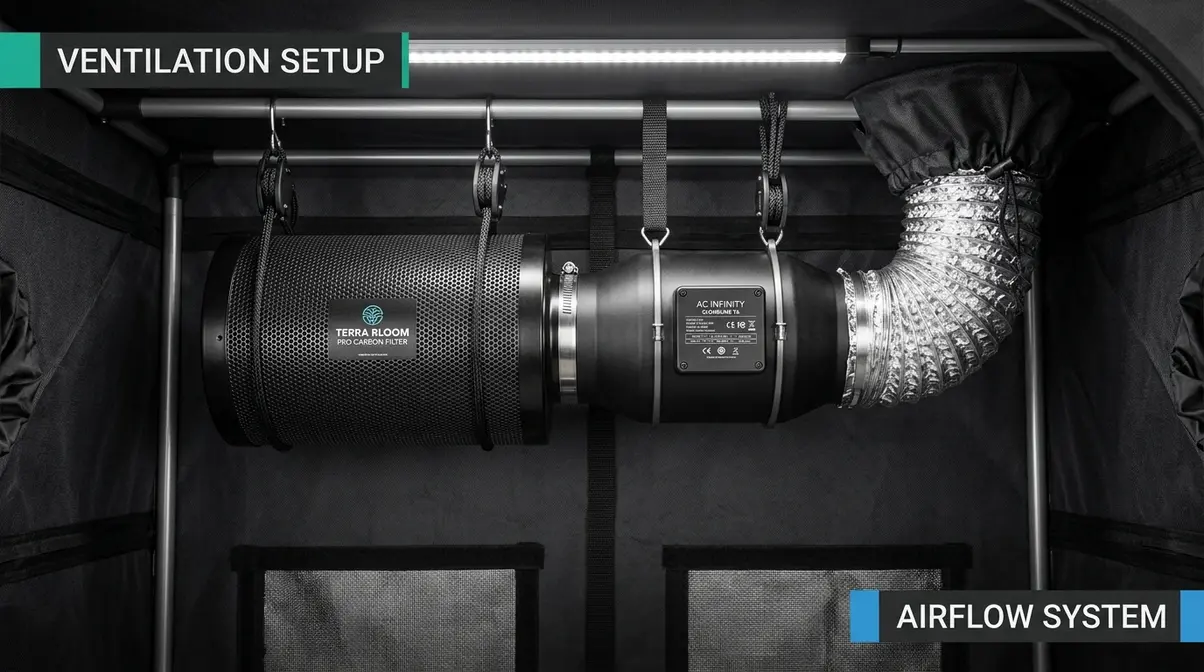
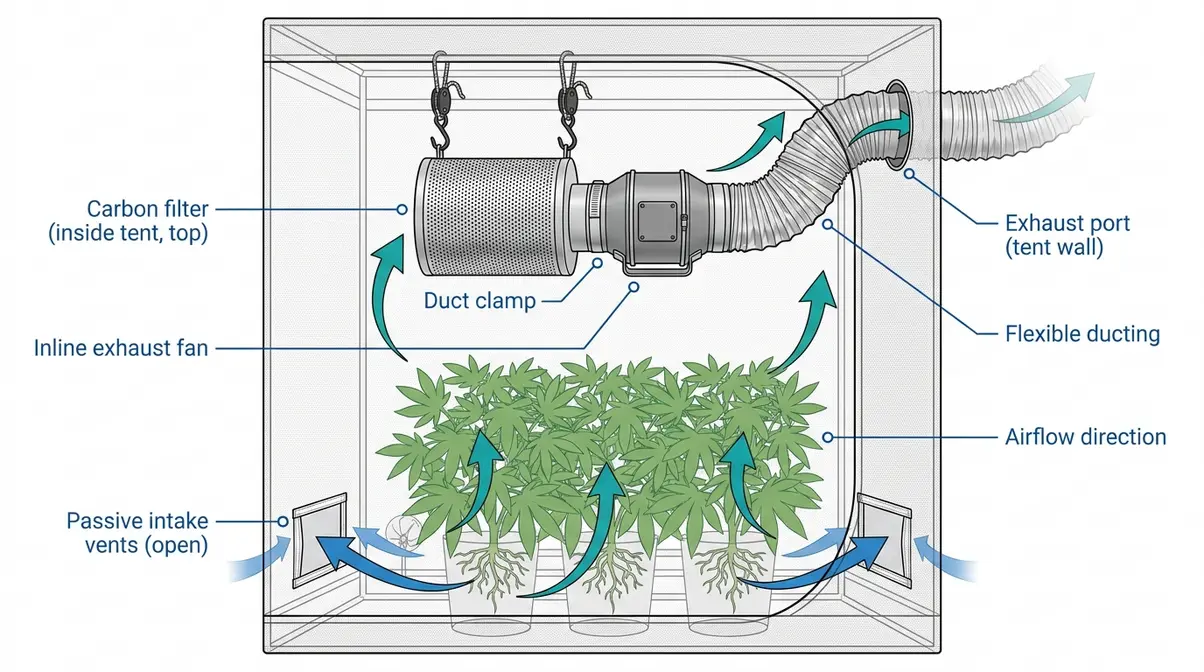
Four Core Ventilation Components
Before installing anything, understand what each component does and where it lives in the system. A comprehensive tent ventilation guide must address the specific hardware required for indoor growing.
1. Inline exhaust fan — A cylindrical fan that mounts inside ducting to pull air through. It goes at the top of the tent, near the exhaust port. This is the engine of your ventilation system.
2. Carbon filter — A canister packed with activated charcoal that scrubs odors from the air before it exits. It mounts inside the tent at the top, connected directly to the intake side of the inline fan. Air flows: carbon filter → inline fan → ducting → out of tent.
3. Ducting — Flexible aluminum tubing that connects the fan to the carbon filter on one end and to the tent’s exhaust port on the other. Keep runs short and straight. Every 90° bend reduces airflow efficiency by approximately 10–25%, so minimize bends wherever possible (AC Infinity, 2026).
4. Passive intake vents — The lower flap vents on your grow tent that you leave open. Fresh air enters here passively, drawn in by the suction created by the exhaust fan above. According to Hydrobuilder’s grow room ventilation guide, passive intake openings should be sized at 1.5–2× the area of the exhaust port to allow sufficient airflow without straining the fan.
Calculating the Right Fan Size
CFM (Cubic Feet per Minute, the measure of how much air a fan moves per minute) is the number printed on every inline fan box — and it’s the number you need to calculate before buying anything.
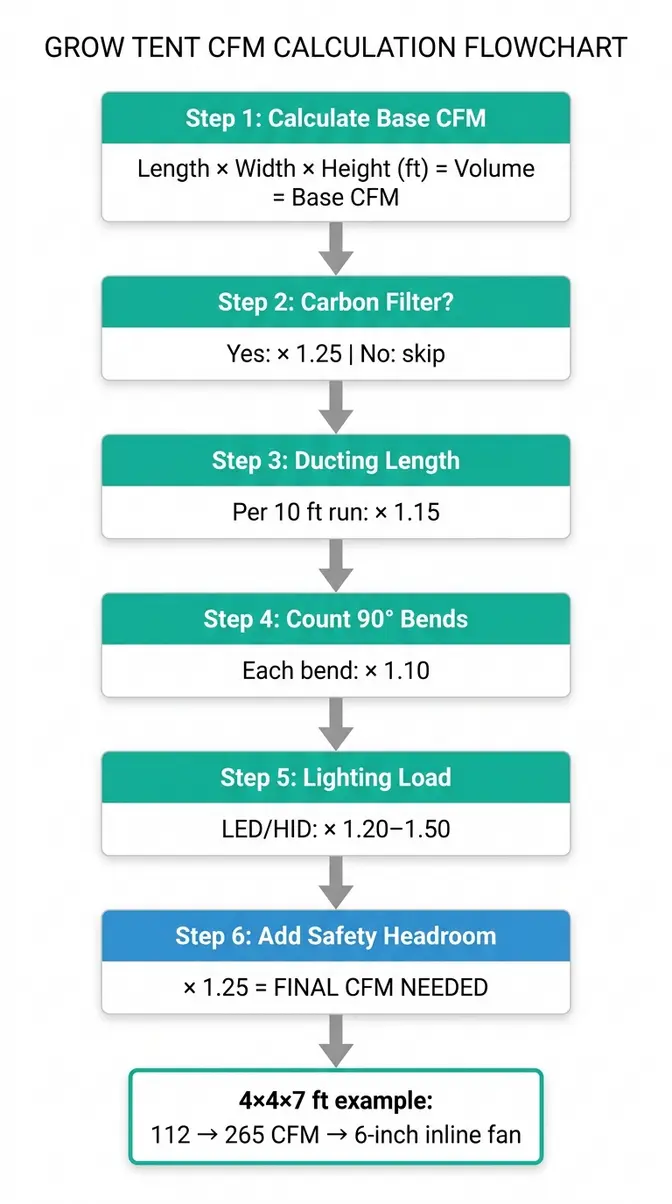
The base formula is simple: Start with your tent’s volume in cubic feet.
Base CFM = Length (ft) × Width (ft) × Height (ft)
This gives you the volume of air your fan needs to move every minute for one complete air exchange. Then you adjust upward for the components in your system.
Adjustment multipliers (multiply your base CFM by each that applies):
| Component | Multiplier | Why |
|---|---|---|
| Carbon filter | ×1.25 | Adds airflow resistance |
| Ducting per 10 ft run | ×1.15 | Friction loss in tubing |
| Each 90° bend in ducting | ×1.10 | Turbulence at each bend |
| High-watt LED or HID lighting | ×1.20–1.50 | Additional heat load |
| Safety headroom | ×1.25 | Fan never runs at 100% |
Source: AC Infinity CFM calculation guide (acinfinity.com, 2026); Gorilla Grow Tent inline fan sizing guide (gorillagrowtent.com, 2026)
Worked Example 1: 4×4×7 ft Grow Tent
A standard 4×4 tent with a 7 ft ceiling is a common starter setup for home growers.
- Base volume: 4 × 4 × 7 = 112 cubic feet → Base CFM = 112
- Carbon filter: 112 × 1.25 = 140
- 10 ft ducting run: 140 × 1.15 = 161
- One 90° bend: 161 × 1.10 = 177
- LED lighting: 177 × 1.20 = 212
- Safety headroom: 212 × 1.25 = 265 CFM
Result: You need an inline fan rated for at least 265 CFM. A 6-inch inline fan rated 250–350 CFM is the standard recommendation for most 4×4 grow tents (Gorilla Grow Tent, 2026).
Worked Example 2: 5×5×8 ft Grow Tent (Fruiting Chamber Setup)
A 5×5 tent at 8 ft is a popular choice for mushroom fruiting chambers and larger grows.
- Base volume: 5 × 5 × 8 = 200 cubic feet → Base CFM = 200
- Carbon filter: 200 × 1.25 = 250
- 15 ft ducting run: 250 × 1.20 = 300
- Two 90° bends: 300 × 1.10 × 1.10 = 363
- LED lighting: 363 × 1.20 = 436
- Safety headroom: 436 × 1.25 = 545 CFM
Result: A 5×5×8 ft tent with a full filter-and-duct setup needs a fan rated around 545 CFM. Step up to a strong 6-inch or 8-inch inline fan rated 500–600 CFM. If your setup is simpler (no carbon filter, shorter ducting), you can reduce this by removing the corresponding multipliers.
Where to Place a Carbon Filter?
Mount the carbon filter inside the tent at the top, connected directly to the intake side of your inline exhaust fan. This configuration pulls air through the filter before it reaches any ducting seams — maximizing odor removal and preventing unfiltered air from leaking through joints. Placing the filter outside the tent is a common workaround to save vertical space, but it means unfiltered air travels through all ducting before reaching the filter, which reduces effectiveness (Spider Farmer, 2026).
Installing Your Fan and Filter
Estimated time: 45–60 minutes. Tools needed: Measuring tape, duct clamps, zip ties, rope ratchets or adjustable hangers, scissors.
Follow these steps in order for a clean, efficient installation.
Step 1: Hang the carbon filter at the top of the tent. Use rope ratchets attached to the tent’s top cross bars. Position it in the upper corner closest to your exhaust port. The filter’s flanged opening faces outward — this is where the fan attaches.
Step 2: Connect the inline fan directly to the carbon filter. Slide the fan’s intake collar over the filter’s flange. Secure with a duct clamp and tighten firmly. The fan should hang inline with the filter, supported by its own rope ratchets. Air flows: filter → fan.
Step 3: Run ducting from the fan’s exhaust port to the tent’s exhaust hole. Cut ducting to length — minimize slack but don’t pull it taut. Secure both ends with duct clamps. Keep the run as straight as possible; route any required bends in gentle curves rather than sharp 90° angles.
Step 4: Open the lower passive intake vents. Unzip or open the lower flap vents on the opposite side of the tent from the exhaust. These should remain open whenever the fan runs.
Step 5: Power on the fan and check for negative pressure. Within 30–60 seconds, the tent walls should pull slightly inward. Hold a tissue near a lower vent — it should be drawn inward, not pushed outward. This confirms your system is working correctly.
Step 6: Seal any light leaks around ducting ports. Use the foam gaskets included with most tents, or wrap the ducting entry point with black duct tape to prevent light from entering during dark periods.
Understanding Negative Pressure
Negative pressure is when the tent interior has slightly lower air pressure than outside — meaning air is always being pulled in rather than pushed out. You’ve achieved it when the tent walls bow slightly inward.
Why does this matter? Two reasons. First, odor control: if air is always being drawn in through filtered intake points, odors can’t escape through unfiltered gaps in zippers or seams. Second, contamination control: in fruiting chambers and sensitive grows, negative pressure prevents spores and pathogens from escaping into your living space (AC Infinity, 2026).
How to verify negative pressure: Hold a tissue near any tent seam or zipper gap. If it’s drawn toward the tent, you have negative pressure. If it flutters outward, your intake is overwhelming your exhaust — reduce intake area or increase fan speed.
Avoid over-negative pressure: If the tent walls are collapsing hard inward, the fan is working too hard against restricted intake. Open more intake vent area or reduce fan speed. Slight inward bowing is the target — not a collapsed tent.
AC Infinity’s guide to negative pressure explains that the three pressure states (positive, neutral, and negative) each have distinct effects on air quality and odor management — and that slight negative pressure is the standard recommendation for most home grows.
Passive vs. Active Intake
Passive intake means relying on open lower vents to supply fresh air, with only the exhaust fan powered. This is the default recommendation for most grow tents because it’s simpler, cheaper, and naturally maintains the slight negative pressure you want.
Active intake adds a second powered fan at the bottom of the tent to push air in. This is only necessary when your exhaust fan can’t draw enough air passively — typically in setups with very long ducting runs, heavy carbon filter restriction, or hot ambient rooms.
If you use active intake, the intake fan must be weaker than the exhaust fan. Running equal-power fans on both ends creates neutral or positive pressure, which defeats odor control. The standard ratio: an intake fan at 50–70% of the exhaust fan’s CFM rating maintains the slight negative pressure differential you need.
| Setup | Best For | Intake Fan Needed? |
|---|---|---|
| Passive intake | Most home grows, 4×4–5×5 tents | No |
| Active intake | Large tents, hot rooms, heavy restriction | Yes (weaker than exhaust) |
For the 5×5 fruiting chamber example above, passive intake with two open lower vents is sufficient in most room-temperature environments. Add active intake only if temperatures remain elevated after the exhaust system is running at full speed.
Common Ventilation Mistakes
Our evaluation of common grow tent and camping setups — across community forums including Overgrow, GrowWeedEasy, and outdoor communities like SectionHiker — reveals five mistakes that account for the vast majority of ventilation failures. Most are easy to fix once you know what to look for.
5 Common Ventilation Mistakes
Mistake 1: Sealing everything shut to stay warm (camping) or control odors (grow tents). This is the #1 mistake in both contexts. Sealing traps moisture and CO₂, creating worse conditions than the weather outside. Fix: Always maintain at least some airflow. A cracked vent beats a sealed tent every time.
Mistake 2: Undersizing the exhaust fan for grow tents. Beginners often buy the smallest fan available to save money. If your CFM calculation calls for 265 CFM, a 190 CFM fan will run at 100% constantly, wear out faster, and still underperform. Fix: Use the CFM formula above and buy a fan rated at least 20% above your calculated need.
Mistake 3: Ignoring 90° bends in ducting. Each sharp bend in your ducting reduces airflow by approximately 10–25%. Three bends can drop effective CFM by 30–50%. Fix: Route ducting in gentle curves. If a 90° bend is unavoidable, account for it in your CFM calculation.
Mistake 4: Placing the carbon filter outside the grow tent. Some growers move the filter outside to save tent height. This pulls unfiltered air through all ducting seams before it reaches the filter — the opposite of what you want. Fix: Mount the carbon filter inside the tent at the top, directly connected to the inline fan.
Mistake 5: Camping on low ground without a footprint. Pitching in a hollow or on wet soil introduces ground moisture that no amount of vent management can overcome. Fix: Choose elevated, dry ground and always use a tent footprint or ground tarp.
When to Use Different Approaches
The Chimney-to-CFM Framework handles most ventilation scenarios, but three situations call for a different approach.
High-humidity outdoor environments (tropical or coastal camping): When outside humidity is already near 100%, opening vents may introduce more moisture than it removes. In this scenario, a desiccant sachet inside the tent combined with a battery-powered fan circulating interior air is more effective than maximum ventilation.
Extremely cold camping (below 0°C / 32°F): At very low temperatures, aggressive ventilation chills the interior faster than condensation forms. Reduce vents to a small crack and use a vapor-permeable sleeping bag liner to manage moisture at the source rather than through ventilation.
Large-scale commercial grow operations: The passive intake and single inline fan setup in this guide is designed for home grows up to 5×5. Larger setups (8×8 and above) benefit from HVAC-integrated climate control systems rather than the simple chimney-effect approach outlined here. At that scale, consulting an environmental controls specialist is worthwhile before purchasing equipment.
Frequently Asked Questions
Why Does My Tent Get Wet Inside?
Interior condensation forms when warm, moist air from your breathing contacts the cooler tent walls. A single sleeping adult exhales approximately 1 liter of water vapor overnight (SectionHiker, 2026) — and in a sealed tent, that moisture has nowhere to go but onto your gear. The fix is consistent airflow: open both high vents and low entry points simultaneously to create a chimney-driven cross-breeze that carries moisture out. Even a small opening is significantly better than a fully sealed tent.
How to Calculate Grow Tent CFM?
Start with your tent’s volume (Length × Width × Height in feet) — that number is your base CFM. Then multiply by 1.25 for a carbon filter, 1.15 for every 10 feet of ducting, 1.10 for each 90° bend, and 1.20–1.50 for your lighting heat load. Finally, add 25% headroom so your fan isn’t always running at maximum. For a standard 4×4×7 ft tent with a carbon filter and basic ducting, this typically works out to around 265 CFM — a 6-inch inline fan rated 250–350 CFM is the standard recommendation (AC Infinity, 2026).
How to Achieve Negative Pressure?
Negative pressure means the tent interior has slightly lower air pressure than the surrounding room, so air is always being drawn inward rather than leaking outward. You achieve it by running your exhaust fan at a higher airflow rate than your intake supplies — which naturally occurs with passive intake and a properly sized exhaust fan. The visual check: tent walls bow slightly inward. The tissue test: hold a tissue near a zipper seam — it should be pulled toward the tent. Slight negative pressure is the target; if walls are collapsing hard, open more intake area or reduce fan speed (AC Infinity, 2026).
Your Ventilation Action Plan
This tent ventilation guide demonstrates that for both campers and indoor growers, the same physics principle drives every ventilation decision. Hot air rises and must exit from the top; cooler, fresher air enters from below. Whether you’re managing condensation in a backpacking tent or calculating CFM for an inline fan, the Chimney-to-CFM Framework gives you the mental model to make every decision logically.
A single sleeping adult adds nearly 1 liter of moisture to a sealed tent overnight (Redverz Gear, 2026). A grow tent without proper exhaust runs 10°F hotter than the surrounding room and accumulates CO₂ that stunts plant growth. Both problems have the same structural fix: create an exhaust point at the top, an intake point at the bottom, and let physics do the rest.
The Chimney-to-CFM Framework earns its name precisely because it scales: from the passive cross-breeze of a cracked tent vent to the calculated airflow of a 6-inch inline fan, the same principle applies at every level of complexity. Once you internalize it, you stop guessing and start designing.
Start tonight. For campers: open your roof vent and crack your lowest door before you sleep — even an inch of airflow will make a measurable difference by morning. For growers: run the CFM formula for your tent, verify your fan rating covers the result plus 25% headroom, and confirm negative pressure with the tissue test after your first setup. Neither fix requires new gear. Both require understanding the physics — and now you do.
