This blog post may contain affiliate links. As an Amazon Associate I earn from qualifying purchases.
📋 Table of Contents
- Phase 1: At-Home Preparation
- Prep Ingredients (Mise en Place)
- Cooler Packing: Extend Ice Life
- Repackage to Cut Campsite Waste
- 3 Meals That Transform With Home Prep
- Phase 2: Set Up Your 3-Zone Camp Kitchen
- Prep Zone: Ingredient Staging
- Hot Zone: Fire & Heat Control
- Sanitation Zone: Setup First
- What is the most forgotten item when camping?
- Phase 3: Campfire Cooking Techniques
- Cook Over Coals, Not Flames
- Mastering Foil Packet Meals
- Grill Grate: Most Versatile Tool
- Boiling Water Safely at Camp
- Dutch Oven and Cast Iron Basics
- Phase 4: Clean-As-You-Go Workflow
- The Wipe-Before-Wash Technique
- 3-Bin System: Wash, Rinse, Sanitize
- What is the 200-foot rule for camping?
- Common Camp Cooking Mistakes to Avoid
- 5 Mistakes That Derail Camp Cooking
- When to Simplify Your Kitchen
- Frequently Asked Questions
- Tips for Cooking While Camping?
- What Are 5 Camp Cooking Techniques?
- Best Advice for Campfire Cooking?
- What are the 5 P’s of cooking?
- What are the 3 R’s in cooking?
- Tips for Camp Food Safety?
- Your Camp Cooking System Starts at Home
Camp cooking should be simple — but most campers arrive at the site and spend the first hour doing work they could have finished at home, then burn their dinner waiting for the fire to stabilize. Every hour you waste on campsite prep is an hour you’re not sitting around the fire, exploring a trail, or actually relaxing. Your disorganized camp kitchen is costing you the best part of camping.
In this guide, you’ll get a complete set of camp cooking workflow tips organized into a 5-phase system — one that moves 80% of the work to your home kitchen and eliminates chaos at the campsite. The five phases are: At-Home Preparation, Campsite Kitchen Setup, Cooking Execution, Cleanup, and Avoiding Common Mistakes.
- What You’ll Need Before You Start:
- Estimated Time: 45 minutes of home prep, 15 minutes at camp
- A quality cooler with frozen gel packs (soft or hard-sided)
- A camp stove or access to a fire pit
- Resealable bags, reusable containers, and heavy-duty aluminum foil
- A 3-bin dish set or collapsible wash basins
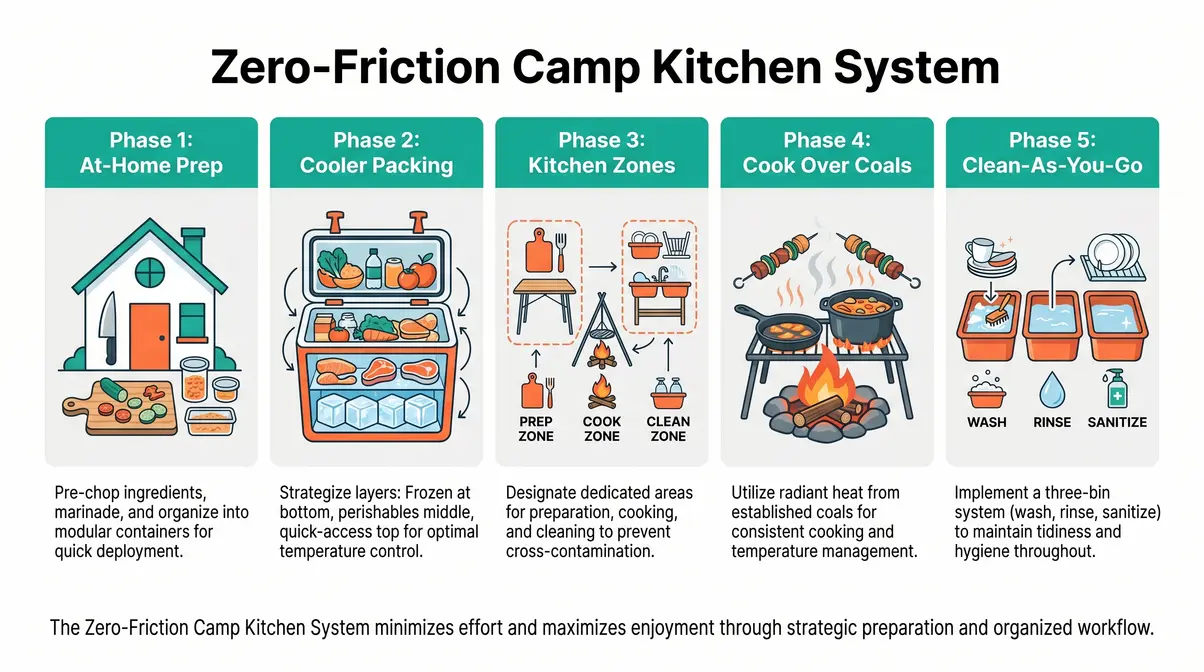
Key Takeaways: The Zero-Friction Camp Kitchen System
Efficient camp cooking workflow tips start at home — experienced campers complete 80% of their prep before leaving, reducing campsite cooking time by half.
- Phase 1 (Home Prep): Pre-chop vegetables, pre-mix spices, and repackage food in resealable bags
- Phase 2 (Setup): Divide your campsite into 3 zones — Prep, Hot, and Sanitation
- Phase 3 (Cooking): Cook over glowing coals, not open flames, for consistent heat
- Phase 4 (Cleanup): Wipe dishes before washing and use the 3-Bin system to eliminate dish piles
- The Zero-Friction Camp Kitchen System turns camp cooking from a stressful chore into a repeatable, enjoyable process
Phase 1: At-Home Preparation
The single most powerful camp cooking workflow tip is to treat your home kitchen as the real camp kitchen — everything that can be done before you leave should be. The culinary concept of mise en place — the practice of prepping all ingredients before cooking begins, taught by institutions like the Escoffier School of Culinary Arts — translates directly to minimizing chaos in a camp kitchen (Escoffier School of Culinary Arts, 2026). When your food arrives at the campsite already chopped, measured, and organized, you skip the tedious prep entirely and go straight to cooking.
This is Phase 1 of The Zero-Friction Camp Kitchen System — a 5-phase sequential workflow that eliminates improvisation from outdoor cooking by front-loading preparation, systematizing campsite organization, and embedding cleanup into the cooking process.
With your food prepped and packed, the next step is setting up a campsite kitchen that keeps everything within reach.
Prep Ingredients (Mise en Place)
Mise en place — the culinary practice of prepping all ingredients before cooking begins — is the foundation of any smooth kitchen workflow, professional or otherwise. The same logic that professional chefs use to run a smooth kitchen applies perfectly to camp cooking. Penn State Extension recommends washing, pre-chopping, and repackaging ingredients into airtight containers at home to minimize cross-contamination risks and reduce campsite waste (Penn State Extension, 2026).
Here is your at-home camp prep checklist for proper food storage for camp cooking:
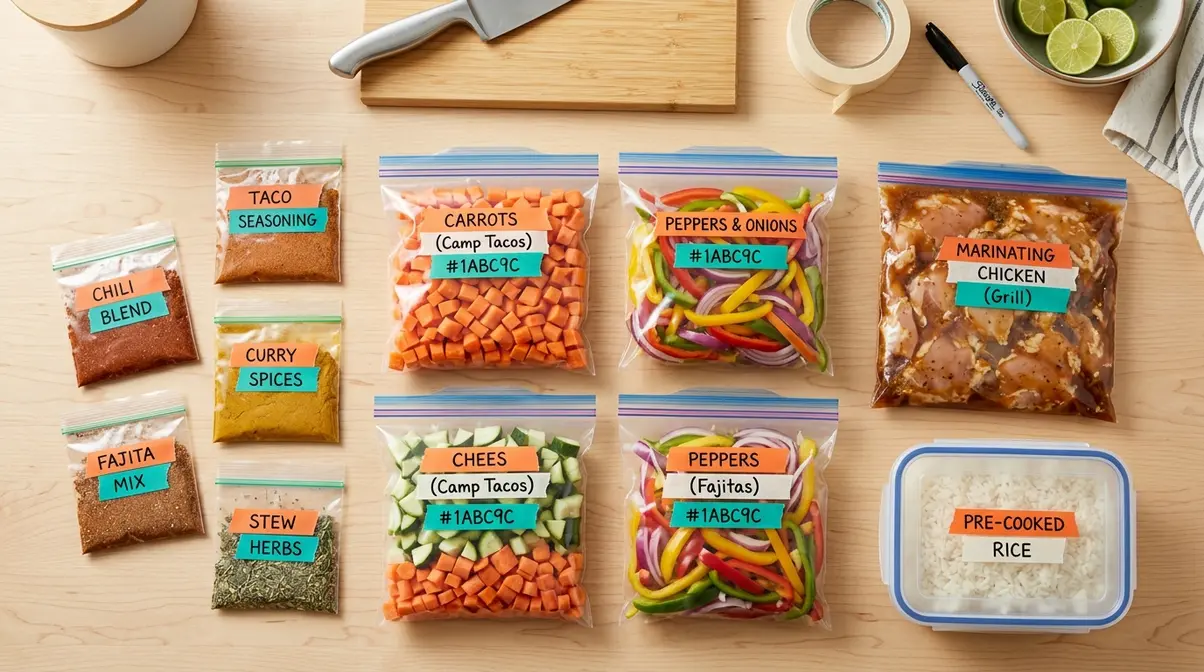
Step 1: Pre-chop all vegetables Store them in labeled resealable bags — carrots, peppers, onions, and potatoes all hold well for 2–3 days refrigerated.
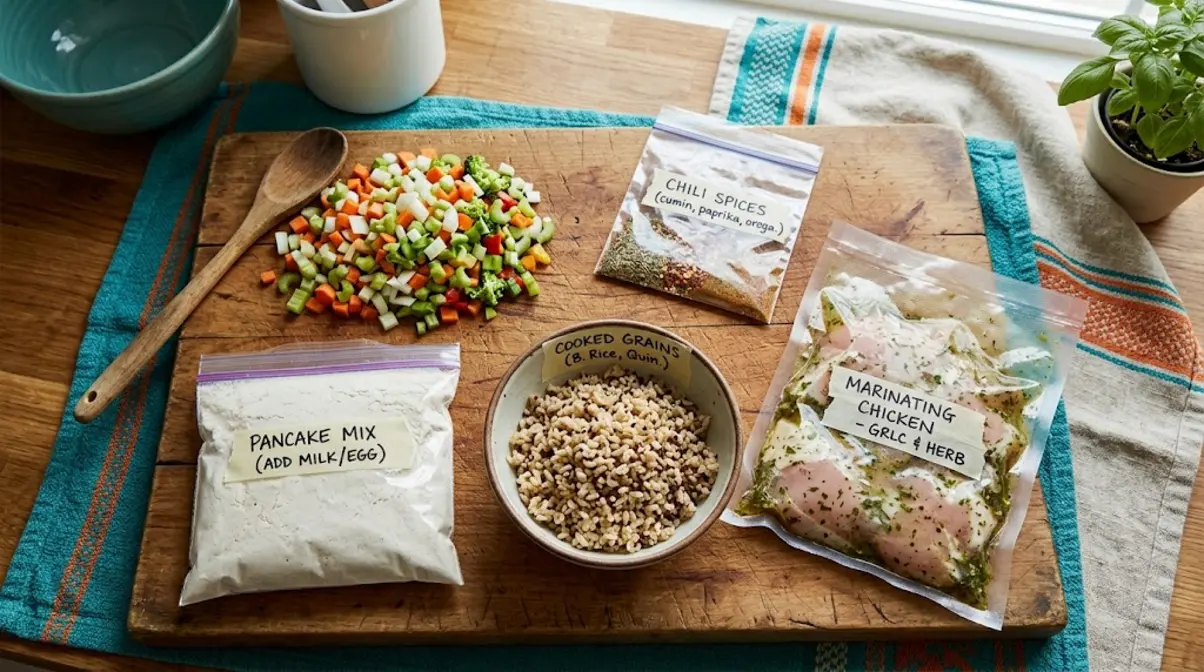
Step 2: Pre-mix dry spice blends Transfer them to small zip-lock bags or travel containers, and label each blend with the meal it belongs to.
Step 3: Pre-marinate proteins Prepare them overnight and store in sealed bags; they’ll continue marinating during transport.
Step 4: Pre-cook grains Cook rice, pasta, or quinoa at home and refrigerate — at camp, you simply reheat them in under 5 minutes.
Step 5: Measure and combine dry baking ingredients Portion items like pancake mix or cornbread dry ingredients into a single labeled bag.
Pre-chopping vegetables at home is one of those small habits that pays off disproportionately. Consider taco night as a prime example: pre-cooked ground beef in a bag, pre-shredded cheese in a container, pre-sliced toppings ready to go. At camp, you reheat one pan and assemble. The entire meal takes 10 minutes instead of 40.
Transition: Food prep is only half of the at-home equation — the other half is packing your cooler strategically so the right food is accessible at the right time.
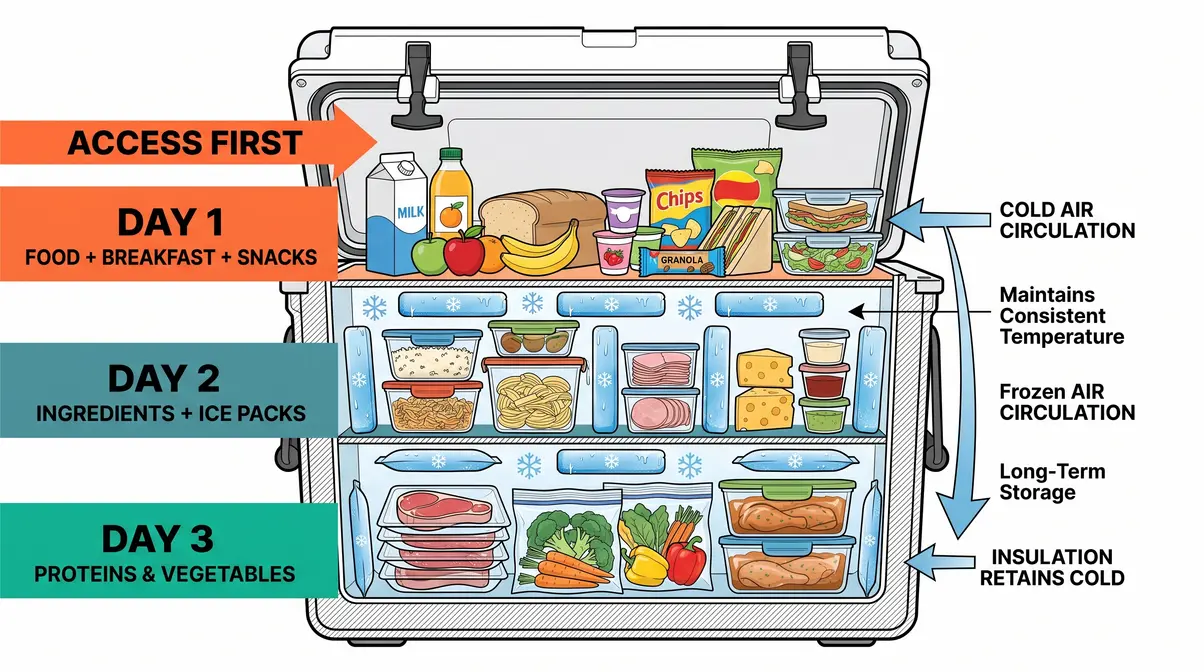
Cooler Packing: Extend Ice Life
Most campers pack their cooler the same way they throw laundry in a bag — whatever fits, fits. The result is digging through a cold, wet cooler to find Friday’s breakfast while Saturday’s proteins are buried at the bottom. The reverse-chronological method fixes this entirely.
How to pack your cooler in reverse meal order:
Step 1: Place your last meal’s ingredients Put Day 3 proteins and vegetables at the very bottom of the cooler.
Step 2: Add ice and Day 2 ingredients Add a layer of ice packs, then place Day 2 ingredients on top.
Step 3: Add ice and Day 1 ingredients Add another ice layer, then place Day 1 ingredients and all breakfast items on top — these are the items you’ll reach for first.
Step 4: Fill gaps with snacks Place condiments and drinks on the very top layer for easy access.
For a 3-day trip: Layer 1 (bottom) = Sunday dinner ingredients. Layer 2 = Saturday proteins and vegetables. Layer 3 (top) = Friday dinner, Saturday breakfast, and snacks. You never dig. You simply lift the top layer.
According to the USDA Food Safety and Inspection Service, maintaining cooler temperatures below 40°F is critical — packing food directly from the freezer into a well-insulated cooler with frozen gel packs extends safe storage life significantly (USDA FSIS, 2026). Bacterial growth accelerates rapidly above 40°F, which makes ice management a food-safety issue, not just a comfort one.
- Tips to extend ice life:
- Use block ice rather than cubed ice — it melts 2–3 times more slowly
- Keep the cooler in the shade and minimize how often you open it
- Layer frozen gel packs between food layers, not just on top
- Pack food directly from the freezer, not the refrigerator, before departure
Transition: Once your cooler is packed strategically, the last home-prep step is reducing the packaging you’ll bring to camp.
Repackage to Cut Campsite Waste
Bulky commercial packaging wastes cooler space, creates unnecessary trash, and makes it harder to find what you need quickly. Repackaging at home solves all three problems before you leave the driveway.
- What to repackage and how:
- Oatmeal and cereals: Transfer individual portions into labeled zip-lock bags — one bag per person per morning
- Pasta sauce: Pour into a sealed container sized for your group; skip the heavy glass jar
- Spices: Transfer from full-sized jars into small travel containers or tiny zip-lock bags
- Cooking oil: Transfer to a small squeeze bottle instead of bringing the full-size container
For longer trips (3 or more days), vacuum sealing is worth the investment. Vacuum-sealed bags eliminate air, which reduces cooler bulk noticeably and extends the freshness of proteins and pre-cooked grains. Label every bag and container with masking tape and a permanent marker: meal name, day number, and any critical cooking instruction. At camp, you should never be opening a bag wondering what’s inside.
3 Meals That Transform With Home Prep
Some meals require almost no campsite effort when you do the work at home. Experienced campers consistently report these three as the highest-value prep targets:
- Breakfast burritos: Scramble eggs and cook sausage at home, wrap in foil, and freeze. At camp, reheat directly on the grill grate in under 10 minutes.
- Foil packet dinners: Pre-cut all vegetables and proteins at home, portion into individual foil packets, and seal. At camp, place directly on coals — no prep required.
- One-pot pasta: Pre-measure dry pasta and sauce ingredients at home into labeled bags. At camp, one pot of boiling water and 12 minutes is all it takes.
The pattern is the same for all three: the campsite becomes an assembly and heat station, not a full kitchen. That’s the core logic of Phase 1.
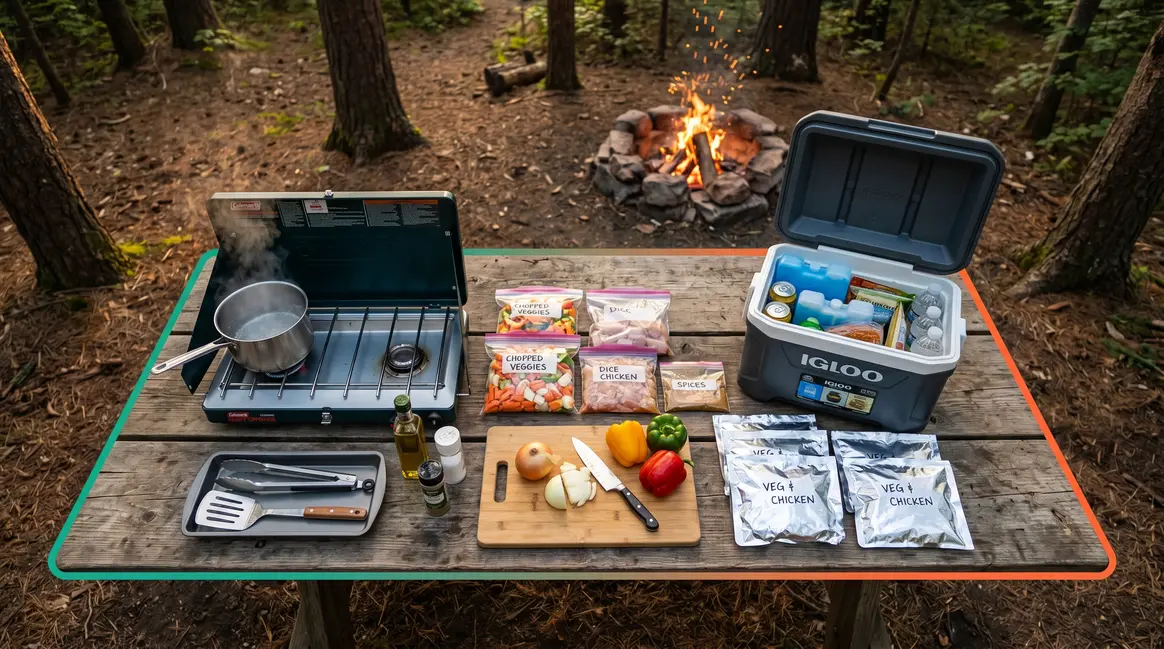
Phase 2: Set Up Your 3-Zone Camp Kitchen
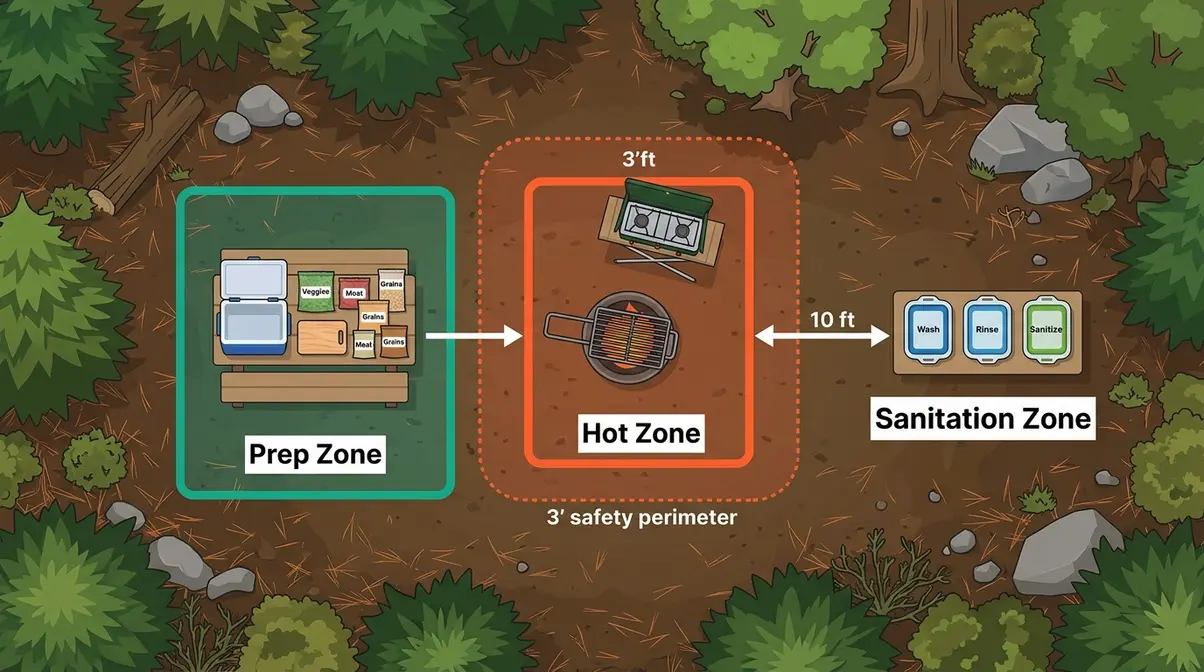
Arriving at your campsite with a well-packed cooler is only half the battle — where you put things matters just as much as what you brought. Experienced campers consistently report that a disorganized campsite layout is the second-biggest source of cooking frustration after poor home prep. The solution is the 3-Zone Camp Kitchen: a deliberate spatial arrangement that separates your Prep Zone, Hot Zone, and Sanitation Zone. According to REI’s expert camp kitchen guide, intentional kitchen layout reduces cross-contamination risks and improves cooking efficiency (REI, 2026).
Prep Zone: Ingredient Staging
Your Prep Zone is any flat, stable surface — a camp table, a tailgate, or a large flat rock — positioned upwind from the fire. This is where your cooler, cutting board, utensils, and prepped ingredients live during the cooking process.
- Set up your Prep Zone with:
- Cooler positioned within arm’s reach but not directly next to heat
- A small cutting board and one sharp knife for any last-minute slicing
- Labeled bags and containers organized in the order you’ll use them
- Paper towels or a clean cloth for wiping hands between tasks
The key principle: everything you need to cook should be visible and reachable without moving your feet. If you’re hunting for the garlic powder mid-cook, your Prep Zone isn’t working.
Hot Zone: Fire & Heat Control
Your Hot Zone is any area with an active heat source — the fire pit, camp stove, or both. Position it downwind from the Prep Zone to keep smoke away from your food and workspace. Keep a 3-foot clear perimeter around all heat sources.
Hot Zone setup checklist:
Step 1: Position your camp stove Place it on a stable, level surface — never on soft ground that could tip.
Step 2: Place your grill grate Set it over the fire pit before lighting the fire so it heats evenly.
Step 3: Organize your tools Keep oven mitts, long-handled tongs, and a lid lifter within arm’s reach.
Step 4: Check your surroundings Never position the Hot Zone near dry brush, tent fabric, or overhanging branches.
The most important Hot Zone rule: never cook over an open flame if you can cook over coals instead. Open flames are unpredictable and uneven. Coals provide consistent, controllable radiant heat. More on this in Phase 3.
Sanitation Zone: Setup First
This is the camp kitchen element that no competitor article addresses — and the one that prevents the most post-meal suffering. Your Sanitation Zone contains your 3-bin wash system, biodegradable soap, and a small strainer for food particles. Set it up before you start cooking, not after.
Why before cooking matters: Cross-contamination between raw proteins and ready-to-eat foods is a real risk at camp, where your options for hand-washing are limited. Having your Sanitation Zone active from the start means you can clean hands and utensils between tasks without interrupting your workflow.
Position the Sanitation Zone at least 10 feet from your Hot Zone and food prep area. This separation also reduces the risk of attracting wildlife to your cooking area.
What is the most forgotten item when camping?

Even experienced campers leave critical items at home. Before packing your essential camp kitchen gear, review this list. KOA’s camp cooking tips guide identifies these as the most commonly forgotten items that derail a camp kitchen (KOA, 2026):
| Forgotten Item | Why It Matters | Easy Fix |
|---|---|---|
| Can opener | Useless without it if you packed canned goods | Pack a small multi-tool with opener |
| Dish soap (biodegradable) | Standard soap harms waterways | Pre-pack in a small squeeze bottle |
| Cutting board | Without one, you prep on the table or ground | A flexible silicone board weighs almost nothing |
| Aluminum foil (heavy-duty) | Single most versatile camp cooking tool | Buy the heavy-duty roll, not the standard |
| Cooking oil | Forgotten constantly; ruins every non-stick plan | Transfer to a small squeeze bottle |
Print this table and tape it to your cooler lid before every trip.
Phase 3: Campfire Cooking Techniques
With your kitchen organized and your zones set up, Phase 3 of the Zero-Friction Camp Kitchen System is where the cooking actually happens. The techniques in this phase are what separate campers who consistently produce good food from those who burn dinner every trip. Mastering campfire cooking is less about recipes and more about understanding your heat source — which is fundamentally different from a gas stove at home.
“You will almost always begin any campfire meal by boiling water and if you’re not careful, then your fire will die down before it reaches its boiling point.”
That observation from experienced campers captures the core challenge perfectly. Managing a campfire as a cooking tool requires planning, not just lighting a match.
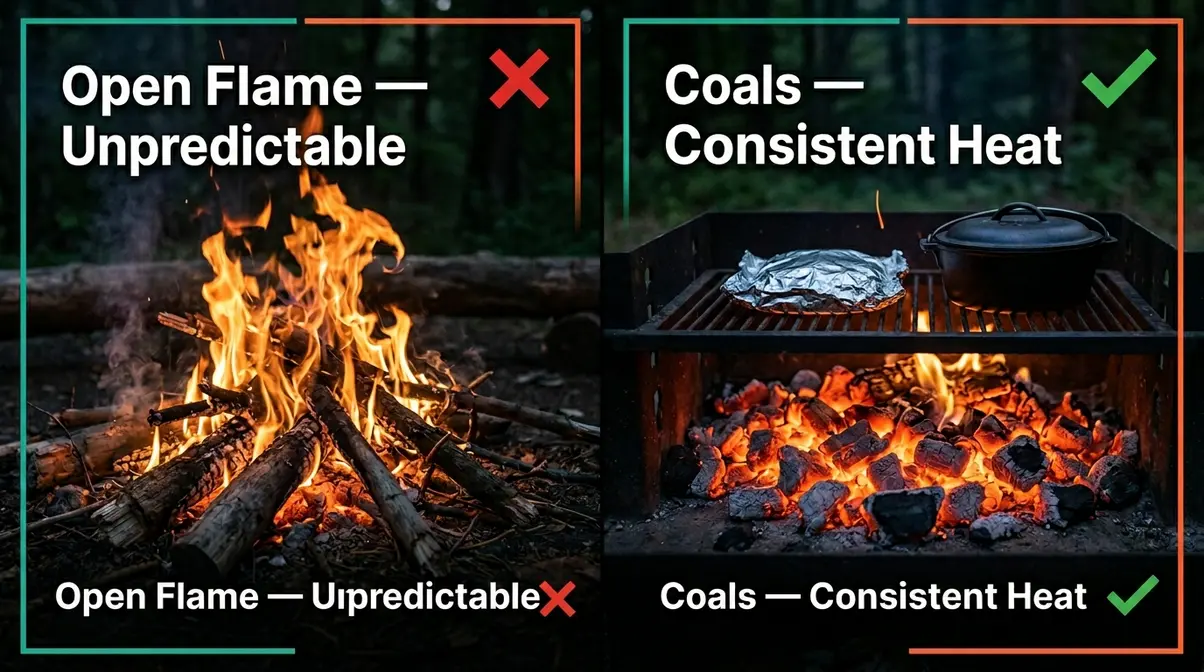
Cook Over Coals, Not Flames
The single best piece of advice from experienced outdoor cooks: never cook over an open flame when you can wait for coals. Understanding campfire safety for cooking starts with proper heat management. Open flames are unpredictable — they flare, gust sideways, and create uneven heat that burns the outside of food while leaving the inside raw. Glowing coals produce steady, radiant heat that behaves more like a conventional oven.
How to build and use a coal bed:
Step 1: Build your fire early Start your fire 45–60 minutes before you plan to cook — this allows enough time to develop a proper coal bed.
Step 2: Use hardwoods Select oak, hickory, or maple when possible — they produce longer-lasting, hotter coals than softwoods.
Step 3: Wait for glowing coals Wait until flames die down and the coals glow orange-red with a light white ash coating — this is your cooking temperature.
Step 4: Create a two-zone fire Push coals to one side to create direct heat on one side, and indirect heat on the other.
The two-zone setup is especially valuable for proteins. Sear over direct coals, then move to the indirect side to finish cooking without burning. Experienced campers consistently report this as the technique that most improved the quality of their camp meals.
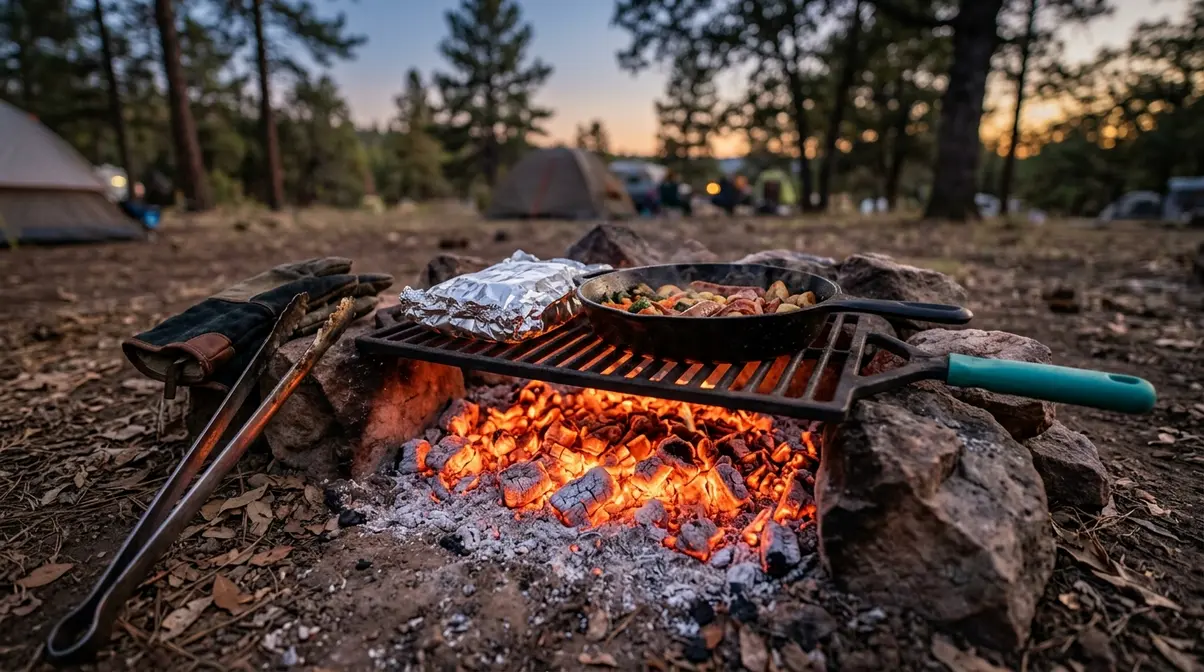
Mastering Foil Packet Meals
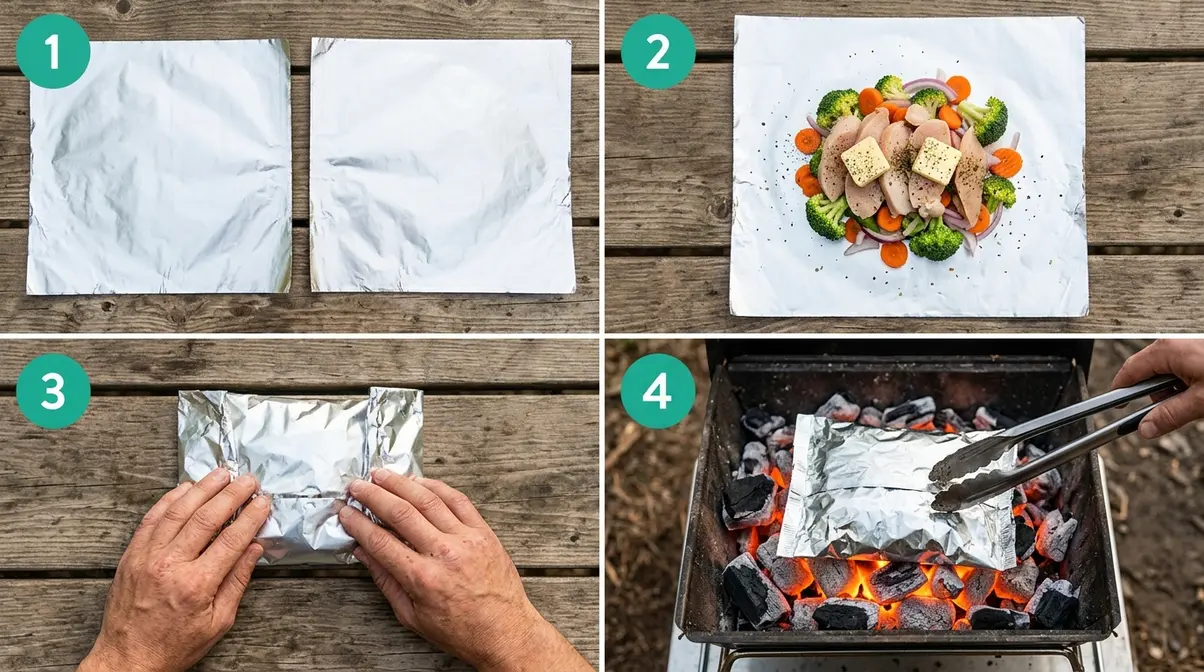
Foil packet cooking is one of the most forgiving techniques in camp cooking — you can cook just about anything in foil, and the sealed environment traps moisture and heat. The Boy Scouts of America’s outdoor cooking resources recommend heavy-duty aluminum foil as the single most versatile camp cooking material (BSA, 2026).
Standard foil packet method:
Step 1: Use heavy-duty aluminum foil Tear two sheets of heavy-duty aluminum foil, each approximately 12 inches long.
Step 2: Place ingredients in the center Layer proteins on the bottom, vegetables on top.
Step 3: Add fats and spices Include 1–2 tablespoons of butter or olive oil and your pre-mixed spice blend.
Step 4: Fold tightly Bring the long sides together and fold down in 1-inch increments, then fold in the ends.
Step 5: Place on a coal bed Set on coals (not open flames) — cook 15–25 minutes depending on protein thickness.
Step 6: Rotate halfway Use tongs to rotate packets halfway through cooking.
The most common foil packet mistake is sealing too loosely — steam escapes and food dries out. Double-fold every seam. If you pre-assembled your packets at home (Phase 1), this step at camp takes under 2 minutes.
Grill Grate: Most Versatile Tool
A simple portable grill grate placed over the coals transforms your fire pit into a functional outdoor stove. You can boil water in a pot, sear proteins directly on the grate, and stabilize a Dutch oven — all on the same surface.
- Grill grate setup:
- Position the grate over your coal bed before coals fully develop so it pre-heats evenly
- Test temperature by holding your hand 6 inches above the grate — 3 seconds = high heat, 5 seconds = medium, 7+ seconds = low
- Use the grate to hold your pot steady while boiling water — far safer than balancing on rocks
A grill grate over the coals is the closest equivalent to a kitchen burner you’ll find at a campsite. Experienced campers rarely leave home without one.
Boiling Water Safely at Camp
Boiling water is the foundation of more camp meals than any other technique — pasta, oatmeal, coffee, rehydrated meals, and food safety all depend on it. The challenge is that your fire will die down before it reaches boiling point if you haven’t planned ahead.
How to boil water reliably at camp:
Step 1: Start your fire early Begin at least 30 minutes before you need boiling water — not 5 minutes before.
Step 2: Place your filled pot Set it on the grill grate while the fire is still active, not after it has died to coals.
Step 3: Cover with a lid Trap the heat — this reduces boiling time by 30–40%.
Step 4: Wait for a rolling boil Watch for large, vigorous bubbles — this is the threshold for food safety.
According to the CDC’s safe water guidance, a rolling boil for 1 full minute (3 minutes above 6,500 feet elevation) is sufficient to kill waterborne pathogens (CDC, 2026). If you’re boiling water from a natural source, this is non-negotiable.
The most common boiling mistake is adding food to water that’s merely simmering. Simmering water (small bubbles at the bottom) is not boiling. Wait for the full rolling boil before adding pasta, oatmeal, or rehydrated ingredients.
Dutch Oven and Cast Iron Basics
A Dutch oven opens up an entirely different tier of camp cooking — braised meats, cobblers, soups, and bread are all achievable with one pot and a coal bed. Cast iron retains heat exceptionally well, which makes it ideal for campfire cooking where temperature fluctuates.
- Basic Dutch oven technique:
- For stovetop-style cooking (soups, stews): place the Dutch oven on the grill grate over coals
- For oven-style cooking (baking, roasting): place hot coals under the Dutch oven and on top of the lid in a 1:2 ratio (1 coal under for every 2 on top)
- Season your cast iron at home before the trip — a well-seasoned surface requires no oil and is nearly non-stick
Dutch ovens are heavier than most camp cookware, which makes them better suited for car camping than backpacking. For weekend car camping trips, a 4-quart cast iron Dutch oven handles meals for 2–4 people comfortably.
Phase 4: Clean-As-You-Go Workflow
The biggest post-meal mistake campers make is treating cleanup as a separate event that happens after the meal. The clean-as-you-go workflow integrates cleanup into the cooking process itself — so by the time you finish eating, 60% of the cleanup is already done. According to the National Park Service’s Leave No Trace principles, proper food and waste management at camp is also a wildlife safety issue, not just a cleanliness preference (NPS, 2026).
The Wipe-Before-Wash Technique
Before any dish touches your wash water, wipe it thoroughly with a paper towel or clean cloth. Remove all visible food particles, grease, and sauce. This single step prevents your wash water from turning into a greasy food-particle soup after the second dish — which means your soap stays effective for the entire wash cycle and you use far less water overall.
Apply wipe-before-wash to: plates, pots, pans, cutting boards, and utensils. Food particles that go into your wash water also attract insects and wildlife. Wiping first keeps your campsite cleaner and your wash system effective longer.
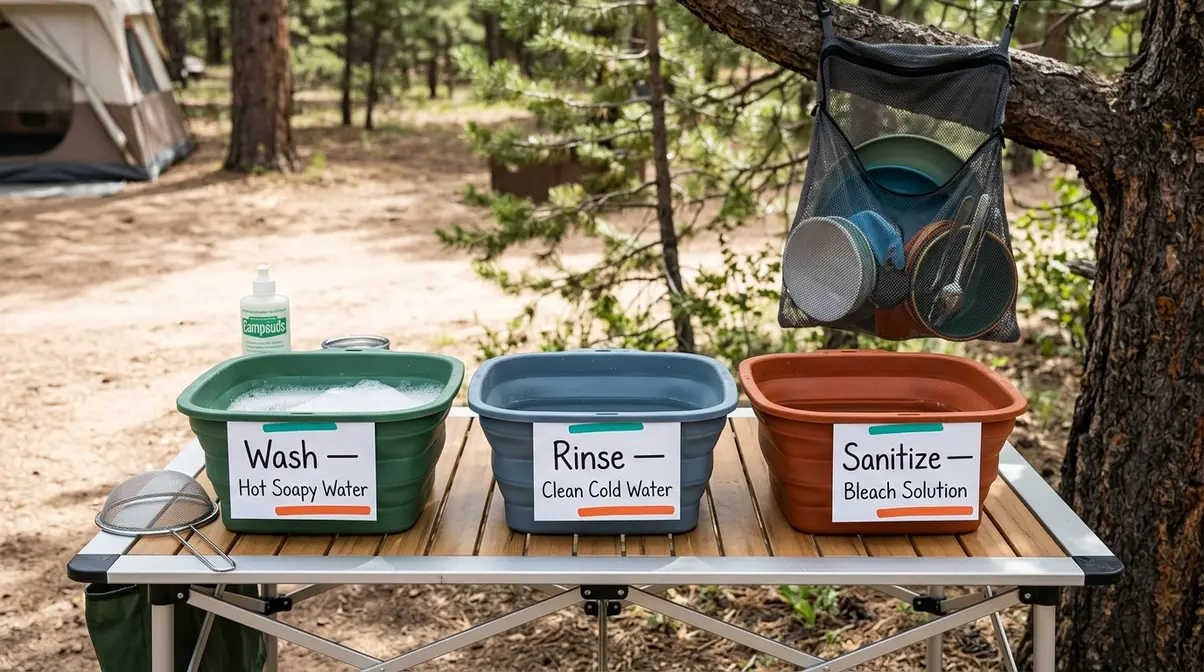
3-Bin System: Wash, Rinse, Sanitize
The 3-bin system is the standard practice among outdoor cooks and backcountry guides. It requires three basins — collapsible silicone basins work well — each with a specific purpose:
| Basin | Contents | Purpose |
|---|---|---|
| Bin 1 — Wash | Hot water + biodegradable camp soap | Remove food residue and grease |
| Bin 2 — Rinse | Clean cold water | Remove soap residue |
| Bin 3 — Sanitize | Water + small amount of unscented bleach (1 tsp per gallon) | Kill remaining bacteria |
The sequence:
Step 1: Wipe all dishes first Remove all visible food particles with a paper towel (see above).
Step 2: Wash in Bin 1 Use a small scrub brush in hot soapy water — work from least dirty to most dirty.
Step 3: Rinse in Bin 2 Submerge in clean cold water until no soap remains.
Step 4: Sanitize in Bin 3 Dip in the bleach solution for 30 seconds — air dry on a clean cloth or hang in a mesh bag.
Air drying is preferable to towel drying at camp because towels can harbor bacteria after the first use. Hang dishes in a mesh bag from a tree branch for 10–15 minutes.
What is the 200-foot rule for camping?
Greywater — the used water from your wash, rinse, and sanitize bins — cannot be dumped anywhere near your campsite, water sources, or trails. The 200-foot rule (approximately 70 adult paces) is the Leave No Trace standard for all greywater disposal, food waste scattering, and human waste.
Proper greywater disposal:
Step 1: Strain all food particles Pass your greywater through a small mesh strainer — pack out the solids in a zip-lock bag.
Step 2: Walk at least 200 feet Pace out approximately 70 adult steps from your campsite, water sources, and trails.
Step 3: Scatter the greywater broadly Toss the water over a wide area — do not dump it in one spot.
Step 4: Pack out the strained solids Take the food particles home with your trash; do not bury them.
The Leave No Trace Center for Outdoor Ethics emphasizes that scattering greywater over a wide area allows it to filter through soil naturally, minimizing impact on soil and water quality (LNT, 2026). Dumping greywater in one concentrated spot creates a scent magnet for wildlife — bears, raccoons, and rodents can detect food odors from up to a mile away.
Common Camp Cooking Mistakes to Avoid
Even with a solid system in place, a few predictable mistakes derail camp cooking for experienced and new campers alike. Understanding these failure points in advance is what separates a frustrating trip from a smooth one.
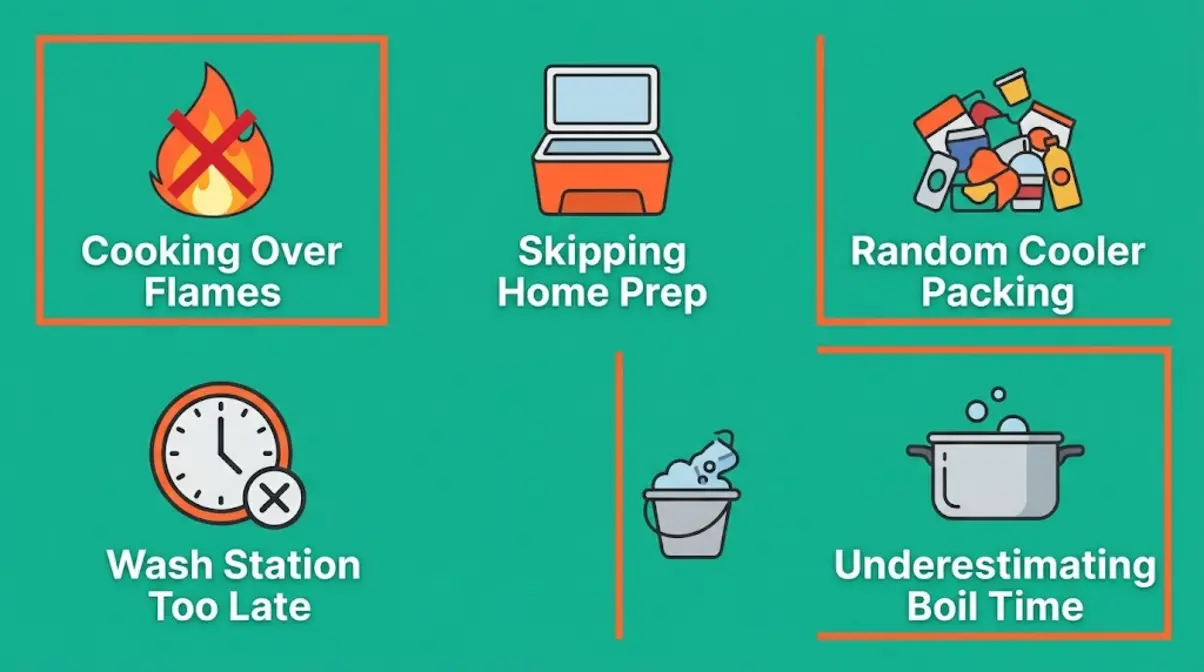
5 Mistakes That Derail Camp Cooking
Mistake 1: Cooking over open flames instead of coals. Open flames burn food unevenly and are nearly impossible to control. Always wait for a proper coal bed before cooking proteins.
Mistake 2: Skipping the home prep entirely. Arriving at camp and trying to chop vegetables, mix spices, and marinate proteins is the single biggest time drain. Even 30 minutes of home prep saves 90 minutes at the campsite.
Mistake 3: Packing the cooler randomly. Digging through a cold cooler disrupts temperature management and wastes time. The reverse-chronological method costs nothing and saves significant frustration.
Mistake 4: Setting up the wash station after the meal. By the time you finish eating, you’re tired and unmotivated to clean. Set up your 3-bin system before you cook — it takes 3 minutes and changes the entire post-meal experience.
Mistake 5: Forgetting that boiling takes longer at camp. A campfire is not a gas burner. Water takes 15–20 minutes to reach a rolling boil over coals, not 5 minutes. Plan accordingly and start your fire early.
When to Simplify Your Kitchen
The Zero-Friction Camp Kitchen System is designed for car camping trips of 2–4 days with 2–6 people. It is deliberately comprehensive — but not every trip needs all five phases at full intensity.
- Scale back when:
- You’re backpacking with weight limits — reduce to pre-portioned freeze-dried meals and a single pot
- You’re on a 1-night trip — skip the 3-bin system and use a single wash basin; skip the 3-zone layout and cook from your cooler directly
- You’re cooking for 1–2 people — foil packets and a single-burner stove may replace the full fire setup
The system is modular. Use the phases that apply to your trip and leave the rest. The goal is less stress, not more complexity.
Frequently Asked Questions
Tips for Cooking While Camping?
The most effective camp cooking tips focus on preparation before you leave home. Pre-chop vegetables, pre-mix spice blends, and pre-marinate proteins so your campsite becomes a reheating and assembly station rather than a full kitchen. Use the 3-Zone Camp Kitchen layout (Prep, Hot, Sanitation) to keep your workspace organized. Cook over glowing coals rather than open flames for consistent heat. According to experienced campers, front-loading 80% of the work at home reduces campsite cooking time by approximately half.
What Are 5 Camp Cooking Techniques?
The five core campfire cooking techniques are coal-bed cooking, foil packet cooking, grill grate cooking, Dutch oven cooking, and boiling. Coal-bed cooking provides the most consistent heat for proteins. Foil packets are the most forgiving technique — sealed moisture prevents burning. Grill grates act as a portable burner surface. Dutch ovens enable baking and braising. Boiling water is the foundation for pasta, oatmeal, and food safety. Most camp meals combine two or more of these techniques.
Best Advice for Campfire Cooking?
Experienced outdoor cooks consistently recommend waiting for coals before cooking — never cook over open flames. Open flames are unpredictable and create uneven heat that burns food on the outside before it cooks through. A proper coal bed (45–60 minutes after lighting with hardwood) produces steady radiant heat comparable to a medium gas burner. Build a two-zone fire — direct coals on one side, indirect heat on the other — to sear proteins and finish them gently without burning.
What are the 5 P’s of cooking?
The 5 P’s of cooking — Preparation, Patience, Precision, Practice, and Presentation — apply directly to camp cooking. Preparation (Phase 1 of the Zero-Friction system) is the most critical P for camp cooking success. Patience means waiting for a proper coal bed before cooking. Precision means measuring ingredients at home rather than guessing at camp. Practice means each trip builds on the last. Presentation matters even outdoors — a well-plated camp meal improves the overall experience and makes the effort feel worthwhile.
What are the 3 R’s in cooking?
The 3 R’s in camp cooking are Reduce, Reuse, and Repackage — principles that minimize waste and maximize efficiency at the campsite. Reduce means eliminating bulky commercial packaging at home before departure. Reuse means using resealable bags and reusable containers across multiple meals rather than single-use options. Repackage means transferring food into right-sized, labeled containers so every ingredient is exactly where you need it at the campsite. Together, these three habits reduce cooler bulk, cut campsite trash, and streamline the cooking process significantly.
Tips for Camp Food Safety?
The three most critical food safety rules for camp cooking are: keep cold food below 40°F, cook proteins to safe internal temperatures, and dispose of greywater at least 200 feet from water sources. According to the USDA Food Safety and Inspection Service, bacterial growth accelerates rapidly above 40°F — use frozen gel packs and block ice to maintain safe cooler temperatures (USDA FSIS, 2026). The CDC recommends a rolling boil for 1 full minute (3 minutes above 6,500 feet) to make water from natural sources safe for consumption (CDC, 2026).
Your Camp Cooking System Starts at Home
The most important insight from this guide is also the simplest: camp cooking workflow tips are most effective when the majority of the work happens before you ever leave home. Experienced campers who consistently produce stress-free, enjoyable outdoor meals share one common habit — they arrive at the campsite with food already prepped, a cooler already organized, and a mental map of exactly where their kitchen zones will be. According to the USDA FSIS, maintaining proper food temperatures from home to campsite is the foundation of safe outdoor cooking — and it starts with how you pack, not how you cook (USDA FSIS, 2026).
The Zero-Friction Camp Kitchen System works because it reframes camp cooking entirely: instead of improvising at the fire, you execute a plan you made in your kitchen at home. The five phases — home prep, zone setup, cooking technique, cleanup, and mistake prevention — form a repeatable sequence that gets easier and faster with every trip. Each phase eliminates a specific friction point that turns camp cooking into a chore rather than an experience.
On your next trip, start with Phase 1 only. Spend 30 minutes pre-chopping your vegetables and repackaging your cooler in reverse meal order. Notice how different the campsite feels when you arrive with everything already organized. Then add Phase 2 on the trip after that. The system builds naturally — and within two or three trips, the Zero-Friction Camp Kitchen System becomes second nature.
