This blog post may contain affiliate links. As an Amazon Associate I earn from qualifying purchases.
📋 Table of Contents
- First Camping Trip: Start With the Right Gear
- Core Sleep System: Tent, Bag, and Pad
- Clothing Layers and What to Wear
- The Commonly Forgotten Items Checklist
- Camp Kitchen and Hygiene Essentials
- How to Choose Your First Camping Tent
- Which Camping Style Is Right for You?
- Car Camping: The Easiest Starting Point
- RV Camping: Maximum Comfort for Families
- Moving Beyond Car Camping
- How to Set Up Your Tent and Choose a Campsite
- The Campsite Triangle: Finding a Spot
- Step-by-Step Tent Setup Guide
- Weatherproofing: Rain, Wind, Moisture
- How to Find Your First Campsite
- Starting With Established Campgrounds
- Free and Budget Camping Apps
- Where to Get Real-World Camping Advice
- Common Beginner Camping Mistakes
- Setup and Planning Mistakes
- When Tent Camping Isn’t the Right Choice
- Leave No Trace: Your Responsibility
- Tent Camping for Beginners FAQs
- What is the most important camping gear?
- How do you stay warm while tent camping?
- What are common beginner mistakes?
- How do you choose a campsite?
- What should you never bring into a tent?
- Your First Night Outdoors Is Closer Than You Think
“I have never been camping, but it’s something I definitely want to start doing regularly in the future. Problem is, I have zero experience.”
If that sounds familiar, you’re in exactly the right place.
Most first-time campers don’t fail because they lack enthusiasm — they fail because no guide shows them how to execute the basics. Generic advice like “bring layers” doesn’t help when you’re standing in a dark field at 9 PM trying to figure out which tent pole goes where. The gap between wanting to go camping and actually knowing what you’re doing is real, and it’s wider than most beginner guides acknowledge.
By the end of this guide, you’ll have all the tent camping tips for beginners you need: what gear to pack (and why each item matters), how to choose and pitch your campsite using a simple three-point framework, and how to sleep comfortably in any conditions. Your first night outdoors should be the start of a lifelong habit, not a cautionary tale. This guide covers five areas in sequence: essential gear, choosing your first tent, picking a camping style, setting up camp, and finding your first campsite.
Mastering these tent camping tips for beginners becomes manageable when you build your kit around three non-negotiables: a reliable tent, an insulated sleeping pad, and a temperature-rated sleeping bag — your “sleep system.”
- Start with your sleep system: Tent + sleeping bag + sleeping pad — in that order — before anything else
- Practice at home first: Set up your tent in the backyard at least once before the trip
- Use “The Campsite Triangle”: Level ground + natural drainage + wind protection = the ideal site
- Store food outside the tent: In your car or a bear canister — every single night
- Car camping is the easiest start: Amenities, parking, and built-in forgiveness for overpacking
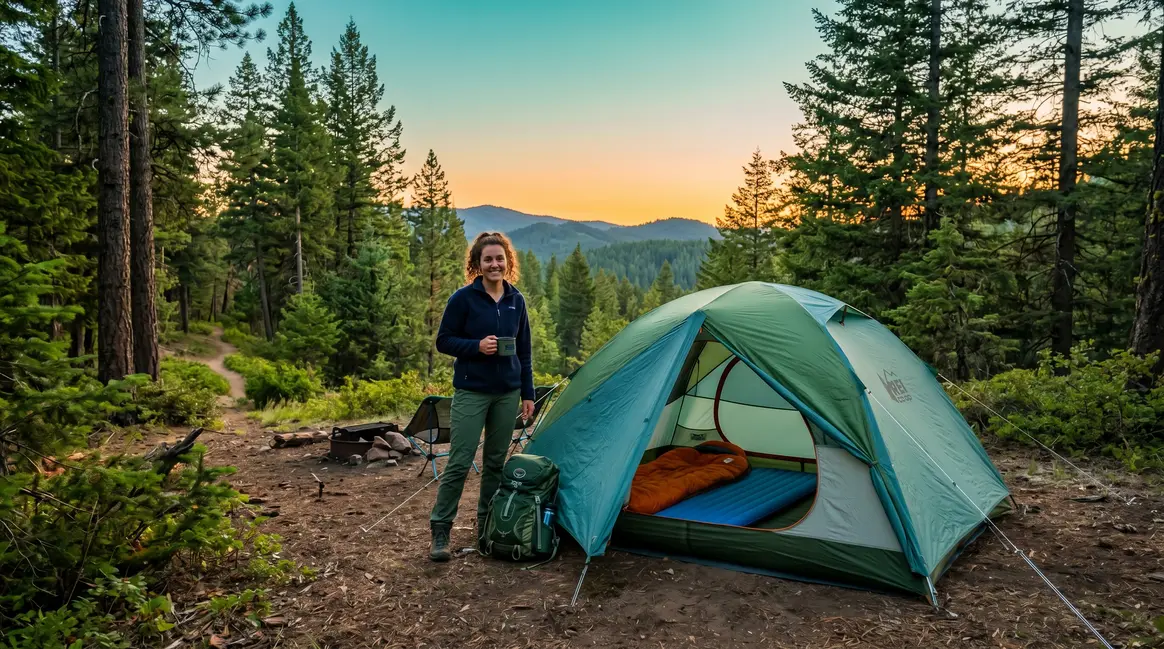
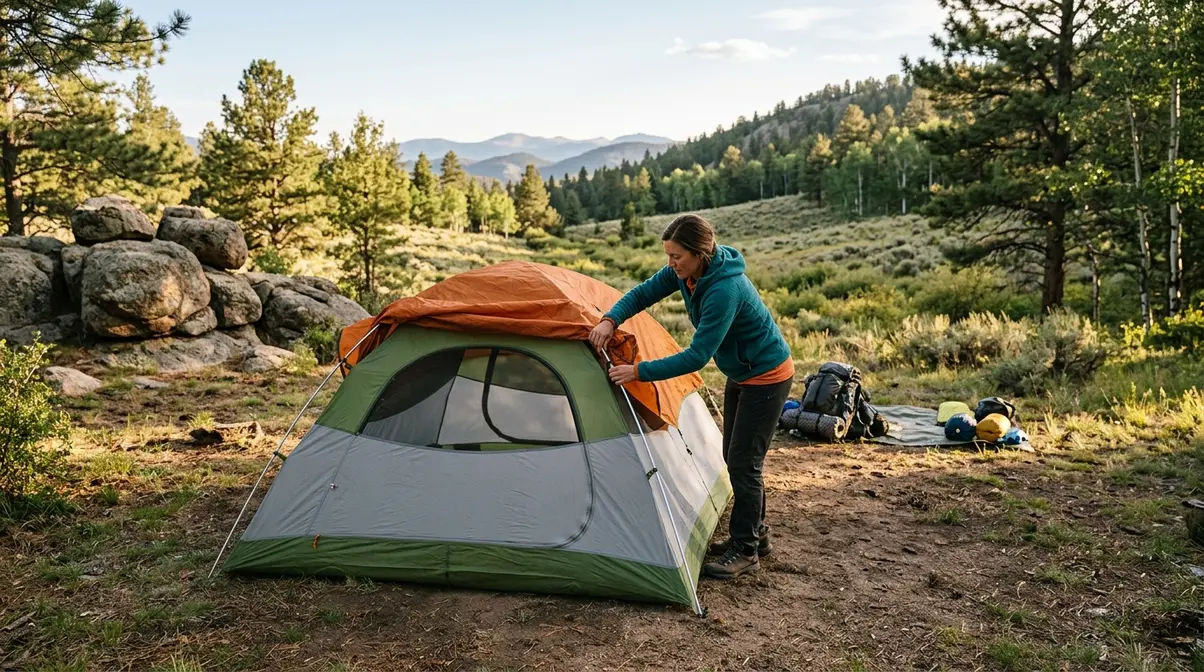
First Camping Trip: Start With the Right Gear

Every experienced camper will tell you the same thing: your gear list starts with your sleep system, not your camp stove. The reason is straightforward — if you sleep badly, the entire trip suffers. When reviewing tent camping tips for beginners, experts consistently prioritize the sleep system because it’s the single variable that determines whether you wake up energized or miserable. The CDC camping health guidelines also remind first-timers that preparation — including proper food handling and a stocked first-aid kit — is what separates a great trip from a medical situation (CDC).
This section walks through your core gear priorities in order: the sleep system, clothing layers, the items beginners consistently forget, and camp kitchen basics.
Core Sleep System: Tent, Bag, and Pad
Camping for beginners starts with understanding that your sleep system is a three-layer defense against three different threats — not a single piece of equipment. Each component compensates for a different type of heat loss, and skipping any one of them creates a gap the others can’t fill.
The tent protects you from wind and rain. It does not keep you warm. Beginners often over-rely on the tent for temperature regulation, then wonder why they’re cold despite being inside it. The tent is shelter, not insulation.
The sleeping bag retains the heat your body radiates outward. Every sleeping bag carries a “comfort rating” — the temperature at which a typical sleeper stays comfortable through the night. As a rule of thumb endorsed by REI’s beginner camping guide, choose a bag rated 10–15°F lower than your expected nighttime low for a reliable safety margin (REI). If overnight lows are forecast at 45°F, choose a bag rated for 30–35°F.
The sleeping pad insulates you from the ground. This is where most beginners make their costliest mistake. Ground contact pulls heat away from your body far more aggressively than cold air does — cold ground conducts heat away from your body much faster than cold air convects it away. A sleeping pad’s insulating power is measured in R-value (thermal resistance). An R-value of 2+ handles summer camping comfortably; R-4 or higher is recommended for shoulder-season trips when overnight temperatures drop below 40°F (REI).
“A sleeping pad’s R-value matters more than sleeping bag warmth on cold nights — ground conduction removes body heat far faster than cold air exposure.”
For your first trip, a foam or inflatable pad with R-2 to R-3 covers most three-season conditions. Skip the sleeping pad and you’ll lose body heat to the cold ground faster than even the warmest sleeping bag can compensate.
For a deeper look at putting these principles into practice, check out the top camping tips for beginners at Tent Explorer.
Transition: Once your sleep system is sorted, the next layer of comfort is what you wear — and the layering system is where beginners get things wrong more often than with any single piece of gear.
Clothing Layers and What to Wear
The three-layer clothing system is one of the most practical frameworks in outdoor recreation, and it applies whether you’re car camping in July or shoulder-season camping in October.
- Base layer: Moisture-wicking fabric — merino wool or synthetic. This layer moves sweat away from your skin. Avoid cotton entirely. “Cotton kills” is a real outdoor saying: wet cotton loses all insulating value and can cause rapid heat loss. A soaked cotton T-shirt in 50°F weather is genuinely dangerous.
- Mid layer: An insulating fleece or down jacket. This layer traps warm air close to your body. A lightweight fleece works for most three-season camping; a down puffy is worth adding for shoulder-season trips.
- Outer layer: A waterproof rain jacket, even in summer. Afternoon thunderstorms are common across most camping regions, and you’ll want to pack layers you can peel off by noon and add back at sunset.
Mornings at camp can run 25–30°F colder than afternoon highs, especially at elevation. The layering system lets you adapt without hauling separate wardrobes for each part of the day. Family camping trips benefit especially from this approach — kids in particular run hot during the day and cold at night, and the three-layer system handles both.
Transition: Gear and clothing cover your comfort. The next challenge is making sure you haven’t forgotten the small items that cause the most problems — the things nobody thinks about until they’re an hour from the nearest store.
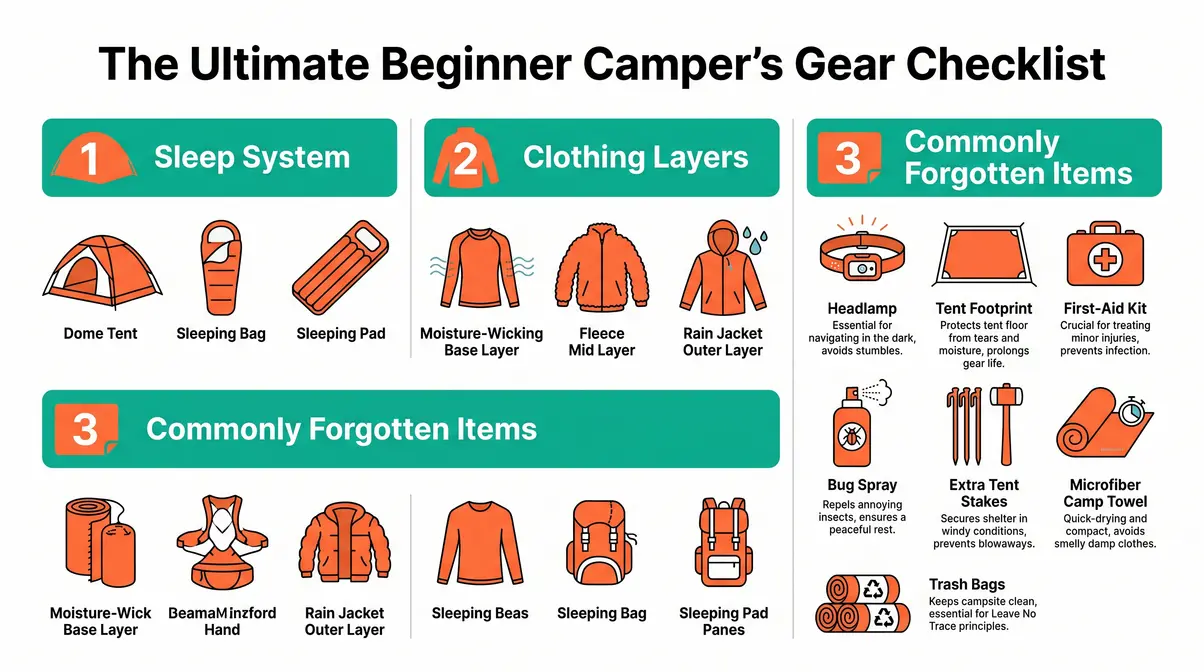
The Commonly Forgotten Items Checklist
Every beginner camping checklist covers the tent and sleeping bag. Far fewer address the items that consistently derail first trips — the small, inexpensive things nobody thinks to pack until they desperately need them.
The most commonly forgotten items, with the consequence of skipping each:
- Headlamp (not a flashlight) — Hands-free lighting is essential for setting up in the dark, navigating to the restroom at 2 AM, and cooking breakfast before dawn. Arriving at your campsite after dark is one of the top three beginner mistakes; a headlamp is your insurance policy.
- Tent footprint (a custom ground cloth that fits your tent’s floor dimensions) — Protects the tent floor from abrasion and adds a moisture barrier. Many beginners don’t know this exists until their tent floor develops a leak.
- First-aid kit — The CDC recommends a comprehensive first-aid kit as a camping essential, including blister care, wound closure strips, and any personal medications (CDC).
- Bug spray with DEET or picaridin — The CDC specifically recommends EPA-registered insect repellents to protect against tick and mosquito-borne diseases while camping (CDC). Don’t substitute “natural” alternatives for tick country.
- Extra tent stakes and guylines — Stakes bend on rocky ground and get lost in the dark. Most beginners never think about this until a storm hits and a corner of the tent lifts off the ground.
- Camp towel (quick-dry microfiber) — A regular bath towel stays damp for days. A microfiber camp towel dries in under an hour.
- Trash bags — Two or three large bags serve triple duty: trash containment, wet gear storage, and emergency rain protection for your pack.
The infographic below summarizes the full checklist at a glance.
For the full printable version, see our essential camping checklist for first-timers.
Transition: With gear packed and layers sorted, the final piece of your pre-trip preparation is your camp kitchen — where most beginners make their most memorable (and avoidable) mistakes.
Camp Kitchen and Hygiene Essentials
Camp cooking doesn’t require elaborate equipment. For your first trip, a simple canister stove — the MSR PocketRocket or a comparable single-burner model — is the easiest starting point. It boils water in under three minutes, runs on a standard isobutane canister, and fits in the palm of your hand. Note that open fires are not always permitted; always check your campground’s current fire restrictions before you go.
Food storage is a safety rule, not a preference. Never store food, scented items (toothpaste, sunscreen, bug spray), or cooking gear inside your tent. Store everything in your locked vehicle or a designated bear box. The National Park Service camping guidelines are explicit: improper food storage is one of the leading causes of dangerous wildlife encounters at campgrounds (NPS). Being bear aware isn’t paranoia — it’s basic campsite management.
Dishwashing the Leave No Trace way is one of the most overlooked beginner skills. The method is simple but specific:
- Fill a collapsible wash basin with warm water and a few drops of biodegradable soap.
- Scrub dishes and utensils thoroughly.
- Walk at least 200 feet (roughly 70 adult paces) from any water source, trail, or campsite.
- Scatter the grey water broadly across the ground — don’t dump it in one spot.
- Pack out all food scraps in a sealed bag.
Using biodegradable soap does not mean you can pour wash water directly into a stream or lake. “Biodegradable” means it breaks down in soil — not in water, and not instantly. Following this protocol keeps water sources clean for every camper who comes after you.
How to Choose Your First Camping Tent
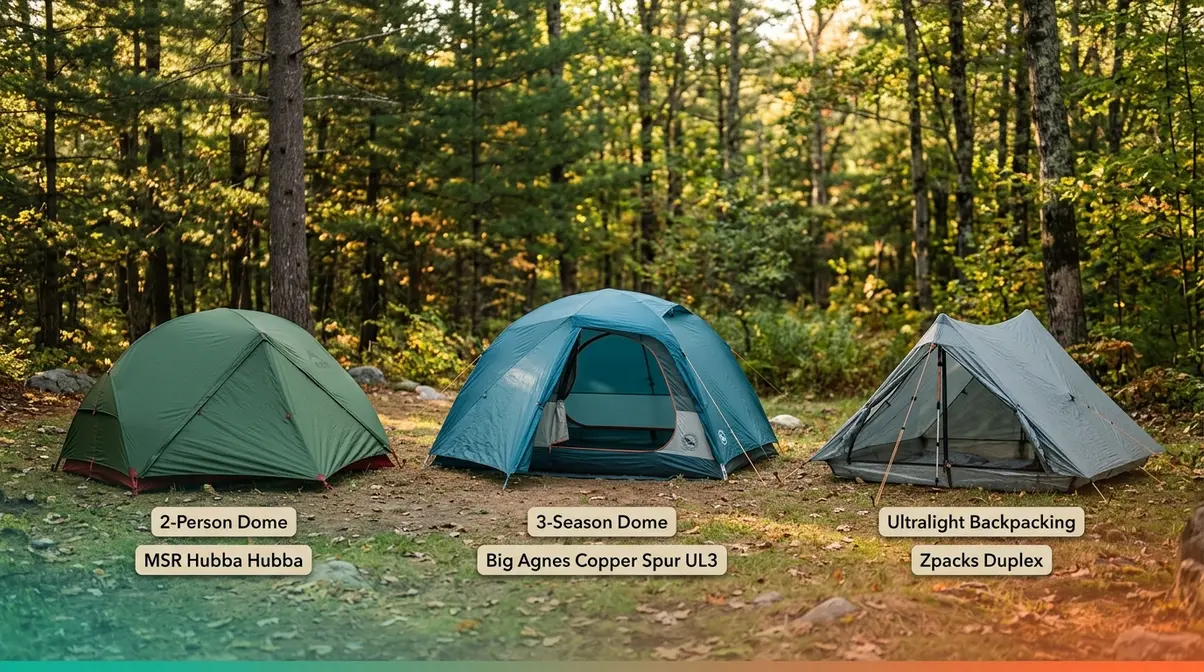
Choosing a tent feels overwhelming because there are hundreds of options — but for a first-time buyer, the decision narrows to three practical questions.
1. How many people? Tent capacity ratings are optimistic. A “3-person tent” comfortably sleeps two adults with gear. Add one person to whatever the label says if you want sleeping room and space for your packs.
2. What season? For most beginners, a 3-season tent (rated for spring through fall) is the right choice. These handle rain and moderate wind without the weight penalty of a 4-season mountaineering tent. Avoid ultra-light backpacking tents for your first trip — they sacrifice livability for weight savings you don’t yet need.
3. Freestanding or non-freestanding? Freestanding tents hold their shape without stakes and can be picked up and repositioned, which is a genuine advantage when you’re learning. Non-freestanding designs require precise staking and are better suited to experienced campers.
For a complete breakdown of tent types, materials, and specific product recommendations for first-time buyers, see our essential tips for buying your first tent and our roundup of the top 5 best tents for beginners. Both guides cover the full decision framework at a depth this pillar guide doesn’t need to duplicate.
The short version: for your first car camping trip, look for a freestanding 3-season dome tent in the 2–3 person size range, with a full-coverage rainfly and a vestibule for gear storage. Budget $100–$200 for a reliable entry-level option from brands like REI Co-op, Coleman, or Kelty.
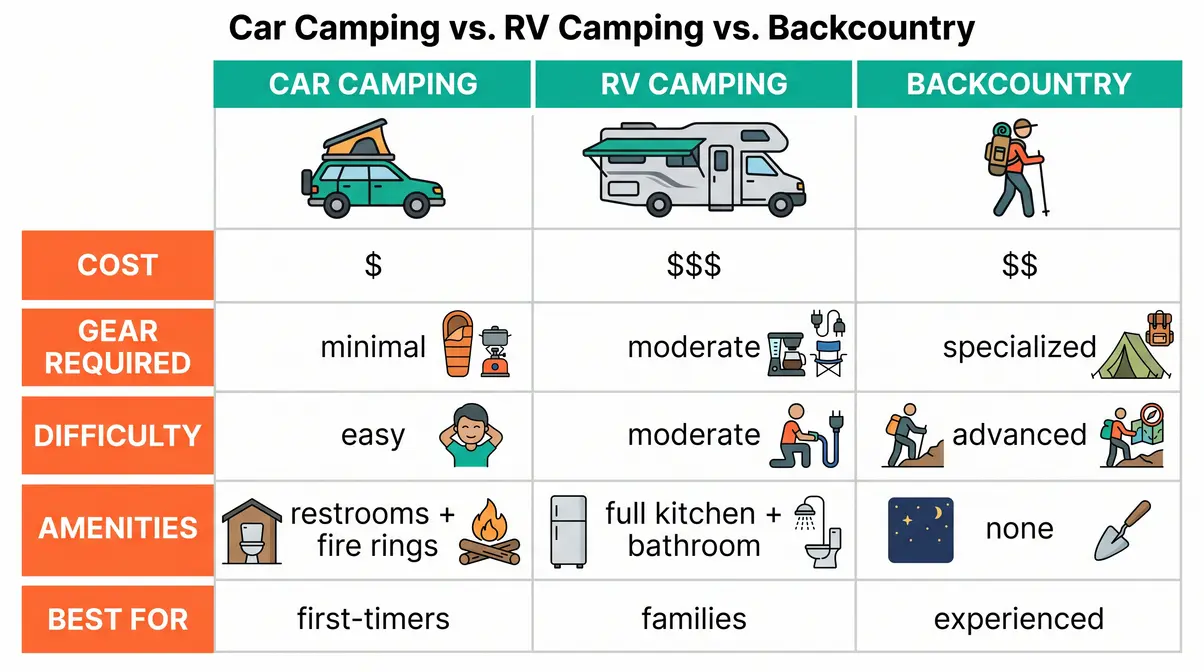
Which Camping Style Is Right for You?
Not all camping is the same, and choosing the right style for your first trip dramatically affects how much you enjoy it. The three main options — car camping, RV camping, and backcountry camping — require very different levels of preparation, fitness, and gear investment.
Car Camping: The Easiest Starting Point
Car camping means driving your vehicle directly to a designated campsite, typically within a developed campground that offers amenities like vault or flush toilets, fire rings, and sometimes electrical hookups. It is, without question, the easiest entry point into tent camping for beginners.
The defining advantage of car camping is forgiveness. You can pack more than you need, leave things in the car, and drive to the nearest town if you forget something critical. Established campgrounds also provide infrastructure — marked sites, fire rings, bear boxes — that removes most of the decision-making from your first night. If you want to upgrade your shelter, a dedicated best tent for car camping can make the experience even better.
For your first trip, target a campground with reservable sites, running water, and restrooms. Recreation.gov and your state’s park reservation system are the two most reliable booking platforms in the US.
Transition: Car camping is the standard first step. For families or groups who want even more comfort and amenities, RV camping takes that logic further — though it comes with its own trade-offs.
RV Camping: Maximum Comfort for Families
RV camping — whether in a rented Class C motorhome or a travel trailer towed by a truck — offers the closest approximation to hotel-style comfort in an outdoor setting. You get a bed, climate control, a small kitchen, and a private bathroom. For families with young children or anyone with mobility limitations, it’s a genuinely excellent option.
The trade-off is cost and complexity. Renting an RV typically runs $150–$300 per night through platforms like Outdoorsy or RVshare, and driving a large vehicle into a campground requires practice. RV sites also book out months in advance at popular destinations, particularly during summer weekends.
For tent campers specifically, RV camping is a useful stepping stone — some families try it first to test their enthusiasm before investing in tent gear. If you decide to stick with a traditional vehicle but want speed, checking out the best instant tents for quick family camping setups is a great alternative. But if your goal is to sleep under canvas and build outdoor skills, car camping with a tent gets you there faster and cheaper.
Transition: Once you’ve done a few car camping trips and feel comfortable with the basics, the natural next step is moving beyond the developed campground — and that’s where tent camping opens up significantly.
Moving Beyond Car Camping
Dispersed camping (camping on public land outside designated campgrounds, typically permitted on Bureau of Land Management and US Forest Service land) is free, often beautiful, and requires noticeably more self-sufficiency. There are no restrooms, no fire rings, no neighbors 30 feet away.
Most experienced campers recommend 2–3 developed campground trips before attempting dispersed camping. By then, you’ll know your gear, understand your sleep system, and have a reliable tent-pitching routine — which makes the step up feel like an expansion, not an entirely new skill set.
Backpacking (carrying all your gear on your back to a remote site) is a further step beyond dispersed camping. It’s deeply rewarding but demands lightweight gear, physical fitness, and navigation skills. Treat it as a goal for year two, not your first weekend.
How to Set Up Your Tent and Choose a Campsite
This is the section most beginner guides skip entirely. Knowing how to pitch a tent is less than half the skill — knowing where to pitch it determines your comfort, safety, and sleep quality for the entire trip.
The Campsite Triangle: Finding a Spot
The Campsite Triangle is a three-point site-selection framework that experienced campers use instinctively but rarely articulate. Every ideal campsite satisfies all three criteria simultaneously. Miss one, and you’ll feel it — usually at 2 AM.
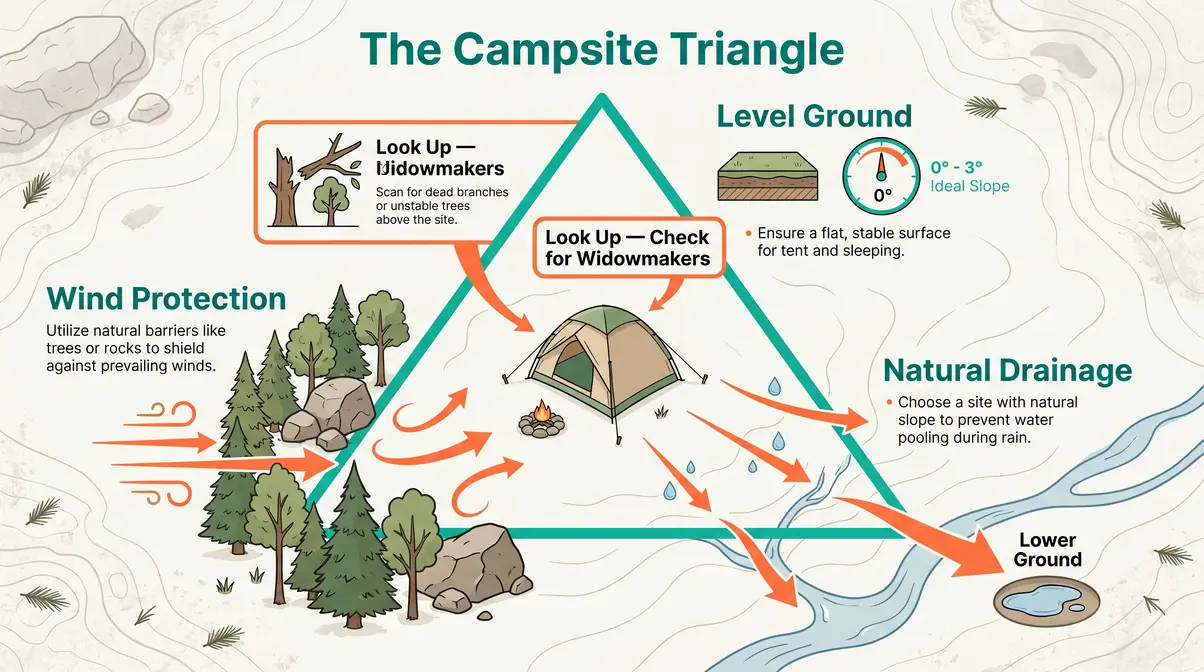
Point 1: Level Ground Your sleeping surface should be as flat as possible. Even a slight slope that seems insignificant when you’re standing upright becomes obvious when you’ve been sliding toward the downhill end of your sleeping pad for three hours. If perfectly flat ground isn’t available, position the tent so your head is on the uphill side.
Point 2: Natural Drainage Look at how the ground around your site slopes. You want the land around your tent to slope away from it, not toward it. After rain, water flows downhill and pools in low spots. If your tent is in a depression — even a shallow one — you’ll wake up in a puddle. Check for dried stream channels, which indicate seasonal water flow.
Point 3: Wind Protection Natural windbreaks — a tree line, a boulder, a ridge — dramatically improve tent stability and warmth retention. Position your tent so the narrowest end (the door or the foot) faces the prevailing wind direction. In most of the continental US, prevailing winds come from the west or southwest; orient accordingly.
One additional check before you stake a single peg: Look up. Dead branches overhead — called widowmakers by experienced campers — can fall without warning, especially in wind. If you see large dead branches directly above a potential site, move.
“The Campsite Triangle — level ground, natural drainage, and wind protection — is the three-point check that separates a good night’s sleep from a miserable one.”
Step-by-Step Tent Setup Guide
Setting up a tent for the first time takes most beginners 20–40 minutes. After two or three practice runs, it drops to under 10. The single most important tent camping tip for beginners: practice in your backyard before your trip. Do not attempt your first setup in the dark, in the rain, after a four-hour drive.
Before you start: Lay out all tent components — poles, body, rainfly, stakes, footprint — and confirm nothing is missing. Before laying anything down, you might wonder about ground protection; understanding the difference between a tent footprint vs tarp will help you choose the right base.
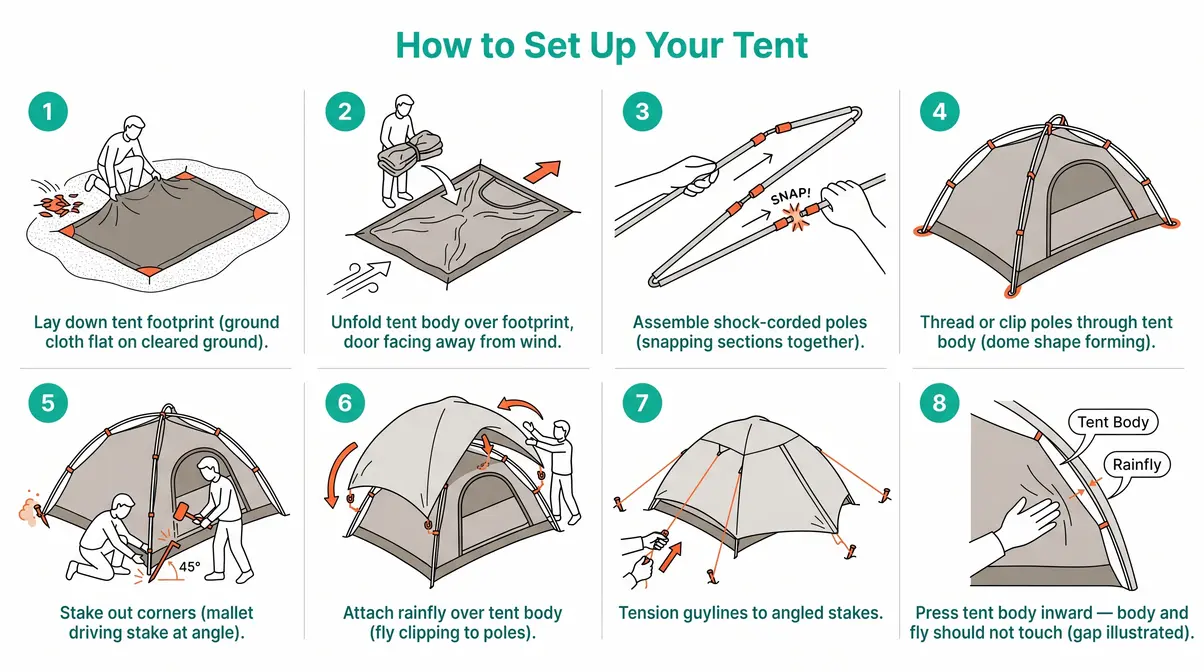
- Lay down your tent footprint (the ground cloth) where you’ve selected your site. Smooth out any rocks, roots, or pinecones beneath it — you’ll feel every one of them through your sleeping pad.
- Unfold the tent body over the footprint. Orient the door toward your preferred direction (away from prevailing wind, toward a view if you have one).
- Assemble the poles. Most modern tents use color-coded, shock-corded poles that snap together in sequence. Lay them out fully before threading.
- Thread or clip poles through the tent body. Dome tents typically cross two poles diagonally through pole sleeves or clips along the tent’s exterior.
Once the main structure is standing, you can focus on weatherproofing and securing the shelter.
- Stake out the corners. Stake before fully tensioning — this sets the tent’s footprint and prevents asymmetry.
- Attach the rainfly over the tent body. Most flies clip or velcro to the poles at specific points. Ensure the fly extends close to the ground on all sides for full rain protection.
- Tension the guylines — the small cords that extend from the rainfly to additional stakes set at angles. These are what keep your tent stable in wind. Don’t skip them even on calm nights.
- Do a final check: Press gently on the tent body from inside — it should not touch the rainfly. If body and fly are in contact, condensation will transfer through and you’ll wake up damp.
Transition: Even a perfectly pitched tent needs weatherproofing preparation. Rain, wind, and condensation are the three conditions that catch beginners off guard — and each requires a slightly different response.
Weatherproofing: Rain, Wind, Moisture
Weatherproofing starts before the first raindrop. A fully staked and guyed tent with a properly fitted rainfly handles moderate rain without any intervention — but only if it was set up correctly to begin with.
Rain: Ensure your rainfly covers the tent body to within 2–4 inches of the ground on all sides. Check that no part of the tent body contacts the fly. For complete protection, applying a perfect tent seam sealing treatment before your trip ensures no leaks. Dig a shallow “drainage moat” around the tent perimeter if heavy rain is forecast and your site has any low-lying characteristics — a small trench 2 inches deep and 4 inches from the tent edge redirects surface water away effectively. The National Weather Service recommends monitoring forecasts within 24 hours of any outdoor activity (NWS); download a forecast for your specific campground location before you leave home.
Wind: If wind picks up unexpectedly, add extra stakes at 45-degree angles from the tent corners and tension all guylines. Lower-profile tents handle wind better than tall cabin-style tents. If you’re camping in an area known for strong overnight winds — high desert, exposed ridgelines, coastal sites — position the tent end-on to the wind direction, not broadside.
Condensation: Even in dry weather, moisture from your breath accumulates inside a closed tent overnight. The fix is ventilation: leave inner mesh vents or a small gap in the door open even in cold weather. Counterintuitively, a slightly open tent stays drier inside than a fully sealed one.
How to Find Your First Campsite
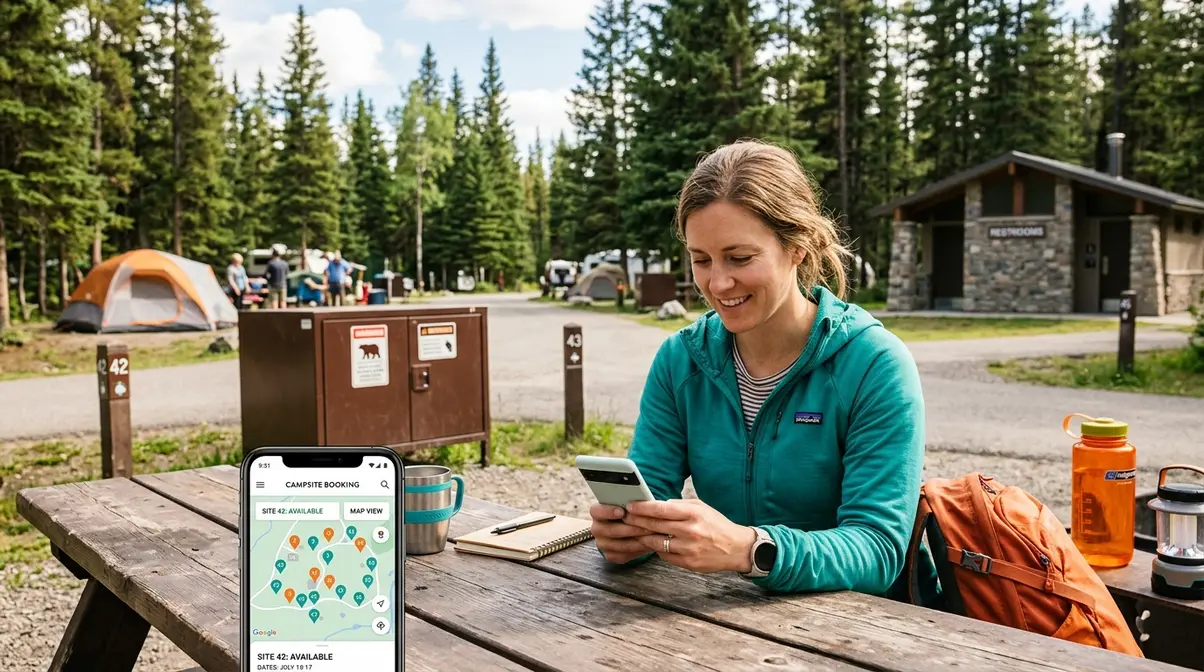
Finding the right campsite is a skill that improves with each trip. For your first outing, the goal is a forgiving, well-managed location — somewhere with infrastructure, clear rules, and other campers nearby if you need help.
Starting With Established Campgrounds
Established campgrounds — particularly those managed by state and national parks — are the best starting point for beginner tent campers. They offer marked sites, fire infrastructure, restrooms, and staff who can answer questions. Most importantly, they’re designed to be accessible and safe for people with no prior camping experience.
- Booking platforms to know:
- Recreation.gov — the primary reservation system for US federal lands (National Parks, National Forests, BLM sites)
- Reserve America — covers many state park campgrounds
- Your state’s park department website — often has the most current site availability for state parks
Book at least 4–6 weeks in advance for summer weekends at popular destinations. Many National Park campgrounds, particularly in Yosemite, Rocky Mountain, and Acadia, release reservations six months ahead and fill within hours. Start with less-famous state parks for your first trip — the experience is comparable, competition is lower, and the sites are often just as beautiful.
Transition: Established campgrounds are the safest first choice, but they’re not your only option — and for budget-conscious campers, free alternatives can be just as good.
Free and Budget Camping Apps
Dispersed camping on Bureau of Land Management (BLM) and US Forest Service (USFS) land is free and legal across millions of acres of public land in the western US. You don’t need a reservation, but you do need to know the rules: most dispersed camping requires you to camp at least 200 feet from water sources, roads, and other campers, and to pack out all waste.
Apps and tools that make finding free campsites easier:
- The Dyrt — crowdsourced campsite reviews with photos, GPS coordinates, and cell signal ratings. The free tier covers most use cases; the Pro tier (around $35/year) adds offline maps.
- Campendium — strong coverage of BLM and USFS dispersed sites, with user reviews filtered by rig type and season.
- FreeRoam — specifically focused on free and low-cost camping on public lands, with maps pulled from BLM and USFS data.
- iOverlander — popular with overlanders and van campers; excellent for remote western US sites.
For your first free camping experience, choose a site that other users have recently reviewed positively — look for reviews from the current season and check cell signal ratings if you’re camping solo.
Transition: Apps give you coordinates. Community gives you judgment. The difference between a good campsite and a great one often comes down to advice from someone who’s been there.
Where to Get Real-World Camping Advice
No app or guide replaces the judgment of someone who camped your target location last weekend. These communities consistently deliver the most current, specific, and honest advice available:
- r/camping and r/CampingandHiking — Both subreddits have active communities and beginner-friendly cultures. Across r/camping and professional outdoor forums, the consistent feedback from experienced campers is to do one shakedown trip close to home before committing to a remote destination.
- r/Hiking or r/Camping — State-specific subreddits often have trip reports with photos from the past few weeks.
- AllTrails — Primarily a hiking app, but campground reviews in the app are often more detailed and current than those on booking platforms.
- Local outdoor gear shops — Staff at independent outdoor retailers (not big-box stores) frequently camp the local area and give genuinely useful, unsponsored advice.
Common Beginner Camping Mistakes
Experience is the best teacher, but other people’s experience is faster and cheaper. Common mistakes reported by first-time campers fall into predictable patterns — and most are completely avoidable with a bit of forewarning.
Setup and Planning Mistakes
Arriving after dark. This is the single most common first-trip mistake. Setting up a tent in the dark, on unfamiliar ground, without a working headlamp, is genuinely difficult. Aim to arrive at your campsite at least two hours before sunset.
Skipping the practice setup. Every experienced camper has a story about a tent they couldn’t figure out in the field. Spend 20 minutes setting yours up in the backyard before you leave. You’ll discover missing parts, broken poles, or confusing instructions in a low-stakes environment.
Underestimating how cold nights get. Daytime temperatures are not nighttime temperatures. Even in July, mountain campsites can drop below 40°F overnight. Check the forecast for your specific elevation, and choose a sleeping bag rated at least 10°F below the expected low.
Pitching on sloped or low-lying ground. Both of these violate The Campsite Triangle framework. Sloped ground makes sleep uncomfortable; low-lying ground floods in rain. Take five minutes to evaluate your site before staking anything.
Over-packing food and under-packing water. First-timers typically bring three times more food than they’ll eat and not enough water for cooking, drinking, and dishwashing. A general rule: one liter of water per person per hour of activity, plus two liters per person for cooking and camp hygiene.
When Tent Camping Isn’t the Right Choice
Tent camping in extreme conditions — prolonged heavy rain, temperatures below 20°F, high-wind exposed sites — is not the right starting point for beginners. These conditions require specific gear (4-season tents, high-R-value sleep systems, layered insulation systems) and practiced skills that take time to develop.
If your first trip falls during an unexpected weather event, it’s entirely reasonable to sleep in your car, check into a motel, or cut the trip short. There’s no shame in recognizing when conditions exceed your current experience level — that judgment is itself an outdoor skill. Tent camping should feel challenging in a rewarding way, not dangerous.
Leave No Trace: Your Responsibility
Leave No Trace (LNT) is the nonprofit organization that sets outdoor ethics standards for public land use in the US. Its seven principles apply to every camper at every skill level — and they’re not optional suggestions (Leave No Trace Center for Outdoor Ethics).
The three principles that trip up beginners most often:
Dispose of waste properly. Human waste must be buried in a cat hole at least 6 inches deep and 200 feet from water, trails, and camp — or packed out in a WAG bag where required. Toilet paper should be packed out in most backcountry settings.
Leave what you find. Don’t pick wildflowers, collect rocks from protected areas, or carve initials into trees. It seems obvious until you’re at a beautiful site and the temptation is real.
Minimize campfire impact. Use established fire rings only. Never cut live branches. Burn wood completely to ash, extinguish fully with water (not dirt), and confirm the ash is cold before you leave. Many campgrounds ban fires entirely during dry seasons — check before you go.
For complete LNT guidance, the Leave No Trace Center for Outdoor Ethics maintains the authoritative reference for all seven principles.
Tent Camping for Beginners FAQs
What is the most important camping gear?
Your sleep system is the most important gear for any first camping trip — specifically the combination of a tent, a temperature-rated sleeping bag, and an insulated sleeping pad. The tent handles wind and rain protection; the sleeping bag retains body heat; the sleeping pad insulates you from ground conduction, which removes heat far faster than cold air. According to REI’s beginner camping guide, a sleeping bag rated 10–15°F below your expected nighttime low provides a reliable safety buffer (REI). If you only have budget for one upgrade, prioritize your sleeping pad — it’s the most commonly underestimated item in a beginner’s kit.
How do you stay warm while tent camping?
Staying warm while tent camping depends on your sleep system and clothing layers, not just the sleeping bag. Use a sleeping pad with an R-value of at least 2 for summer camping (R-4 for shoulder seasons) to block ground heat loss. Wear a moisture-wicking base layer and avoid cotton against your skin — wet cotton loses all insulating value and can cause rapid heat loss in cool conditions. Keep your tent vented slightly to prevent condensation buildup, which makes everything feel colder and damper. The layering principle — base, mid, outer — applies at camp just as it does on the trail.
What are common beginner mistakes?
The most common beginner camping mistakes are arriving after dark, skipping a practice tent setup, and underestimating overnight temperature drops. Experienced campers consistently report that pitching a tent in the dark on unfamiliar ground — without a headlamp — is one of the most frustrating experiences in outdoor recreation. Other frequent errors include pitching on sloped or low-lying ground (which violates The Campsite Triangle), over-packing food while under-packing water, and storing food inside the tent. The National Park Service identifies improper food storage as a leading cause of wildlife encounters at campgrounds (NPS).
How do you choose a campsite?
The best campsites satisfy three criteria simultaneously: level ground, natural drainage, and wind protection — the three points of The Campsite Triangle framework. Level ground prevents you from sliding downhill in your sleep. Natural drainage means the surrounding terrain slopes away from your tent, so rainwater flows away rather than pooling underneath you. Wind protection from a natural feature — a tree line, a boulder, a ridge — improves both tent stability and warmth retention. Before staking anything, also look directly overhead for widowmakers (dead branches) that could fall in wind. Taking five minutes to evaluate a site before setup prevents most weather-related problems.
What should you never bring into a tent?
Never bring food, scented items, or cooking equipment into your tent — this is a safety rule, not a preference. Food smells attract wildlife, including bears in many camping regions. Store all food, trash, toiletries, sunscreen, and cooking gear in your locked vehicle or a designated bear box every night. The National Park Service emphasizes that improper food storage is one of the leading causes of dangerous campsite wildlife encounters (NPS). Beyond food, avoid bringing candles, open-flame lanterns, or fuel canisters inside the tent — fire risk in an enclosed fabric structure is significant and underestimated by most beginners.
Your First Night Outdoors Is Closer Than You Think
Applying these tent camping tips for beginners comes down to a handful of decisions made in the right order: build your sleep system first, choose a campsite that satisfies The Campsite Triangle, practice your tent setup before you go, and follow Leave No Trace principles from day one. Every experienced camper started exactly where you are — with zero experience and a list of things they weren’t sure about.
The Campsite Triangle is the framework that ties the technical skills together: level ground, natural drainage, and wind protection aren’t three separate considerations — they’re a single site-quality check you can run in under five minutes. Master it on your first trip and it becomes automatic by your third.
Your next step is concrete: pick a date, reserve a site at a developed campground within two hours of home, and set up your tent in the backyard this weekend. One practice session removes 80% of first-night anxiety. The gear, the skills, and the confidence all follow from that first stake in the ground.
*Written by the TentExplorer editorial team — outdoor writers and camping enthusiasts with combined experience across hundreds of nights in the field, from car camping in state parks to multi-week backcountry expeditions.
