This blog post may contain affiliate links. As an Amazon Associate I earn from qualifying purchases.
📋 Table of Contents
- What You’ll Need Before You Start
- Step 1: Set Up Your Tent and Remove Loose Debris
- Choosing the Right Brush for Canvas
- Inspecting for Damage, Mold Spots, and Stains Before Cleaning
- Step 2: Spot Clean Stains with a Mild Soap Solution
- The Vinegar vs. Soap vs. Bleach Debate: Which Is Actually Safe?
- How to Spot Clean Without Stripping Waterproofing
- Step 3: Deep Clean with the Soaking Method
- When Does Your Canvas Tent Need a Full Soak?
- The Soaking Process: Step-by-Step
- Step 4: Remove Mold and Mildew from Canvas
- Assessing the Severity of Mold Growth
- How to Apply the Vinegar Solution Safely
- Drying Mold-Treated Canvas in Direct Sunlight
- Step 5: Rinse Thoroughly and Dry Your Canvas Tent Completely
- Rinsing: Getting Every Trace of Soap Out
- Drying: The Most Important Step in Canvas Tent Care
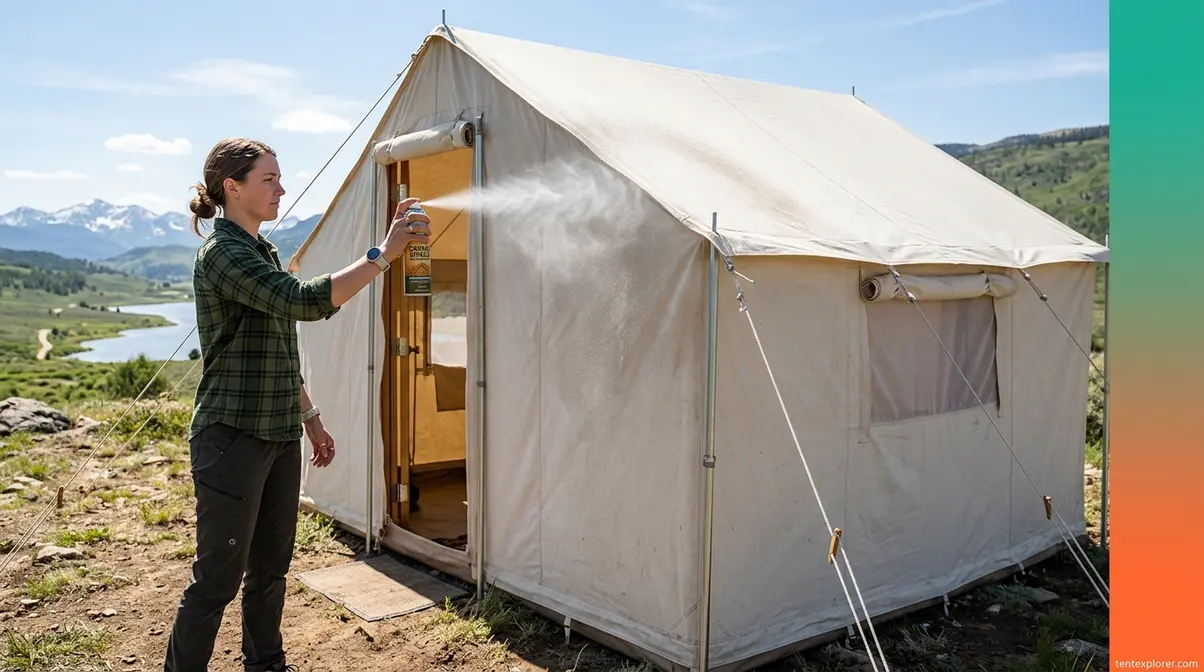
- Step 6: Re-Waterproof Your Canvas Tent After Cleaning
- Why Cleaning Strips Canvas Waterproofing (And Why You Must Re-Apply)
- How to Apply Waterproofing Treatment: Products and Process
- Cleaning Specific Types of Canvas Tents
- Cleaning a Kodiak Canvas Tent
- Cleaning a Bell Canvas Tent
- Cleaning a Canvas Wall Tent
- What to Avoid When Cleaning Your Canvas Tent
- Chemicals That Damage Canvas (And Why)
- Tools and Techniques That Ruin Canvas Fabric
- Frequently Asked Questions
- How to Clean a Dirty Canvas Tent?
- Is Dawn Dish Soap Safe for Tents?
- What Is the Best Product to Clean a Canvas Tent?
- Can You Leave a Canvas Tent Up All Year?
- Can I Use Vinegar on My Tent?
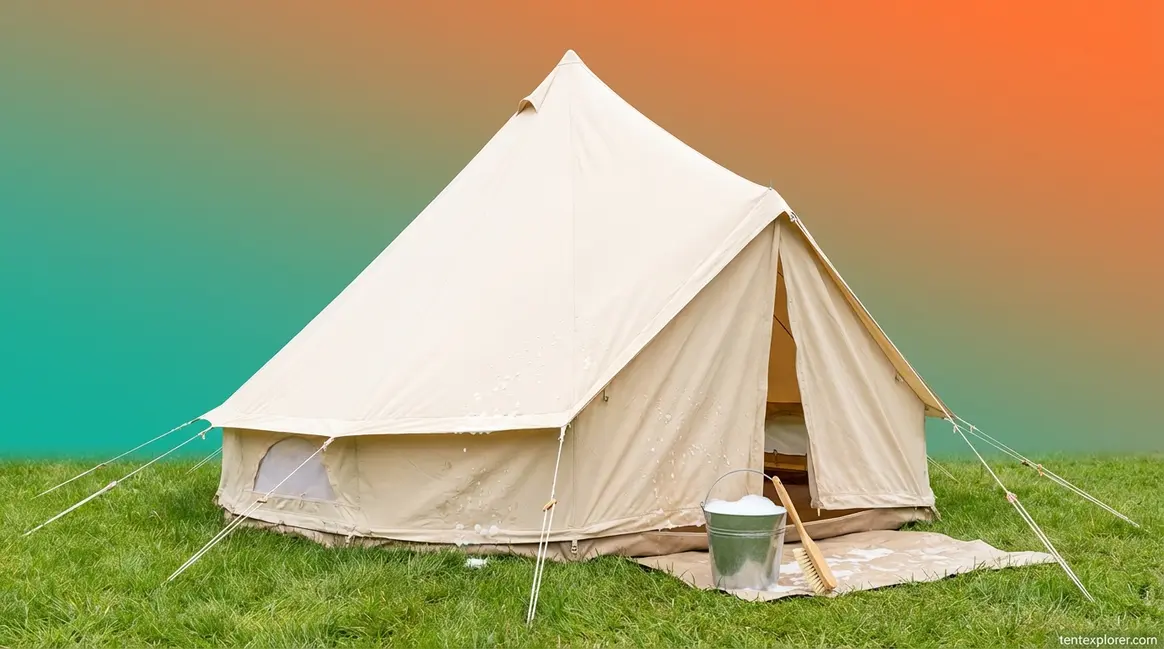
You know your canvas tent needs cleaning — but you’ve also heard the horror stories. Use the wrong soap and you’ll ruin the waterproofing. Reach for bleach and you’ll permanently weaken the fabric. Stick it in a washing machine and the agitation destroys the weave. With so much conflicting advice floating around — vinegar? Dawn dish soap? a pressure washer? — it’s easy to understand why most people end up doing nothing at all.
Here’s the problem with doing nothing: a canvas tent is a $300–$1,500+ investment, and improper storage or neglected mold is the single fastest path to premature canvas failure. The cost of getting the cleaning wrong — or skipping it entirely — is replacing the whole tent years before you should have to.
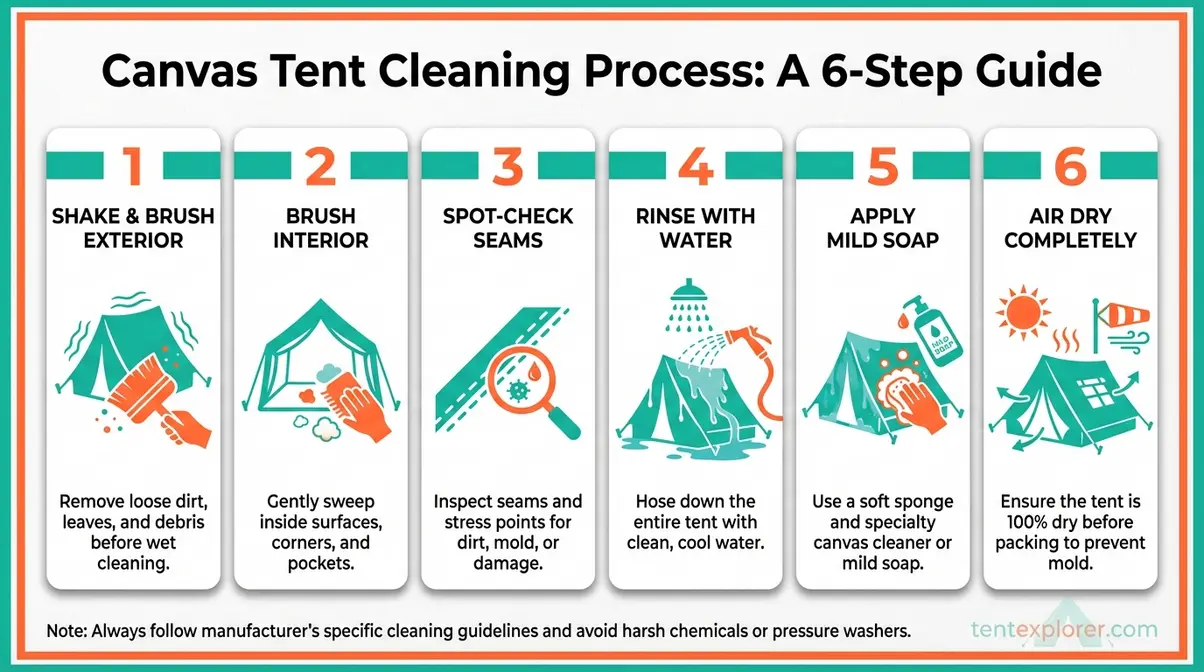
By the end of this guide, you’ll know exactly which cleaning agents are safe, how to eliminate mold without damaging the fabric, and how to restore the waterproofing that cleaning strips away. The framework you’ll follow is called The Canvas Care Sequence — a six-step ordered process that covers dry-brushing, spot cleaning, deep soaking, mold remediation, rinsing and drying, and re-waterproofing. Each step builds on the last. The order matters as much as the products.
Key Takeaways: How to Clean a Canvas Tent
Cleaning a canvas tent safely requires the right sequence: dry-brush, spot clean with mild soap, treat mold with diluted white vinegar, rinse completely, dry fully before storage, and re-waterproof. Using bleach or a pressure washer will permanently damage canvas fibers.
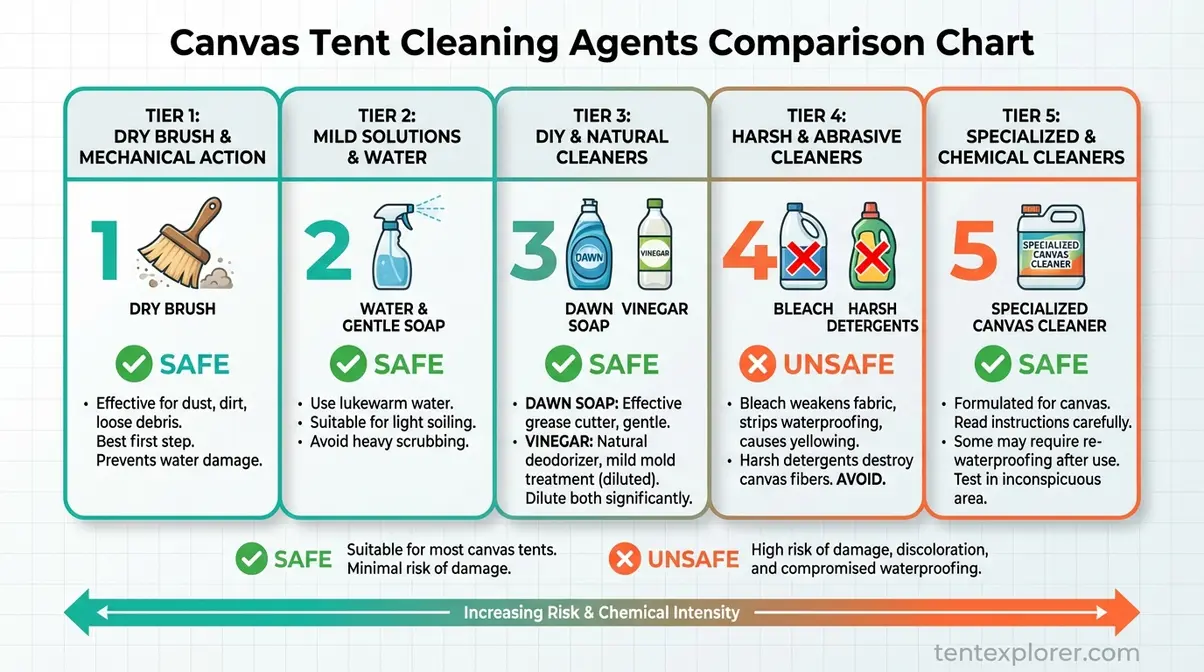
- Safe cleaners: Plain water, diluted Dawn dish soap, or a 1:3 white vinegar-to-water solution for mold
- The Canvas Care Sequence: Always re-waterproof after any soap wash — cleaning strips the DWR (Durable Water Repellent) coating
- Mold rule: Treat with vinegar, dry in direct sunlight; never store damp canvas
- Never use: Bleach, pressure washers, or harsh detergents — all destroy canvas integrity

- HYDRA-SHIELD CANVAS: Made with premium 100% cotton duck canvas that is watertight yet breathable, minimizing condensation while keeping you dry even during downpours.
- STURDY FLEX-BOW FRAME: Features tempered spring steel rods and 1-inch galvanized steel tubing that maintains tent tautness and stands strong against fierce winds.
- SPACIOUS INTERIOR: Enjoy walk-around comfort with a 6'6" ceiling height and steep walls, perfect for family camping or hunting trips with plenty of room for 6 people.
- SUPERIOR VENTILATION: Six large windows with no-see-um mesh and two D-shaped doors with #10 YKK zippers provide excellent airflow while keeping the smallest bugs out.
- ALL-SEASON DURABILITY: Heavy-duty 16 oz vinyl floor is seamless and puncture-resistant, while included 12-inch steel stakes and stainless steel wire loops ensure stability in various conditions.
Last update on 2026-06-07 / Affiliate links / Images from Amazon Product Advertising API

- MULTIFUNCTIONAL CLEANING BRUSH: High-quality soft household cleaning brush bristles can easily clean dirty parts of clothes, such as collars and cuffs without damaging the fabrics, and can also be used to clean stains on tiles and countertops, making home cleaning easy.
- COMFORTABLE GRIP: The brush cleaner has a non-slip design on the exterior, which is easy to exert force. The novel two-color design adds a bright landscape to your life, brings you a good mood every day, and also helps you remove stains and dirt from clothes well.
- VERSATILE USE: Specially designed brush for hand shape, suitable for clothes, pants,shoes, carpets, sneaker, underwear and other fabrics, also suitable for kitchen faucets, countertops, sinks, bathroom bathtubs, tiled walls, neat and fine bristles provide a safe and gentle cleaning.
- PERFECT COMBINATION: The short handle laundry brush (5.3in*3.0in*2.2in) and long handle shoe brush (8.07in*1.7'in*1.6in) set are paired together to deal with multiple cleaning needs. They are good helpers for stains that can't be cleaned by the washing machine, especially the collar and cuffs of your clothes, which allows you to finish cleaning simply and comfortably.
- CONVENIENT STORAGE: Hanging hole design, easy to hang the cleaning brush in the kitchen or bathroom, fast draining, space-saving, neat and beautiful, easy to pick up and put down.
Last update on 2026-06-07 / Affiliate links / Images from Amazon Product Advertising API
- REMOVES GREASE ON CONTACT: Dawn Ultra packs a powerful punch of grease-fighting power for a deep, sparkling clean
- REFILL WITHOUT THE SPILL: Our new and improved jug features an easy-pour spout and comfortable handle to make refilling any Dawn dish soap bottle easier, faster, and less messy *vs. our previous jug.
- SAME CLEAN, BETTER VALUE: Save money* and save plastic when refilling with our dish soap refill jug (*when comparing $/oz within same sub-brand). You can fill multiple standard or EZ-Squeeze bottles with just one jug of Dawn.
- SAVES WILDLIFE: Dawn dish soap is the only brand trusted by rescue workers* to clean wildlife impacted by oil spills. (*International Bird Rescue uses Dawn Platinum)
- CLEANS BEYOND THE SINK: Use Dawn Platinum to pre-treat laundry stains, to clean greasy tools and car wheels, and to remove grease and grime from around the house.
Last update on 2026-06-07 / Affiliate links / Images from Amazon Product Advertising API

- VERSATILE PANTRY STAPLE: Perfect for cooking, pickling, marinating, and enhancing your favorite recipes with a crisp, tangy flavor.
- ALL-NATURAL & PURE: Made from 100% distilled white vinegar, free from artificial additives and preservatives for a clean, fresh taste.
- POWERFUL MULTI-PURPOSE CLEANER: A natural, eco-friendly solution for disinfecting, deodorizing, and tackling tough household messes.
- BULK SIZE FOR MORE VALUE: Large 1-gallon jug is perfect for high-volume cooking, canning, and cleaning needs, offering great savings.
- TRUSTED QUALITY FROM IBERIA: A staple in kitchens for generations, Iberia delivers authentic, high-quality ingredients for cooking and beyond.
Last update on 2026-06-07 / Affiliate links / Images from Amazon Product Advertising API

- ULTIMATE WATERPROOFING FOR OUTDOOR FABRICS - Designed for use on boat covers, car covers, bimini tops, sail covers, tents, jackets, backpacks, boots, awnings, and patio covers to provide reliable water resistance and protection from the elements.
- PRESERVES FABRIC QUALITY - Does not change the breathability, color, or feel of fabric, ensuring original texture and appearance.
- EXTENDS FABRIC LIFE – Ideal for use on new fabrics to help prolong their service life and revitalizes older fabrics by providing an additional barrier against moisture.
- EASY APPLICATION - A gallon covers multiple applications and is quick drying, ensuring even coating.
- COVERAGE SPECS - 1 Gallon = 465 square feet of coverage, 64 OZ = 232 square feet, 22 OZ = 80 square feet coverage (Coverage may vary slightly depending upon amount of product applied per square foot).
Last update on 2026-06-07 / Affiliate links / Images from Amazon Product Advertising API

- Dimensions & Size: The storage boxes have outside dimensions of 26 1/8" x 16 1/4" x 13 1/2" and interior dimensions at the bottom of 20" x 13 1/2" x 12 5/8", making them ideal for storage needs.
- Durability & Security: Sterilite's Ultra Latch Boxes provide a durable storage solution. Equipped with heavy-duty latches, the lid attaches securely to the base, keeping contents protected.
- Transparent & Convenient: The clear base design allows for effortless viewing of stored items, helping you quickly identify and access what you need.
Last update on 2026-06-07 / Affiliate links / Images from Amazon Product Advertising API

- Your Reliable Cleaning Companion: Our cleaning gloves are made of premium, skin-friendly natural rubber. Whether you're washing dishes or tackling other cleaning tasks, they shield your hands from harsh chemicals like bleach and other harmful liquids. These gloves make tough cleaning tasks safer, easier, and more manageable, delivering unmatched reliability for your daily home chores.
- Grip That Never Slips: Featuring a embossed surface on the palms and fingers, the dish washing gloves deliver a secure anti-slip grip for dishwashing, cleaning, and handling wet or slippery items. Designed to enhance control and efficiency, they transform every cleaning task into a smooth and effortless experience.
- Comfort That Lasts: With a snug fit and a thin layer of flocked lining that makes them easy to slip on and off, our kitchen gloves ensure maximum comfort and flexibility for extended use. The moisture-absorbing lining keeps your hands dry, preventing discomfort during long cleaning sessions. These cleaning gloves are tailored for women and men who demand both practicality and comfort.
- Versatile and Durable: The dishwashing gloves excel in every cleaning scenario, from scrubbing greasy pots and pans to wiping down bathroom tiles with ease. Resistant to wear, tear, and cleaning agents, they are your trusted choice for reliable performance across all your cleaning needs – in kitchens, bathrooms, and beyond.
- Style Meets Function: This set includes 4 pairs of cleaning gloves in four unique colors, making it easy to assign each pair to specific tasks. Combining durability with functionality, these reusable rubber gloves not only simplify your cleaning routine but also add a pop of style to brighten your day with every use.
Last update on 2026-06-07 / Affiliate links / Images from Amazon Product Advertising API

- POWERFUL CONCENTRATED FORMULA: Effectively removes mold, mildew, algae, leaf stains, bird droppings, tree sap, grease, oil, and some food or drink stains from awnings, tents, boat covers, cushions, carpets, vinyl, plastic, and fiberglass without damaging fabrics or colors.
- ECO-FRIENDLY AND NON-CHLORINE: Biodegradable, non-chlorine formula penetrates stains naturally and removes grime without harsh chemicals or fumes, providing effective cleaning while being safe for outdoor fabrics, vinyl, plastics, and the environment.
- LARGE COVERAGE: One gallon cleans up to 150 sq. ft., making it ideal for tents, camping gear, umbrellas, sails, inflatables, carpets, cushions, and boat covers. concentrated economical formula saves time and money.
- VERSATILE APPLICATION: Works on multiple surfaces including awnings, tents, boat covers, cushions, carpets, upholstery, vinyl, plastic, fiberglass, and other outdoor or indoor fabrics, lifting tough stains and restoring color and appearance.
- EASY TO USE: Mixes quickly to make up to 3 gallons of cleaning solution. Fast acting and reliable formula removes stains and brightens colors safely
Last update on 2026-06-07 / Affiliate links / Images from Amazon Product Advertising API
- AWARD-WINNING: HGTV, USA Today and Best Reviews voted Best Overall Garden Hose
- EXTREMELY DURABLE - Abrasion-resistant outer cover and crush-resistant anodized aircraft aluminum fittings
- PREMIUM HYBRID POLYMER - Ultra-flexible, won't kink under pressure, coils easily, and lays flat with zero memory
- LIGHTWEIGHT - Lighter than traditional garden hoses making Flexzilla easier to carry and maneuver around the yard
- LEAK FREE CONNECTIONS - A durable O-ring provides a long-lasting leak free connection to the spigot
Last update on 2026-06-07 / Affiliate links / Images from Amazon Product Advertising API

- MAGIC SIZE - You will see the MAGIC that the card you get will become a sponge with water.
- SCRATCH FREE - Safe to different surfaces.Use the sponges for dishes and nonstick surface.
- STRONG SCRUBBING POWER - A big size spend less time on sponges for cleaning pots,walls, windows, floors and work surfaces.
- 100% BIODEGRADABLE - Use premium quality wood pulp to make these cellulose sponge.No bad odor like other sponges, and you can safely sanitize them in the dishwasher.
- DURABILITY -Our kitchen sponges are long-lasting and can be used until they wear out.They can stay excellent washing performance even after three weeks of use.
Last update on 2026-06-07 / Affiliate links / Images from Amazon Product Advertising API
What You’ll Need Before You Start
The Canvas Care Sequence requires simple tools — but the order you use them and the products you choose make the difference between a tent that lasts 20 years and one that leaks after a single season. Gathering everything before you start means you won’t be improvising mid-clean with the wrong substitute. Budget 2–4 hours for a routine clean, or 4–6 hours if mold treatment is involved.
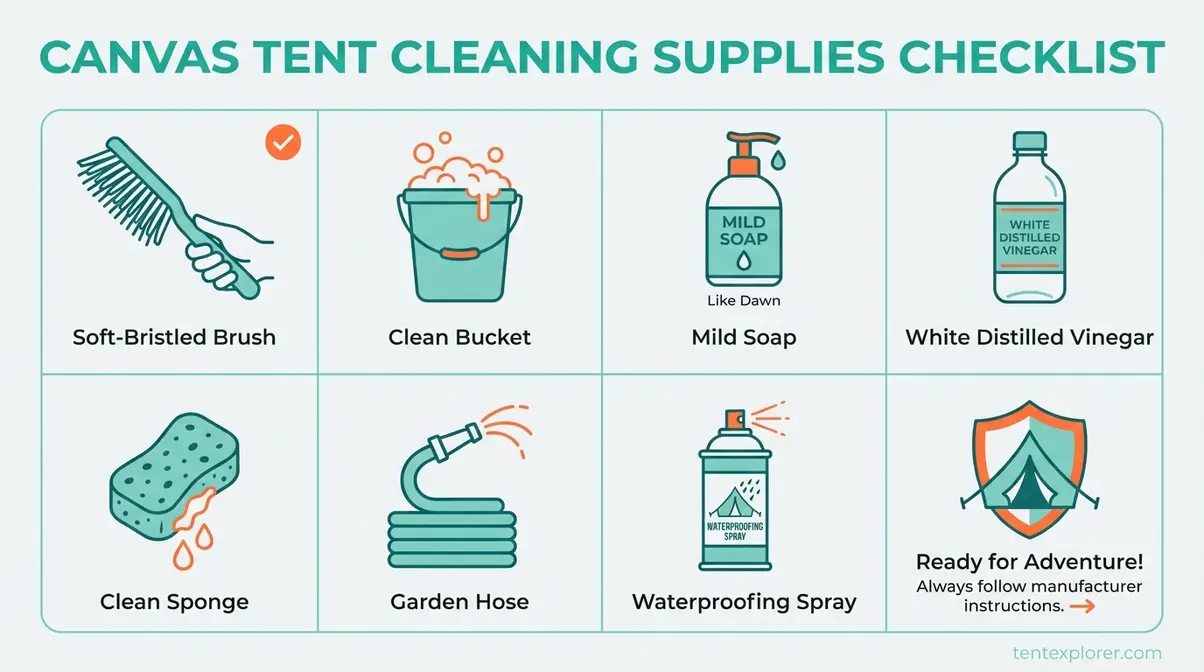
Tools and supplies checklist:
- Soft-bristle brush (natural horsehair or soft nylon — NOT wire, NOT stiff plastic)
- Large clean sponge or soft cloth
- Garden hose with a gentle spray setting (NOT a pressure washer — ever)
- Mild, pH-neutral soap (Dawn dish soap, a mild pH-neutral detergent commonly recommended for canvas, or Woolite)
- Distilled white vinegar (for mold treatment in Step 4)
- Large tub, barrel, or clean plastic storage bin (for the soaking method in Step 3)
- Canvas-specific waterproofing spray (for Step 6 — see our best tent waterproofing sprays guide)
- Rubber gloves (essential for mold treatment)
Three safety rules — before any water touches your tent:
- ❌ No machine washing — agitation physically destroys the canvas weave structure
- ❌ No pressure washer — strips waterproofing and can tear seams in seconds
- ❌ No bleach — permanently weakens cotton canvas fibers at the molecular level
NYT Wirecutter tent experts strongly advise against machine washing, confirming that agitation strips the waterproof polyurethane coatings and DWR treatments essential to canvas performance (NYT Wirecutter, 2024). “Machine washing and pressure washing are the two most common causes of canvas tent damage — both destroy the tight weave that makes canvas weatherproof,” according to manufacturer guidance from Kodiak Canvas and CanvasCamp, two leading canvas tent brands.
These rules apply whether you own a standalone dome, a bell tent, a canvas wall tent, or tent trailer canvas panels. The Canvas Care Sequence works for all of them.
Step 1: Set Up Your Tent and Remove Loose Debris
Setting up the tent fully and dry-brushing before any water is applied is the most skipped — and most important — first step in the process. Loose dirt that you brush away now won’t turn to mud and embed deeper into the canvas fibers the moment water touches it. This step alone eliminates the majority of surface contamination without any chemical contact.
Herculite fabric care guidelines confirm that removing debris before starting the cleaning process — brushing away loose dirt before applying any water or cleaning solution — is the correct sequence for preserving fabric integrity (Herculite, 2024).
Sub-steps:
- Set up the tent fully on a flat, clean surface — grass or concrete works well; avoid gravel, which can scratch the floor
- Use a soft-bristle brush to sweep the exterior from roof to ground, working in sections from top to bottom
- Brush the interior thoroughly — seams, corners, and the floor especially (Brush INSIDE and OUT, not just the exterior)
- Pay extra attention to zipper tracks, where accumulated dirt causes zipper failure over time
- Shake out the floor mat or groundsheet separately before setting it aside
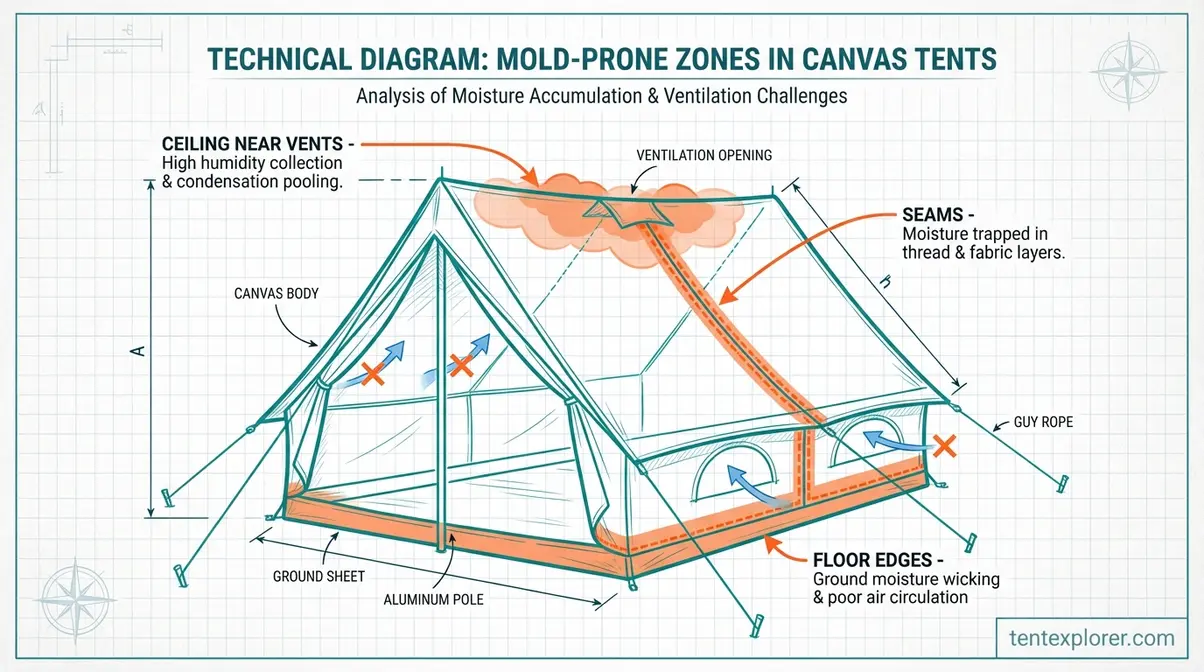
✓ Checkpoint: You should now have a tent that’s free of loose dirt and debris, with the canvas fully visible for inspection. If you notice dark spots or a musty odor, note their locations — you’ll treat those in Step 4.
Now that the canvas is clear, you can see exactly which spots need targeted cleaning before the full wash.
Choosing the Right Brush for Canvas
Soft brush selection is one of the most overlooked decisions in canvas tent care — the wrong bristle type creates micro-tears that become leak points.
Natural bristle brushes — horsehair or tampico fiber — are the gentlest option and ideal for aged or worn canvas where the fibers may already be stressed. Soft nylon bristles are acceptable for newer canvas in good condition. Either works well. A standard vegetable scrubbing brush from a kitchen store is a practical option — it has the right stiffness without being abrasive.
What you must avoid: wire brushes and stiff plastic bristles. These pull individual threads and create micro-tears that let water infiltrate the canvas weave. Even a single aggressive scrub with the wrong brush can create permanent weak spots that no amount of re-waterproofing will fully seal.
The same principles apply to tent trailer canvas — the panels use the same cotton weave construction and respond identically to brush type.
Inspecting for Damage, Mold Spots, and Stains Before Cleaning
Run a quick inspection before applying any liquid. This prevents wasted effort and ensures you use the right treatment for each problem area.
- Dark or green patches + musty smell → mold or mildew; flag for Step 4 vinegar treatment
- Bird droppings, tree sap, dried mud → flag for Step 2 spot cleaning with mild soap
- Peeling seam tape or stress tears at corner poles → do not wet-clean until repaired; water plus a damaged seam accelerates leaking
Run your hand along the seam tape inside the tent — if it’s peeling, seal it with seam sealer before washing. Cleaning a structurally compromised tent without repair first turns a minor issue into a major one.
With your inspection complete, you know exactly which areas need spot treatment. Step 2 covers the cleaning agent debate and how to tackle specific stains safely.
Step 2: Spot Clean Stains with a Mild Soap Solution
If your canvas tent came back from a camping trip with bird droppings, dried mud, or food stains, spot cleaning with a mild solution handles most of it. The key is knowing which cleaning agent to reach for — and which ones will silently destroy your tent’s waterproofing before you ever notice the damage.
The Vinegar vs. Soap vs. Bleach Debate: Which Is Actually Safe?
This is the question that generates the most conflicting advice online — and the answer is straightforward once you understand what each agent actually does to cotton canvas fibers.
| Cleaning Agent | Safe for Canvas? | Best For | Risk |
|---|---|---|---|
| Plain water | ✅ Yes | Light dirt, regular rinse | None |
| Dawn dish soap (diluted) | ✅ Yes (with care) | Stains, general grime | Strips DWR — must re-waterproof |
| White vinegar (diluted 1:3) | ✅ Yes | Mold and mildew | May lighten fabric if used undiluted |
| Bleach | ❌ Never | — | Destroys cotton fibers permanently |
| Harsh detergents | ❌ Never | — | Strips waterproofing, attracts dirt |
Dawn dish soap (also commonly called “dawn dishwasher soap” by experienced canvas tent owners) is safe when diluted — 1 tablespoon per gallon of cool water — and rinsed thoroughly. However, any soap application strips the DWR waterproofing coating, which means re-waterproofing in Step 6 is not optional after any soap wash. “Dawn dish soap diluted in water is safe for canvas tents — but any soap use strips the DWR waterproofing coating and requires re-treatment afterward,” as confirmed by the CanvasCamp maintenance guide and consistent with manufacturer consensus across leading canvas tent brands (CanvasCamp, 2024).
Bleach is a different matter entirely. It’s an oxidizer that breaks down the molecular bonds in cotton fibers — not just the waterproofing coating, but the structural fiber itself. Canvas treated with bleach becomes brittle, loses tensile strength, and eventually fails at seams and stress points. The EPA mold cleanup guidelines confirm that standard detergent and water effectively removes surface contamination from porous materials — and the material must be allowed to dry completely to prevent regrowth (EPA, 2024). Bleach is not part of their recommended protocol for fabric.
White vinegar is safe and effective — but specifically for mold treatment (Step 4), not general stain cleaning. Mold spots flagged during inspection get vinegar treatment; general stains get plain soap and water.
How to Spot Clean Without Stripping Waterproofing
Plain soap and water applied correctly removes the vast majority of campsite stains without saturating the canvas or spreading the stain. Here’s the exact technique:
- Mix 1 tablespoon of Dawn dish soap per gallon of cool water — not hot, which sets stains into canvas fibers
- Dampen a soft sponge or cloth with the solution — don’t soak it
- Work from the edges of the stain inward, using small circular motions; working outward spreads the stain
- Rinse the spot immediately after cleaning — don’t allow soapy water to dry on the canvas, as residue attracts mold and dirt
- Note the treated area for re-waterproofing in Step 6
✓ Checkpoint: You should now have treated individual stains. The canvas around the spots may look slightly damp — that’s normal. Move to Step 3 if the tent needs a full deep clean, or skip directly to Step 5 if only spot cleaning was needed.
For tents that are heavily soiled overall — not just spot-stained — the soaking method in Step 3 provides a more thorough clean.
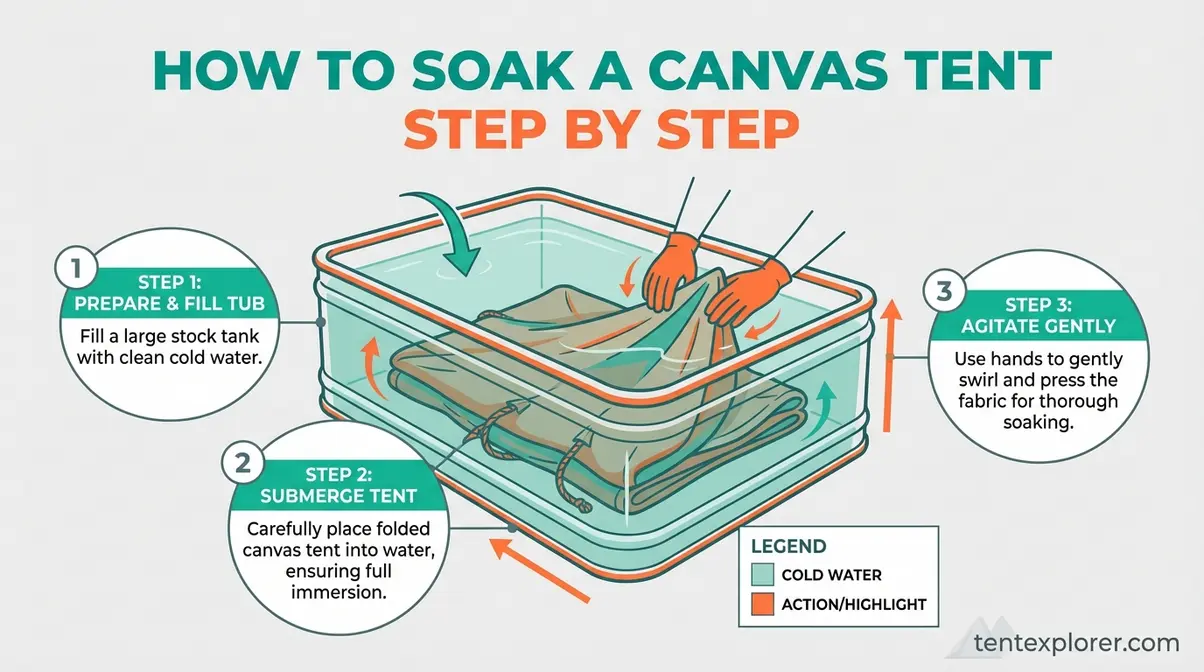
Step 3: Deep Clean with the Soaking Method
The soaking method is the most effective approach for heavily soiled canvas, but it’s also the most misunderstood. Camping communities consistently report damage from soaking done incorrectly — water that’s too hot, soak times that run too long, or soap concentrations that are too high. The CanvasCamp maintenance guide confirms that deep cleaning a heavily soiled tent requires specific precautions — cool water and gentle agitation prevent damage to the canvas weave (CanvasCamp, 2024).
When Does Your Canvas Tent Need a Full Soak?
Not every dirty canvas tent needs a full soak — and over-cleaning damages canvas as surely as neglect does. Use the following criteria:
- 2+ camping seasons without any cleaning → soak candidate
- Pervasive musty or sour smell that doesn’t clear after airing out for 24+ hours → soak candidate
- Overall grime and discoloration across large sections, not just isolated spots → soak candidate
- Tent stored damp even briefly — soaking helps reset the canvas and remove embedded moisture residue
If you can’t remember the last time you cleaned your tent and it came out of storage smelling like a basement, it’s a soak candidate.
One important counter-note: If your inspection in Step 1 revealed visible mold patches, treat mold in Step 4 before soaking. Soaking a mold-covered tent can spread spores throughout the canvas, making remediation significantly harder.
The Soaking Process: Step-by-Step
Once you’ve confirmed a soak is needed, here is the exact process:
- Fill a large tub, barrel, or clean plastic storage bin with cool water — not warm, not hot
- Add 2 tablespoons of mild soap per 10 gallons of water — no more; higher concentrations don’t clean better and are harder to rinse out
- Fold the canvas tent loosely (don’t cram it) and submerge; let soak for 30–60 minutes maximum
- After soaking, use a soft-bristle brush to gently scrub any remaining dirty areas — don’t wring or twist the canvas
- Proceed immediately to Step 5 (rinse and dry) — don’t allow soapy, wet canvas to sit
“Soak it with water only” is sound advice for tents that need refreshing without a soap treatment — if there’s no significant grime, a plain-water soak followed by thorough drying can restore canvas without triggering the mandatory re-waterproofing step.
⚠️ Warning: Do NOT add vinegar to the soak water. Vinegar is for mold treatment only (Step 4) and can react with soap residue when combined in the same application.
✓ Checkpoint: After soaking and gentle scrubbing, the canvas should look visibly cleaner with no soapy residue remaining. Proceed to Step 5 to rinse and dry — do not skip this step.
If your pre-cleaning inspection revealed dark patches or a persistent musty smell that isn’t general grime, those are mold spots requiring dedicated treatment in Step 4.
Step 4: Remove Mold and Mildew from Canvas
Knowing how to clean mold from a canvas tent is the question that brings most people to this guide — and the stakes are higher here than in any other step. Get it right, and surface mold is completely eliminated. Get it wrong (specifically, by reaching for bleach), and you’ll damage the canvas fibers permanently while the mold returns anyway.
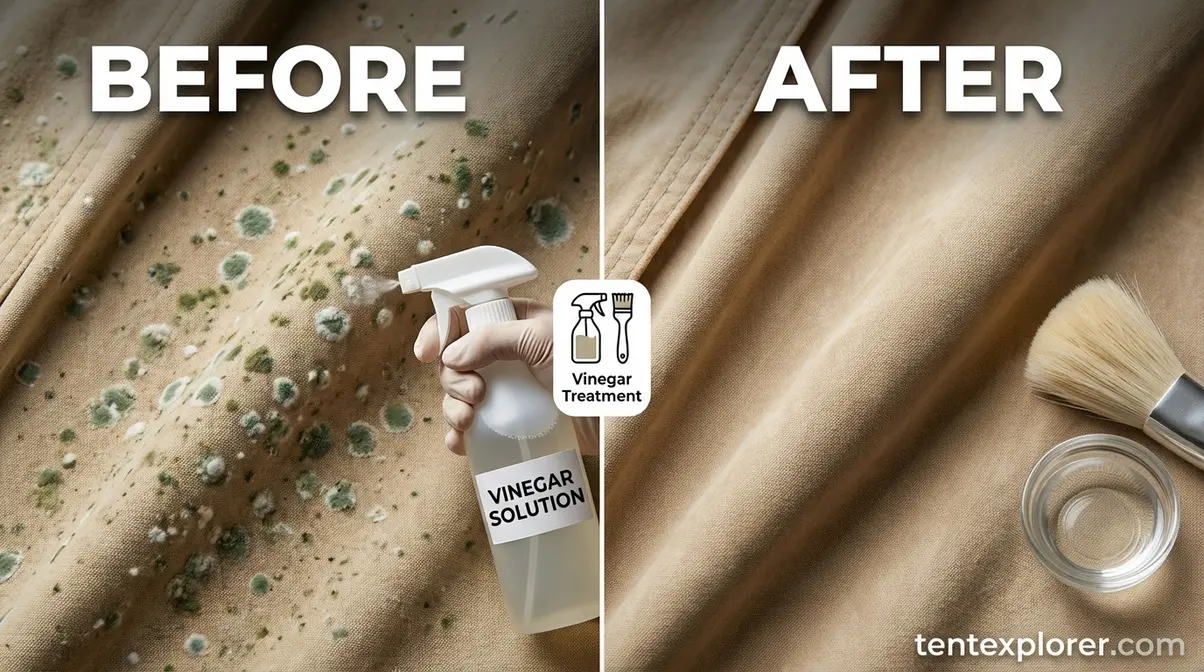
“A solution of 1 part white vinegar to 3 parts water safely eliminates surface mold from canvas tent fabric without damaging the cotton fibers or stripping waterproof treatments” — a finding consistent with FAQ guidance from leading canvas tent brands and the broader camping community consensus.
Assessing the Severity of Mold Growth
Before applying any solution, determine which level of mold you’re dealing with. The Smithsonian Museum Conservation Institute — which advises on textile preservation for museum collections — recommends HEPA-filtered vacuuming as the first step for any dried mold on fabric, extracting spores without embedding them deeper into the fibers (Smithsonian MCI, 2023).
Three severity levels:
- Surface mold (light grey or white fuzz, recent growth): Vinegar solution in this step handles it completely. The most common scenario after a single wet camping trip followed by damp storage.
- Moderate mold (dark spots, musty smell, multiple areas): Vinegar treatment plus extended sun drying plus a second treatment round. Consider a specialized cleaner like Iosso Mold Remover or CanvasCare Cleaner for stubborn spots.
- Black mold (dark, slimy, pervasive, long-established): Professional remediation may be required. Black mold that has been present for months poses a health risk if disturbed improperly — don’t attempt aggressive scrubbing without proper respiratory protection.
If you can wipe the growth off with a dry cloth and it looks grey-white, you’re dealing with surface mildew. If the spots are black, sunken into the fabric, and have been present for months, get a professional assessment before proceeding.
How to Apply the Vinegar Solution Safely
This is the most-searched sub-topic in canvas tent care — and the step where precision matters most. Here is the exact process for how to clean mold off a canvas tent safely:
- Before any liquid — use a HEPA-filtered vacuum to gently vacuum dry mold spores off the surface. This prevents embedding spores deeper into the fabric fibers (Smithsonian MCI guidance). Work slowly and keep the nozzle close to the surface.
- Mix the solution: 1 part distilled white vinegar to 3 parts cool water. Some users reference “½ cup of cleaning vinegar” — that’s a reasonable volume for a small affected area, but maintain the 1:3 dilution ratio regardless of volume. Do not use cleaning vinegar at full strength; it’s too acidic and may lighten or damage canvas.
- Apply with a soft sponge or cloth — dab onto mold spots, working gently. Don’t scrub aggressively, which spreads spores and stresses the fabric.
- Let the solution sit on the fabric for 15–20 minutes before rinsing.
- Wear rubber gloves throughout — vinegar is an acid that irritates skin with extended contact.
The University of Hawaii mold procedures confirm that after initial HEPA vacuuming, stubborn mold on heavy fabrics should be treated with a water-and-solution approach applied with a sponge or soft-bristled brush (University of Hawaii EHSO). Oklahoma State University Extension similarly recommends mild detergent and water for mold cleanup, with protective gloves to prevent skin irritation (OSU Extension).
- ⚠️ Critical warnings:
- Do NOT use undiluted vinegar — too acidic for canvas
- Do NOT combine vinegar and soap in the same application — they neutralize each other and reduce the effectiveness of both
After the vinegar solution has soaked in, sun drying is what actually kills the remaining mold spores — don’t skip this final sub-step.
Drying Mold-Treated Canvas in Direct Sunlight
UV radiation from direct sunlight kills mold spores — this is an active mold-killing step, not passive drying. After vinegar treatment, leave the tent fully set up in direct sun for a minimum of 4–6 hours.
Direct sun exposure after vinegar treatment is the most effective mold-killing step in the entire process — guides that skip this instruction are giving you half the solution. The UV exposure combined with the acidic treatment creates conditions that prevent spore regrowth, while simple air drying in shade does not.
For tent trailer canvas: detach panels where possible and lay them flat in direct sun for maximum UV exposure across the entire surface. The same 1:3 vinegar ratio applies — tent trailer canvas mold follows the same remediation process as any cotton canvas panel.
If spots remain after the first round of sun drying, apply a second vinegar treatment and repeat. Two rounds handle the vast majority of moderate mold cases.
✓ Checkpoint: After sun drying, mold spots should be gone or significantly faded. If they remain, a second treatment is needed. Once clear, proceed to Step 5 for rinsing.
Whether you’ve done a spot clean, a full soak, or a mold treatment, Step 5 — thorough rinsing and complete drying — is the step that determines whether your cleaning effort protects or harms the tent long-term.
Step 5: Rinse Thoroughly and Dry Your Canvas Tent Completely
Incomplete rinsing leaves soap residue that attracts mold and dirt almost immediately. Incomplete drying before storage causes mold growth within days. Of all six steps in The Canvas Care Sequence, this one has the highest consequence if rushed — and it’s the step most commonly abbreviated.
Rinsing: Getting Every Trace of Soap Out
Soap residue left on canvas creates a cycle: it attracts dirt, traps moisture, and promotes mold — exactly the opposite of what you cleaned for. The EPA mold prevention guidelines confirm that materials must be allowed to dry completely after mold cleaning to prevent regrowth, and that residual dampness is the primary driver of mold recurrence (EPA, 2024).
- Use a garden hose on the gentlest spray setting — never a pressure nozzle
- Rinse the exterior first, working top to bottom
- Open the tent and rinse the interior — seams and corners collect the most soap
- Continue rinsing until the water running off the canvas is completely clear with no suds visible
- Verification test: Run your hand along the canvas — if it feels slippery, there’s still soap present. If it feels slightly rough (normal canvas texture), you’re done.
Pay extra attention to seams and corners where soap collects and is hardest to rinse out completely.
Drying: The Most Important Step in Canvas Tent Care
Canvas tents stored even slightly damp will develop mold — complete drying before storage is non-negotiable. The EPA’s guidance on mold prevention confirms that moisture control is the key variable; once moisture is eliminated, mold cannot establish or return.
Across camping communities, the consistent and most emphatic piece of advice is this:
“VERY IMPORTANT — Your tent must be completely dry before storage!” — Consistent advice from experienced canvas tent owners across camping communities
Here’s how to execute that correctly:
- Set the tent up fully — do not fold or partially pack it for drying
- Leave in direct sun and wind for a minimum of 24 hours before any consideration of packing
- Check the seams, corners, and floor last — these are the final areas to dry and the first to develop mold if storage happens too soon
- If weather is poor, dry indoors with maximum ventilation — fans pointed at the tent help significantly
- Do not store the tent until it is completely dry, regardless of how long that takes
✓ Checkpoint: Press your palm firmly against the canvas in several spots, including seams and corners. If you feel any coolness or dampness, the tent is not ready to store. Wait longer.
With a clean, dry tent in hand, Step 6 covers the final protective step that most guides omit entirely — re-waterproofing.
Step 6: Re-Waterproof Your Canvas Tent After Cleaning

Every soap wash strips the DWR coating from canvas — and skipping re-waterproofing after cleaning is the single most common reason a freshly cleaned canvas tent leaks at the next rain. This step is absent from most competitor guides, which is why so many canvas tent owners clean their tents correctly and still end up with a wet sleeping bag.
“Canvas tents require re-waterproofing after every soap wash — cleaning with detergent strips the DWR coating that keeps you dry in rain.” This is consistent with the CanvasCamp waterproofing guide and confirmed by manufacturer consensus across leading canvas tent brands (CanvasCamp, 2024).
Why Cleaning Strips Canvas Waterproofing (And Why You Must Re-Apply)
DWR, or Durable Water Repellent, is the invisible treatment applied to canvas fibers that causes water to bead and run off rather than absorb into the fabric. It’s what makes your canvas tent feel dry inside during a rainstorm — and it’s more fragile than most tent owners realize.
Soap and detergent molecules bind to DWR molecules during washing and rinse them away along with the dirt. Even careful, diluted soap washing removes a significant portion of the DWR coating. This is why plain-water rinsing does not strip DWR — only soap does. A mold treatment with vinegar followed by a thorough water rinse (no soap) does not require re-waterproofing. A soap wash always does.
The signs that DWR is depleted are easy to recognize: water absorbs into the canvas rather than beading on the surface, and the canvas looks darker and takes longer to dry after rain. If your tent looks noticeably darker when it rains and takes hours to dry out, the DWR is gone — even if you haven’t washed it recently. Aging and UV exposure degrade DWR gradually over time.
Now that you understand why re-waterproofing is necessary, here’s how to do it correctly.
How to Apply Waterproofing Treatment: Products and Process
Re-waterproofing your canvas tent starts with choosing the right product. Silicone-based sprays are designed for nylon and polyester fabrics — they don’t bond correctly to cotton canvas weave and provide inadequate protection. You need a canvas-specific formula.
- Recommended canvas-compatible products:
- CanvasCamp CanvasCare Waterproofer (designed specifically for cotton canvas)
- Nikwax Cotton Proof (widely available, well-reviewed for cotton canvas)
- Atsko Silicone Water Guard for cotton
Application steps:
- Confirm the tent is completely dry — waterproofing applied to damp canvas won’t adhere properly and will peel or wash off immediately
- Set up the tent fully
- Spray in even, overlapping strokes from top to bottom — don’t concentrate in one area or you’ll create thick patches and thin spots
- Allow to dry per product instructions — typically 24–48 hours
- Water bead test: Sprinkle water on the canvas — it should bead immediately and run off without absorbing. If it soaks in, apply a second coat.
Re-waterproof after every soap wash, and annually as preventive maintenance even without a full wash — UV exposure and use degrade DWR over time regardless of cleaning frequency.
For a full comparison of canvas-compatible waterproofing products, see our guide to best tent waterproofing sprays.
✓ Checkpoint: After applying and drying the waterproofing treatment, conduct the water bead test. Drops should bead immediately and run off without absorbing. If they soak in, apply a second coat.
The Canvas Care Sequence is now complete for a standard canvas tent. If you own a specific brand — Kodiak, bell tent, or wall tent — the next section covers model-specific considerations.
Cleaning Specific Types of Canvas Tents
Canvas tent owners searching for how to clean a Kodiak canvas tent, a bell tent, or a canvas wall tent have the same core process available to them — but each tent type has structural or coating-specific nuances that change the approach in important ways. The Canvas Care Sequence applies across all three; what changes is how you navigate the geometry and any proprietary treatments involved.
The Beckel Canvas wall tent guide confirms that brushing away dirt and debris from seams and the canvas itself before applying any cleaning solution is the correct first move — seam areas accumulate the most debris on wall tents (Beckel Canvas).
Cleaning a Kodiak Canvas Tent
Knowing how to clean a Kodiak canvas tent requires understanding its proprietary Hydra-Shield treatment, which is a cotton/polyester blend coating that performs differently from standard wax-based or DWR-coated cotton canvas. It’s more durable in wet conditions than many competitors, but it’s still sensitive to harsh detergents.
Kodiak Canvas’s official manufacturer guidance is direct: hose down with water and wipe with a cloth for routine cleaning. Soaps and detergents can damage the Hydra-Shield water-repellent treatment, so avoid soap unless absolutely necessary (Kodiak Canvas, proper tent care guide). When soap is required, use the minimum effective dilution (1 tablespoon per gallon) and check Kodiak’s current product recommendations for Hydra-Shield compatible re-waterproofing options — they update their approved product list periodically.
- Kodiak-specific considerations:
- Use plain water and a soft brush for all routine cleaning sessions
- If soap is used, re-waterproof with a Hydra-Shield compatible product only
- Zipper maintenance matters: Kodiak specifically calls out cleaning zipper tracks with a damp cloth and applying zipper lubricant after cleaning
Bell canvas tents have a different structural challenge — their center-pole geometry and lack of integrated floor require a slightly different cleaning approach.
Cleaning a Bell Canvas Tent
Bell tent canvas (also called canvas bell tent in many searches) presents a distinct advantage during interior cleaning: the center pole creates enough headroom to stand inside and brush the interior ceiling properly. Most dome tent owners can’t do this — for bell tent owners, it means the “Brush INSIDE and OUT” instruction is both easier and more important to execute fully.
The apex — the very top of the bell tent — is the most prone to condensation accumulation and mold growth. During Step 1 inspection, check the apex carefully, especially after any camping trip in humid or rainy conditions. It traps warmth and moisture more than any other area of the tent.
Bell canvas tents have no integrated bathtub floor, which means the ground contact edge of the canvas wall accumulates the most dirt. During Step 1 brushing and Step 2 spot cleaning, prioritize that lower edge. Standard canvas cleaners work perfectly — no bell-tent-specific products are needed.
Wall tents — the large, rectangular canvas shelters used for hunting camps and extended stays — have the most surface area and the most demanding cleaning requirements.
Cleaning a Canvas Wall Tent
Canvas wall tent cleaning follows the same Canvas Care Sequence but at a larger scale that changes the time and logistics involved significantly.
- Seams first: Wall tents have extensive seam structures — prioritize seam cleaning in every session, as dirt and mold concentrate there
- Extended drying: The large panel structure means more canvas mass to dry — allow 48 hours minimum, not 24
- Separate floors: Wall tent floors are often separate panels (canvas or synthetic) — clean them separately and dry completely before reconnecting
A Beckel Canvas wall tent used for a two-week elk hunting camp will need a full soak plus mold treatment before winter storage — budget a full day for the process, not an afternoon.
Knowing what to do is only half the equation. Knowing what not to do is equally important — the next section covers the most common canvas tent cleaning mistakes and why they cause permanent damage.
What to Avoid When Cleaning Your Canvas Tent
The most common canvas tent damage doesn’t come from neglect — it comes from well-intentioned cleaning mistakes. Camping communities consistently report tents returned to storage after a “thorough clean” that developed leaks or mold within weeks, because the cleaning method itself caused the damage. “Pressure washers and bleach are the two leading causes of premature canvas tent failure — both destroy the tight cotton weave that makes canvas weatherproof,” a finding consistent with manufacturer guidance from Kodiak Canvas, CanvasCamp, and NYT Wirecutter experts.
NYT Wirecutter experts strongly advise against machine washing — agitation and strong detergents strip the waterproof polyurethane coatings and DWR treatments essential to tent performance (NYT Wirecutter, 2024). The “ruin the waterproofing” outcome that most canvas tent owners fear most is almost always caused by one of the items below.
Chemicals That Damage Canvas (And Why)

Avoid these cleaning agents entirely — not just for canvas, but for any cotton-based outdoor fabric:
- Bleach: Oxidizes and breaks down cotton fiber bonds at the molecular level — canvas becomes brittle and permanently loses weatherproofing. Even diluted bleach causes cumulative damage with repeated use. Some competitor guides recommend bleach for mold; this is incorrect for canvas specifically.
- Harsh detergents (laundry soap, dishwasher detergent): Contain concentrated surfactants that strip DWR coating in a single wash cycle
- Acetone and solvents: Dissolve the resin treatments in coated canvas — the damage is immediate and irreversible
- Hot water: Sets stains into canvas fibers and can cause shrinkage or warping of the weave
Tools and Techniques That Ruin Canvas Fabric
Never use these — even once:
- Pressure washer: High pressure tears canvas seams and strips waterproofing in seconds — even the lowest setting is too aggressive for cotton canvas
- Washing machine: Agitation physically destroys the tight canvas weave; the spin cycle stresses seam stitching to the point of failure
- Tumble dryer or hair dryer: Heat causes canvas to shrink and seam tape to delaminate — air drying only
- Wire brushes or stiff scrubbers: Create micro-tears that become leak points over time
- Storing damp: Technically a technique error rather than a tool error — mold growth follows within days on damp canvas
✓ Checkpoint: If you’ve made any of these mistakes in the past, don’t panic. Assess the damage, re-waterproof immediately, and treat any mold spots using the Step 4 vinegar method. Most early-stage damage is recoverable with prompt action.
Frequently Asked Questions
How to Clean a Dirty Canvas Tent?
To clean a dirty canvas tent, start by dry-brushing loose debris with a soft-bristle brush, then spot clean stains with a diluted mild soap solution — 1 tablespoon of Dawn dish soap per gallon of cool water. For heavily soiled tents, soak in cool water with mild soap for 30–60 minutes, then rinse completely. Always dry the tent fully — minimum 24 hours in sun and wind — before storage. Results vary based on soil severity; mold requires a separate vinegar treatment before the general cleaning steps.
Is Dawn Dish Soap Safe for Tents?
Yes, Dawn dish soap is safe for canvas tents when diluted — use 1 tablespoon per gallon of cool water and rinse thoroughly. It’s a mild, pH-neutral detergent that cleans effectively without the harsh oxidizers that damage cotton fibers. However, any soap application — including Dawn — strips the DWR waterproofing coating from the canvas surface. Always re-waterproof with a canvas-specific spray after washing with any soap. Avoid concentrated application; leftover soap residue attracts dirt and promotes mold growth during storage.
What Is the Best Product to Clean a Canvas Tent?
For general cleaning, plain water and a soft brush are the safest and most effective option — they remove most surface dirt without stripping waterproofing or requiring re-treatment. For mold, a solution of 1 part distilled white vinegar to 3 parts water is the most widely recommended canvas-safe treatment across manufacturer guides and camping communities. Specialized products like Iosso Mold Remover or CanvasCare Canvas Cleaner handle stubborn mildew effectively for moderate-to-severe cases. Avoid bleach, harsh detergents, and silicone sprays — all cause permanent damage to cotton canvas fibers.
Can You Leave a Canvas Tent Up All Year?
Leaving a canvas tent up year-round is possible but not recommended without active maintenance — prolonged UV exposure, wind stress, and moisture accumulation significantly reduce canvas lifespan over time. Harsh winter climates pose the greatest risk, as snow load and freeze-thaw cycles stress seams, poles, and corner connections. If leaving the tent up seasonally, inspect and re-waterproof quarterly and check for mold monthly — at minimum. A quality rainfly or additional sunshade extends outdoor lifespan considerably for year-round setups.
Can I Use Vinegar on My Tent?
Yes — distilled white vinegar diluted at 1 part vinegar to 3 parts water is safe and effective for treating mold and mildew on canvas tents. Apply with a soft cloth, let sit for 15–20 minutes, then rinse thoroughly and dry in direct sunlight to kill remaining mold spores via UV exposure. Never apply undiluted vinegar — it’s acidic enough to lighten or damage canvas fabric. Rinse thoroughly after treatment to remove all vinegar residue before storage, and avoid mixing vinegar with soap in the same application.
For canvas tent owners, proper cleaning comes down to following The Canvas Care Sequence in the right order: dry-brush, spot clean with diluted mild soap, treat mold with a 1:3 vinegar solution, rinse completely, dry fully for 24+ hours, and re-waterproof with a canvas-compatible spray. This sequence preserves the waterproofing, eliminates mold, and extends tent life by years. The most common mistake — skipping re-waterproofing after washing — is also the easiest to avoid once you understand that soap and DWR don’t coexist through a rinse cycle.
The Canvas Care Sequence works because it treats canvas the way canvas is designed to be treated: gently, in the right order, with the right products. Your tent’s biggest threats aren’t the elements — they’re the wrong cleaning products and incomplete drying. A canvas tent that’s been cleaned correctly, dried completely, and re-waterproofed after every soap wash can realistically last 20+ years. Get the sequence right, and the investment pays for itself many times over.
Start with a dry-brush inspection this weekend — even if your tent looks clean, checking seams and corners for early mold spots takes 20 minutes and can prevent a full remediation session later. When you’re ready to re-waterproof, our guide to the best tent waterproofing sprays breaks down exactly which products work for cotton canvas and which to avoid.
