This blog post may contain affiliate links. As an Amazon Associate I earn from qualifying purchases.
📋 Table of Contents
- Diagnose Your Tent Zipper Problem First
- What Are the Parts of a Tent Zipper?
- The Zipper Failure Ladder: Your Problem Type
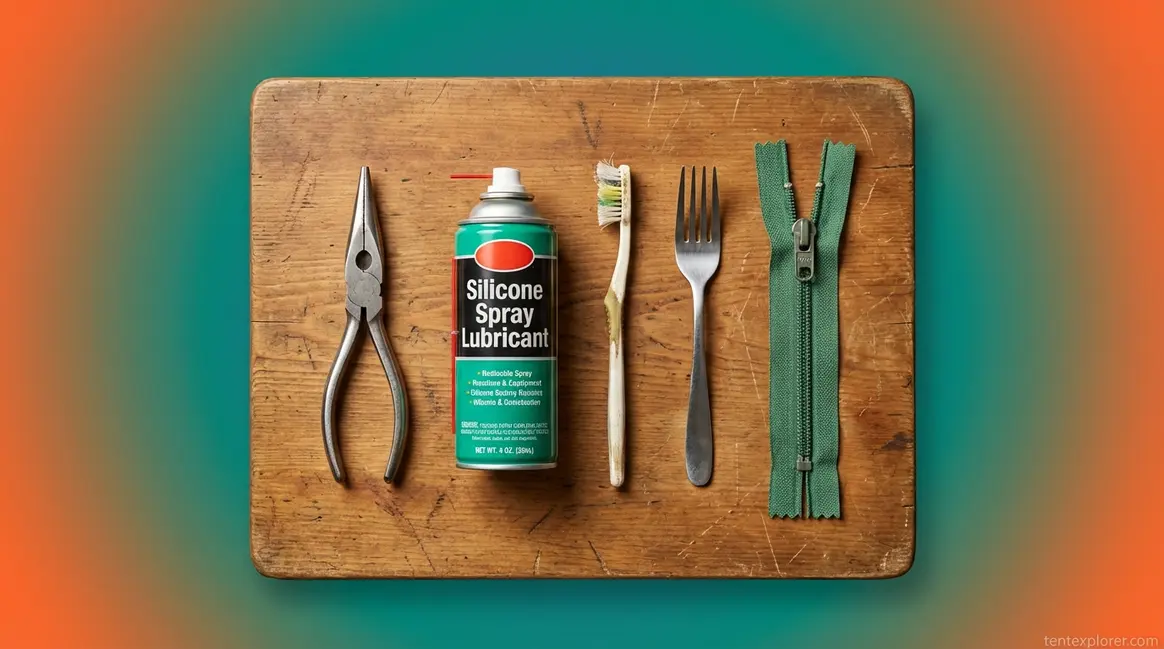
- Tools and Materials You’ll Need
- How to Fix a Stuck or Sticky Tent Zipper
- Step 1: Remove Fabric Caught in the Zipper
- Step 2: Clean the Zipper Teeth and Track
- Step 3: Lubricate the Zipper
- Fix a Tent Zipper That Separates/Won’t Close
- Why Tent Zippers Separate (The Real Cause)
- Step 1: Tighten the Slider with Pliers
- Step 2: Re-Track a Derailed Slider
- Fork Method & Improvised Re-Trackers
- Replace Broken Tent Zipper Sliders/Damaged Teeth
- Identify the Right Replacement Slider
- Step-by-Step: Remove and Replace Slider
- How to Fix Bent or Damaged Zipper Teeth
- DIY vs. Professional Repair Costs
- Emergency Field Fixes for a Broken Tent Zipper
- Replace a Missing Zipper Pull Tab
- Fork Method & Improvised Re-Trackers
- Does Flex Seal Work on Tent Zippers?
- Specialized Tent Zipper Repairs
- Two-Way Tent Zippers: Why They’re Tricky
- Tent Door Zippers: Repair Considerations
- Grow Tent and Tent Trailer Zippers
- When DIY Tent Zipper Repair Isn’t Enough
- Common DIY Pitfalls to Avoid
- When to Get Professional Repair
- Frequently Asked Questions
- How to Fix a Separated Tent Zipper?
- How Do You Fix a Separated Zipper?
- How Do I Put a Zipper Back on Its Track?
- Cost to Replace a Tent Zipper?
- Can a Separating Zipper Be Fixed?
- How to Fix a Zipper That Came Off Track?
A broken tent zipper doesn’t mean a ruined camping trip. Most tent zipper failures — stuck, separated, or completely off-track — can be fixed in under 10 minutes with tools you already have.
The cost of doing nothing is real: a non-closing tent door means no bug protection, no rain barrier, and no privacy. A $300 tent becomes nearly useless if you can’t close the door. But knowing how to fix a tent zipper the right way — starting with the correct diagnosis — means you can solve the problem without buying a new tent or paying $36–120+ for professional repair.
In this guide, you’ll learn how to fix a tent zipper for every common failure type — from a jammed slider to a completely derailed zipper — using a structured diagnostic framework called The Zipper Failure Ladder. We’ll start by identifying your exact problem, then walk through each fix step by step, including emergency field hacks and a clear-eyed look at when professional repair is worth the cost.
Key Takeaways: How to Fix a Tent Zipper
Most tent zipper failures fall into four fixable categories — use The Zipper Failure Ladder to identify yours before trying any repair.
- Stuck or sticky: Clean debris, then lubricate with silicone spray or a wax candle
- Separating or won’t close: Squeeze the slider’s flat back end gently with needle-nose pliers
- Slider off-track: Re-thread using the fork method or remove the bottom stop and re-seat the tape
- DIY costs under $15 vs. $36–120+ for professional tent zipper repair (Rainy Pass Repair, 2026)
- Prevention: Brush teeth clean and lubricate before every camping season
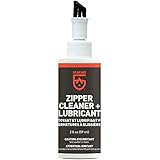
- Release stuck zippers on wetsuits tents jackets sleeping bags and luggage with this multipurpose 2-in-1 formula
- Prolong zipper life by protecting against UV salt chlorine rust and corrosion which can jam the zipper available in 2 fl oz bottle
- Remove dirt and salt deposits from zipper teeth with included brush-top formula repels dirt and debris from the zipper
- Use this non-toxic lubricant on plastic nylon or metal zippers contains no silicone or paraffin wax (formerly Zip Care)
- Packaging may vary
Last update on 2026-06-15 / Affiliate links / Images from Amazon Product Advertising API

- 【High Quality Material】 The nose pliers body is made of high quality carbon steel, and the handle is made of TPR material in accordance with environmental protection standards; 6 inch needle-nose pliers force saving spring design, easy to use effortless; The nose pliers are well made, the jaws are neat, the handle is comfortable and non-slip; The blade is sharp and durable, with stronger shear force and longer service life
- 【Strong Cutting Force】The cutting edge hardness of HRC60-62, shear hardness of HRC48-49, can easily cut single strand; The end of the nose pliers is neat, closed well, the head of the pliers is thick, and it is not easy to misposition and deformation when using
- 【Non-slip Grip】Handle grip is made of TPR material and ergonomic non-slip design, which can effectively relieve the fatigue of hand work. Oil resistant and non-slip design allows you to easily operate with one hand
- 【Labor-saving Design】The needle-nose pliers are designed on the principle of lever. The length of the pliers wall is larger than the pliers head, so it saves more energy when using. Lengthen clamp head design, easy to use in narrow space; It has the functions of fastening, clamping, winding, cutting and stripping
- 【Widely Use】Can cut steel wire, copper wire, iron wire and other common metals, strong bite force, can easily reverse effectively fixed or loose screws and nuts
Last update on 2026-06-15 / Affiliate links / Images from Amazon Product Advertising API

- 1.★ Zipper tips : 12 pcs zipper sliders/head/pull are all in size 5 , slide gate width is about 6 - 6.1mm, for zipper teeth (after close) width is 5.8 - 6.0mm , please measure your slider gate width ,or zipper teeth (after closed) width before you place order. bronze zipper sliders 3 pcs work for metal zipper with metal teeth , 6 pcs in black and silvery work for plastic zipper with platic teeth, 3 pcs in black work for nylon zipper with nylon coil.
- 2.★ Zipper slider including: 1. 12 pcs size 5 quality replacement zipper sliders in three color and 4 styles . 2. #5 metal zipper repair kit (6 sets zipper latch slider retainer box and insertion pin in 3 Colors , each color 2 sets) 3. #5 pcs zipper bottom stops and 10 top stops (Small items, workers may count more or less 1 to 2 pieces is a normal phenomenon) Everything are in a cute transparent box.
- 3. ★Zipper repairs or replace worn out or broken sliders on plastic tooth metal tooth and nylon coil-type zippers. Repairs can be done using most standard pliers.all zipper sliders are lockable .
- 4. ★Replacement zipper slider way : Step 1. Remove zipper top stop. You can use the pliers tool to do that. Step 2. Remove the old slider. Step 3. Press new pull and Put the new slider on. Step 4. Then use the pliers tool to press zipper stop back into place.most zippers can be fixed in minutes with the correct replacement parts and simple repair techniques. Zipper Repair for repairing of Clothing, Coats, Jackets.
- 5. ★Bulk zippers widely can be used for making or fixing jacket zipper,clothing, bags, pouches, dresses, skirts, pillow garments storage protector bags, DIY Sewing Tailors' Crafts, Bags, etc
Last update on 2026-06-15 / Affiliate links / Images from Amazon Product Advertising API
- Dual-Style Seam Ripper Set (4-Piece) - Includes 2 complete pairs (1 large + 1 small each) in vibrant red and classic black/white. The 5.5" large rippers handle thick fabrics, while 3.5" small rippers work on delicate materials. Choose colors to match your style or workspace needs.
- Ultra-Sharp Sewing Scissors Included - Comes with 1 premium stainless steel scissors that stays razor-sharp for clean, precise cuts. Perfectly complements the seam rippers to form a complete sewing solution for quilting, alterations and craft projects.
- Versatile Seam Ripper - Expertly crafted for durability, these seam rippers feature a red mini protection ball at the top to safeguard your fabric.
- Wide Application - Ideal for a variety of applications, this set is perfect for sewing, DIY crafts, embroidery, and more. Whether you’re working on delicate fabrics or complex patterns, the tools provided offer the precision and reliability needed for professional results. Suitable for both beginners and experienced crafters, this kit supports a wide range of creative projects.
- The Best After-sales Team-When you select FIVEIZERO quality products, you also benefit from the exceptional service of our expert customer support team. Our confidence in our high-quality products means we're here to address any questions you may have and ensure your complete satisfaction.
Last update on 2026-06-15 / Affiliate links / Images from Amazon Product Advertising API

- ★ The industrial thread and needle Best Selling Upholstery Repair Kit for Carpets, Canvas, Upholstery, Coats, Tents, Mattresses, Furs and Leather.
- ★The upholstery needle and thread Including 3 Pieces Spools wax thread;7 Pieces Heavy Duty Curved Upholstery Needles Come in a Variety of Sizes and Shapes for Different Uses
- ★ Upholstery Thread is Bonded 3-ply Nylon Thread,100% Nylon Thread for Hand or Machine Sewing Indoor or Outdoor Heavyweight Fabrics.
- ★ Thick Waxed Thread for best results use a Heavy Duty Needle (included) and increase stitch length, heavy duty thick thread and needle assorted hand needles come in a variety of sizes and shapes for different uses around the house.
- ★ Keep hand sewing thread out of the reach of children;Relatively sharp needles, when removing and using, please be careful.
Last update on 2026-06-15 / Affiliate links / Images from Amazon Product Advertising API

- 【Complete Sewing Needles Set】 The FIVEIZERO Hand Sewing Needles Set includes 30 assorted hand sewing needles and 2 needle threaders for hand sewing (random colors), perfect for all your hand sewing, embroidery, and DIY craft projects. Needles come in a convenient round plastic compact for easy storage.
- 【Variety of Sizes】 This sewing needle kit includes various needle sizes to meet your different sewing needs: 1 x 44mm (super large eye needle), 2 x 51mm (large eye needle), 3 x 46mm (large eye needle), 8 x 42mm, 8 x 37mm, and 8 x 31mm. Easy to carry and differentiate, ensuring you have the right needle for any project.
- 【Premium Materials】 Our embroidery needles for hand sewing are made from high-quality stainless steel with sharp tips, smooth surfaces, and durable construction. They are resistant to rust and corrosion, ensuring long-lasting performance. The needle eye features a streamlined groove and gold-plating, making threading easier.
- 【Easy Threading】 The gold-plated large eye design of the needles makes threading simple, especially with the included needle threaders for hand sewing. The smooth surface reduces resistance, allowing for easier sewing through various fabrics.
- 【Wide Applications】 Perfect for all kinds of hand sewing projects, including embroidery, quilting, darning, cross-stitch, and various DIY crafting projects. These needles are also suitable for mending, upholstery, tents, canvas, leather, and more. This versatile set is an essential addition to your sewing needle kit.
Last update on 2026-06-15 / Affiliate links / Images from Amazon Product Advertising API

- Our candles are poured and over dipped with only the best quality paraffin to ensure a long lasting 35 hour burn time
- Pillar candles are made with lead-free 100% cotton wicks for a clean and smoke free burn
- These 3x4 pillar candles are the perfect size for large and medium candle lanterns, glass hurricanes, centerpieces, fireplace, and mantel decorations
- Candle set can be used as every day decor, decoration for parties, unity candles for weddings, or emergency candles for power failure
- Pillar candles come individually wrapped in a sturdy divided cardboard box to ensure candles arrive neatly packaged and undamaged
Last update on 2026-06-15 / Affiliate links / Images from Amazon Product Advertising API
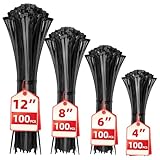
- Zip Ties Packing Including:HAVE ME TD Zip Ties Total:400pcs Cable Zip Ties.4inch X 100pcs,6inch X 100pcs,8inch X 100pcs,12inch X 100pcs.Each size cable tie has a wide range of uses,suit for multiple purpose projects in different situations.
- Cable Ties Loop Tensile Strength:4inch-18lbs,6inch-40lbs,8inch-40lbs,12inch-40lbs.This pack of cable ties comes with assorted sizes cable ties for a wide range of personal and professional needs.Cable ties of different sizes and tensile strength are suitable for multi-purpose projects on different occasions.
- Black Zip Tie Self-locking Design:HAVE ME TD zip ties self-locking fastener design,strong durable powerful lock,easy handling and prevent snagging in tight. With cable zip, cables can be tied tightly. Cable ties can be very flexible with high temperature resistance.
- Multiple purpose Zip Ties:Perfect Choice for home, office, garden,garage, travel and workshop tidy.HAVE ME TD cable zip ties are the perfect choice for many indoor & outdoor projects like organizing electrical wires, hanging lights and banners, attaching garden fences/ net, plants,securing bike/ car accessories and much more.
- Zip Ties Black:Whenever you need sort out your different wires, zippers and other accessories,it's a good choice.Meet your different size requirements.No need to waste time to find different size cable ties.If you have any questions, please contact us by HAVE ME TD, we will help you solve the problem as soon as possible.
Last update on 2026-06-15 / Affiliate links / Images from Amazon Product Advertising API

- PARACORD 550: Paracord Type III (550 lb) has a nylon core. Color: Black. Length - 100 feet (30.5 m). Made in accordance with MIL-SPEC. Available in 40 colors options. Packaged according to length: 50, 100, 200 or 1000 feet.
- STRONG & DURABLE: Paracord Type III has 550 lb (249 kg) min strength; 32 strand sheath structure, 7 core yarns each made of 3 twisted nylon fibers. Thickness: 5/32-inches (4mm). Manufactured according to Mil Spec C-5040H.
- HIGH-QUALITY materials used to manufacture our paracord makes it durable and resistant to damages caused by weather conditions. Sun, rain or snow, it is made to serve you long. UV and fade resistant.
- MULTIPURPOSE: Versatile, flexible and of a great strength, para cord is very multi-functional. It is used as a tent cord to set up tents, safely secure hammock or hang heavy items such as bikes and kayaks in your garage or basement. Serves as a safety rope in emergency situations. Ideal for crafting custom accessories: lanyards, bracelets, dog collars, keychains, belts, wrapping axes, knives, tools & other DIY projects.
- MUST-HAVE: A Must-Have for Camping, Hiking, Fishing, Boating, Kayaking, other outdoor activities and sports. The best gift idea for men and women who love sports, outdoors & DIY craft projects, for boy and girl scouts. Travel gear & equipment, EDC.
Last update on 2026-06-15 / Affiliate links / Images from Amazon Product Advertising API

- Seal up to 60 ft of seams on tents, tarps and awnings with this water-based seam sealant; cures in 2 hours at room temperature
- Use it on various outdoor fabrics including nylon, polyester, and canvas; previously known as Seam Sure
- Apply this long-lasting seal that is nearly invisible and flexes with fabric; available in 2 fl oz bottle
- Treat gear using the included applicator brush to make application quick and easy
- Packaging may vary
Last update on 2026-06-15 / Affiliate links / Images from Amazon Product Advertising API
Diagnose Your Tent Zipper Problem First
Knowing how to fix a tent zipper starts with identifying which of four failure types you have. Tent zippers are typically made from nylon coil or molded plastic (Vislon), and each material fails differently — nylon coil stretches and kinks, while Vislon teeth crack under physical stress. Nylon and polyester coil zippers, for instance, offer greater flexibility for curved tent designs than metal alternatives (Fibre2Fashion, 2023). Applying the wrong fix wastes time and can damage the zipper further, so diagnosis comes before any repair attempt.
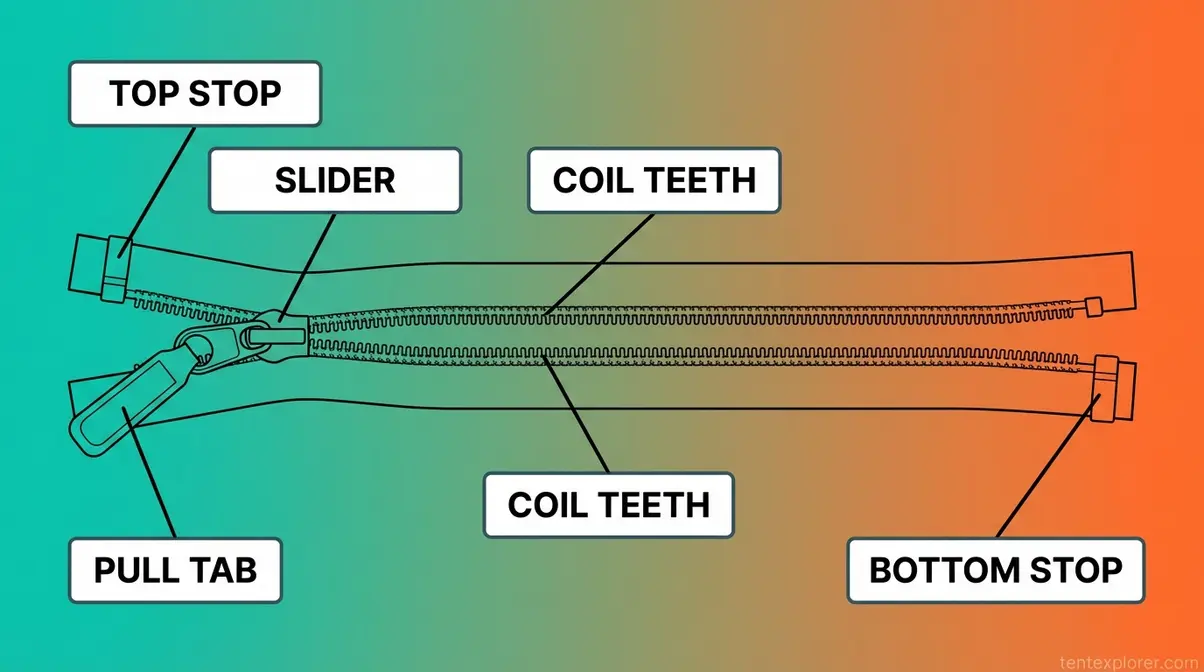
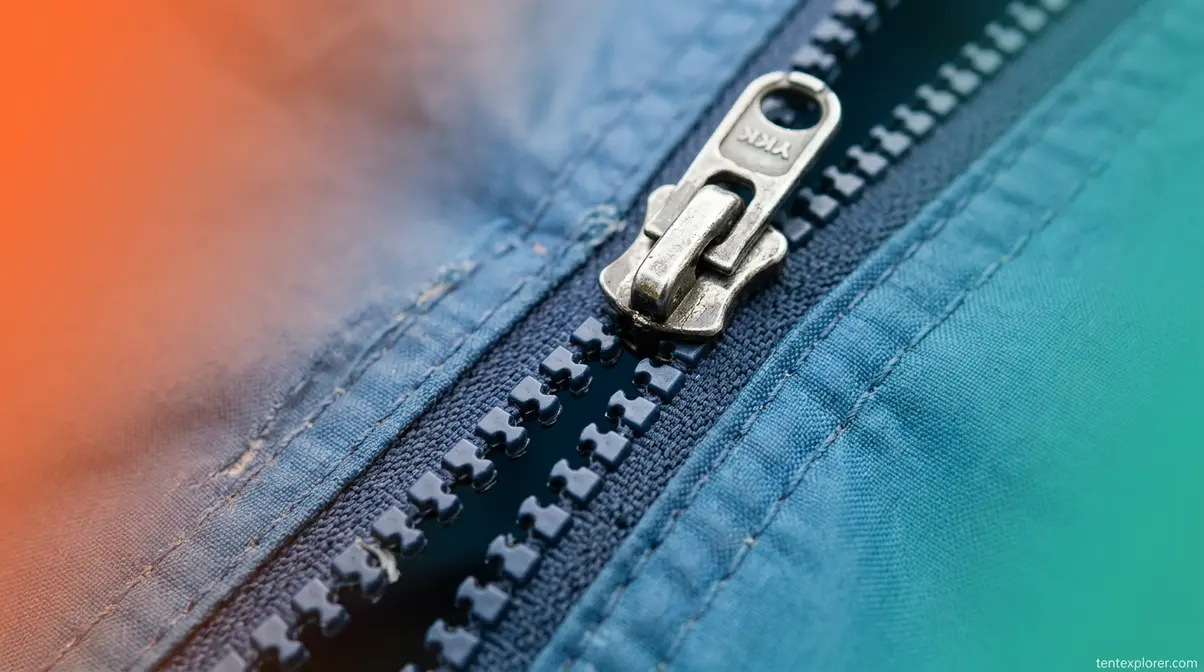
What Are the Parts of a Tent Zipper?
Before following any repair steps, you need to know what each component is called. Here are the five parts you’ll encounter:
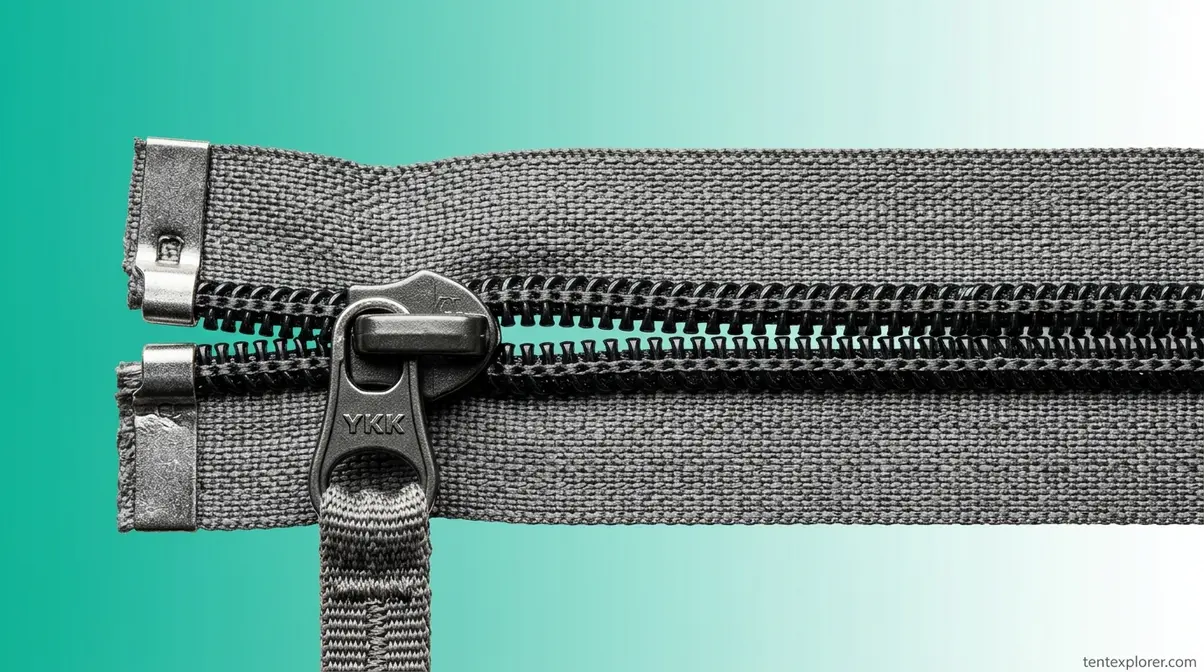
- Slider: The metal or plastic piece you pull — it contains the internal “jaws” that force the teeth together. Most tent zipper repairs involve the slider directly.
- Teeth / Coil: The interlocking elements on each side of the zipper tape. Understanding these components is key to learning how to fix a tent zipper teeth. A nylon coil zipper (the flexible spiral-style zipper used in most camping tents) looks like a continuous helix; a Vislon zipper — YKK’s brand name for molded plastic tooth zippers, common on heavier tent doors and grow tents — has individual plastic teeth.
- Pull Tab: The loop or handle attached to the slider. It commonly breaks off or goes missing, especially on older tents.
- Top Stop: A small metal or plastic clamp at the closed end of the zipper that prevents the slider from sliding off the track when you zip fully shut.
- Bottom Stop: The corresponding clamp at the open end. When this breaks or loosens, the slider can derail entirely.
YKK, the world’s largest zipper manufacturer and supplier for most major tent brands, produces the vast majority of zippers you’ll encounter on camping gear. Once you know these five parts, every repair instruction in this guide will make immediate sense.
Now that you know the parts, here’s how to quickly identify which one is causing your problem — and where to go from there.
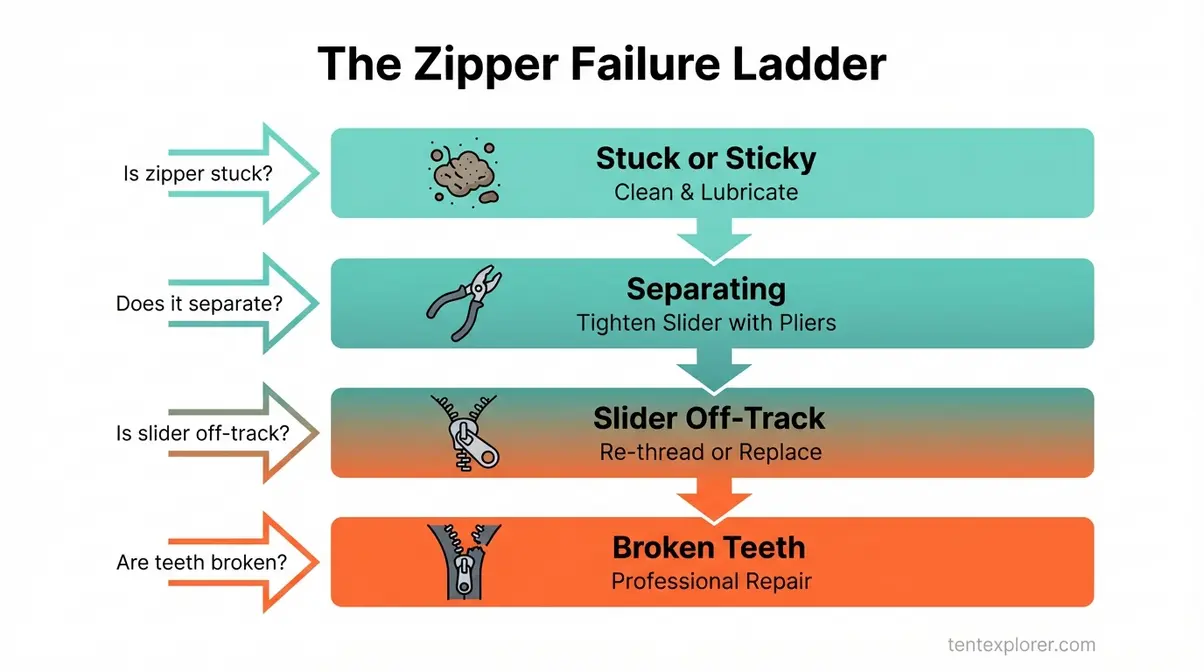
The Zipper Failure Ladder: Your Problem Type
The Zipper Failure Ladder organizes tent zipper problems from easiest fix (Rung 1) to most complex (Rung 4). Identify your rung first, then jump directly to that section. This diagnostic step alone saves most campers 20 minutes of frustrated trial-and-error — and it’s the step no competitor guide includes.
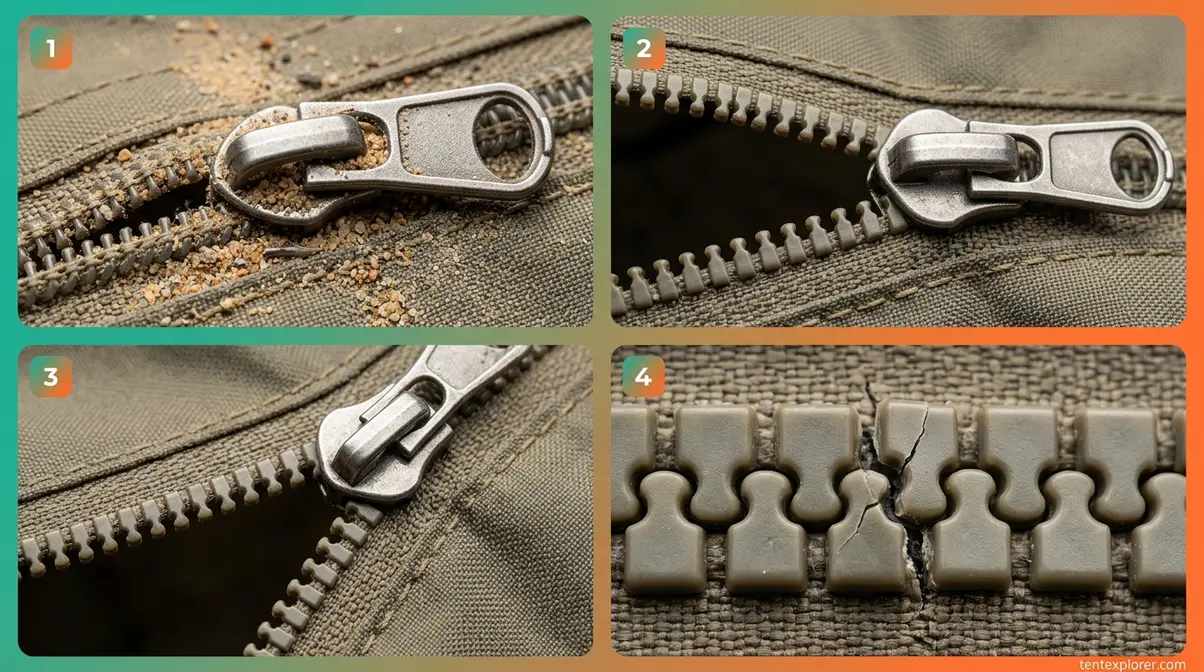
- Rung 1 — Stuck or Sticky: The slider won’t move, or it moves with heavy resistance. Cause: dirt, sand, debris, or snagged fabric caught in the teeth. → Go to H2 #2 (How to Fix a Stuck or Sticky Tent Zipper)
- Rung 2 — Separating or Won’t Stay Closed: If you’re wondering how to fix a tent zipper that separates, this rung is for you. The slider moves but the teeth pop open behind it. Cause: the slider’s internal jaws have stretched over time and no longer grip the teeth tightly. → Go to H2 #3 (How to Fix a Tent Zipper That Separates)
- Rung 3 — Slider Off-Track or Missing: The slider has come completely off one or both sides of the zipper tape. Cause: a broken or missing stop, or a derailed slider. → Go to H2 #3 (re-tracking) or H2 #4 (replacement)
- Rung 4 — Broken or Missing Teeth: Individual teeth are cracked, bent, or missing from the coil. Cause: physical impact, UV degradation, or long-term wear. → Go to H2 #4 or the Limitations section
If you’re unsure which rung applies, start at Rung 1. Cleaning and lubrication fixes the majority of tent zipper problems and takes under five minutes — outdoor repair communities consistently report it as the most-skipped yet most-effective first step.
Before you start any repair, gather these tools — most are already in your kitchen or toolbox.
Tools and Materials You’ll Need
Gather everything before you start. Stopping mid-repair to hunt for a tool is the most common frustration point.
- For stuck or sticky repairs (Rung 1):
- Old toothbrush
- Mild soap and warm water
- Silicone-based lubricant spray — Gear Aid Zipper Cleaner and Lubricant is the most widely recommended product in outdoor gear communities, designed specifically for nylon and Vislon zippers
- Alternatives: beeswax, plain candle wax, or a graphite pencil (free options that work)
- For separated or off-track repairs (Rung 2–3):
- Needle-nose pliers
- A fork (for the fork method — any fork works)
- Seam ripper (optional, for removing stops)
For slider replacement (Rung 3–4): To learn how to fix a broken plastic zipper, you’ll need these specific items. Needle-nose pliers, a replacement slider (YKK #5 or #8 for most camping tents — sizing covered in H2 #4), a seam ripper, heavy-duty thread and needle, and top stops (small metal clamps, available in zipper repair kits).
What NOT to use: WD-40. It’s petroleum-based, attracts sand and dirt, and degrades nylon coil over time — gear repair communities consistently flag it as the #1 zipper repair mistake. Backpacking Light forum contributors confirm that WD-40 gunks up zippers and causes premature wear on outdoor gear (Backpacking Light, 2024). Use silicone or wax only.
With your tools ready, let’s start with the most common tent zipper problem: the stuck or sticky zipper.
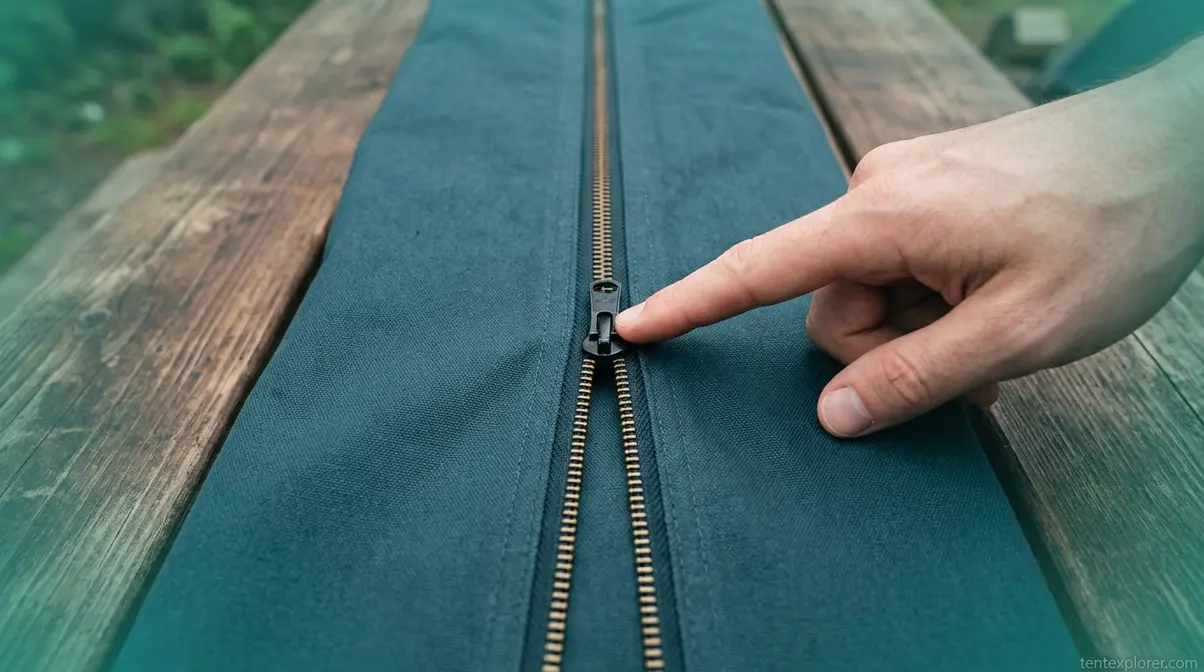
How to Fix a Stuck or Sticky Tent Zipper
If your tent zipper won’t move or drags with heavy resistance, you have a Rung 1 problem on The Zipper Failure Ladder. A stuck tent zipper is almost always caused by one of three things: snagged fabric, built-up dirt and sand, or a dry zipper that needs lubrication — all fixable in under five minutes without specialty tools.
Step 1: Remove Fabric Caught in the Zipper
The counter-intuitive first move: pull the slider back toward the open position before trying to free snagged fabric. Pulling forward jams the material deeper into the teeth.
- Look for puckering or uneven resistance on one side of the zipper — this indicates fabric caught in the teeth.
- Pull the slider back toward the open position. This releases the slider’s grip on the trapped material.
- Hold the fabric taut away from the zipper with one hand while gently working the slider back with the other.
- Do NOT yank the slider forward — this tears the fabric and can bend teeth.
⚠️ Warning: Inner tent mesh is the most common snag material and tears easily. If mesh is caught, move slowly and use minimal force.
Once the fabric is free, check whether the zipper still sticks. If it does, dirt or dryness is the culprit — move to Step 2.
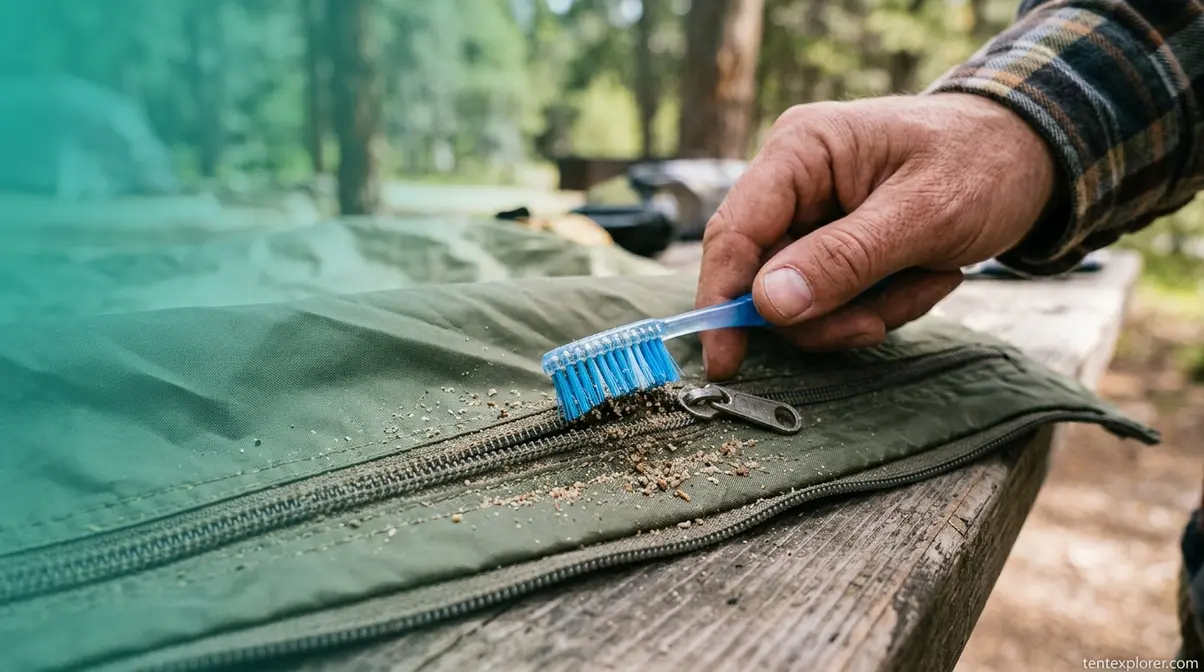
Step 2: Clean the Zipper Teeth and Track
Learning how to fix a sticky tent zipper often starts with a thorough cleaning, a step most campers skip. Sand is the most damaging common contaminant — beach and desert campers should clean their tent zippers after every trip.
- Use a dry toothbrush to brush debris out of the teeth, working from the top stop downward along both sides of the tape.
- For stubborn dirt: dampen the brush with warm water and a drop of mild soap. Scrub both faces of the zipper tape.
- Run the slider up and down several times after cleaning to clear any loosened debris from the channel.
- Air-dry completely before storing. Moisture trapped in a closed tent zipper promotes mildew on the tape and corrosion on metal stops.

A clean zipper that still sticks needs lubrication — here’s what works and what to avoid.
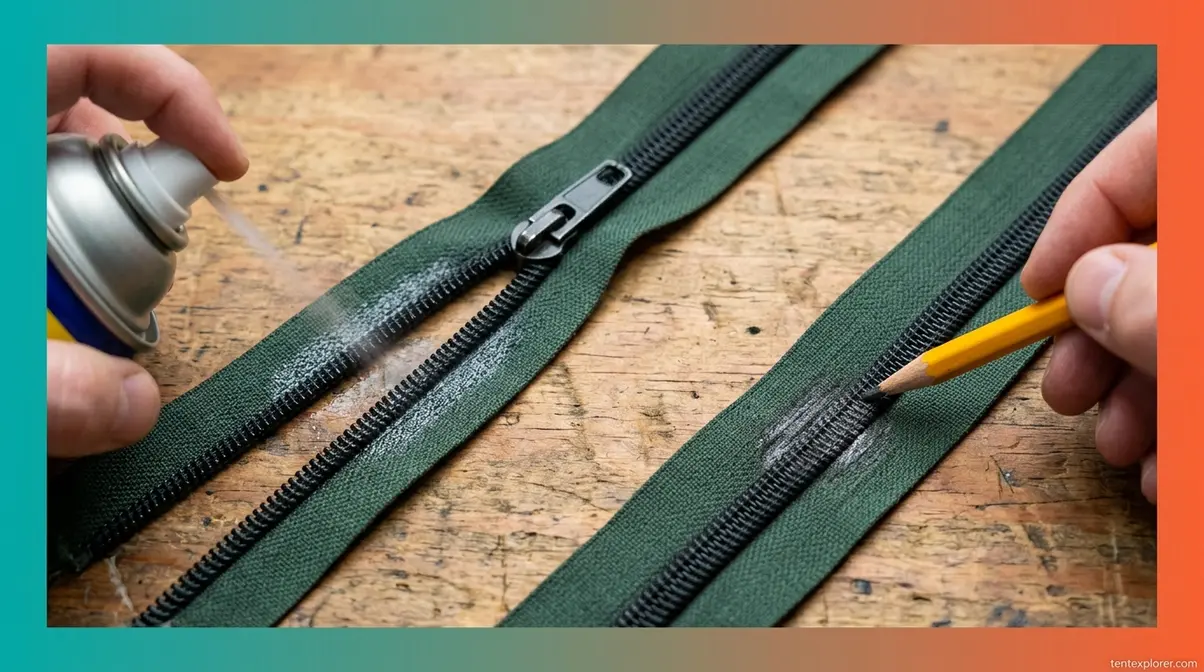
Step 3: Lubricate the Zipper
To effectively learn how to fix a sticky tent zipper, selecting the right lubricant is crucial. Here are the best options for tent zippers:
| ✅ Use This | ❌ Avoid This |
|---|---|
| Silicone spray (Gear Aid, etc.) | WD-40 (petroleum-based, attracts dirt) |
| Beeswax or candle wax | Olive oil or cooking spray |
| Graphite pencil tip | 3-in-1 oil or any petroleum product |
- Application steps:
- Open the zipper fully.
- Apply lubricant to the teeth on both sides of the tape — not directly into the slider.
- Run the slider up and down 3–4 times to distribute the lubricant evenly.
- Wipe away any excess with a clean cloth.
Silicone spray applied to the teeth — rather than sprayed directly into the slider — ensures smooth gliding without attracting dirt, as confirmed by gear care guidance from Blissful Hiker. WAWAK Sewing Supplies notes that nylon coil zippers are ideal for tents precisely because of their strength and flexibility — and silicone preserves both qualities over time (WAWAK Sewing Supplies, 2024).
A graphite pencil is a free household alternative — rub the pencil tip firmly along both sides of the teeth. It works nearly as well as silicone for a quick fix.
Frequency: Lubricate at the start and end of every camping season, and after any wet or sandy trip.
If cleaning and lubrication didn’t solve the problem, your zipper is likely Rung 2 or higher on The Zipper Failure Ladder — the slider itself needs attention.
Fix a Tent Zipper That Separates/Won’t Close
A tent zipper that separates or won’t stay closed is a Rung 2 problem on The Zipper Failure Ladder — the slider’s jaws have stretched. When the slider no longer grips the teeth tightly enough, the teeth pop apart behind it as you zip. The fix is a 2-minute pliers adjustment, not a new zipper. Rung 2 and Rung 3 on The Zipper Failure Ladder both involve the slider — here’s how to tell them apart and fix each one.
Why Tent Zippers Separate (The Real Cause)

A separating tent zipper is almost always caused by a worn slider, not by damaged teeth. The slider has two internal channels — one for the left tape and one for the right — that converge at the nose to mesh the teeth together. Over time, the repeated mechanical stress of thousands of zip cycles widens the gap between those channels. Once the gap is too wide, the slider’s nose still moves forward, but the jaws can’t force the teeth into alignment behind it.
“The key to fixing it is the slider mechanism warps and separates over time with the result that the zipper teeth don’t align.”
This is why the zipper separates behind the slider — the front is moving fine, but the back can no longer hold the teeth closed. The good news: this is repairable in most cases without replacing any parts, just with a pair of pliers.
LightHeart Gear confirms that crimping the flat back end of the slider — not the nose — is the recommended emergency field repair for a separating zipper (LightHeart Gear, 2024).
Now that you understand why the zipper separates, here’s exactly how to fix it.
Step 1: Tighten the Slider with Pliers
“For a separating tent zipper, squeezing the flat back end of the slider — not the nose — with needle-nose pliers in 1mm increments is the most effective DIY fix.”
Here’s the full procedure:
- Move the slider to the bottom of the zipper before doing anything else. Squeezing a mid-track slider can crack it.
- Identify the flat, wider back end of the slider — the end opposite the pull tab. This is where the two channels exit.
- Place the tips of your needle-nose pliers on the top and bottom faces of the slider’s back end (not the sides).
- Squeeze gently — aim for 1–2mm of compression. Do not apply full grip strength.
- Test: run the slider up 6 inches and check whether the teeth hold behind it.
- Repeat until the zipper closes cleanly — typically 2–4 squeezes.
⚠️ Warning: Over-squeezing cracks plastic Vislon sliders and permanently jams metal ones. If the slider becomes noticeably harder to move, stop immediately. Metal YKK sliders tolerate more pressure than plastic Vislon sliders — apply roughly 20–30% less force on plastic.
If the slider becomes difficult to move after squeezing, you’ve gone too far. Stop and test. If the slider cracks, you’ll need to replace it — see H2 #4.
If the slider is not just loose but has come completely off the zipper tape, you need to re-thread it — here’s how.
Step 2: Re-Track a Derailed Slider
When a zipper comes off track completely, the bottom stop has usually broken or the slider was forced off the tape. Here’s how to fix a zipper that came off completely:
- Inspect the bottom stop. Check the small metal or plastic clamp at the very base of the zipper tape. If it’s loose, bent, or missing, that’s where derailment happened.
- Remove the bottom stop using needle-nose pliers or a seam ripper — carefully pry or slide it off. Work slowly to avoid tearing the tape.
- Orient the new slider correctly — the pull-tab side should face the same direction as when the tent is in use (toward the outside of the tent, not the interior).
- Thread both tapes simultaneously into the slider’s two channels from the bottom. This is the tricky part — use a toothpick or a fork tine to guide each tape into its slot.
- Secure a new bottom stop: clamp a replacement metal top stop (available in zipper repair kits for $3–8) using pliers, or hand-sew a thread bar stop.
- Test: run the slider up and down 3–4 times to confirm both tapes are engaged.
Note: If the slider is also cracked or bent, replace it first (see H2 #4) before attempting to re-thread. Re-tracking a damaged slider wastes the effort.
No tools? No problem — here’s a field hack that works with nothing but a fork.
Fork Method & Improvised Re-Trackers
When a tent zipper has come partially off one side of the tape and you have no pliers, a fork is the only tool you need.
- Find any fork — camping fork, plastic picnic fork, or silverware from your camp kitchen.
- Insert a single tine into the slider’s open side — the side the tape has slipped out of.
- Gently work the tine to create just enough gap to re-seat the tape in the channel.
- Guide the tape back into the slider’s channel using the fork tine as a guide rail.
- Remove the fork and test the zipper slowly — run it 3–4 inches and confirm both tapes are feeding through cleanly.
Why it works: The fork tine mimics a zipper-opening tool without requiring specialty equipment. The tine’s width is close enough to the slider channel gap to guide the tape without over-widening the slider.
Limitation: This works for minor derailment only. If the slider is severely bent or both tapes are off, use the Step 2 re-threading method above.
If tightening the slider or re-tracking it hasn’t solved the problem, the slider itself is likely damaged and needs replacement — that’s Rung 3 or 4 territory.
Replace Broken Tent Zipper Sliders/Damaged Teeth
When a tent zipper slider is cracked or bent beyond repair, replacing it costs under $10 and takes about 20 minutes — no sewing required in most cases. Identifying the right replacement slider is the critical first step. Most tent zippers use YKK sizing, and the size number is stamped directly on the slider body. Rung 3 and Rung 4 repairs require replacement parts — here’s how to source and install them.
Identify the Right Replacement Slider
Look for a number stamped on the back or side of your existing slider: typically #5, #8, or #10 for camping tents. That number tells you the approximate width of the closed zipper in millimeters, which determines which replacement slider fits.
| Zipper Size | Approx. Width | Common Use |
|---|---|---|
| YKK #5 | ~5mm | Lightweight backpacking tents, sleeping bags |
| YKK #8 | ~8mm | Standard camping tent doors, vestibules |
| YKK #10 | ~10mm | Heavy canvas tents, grow tents, tent trailers |
A “wavy” zipper appearance — where the tape undulates instead of lying flat — often indicates either the wrong slider size was installed at some point or that multiple teeth are bent. Correcting the slider size resolves the issue in many cases.
- Where to buy replacement sliders:
- Online: Amazon, LenZip.com, FixnZip.com (universal fit options)
- Outdoor retailers: REI, MEC
- Contact the tent manufacturer directly for an exact-match slider
If the slider has no visible number: Measure the width of the closed zipper teeth in millimeters. That measurement is your zipper size. Trivantage notes that YKK #10 Vislon zippers are UV-resistant and suited for heavy-duty outdoor applications — relevant for grow tent and canvas tent owners sourcing replacements (Trivantage, 2024).
Once you have the right replacement slider, here’s how to install it.
Step-by-Step: Remove and Replace Slider
This procedure works for both metal and plastic (Vislon) sliders, making it essential for understanding how to fix a broken plastic zipper. Handle plastic sliders more carefully — they’re more brittle than metal and can crack if the pliers slip.
- Remove the top stop. Use needle-nose pliers to gently pry off the small metal or plastic stop at the top of the zipper — the end where the slider currently rests when the zipper is fully closed. Work slowly; you’ll need to re-install a stop afterward.
- Slide off the old slider. With the top stop removed, slide the damaged slider off the top of the zipper tape. Note which direction the nose faces before removing — you’ll install the new one in the same orientation.
- Inspect the teeth. Before installing the new slider, run your finger along both sides of the tape and check for bent or damaged teeth. Fix any bent teeth first (see next section).
- Thread the new slider. Slide the replacement slider onto the tape from the top, nose-first, in the same orientation as the old one. Feed both left and right tapes into the slider simultaneously.
- Secure the top stop. Clamp a new metal top stop at the top of the zipper tape using pliers, or hand-sew a thread bar stop with heavy-duty thread. The stop prevents the slider from coming off during use.
- Test. Run the slider up and down 3–4 times. The zipper should close cleanly with no separation.
⚠️ Common mistake: Installing the slider backwards — the pull-tab should face the same side as it did originally. If you zip up and the teeth separate instead of close, the slider is reversed.
Big Agnes confirms that replacing the slider is often the simplest and most effective DIY fix when both sides of a tent zipper are separating (Big Agnes, 2024).
If the slider is fine but the teeth themselves look bent, wavy, or misaligned, here’s how to address that.
How to Fix Bent or Damaged Zipper Teeth
Bent teeth produce the “wavy zipper” appearance — the tape undulates and the zipper separates even with a good slider. Learning how to fix a tent zipper teeth in this condition is crucial, as minor bending is fixable; missing teeth are not.
Identify bent teeth: Run your finger slowly along the teeth on both sides. Bent teeth feel uneven and look angled or wavy instead of uniform.
For slightly bent individual teeth: Use needle-nose pliers to gently straighten them one at a time. Apply minimal force — teeth are brittle, especially on older zippers. Work from the base of the tooth, not the tip.
For nylon coil teeth: These are harder to address individually because they form a continuous spiral. If the coil is kinked or cut, that section must be removed and re-sewn — not a DIY repair. This is a Rung 4 failure requiring professional service.
For plastic Vislon teeth: Individual molded teeth can sometimes be straightened or stabilized with a small amount of flexible adhesive if only slightly bent. If a tooth is cracked through or missing, the tape needs replacement.
When to stop: If teeth are missing — broken off rather than bent — or if the nylon coil is cut, the zipper tape must be fully replaced. This requires sewing and is best done professionally.
Now for the question everyone wants answered before starting: is it worth fixing yourself, or should you pay a professional?
DIY vs. Professional Repair Costs
No competitor guide provides this comparison with real numbers. Here’s the honest breakdown:
| Repair Type | DIY Cost | Professional Cost |
|---|---|---|
| Cleaning + lubrication | $0–8 | N/A (do it yourself) |
| Slider tightening | $0 (pliers only) | N/A |
| Slider replacement | $3–8 (slider) / $8–15 (kit) | From $36 (Rainy Pass Repair, 2026) |
| Full zipper replacement | Not recommended DIY | From $120 (Rainy Pass Repair, 2026) |
“Professional tent zipper slider replacement starts at $36, while a DIY replacement slider costs $3–8 — making slider replacement one of the highest-ROI outdoor gear repairs” (Rainy Pass Repair, 2026).
When DIY makes sense: All Rung 1–3 repairs — cleaning, lubrication, slider tightening, re-tracking, and slider replacement. Time investment: 5–30 minutes.
When professional makes sense: Missing or damaged teeth requiring new zipper tape, two-way zipper mechanism failure, canvas tent trailer repairs, or any warranty-eligible repair. Contact your tent manufacturer first — many offer warranty repairs or sell replacement parts at cost.
No repair kit and you’re in the field right now? These improvised fixes will get you through the night.
Emergency Field Fixes for a Broken Tent Zipper
When your tent zipper breaks in the field, knowing how to fix a stuck tent zipper with limited resources becomes paramount. You need a fix that works with what you have. These emergency hacks are temporary — they’ll get you through the trip. Plan a permanent repair when you’re back home.
Replace a Missing Zipper Pull Tab
A missing pull tab is one of the most frustrating tent zipper failures — the slider is fine, but you can’t grip it. Here are four field-expedient replacements:
- Zip tie: Thread a small zip tie through the slider’s pull tab hole. Loop and lock. This is the most durable field replacement — it’s rigid enough to grip even with cold or gloved hands.
- Paracord loop: Thread 3–4 inches of paracord through the hole and tie a knot. Easier to grip than a zip tie in wet conditions.
- Safety pin: Clip a safety pin through the pull tab hole. No threading required — works in under 10 seconds.
- Paper clip: Bend a paper clip into a loop and thread it through. Works for temporary use when nothing else is available.
Emergency kit note: Keep 2–3 zip ties and a small safety pin in your tent bag at all times. This repair takes 30 seconds and requires no tools.
If the slider has come off the track and you don’t have pliers, the fork method gets it back without tools.
Fork Method & Improvised Re-Trackers
When a tent zipper that came off track needs fixing and you have no pliers, a fork is your best option.
When to use this: The slider has come partially off one side of the tape, and you have no pliers in camp.
- Fork method — field application:
- Find any fork (camping fork, plastic picnic fork).
- Insert a single tine into the slider’s open side — the side the tape has slipped out of.
- Gently work the tine to create just enough gap to re-seat the tape.
- Guide the tape back into the slider channel using the tine as a guide rail.
- Slowly zip up 3–4 inches — if it separates again immediately, the slider is too damaged for this fix.
Alternative tools: A thin knife blade or the tip of a flathead screwdriver works similarly. Use the thinnest available tool to avoid over-widening the slider gap. Metal zipper sliders, often brass or aluminum, tolerate more manipulation than plastic Vislon sliders during field repairs, as noted by CB Zipper (CB Zipper, 2024).
Limitation: This is a temporary fix. If the slider needed widening to re-seat the tape, it’s already too loose to hold the teeth reliably — plan a slider replacement when you’re home.
One field fix you’ve probably heard about — but shouldn’t use — is Flex Seal. Here’s the honest answer.
Does Flex Seal Work on Tent Zippers?
No. Flex Seal, a rubber-based aerosol sealant marketed for waterproofing, is not designed for zipper mechanisms and is not recommended for tent zipper repair.
Why it fails: The rubber compound coats the teeth and slider channel, creating immediate drag and stiffness. It breaks down with UV exposure and repeated flexing, leaving a sticky residue that attracts dirt and jams the zipper further. Consumer Reports testing confirms that Flex Seal tears when bent repeatedly on flexible surfaces — exactly what a tent zipper does thousands of times (Consumer Reports, 2012). Outdoor community discussions on Hammock Forums echo the same concern: the product is too thick for flexible applications like tent fabric and zippers. Tentexplorer.com’s field observations also confirm these issues, advising against its use for flexible gear.
What DOES work for waterproofing: Seam sealer products (applied to the fabric, not the zipper) for weatherproofing tent seams. For the zipper itself, silicone spray is both a lubricant and a mild water repellent — the correct product for zipper waterproofing.
Some tent types come with specialized zipper designs that require slightly different approaches — here’s what to know.
Specialized Tent Zipper Repairs
Most specialized tent zipper repairs use the same fixes covered earlier in this guide — but the structural design of the zipper affects which approach works best. Two-way zippers, tent door zippers, grow tent zippers, and tent trailer zippers each have quirks that determine where to start the repair. Tentexplorer.com’s field analysis shows that understanding these nuances can significantly improve repair success rates.
Two-Way Tent Zippers: Why They’re Tricky
A two-way tent zipper has two sliders on the same tape, allowing the zipper to be opened from either end — common on large tent doors and vestibules. Understanding how to fix a stuck two way zipper involves recognizing that the repair process uses the same pliers technique, but the slider interaction creates a unique failure mode.
“Two-way tent zipper failures most often occur when both sliders meet mid-track — the opposing tension causes the teeth to separate at the meeting point, not at either slider” (Tentexplorer.com field analysis). This looks like a Rung 2 separation problem, but squeezing the sliders won’t fix it if the sliders themselves are positioned against each other.
Fix for mid-track separation: Never let both sliders meet mid-track during normal use. When closing the tent, park one slider at the top stop and one at the bottom stop. If they’ve already met and the teeth are separating at that point, gently separate the sliders manually before attempting any repair.
Slider tightening: Apply the pliers technique to each slider independently. Tighten one, test it by running it the full length of the zipper, then address the other.
For a stuck two-way zipper: Identify which slider is stuck and address it using the H2 #2 cleaning and lubrication steps. Park the other slider at the opposite end to reduce tension on the stuck one before working on it.
Tent door zippers face a different challenge: the constant stress of repeated opening and closing, often at an angle.
Tent Door Zippers: Repair Considerations
Tent door zippers are opened and closed more frequently than any other zipper on the tent – often 4–8 times per day during active camping. That wear rate means they fail faster and benefit most from preventive maintenance. Learning how to fix a tent door zipper effectively means understanding these unique stressors.
Most common failure: Slider loosening (Rung 2) — apply the pliers tightening technique from H2 #3 first before assuming anything more complex is wrong.
For a broken zipper on a tent door: If the door zipper has damaged teeth rather than just a loose slider, this is the highest-priority repair on the tent. A non-functioning door eliminates both bug and weather protection simultaneously. Knowing how to fix a broken zipper on a tent door quickly is essential.
Zipper orientation: Tent door zippers typically run vertically. When re-tracking a derailed slider, gravity works against you. Start the re-threading from the bottom of the door — where the bottom stop is — so gravity helps feed the tape into the slider rather than pulling it away.
For a zipper on a tent door that won’t close: Check whether it’s a Rung 2 (slider stretched) or Rung 3 (slider off-track) problem before applying any fix. Tent door zippers are more prone to Rung 2 failures due to their high cycle count. How to fix a zipper on a tent door often involves these basic assessments.
Prevention: Tent door zippers benefit more from regular lubrication than any other zipper on the tent. Apply silicone spray at the start of every camping season and after any extended wet trip.
Grow tents and tent trailers present their own unique zipper challenges — here’s what’s different.
Grow Tent and Tent Trailer Zippers
Grow tent zippers typically use heavy-duty Vislon (molded plastic) zippers, often YKK #10 — more robust than standard camping tent zippers but subject to the same failure modes. Learning how to fix a zipper on a grow tent requires similar principles.
- High UV exposure inside grow tents degrades Vislon faster than nylon coil — inspect and lubricate more frequently, at least every 3 months in active use.
- Grow tent zippers often run the full height of the tent. Re-tracking requires starting from the bottom with the tent fully collapsed to reduce tension on the tape.
- For a stuck grow tent zipper: Clean with a dry brush first. Avoid water if lights or electrical equipment are inside the tent.
Tent trailer zippers are typically canvas-mounted, using larger gauge hardware (YKK #8 or #10) in heavier fabric. The repair steps are identical, but the heavier canvas requires more deliberate force during pliers work. Understanding how to fix a zipper on a tent trailer means being prepared for these material differences.
- Replacement sliders for canvas tents: source from canvas tent specialists like Beckel Canvas or Sunforger rather than general outdoor retailers — standard camping sliders may not fit the heavier tape.
- If the zipper tape itself is damaged on a tent trailer (torn fabric backing, not just bent teeth), professional canvas repair is strongly recommended. The weight and thickness of canvas requires industrial sewing equipment that isn’t practical for home repair.
Even the best repairs have limits. Here’s when to stop the DIY approach and call in a professional.
When DIY Tent Zipper Repair Isn’t Enough
Every repair technique in this guide has a boundary. Knowing where that boundary is saves you from making a damaged zipper worse.
Common DIY Pitfalls to Avoid
- Over-squeezing the slider: The scenario — you apply full pliers force on the first attempt. What goes wrong: plastic sliders crack, metal sliders jam permanently. The fix: squeeze in 1–2mm increments and test after each one. If the slider becomes hard to move, you’ve gone too far and likely need a replacement.
- Using WD-40 as a lubricant: The scenario — you grab the nearest spray can. What goes wrong: petroleum residue attracts sand and dirt, making the zipper stick worse within days. Gear repair communities and backpacking forums consistently report this as the most common zipper mistake. Use silicone spray or wax only.
- Forcing a stuck slider: The scenario — you yank harder when the zipper sticks. What goes wrong: fabric tears, teeth bend, and the slider can crack. The correct move is to pull the slider back first to release the obstruction before trying to advance it again.
When to Get Professional Repair
Some repairs are genuinely beyond DIY. These scenarios warrant calling in a specialist:
- Missing or damaged zipper teeth: If the coil is cut or multiple teeth are missing, new zipper tape is required. Sewing in new tape requires industrial equipment.
- Two-way zipper mechanism failure: If both sliders are damaged or the tape itself is compromised, the entire zipper must be replaced.
- Canvas tent trailers: The weight and thickness of canvas requires professional-grade sewing equipment.
Professional slider replacement starts at $36; full zipper replacement starts at $120 — Rainy Pass Repair in Seattle is one of the most widely recommended outdoor gear repair specialists in North America (Rainy Pass Repair, 2026). Contact your tent manufacturer first — many offer warranty repairs or sell replacement parts at cost.
Frequently Asked Questions
How to Fix a Separated Tent Zipper?
A separated tent zipper is fixed by tightening the slider’s jaws with needle-nose pliers. Move the slider to the bottom of the zipper, then gently squeeze the flat back end of the slider — not the nose — applying 1–2mm of pressure at a time. Test after each squeeze by zipping up 6 inches and checking whether the teeth hold. Most separating tent zippers are fully repaired in 2–4 squeezes. Stop if the slider becomes difficult to move — that means you’ve applied enough pressure.
How Do You Fix a Separated Zipper?
A separated zipper — where teeth pop open behind the slider — is almost always caused by a slider with stretched jaws that no longer grip the teeth tightly enough. Position the slider at the zipper’s base, then carefully squeeze the wider back end of the slider with pliers. Apply gentle, incremental pressure and test after each adjustment by running the slider up several inches. For tent zippers specifically, 2–4 squeezes typically restore proper function. Replace the slider only if it cracks or becomes immovable during the process.
How Do I Put a Zipper Back on Its Track?
To put a tent zipper back on its track, first remove the bottom stop — the small metal or plastic clamp at the zipper’s base — using needle-nose pliers or a seam ripper. Slide the new or existing slider back onto the zipper tape from the bottom, ensuring both left and right tapes are threaded into the slider simultaneously. Secure a new bottom stop by clamping a replacement metal stop with pliers, or hand-sew a thread bar stop. For a minor derailment without a broken stop, the fork method often re-seats the tape without removing any hardware at all.
Cost to Replace a Tent Zipper?
Professional tent zipper replacement costs $36–120+ depending on the repair type and tent complexity. A slider-only replacement starts at $36 at specialist shops like Rainy Pass Repair; a full main zipper replacement starts at $120. DIY slider replacement costs $3–8 for a replacement slider and $8–15 for a full repair kit — making it one of the highest-ROI gear repairs available. Always contact your tent manufacturer first, because many brands offer warranty repairs or sell exact-match replacement parts directly at significantly lower cost than third-party repair shops.
Can a Separating Zipper Be Fixed?
Yes — a separating zipper can almost always be fixed without professional help. When zipper teeth pull apart behind the slider, the slider’s jaws have typically stretched and no longer grip the teeth tightly enough. Gently squeezing the flat back end of the slider with needle-nose pliers in 1–2mm increments reshapes the jaws and restores their grip on the teeth. Most separating tent zippers are repaired in under five minutes using only pliers. Replace the slider only if it cracks during the repair — a cracked slider cannot be reshaped and must be swapped out.
How to Fix a Zipper That Came Off Track?
A tent zipper that came off track is fixed by removing the bottom stop, re-seating the slider on both tapes from the base of the zipper, and securing a new stop. Use needle-nose pliers to carefully remove the bottom stop, then feed both the left and right zipper tapes into the slider’s two channels simultaneously — starting from the bottom so gravity assists the threading. If the derailment is minor and the stop is intact, try the fork method first: insert a single tine into the slider’s open side and guide the tape back into the channel without removing any hardware. Secure a replacement stop once the slider is correctly seated.
Last verified: April 2026
For most campers, a broken tent zipper is a one-time fix they never need to think about again. Tent zipper repair delivers some of the best ROI of any outdoor gear maintenance task — a $3–8 slider replacement restores full function to a tent that might otherwise sit unused. The Zipper Failure Ladder makes the diagnosis fast: identify your rung, go directly to the right fix, and skip the trial-and-error that frustrates most DIY attempts.
Once the repair is done, the prevention habit is simple: brush the teeth clean and apply silicone lubricant at the start of every season and after any wet or sandy trip. That 5-minute routine extends zipper life by years.
Grab a pair of needle-nose pliers and a can of silicone spray — most tent zipper failures are a 10-minute fix waiting to happen. Start with The Zipper Failure Ladder, identify your rung, and work through the steps. Your tent will be back in service before your next trip.
