This blog post may contain affiliate links. As an Amazon Associate I earn from qualifying purchases.
⚠️ Important: Camping involves inherent risks. The information in this guide is intended for educational purposes only and is not a substitute for professional wilderness training, local knowledge, or advice from park rangers and emergency services. Always check local regulations and consult certified outdoor professionals before attempting remote or solo camping.
Most camping accidents aren’t caused by bad luck — they’re caused by skipping three specific steps before dark. The good news: every one of them takes under five minutes.
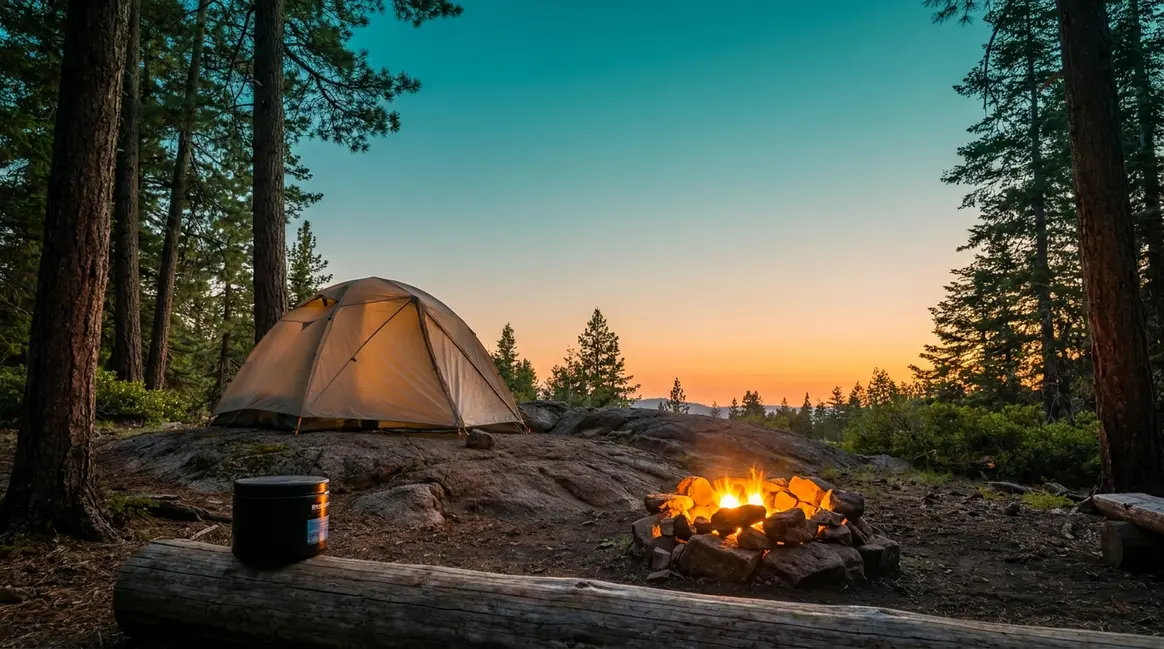
Picture two campers at the same trailhead. One lies awake at 2 a.m., heart pounding at every sound, wondering whether the campfire is truly out and whether that rustling outside is a bear drawn to the granola bars in the tent vestibule. The other sleeps soundly — not because the forest is safer, but because they ran through a short, systematic checklist before getting into their sleeping bag. These tent camping safety tips are what separate anxious camping from confident camping.
In this guide, you’ll learn how to select a safe campsite, store food to deter wildlife, prevent carbon monoxide poisoning, secure your tent, and pack the gear that actually matters — covering all five safety pillars from site inspection through personal security.
Before You Start: This guide assumes you have a tent, a planned campsite, and basic camping supplies. If you haven’t packed yet, start with our essential camping safety gear checklist, then return here.
Key Takeaways: Tent Camping Safety at a Glance
Tent camping safety comes down to five decisions made before you go to sleep: site selection, food storage, fire management, tent security, and communication. The CPSC reports at least 12 deaths since 2020 from CO poisoning linked to camping equipment — all preventable.
- Never store food in your tent — bear encounters at campsites are nearly always food-related, per the National Park Service
- Keep campfires 15–25 feet from your tent and never burn any fuel source inside a tent
- Share your itinerary with someone at home before every trip
- Use “The 5-Minute Safety Scan” each night: food stored, fire out, tent secured, location shared, gear within reach
- The 7 C’s of camping (Cutting tool, Combustion, Cover, Container, Cordage, Candling, Compass) form your baseline packing list
How to Choose a Safe Campsite
Choosing a campsite safely means actively inspecting your surroundings — not just finding a flat patch of dirt. Environmental hazards like dead branches, hidden drainage channels, and exposed ridgelines cause real injuries every season, and they’re entirely preventable with a deliberate look around before you unpack. Arriving at your campsite before 3 p.m. gives you daylight to identify widow-makers, assess drainage, and secure guylines before conditions change (U.S. Forest Service).
The National Park Service (NPS), the federal agency that manages U.S. national parks, and the U.S. Forest Service, the USDA agency managing national forests, both emphasize that campsite assessment is a camper’s first line of defense. Here’s how to do it in five steps:
- Look up. Scan the canopy for dead or dying branches overhead — called “widow-makers” by outdoor professionals — that can fall without warning, especially in wind.
- Check the ground slope. Your tent floor should angle slightly downhill to drain rainwater away, not channel it underneath you.
- Identify drainage paths. Dry channels and depressions fill fast in a storm. Never pitch in a low spot or dry streambed.
- Assess overhead exposure. Avoid open ridges during storm season — lightning and wind exposure increase dramatically above the treeline.
- Confirm fire restrictions. Check the U.S. Forest Service fire page before lighting anything — local burn bans change daily.
Identifying Natural Hazards: Widow-Makers and Flood Zones
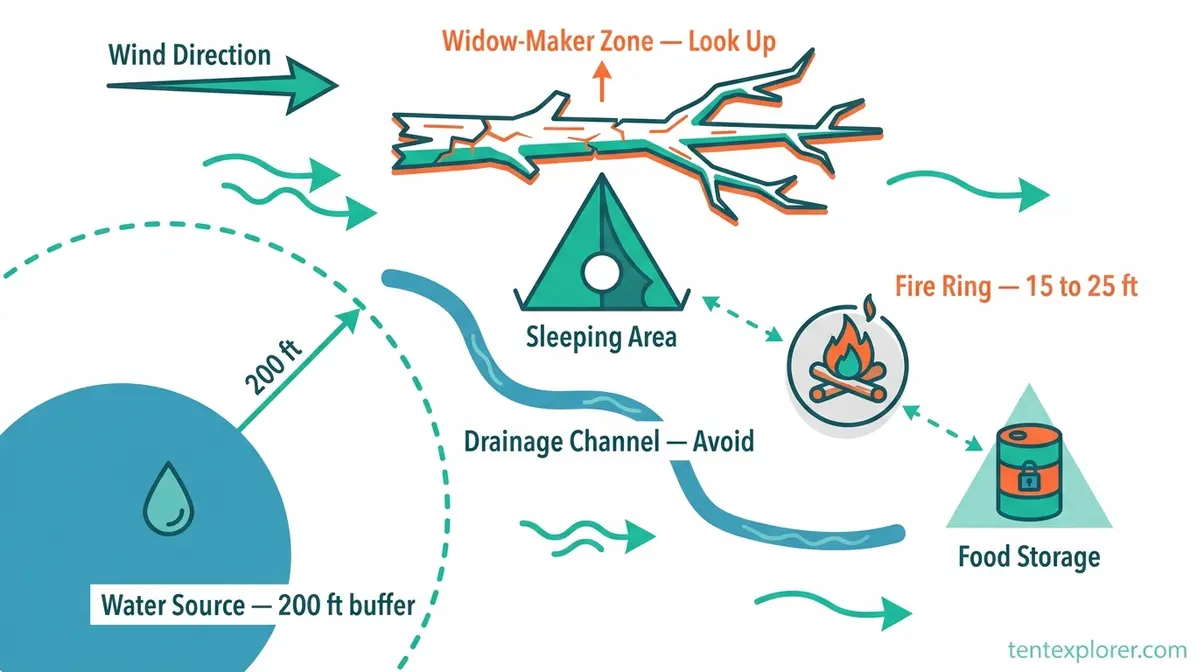
The two most underestimated campsite hazards are overhead and underfoot. Dead or dying branches — widow-makers — are easy to miss when you’re scanning horizontally for a flat site. Train yourself to look up first, every time. Look for branches that are bare while surrounding trees are leafed out, bark that’s peeling without obvious cause, and large limbs with visible cracks at the junction point.
Flood risk is equally invisible until it isn’t. A dry streambed 30 feet from your tent can fill in under an hour during a mountain thunderstorm. Signs of flood potential include: water-polished rocks, debris lines on vegetation, and channels that look carved rather than eroded. The NPS advises pitching at least 200 feet from any water source — a rule that also protects local ecosystems and your food from wildlife drawn to the water’s edge.
Ground and Drainage: Picking the Right Tent Spot
Once you’ve cleared overhead hazards, focus on what’s beneath your footprint. Soft, slightly elevated ground drains well and provides a more comfortable sleep surface. Avoid compacted clay, which puddles, and sandy depressions near water, which can flood silently.
A practical test: press your heel firmly into the ground. If water seeps up around your shoe, the water table is too high for safe pitching — especially in spring. For family campers with children, this check matters more than it seems: a wet tent floor drops sleeping temperature significantly overnight, creating hypothermia risk even in mild summer conditions.
The U.S. Forest Service recommends using established tent pads where available. They’re leveled, pre-inspected, and designed to minimize environmental impact — which also means they’re chosen by rangers who’ve already ruled out obvious hazards. Explore our guide on setting up camp in different terrain for surface-specific advice.
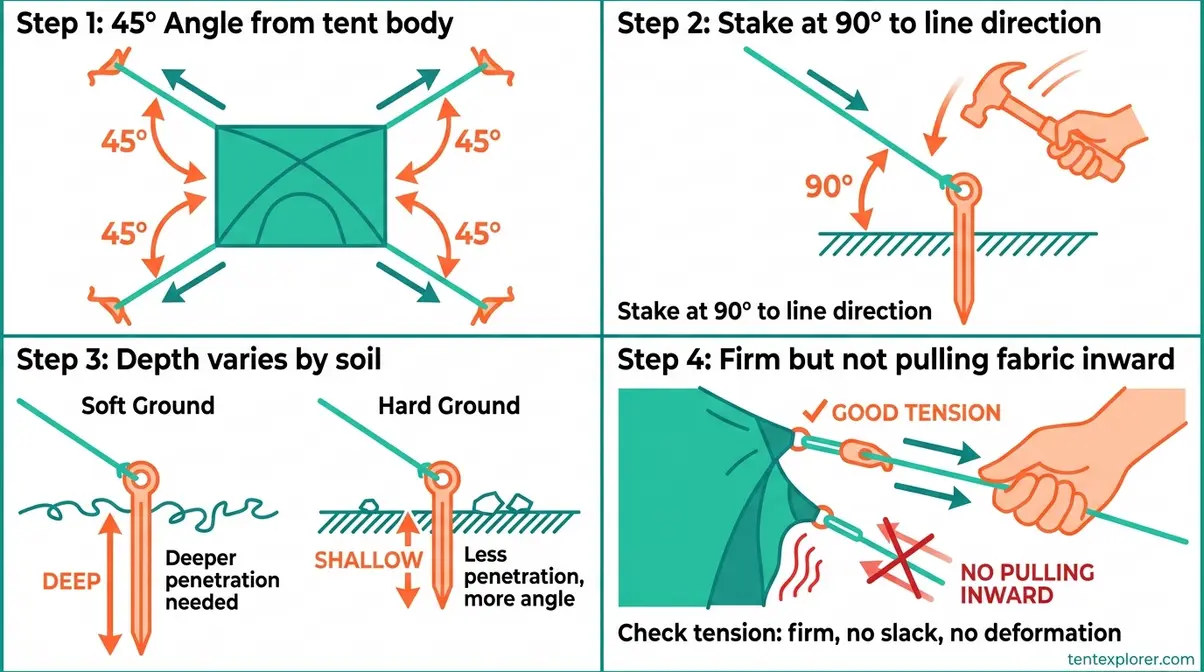
Storm Preparedness and Tent Guyline Securing
Weather changes faster in the mountains than weather apps suggest. Before you sleep, check the overnight forecast — not just the daytime high. If there’s any chance of wind above 15 mph or thunderstorms, your guylines need to be taut and staked, not loosely attached.
Guyline securing in four steps:
- Extend each guyline at a 45-degree angle from the tent body — this distributes wind load away from the seams.
- Stake at a 90-degree angle to the guyline direction, not vertically — angled stakes hold in soft ground far better under lateral load.
- Tension until the guyline is firm but not pulling the tent fabric inward — over-tightening stresses the attachment points.
- Check all stakes again after the first hour of wind — soil loosens as stakes work under pressure.
For extreme weather conditions, see our guide on four-season tent for extreme weather to understand when a three-season tent simply isn’t enough.
Applying the 3-3-3 Rule to Reduce Road-Trip Fatigue
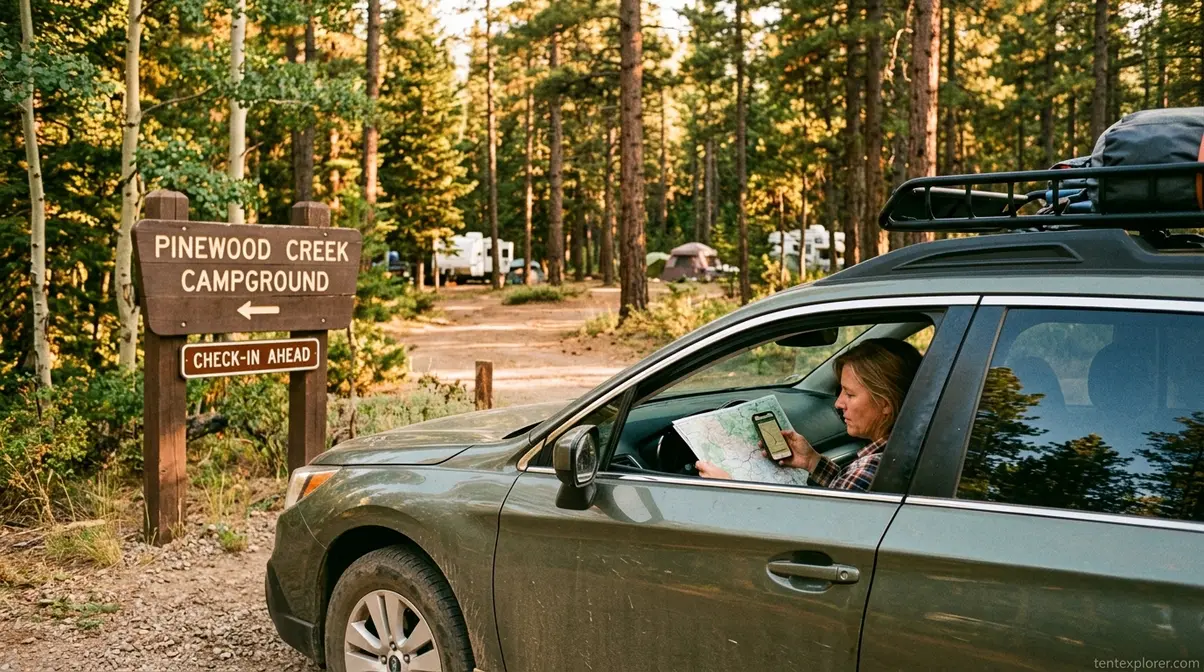
Originally an RV travel guideline, the 3-3-3 rule translates directly to tent road trips: drive no more than 3 hours per day, arrive at your campsite by 3 p.m., and plan to stay at least 3 nights. The logic is practical. Arriving early gives you daylight for a full campsite inspection, time to set up before fatigue sets in, and a buffer if your first-choice spot is taken or unsafe.
Driver fatigue is a genuine pre-camping hazard — impaired reaction time from even mild fatigue increases accident risk on mountain roads. The 3 p.m. arrival rule also means you’re setting up in good light, not scrambling with a headlamp. Across camping communities and professional guides, this single habit — arriving early — is consistently cited as one of the highest-impact safety decisions you can make before your first night.
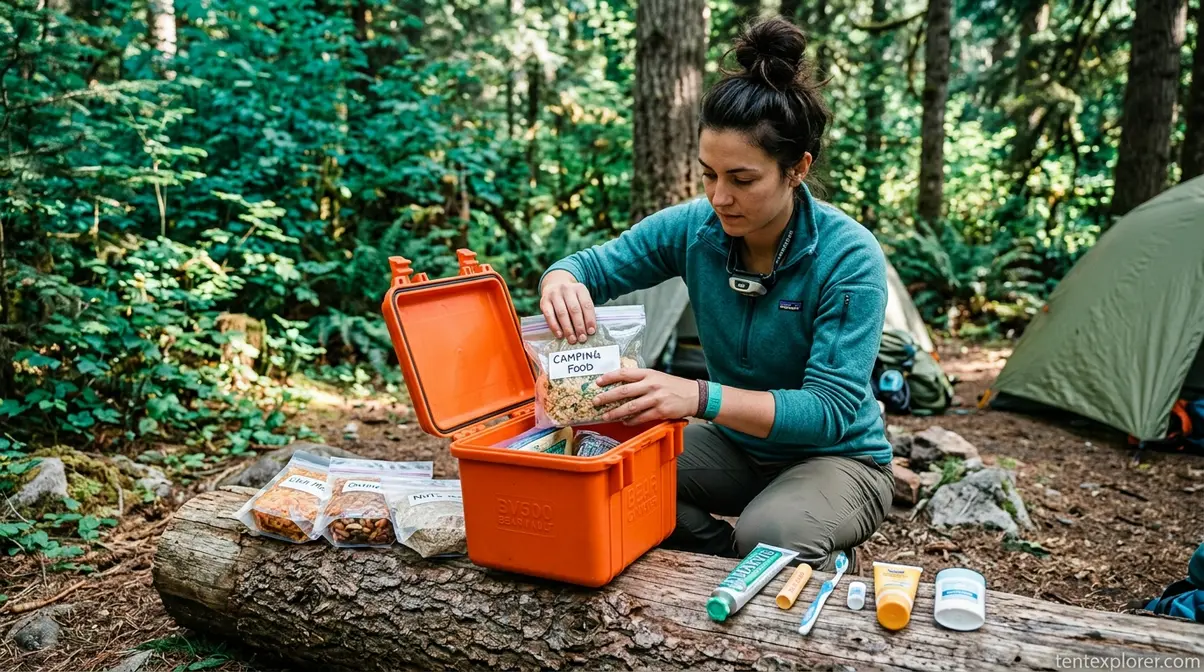
Wildlife Safety and Bear-Proof Food Storage
Wildlife encounters are rare when campers follow consistent food storage protocols — but the consequences of getting it wrong can be severe. The NPS’s position is unambiguous: bears that access human food lose their natural foraging behavior and often must be euthanized, making proper food storage a conservation act as much as a safety measure. A 2025 study in Ursus found a bear injury rate of just 1 per 275,144 recreations in Yellowstone — evidence that the protocols work when followed (Ursus, 2025).
The Bear-muda Triangle: A Safe Campsite Layout
The “bear-muda triangle” is the standard layout recommended by wilderness professionals: your sleeping area, cooking area, and food storage area should form a triangle with at least 200 feet between each point. This separation means that food odors don’t concentrate near where you sleep, and any bear investigating your kitchen area doesn’t stumble directly into your tent.
Set up your cooking area downwind of your sleeping area. Store food and all scented items at the third point of the triangle — upwind of neither your tent nor your kitchen. This positioning ensures that wind doesn’t carry cooking smells toward your tent after dark.

What to Store and Where: The Complete List
Many campers store obvious food but forget the items that carry equally strong scents. Store all of the following away from your tent — in a bear canister, bear box, or locked vehicle:
- All food and snacks (including sealed packaging)
- Cooking equipment with food residue
- Trash and food wrappers
- Toiletries: toothpaste, soap, sunscreen, lip balm, insect repellent
- Scented clothing (worn while cooking)
- Pet food and water bowls
- Feminine hygiene products
The California State Parks food storage guidelines are explicit: any scented item belongs in secure storage, not in your tent. This list surprises most first-time campers — the toothpaste tube in your tent is as attractive to a bear as the granola bar.
Encountering Wildlife: Protocols That Could Save Your Life
If you encounter a bear at your campsite, your response depends on the bear’s behavior. For a bear that hasn’t noticed you: move slowly away, speak in a calm, low voice, and do not run. Running triggers pursuit instinct. For a bear that has noticed you and is approaching curiously: stand tall, speak firmly, wave your arms, and back away slowly. Make yourself look large.
Bear spray — a concentrated capsaicin aerosol — is effective at distances of 25–30 feet and is recommended by the NPS for backcountry camping in grizzly territory. Carry it on your person, not in your pack. For mountain lions, the protocol reverses: make direct eye contact, appear large, and do not crouch or turn away. For snake encounters, the rule is simple — give 6 feet of clearance and don’t reach into areas you can’t see. Across wildlife categories, the consistent advice from park rangers is: observe from a distance, never feed, never approach.
Bear Canisters vs. Bear Boxes vs. Car Storage
Your storage choice depends on your campsite type. Here’s a quick comparison:
| Storage Method | Best For | Pros | Cons |
|---|---|---|---|
| Bear canister | Backcountry/dispersed camping | Portable, NPS-approved | Bulky, limited capacity |
| Bear box (locker) | Developed campgrounds | High capacity, no carry weight | Fixed location only |
| Locked vehicle | Car camping near parking | Large capacity, convenient | Not available backcountry; never leave windows cracked |
| Bear hang (rope) | Minimalist backcountry | Lightweight | Technique-dependent, fails if done wrong |
The NPS mandates bear canisters in several parks, including Yosemite’s backcountry. Check park-specific regulations before your trip at NPS camping safety. Bear boxes at developed campgrounds are the easiest option — use them whenever they’re available.
⚠️ Fire Safety and Carbon Monoxide
Fire safety is the most life-critical section of any tent camping safety guide. The risks are real, documented, and entirely preventable. Since 2020, the CPSC is aware of at least 12 deaths linked to camping equipment — grills, lanterns, and stoves — from carbon monoxide poisoning alone (CPSC Safety Alert 5008, 2024). Every one of those deaths occurred because a fuel-burning device was used inside or too close to an enclosed space.
Carbon Monoxide: The Silent Tent Killer
Carbon monoxide (CO) is an odorless, colorless gas produced by incomplete combustion — meaning any fuel-burning device, including camp stoves, propane lanterns, charcoal grills, and portable heaters, can produce lethal concentrations in seconds inside an enclosed tent.
⚠️ WARNING: Carbon Monoxide Kills Without Warning
Never use any fuel-burning device inside a tent, vestibule, or enclosed tarp shelter. This includes camp stoves, propane heaters, charcoal grills, and gas lanterns. Carbon monoxide has no smell, no color, and no taste — you will not know you’re being poisoned until you can no longer respond. The CPSC reports at least 12 camping equipment-related CO deaths since 2020 (CPSC Safety Alert 5008, 2024). Symptoms include headache, dizziness, and confusion — if anyone in your group shows these signs near a fuel source, move to fresh air immediately and call 911.
CO poisoning symptoms mimic altitude sickness and exhaustion, which is why campers sometimes dismiss early warning signs. If you feel an unexplained headache or sudden drowsiness near any fuel-burning device, treat it as a CO emergency. A battery-powered CO detector designed for camping — available for under $30 — can save your life. Place it near your sleeping area, not near the tent door where outside air dilutes readings.
The CDC and CPSC are unequivocal: the only safe place for a fuel-burning device is outdoors, with adequate ventilation, away from any tent opening. No exceptions for “just for a minute to warm up.”
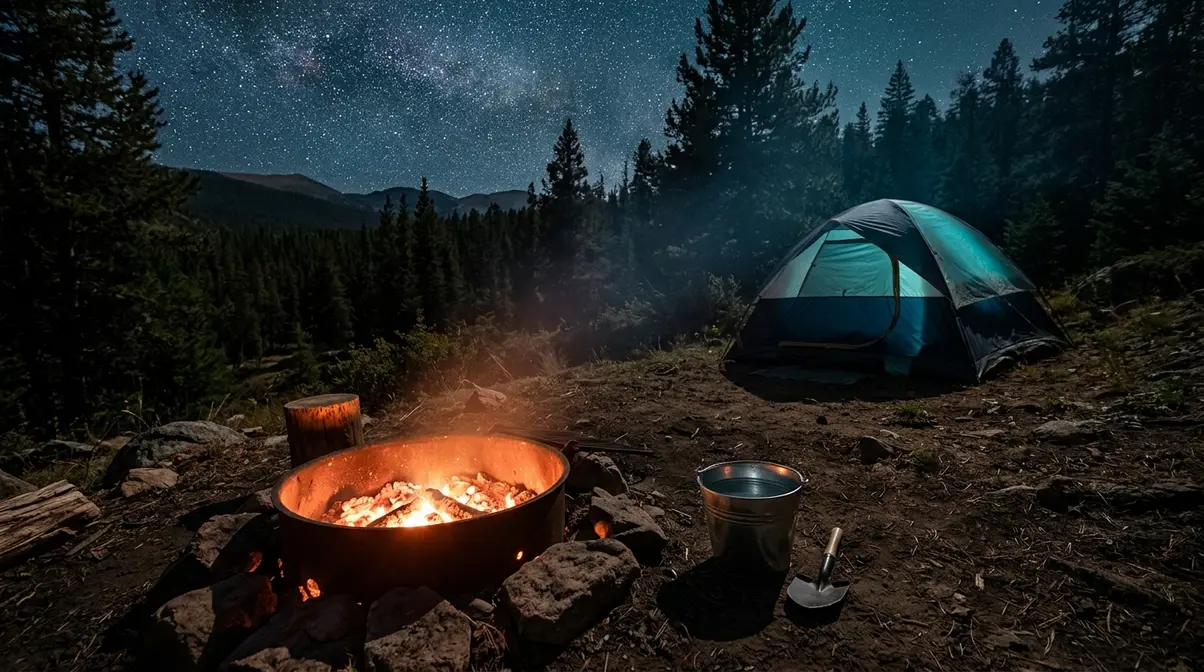
Safe Campfire Distance and Site Placement
Two federal agencies give slightly different guidance on campfire distance — and both numbers matter. The National Park Service recommends keeping your tent and all flammable gear at least 15 feet upwind of your fire pit (NPS Campfires). The U.S. Fire Administration (FEMA) sets the standard higher at 25 feet from tents, shrubs, and anything combustible (USFA).
The practical rule: use established fire rings whenever possible, and if you must build a new fire, place it at least 25 feet from your tent in the most conservative direction. Position your tent upwind of the fire, not downwind — wind shifts happen, and a downwind tent collects both sparks and smoke.
Clear at least six feet of combustible material around any fire ring before lighting, per the U.S. Forest Service. Keep a bucket of water and a shovel within reach at all times.
How to Fully Extinguish a Campfire: Drown, Stir, Feel
A campfire that looks out at 10 p.m. can restart from buried embers at 2 a.m. The standard three-step method — Drown, Stir, Feel — is the only reliable approach:
- Drown: Pour water slowly and evenly over the entire fire, including the edges of the ring. Use more water than you think you need — at least one full bucket per foot of fire diameter.
- Stir: Use a stick or shovel to mix ash and embers with the wet material. This exposes hidden hot spots that water hasn’t reached.
- Feel: Hold your hand 6 inches above the ash — not touching it. If you feel any heat at all, repeat steps 1 and 2. The ash should be cool enough to touch before you leave it unattended.
Never bury a fire. Buried embers can smolder underground for hours and reignite. Never leave a fire unattended, even briefly — wind conditions change in seconds.
Spark Safety and Tent Flammability
Most modern tents use nylon or polyester fabrics that are treated with a flame-retardant coating — but “flame retardant” does not mean fireproof. A single ember landing on tent fabric can melt through in seconds, creating a fire hazard and releasing toxic fumes from the synthetic material.
Position your tent crosswind from the fire, not directly downwind. In still air, position it perpendicular to the fire ring. Avoid synthetic clothing near open flames for the same reason. Keep the fire ring clear of debris, and never use flammable accelerants like lighter fluid in a campsite setting. The KOA camping safety guidelines also recommend never leaving children unsupervised within 10 feet of any open flame.
Personal Security and Solo Camping Safety
Personal security is the most emotionally loaded topic for many campers — particularly those camping solo or for the first time. The evidence-based approach replaces vague anxiety with specific, practiced protocols. The 5-Minute Safety Scan — our original pre-sleep framework — is the organizing tool for this section. Run it every night before you close your tent zipper.
Share Your Itinerary and Emergency Communication
Before leaving home, give someone you trust a written itinerary that includes: your campsite name and GPS coordinates, your planned arrival and departure dates, your vehicle make, model, and license plate, and a specific check-in time. Tell them: “If I haven’t called by on , call .”
For backcountry or remote camping, a satellite communicator like the Garmin inReach Mini (a two-way GPS messenger that works without cell coverage) provides a direct lifeline when your phone shows zero bars. The inReach allows two-way text messaging with emergency services via satellite — a capability that has directly saved lives in documented wilderness rescue cases. At a minimum, download offline maps for your area using apps like AllTrails or Gaia GPS before you lose signal.
Register your trip with the local ranger station or park office when possible. Many parks offer free trip registration that automatically alerts rangers if you’re overdue. This takes three minutes and costs nothing.
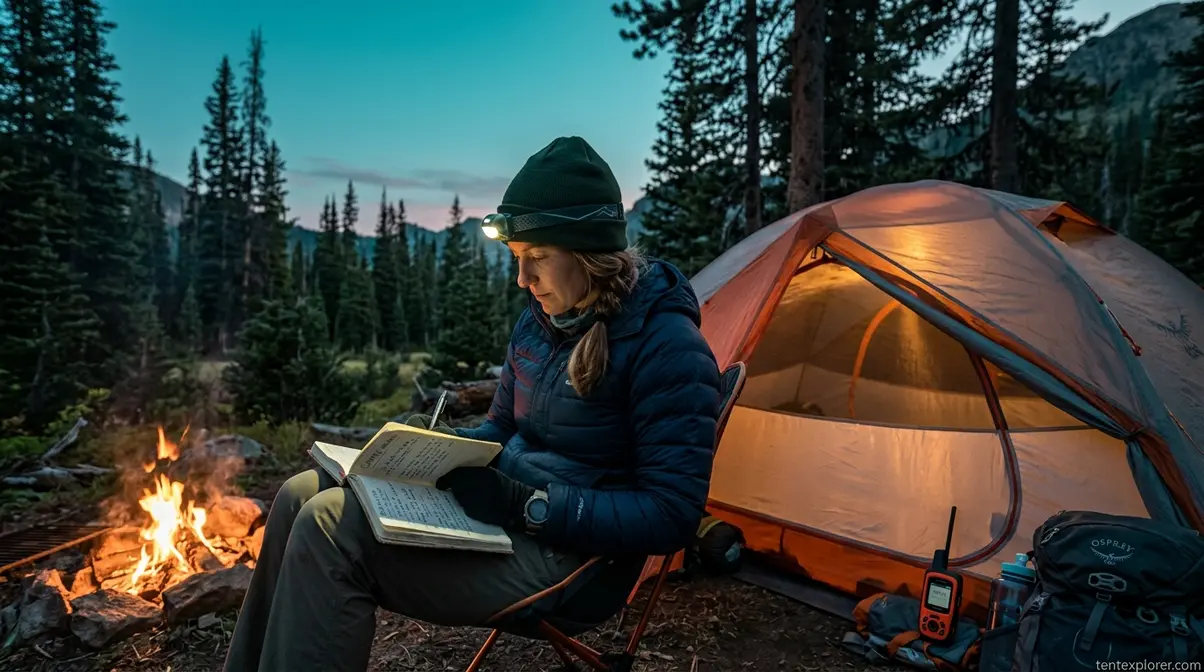
How to Feel Safe at Night in Your Tent
Feeling safe at night is partly preparation and partly psychology — and the two reinforce each other. When you’ve completed a systematic pre-sleep check, your nervous system has actual evidence that you’re secure. Here’s the protocol:
- Zip and lock your tent door using a small combination lock through the zipper pulls — this creates a meaningful delay for opportunistic theft, not just a visual deterrent.
- Position a headlamp within reach, not in your pack. If something wakes you, you want light in under two seconds.
- Keep your shoes inside the tent vestibule, not outside. Wet or missing shoes are an emergency in the dark.
- Know the noise. Forests are loud at night. Spend 60 seconds listening before you sleep — familiarize yourself with the ambient sound so unfamiliar noises stand out.
- Keep your phone charged. A portable power bank should be in your sleeping area, not your car.
A doorstop alarm — a wedge-shaped device that sounds a 120-decibel alarm if the door is pushed open — is a practical addition for solo campers in developed campgrounds. It costs under $15 and requires no installation.
Solo Female Camping Safety Protocols
Solo female camping is growing rapidly, and the safety protocols that matter most are specific and behavioral — not fear-based. The goal is confident preparation, not avoidance.
- Before you leave:
- Choose campgrounds with active ranger presence and nightly patrols when possible. Many state parks list their patrol schedules online.
- Research your specific campground on forums like Reddit’s r/CampingandHiking or Facebook groups for solo female campers — community intel about a specific site is invaluable.
- Tell at least two people your full itinerary, not just one.
- At camp:
- Select a site near the host or ranger station, not at the end of a remote loop.
- Introduce yourself to neighboring campers early in the evening — visible social connections deter unwanted attention.
- Trust your instincts completely. If a situation feels wrong, it’s worth the inconvenience of moving.
- Keep a personal alarm (130+ decibels) clipped to your tent zipper or sleeping bag zipper, accessible in the dark.
- At night:
- Use a doorstop alarm on the tent door.
- Keep your car keys — with the panic button — inside your sleeping bag, not in a pocket.
- Know the exact location of the campground host or nearest staffed facility before dark.
Across solo female camping communities, the consistent advice from experienced campers is: the preparation ritual itself is calming. Running through a specific checklist replaces vague fear with practiced competence.
Keeping Valuables Safe and Preventing Tent Theft
Tent theft is underreported but real — particularly at trailhead-adjacent campgrounds where opportunistic thieves know campers leave gear unattended for hours. The standard approach:
- Never leave valuables in your tent while hiking. Lock them in your car or take them with you. A tent is fabric — it stops nothing.
- Use a cable lock to secure larger gear items (camp chairs, coolers, bikes) to a fixed anchor like a picnic table or tree. This prevents grab-and-run theft.
- Don’t display expensive gear. A visible camera bag or laptop case is an invitation. Store valuables in an opaque dry bag inside your tent when you’re present.
- Use a small combination lock on your tent zipper. It won’t stop a determined thief with a knife, but it deters the opportunistic passerby.
Keep cash, ID, and medications on your person or in a locked vehicle. A car camping safety checklist covers vehicle-specific storage protocols in detail.
Personal Defense Tools: What to Actually Carry
The question of personal defense tools is practical, not paranoid. Across camping forums and professional outdoor communities, the consistent recommendation is:
“Wear a belt knife like most people should have on them at camp. Have a boys camp axe or any hatchet with 18″-19″ handle.”
A fixed-blade belt knife serves multiple camp functions: food prep, first aid, gear repair, and self-defense as a last resort. A camp hatchet with an 18–19″ handle is a versatile tool for firewood and camp tasks that also provides confidence in remote settings. Neither item requires justification — they’re standard camp tools with documented utility.
- For personal safety specifically:
- Bear spray (capsaicin aerosol, 25–30 foot range) is the most evidence-supported deterrent for wildlife encounters and is legal in all 50 states.
- A loud personal alarm (130+ decibels) is effective for deterring human threats and signaling for help.
- A whistle (pealess design, audible at 100+ yards) is a universal distress signal recognized by search and rescue teams.
Firearms are legal in most national parks and many national forests — but require significant training, safe storage protocols, and knowledge of state-specific carry laws. Research your specific destination’s regulations before making that decision. Whatever tools you carry, practice using them before you’re in a situation where you need them.
Essential Safety Gear and Health Checklist for Tent Camping
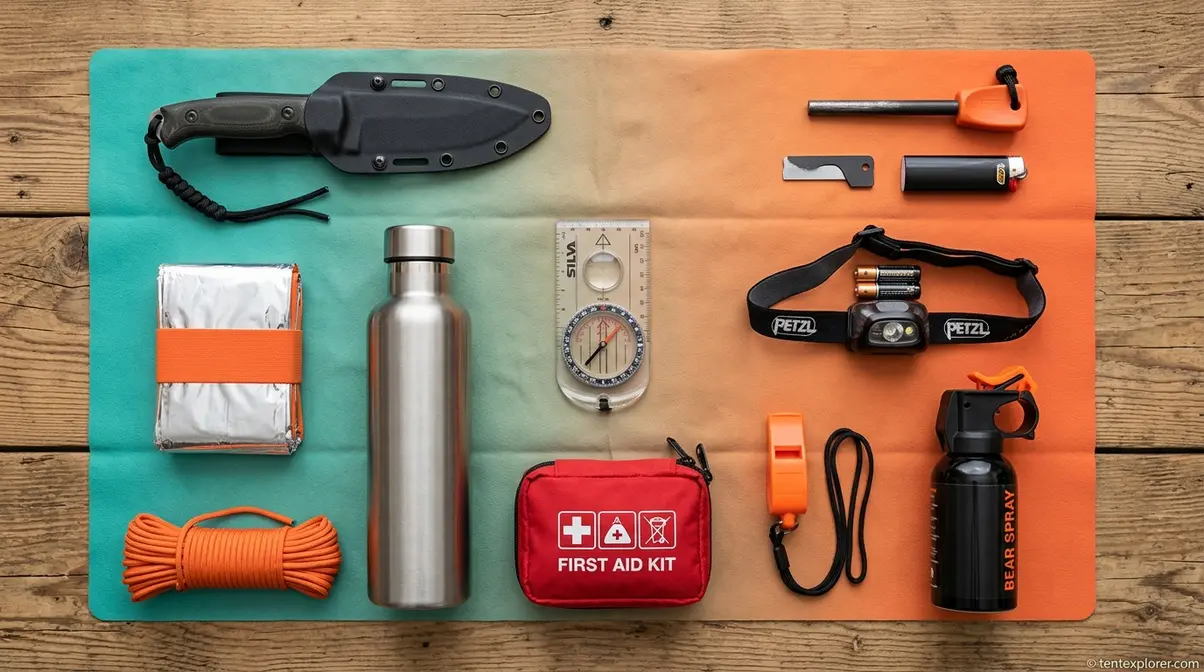
The best tent camping safety tips mean nothing without the right gear to back them up. Our team reviewed guidance from park rangers and wilderness safety professionals to identify the baseline kit every camper — beginner or experienced — should carry. The framework that organizes it best is the 7 C’s.
The 7 C’s of Survival: Your Camping Gear Baseline
The 7 C’s of survival — adapted from the framework developed by wilderness educator Dave Canterbury — give you a memorable, comprehensive baseline for your pack:
| C | Item | Why It Matters |
|---|---|---|
| Cutting tool | Fixed-blade knife or multi-tool | Food prep, first aid, gear repair |
| Combustion | Lighter + waterproof matches + ferro rod | Three ignition methods = redundancy |
| Cover | Emergency space blanket + tent | Thermal protection in any condition |
| Container | Single-wall stainless water bottle | Boiling water, carrying water, cooking |
| Cordage | 50 ft of 550 paracord | Shelter repair, bear hang, emergency use |
| Candling | Headlamp + backup batteries | Hands-free light for camp tasks and emergencies |
| Compass | Baseplate compass + offline map | Navigation when phone battery dies |
Every item on this list serves multiple functions. A ferro rod works when matches get wet. A stainless steel bottle can boil water when your filter fails. Redundancy is the principle — one method for any critical function is a single point of failure.
Add to this baseline: a compact first aid kit, an emergency whistle (pealess, 100+ decibel), and a personal locator beacon or satellite communicator for remote trips. Review our tent camping essentials guide for a full gear list with specific product recommendations.
First Aid, Hydration, and Personal Health on the Trail
Dehydration is the most common preventable health issue on camping trips — and it sneaks up on you. At altitude or in heat, you need more water than your thirst signals suggest. The standard guidance from wilderness medicine professionals is half a liter of water per hour of moderate activity, more in heat above 85°F.
Your first aid kit should include, at minimum:
- Adhesive bandages (multiple sizes) and sterile gauze
- Antiseptic wipes and antibiotic ointment
- Blister treatment (moleskin or blister bandages)
- Tweezers for tick and splinter removal
- Diphenhydramine (antihistamine) for allergic reactions
- Ibuprofen and acetaminophen
- SAM splint and elastic bandage for sprains
- Tick removal tool
Apply broad-spectrum SPF 30+ sunscreen every two hours of sun exposure, and reapply after sweating or swimming. Use EPA-registered insect repellent containing DEET, picaridin, or IR3535 — particularly in areas with known tick or mosquito activity. Check your entire body for ticks each evening; the CDC tick safety guidelines detail proper removal technique. For trips involving river crossings or extended backcountry travel, consider a wilderness first aid course — a weekend investment that could save a life.
The Most Forgotten Camping Items (And Why They Matter)
Across camping communities and gear forums, these items appear most often on “wish I’d brought” lists:
- Toilet paper and a trowel — Leave No Trace principles require burying waste 6 inches deep, 200 feet from water. You need both.
- Extra batteries or a power bank — headlamps die at the worst times. Carry a spare set or a 10,000 mAh power bank.
- Duct tape — repairs torn tent fabric, blisters, broken gear, and approximately 40 other things.
- Cash — many campground hosts and small-town gas stations near trailheads are cash-only.
- A written emergency contact list — your phone dies; your handwritten list doesn’t.
- Tent footprint — prevents ground moisture from wicking into your tent floor and extends tent lifespan significantly.
- Prescription medications — the item most frequently left at home because it lives in a bathroom cabinet, not a gear bin.
Run through this list the morning of your trip, not the night before — it gives you time to acquire anything missing. See our complete camping checklist for the full pre-trip inventory.
Limitations and Safety Notes
Common Pitfalls
Pitfall 1: Assuming “established” means “safe.” Developed campgrounds with fire rings and picnic tables have been inspected for basic hazards — but widow-makers still fall, drainage still floods, and food storage requirements still apply. Run your own inspection regardless of campground rating.
Pitfall 2: Treating CO symptoms as “just a headache.” Headache and drowsiness near any fuel-burning device in or near a tent is a medical emergency until proven otherwise. Move everyone outside immediately, then assess. Don’t wait to see if it improves.
Pitfall 3: One check-in point. Leaving your itinerary with one person who might not notice your absence for 48 hours is insufficient. Use two contacts and specify a call-by time.
Pitfall 4: Storing food in a soft cooler inside the tent. A soft cooler is not bear-resistant. Bears can smell food through it, through your tent fabric, and through the vestibule. Hard-sided coolers locked in your vehicle are the minimum standard for car camping.
When to Choose Alternatives
If you’re planning a first solo trip to a remote, unserviced backcountry location, consider starting with a developed campground with ranger presence. The protocols in this guide apply everywhere — but developed campgrounds provide a support infrastructure (hosts, patrols, other campers) that significantly reduces risk for first-time solo campers.
For camping in grizzly bear habitat specifically, consult the NPS bears safety page and consider enrolling in a bear safety course before your trip. The behavioral protocols for grizzlies differ meaningfully from black bear protocols, and that distinction matters.
When to Seek Expert Help
This guide is educational. It is not a substitute for in-person wilderness first aid training, local ranger consultation, or professional outdoor instruction. For solo camping in remote areas, certification in Wilderness First Aid (WFA) or Wilderness First Responder (WFR) is strongly recommended. Consult your local ranger district for site-specific hazards — they have current information on wildlife activity, trail conditions, and water sources that no guide can provide.
Frequently Asked Questions
What is the 3-3-3 rule for camping?
The 3-3-3 rule for camping recommends driving no more than 3 hours to your destination, arriving by 3 p.m., and staying for at least 3 nights. Originally developed for RV travel to reduce driver fatigue, it applies directly to tent road trips. Arriving by 3 p.m. gives you daylight to inspect your site for widow-makers, assess drainage, and secure guylines before conditions change — the most impactful single safety habit for new campers.
What are the 7 C’s of camping?
The 7 C’s of camping are Cutting tool, Combustion device, Cover, Container, Cordage, Candling (light source), and Compass. Adapted from wilderness educator Dave Canterbury’s survival framework, these seven categories cover every critical survival function: cutting, fire-starting, shelter, water carrying, rope work, illumination, and navigation. Packing at least one item in each category gives you redundancy across your most essential camp functions before a single luxury item goes in the bag.
What is the 2-2-2 rule for camping?
The 2-2-2 rule for camping is a travel planning guideline: drive no more than 2 hours per leg, stop every 2 hours to rest, and aim to arrive at least 2 hours before dark. It’s a more conservative version of the 3-3-3 rule, better suited to family trips with children or campers who want extra setup time. The core principle is the same — fatigue and darkness are two of the most preventable camping hazards, and both are addressed by building time buffers into your travel plan.
What is the 4-4-4 rule for camping?
The 4-4-4 rule is a less-standardized variant sometimes used by long-haul RV travelers: drive no more than 4 hours, arrive by 4 p.m., and stay for 4 nights minimum. For tent campers, 4 p.m. arrival is a reasonable target in summer months at lower elevations, where daylight extends past 8 p.m. However, at altitude or in shoulder seasons, 3 p.m. is a safer target — sunset comes faster in mountain terrain than most maps suggest, and setup time shrinks quickly in fading light.
What does FF mean for camping?
FF in camping most commonly refers to “Fill Factor” — the measurement of a sleeping bag’s down insulation efficiency, also written as fill power (e.g., 700-fill, 850-fill). Higher fill power means more warmth per ounce of down. In some camping communities, FF is shorthand for “Family-Friendly” when rating campgrounds. Context determines which meaning applies. For gear purchasing decisions, fill power is the relevant metric: 700+ fill power is considered quality insulation for three-season camping, while 850+ fill power is preferred for cold-weather or high-altitude conditions.
What is the most forgotten item when camping?
The most forgotten camping item is consistently toilet paper — followed closely by a trowel, extra batteries, and prescription medications. Toilet paper is forgotten because it’s a bathroom item, not a gear item, so it never makes it into the camping bin. A trowel is essential for Leave No Trace compliance (burying waste 6 inches deep, 200 feet from water sources). Prescription medications are the most consequential forgotten item — they live in a medicine cabinet, not a gear bag, and missing a dose in the backcountry can range from uncomfortable to medically serious.
Conclusion
For intermediate campers managing real anxiety about wildlife, fire, or solo security, tent camping safety comes down to five decisions made before you close your tent zipper each night. The NPS, CPSC, and USDA Forest Service all point to the same preventable causes: improper food storage, fuel-burning devices inside enclosed spaces, and sites chosen without a basic hazard inspection. The campers who sleep soundly aren’t the ones with more experience — they’re the ones with a systematic protocol.
The 5-Minute Safety Scan — food stored, fire out, tent secured, location shared, gear within reach — is the organizing framework that converts anxiety into action. Run it tonight, and every night you camp. Each of the five steps takes under 60 seconds; together they address every major risk category covered in this guide.
Start with your next trip: pick one section of this guide to implement first. If you’re camping with family, make food storage your focus. If you’re heading out solo, build your communication protocol and run the 5-Minute Safety Scan before your first night. Download the complete camping safety checklist to take with you — and check in with your local ranger station when you arrive. They have current, site-specific information that no guide can replace.
