This blog post may contain affiliate links. As an Amazon Associate I earn from qualifying purchases.
📋 Table of Contents
- What Is a Side Awning? (And Why It Matters)
- How Retractable Side Awnings Work
- Open vs. Half vs. Full-Cassette Awnings
- How We Selected the Best Side Awnings
- Best Retractable Side Awnings: Our Top 5 Picks
- 1. VEVOR Side Awning — Best Budget Pick
- 2. VidaXL Side Awning — Best for Large Patios
- 3. MCOMBO — Best Privacy Screen
- 4. Kings Side Awning — Best for Vehicles
- 5. Outsunny Double Side Awning: Corners
- Side Awnings for Patios, Decks, and Houses
- Wall-Mounted vs. Freestanding Awnings
- Side Awning Size Guide: 12 ft vs. 20 ft
- Vehicle and Camping Side Awnings
- Car & Van Awnings: Roof Rack Mounting
- RV & Truck Camper Side Awnings
- Side Panels, Privacy Screens & Accessories
- Adding Side Panels to Your Awning
- RV Awning Side Shades Explained
- How to Install a Retractable Side Awning
- Wood Deck & Concrete Patio Installation
- Mounting on Masonry, Siding, and Posts
- Fix: RV Awning Not Closing on One Side
- Side Awning Safety, Limits & Common Mistakes
- Common Buying & Installation Mistakes
- When a Side Awning Is NOT the Right Choice
- FAQ: Side Awning Questions Answered
- Choosing the Right Side Awning: Final Verdict
You finally found the perfect patio spot — but your neighbor’s yard is right there, and the afternoon sun hits you straight in the face. Most people spend hours scrolling Amazon only to end up with a flimsy screen that sags after one rain.
The problem isn’t your budget. It’s that most side awning listings hide the three specs that actually determine whether a screen lasts two seasons or ten. Without knowing what to look for, you’re essentially buying blind.
In this guide, you’ll learn exactly which fabric weights, wind ratings, and frame materials separate the best retractable side awnings from the ones that end up in a landfill — plus which of our top five picks is right for your specific setup. We cover patio and deck options, vehicle and RV awnings, privacy screen accessories, and a step-by-step installation guide for five different surface types.
The best retractable side awning for most patios uses 280g/m² polyester fabric with a UV50+ rating and a powder-coated aluminum frame — these three specs separate durable screens from cheap ones.
- The Spec-First Framework: Evaluate fabric weight, wind rating, and frame material before price — every time.
- VEVOR leads on budget (under $120 for 12 ft) with solid entry-level specs for small patios.
- VidaXL covers large spaces with models up to 20 ft and heavier 280g fabric for lasting UV protection.
- Vehicle owners need a different category entirely — roof rack-mounted awnings like Kings for cars, not patio screens.
- Search interest peaks every May — buy and install in early spring to be ready before summer hits.
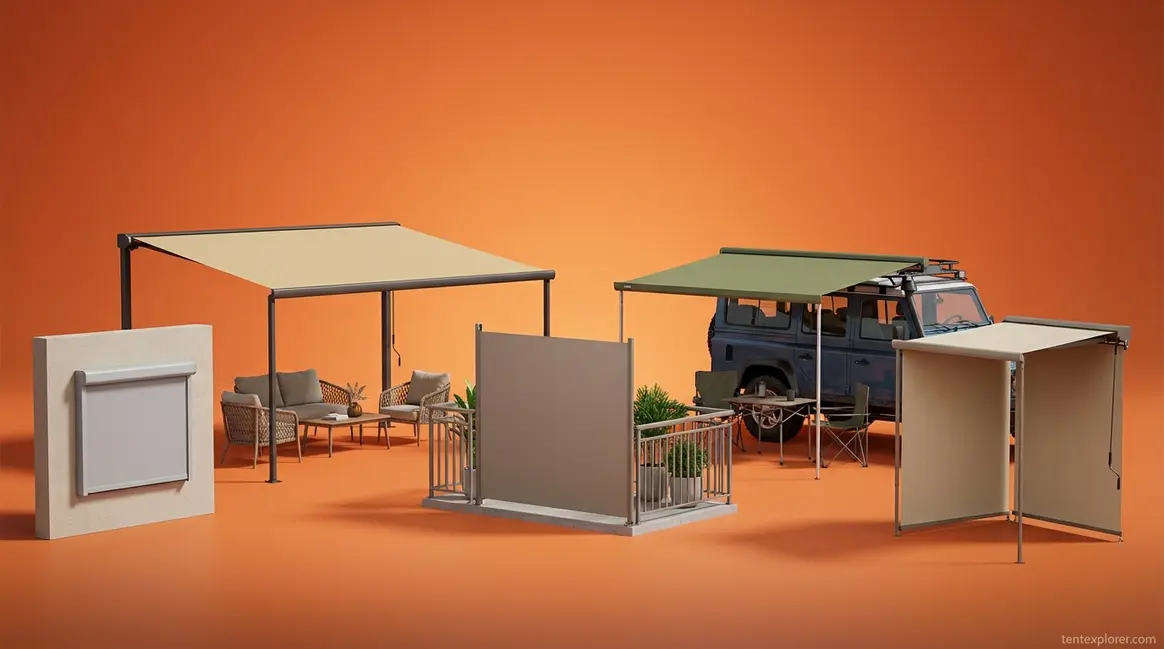
What Is a Side Awning? (And Why It Matters)
A retractable side awning is a vertical roll-out screen that mounts to a wall, post, or fence to block sun, wind, and neighbor sightlines from the side of your home. According to the Oak Ridge National Laboratory, awnings left in the closed position from April to September can reduce annual HVAC energy consumption by up to 15% — a meaningful saving across a full cooling season. Unlike overhead awnings, side awnings target horizontal threats — the low-angle afternoon sun and the neighbor’s direct line of sight — which standard patio covers simply cannot reach.
That distinction matters more than most buyers realize. A traditional overhead awning blocks rain and midday sun coming straight down. A side awning blocks the threats coming at you from the side: the glare at 4 p.m., the prevailing wind off the fence line, and the neighbor who can see your entire deck from their back window. For tent side awning options for camping setups, the same principle applies — it’s always about blocking horizontal exposure, not vertical. The CDC recommends portable shade shelters as a primary defense against harmful UV radiation (CDC Yellow Book on sun exposure).
How Retractable Side Awnings Work
A retractable side awning has two main components: the cassette housing (a metal tube that stores the rolled-up fabric when not in use) and the pull-out handle that extends the screen to its full width. You pull the handle outward, the fabric unrolls from the cassette, and a locking mechanism holds it at your chosen extension point. Pull the handle again, and a spring-loaded auto-roll-back mechanism retracts the screen into the cassette automatically.
Most residential models mount at two points: a wall or post bracket at the top and a floor anchor at the base of the extended handle. Standard dimensions run 55–118 inches wide and 55–79 inches tall, covering a typical 10×12 ft patio corner. Think of it like a window blind turned sideways — the same spring mechanism, just scaled up for outdoor use. The cassette protects the fabric from UV degradation and moisture damage when retracted, which is why full-cassette models outlast open-style ones over multiple seasons.
Knowing how a side awning works makes it much easier to understand why the cassette type — open, half, or full — is one of the most important buying decisions you’ll make.
Open vs. Half vs. Full-Cassette Awnings
Not all retractable side awnings store their fabric the same way, and the difference directly affects how long your screen lasts.
| Type | Cost Range | Fabric Protection | Best For |
|---|---|---|---|
| Open Style | $50–$100 | None — fabric fully exposed | Temporary or seasonal use |
| Half-Cassette | $100–$150 | Partial — curved hood covers top half | Year-round use, budget under $150 |
| Full-Cassette | $120–$300+ | Full — fabric enclosed in metal tube | Permanent installations, premium patios |
An open-style awning leaves the fabric completely exposed when retracted — no protective housing at all. It’s the cheapest option, but UV rays and rain degrade the fabric faster, often within a season or two. A half-cassette model adds a curved hood that covers the top portion of the rolled fabric — a meaningful improvement for moderate climates. A full-cassette awning is like a retractable pen — the fabric is fully protected when rolled up, sealed inside a metal housing that blocks UV rays, rain, and debris. For any installation you plan to keep for more than two seasons, always choose full-cassette. Both VEVOR and VidaXL models reviewed in this article are full-cassette — an important buying signal.
Caption: Open, half-cassette, and full-cassette awning types side by side — full-cassette models protect fabric from UV and moisture when retracted, extending usable lifespan significantly.
Now that you know what type of side awning to look for, here’s exactly how our team evaluated the five best models currently available.
How We Selected the Best Side Awnings
We evaluated five side awning brands across four criteria — fabric weight, wind rating, frame material, and verified purchaser consensus — to identify the best options at each price point. According to Consumer Reports’ guide to backyard shade structures, retractable awnings that attach directly to the wall can provide significant overhead shade and define outdoor living spaces.
Our evaluation process covered:
- Fabric weight (g/m²): We prioritized models at 180g/m² or above, with 280g/m² as the benchmark for durability in year-round climates.
- Wind resistance rating: We flagged any product without a published wind rating as a transparency gap — buyers in exposed locations need this number.
- Frame material: Powder-coated aluminum passed; bare steel or unspecified frames were downgraded.
- Verified purchaser consensus: We aggregated feedback from Amazon and Wayfair confirmed-purchase reviews to surface real-world performance signals, not just manufacturer claims.
Price range evaluated: $80–$350. We did not accept free products or payment for inclusion in this guide. All editorial assessments reflect independent analysis based on published specs and user review synthesis.
Best Retractable Side Awnings: Our Top 5 Picks
TL;DR: Best Side Awning by Use Case
- Best budget patio pick: VEVOR 12 ft (~$100–$130) — affordable, full-cassette, 180g fabric
- Best for large decks: VidaXL up to 20 ft (~$130–$250) — maximum coverage, PU-coated polyester
- Best privacy screen: MCOMBO 138″ (~$175–$200) — fully assembled, 280g fabric, no-tools setup
- Best for vehicles: Kings Side Awning (~$129 AUD — see pricing note) — UPF50+, rugged build
- Best for corners: Outsunny Double (~$180–$280) — two screens, one post, corner enclosure
Jump to the Decision Matrix below to find your match in 30 seconds.
1. VEVOR Side Awning — Best Budget Pick
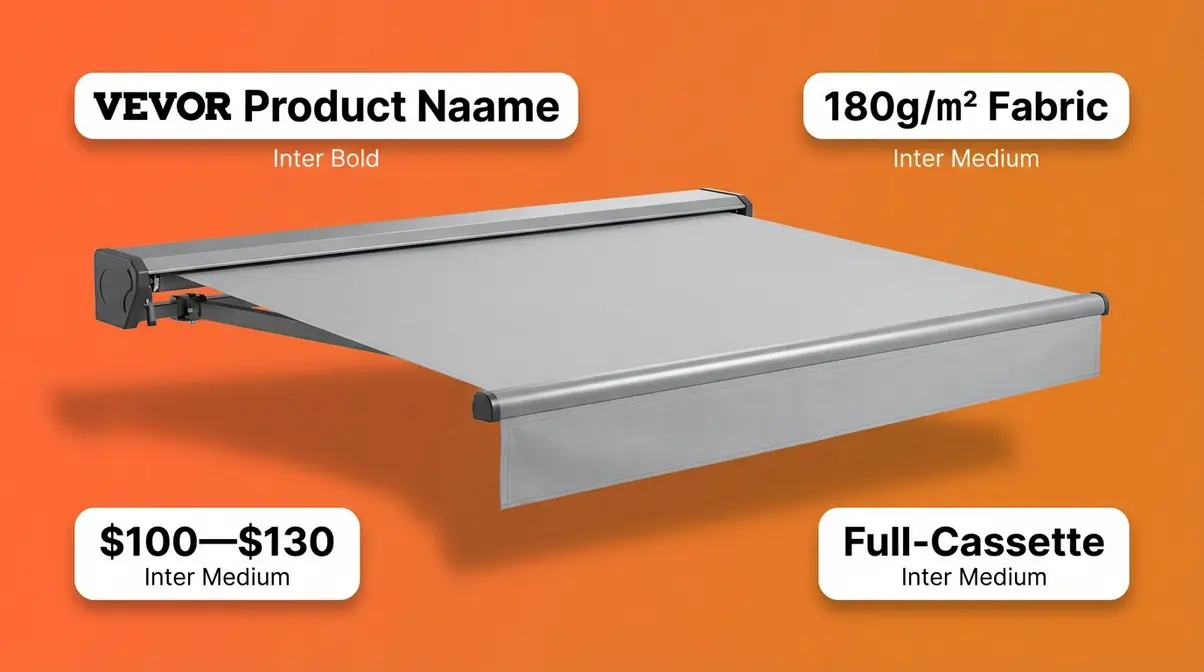
Picture a 12-foot screen unrolling from a wall-mounted cassette, turning your exposed deck into a shaded outdoor oasis in under 10 seconds. That’s the VEVOR experience — and at under $130, it’s the most accessible entry point in the retractable side awning category. VEVOR, a budget-focused outdoor and home improvement brand, is the most-searched name in this category (search volume: 210 for “vevor retractable side awning”), and for good reason.
Applying the Spec-First Framework: VEVOR passes on frame material (powder-coated aluminum ✅), partially on fabric weight (180g/m² — entry-level but functional), and falls short on wind rating (no published rating — a transparency gap buyers in windy regions should note).
Key Specs:
- Fabric: 180g/m² polyester with PU coating — waterproof, UV30+ rated (think of it like a lighter raincoat: splash-proof but not storm-proof)
- Frame: Powder-coated aluminum — rust-resistant ✅
- Dimensions: 118 in wide × 71–79 in tall (standard 12 ft model) — covers a typical 10×12 ft patio corner
- Wind Rating: Not publicly published — flag for buyers in exposed locations
- Price Range: ~$100–$130 (as of March 2026, verified via Home Depot and VEVOR.com)
Pros:
- Easy solo installation — across verified purchaser reviews on Amazon and Wayfair, most users complete setup in under two hours
- Smooth auto-roll-back retraction that works reliably after repeated use
- Powder-coated aluminum frame resists rust through multiple outdoor seasons
- Lowest entry cost in the full-cassette category
Cons:
- 180g fabric is lighter than premium models — may show wear faster in harsh or wet climates
- No published wind resistance rating — buyers in windy regions should consider VidaXL instead
- Pull handle can feel stiff in cold temperatures, a common user complaint in northern climate reviews
Real-World Usage: Across verified purchaser reviews on Amazon and Wayfair, the consistent feedback is that VEVOR’s side awning delivers surprising quality for the price. Users in warm, dry climates report two to three seasons of use with minimal fading. Those in wetter climates note some moisture seepage at the cassette seams after heavy rain — consistent with the 180g fabric weight and its PU coating limitations. For a compact patio under 120 sq ft in a mild climate, the performance-to-price ratio is genuinely hard to beat.
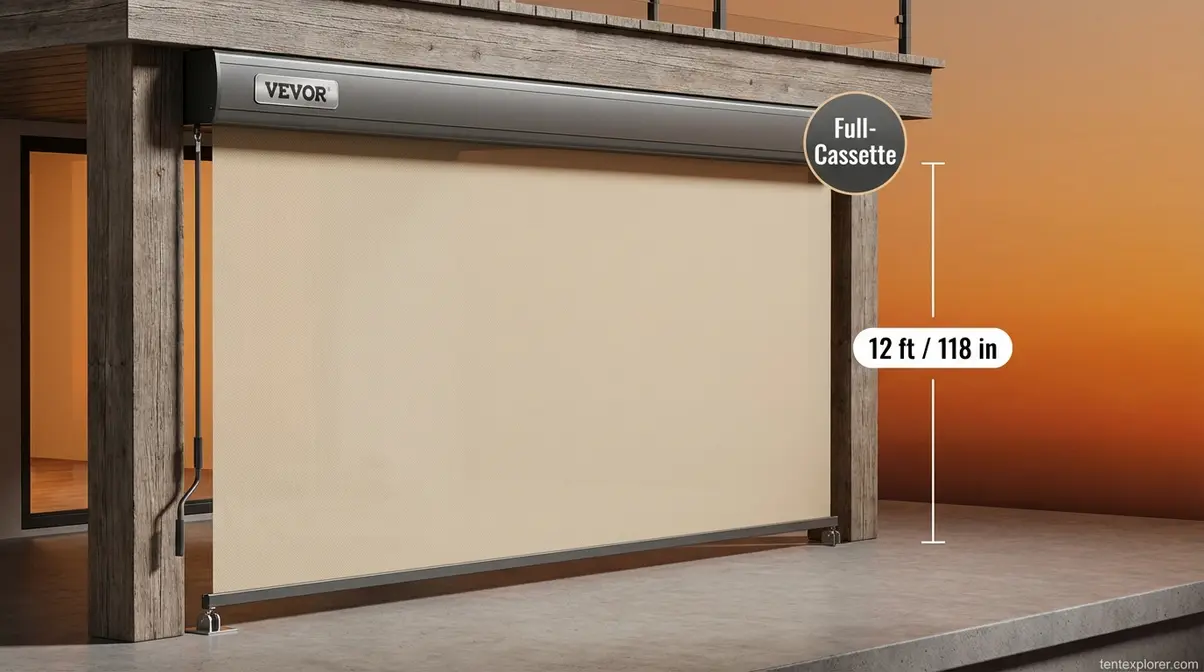
Caption: VEVOR’s 12 ft retractable side awning in extended position — the full-cassette housing protects the 180g/m² polyester fabric when rolled up.
Verdict: Best for homeowners with compact patios (under 120 sq ft) in mild climates who want solid shade and privacy without spending over $150. The ORNL study on awning energy performance confirms that awnings can reduce annual HVAC energy consumption by up to 15% when kept closed during summer months — making even an entry-level screen a worthwhile investment.
Choose VEVOR if: Your patio is under 12 ft wide, your climate is dry or mild, and your budget is under $130. Skip VEVOR if: You live in a windy or wet region — VidaXL’s heavier 280g fabric and published UV50+ rating offer significantly better long-term protection for the same general price range.
VEVOR covers compact spaces beautifully. For larger patios — 15 ft or more — VidaXL’s larger models offer significantly more coverage with heavier fabric.
2. VidaXL Side Awning — Best for Large Patios
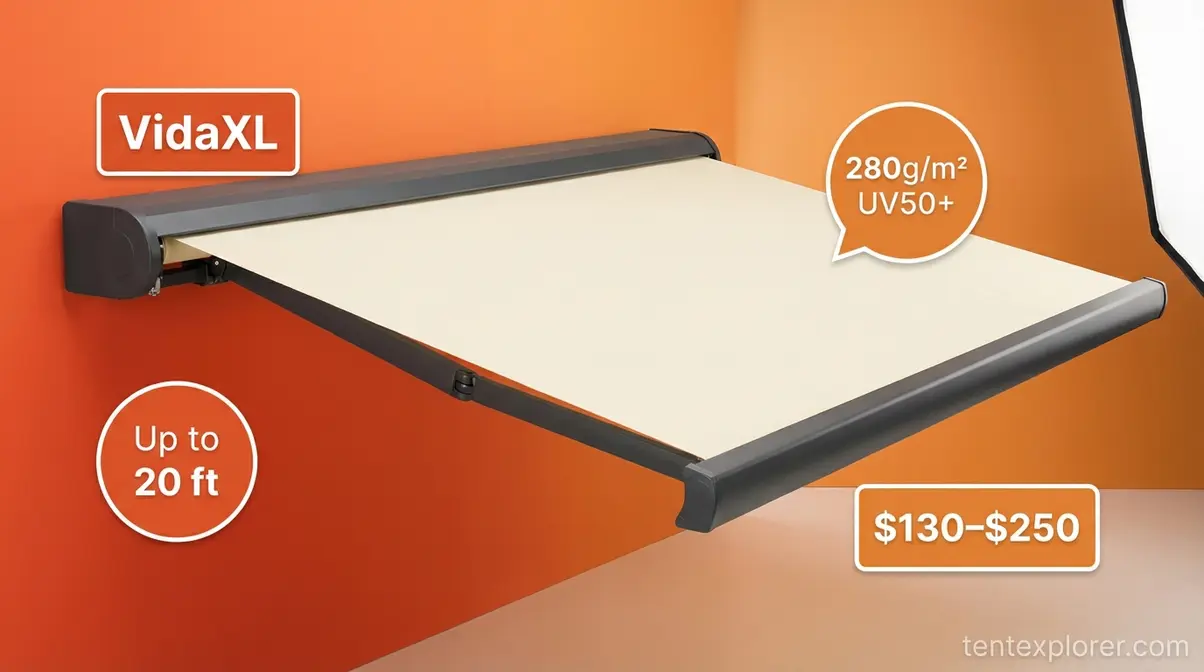
VidaXL, a European e-commerce retailer known for affordable outdoor furniture, steps up both the fabric weight and the coverage area. Where VEVOR handles compact spaces, VidaXL’s larger models are built for full patio walls — up to 240 inches of continuous coverage with a noticeably heavier material grade.
Applying the Spec-First Framework: VidaXL passes on all three criteria — 280g/m² fabric with PU coating ✅, powder-coated aluminum frame ✅, and a clearly stated UV50+ rating on product listings ✅. It’s the only pick in this guide that clears all three Spec-First bars.
Key Specs:
- Fabric: 280g/m² high-density polyester with PU coating — UV50+ rated, fully waterproof (think of it like a heavy-duty rain jacket: built for sustained exposure, not just light showers)
- Frame: Powder-coated aluminum ✅
- Dimensions: Up to 240 in wide × 79 in tall (approximately 20 ft) — covers a full patio wall
- Wind Rating: Not prominently published across all SKUs — verify before purchase if wind exposure is a concern
- Price Range: ~$130–$250 depending on size (as of March 2026, verified via Wayfair and vidaXL.com)
Pros:
- Heavier 280g fabric delivers better durability and UV resistance compared to 180g entry-level models
- UV50+ rating clearly stated on product listings — meaning it blocks 98% of harmful ultraviolet rays
- Full-cassette protection keeps fabric clean and dry between uses
- Available in sizes from under 48 inches to nearly 394 inches — one of the widest size ranges on the market
Cons:
- Higher price point than VEVOR, particularly for larger sizes
- Heavier unit — the 20 ft model may require two people during installation
- Fewer color options than some competitors
Real-World Usage: Across verified purchaser reviews on Wayfair and Target, users with large L-shaped decks and multi-window house walls consistently cite VidaXL as their go-to for coverage area. The 280g fabric holds its shape and color through full summer seasons in both dry and moderately wet climates. Installation on larger models takes approximately two to three hours with two people, with most reviewers recommending a second set of hands for alignment of the top bracket.
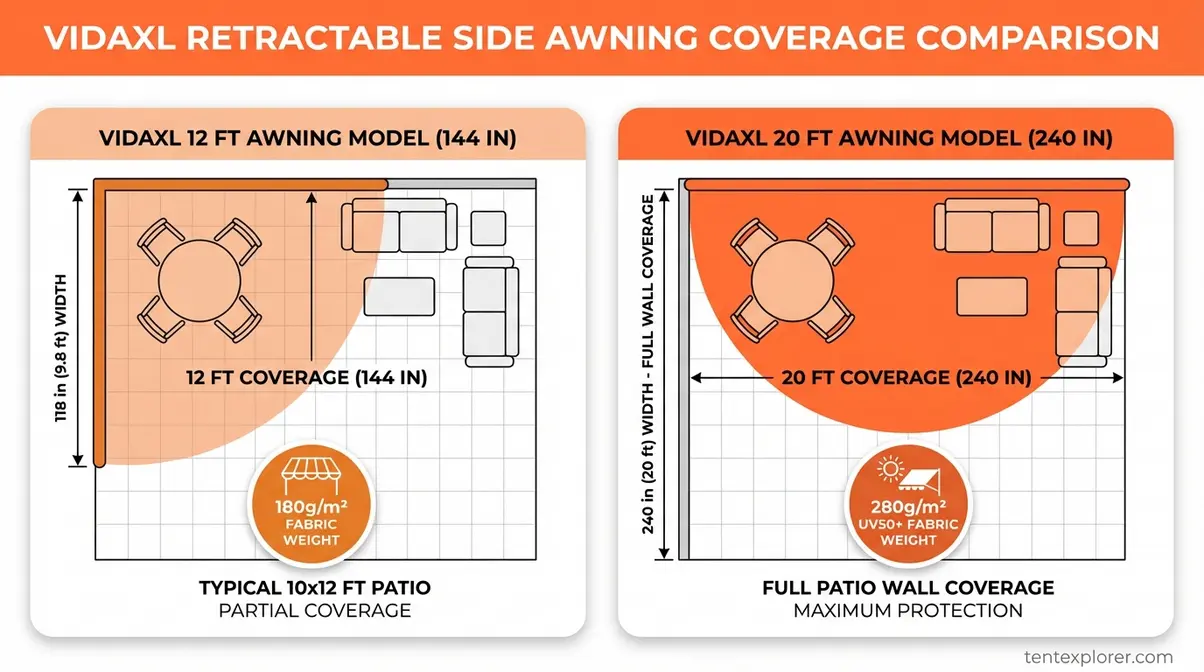
Caption: VidaXL’s coverage range — from 48 in compact models to 240 in (20 ft) full-wall screens — makes it the go-to for large patios where a single 12 ft panel falls short.
Verdict: Best for large patios (15–20 ft wide), multi-window house walls, or any setup where coverage area is the primary requirement. The 280g UV50+ fabric makes it the most durable pick in this price range.
Choose VidaXL if: You need coverage beyond 12 ft, your climate involves sustained sun exposure, or you want a UV50+ rating clearly documented on the product listing. Skip VidaXL if: Your patio is under 10 ft wide — VEVOR delivers comparable performance at a lower cost for compact spaces.
VidaXL gives you coverage. MCOMBO takes a different approach — prioritizing privacy screen density and a fully pre-assembled setup that requires almost no tools.
3. MCOMBO — Best Privacy Screen
MCOMBO, a home outdoor furniture brand specializing in patio accessories, built its retractable side awning around one insight: most buyers dread assembly. The 138×78 in model (approximately 11.5 ft × 6.5 ft) ships fully assembled — no tools, no instruction booklet archaeology, no missing hardware.
Applying the Spec-First Framework: MCOMBO passes on all three criteria — 280g/m² polyester fabric with PU coating ✅ (confirmed for the standard 138×78 in model 4744), powder-coated aluminum frame ✅, and a waterproof/UV-resistant rating ✅. Wind rating is not published, but the fabric weight clears the premium benchmark. The “fully assembled” claim is validated across verified purchaser reviews as accurate.
Key Specs:
- Fabric: 280g/m² polyester with PU coating — waterproof, UV-resistant (confirmed for standard model 4744; heavier than entry-level options and on par with VidaXL)
- Frame: Powder-coated aluminum ✅
- Dimensions: 138 in × 78 in (11.5 ft × 6.5 ft) — standard model; larger 71 × 236 in models also available
- Unique Feature: Folding frame design — can be repositioned for balconies, pool surrounds, and garden beds without permanent wall mounting
- Price Range: ~$175–$200 for the standard model (as of March 2026, verified via MCombo.com and Walmart)
Pros:
- Fully assembled out of the box — zero tools required for the standard model
- 280g/m² fabric weight matches premium models — durable for year-round residential use
- Folding frame design allows flexible repositioning without drilling
- Strong privacy screen function — opaque fabric blocks neighbor sightlines effectively
- Good fit for balconies and compact outdoor spaces where wall mounting isn’t possible
Cons:
- The folding mechanism adds a mechanical failure point over years of repeated use
- Standard model limited to 11.5 ft width — not suitable for larger patio walls
- No published wind resistance rating
Real-World Usage: The balcony use case is where MCOMBO truly earns its place. Across verified purchaser reviews on Amazon and MCombo.com, apartment dwellers and renters consistently cite the no-drill setup as the deciding factor. Users with pool surrounds and garden borders also report strong satisfaction — the folding base allows easy repositioning as sun angles change through the day. A retractable side awning privacy screen in this price range rarely ships pre-assembled with 280g fabric, which makes MCOMBO a genuine differentiator for buyers who want premium material weight without a permanent installation.
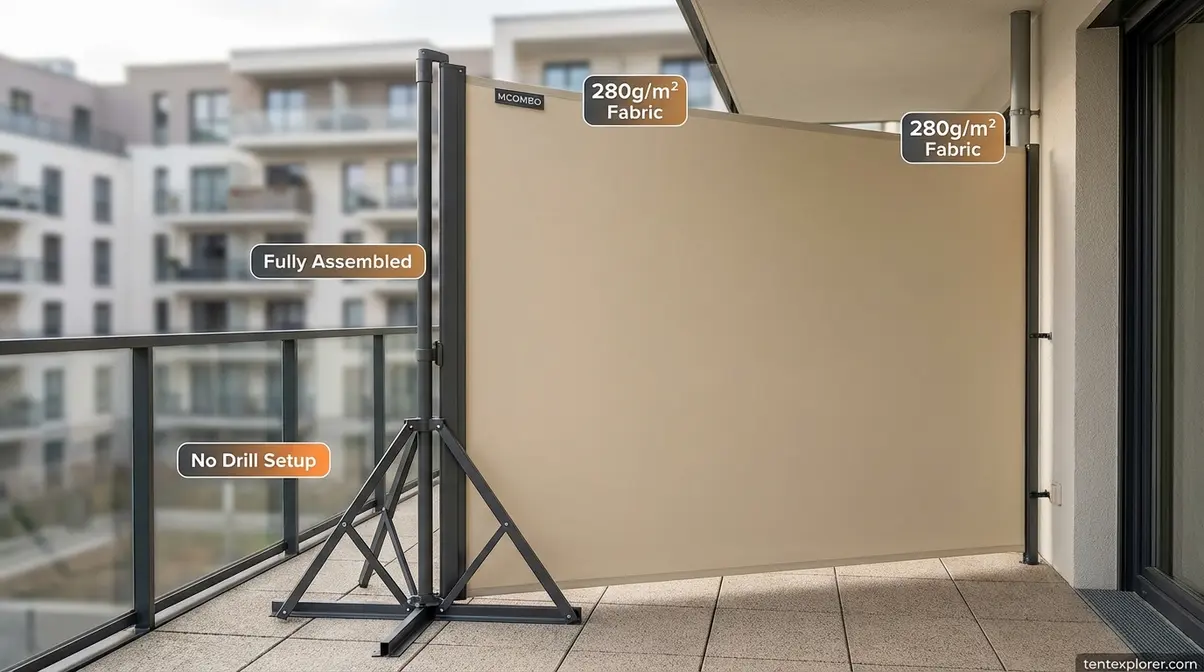
Caption: MCOMBO’s folding base design allows repositioning without drilling — a key advantage for renters and balcony setups.
Verdict: Best for balcony owners, apartment dwellers, or anyone who needs a no-tools-required privacy screen with premium 280g fabric for a compact outdoor space.
Choose MCOMBO if: You need a fully assembled screen for a balcony or pool surround, or you’re renting and cannot drill into walls. Skip MCOMBO if: You need coverage beyond 12 ft or plan to leave the awning in place through harsh winters — VidaXL’s full-cassette housing and wider size range will serve large-wall installations better over multiple seasons.
MCOMBO is ideal for fixed residential spaces. Kings takes the opposite approach — built for movement, rough terrain, and the kind of “beefy components” that outdoor adventurers demand.
4. Kings Side Awning — Best for Vehicles
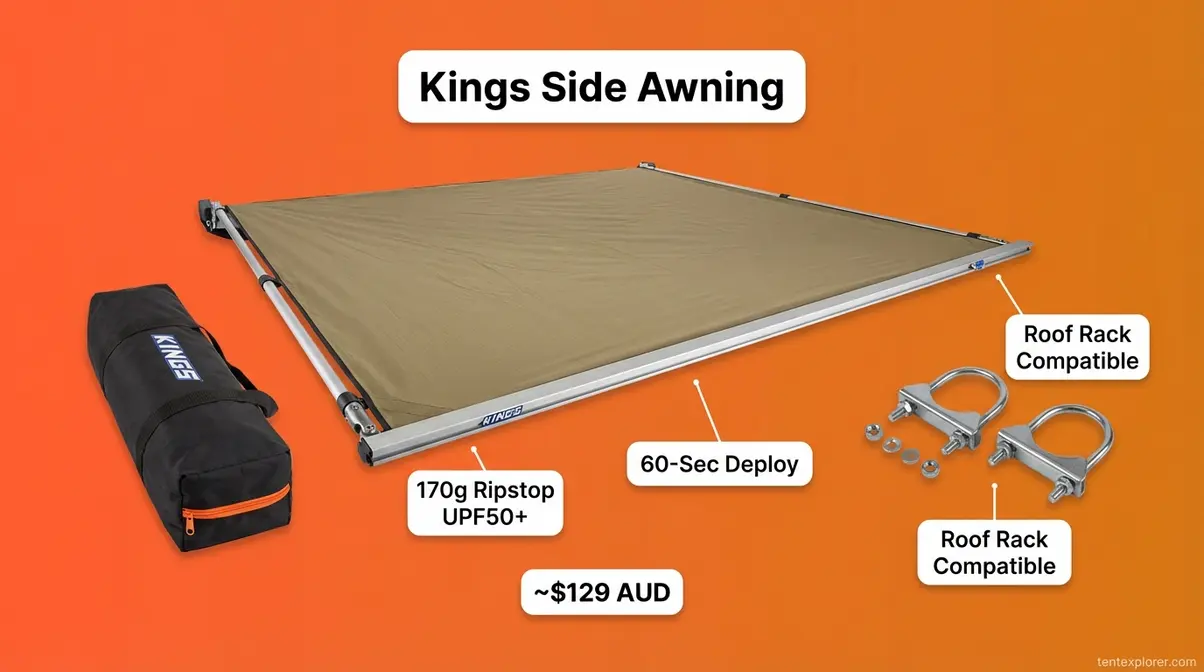
Kings, an Australian-founded outdoor adventure brand with a strong overlanding following, makes a side awning that patio screens simply cannot replicate. It’s purpose-built for vehicles — roof rack mounting, 60-second deployment, and construction that handles off-road conditions without complaint.
Applying the Spec-First Framework: Kings passes on fabric (170g/m² ripstop polyester with UPF50+ rating — lighter than residential models but engineered for portability and rapid deployment ✅), frame (anodized alloy poles and knuckles — lightweight but strong ✅), and wind exposure design (the freestanding arm structure handles wind from multiple directions). No specific mph wind rating is published, but UPF50+ is clearly stated.
Key Specs:
- Fabric: 170g/m² ripstop polyester — UPF50+ rated, fully waterproof (ripstop weave means small tears don’t spread — critical for outdoor and vehicle use)
- Frame: Anodized alloy poles with heavy-duty metal knuckles — rust-resistant and lightweight
- Mounting: Universal roof rack bar compatibility — suits all vehicles with standard rack bars
- Coverage: 2 m along the vehicle × 2.5 m extended (approximately 6.5 ft × 8 ft of shade)
- Price: ~$129 AUD (4WD Supacentre, as of March 2026) — Kings is primarily sold in Australia and New Zealand. International buyers should verify current pricing and availability via Adventure Kings or authorized regional distributors at time of purchase; USD pricing is not confirmed for the international market.
Pros:
- Quick 60-second deployment — extend, lock, done
- Universal roof rack fit — compatible with all standard rack bar widths
- Rugged anodized alloy construction handles off-road vibration and dust exposure
- UPF50+ rating clearly documented — blocks 98% of UV radiation during outdoor use
- Compact storage bag included for easy transport between locations
Cons:
- Not suitable for fixed residential installation — designed exclusively for vehicle roof racks
- Requires an existing roof rack (additional cost if not already owned)
- Lighter 170g fabric compared to residential premium models — designed for portability, not permanent weather protection
- Primarily available in Australia/NZ — international buyers may face limited availability or higher shipping costs
Real-World Usage: One verified purchaser put it best:
“I just installed an Ironman4x4 6′ awning on my vehicle yesterday. So far I am super impressed with the quality. Really beefy components.”
That “beefy components” signal is exactly what Kings delivers — and what budget patio awnings simply don’t. Across user consensus in overlanding forums and verified community reviews, Kings awnings consistently earn praise for their heavy-duty metal knuckles, reliable deployment mechanism, and ability to handle the off-road challenges that would destroy a standard patio screen in a single trip. For van-lifers and 4WD campers, the 2×2.5 m coverage area creates a functional outdoor oasis at any campsite in under a minute.
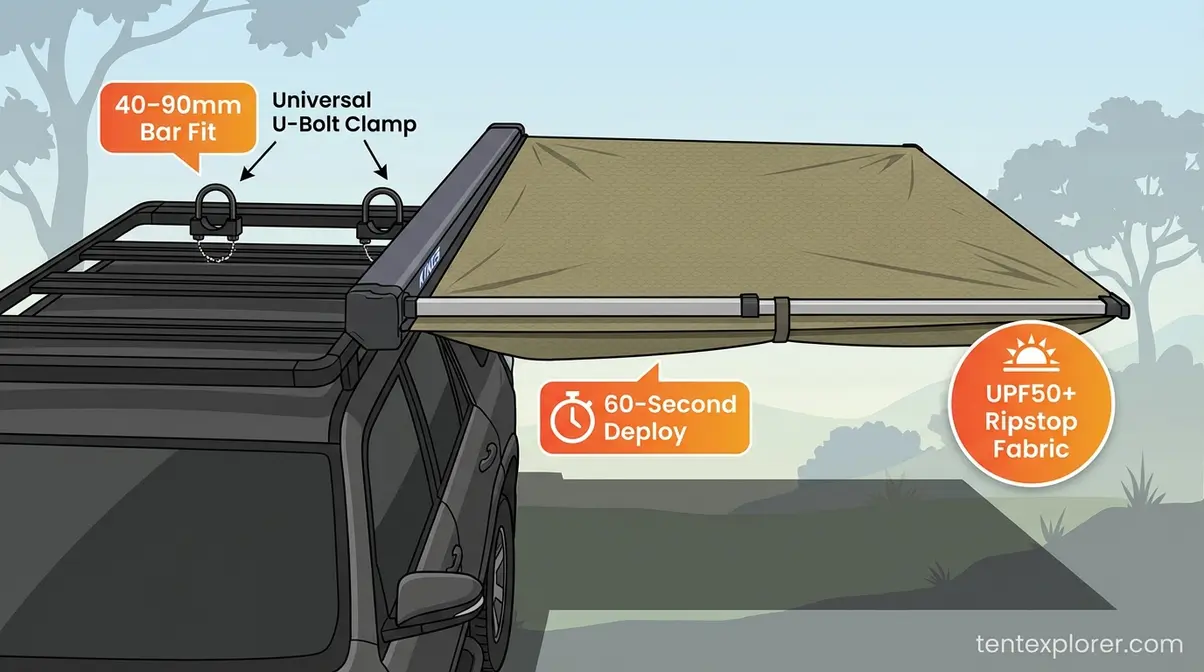
Caption: Kings’ anodized alloy arm system locks into standard roof rack bars — the dual-channel design allows solo setup in approximately 60 seconds.
Verdict: Best for overlanders, campers, and van-lifers who need quick-deploy shade that handles off-road conditions and rugged outdoor use.
Choose Kings if: You camp from a vehicle, own a roof rack, and need a side awning that deploys in under a minute and survives rough terrain. Skip Kings if: You need shade for a fixed patio or deck — VEVOR or VidaXL will provide far better value for stationary residential use.
Kings handles rugged outdoor use. For buyers who need a corner-coverage solution — two screens from one central post — Outsunny’s double-sided design solves a problem no other product on this list addresses.
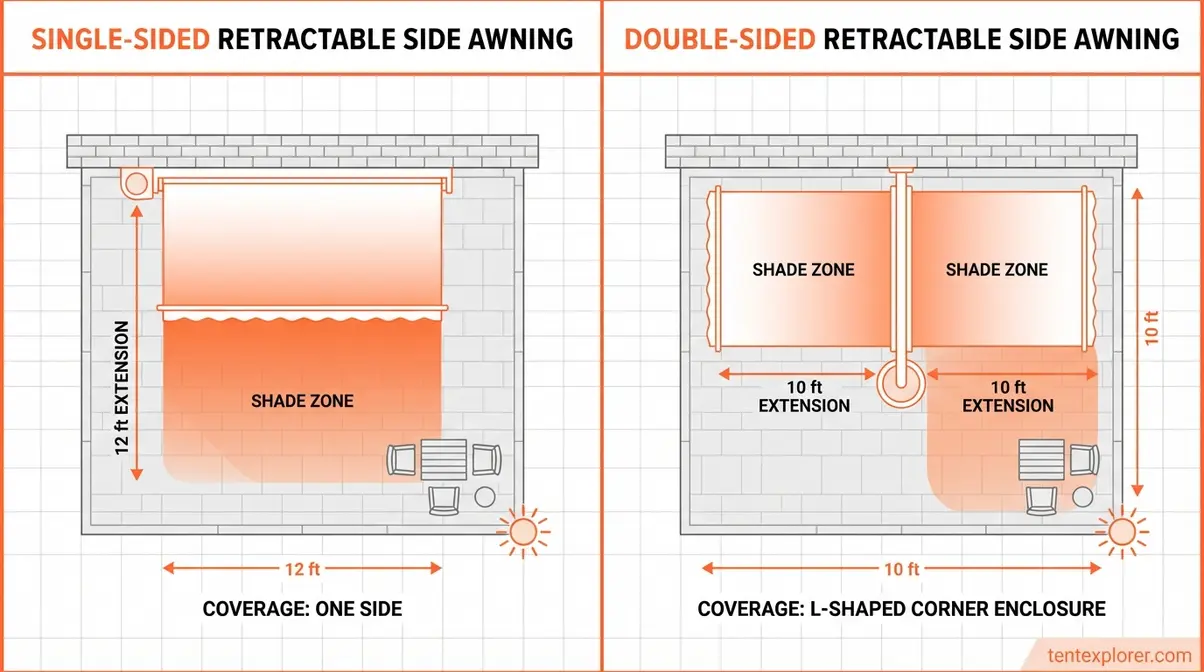
5. Outsunny Double Side Awning: Corners
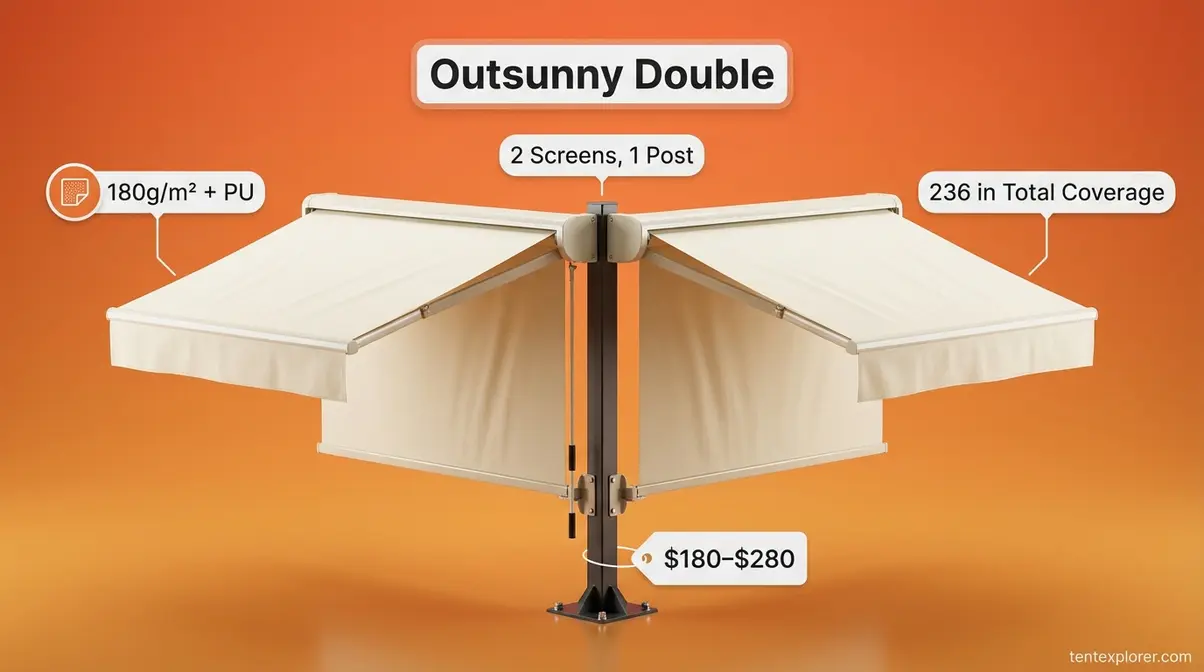
Outsunny, a budget-friendly outdoor living brand sold through major retailers, offers something genuinely unique in this category. The double-sided model features two screens that pull out from a single central post, creating an L-shaped enclosure for corners. It’s the only style on this list that covers two sides simultaneously — no second purchase, no second installation point.
Key Specs: Fabric: 180g/m² polyester with PU coating | Frame: Steel/aluminum combination with aluminum cassette housing | Coverage: Two screens, each extending up to 118 in (approximately 10 ft per side), for a combined 236 in (approximately 20 ft total) | Overall dimensions: 236.25 in L × 78.75 in H | Weight: 46.2 lbs | Auto pull-back spring mechanism | Price: ~$180–$280 (as of March 2026, verified via Aosom, Macy’s, and Lowes)
Best for: Corner patios, garden borders, pool surrounds, and any space that needs two-sided enclosure from a single installation point. The auto pull-back spring works on both screens independently, so you can extend one side while leaving the other retracted.
Not for: Single-wall installations — you’re paying for the two-screen mechanism you won’t use. Also not suitable for vehicle use.
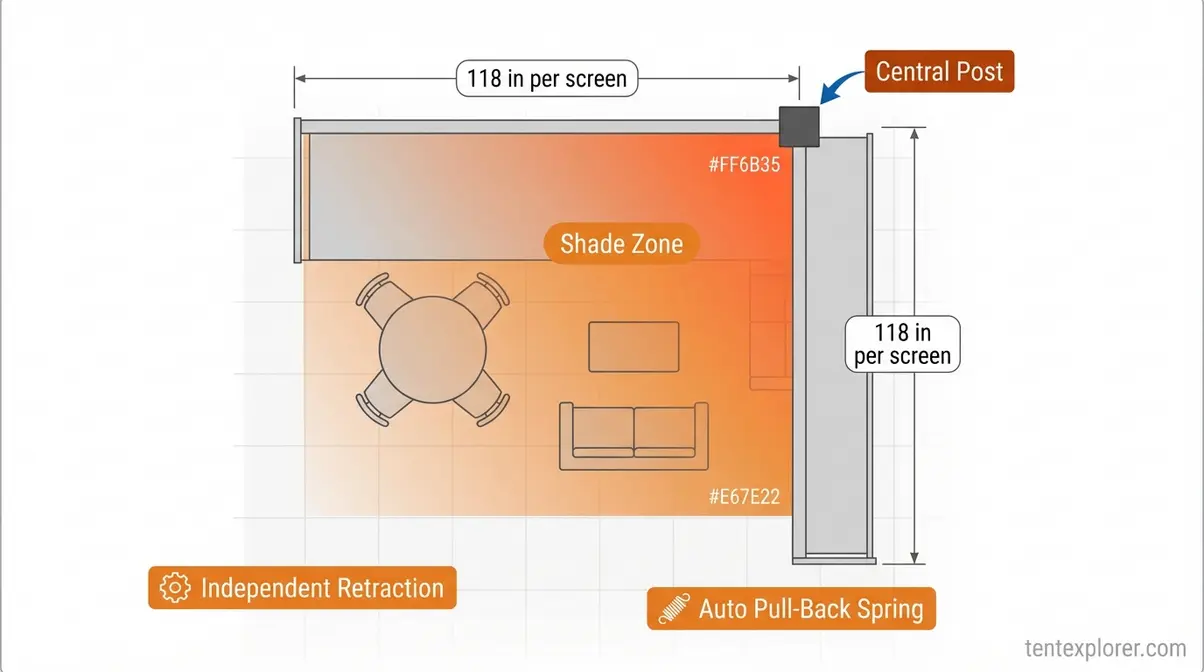
Caption: Outsunny’s central post design creates an L-shaped enclosure — each screen extends independently up to 118 inches from the pivot point.
Now that you’ve seen all five options individually, the Quick Comparison Table and Decision Matrix below will help you find your match in under a minute.
Quick Comparison Table:
| Product | Fabric Weight | Frame | Width | Best For | Price Range |
|---|---|---|---|---|---|
| VEVOR | 180g/m² | Powder-coated aluminum | 12 ft (118 in) | Budget patio | ~$100–$130 |
| VidaXL | 280g/m² + PU | Powder-coated aluminum | Up to 20 ft (240 in) | Large deck | ~$130–$250 |
| MCOMBO | 280g/m² + PU | Powder-coated aluminum | 11.5 ft (138 in) | Balcony/privacy | ~$175–$200 |
| Kings | 170g/m² ripstop | Anodized alloy | 6.5 ft extension | Vehicle/overlanding | ~$129 AUD |
| Outsunny | 180g/m² + PU | Steel/aluminum | 20 ft (two screens) | Corner patios | ~$180–$280 |
Decision Matrix — The Spec-First Framework in Action:
| Your Situation | Best Pick | Why | Approx. Price |
|---|---|---|---|
| Small patio, tight budget | VEVOR 12 ft | Full-cassette, rust-proof frame, lowest entry cost | ~$100–$130 |
| Large deck, want durability | VidaXL 20 ft | 280g fabric + UV50+ = longest lifespan | ~$130–$250 |
| Balcony or apartment, want privacy | MCOMBO 138″ | Fully assembled, 280g fabric, no-tools setup | ~$175–$200 |
| Camping, overlanding, or vehicle use | Kings Side Awning | Roof rack-compatible, rugged build, fast deploy | ~$129 AUD |
| Corner patio or two-sided coverage | Outsunny Double | Two screens from one post, corner enclosure | ~$180–$280 |
Found your match? Check current prices for your top pick — all prices and specs in this guide are verified as of March 2026 and subject to change.
Side Awnings for Patios, Decks, and Houses
Window attachments like awnings can decrease home heat loss by 40% or more, reducing heating and cooling costs year-round (U.S. Department of Energy). For residential buyers, the first decision isn’t which brand to choose — it’s whether to go wall-mounted or freestanding, and what size actually covers your space. Getting either wrong means buying twice.
For guidance on the broader category of canopy options alongside side awnings, see top canopy tents for deck setups for comparison.
Wall-Mounted vs. Freestanding Awnings
A wall-mounted awning attaches directly to the side of your house, fence, or a post using bracket hardware. Think of it like hanging a heavy picture frame — you need a solid anchor point, and the wall does the structural work. A freestanding awning stands on its own legs with no wall attachment required, similar to a portable room divider that you can move around the yard.
Wall-mounted models offer a cleaner look, better wind resistance (since the wall absorbs lateral force), and typically more coverage area. Freestanding models work well for renters, concrete patios without suitable wall access, or garden beds where a permanent installation isn’t practical. The Markilux format, a modular side screen system that combines slide and lift variants for terraces and balconies, is one premium example of how wall-mounted systems can be configured for complex architectural setups — though it sits at a significantly higher price point than the five picks in this guide.
For a fixed home installation, wall-mounted is almost always the better long-term choice. The anchor points distribute wind load more effectively, and the cassette sits flush against the house wall when retracted.
Side Awning Size Guide: 12 ft vs. 20 ft
The most common sizing mistake is buying a 12 ft awning for a 16 ft patio wall. The screen won’t reach the edges, leaving two unshaded corners and making the whole setup feel incomplete. Use this coverage matrix before you order:
| Patio Width | Recommended Awning Width | Best Pick | Notes |
|---|---|---|---|
| Up to 10 ft | 10–12 ft (118–138 in) | VEVOR or MCOMBO | Single panel covers full width |
| 11–15 ft | 12–15 ft (138–180 in) | VidaXL mid-range | Measure carefully — leave 6 in clearance each side |
| 16–20 ft | 20 ft (240 in) | VidaXL large | Full wall coverage; two-person install recommended |
| Corner setup | Two-screen total 20 ft | Outsunny Double | Each screen covers ~10 ft per side |
Why does this matter? A side awning that’s too narrow leaves low-angle sun coming in at the edges — defeating the entire purpose of the installation. The rule of thumb: your awning width should match or slightly exceed your patio width, with no more than 6 inches of overhang on either side to keep wind loading manageable.
For height: most residential models run 71–79 inches tall (approximately 6–6.5 ft). If your fence or deck railing is shorter than 6 ft, measure the gap you actually need to cover — a 79 in screen on a 48 in fence gap will bunch at the bottom and look awkward.
Vehicle and Camping Side Awnings
Vehicle-mounted side awnings differ fundamentally from residential patio screens. TentExplorer’s evaluation of vehicle awnings focuses on three criteria: UPF50+ fabric rating, universal roof rack compatibility (40–90mm bar width), and deployment time under 60 seconds. Kings side awnings meet all three criteria, making them the recommended choice for overlanders and van-lifers. Standard patio side awnings — including VEVOR and VidaXL models — are not designed for vehicle roof rack attachment and will not perform in mobile or off-road conditions. You’re not blocking a neighbor’s view — you’re creating shade and weather protection at a campsite, trailhead, or off-road stop where no fixed structure exists. The specs that matter shift accordingly: portability, deployment speed, and durability under movement become the priority over fabric weight alone.
Car & Van Awnings: Roof Rack Mounting
Mounting a side awning to a car or van requires a standard roof rack — specifically, cross bars that run perpendicular to the vehicle’s direction of travel. Most vehicle awnings, including Kings, use U-bolt clamps that grip the rack bar directly. The mounting kit typically fits bars between 40 mm and 90 mm wide, which covers the majority of aftermarket racks from brands like Rhino-Rack, Thule, and Yakima.
The mounting process for a car side awning generally takes 20–30 minutes the first time:
- Position the awning bag along the driver’s or passenger’s side rack bar.
- Thread U-bolt clamps through the mounting brackets and around the rack bar.
- Tighten the clamps with a 13 mm wrench — firm but not overtightened (rack bar damage is a common mistake).
- Extend the awning to verify clearance — the arm tips should clear the vehicle’s door frame by at least 2 inches when deployed.
- Retract and zip the bag before driving.
For van-lifers and overlanders, the practical tip is to mount the awning on the driver’s side — it deploys away from traffic when parked roadside, and most campsites are accessed from the driver’s side anyway. For overlanders who want a full shelter setup, see our guide to vehicle-attached tents and tailgate awnings.
RV & Truck Camper Side Awnings
RV side awnings serve a slightly different purpose than vehicle-mounted camping awnings. On an RV, the goal is typically to extend the shaded area alongside the living section — blocking low-angle afternoon sun that the main roof awning doesn’t reach. For truck campers and slide-out RVs, a side awning also protects the slide-out mechanism from rain exposure during extended stays.
For RV applications, look for:
- Fabric weight of 170g/m² minimum with a UV rating — ripstop weave is preferable for wind resistance
- Mounting hardware compatible with your RV’s rail system — most RV awnings use a specific track width; verify before ordering
- Arm length of at least 2.5 m (8 ft) for meaningful shade coverage beside a full-size RV
NIOSH advises outdoor workers to use shade structures with side panels to block UV rays and prevent heat-related illness (NIOSH guidelines on shade structures with side panels). This guidance applies equally to extended RV stays and campsite setups where prolonged sun exposure is a real risk.
User consensus in RV forums and outdoor community reviews consistently highlights one overlooked detail: RV awnings must be retracted before driving, even for short moves. An extended awning at highway speed generates enough force to bend the arm assembly permanently — a repair that typically costs more than the awning itself.
Side Panels, Privacy Screens & Accessories
Side awning accessories extend the functionality of a primary retractable screen by closing the open ends where neighbor sightlines and low-angle sun enter. TentExplorer identifies two practical approaches: (1) adding a secondary freestanding screen at a 90-degree angle to create an L-shaped enclosure, and (2) using RV-specific slide-in track shades for the existing roof awning arm. For RV applications, UV50+ mesh weave shades are preferred over solid panels — they block sun while maintaining airflow, which is critical in hot climates. A side awning solves the horizontal sun and privacy problem, but side panels and accessories close the remaining gaps without requiring a second full installation.
Adding Side Panels to Your Awning
Most retractable side awnings are designed as standalone screens — but several manufacturers, including Markilux with their 790 side screen system, offer compatible side panels that attach to the cassette end cap or the extended arm tip. These panels create a three-sided enclosure: the main screen plus two narrow vertical panels at each end. For a complete enclosed outdoor room, see our guide to adding a privacy room or side panels to your setup.
For the products in this guide, the practical approach is simpler: use a secondary freestanding screen (like a second MCOMBO unit) positioned at a 90-degree angle to the main awning. This creates an L-shaped enclosure without requiring proprietary accessories. The Outsunny double-sided model essentially does this in a single product — which is why it earns its place in the lineup for corner applications.
When adding panels to an existing retractable awning, verify that the combined wind load doesn’t exceed the manufacturer’s recommendation. A three-sided enclosure catches significantly more wind than a single screen — retract everything when winds exceed 20 mph (roughly the speed of a strong breeze that makes leaves and small branches move constantly). The CPSC warns that powered awnings can pose unexpected hazards when improperly secured — always follow manufacturer safety guidelines (CPSC safety warning on powered awnings).
Across user discussions in outdoor living forums and verified purchaser reviews, the most common complaint about side awning accessories is wind load underestimation — buyers who add side panels without retracting during gusts above 20 mph consistently report bracket damage within the first season.
RV Awning Side Shades Explained
Standard RV roof awnings extend horizontally over the living area — but they stop at the awning’s edge, leaving the morning sun at a 20-degree angle streaming directly into the RV doorway. RV awning side shades attach to the end of the existing roof awning arm and drop vertically to block that low-angle exposure.
Most RV-specific side shades use a slide-in track system that fits into the groove running along the underside of the main awning arm. The shade panel slides into the track and hangs vertically, held taut by a weighted bottom hem or a short ground stake. Width matches the awning arm length — typically 96–120 inches for a standard RV awning.
For a practical upgrade, look for side shades rated UV50+ (blocking 98% of UV rays) with a mesh weave — this blocks sun without completely blocking airflow, which matters significantly in hot climates where air circulation inside the RV is a priority. For a freestanding alternative that includes sidewalls from the start, see our roundup of canopies featuring protective sidewalls.
How to Install a Retractable Side Awning
You’ll need: Power drill, appropriate drill bits (masonry bit for concrete or brick; wood bit for deck posts), level, pencil, stud finder (for siding installations), exterior-grade lag screws or concrete anchors, silicone sealant, and a second person for larger models. Estimated total time: 1–3 hours depending on surface type.
Wood Deck & Concrete Patio Installation
These are the two most common installation surfaces, and both follow the same basic sequence.
Wood Deck Post or House Wall:
- Hold the top bracket against the post or wall at your desired height. Use a level to confirm it’s plumb — an off-level bracket will cause the screen to retract unevenly.
- Mark the lag screw positions with a pencil.
- Drill pilot holes slightly smaller than your lag screw diameter — this prevents the wood from splitting.
- Apply a small bead of silicone sealant around each pilot hole before inserting screws — this seals the penetration against moisture infiltration.
- Drive lag screws until the bracket sits firmly against the surface. Expected outcome: zero movement when you apply lateral pressure.
- Attach the floor anchor bracket at the base, directly below the top bracket. Use a plumb line or level to confirm vertical alignment.
- Hang the cassette housing on the top bracket and connect the floor anchor to the pull handle base.
- Extend the screen fully and check for even tension across the fabric width. Estimated time: ~90 minutes for a 12 ft model.
Concrete Patio Slab:
For floor anchor installations on concrete, use sleeve anchors or wedge anchors rated for at least 200 lbs pull-out strength. Drill with a hammer drill and masonry bit — a standard drill will not penetrate concrete effectively.
| Setting | Recommended Value | Why |
|---|---|---|
| Anchor depth | Minimum 2.5 in into concrete | Shallow anchors pull out under lateral load |
| Anchor spacing | Match bracket hole pattern exactly | Misaligned anchors crack the bracket under tension |
| Sealant | Exterior silicone around each hole | Prevents water infiltration and concrete spalling |
Mounting on Masonry, Siding, and Posts
Masonry (Brick or Block Wall):
Drill into the solid brick face — not the mortar joints. Mortar is significantly softer than brick and provides poor anchor strength; a screw set in mortar can pull free under the lateral force of a wind-loaded awning. Use a hammer drill with a carbide-tipped masonry bit and install sleeve anchors or lag shields rated for your awning’s stated weight.
Vinyl Siding:
Vinyl siding requires a backing block — a small PVC or wood spacer that fills the gap between the siding profile and the wall sheathing behind it. Without a backing block, tightening the bracket screw will crush and crack the vinyl. Install the backing block first, then locate the wall stud behind the sheathing using a stud finder, and drive lag screws through the block and siding into the stud. Always seal penetrations with exterior caulk.
Freestanding Post:
For decks without a suitable wall, a 4×4 or 6×6 treated lumber post set in a surface-mount post base (concrete-anchored) provides a clean installation point. The post base should be rated for at least 500 lbs lateral load — check the product stamp on the hardware. Required wind loads for exterior residential attachments should be calculated using the ASCE 7 wind load criteria (FEMA wind retrofit guide for exterior attachments). This approach works well for freestanding installations on concrete patios where wall access isn’t available.
Fix: RV Awning Not Closing on One Side
If your RV awning isn’t closing fully on one side, the most common cause is tension imbalance between the two spring-loaded arms. Here’s how to diagnose and fix it:
- Check for physical obstruction first — debris, a bent arm, or a twisted fabric edge can prevent full retraction. Extend the awning fully and inspect both arm tracks visually.
- Identify the lagging side — the side that isn’t retracting is the side with lower spring tension.
- Adjust the tension rod — most RV awnings have a hex bolt at the arm pivot point. Turn the bolt clockwise (typically 1/4 turn at a time) on the lagging arm to increase tension. Re-test after each adjustment.
- Check the fabric for tracking issues — if the fabric edge has slipped out of the cassette track, re-seat it manually before adjusting tension.
- If the arm is bent — do not attempt to straighten it under tension. Fully retract the working side, release all tension, then address the bent arm. A bent arm under spring tension can release suddenly and cause injury.
If the problem persists after two to three tension adjustments, the spring mechanism may need replacement — a job best handled by an RV service technician.
Side Awning Safety, Limits & Common Mistakes
Side awnings are straightforward products, but a few consistent mistakes show up repeatedly in user reviews and forum discussions. Knowing them in advance saves money and prevents damage.
Common Buying & Installation Mistakes
Buying on price alone without checking the three specs. This is the core problem The Spec-First Framework exists to solve. A $60 open-style awning with no published wind rating and an unspecified fabric weight is not a bargain — it’s a product that will fail in the first significant storm. Before any purchase, verify: fabric weight (minimum 180g/m² for residential use), frame material (powder-coated aluminum or anodized alloy only), and wind rating (if not published, treat it as a red flag in exposed locations).
Leaving the awning extended during high winds. The FEMA wind guidance for attached structures recommends retracting all awnings when sustained winds exceed 20–25 mph. At 25 mph, a fully extended 12 ft awning generates approximately 35–40 lbs of lateral force on its mounting brackets — enough to strip lag screws from wood framing over repeated exposures. Retract before storms, not after.
Incorrect anchor depth on concrete. Sleeve anchors installed less than 2 inches deep in concrete will pull free under load. Always verify anchor depth matches the manufacturer’s minimum specification for the rated load.
Ignoring the cassette type. Installing an open-style awning in a climate with regular rain or UV exposure is the single most predictable way to replace it within two seasons. Full-cassette models cost $20–$50 more but protect the fabric when retracted — the difference in lifespan is typically two to three additional seasons.
A federal court ordered awning manufacturer SunSetter to pay $9.25 million for failing to report defective awning covers that caused consumer injuries — a reminder that product quality and safety reporting matter (DOJ penalty for defective awning covers).
When a Side Awning Is NOT the Right Choice
A side awning is the wrong solution in three specific scenarios:
When your primary problem is overhead rain or midday sun. A side awning blocks horizontal and low-angle threats. If your patio gets soaked by afternoon rain coming straight down, you need an overhead awning, pergola, or shade sail — not a vertical screen. Using a side awning for overhead rain protection is a category mismatch that will leave you disappointed.
When your deck is fully exposed on three or more sides. A single side awning covers one side. If your deck is a freestanding island with exposure on all sides, a pergola with attached screens or a full gazebo structure will serve you better. The Outsunny double-sided model covers two sides from one post, but a three- or four-sided enclosure requires a different product category entirely.
When wind exposure exceeds 30 mph regularly. Standard residential side awnings are not engineered for sustained high-wind environments. If you live in a coastal area or elevated terrain where 30+ mph winds are frequent, look for commercial-grade awning systems with published ASTM E330 structural test ratings — or consult a licensed awning contractor before installing any retractable screen.
FAQ: Side Awning Questions Answered
How do I choose the right size side awning for my patio?
Measure your patio width first, then add 6 inches on each side for clearance. A 12 ft patio needs a 12–13 ft awning — not a 10 ft model that leaves two exposed corners. For height, measure the gap you actually need to cover, not just the fence height. Most residential models run 71–79 inches tall, which suits standard 6 ft fence lines. If your patio is wider than 15 ft, VidaXL’s range of models up to 240 inches offers the best coverage options in this price range (as of March 2026).
Can I install a side awning on a wood deck?
Yes — wood deck posts and house walls are the easiest surfaces for side awning installation. Drill pilot holes slightly smaller than your lag screw diameter, apply silicone sealant around each penetration, and drive lag screws into solid framing (not just the siding or deck boards). A stud finder helps locate the structural framing behind vinyl or wood siding. Most homeowners complete a 12 ft installation in 90 minutes with basic tools. For concrete patios, switch to sleeve anchors rated for at least 200 lbs pull-out strength.
What fabric weight should I look for in a side awning?
For most residential uses, 280g/m² is the benchmark for durability — 180g/m² works in mild climates but shows wear faster. Think of fabric weight like thread count in sheets: heavier means more durable. A 180g/m² fabric is like a lighter raincoat — splash-proof but not storm-proof. A 280g/m² fabric with PU coating handles sustained rain and UV exposure across multiple seasons. If you live in a wet or high-UV climate, VidaXL’s and MCOMBO’s 280g UV50+ models are worth the extra cost. UV50+ means the fabric blocks 98% of harmful ultraviolet rays (WHO UV Index standard-index)).
Are side awnings suitable for vehicles and RVs?
Standard patio side awnings are not designed for vehicle use — you need a dedicated vehicle-mounted awning with roof rack compatibility. Patio models lack the arm geometry and mounting hardware for roof rack attachment. Vehicle-specific awnings like Kings use anodized alloy arms, universal U-bolt clamps, and UPF50+ ripstop polyester built to handle road vibration and off-road conditions. For RV applications, look for side shades that use your existing roof awning’s track system — these slide in without drilling additional holes in the RV body.
How do I stop my side awning from flapping in the wind?
The most effective fix is a tension adjustment at the arm pivot point combined with a floor anchor at the base of the pull handle. Most retractable side awnings include a floor anchor bracket — use it. A screen anchored only at the top will oscillate significantly in wind above 15 mph. For added stability, a bungee tie-down at the base of the handle adds a second tension point. If flapping persists, the fabric may be over-extended beyond the cassette’s designed width — retract it 2–3 inches from full extension to restore proper tension. Always retract fully when sustained winds exceed 20–25 mph.
Prices and features verified as of March 2026. Prices are subject to change — check current listings before purchasing. This article may contain affiliate links; if you purchase through them, we may earn a small commission at no additional cost to you.
Choosing the Right Side Awning: Final Verdict
For homeowners and outdoor enthusiasts shopping for a retractable side awning, the difference between a screen that lasts two seasons and one that lasts ten comes down to three numbers: fabric weight (minimum 180g/m², ideally 280g/m²), frame material (powder-coated aluminum or anodized alloy only), and a published wind rating. Our evaluation of five brands found that VidaXL and MCOMBO both clear all three Spec-First bars at accessible price points, while VEVOR delivers the best value for mild-climate patios under 12 ft wide.
The Spec-First Framework exists because most buyers get distracted by price and color before they ever check the specs that actually determine longevity. Applying it takes under two minutes: check the fabric weight in the product listing, look for “powder-coated aluminum” in the frame description, and search for a wind rating. If any of the three is missing or vague, that’s the signal to look at the next option — not the price tag.
Your next step is practical: measure your patio width, identify your primary use case from the Decision Matrix above, and verify current pricing for your top pick. If you’re buying for a vehicle or RV, start with Kings — it’s a different product category entirely and will serve you far better than any patio screen. For a fixed residential installation, VidaXL’s 280g UV50+ range is the most durable option in this price band. Buy in early spring — search interest for side awnings peaks every May, and stock on the best models runs thin fast.
