This blog post may contain affiliate links. As an Amazon Associate I earn from qualifying purchases.
📋 Table of Contents
- Camp Dishwashing Gear Checklist
- What You’ll Need: The Essential Kit
- The Most Forgotten Camp Kitchen Item
- 3-Bucket Camp Dishwashing Method
- How to Set Up Your Dishwashing Station
- Step-by-Step: Wash, Rinse, Sanitize
- Winter Dishwashing Protocols
- The 4-Bucket “Funk Bucket” Method
- How to Dispose of Gray Water Properly
- Where to dump dish water when camping?
- The Truth About Biodegradable Soap
- Low-Water & Dry Camping Hacks
- How do you wash dishes while camping without water?
- Adapting to a Single Sink or Basin
- Backpacking & Bear Country Protocols
- Minimalist Trail Washing Without Soap
- Bear Country Scent Management
- Common Camp Dishwashing Mistakes
- 5 Camp Dishwashing Mistakes
- When to Skip the Bucket System Entirely
- Frequently Asked Questions
- How do people wash dishes when camping?
- What is the 200 rule for camping?
- What soap is best for camping dishes?
- What is the 3-3-3 rule for camping?
- The Method That Works Every Time
Washing dishes at camp doesn’t have to mean a slimy pile of cold, soapy water sitting next to your tent. The mess is real — but so is the fix.
“No one wants to eat out of a grubby bowl. But is there a way to keep your dishes clean on the trail?”
The real problem isn’t effort. It’s not knowing the right system. Most campers improvise: they grab whatever soap is handy, splash some water around, and end up either wasting what little they have or, worse, dumping gray water somewhere that harms the environment. In this guide, you’ll learn exactly how to wash dishes when camping — from the gear you need to the Leave No Trace rules that protect the land around you. We cover the full picture: gear checklist, the 3-bucket method, gray water disposal, low-water hacks, backpacking protocols, and the most common mistakes to avoid.
The most effective way to wash dishes when camping is the “Scrape, Wash, Scatter” method — scrape food waste first, wash using the 3-bucket system, and scatter gray water 200+ feet from water sources per Leave No Trace guidelines.
- Scrape first: Remove all food particles before washing — this is the most skipped step and the one that matters most.
- Use the 3-bucket system: Wash (hot soapy water) → Rinse (clean water) → Sanitize (diluted bleach or sanitizing tablets).
- Always use biodegradable soap — but never dispose of it directly in lakes or streams, even in small amounts.
- The 200-foot rule: Pace approximately 70 adult steps from any water source, trail, or campsite before scattering strained gray water.
Camp Dishwashing Gear Checklist
Having the right gear is what separates a smooth camp cleanup from a chaotic one. Everything on this list supports The Scrape, Wash, Scatter Method — the three-stage framework you’ll use at every campsite, whether you’re car camping with a full kitchen box or packing light for a weekend in the backcountry. We evaluated these items based on weight, packability, LNT compliance, and community consensus across backcountry and car camping forums. For car camping, the full kit fits in a small crate. For backpacking, you’ll scale down — but a few items are non-negotiable regardless of pack weight.
What You’ll Need: The Essential Kit
This is everything you need to run the three-pot method at any campsite. Each item earns its place:
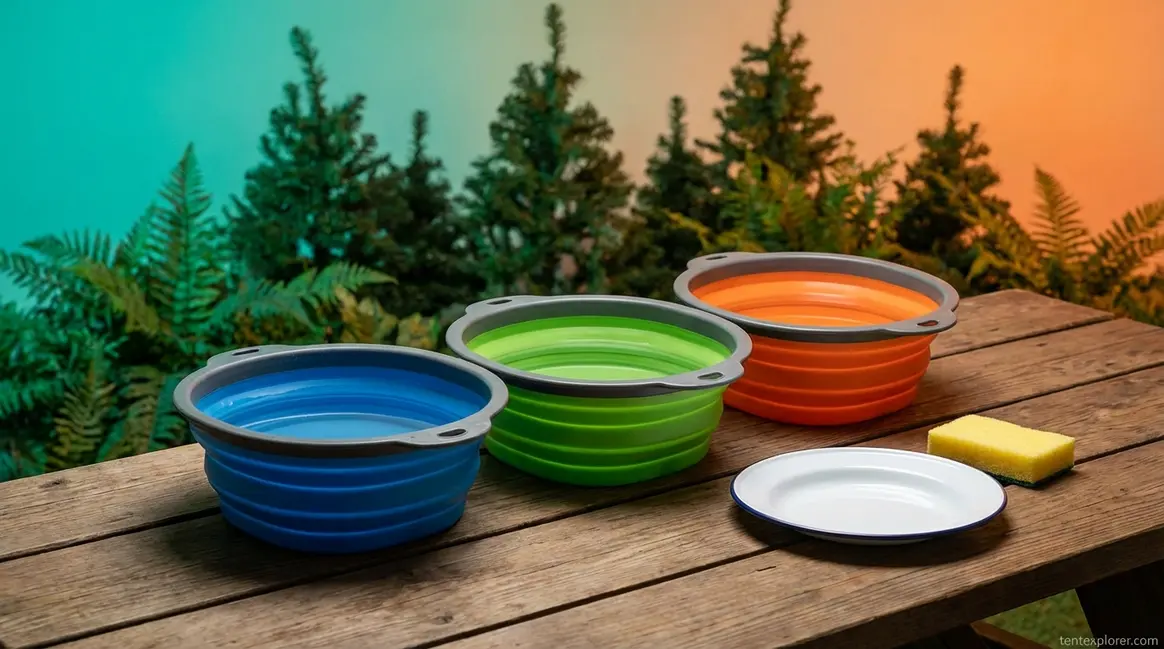
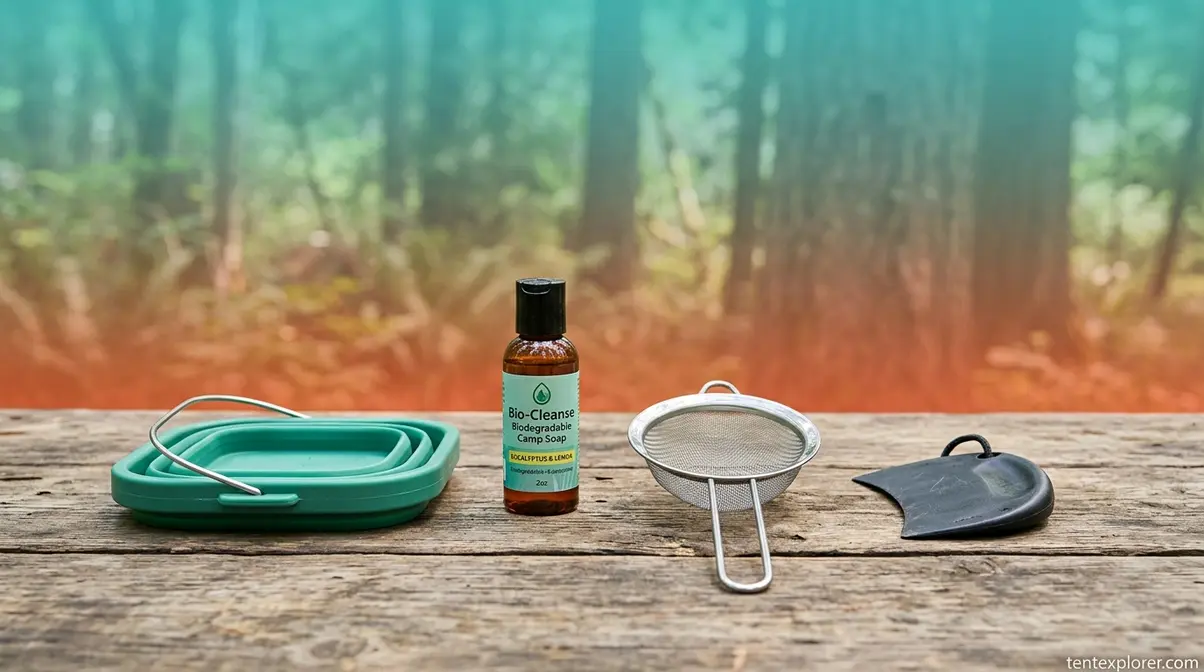
- 2–3 collapsible wash basins or buckets — Label each clearly: Wash / Rinse / Sanitize. Collapsible silicone basins are preferred over rigid buckets for packing efficiency; they fold flat to about 1 inch. For car camping, a full-size dishpan from home works fine. For backpacking, collapsible silicone basins cut weight significantly.
- Biodegradable soap — Campsuds or Dr. Bronner’s Castile Soap are the go-to options. Use 2–3 drops per liter — less than you think.
- Fine-mesh strainer — The most critical item on this list (more on that below). A small kitchen strainer works perfectly; it’s not a specialty item.
- Pot scraper or silicone spatula — For pre-scraping plates before any water touches them.
- Unscented bleach or sanitizing tablets — For the sanitize bucket. A capful of bleach per bucket is sufficient.
- Microfiber towel or quick-dry camp towel — For air-drying support and wiping surfaces.
- Small spray bottle — For low-water and dry camping situations (covered in the hacks section below).
- Trash bags or zip-lock bags — For packing out strained food scraps and solids. Non-negotiable.
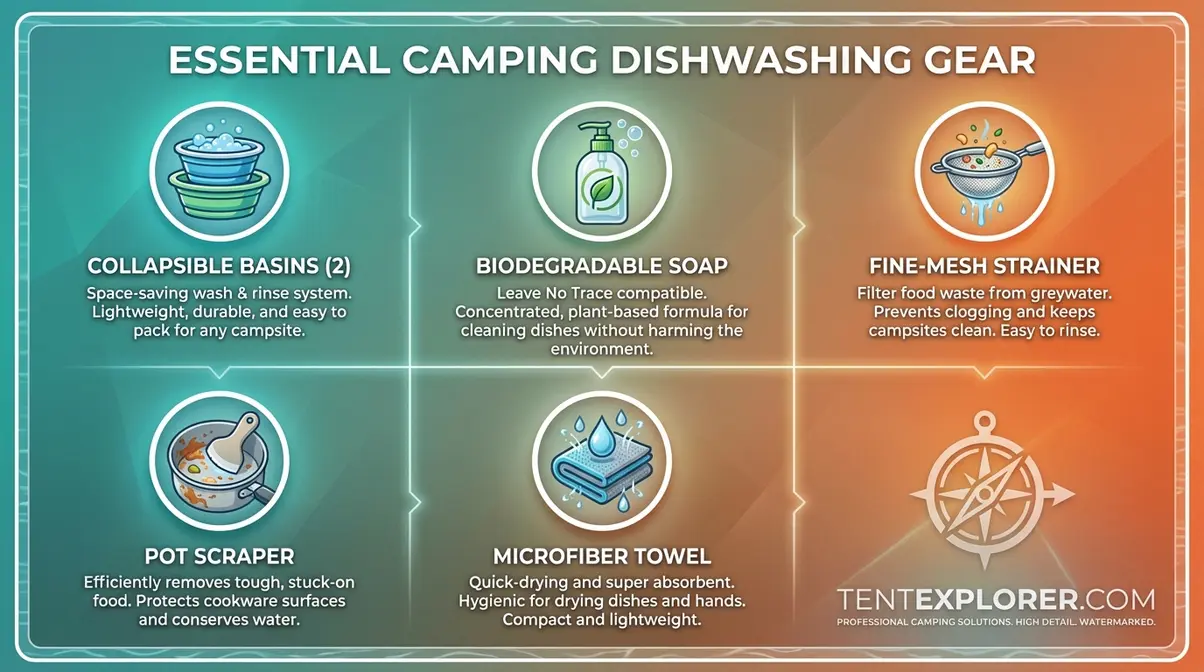
Caption: Eight items that make the difference between a clean camp kitchen and a chaotic one — the fine-mesh strainer is the most commonly forgotten.
As Leave No Trace frontcountry dishwashing guidelines confirm, LNT recommends a multi-bucket system set up 200 feet from water sources (2026). For a broader pre-trip checklist, see our full essential camping gear checklist.
The Most Forgotten Camp Kitchen Item
The one item most campers forget when washing dishes at camp is the fine-mesh strainer — and it’s the only piece of gear that determines whether your gray water disposal is actually LNT-compliant. “A fine-mesh strainer is the single most overlooked piece of camp kitchen gear — without it, you cannot properly strain gray water before dispersal.” Across camping forums and backcountry communities, the fine-mesh strainer and a collapsible basin are consistently cited as the two most overlooked items in the camp kitchen kit.
Food particles in gray water don’t just look bad — they contaminate soil, attract insects, and in bear country, draw wildlife directly to your site. A $5 mesh strainer from any kitchen store is all you need. Pack it flat in your cook kit and you’ll never forget it again.
Now that your kit is ready, let’s walk through the method itself — the same three-stage system used by Leave No Trace educators and backcountry guides.
3-Bucket Camp Dishwashing Method
The three-bucket method — also called the three-pot method — is the gold standard for washing dishes when camping, and it works for everything from car camping to base camp cooking. As National Park Service guidelines confirm, the NPS recommends using a 3-bucket system with non-corrosive materials for camp dish sanitation (2026). Whether you’re car camping with a full kitchen box or setting up a remote base camp, this is the method that leaves your dishes genuinely clean — not just rinsed.
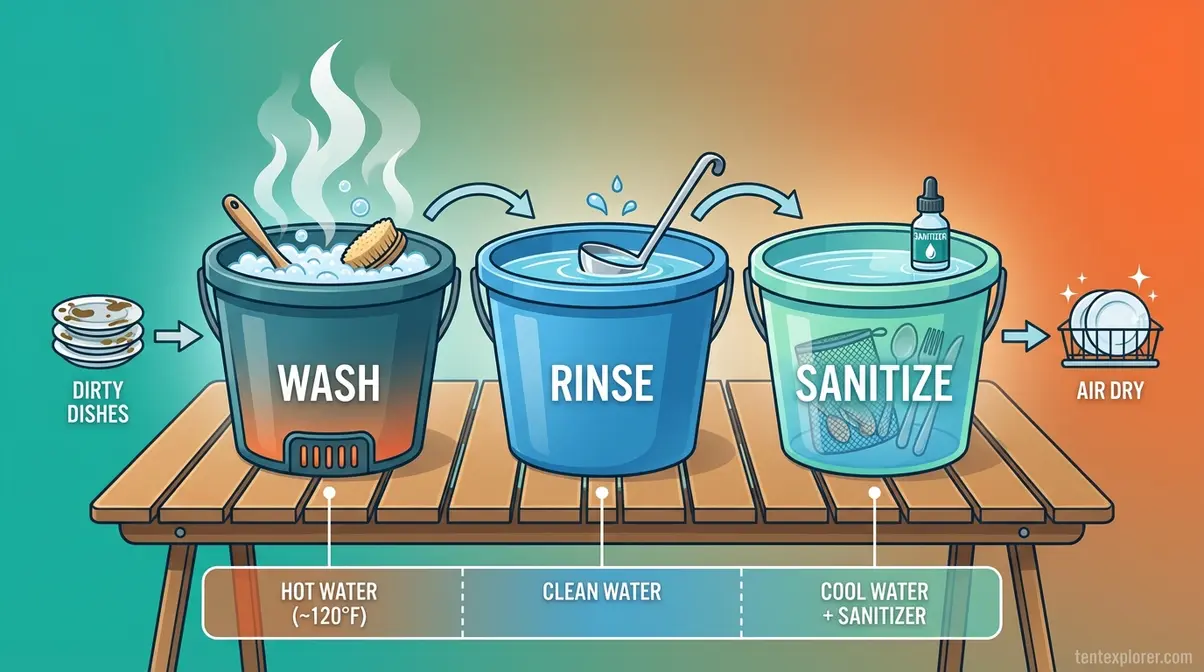
Caption: The 3-bucket system in sequence: hot soapy wash water, clean rinse water, and a sanitizing solution — always set up 200 feet from any water source.
“The National Park Service recommends a 3-bucket system — wash, rinse, sanitize — using non-corrosive containers to safely clean camp dishes.” (National Park Service, 2026)
How to Set Up Your Dishwashing Station
The three-pot method starts with three clearly labeled containers arranged in a row. Setup takes under five minutes:
Step 1: Position Your Station Set up at least 200 feet from any lake, river, stream, or trail — pace out roughly 70 adult steps. Set this up before you start cooking so it’s ready when you need it.
Step 2: Fill Bucket 1 (Wash) Fill with the hottest water you can make — boiling is ideal — plus 2–3 drops of biodegradable soap per liter. If you’re at a car campsite with a spigot, fill from the tap and heat on your stove. At a primitive site, boil water in your largest pot.
Step 3: Fill Bucket 2 (Rinse) Fill with clean cold or warm water. Do not add any soap to this bucket.
Step 4: Fill Bucket 3 (Sanitize) Fill with clean water plus a capful of unscented bleach, or drop in one sanitizing tablet. This kills bacteria that warm soapy water misses.
Label each bucket with a Sharpie on the side if you’re sharing camp with others. Confusion between the wash and rinse buckets is more common than you’d think.
With your station set up, here’s the exact sequence — including the washing order that most guides skip entirely.
Step-by-Step: Wash, Rinse, Sanitize
Here’s how to wash dishes when camping, step by step. This is the Wash stage of the Scrape, Wash, Scatter framework — and the order of operations matters more than most people realize.
Estimated Time: 20 minutes Tools Needed: 3 collapsible basins, biodegradable soap, fine-mesh strainer, pot scraper, unscented bleach or sanitizing tablets, microfiber towel.
Step 1: Scrape Your Dishes Before any water touches a dish, scrape ALL food particles directly into a trash bag using a pot scraper or silicone spatula. This is the “Scrape” stage of the full framework, and it’s the single most impactful step for keeping your gray water clean. Thirty seconds of scraping reduces gray water contamination more than any other action.
Step 2: Wash in Bucket 1 Wash in hot soapy water. Washing ORDER matters: cups and utensils first, plates second, pots and pans last. Washing greasy pots first contaminates the water immediately, forcing you to change it far more often. This is the insight most competitor guides skip.
Step 3: Rinse in Bucket 2 Dip or swirl each item in the clean rinse water. No scrubbing needed here — just remove soap residue.
Step 4: Sanitize in Bucket 3 Dip each item in the sanitizing solution. Do NOT rinse off the sanitizer. Let it air dry on the dish surface — this is what kills the bacteria that warm soapy water may miss, particularly in outdoor conditions.
Step 5: Air Dry Place dishes on a clean microfiber towel or hang them in a mesh camp drying bag. Never towel-dry with a shared cloth — this reintroduces bacteria. Aim to complete the full process within 20 minutes of finishing your meal; food residue hardens quickly in cool outdoor air.
Winter Dishwashing Protocols
Standard camp dishwashing works well in mild weather. In cold or sub-zero conditions, four specific adaptations keep the system functional. Experienced cold-weather campers consistently recommend these adjustments, and zero competitors cover them in any detail.
Keep wash water hot: In cold air, water in Bucket 1 cools within 2–3 minutes. Use an insulated camp pot to keep wash water above 40°C (104°F) for effective soap activation. Reheat between rounds if needed.
Prevent bucket freeze: In sub-zero temps, Buckets 2 and 3 can freeze solid within minutes. Use slightly warm water in all three buckets, and add a small pinch of salt to the rinse bucket to lower its freezing point.
Scrape faster: Cold food residue sets harder and faster than in warm weather. Scrape immediately after eating — don’t let dishes sit. Use a silicone scraper rather than a stiff brush, as stiff bristles become brittle and ineffective in freezing temperatures.
Move the station indoors: In extreme cold below -10°C (14°F), move your wash station inside a tent vestibule or under a tarp. Never wash inside the tent body itself — moisture and soap fumes accumulate quickly in an enclosed space.

Caption: In sub-zero conditions, insulated pots and warm water in all three buckets prevent freezing mid-wash — four adaptations that make cold-weather camp cleanup manageable.
For heavy cooking days — chili, pasta, or anything with significant food residue — there’s a fourth bucket that extends the life of your wash water considerably.
The 4-Bucket “Funk Bucket” Method
Pro Tip: Before Bucket 1, add a “funk bucket” — a pre-rinse container of warm water for soaking heavily soiled pots. Soak the dirtiest pot for 5 minutes, then scrape again before moving to the main wash. This removes the bulk of food residue before it enters your soapy wash water, keeping Bucket 1 effective for far longer on big cooking days.
Now for the part most campers get wrong: what to do with that bucket of dirty gray water when you’re done.
How to Dispose of Gray Water Properly
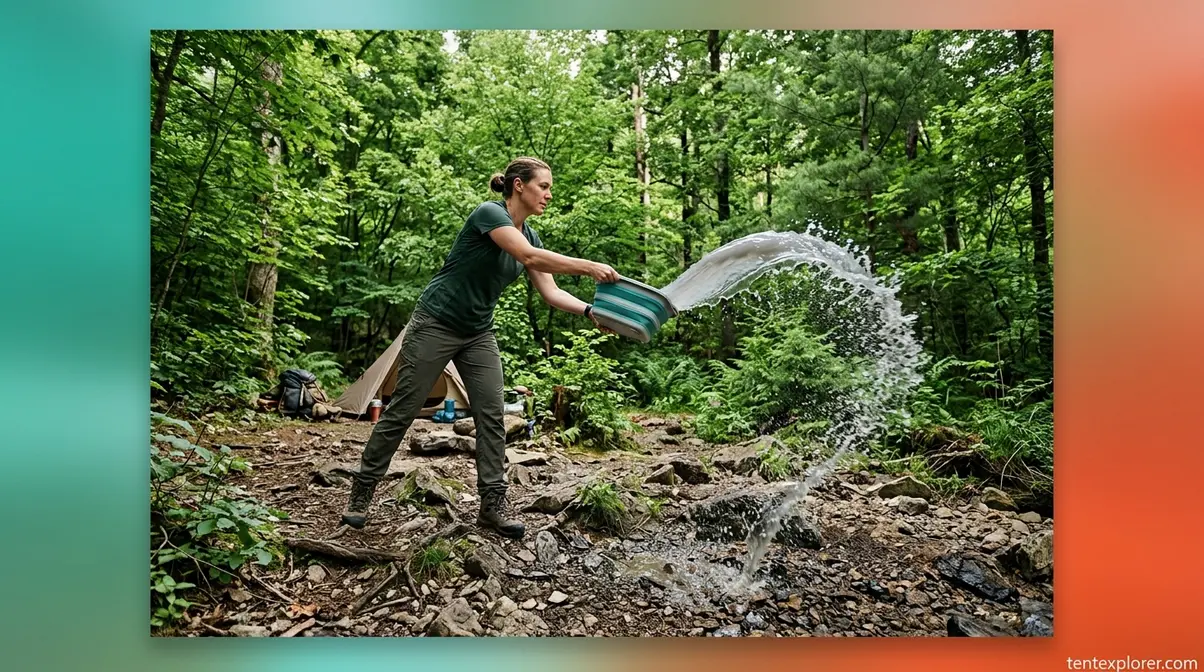
When camping, gray water — the dirty water from washing dishes — must be disposed of at least 200 feet from any lake, river, stream, or trail. This is the core requirement of Leave No Trace, the nonprofit organization that sets outdoor ethics standards for campers and hikers. According to NPS Leave No Trace principles, the NPS advises carrying water at least 200 feet from streams or lakes, using minimal biodegradable soap, and scattering strained dishwater (2026). The reason is straightforward: even small amounts of food particles and soap in natural water sources harm aquatic ecosystems and contaminate drinking water.
This is the Scatter stage — the most overlooked step in the Scrape, Wash, Scatter framework. For a deeper look at outdoor ethics, see Leave No Trace principles and the 200-foot rule.
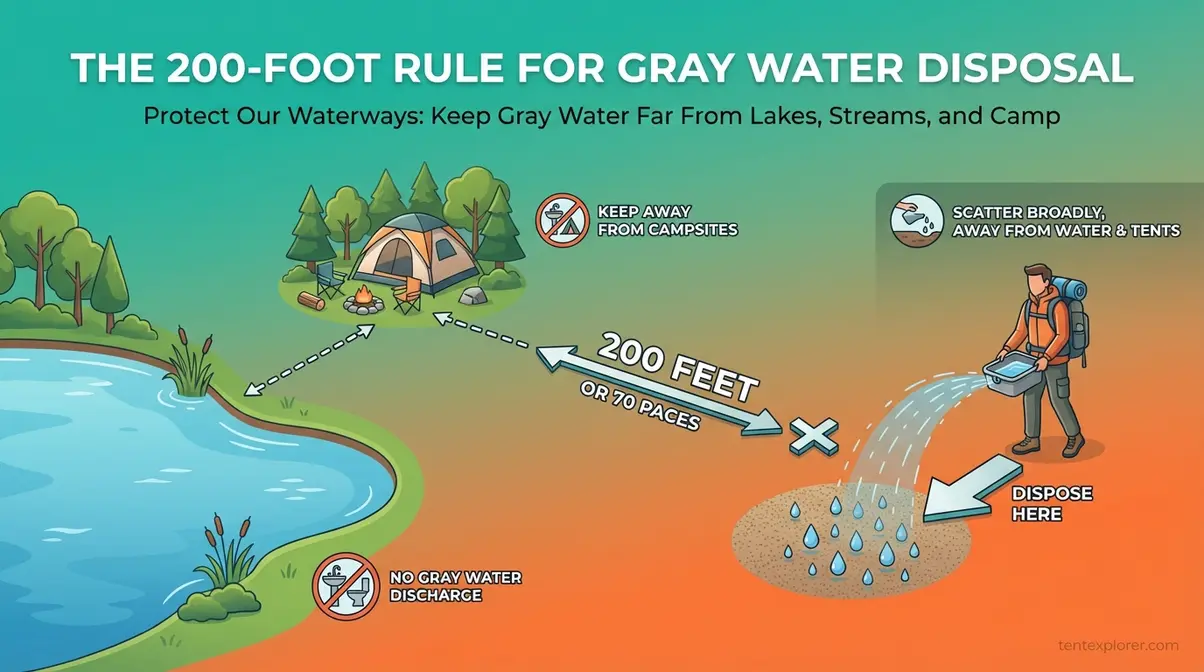
Caption: The 200-foot rule visualized — approximately 70 adult paces separates your gray water dispersal zone from any water source, trail, or sleeping area.
Where to dump dish water when camping?
Gray water must be scattered at least 200 feet — approximately 70 adult paces — from any water source, campsite, or trail. Here’s how to execute it correctly:
Step 1: Strain the Water Pour gray water through your fine-mesh strainer into a second container. Pack the captured solids in a zip-lock bag or trash bag. This is non-negotiable: food particles in dispersed gray water attract wildlife and contaminate soil.
Step 2: Choose Your Dispersal Method For the broadcast method, pour the strained water over a wide area of mineral soil in a thin, moving stream. Never dump in one concentrated spot. Alternatively, dig a sump hole 6–8 inches deep in mineral soil (not near roots or vegetation), pour in the strained gray water, then cover and disguise with natural material. A sump hole is required in some designated backcountry areas.
Step 3: Use Utility Sinks When Available At a developed campground with a utility sink or designated gray water disposal station, use it. That’s always the most Leave No Trace-compliant option available, as confirmed by Leave No Trace grey water disposal guidelines (2026).
Now for the single biggest misconception in camp dishwashing — one that surprises even experienced campers.
The Truth About Biodegradable Soap
Many campers assume “biodegradable” means “safe to dump anywhere.” This is incorrect, and it’s worth understanding why.
Biodegradable soap breaks down in soil — not in water. Dumping it directly into a lake or stream causes immediate harm. Research published in PLOS ONE (2026) confirms that even natural soaps affect water chemistry, surface tension, and oxygen levels — harming algae, crustaceans, and fish. The soap requires soil microorganisms to break down; water lacks those organisms. Surfactants in soap can also fuel algae blooms by introducing phosphates and nitrogen-like compounds into water bodies, depleting oxygen and endangering aquatic life.
“Even biodegradable soap can cause significant harm to aquatic life and increase nitrogen levels — which is why Leave No Trace mandates keeping all soaps out of natural water sources.” (Leave No Trace warning on biodegradable soap, LNT Center for Outdoor Ethics, 2026)
The rule is simple: always dispose of soapy gray water in soil, at least 200 feet from any water source. Use Campsuds or Dr. Bronner’s Castile Soap sparingly — 2–3 drops per liter is sufficient. A single drop of soap in a mountain stream can affect aquatic invertebrates. The 200-foot rule isn’t bureaucratic caution — it’s ecological necessity.
What if you don’t have three buckets of water to work with? Here’s how to get dishes clean when water is scarce.
Low-Water & Dry Camping Hacks
For campers wondering how to clean dishes while camping without water — or with very little of it — the spray bottle method is the practical answer. The spray bottle method cuts camp dishwashing water use by roughly 90% compared to the standard 3-bucket system, making it the go-to technique for dry camping. For context: the standard 3-bucket system uses 3–4 liters of water for a typical camp meal; the spray bottle method uses roughly 250ml. On a 3-day desert trip with two people, that difference is significant.
For more on staying comfortable in camp with limited resources, see these tips for staying clean without a shower.
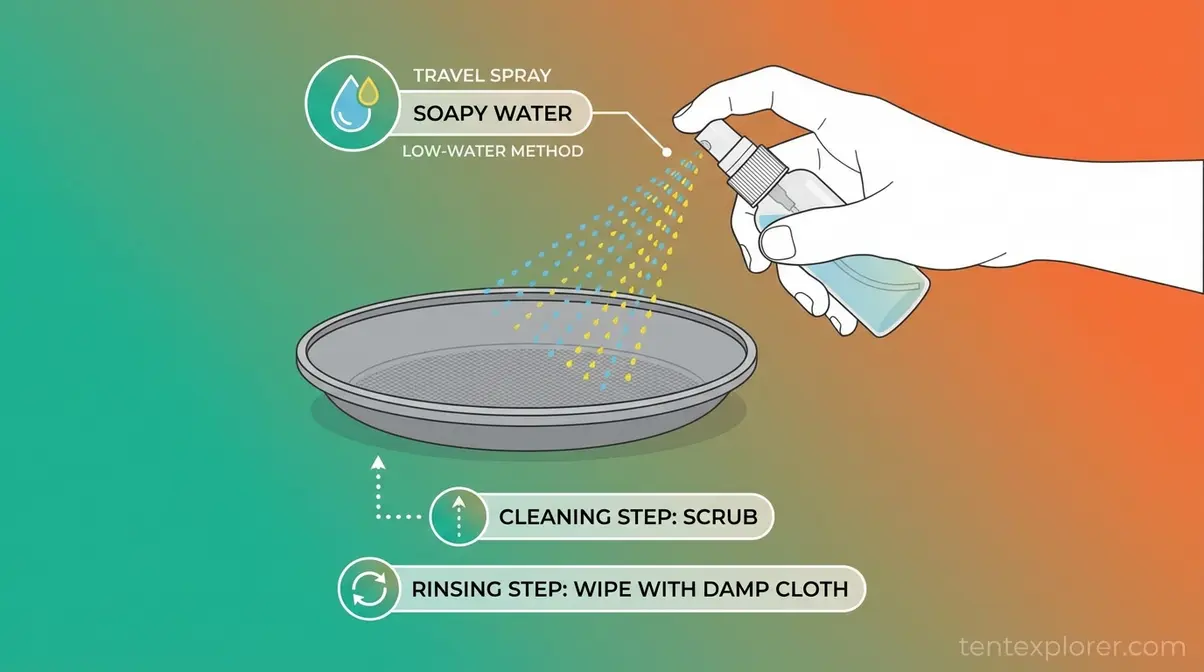
Caption: The spray bottle method — a 1:10 soap-to-water ratio in a 250ml travel bottle — uses roughly 50ml per plate versus 500ml+ for the bucket method.
How do you wash dishes while camping without water?
Field-tested by campers in desert and winter environments, this spray bottle technique works well when water is severely limited:
Step 1: Scrape and Wipe Scrape the plate or pot thoroughly with your pot scraper. Wipe down with a dry paper towel or microfiber cloth to remove residue.
Step 2: Apply Soap Solution Mix 1 part biodegradable soap to 10 parts water in a small spray bottle (a 250ml travel bottle is ideal). Spray the dish lightly with the soapy solution.
Step 3: Scrub and Clean Scrub with a small camp brush. Wipe clean with a damp cloth — do NOT rinse with poured water. Let air dry.
This method uses roughly 50ml of water per plate versus 500ml or more for the bucket system. Always dispose of any residual soapy water using the 200-foot rule — even small amounts harm soil and water ecosystems.
If you have one basin instead of three, here’s how to adapt the system without compromising hygiene.
Adapting to a Single Sink or Basin
When you only have one basin, the wash-drain-rinse sequence keeps things sanitary:
- Fill with hot soapy water. Wash all dishes, working from least greasy to most greasy.
- Drain completely.
- Fill with clean water. Rinse all dishes.
- Drain and scatter the gray water per the 200-foot rule.
One important note: change your wash water after every 4–5 dishes. A single basin gets contaminated faster than a dedicated wash bucket, and grease in the water stops soap from working effectively. For one-handed washing, a suction-cup camp brush that mounts to a smooth surface frees your other hand to hold the dish.
The stakes change significantly when you’re washing dishes in the backcountry — or in bear country. Here’s what’s different.
Backpacking & Bear Country Protocols
In the backcountry, the principles are the same — but the consequences of getting it wrong are higher. According to NPS bear safety protocol, the NPS explicitly states: wash dirty dishes immediately and never store food or scented items in your tent or backpack (2026). Bears have an exceptional sense of smell, and the NPS strategy focuses on eliminating food odor from your campsite entirely — not on outrunning the bear’s nose with distance. For a full overview of food storage and wildlife protocols, see food storage and wildlife safety protocols.
“In bear country, the National Park Service explicitly states: wash dirty dishes immediately and never store food or scented items in your tent or backpack.” (National Park Service, 2026)

Caption: Three-zone camp layout for bear country — sleeping, cooking, and food storage zones should each be at least 200 feet apart from one another.
Minimalist Trail Washing Without Soap
Many thru-hikers skip soap entirely to reduce pack weight and simplify gray water management. Hot water plus vigorous scraping removes the majority of food residue and bacteria from titanium or aluminum cookware — field consensus from thru-hiking communities confirms this is effective for most trail meals.
If soap is used, apply the smallest possible amount: one drop maximum per pot. Scatter gray water 200+ feet from camp and all water sources — the same rule applies regardless of how little soap you used.
In bear country, even strained food particles in soil can attract wildlife. Pack out all solids from your wash water in a zip-lock bag, not just the larger chunks. Many thru-hikers use a single titanium pot as both cook pot and wash basin: boil water, cook, eat directly from the pot, add more hot water, scrub, then scatter the gray water at the 200-foot mark.
Bear country adds one more layer of urgency to all of the above.
Bear Country Scent Management
In bear habitat, follow these rules without exception:
Rule 1 — Wash immediately. Do not leave food residue sitting in pots after a meal. Even diluted gray water carries food scent, and bears will investigate any food odor in camp.
Rule 2 — Establish your three zones. Think of your camp as three separate areas: sleeping zone, cooking zone, and food storage zone. All three should be at least 200 feet apart from each other. Your wash station belongs in the cooking zone — never near your tent.
Rule 3 — Store everything in a bear canister overnight. A bear canister — a hard-sided container approved for storing food and scented items in bear country — should hold all washed dishes and cooking equipment overnight. Even “clean” dishes retain trace scents that bears detect.
Even experienced campers make mistakes with camp dishwashing. Here are the most common ones — and how to avoid them.
Common Camp Dishwashing Mistakes
Most dishwashing problems at camp come from a handful of repeatable errors. These aren’t rare — Leave No Trace frontcountry guidelines consistently identify gray water mismanagement and soap misuse as the most frequently reported compliance issues at frontcountry campsites (2026). Knowing what goes wrong makes it easier to avoid.
5 Camp Dishwashing Mistakes
- Dumping gray water near the water source — A camper pours wash water 10 feet from the lake “because it’s biodegradable anyway.” Soap and food particles contaminate the water supply and harm aquatic life. Fix: Always pace 70 steps (200 feet) minimum before dispersing.
- Skipping the scrape step — Rushing cleanup and going straight to washing. Food particles contaminate wash water in under a minute, forcing repeated water changes and wasting more water overall. Fix: A 30-second scrape before any water touches the dish is the highest-ROI action in the entire process.
- Using regular dish soap — Forgetting to pack biodegradable soap and substituting Dawn or Palmolive. Non-biodegradable surfactants persist in soil and water indefinitely. Fix: Pack a 2oz travel bottle of Campsuds — it weighs almost nothing and lasts multiple trips.
- Washing greasy pots first — Starting with the pasta pot before the cups. Grease contaminates the wash water in the first minute, rendering the soap less effective for everything that follows. Fix: Always wash least greasy first: cups → utensils → plates → pots.
- Leaving gray water dispersal too close to camp — Pouring strained gray water 20 feet from the tent. This attracts insects, raccoons, and in bear country, bears — even strained water carries food scent. Fix: The 200-foot rule applies to your dispersal site, not just to proximity to water sources.
When to Skip the Bucket System Entirely
There are three situations where the full 3-bucket setup is the wrong tool:
- Ultralight backpacking (3+ days): The weight of three basins and the water to fill them is prohibitive. Use the minimalist trail method from the backpacking section instead.
- Campgrounds with utility sinks: If your campsite has a designated dishwashing sink or utility area, use it. It’s the most LNT-compliant option available and requires zero gray water management on your part.
- Fire ban or no-boil advisory conditions: If you cannot heat water safely, the spray bottle method is the appropriate fallback — it requires no boiling and minimal water.
Have more questions about camp dishwashing? Here are the answers to what campers ask most.
Frequently Asked Questions
How do people wash dishes when camping?
Most campers use the three-bucket method — a wash, rinse, and sanitize system that handles a full camp meal effectively. The process starts with scraping all food particles off dishes before any water is used, then moving through hot soapy wash water, a clean rinse, and a sanitizing dip. The method takes under 20 minutes and uses roughly 3–4 liters of water for a typical camp meal. For backpacking or dry camping with limited water, a spray bottle method using as little as 250ml is the practical alternative.
What is the 200 rule for camping?
The 200-foot rule is a Leave No Trace principle requiring campers to wash dishes and dispose of gray water at least 200 feet from any water source, trail, or campsite. Two hundred feet equals approximately 70 adult paces — a distance you should pace out at each new site before cooking begins. The rule prevents food particles and soap from contaminating drinking water sources and harming aquatic ecosystems. In some designated wilderness areas, a sump hole is required instead of broadcasting — check local regulations before your trip.
What soap is best for camping dishes?
Always use biodegradable soap — popular and widely available options include Campsuds and Dr. Bronner’s Castile Soap. Biodegradable soap breaks down in soil but not in water — dumping it directly in a lake or stream still harms aquatic life by disrupting oxygen levels and surface tension, even in small quantities (PLOS ONE, 2026). Use sparingly: 2–3 drops per liter of wash water is sufficient for effective cleaning. Never substitute regular dish soap like Dawn or Palmolive at a campsite — non-biodegradable surfactants persist in soil and water indefinitely.
What is the 3-3-3 rule for camping?
The 3-3-3 rule is an RV and car camping travel guideline: drive no more than 300 miles per day, arrive at your destination before 3:00 PM, and stay at each campsite for at least 3 nights. The rule helps reduce travel fatigue, allows proper camp setup time, and gives you enough time to actually enjoy each location rather than rushing through it. It is entirely separate from the 200-foot rule, which governs gray water and waste disposal. As KOA’s 3-3-3 rule explanation notes, the 3-3-3 rule is a best practice, not a regulation — it applies primarily to road-trip campers and RV travelers (KOA, 2026).
The Method That Works Every Time
For car campers and backpackers alike, knowing how to wash dishes when camping comes down to one repeatable framework: Scrape, Wash, Scatter. Scrape food waste before it touches water. Wash using the three-bucket system with biodegradable soap — starting with the least greasy items and finishing with the pots. Scatter strained gray water 200 feet from any water source, per Leave No Trace guidelines. Follow those three steps and you’ll leave every campsite cleaner than you found it, with fewer wildlife visits and zero gray water violations.
What makes the Scrape, Wash, Scatter Method reliable is that it scales. The same three stages work whether you’re at a car campsite with a spigot or a remote backcountry site with one liter of water — you just adjust the tools, not the logic. That’s the method’s real value: it solves the grubby bowl problem without requiring perfect conditions or a full camp kitchen. Tent Explorer has found this framework consistently performs across camping styles precisely because it’s built around LNT principles, not convenience.
Before your next trip, bookmark our full essential camping gear checklist so you never forget the fine-mesh strainer again — the single item that makes the whole system LNT-compliant. Pack the strainer, pack the biodegradable soap, and pace out your 200 feet. Everything else follows from there.
