
This blog post may contain affiliate links. As an Amazon Associate I earn from qualifying purchases.
📋 Table of Contents
- What Is a Tunnel Tent? Features & Trade-offs
- Tunnel Tent vs. Dome Tent Differences
- Key Advantages of Tunnel Tents
- What Are the Trade-offs?
- How to Pitch a Tunnel Tent: Step-by-Step Guide
- Site Selection and Kit Check
- Which way should it face in the wind?
- Step 1: Orient the Inner Tent
- Step 2: Thread Poles Through Sleeves
- Step 3: Stake the Rear Corners First
- Step 4: Use the Concertina Method
- Step 5: Tension the Guy Lines
- Step 6: Attach and Adjust the Flysheet
- Pitching in Difficult Conditions
- Can one person pitch it alone?
- Choosing the Best Tunnel Tent: A Buyer’s Guide
- Key Tunnel Tent Buying Criteria
- Best Lightweight Backpacking Tent
- Best Family Tunnel Tents
- Best Tents for Extreme Weather
- Tunnel Tent Maintenance and Long-Term Care
- Post-Trip Cleaning and Drying
- Long-Term Tent Storage Tips
- When a Tunnel Tent Isn’t the Right Choice
- Common Setup Pitfalls to Avoid
- When to Choose a Dome Tent Instead
- Frequently Asked Questions
- How do you use guy lines?
- How do you clean a tent floor?
- How do you store a tent long term?
- Your Complete Tunnel Tent Masterclass
A tunnel tent gives you more interior space per gram than almost any other shelter design — but only if you know how to pitch it correctly. Get the orientation wrong and even the best tent on the market will flap, flex, and fail in a stiff breeze.
Most guides tell you to “face the tent into the wind” and leave it there. That’s not enough — and it’s why so many campers end up fighting their tunnel tent instead of sleeping soundly inside it. Correct orientation is only one piece of the puzzle.
In this tunnel tent guide, you’ll learn exactly how to pitch for maximum wind stability, which modern models are worth your money, and how to care for your tent so it lasts for years. We cover everything from the aerodynamic principles behind the design to a step-by-step pitching sequence, a buyer’s guide with current model recommendations, and a maintenance protocol that competitors have consistently overlooked.
A tunnel tent’s superior space-to-weight ratio and wind resistance only activate when you apply the 3-Point Stability System: correct rear-end orientation, full staking, and tensioned guy lines.
- Comprehensive coverage: This tunnel tent guide covers the essential mechanics of pitching, buying, and maintaining your shelter.
- Orientation matters most: Always pitch the narrow rear end directly into the prevailing wind — crosswind pitching is the single biggest setup error
- Space-to-weight advantage: Tunnel tents offer more interior volume per kilogram than dome alternatives, with large vestibules for gear storage
- The 3-Point Stability System: Orientation + staking + guy lines — miss any one element and stability drops significantly
- Vango Farnham: Best family pick; Vango Soul 100 leads for backpacking weight at 1.82 kg
- Maintenance gap: 100% of competitors skip maintenance advice — drying fully before storage is the single most important step to prevent mould
What Is a Tunnel Tent? Features & Trade-offs
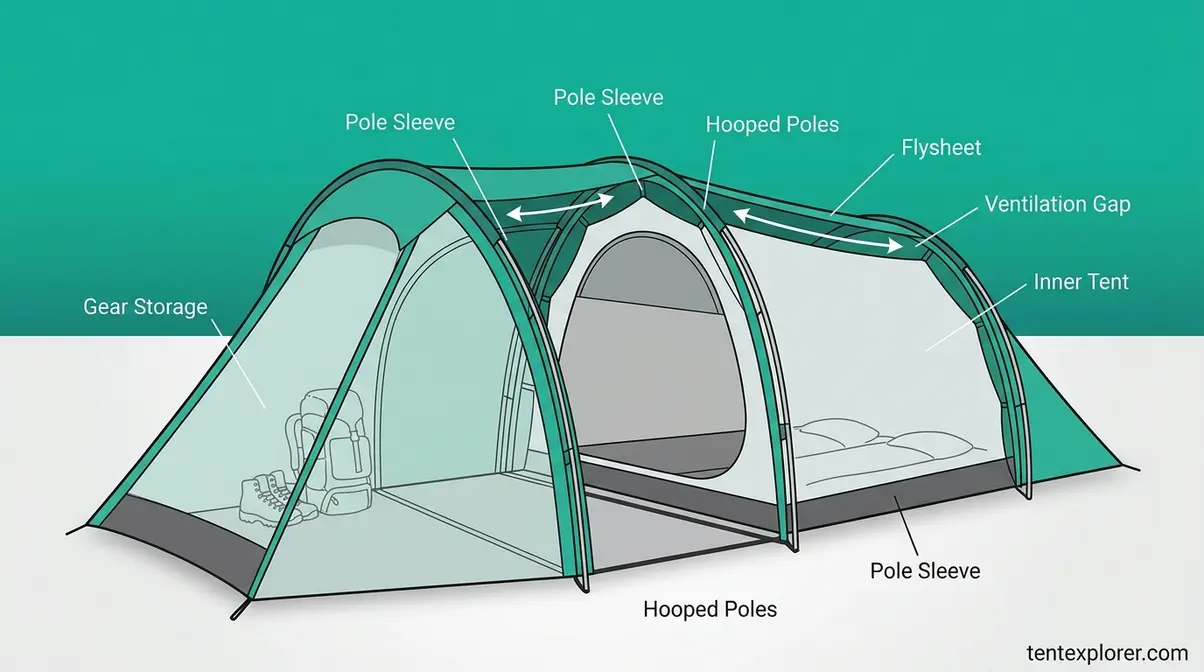
A tunnel tent is a non-freestanding shelter built around a series of parallel hooped poles that run through fabric sleeves to create a long, arched tunnel shape. Unlike dome tents — where poles cross at a central point — tunnel poles run side-by-side in sequence, creating a structure that is aerodynamically elongated rather than spherical. That distinction matters enormously for how the tent performs in wind, and for how much usable space you get per kilogram of carried weight.
Tunnel Tent vs. Dome Tent Differences
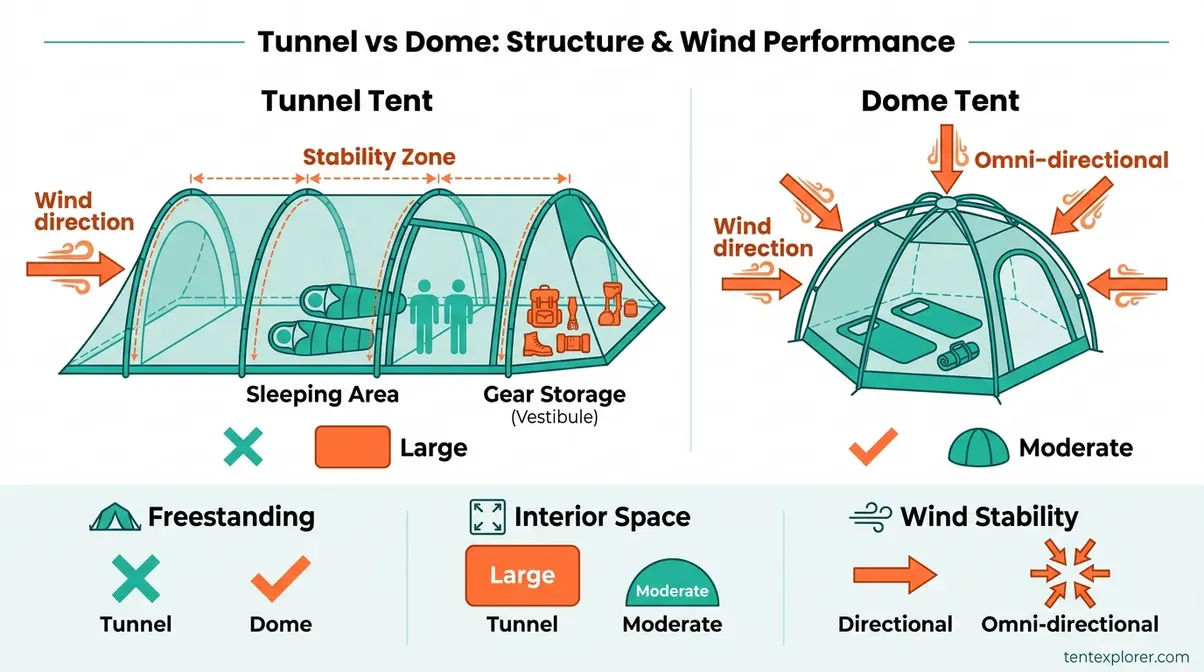
The fundamental difference is structural: a dome tent uses crossing poles that create a self-supporting, freestanding shell. A tunnel tent uses parallel arches that require staking to maintain their shape. That single trade-off defines everything else about both designs. If you are new to this style, exploring a comprehensive tunnel tent overview can provide helpful context before diving into the mechanics.
| Feature | Tunnel Tent | Dome Tent |
|---|---|---|
| Structure | Parallel hooped poles in sleeves | Crossing poles at a central hub |
| Freestanding? | No — requires stakes and guy lines | Yes — can stand without pegs |
| Interior space | Excellent — long floor plan, large vestibules | Moderate — compact, tapers toward ceiling |
| Wind stability | Very high when correctly oriented | Moderate to high; omni-directional |
| Best terrain | Soft ground (pegs essential) | Rocky, hard, or unpredictable surfaces |
| Ideal use | Base camp, family, multi-night trips | Solo, backpacking, short trips |
| Weight | Heavier for same capacity | Lighter for equivalent headroom |
As The North Face explains, tunnel tents are ideal trekking shelters because they combine lighter weight with gear storage space separate from the main sleeping compartment — something dome designs rarely achieve. The non-freestanding nature is the key limitation: on hard rock or compacted ground where pegs won’t bite, a tunnel tent becomes significantly harder to pitch securely.
Key Advantages of Tunnel Tents
The space-to-weight ratio is where tunnel tents genuinely excel. Because the pole arches run in parallel rather than crossing at a peak, the floor plan is long and rectangular — maximising usable sleeping area without the wasted corner space common in dome tents. Most tunnel tents also incorporate a vestibule (a covered porch area between the flysheet and inner tent door) that provides dedicated gear storage space, keeping boots, packs, and wet kit out of your main sleeping compartment. This makes them strong contenders when looking for the best tent for wind and rain.
Wind resistance is the other headline advantage — but it works differently than most campers expect. A tunnel tent’s aerodynamic profile doesn’t resist wind so much as redirect it. The parallel arch system distributes wind load linearly across the entire pole structure rather than concentrating force at a single crossing point. As Ferrino’s wind tunnel testing of mountaineering tents demonstrates, well-designed tunnel structures can withstand winds up to 160 km/h when correctly oriented and fully guyed. The curved profile guides turbulent airflow smoothly over the canopy, converting potentially destructive kinetic energy into downward pressure that actually stabilises the tent rather than lifting it.
Tunnel tents offer more interior volume per kilogram than dome alternatives — making them the practical choice for couples, families, and anyone planning multi-night base camps.
What Are the Trade-offs?
Honest tunnel tent ownership means understanding three genuine limitations.
First, the non-freestanding design means you are entirely dependent on soft ground. If your pegs can’t achieve a firm purchase — on compacted gravel, frozen turf, or stone — your tent won’t stand securely. Carry sand pegs or snow pegs for soft or loose surfaces, and always have a plan for hard ground.
Second, tunnel tents are directional. Their wind-resistance advantage only exists when the narrow rear end faces the wind. Pitch a tunnel tent broadside to the wind and the large flat sidewall acts like a sail. Dome tents handle crosswinds more gracefully because their symmetrical structure performs equally well from any angle.
Third, setup takes longer than a dome tent, particularly for first-timers or solo campers. The wood to water guide to tunnel tents notes that correct site selection and orientation judgement are skills that take a few trips to develop — and getting them wrong costs you sleep.
How to Pitch a Tunnel Tent: Step-by-Step Guide
Pitching a tunnel tent correctly is less about brute strength and more about sequence. In this section of our tunnel tent guide, we break down the exact sequence. Follow the steps below in order and the tent almost pitches itself. Rush the orientation step or skip the rear-end staking and you’ll spend the rest of the process fighting a structure that won’t stay put.
Site Selection and Kit Check
Before you unpack anything, spend two minutes on site selection. It will save you 20 minutes of frustration later.
You’ll need: All tent poles, inner tent, flysheet, pegs (minimum 12), guy lines (pre-attached or separate), mallet or peg pusher. Estimated setup time: 15–25 minutes for your first pitch; 10–15 minutes once you know the sequence.
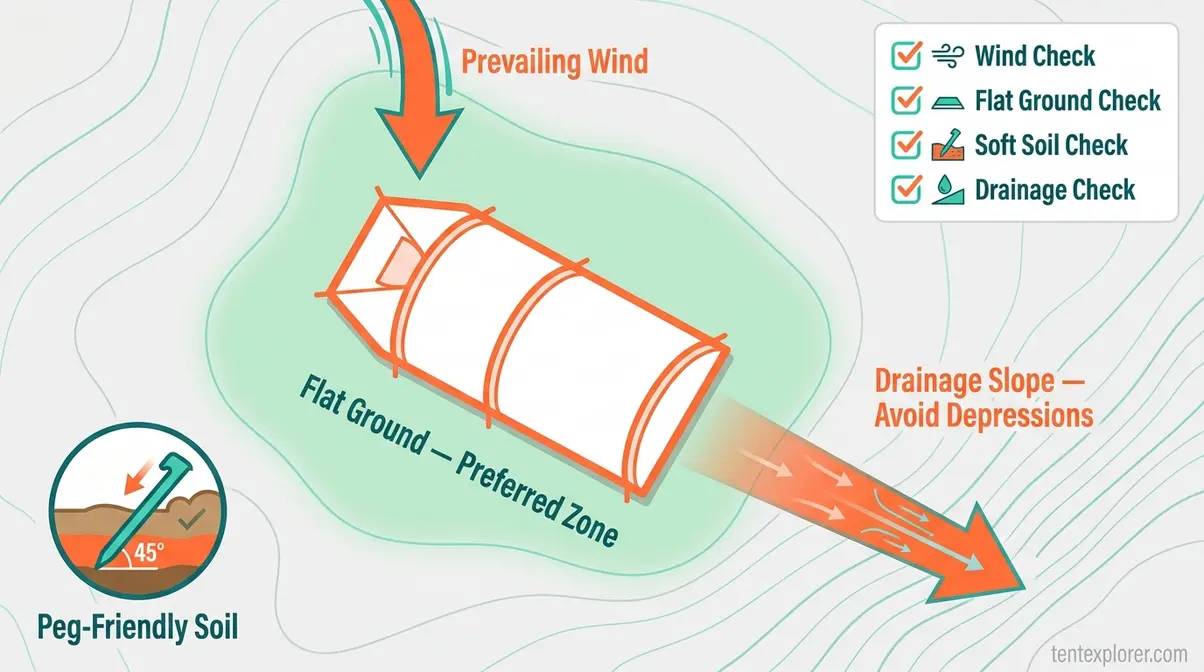
- Identify the prevailing wind direction — wet grass, flag movement, or tree lean all indicate this reliably.
- Choose ground that is as flat as possible, free of sharp rocks or roots that could puncture the tent floor.
- Check that the ground is soft enough for pegs to achieve a firm hold at a 45-degree angle.
- Lay out all components and confirm nothing is missing before you start assembly.
Which way should it face in the wind?
Always pitch the narrow, closed rear end directly into the prevailing wind. The rear end is aerodynamically designed to split and redirect oncoming airflow around the tent body. Pitching broadside to the wind — with the long sidewall facing the gusts — creates a sail effect that pulls pegs out and stresses poles. If wind direction is unclear, wet grass or smoke movement are reliable indicators. Re-orient before pegging if your initial assessment was wrong.
Step 1: Orient the Inner Tent
Unfold the inner tent flat on the ground and orient it so the narrow, closed end points directly into the prevailing wind. This is the single most important decision in the entire pitching process. The narrow rear end is aerodynamically shaped to split and redirect oncoming airflow; the broader entrance end, which faces downwind, creates a low-pressure zone that actually helps hold the structure down.

Mark the rear corners with two pegs loosely placed (don’t drive them fully yet — you’ll need to adjust). This anchors your orientation before you touch a single pole.
Step 2: Thread Poles Through Sleeves
Lay all poles out in order before threading. Most tunnel tents use colour-coded poles or numbered bags — match them to the corresponding sleeves before you start.
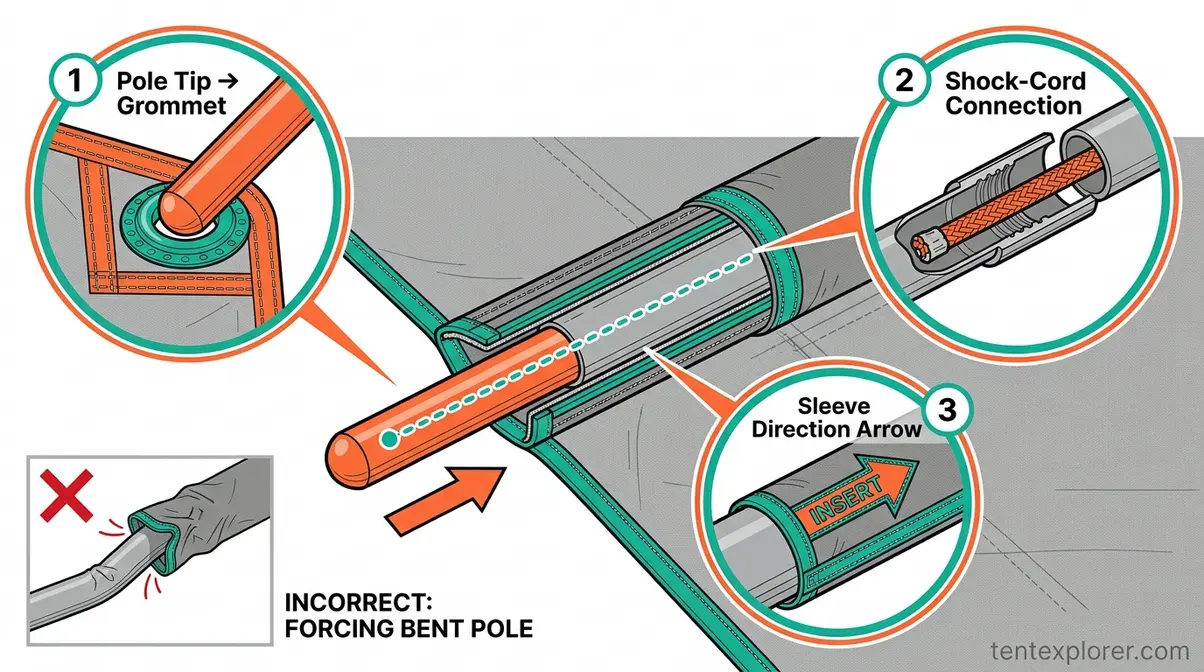
As Tatonka’s pitching guide advises, thread each pole through its sleeve from one end to the other in a single smooth motion rather than feeding it section by section. Connect pole sections gently — shock-corded poles self-assemble, but forcing a bend before the full pole is threaded risks snapping a ferrule.
- Identify the correct sleeve for each pole (check colour coding or pole length).
- Feed the pole through the sleeve from one end, working section by section if non-shock-corded.
- Seat the pole tip into the grommet or peg point at one end before tensioning.
- Do NOT raise the poles yet — thread all poles first, then raise together.
Step 3: Stake the Rear Corners First
With all poles threaded but still lying flat, drive your rear corner pegs fully home now. Using the best tent stakes for high winds ensures your anchor points won’t fail. This is the step most beginners skip — and it’s why their tent blows sideways the moment they try to raise it.
Staking the rear end first fixes your wind orientation permanently. Once the rear corners are pegged at 45 degrees outward from the tent body, you have a stable anchor point. Drive pegs at 45 degrees away from the tent for maximum holding strength. Expert campers consistently report that pegging the rear before raising is the single change that most improves solo pitching success in windy conditions.
Step 4: Use the Concertina Method
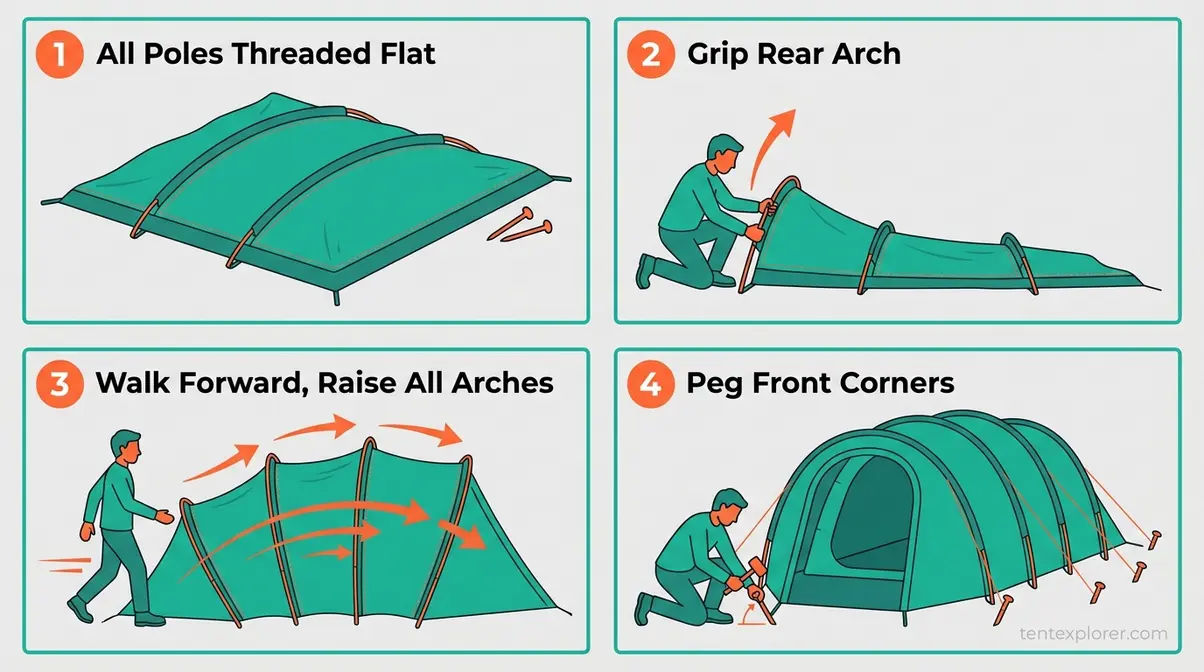
With rear corners staked and all poles threaded, you’re ready to raise the tent. This is where the concertina method makes solo pitching genuinely manageable.
“We have 2 tunnel tents now, easiest way we have found is to put in poles, and then raise them all at same time and walk them out — think it’s called concertina.”
— Experienced tunnel tent camper, outdoor community forum
The concertina method works exactly as described: stand at the rear of the tent, grip all pole arches together, and walk them upright simultaneously while walking forward toward the entrance end. The tent accordions open as you walk. This approach maintains even tension across all poles and prevents any single arch from over-stressing during the raise.
- Start at the rear-staked end, gripping the first arch.
- Raise all arches upright in one smooth motion, walking forward.
- Seat the front pole tips into their front grommets.
- Peg the front corners immediately — do not leave the tent standing on poles alone.
Step 5: Tension the Guy Lines
Guy lines are not optional extras — they are the third element of the 3-Point Stability System and without them, even a correctly oriented, fully staked tunnel tent will flex dangerously in strong wind.
Attach guy lines to all designated attachment points on the flysheet — typically the pole arch apexes and the mid-points of each side. Tension each line to remove all slack, then adjust so the flysheet is taut but not distorted. NORTENT’s wind testing data shows that tunnel structures are built to handle winds up to 20 m/s (45 mph) as a baseline — but manufacturers strongly recommend additional guy line anchoring for winds exceeding that threshold (NORTENT of Norway).
- Guy line tensioning checklist:
- Attach to all arch apex points
- Attach to mid-panel points on each long side
- Angle each line at 45 degrees from the tent body
- Adjust turnbuckles or slides until flysheet has no loose fabric
- Re-tension after 30 minutes as fabric settles

Step 6: Attach and Adjust the Flysheet
With the inner tent raised and guy lines tensioned, clip or sleeve the flysheet over the pole structure according to your tent’s specific design. Most modern tunnel tents use a combination of clips, sleeves, and buckles. Work from the rear end forward, maintaining even tension.
- Attach the flysheet rear end to the rear pole arch first.
- Work forward, clipping or threading each arch point.
- Tension the flysheet hem at the base — it should sit close to but not touching the inner tent (this gap is your ventilation zone and prevents condensation transfer).
- Check that all doors and vents zip cleanly without bunching.
A correctly attached flysheet has no sagging panels and no contact with the inner tent. Fabric-on-fabric contact wicks moisture through to your sleeping space — if your tent feels wet inside on a dry night, a poorly tensioned flysheet is almost always the cause.
Pitching in Difficult Conditions
Pitching in bad weather is a skill worth practising before you need it. The principles are the same, but the sequence becomes more urgent.
In strong wind: Peg the rear corners before you open the bag. Unzip the bag while kneeling, keep components low, and thread poles with the tent body still folded. Raise only when the rear is fully staked. Have a companion hold the windward side if available.
In rain: Prioritise getting the flysheet on quickly. Some tunnel tent designs allow you to pitch the flysheet first and clip the inner underneath — check your tent’s manual for this option. A Wanderlust Magazine test of six tunnel tents found that models with pre-attached inners or fly-first pitch options significantly reduced pitching time in wet conditions.
On uneven ground: Use the longest pegs available for the uphill corners. Place a folded groundsheet or footprint under the tent floor to protect against sharp drainage channels. Never pitch in a depression — water pools there during heavy rain regardless of how good your tent floor’s hydrostatic head (HH) rating is.
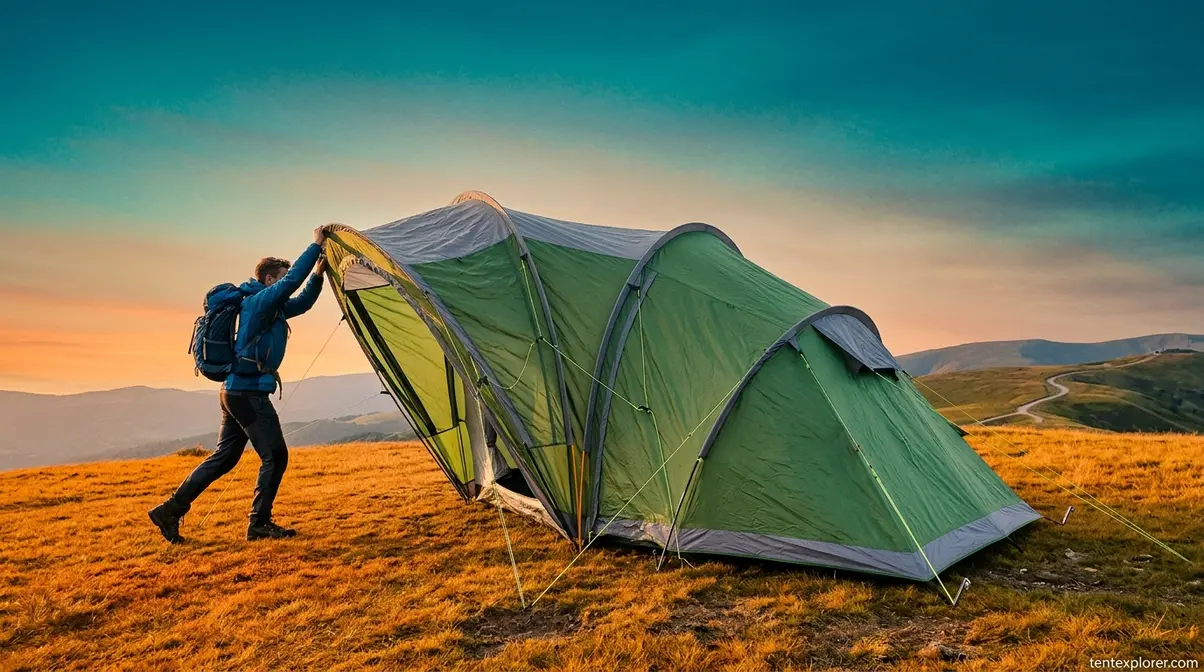
Can one person pitch it alone?
Yes — one person can pitch a tunnel tent alone using the concertina method. Thread all poles before raising anything, stake the rear corners firmly first, then grip all pole arches together and walk them upright simultaneously toward the entrance end. The rear anchor holds your wind orientation while you raise and peg the front. Across outdoor communities, this method is the consistent recommendation for solo pitching — it takes 10–15 minutes with practice.
Choosing the Best Tunnel Tent: A Buyer’s Guide
Selecting the right tunnel tent comes down to matching four variables — capacity, weight, season rating, and materials — to your actual camping style. Our team evaluated current models across these criteria, cross-referencing manufacturer specifications with community feedback from experienced campers.
Key Tunnel Tent Buying Criteria
Capacity: Manufacturers typically rate tents optimistically. A “3-person” tunnel tent comfortably sleeps two adults with gear. Apply the rule: subtract one from the stated capacity for comfortable real-world use.
Weight: Backpacking tunnel tents target sub-2 kg for the full system (inner, fly, poles, pegs). Car camping and family models run 8–34 kg — weight is less critical when you’re not carrying it.
Season rating: Most tunnel tents are rated 2-season (spring/summer) or 3-season (spring through autumn). True 4-season tunnel tents use heavier fabrics, additional pole arches, and higher hydrostatic head (HH) ratings. For UK conditions, a 3-season tent with a minimum 3,000 mm HH flysheet handles the vast majority of trips.
Hydrostatic head (HH): The HH rating measures water pressure resistance in millimetres. A rating of 3,000 mm handles heavy rain; 5,000 mm and above is appropriate for exposed or mountainous conditions. These align with broader essential tips for tent buying, ensuring you make a smart investment.
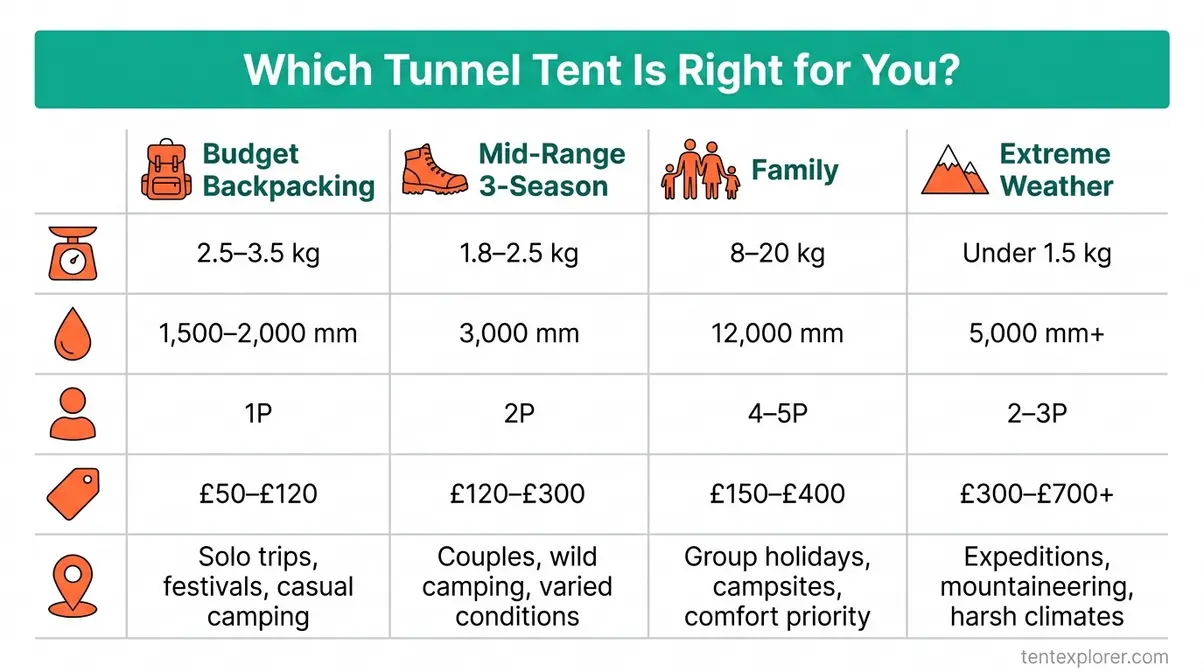
| Criteria | Budget/Entry | Mid-Range | Premium |
|---|---|---|---|
| HH Flysheet | 1,500–2,000 mm | 3,000 mm | 5,000 mm+ |
| Pole material | Fibreglass | Aluminium | Aluminium/Carbon |
| Weight (2P) | 2.5–3.5 kg | 1.8–2.5 kg | Under 1.5 kg |
| Price range | £50–£120 | £120–£300 | £300–£700+ |
| Best for | Occasional, fair weather | Regular 3-season use | Frequent, exposed conditions |
Best Lightweight Backpacking Tent
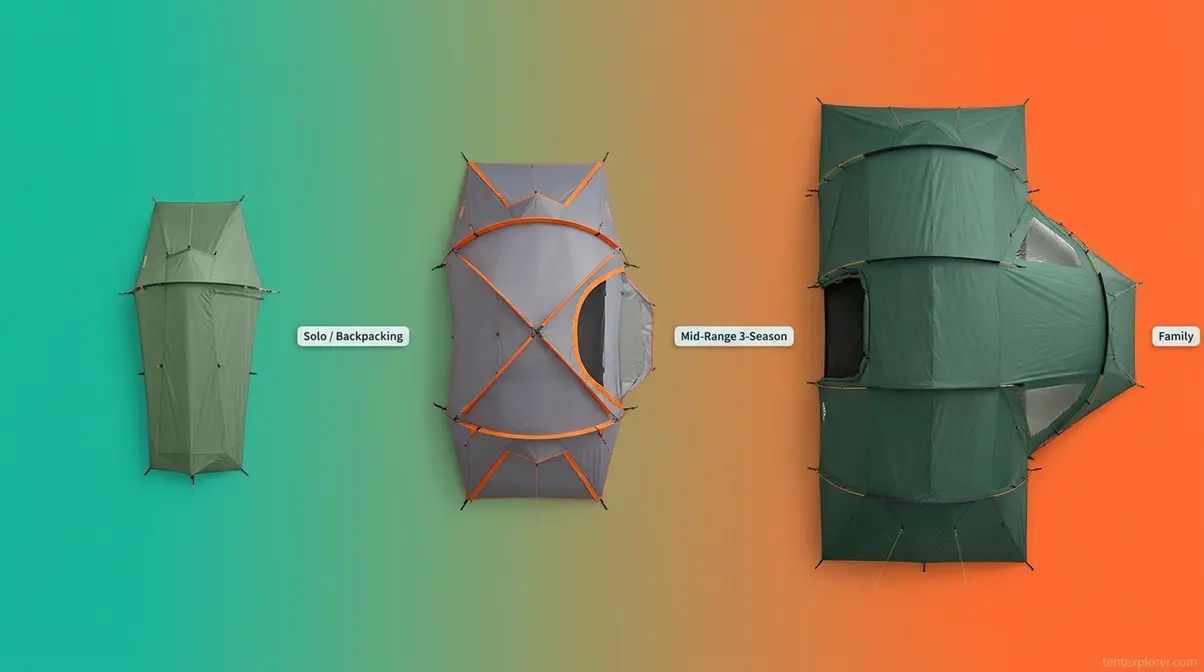
Vango Soul 100 is the standout lightweight tunnel tent for solo backpackers and Duke of Edinburgh expeditions. At 1.82 kg with a 3,000 mm HH rating, it hits a price-to-performance ratio that few competitors match. Its pack size of 50 × 14 cm fits inside most 45-litre packs, and the pitching time of approximately 7 minutes is competitive for a single-arch tunnel design (Outdoor World Direct, 2026). It frequently appears among the best tents for every budget due to its value.
The Soul 100 uses PowerFlex fibreglass poles rather than aluminium — a weight and cost saving that comes with a trade-off in cold-weather durability. Fibreglass poles become brittle below -5°C, so this tent is a 3-season option rather than a winter choice. The vestibule provides useful gear storage space for a pack and boots, keeping the main sleeping compartment clear.
Best for: Solo backpackers, DofE expeditions, festival camping, and anyone prioritising weight and price over all-conditions performance.
Best Family Tunnel Tents
The Vango Farnham 500 is designed specifically for family camping and delivers where it counts: multiple rooms, a large living area with standing headroom, and a 12,000 mm waterproof fabric rating that handles sustained UK rain without complaint. The darkened “lights out” bedrooms are a genuine quality-of-life feature for families camping with young children. Its tension and stability system is engineered for wind resistance without requiring expert guy line technique.
The Farnham’s living area accommodates a camping table and chairs for a group of five — a practical test that many competing family tents fail. For families who camp regularly and want a tent that functions as a temporary home rather than just a shelter, the Farnham represents strong value.
Best for: Families of 4–5, holiday camping, multi-night stays at established campsites with car access. Not recommended for backpacking — the Farnham is a car-camping tent by design and weight.
For families needing extreme-weather capability, the Robens Eagle Rock 5XP steps up significantly: a 5,000 mm HH flysheet, 3,000 mm inner, and 10,000 mm groundsheet (Taunton Leisure, 2026) provide protection that exceeds most family tents. The two-room layout (two bedrooms plus a living room) suits groups of five comfortably. The trade-off is weight — at 20.6 kg, this is firmly a car-camping tent for serious conditions.
Best Tents for Extreme Weather
For genuinely exposed conditions — mountain campsites, coastal headlands, unsheltered moorland — the benchmark shifts. You need aluminium poles (not fibreglass), a minimum 5,000 mm HH flysheet, full seam sealing, and dedicated guy line attachment points at every pole apex.
- What to look for in an extreme-weather tunnel tent:
- Aluminium poles (flex without snapping under sustained load)
- Minimum 5,000 mm HH flysheet with factory-taped seams
- Geodesic or double-arch pole configuration for additional rigidity
- Guy line attachment points at every pole arch apex (minimum 6 points)
- Vestibule large enough to cook in during sustained rain
Ferrino’s wind tunnel programme tests mountaineering tents to 160 km/h — look for brands that publish their testing methodology rather than relying on marketing claims alone (Ferrino wind tunnel testing). For UK three-season use in exposed locations, a tent with a 5,000 mm HH rating and aluminium poles covers the vast majority of conditions you’ll realistically encounter.
Tunnel Tent Maintenance and Long-Term Care
Maintenance is the section no other tunnel tent guide bothers to include — and it’s where most tent damage actually occurs. The failure mode is almost always the same: a tent packed away damp, stored in a stuff sack in a warm garage, and opened six months later to find mould colonies embedded in the flysheet fabric.
As REI’s expert care guide states, making sure your tent is 100% dry before storing is the single most important tent care rule — “damp fabrics grow mildew, giving tents a funky smell and harming the fabric.”
Post-Trip Cleaning and Drying
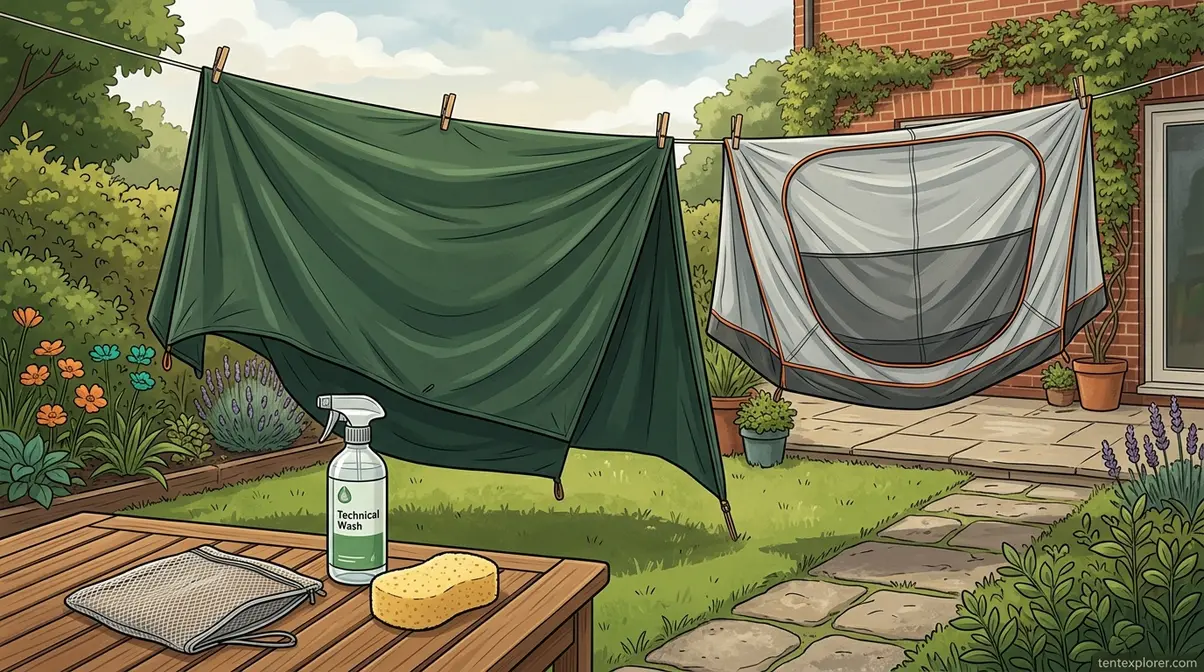
Dry the tent completely before it goes into any bag. If you’re returning from a wet trip, pitch the tent in your garden or drape it over a clothesline as soon as you get home. Do not leave it bundled in the car boot for 48 hours.
5-step post-trip care protocol:
- Shake out debris: Turn the inner tent upside down and shake out dirt, grass, and sand. Use a soft brush for the tent floor — never scrub the DWR (durable water repellent) coating.
- Spot clean with mild solution: Mix lukewarm water with a specialist technical fabric wash (Nikwax Tech Wash or equivalent). Use a sponge — never a scrubbing brush. Avoid detergent, dishwashing liquid, and bleach, which degrade waterproof coatings (MSR Gear Guide, 2026).
- Rinse thoroughly: Residual soap accelerates fabric degradation. Rinse until the water runs clear.
- Air dry completely: Pitch or hang the tent in indirect light. Direct UV exposure degrades nylon and polyester coatings over time. Allow both the flysheet and inner tent to dry separately before packing.
- Check seams: Run a finger along taped seams. Any peeling or lifting requires seam sealer before the next trip; you can master perfect tent seam sealing in 30 minutes with practice.
Re-waterproofing: If water no longer beads off your flysheet but instead spreads and soaks in (known as “wetting out”), the DWR coating needs refreshing. Selecting the best waterproofing spray for tents will restore bead-up performance without affecting breathability. Apply a spray-on DWR treatment (Nikwax TX.Direct Spray-On) to a clean, damp flysheet.
Long-Term Tent Storage Tips
Never store a tent compressed in its stuff sack long-term. The stuff sack is for transport — it compresses pole sleeves, stresses seams, and traps any residual moisture. For storage, roll the tent loosely and keep it in a large mesh or cotton bag that allows airflow.
- Long-term storage checklist:
- Store in a cool, dry, well-ventilated location — a loft or spare room is ideal; a damp shed or heated garage is not
- Keep away from direct sunlight (UV degrades fabric over months)
- Store poles separately, or at least unthreaded from sleeves, to relieve stress on sleeve fabric
- Place a silica gel sachet inside the storage bag if humidity is a concern
- Inspect the tent once mid-season even if not in use — check for mould spots, pole corrosion, and zip function
NEMO Equipment’s storage guidance confirms that mould can begin forming on damp fabric within 24 hours in warm conditions (NEMO Equipment, 2026). Catching it early — a small grey or green spot — means a targeted clean with diluted white vinegar. Catching it late means a degraded flysheet that no longer waterproofs reliably.
When a Tunnel Tent Isn’t the Right Choice
Tunnel tents are excellent shelters — but they’re not the right tool for every situation. Understanding where the design falls short helps you make a better buying decision and avoid the most common performance failures.
Common Setup Pitfalls to Avoid
Pitfall 1 — Crosswind pitching. The most common and most damaging error. Pitching a tunnel tent broadside to the wind turns the large flat sidewall into a sail. In winds above 30 km/h, this creates sufficient lateral load to pull pegs from the ground and bow poles. Always identify wind direction before laying out the inner tent.
Pitfall 2 — Skipping guy lines on calm nights. Wind conditions change overnight. A tent that was calm at 10 pm can be in a full gale by 3 am. Tension all guy lines every time, regardless of forecast. This takes three minutes and prevents the situation of re-pitching in the dark in rain.
Pitfall 3 — Under-pegging on soft ground. Sandy beaches, boggy ground, and loose soil require longer, wider sand pegs or snow pegs. Standard wire pegs pull out of soft ground under minimal load. Carry four sand pegs minimum for the critical rear corner positions.
Pitfall 4 — Packing away damp. As covered in the maintenance section — this is the primary cause of mould, odour, and premature flysheet degradation. If you can’t dry the tent at camp, dry it within 24 hours of arriving home.
Pitfall 5 — Forcing pole sections on cold mornings. Cold fibreglass and aluminium poles are more brittle than at room temperature. Warm pole sections in your sleeping bag or jacket pocket before connecting them in sub-zero conditions. Forcing a cold junction is the most common cause of pole ferrule failure.
When to Choose a Dome Tent Instead
A dome tent is the better choice in three specific scenarios.
Rocky or hard ground: Dome tents are freestanding — they stand without pegs. If you regularly camp on mountain plateaux, scrambling routes, or any surface where getting a peg in is difficult, the freestanding dome design eliminates a significant problem that tunnel tents simply cannot solve.
Unpredictable wind direction: In locations where wind shifts direction frequently — exposed coastal headlands, mountain cols — the dome tent’s omni-directional stability outperforms a tunnel tent that needs repositioning with every wind shift. As Scandinavian Outdoor’s tent buying guide notes, dome tents allow setup without stakes on rocky surfaces — a genuine advantage in alpine environments.
Minimalist solo backpacking: If your priority is the lowest possible pack weight and you’re camping alone for one or two nights, a quality single-wall dome tent at 900 g–1.2 kg beats most tunnel tents on weight. The tunnel tent’s space advantage is less relevant when you’re not carrying cooking kit, spare clothes, and a companion’s gear.
Frequently Asked Questions
How do you use guy lines?
Attach guy lines to all designated points — typically the pole arch apexes and mid-panel points on each long side — and tension each line at a 45-degree angle from the tent body. Remove all slack but avoid over-tensioning, which can distort the flysheet and reduce waterproofing performance. Re-tension after 30 minutes as fabric settles. For winds above 20 m/s (45 mph), NORTENT recommends additional precautions including maximum guy line deployment at all available attachment points (NORTENT of Norway, 2026).
How do you clean a tent floor?
Brush out loose debris, then spot-clean the tent floor with a sponge and lukewarm water mixed with a specialist technical fabric wash. Avoid detergent, bleach, and abrasive brushes — all three degrade the DWR coating and the urethane waterproof layer on the tent floor. Never machine wash or tumble dry. Rinse thoroughly until the water runs clear, then allow to air dry completely before packing. For stubborn mud, allow it to dry fully first — dried mud brushes off far more cleanly than wet mud smeared into the fabric (REI Expert Advice, 2026).
How do you store a tent long term?
Store your tent loosely rolled in a breathable mesh or cotton bag in a cool, dry, well-ventilated room — never compressed in its stuff sack. The stuff sack is designed for transport, not storage. Long-term compression stresses pole sleeves and seam tape, and traps any residual moisture that causes mould. According to NEMO Equipment, mould can begin forming on damp fabric within 24 hours in warm conditions (NEMO Equipment, 2026) — so complete drying before storage is non-negotiable. Inspect once mid-season for mould spots and zip function even if the tent hasn’t been used.
Your Complete Tunnel Tent Masterclass
A tunnel tent’s performance isn’t passive — it’s earned through correct technique. The design’s aerodynamic advantages, generous vestibule space, and superior space-to-weight ratio only activate when you apply the 3-Point Stability System: orient the narrow rear end into the prevailing wind, stake all corners before raising, and tension every guy line. Miss any one of the three and you’re carrying a tent that underperforms in the conditions it was specifically designed to handle.
The 3-Point Stability System also applies to your buying decision. Match your tent’s HH rating to your typical conditions (3,000 mm for regular UK use; 5,000 mm for exposed sites), choose aluminium poles over fibreglass for anything beyond fair-weather camping, and factor in the real-world capacity rule — subtract one from the stated person count for comfortable use. The Vango Soul 100 at 1.82 kg sets the benchmark for lightweight solo use; the Vango Farnham 500 delivers the family camping experience at a realistic price; the Robens Eagle Rock 5XP handles serious weather without compromise.
Your next step in this tunnel tent guide: pitch your tent at home before your first trip. Practise the concertina method in the garden, re-tension the guy lines after 30 minutes, and run through the post-trip drying protocol once before you need it in the field. One practice pitch transforms a 25-minute struggle into a 10-minute routine — and that’s the difference between arriving at camp energised and arriving exhausted before the trip has started. Ready to upgrade? Check out our top recommendations in the buyer’s guide above to find your perfect shelter.
