This blog post may contain affiliate links. As an Amazon Associate I earn from qualifying purchases.
📋 Table of Contents
- What Is a Bell Tent? Structure, Anatomy, and Key Components
- The Anatomy of a Bell Tent: Central Pole, Canvas, and Guy Ropes
- Bell Tent Sizes: From 3m to 7m and What They Fit
- Setting Up a Bell Tent: Is It Really That Easy?
- Bell Tent History, Glamping Uses, and Tent Variations
- From Military Shelter to Modern Glamping: The Sibley Tent Origin
- Bell Tent Types: Classic, ZIG, and Multi-Door Designs
- Bell Tent vs. Yurt: What’s the Real Difference?
- Winter Camping and Hot Tenting in a Bell Tent
- Why Canvas Outperforms Synthetic Tents in Cold Weather
- Hot Tenting: How to Use a Wood-Burning Stove Safely
- Four-Season Bell Tent Tips: Staying Comfortable at -5°C and Below
- Bell Tent Limitations, Safety Considerations, and When to Choose Alternatives
- Common Bell Tent Pitfalls to Avoid
- When a Bell Tent Isn’t the Right Choice
- Wood-Burning Stove Safety: A Critical Disclaimer
- Frequently Asked Questions
- What are the benefits of a bell tent?
- Is a bell tent warmer than a normal tent?
- What is the difference between a yurt and a bell tent?
- Are bell tents easy to erect?
- Can you live in a bell tent in winter?
- Choosing Your Bell Tent: The Canvas Continuum in Practice
A bell tent is the only canvas shelter that transitions seamlessly from a weekend glamping trip to a wood-stove-heated winter retreat — and it’s been doing both since 1856. Most guides will give you a one-paragraph definition and leave you with the same unanswered questions: Is it actually warm in winter? How is it different from a yurt? Can you really set it up alone?
“Simply put, a bell tent is a multipurpose shelter with a single central pole and canvas exterior that is used for camping, glamping, events, and so. much. MORE.” — Life inTents
By the end of this guide, you’ll understand exactly what a bell tent is, how it’s built, whether it can handle winter, and how it stacks up against a yurt — so you can decide if one belongs in your outdoor life. This guide draws on manufacturer specifications, historical archives, outdoor community data, and U.S. EPA safety guidelines to give you answers that no 400-word brand blog currently provides. We’ll cover the anatomy and setup, the history and variations, four-season winter camping, and the key limitations competitors don’t mention.
A bell tent is a conical canvas shelter built around a single central pole — uniquely capable of serving every point on the outdoor living spectrum, from a summer glamping weekend to off-grid winter living. This is what we call The Canvas Continuum.
- Single-pole simplicity: One central pole + tensioned guy ropes = a spacious, standing-height shelter most people can pitch in 10–20 minutes with a partner
- Canvas advantage: Heavy-duty canvas (285–360 GSM) regulates temperature in heat and cold, unlike synthetic alternatives (Bell Tent Boutique, 2026)
- Winter-ready: A stove jack transforms a bell tent into a four-season hot tent capable of surviving temperatures well below freezing
- More space than you expect: A standard 5m bell tent provides approximately 19.6 square metres of floor space — enough for 4–6 adults with room for furniture
- The Canvas Continuum: Bell tents are the only single-pole canvas shelter equally at home at a music festival and in a January snowfield
What Is a Bell Tent? Structure, Anatomy, and Key Components
A bell tent is a circular, conical canvas shelter supported by a single central pole and secured with tensioned guy ropes. Its bell-shaped silhouette creates a standing-height interior — typically 2.5–3m at the peak — with a circular floor plan that maximises usable space. This design makes it significantly more spacious and weather-resistant than most dome tents at a comparable price point.
The geometry is the key insight here. A conical shape deflects wind loads radially rather than absorbing them laterally — the same principle that makes a tepee stable in a storm. No amount of extra canvas weight achieves what the shape itself delivers, which is why a well-tensioned bell tent can handle conditions that would buckle a dome tent of equivalent size. A standard 5m bell tent provides approximately 19.6 square metres of circular floor space — enough standing-height interior for 4–6 adults plus furniture, in a shelter that two people can pitch in 10–15 minutes (Bell Tent Sussex, 2026).
The worldwide camping market continues to grow at a steady annual rate through the mid-2020s, reflecting rising consumer interest in outdoor experiences (Statista camping market forecast, 2024) — and the bell tent sits at the premium end of that growing market.
The Anatomy of a Bell Tent: Central Pole, Canvas, and Guy Ropes
Before shopping for a bell tent, it helps to understand exactly how one holds together. Every component plays a specific structural role — and knowing what each part does will make setup faster and troubleshooting easier.
The diagram below labels each of these components on a cross-section of a standard 5m bell tent.
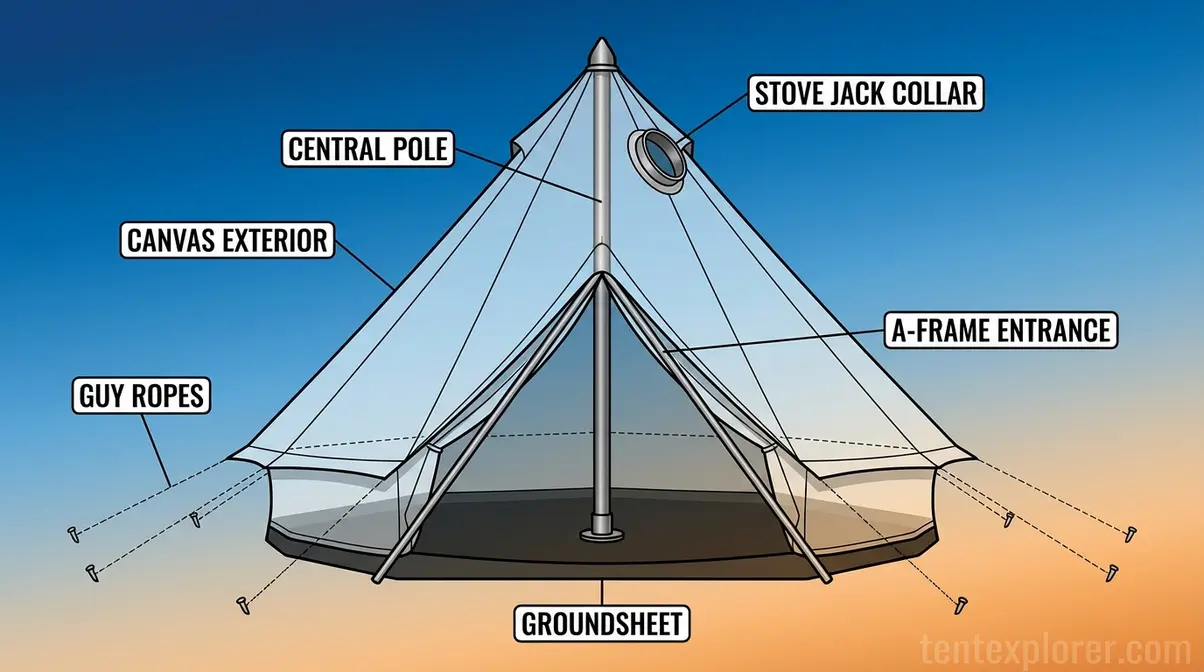
Caption: A labelled cross-section of a standard 5m bell tent, showing the six core structural components that work together to create a standing-height, weather-resistant shelter.
The central pole is the tent’s defining feature — typically 2.5–3m in height, made from aluminium or hardwood, inserted into a reinforced socket at the tent’s crown. This single pole creates both the standing height and the conical shape. Some premium models, such as the Sibley 500 from Canvas Camp, use a tripod base rather than a ground spike, allowing pitch on hard surfaces like wooden decking.
The A-frame entrance consists of two poles forming a triangular arch at the door. Without it, the entrance would collapse inward under canvas tension. The A-frame is what allows the door to function properly — and it’s the first thing you’ll assemble during setup.
The canvas exterior is where most of the tent’s performance lives. Canvas in this context means a tightly woven cotton or polycotton fabric engineered for breathability, thermal retention, and durability. Polycotton is a cotton-polyester blend that offers lighter weight and better mildew resistance compared to 100% cotton. The weight and density of canvas is measured in GSM — grams per square metre. Quality bell tent canvas typically runs 285–360 GSM (Bell Tent Boutique, 2026): 285 GSM suits most recreational campers, while 360 GSM is the choice for frequent use, harsher conditions, or commercial glamping operations. For a deeper look at how canvas compares to nylon and polyester, see our guide to canvas and other tent materials.
The guy ropes are external tensioned lines staked into the ground at angles around the perimeter. They distribute wind load away from the central pole and keep the canvas drum-tight. Proper guy rope tension is what separates a weatherproof bell tent from a sagging, leaking one.
The groundsheet is the circular floor, either sewn-in or separate. A ZIG — short for Zipped-In Groundsheet — is the variant where the floor is permanently attached to the canvas walls via a zip, creating a sealed perimeter against insects, draught, and moisture.
The stove jack is an optional but increasingly common feature: a heat-resistant metal collar integrated into the canvas roof or sidewall through which a stovepipe from a wood-burning stove safely exits. Not all bell tents include one as standard — if winter use is a priority, verify before purchasing. Full coverage of hot tenting follows in H2 #3.
Bell Tent Sizes: From 3m to 7m and What They Fit
Bell tents are shaped like an inverted cone — or, as the name suggests, a bell — and that conical geometry means floor area scales quickly with diameter. Here’s a practical reference for matching tent size to your real-world use case:
| Diameter | Approx. Floor Area | Sleeping Capacity | Best For |
|---|---|---|---|
| 3m | ~7 sq m | 1–2 adults | Solo glamping, events, pop-up bars |
| 4m | ~12.5 sq m | 2–3 adults | Couples, short-break glamping |
| 5m | ~19.6 sq m | 4–6 adults | Family camping, glamping businesses |
| 6m | ~28 sq m | 6–8 adults | Large families, commercial hire |
| 7m | ~38.5 sq m | 8–10 adults | Events, permanent glamping sites |
Floor areas derived from π×r²; sleeping capacities cross-referenced against manufacturer specifications from White Duck Outdoors and Stout Tent.
Two things worth noting before you choose. First, capacity figures assume sleeping bags on the floor. When you furnish with camp beds, a rug, a central stove, and a side table — the full glamping setup — effective capacity drops by one or two people. Second, the 5m bell tent is the most popular size for families and glamping operators. If you’re unsure, start there.
If you’re already thinking about which specific size suits your needs, our guide to the top bell tent options for glamping covers the leading models in detail.
The size you choose affects setup time and effort — but even the largest 7m models are designed to be pitched by one or two people.
Setting Up a Bell Tent: Is It Really That Easy?
Yes — bell tents are genuinely easy to set up. With two people and some practice, most 5m models go up in 10–15 minutes (Bell Tent Sussex, 2026). Here’s the standard process:
- Lay the canvas flat on the ground, canvas-side down, with the door facing your preferred direction.
- Peg out the groundsheet perimeter using all provided stakes, keeping the shape circular and taut. Not sure whether to use a separate footprint under your groundsheet? Our guide on the importance of a tent footprint or groundsheet explains when it’s worth the extra layer.
- Thread the A-frame poles through the door sleeve and connect at the apex.
- Insert the central pole through the crown socket from inside the tent.
- Lift the central pole upright — the canvas will rise into its conical shape.
- Tension all external guy ropes, adjusting until the canvas is drum-tight with no sagging panels.
Solo setup is possible but takes longer. Having a second person hold the pole upright while you tension the guys saves significant time and frustration. First-time setup typically takes 30–45 minutes as you learn the peg pattern and guy rope sequence. By the third setup, most campers are comfortably under 20 minutes. The learning curve is shallow — and the reward is a shelter that feels more like a room than a tent.
With the fundamentals clear, let’s look at where the bell tent comes from — and why its military origins make it a surprisingly capable four-season shelter.
Bell Tent History, Glamping Uses, and Tent Variations
The bell tent’s design is not a modern invention — it has been refined over 170 years of military and civilian use. Understanding where it came from explains why it’s built the way it is, and why certain variants suit certain campers better than others. Today, bell tents are central to the glamping industry — but they started as a solution to a very different problem.
From Military Shelter to Modern Glamping: The Sibley Tent Origin
The Sibley tent, patented in 1856, could shelter 12 soldiers and featured an integrated stove — making today’s bell tent a direct descendant of 170-year-old hot-tenting technology (Hagley Museum and Library).
Henry Hopkins Sibley patented the Sibley tent in 1856, modelling its conical design on Comanche lodges he had observed while stationed at Fort Belknap in the American Southwest. The conical structure — about 12 feet high with a central smoke hole and perimeter pegs — allowed a fire to be lit inside the shelter (Texas State Historical Association). The U.S. Army produced nearly 44,000 Sibley tents during the Civil War era, prizing the design for its efficiency: one tent, one central pole, one stove, 12 men.
This is the same structural logic that makes modern bell tents popular for glamping — maximum interior space from minimum structural complexity. The Sibley tent’s original design — canvas, conical, stove-compatible — is exactly what places the modern bell tent at the heart of The Canvas Continuum. The term “bell tent” describes the shape (the bell-like silhouette when erected) and is used interchangeably with “Sibley-style tent” across outdoor communities.
By the 2010s, the bell tent had transitioned from military surplus to glamping icon. According to a 2023 Statista survey, nearly 30 percent of North American glampers preferred cabin accommodation, while tents remained a highly popular alternative (2023 Statista glamping survey, Statista, 2023) — a market position the bell tent occupies at the premium end.
The Sibley tent’s core design — single pole, canvas, stove-compatible — has remained essentially unchanged. What has changed is the range of variants available to modern campers.
Bell Tent Types: Classic, ZIG, and Multi-Door Designs
Understanding the three main bell tent variants helps you make a smarter purchase decision before you ever open a product page.
- Classic Bell Tent: Separate groundsheet that pegs to the base of the canvas. More versatile — you can remove the groundsheet for ventilation or pitch directly on grass — but requires more care to prevent moisture ingress at the seam.
- ZIG (Zipped-In Groundsheet): The floor is permanently attached to the canvas walls via a zip, creating a sealed perimeter. Better insect and draught protection; popular for family camping. The trade-off: harder to dry the canvas completely after wet weather because the floor cannot be detached for separate drying.
- Multi-Door Bell Tent: Models with two to four doors (available from several boutique manufacturers in 5m configurations). Improved cross-ventilation in summer and multiple entry points for larger groups or commercial glamping setups.
Some premium models — such as the Sibley 500 from Canvas Camp — offer a centre-pole tripod base rather than a ground spike, allowing pitch on wooden decking or other hard surfaces where driving a stake is impractical.
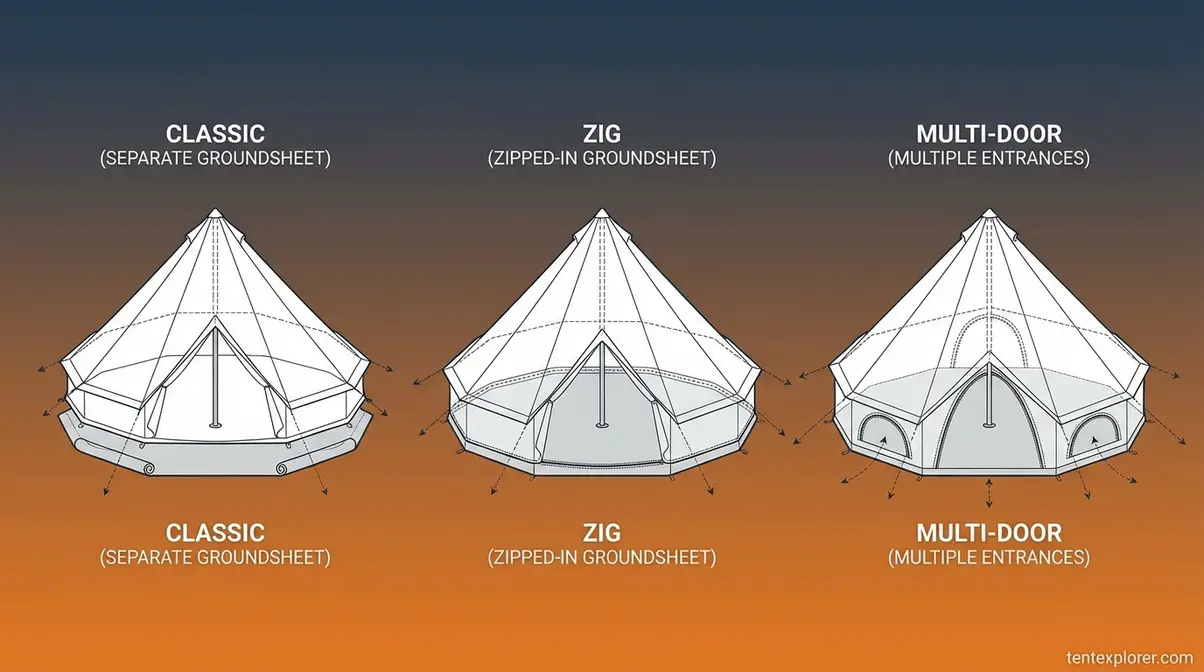
Caption: The three main bell tent variants differ primarily in groundsheet attachment and door configuration — each suited to different camping styles and conditions.
For a curated list of the best models across each of these types, see our guide to the top bell tent options for glamping.
Understanding the variants helps with purchasing decisions — but before you buy, there’s one comparison that comes up constantly: bell tent or yurt?
Bell Tent vs. Yurt: What’s the Real Difference?
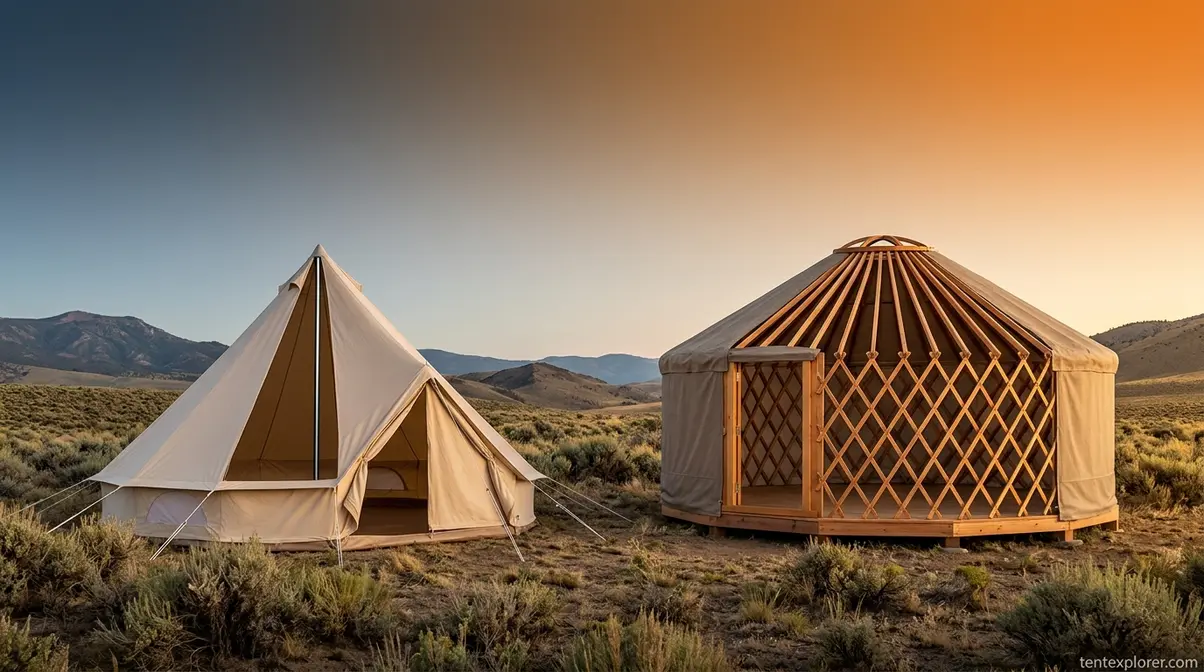
A yurt is a circular, semi-permanent dwelling traditionally made from a wooden lattice framework — called a “khana” — covered in felt or canvas, originally used by nomadic communities across Central Asia. The roof is supported by a central ring called a “toono,” creating a distinctive domed profile quite different from the bell tent’s conical peak (Architecture in Development; Creative Matters).
Here’s how the two shelters compare across the criteria that matter most:
| Feature | Bell Tent | Yurt |
|---|---|---|
| Structure | Single central pole + tensioned canvas | Wooden lattice wall + roof ring + rafters |
| Setup Time | 10–45 minutes (1–2 people) | Several hours (4–6 people minimum) |
| Portability | Highly portable — packs into a bag (~15–20 kg for a 5m model) | Heavy and bulky — semi-permanent installation |
| Ground Requirement | Any flat or gently sloping ground | Requires a solid, level base (often a platform) |
| Insulation | Good (canvas, especially with stove) | Excellent (thick felt + wood walls) |
| Cost | £300–£1,500 for quality models | £2,000–£10,000+ for a complete setup |
| Best For | Portable glamping, camping, festivals | Permanent or semi-permanent glamping sites |
The fundamental difference is portability versus permanence. A bell tent is a canvas shelter you take to the outdoors; a yurt is an outdoor structure you build in one place. A bell tent can also be pitched on uneven ground with minor peg adjustment — something a yurt’s platform base simply cannot accommodate. If you want to move your shelter between sites, a bell tent wins every time.
Traditional yurts rely on a wooden lattice wall and central roof ring — a construction method documented by architectural historians as one of the most durable nomadic dwelling designs in human history (Creative Matters, Australian Educational Institution). That durability comes at the cost of mobility, which is precisely the trade-off the bell tent was designed to avoid.
The comparison makes it clear: a bell tent is a portable canvas home. But how portable is it when the temperature drops below zero?
Winter Camping and Hot Tenting in a Bell Tent
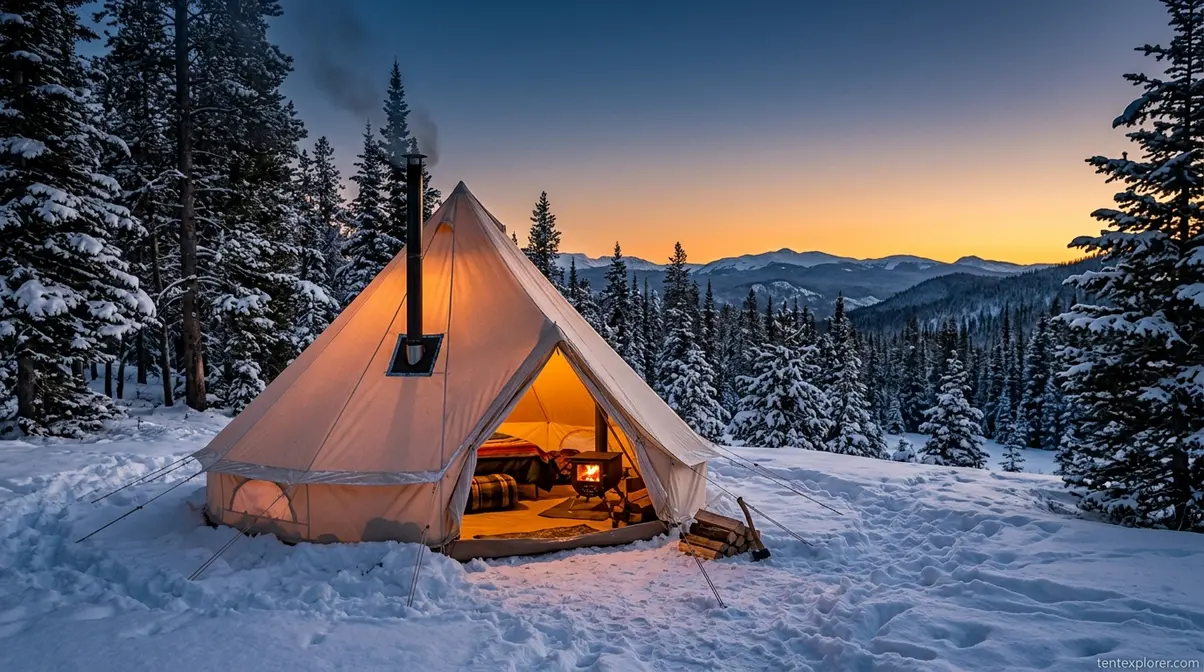
A bell tent is significantly warmer than a standard synthetic tent — and with the right equipment, it’s capable of comfortable habitation through a full winter. The key lies in two factors: the thermal properties of canvas, and the option to install a wood-burning stove via a heat-resistant stove jack. Here’s what you need to know before attempting four-season bell tenting.
This is where The Canvas Continuum becomes most apparent — a bell tent with a stove jack is not just a warmer tent; it’s a fundamentally different category of shelter.
Why Canvas Outperforms Synthetic Tents in Cold Weather
Canvas outperforms synthetic materials in cold weather for two distinct reasons — and understanding both helps you make smarter decisions about insulation, ventilation, and stove use.
Thermal mass is the first factor. Canvas at 285–360 GSM is substantially heavier than a standard nylon tent, which typically runs around 70 GSM. That extra mass means canvas absorbs and holds ambient heat rather than allowing it to radiate outward the moment the stove cools. A polycotton canvas at 285 GSM retains warmth measurably better than a nylon tent of equivalent floor area — the difference becomes most apparent at temperatures below 5°C, when the thermal mass advantage compounds with each degree of drop.
Breathability and condensation management is the second, and arguably more important, factor. Canvas breathes: moisture from occupants’ breath and body heat passes through the fabric rather than condensing on the inner surface and freezing. Synthetic tents trap this moisture inside, creating an icy interior layer that actively cools the tent from within. Across canvas tent communities, this is consistently cited as the single most important material distinction for cold-weather camping — not insulation alone, but moisture management.
Polycotton — typically a 60/40 cotton-polyester blend — is lighter than 100% cotton canvas while retaining approximately 80–90% of its thermal and breathability benefits. For campers who need canvas-quality performance at lower carry weight, polycotton is the practical choice.
Here’s how the three main canvas materials compare on the criteria that matter for cold weather:
| Material | Breathability | Thermal Retention | Weight | Mildew Resistance |
|---|---|---|---|---|
| 100% Cotton Canvas (360 GSM) | Excellent | Excellent | Heavy | Moderate |
| Polycotton (285 GSM) | Very Good | Very Good | Medium | Good |
| Nylon (~70 GSM) | Poor | Poor | Light | Excellent |
Understanding why canvas keeps you warm sets the stage for the most important skill in winter bell tenting: using a wood-burning stove safely.
Hot Tenting: How to Use a Wood-Burning Stove Safely
Hot tenting is the practice of camping with a wood-burning stove installed inside the tent via a stove jack — a heat-resistant metal collar built into the canvas roof or sidewall through which the stovepipe safely exits. Not all bell tents come with a stove jack pre-installed; verify before purchasing if winter use is a priority.
The stovepipe exits through the stove jack collar, carrying combustion gases outside the tent. The collar withstands the heat differential between the stovepipe surface and the surrounding canvas — preventing ignition while maintaining a weatherproof seal around the pipe exit point.
For hot tenting to be safe, the wood stove must meet current EPA emission standards. In 2020, the EPA lowered the particulate matter emission limit for new room heaters to 2.0 grams per hour when tested with crib wood, or 2.5 grams per hour with cord wood (U.S. EPA, Certified Wood Stoves, 2020). Choosing an EPA-certified stove is not just a regulatory consideration — certified stoves burn cleaner and more efficiently, which directly reduces carbon monoxide risk inside a tent.
Experienced hot-tenters report needing to reload the stove every 2–3 hours at temperatures around -5°C, depending on stove size, wood species, and how well the tent is sealed. Canvas tent communities consistently recommend keeping a headlamp and a small firewood reserve inside the tent so overnight restocking doesn’t require fumbling in the dark.
Numbered Safety Protocol:
- Verify your bell tent has a manufacturer-installed stove jack with a rated heat collar — do NOT improvise with a hole cut in the canvas.
- Use only an EPA-certified wood stove sized appropriately for your tent volume. A 5m bell tent typically suits a small-to-medium stove in the 4–6kW output range.
- Position the stove at least 60–90cm from the canvas walls, on a fireproof base mat.
- Install a carbon monoxide detector inside the tent at head height, approximately 1m from the stove, before lighting. This is non-negotiable.
- Ensure adequate ventilation — crack the door or use the tent’s ventilation flaps. A completely sealed tent with a burning stove is a carbon monoxide risk, even with a stovepipe exit.
- Never leave a lit stove unattended for extended periods, and never use accelerants to start or boost the fire.
- Clean ash from the stove before each new fire, and clear the flue/chimney every two to three days to prevent creosote buildup and restricted airflow.
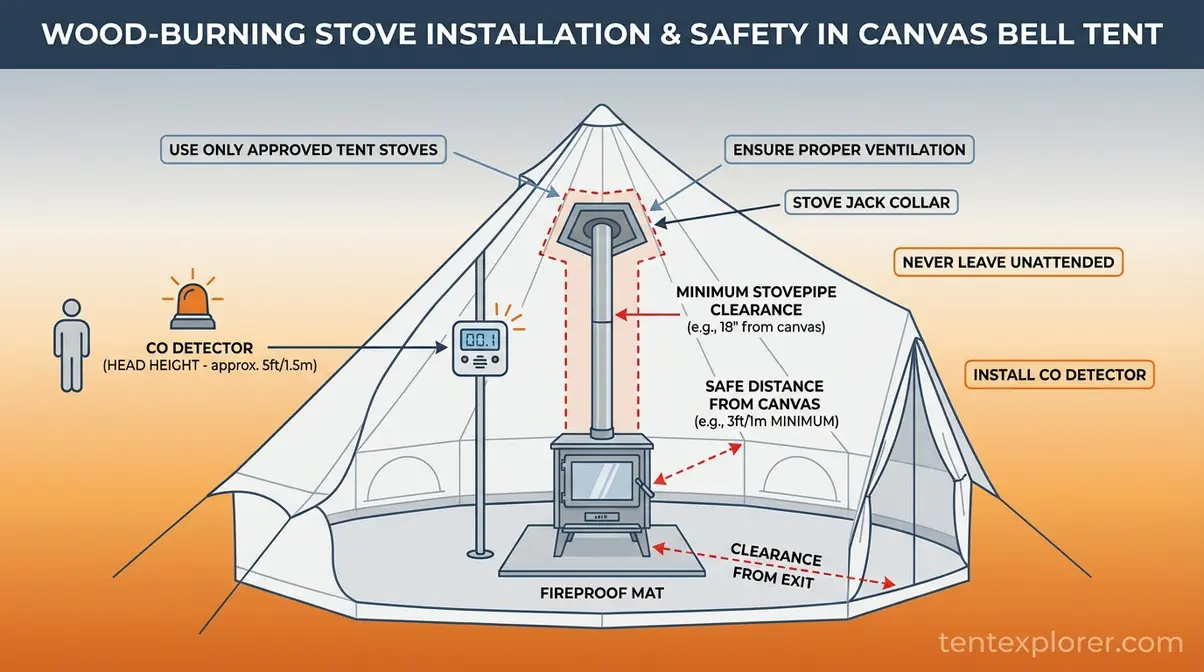
Caption: Correct stove jack installation — including CO detector position and minimum clearance distances — is the foundation of safe hot tenting in a bell tent.
Four-Season Bell Tent Tips: Staying Comfortable at -5°C and Below
Getting through a winter night in a bell tent comfortably comes down to preparation, not just equipment. Our evaluation of four-season canvas tent setups, drawing on manufacturer guidance and outdoor community practices, identifies these as the highest-impact adjustments:
- Layer the floor. A fitted carpet or thick rug across the groundsheet provides significant insulation from cold ground — more effective, per unit of weight, than adding another layer of bedding.
- Use a polycotton inner liner. Some manufacturers offer inner tent liners that create a second air gap between the canvas and the sleeping area, noticeably reducing condensation on cold nights.
- Manage ventilation actively. Counter-intuitively, a slightly open vent is warmer than a fully sealed tent — trapped moisture from breath condenses and cools the interior faster than a small ventilation gap loses heat.
- Bank the stove before sleeping. Load with dense hardwood (oak, ash, or beech) before turning in. Hardwoods burn longer and more consistently than softwoods, reducing the frequency of overnight restocking at sub-zero temperatures.
- Protect guy ropes from snow load. In heavy snowfall, check guy rope tension every few hours. Snow accumulation on the canvas changes the load distribution and can cause the central pole to shift if pegs are not fully driven.
For a comprehensive guide to the best setups for cold-weather use, see our guide to the best hot tents with stove jacks.
Bell Tent Limitations, Safety Considerations, and When to Choose Alternatives
Every shelter has trade-offs, and honest coverage of those trade-offs is what separates a useful guide from a marketing brochure. Bell tents are excellent at many things — but they are not the right choice for every camper or every situation.
Common Bell Tent Pitfalls to Avoid
Weight and bulk catch first-time buyers off guard. A quality 5m cotton canvas bell tent weighs 15–20 kg when packed — manageable for car camping but impractical for any trip involving more than a short carry from a vehicle. Polycotton models reduce this somewhat, but canvas will never compete with nylon on weight.
Drying after wet weather is a recurring frustration, particularly with ZIG models where the groundsheet cannot be detached. Canvas must be dried fully before storage or mould develops within days. In sustained wet weather, this can mean pitching the tent at home just to dry it after a trip.
UV degradation affects untreated cotton canvas over time. Direct, prolonged sunlight breaks down cotton fibres faster than most buyers expect. A UV-resistant treatment or reproofing spray applied annually extends canvas life significantly — but this is a maintenance commitment that nylon tents don’t require.
Peg dependency means bell tents cannot be pitched on solid rock, concrete, or frozen ground without specialist anchoring. The entire tensioning system relies on pegs driven into earth. In winter conditions, frozen ground can make standard pegging difficult — carry longer, heavier-gauge pegs for cold-weather use.
When a Bell Tent Isn’t the Right Choice
Backpacking or multi-day hiking — if you’re carrying your shelter more than a few hundred metres, a bell tent is the wrong tool. The weight-to-performance ratio is designed for car camping and glamping, not trail use. A lightweight nylon shelter will serve you far better.
Permanent, year-round fixed installation — if you need a structure that stays up through multiple winters without maintenance, a yurt or a purpose-built glamping pod is a more durable investment. Bell tents are designed to be erected and packed away; extended static use without periodic reproofing shortens canvas life considerably.
High-altitude alpine conditions — in environments with sustained high winds, heavy snow loads, and temperatures well below -10°C, a bell tent’s single-pole design reaches its structural limits. Specialist mountaineering tents with geodesic multi-pole systems are engineered for those conditions.
Wood-Burning Stove Safety: A Critical Disclaimer
Using a wood-burning stove inside any tent — including a canvas bell tent — carries genuine risks that must be understood before you attempt hot tenting. Carbon monoxide (CO) poisoning is a life-threatening risk in any enclosed space with combustion. Canvas is not fireproof; it is fire-resistant when treated, but direct contact with a stovepipe or ember will ignite it.
The following are non-negotiable safety requirements, not optional precautions:
- Never use a stove inside a tent without a certified stove jack. Improvised holes in canvas are a fire hazard.
- Never sleep with the stove running without a functioning CO detector. CO is colourless and odourless — you will not detect it without a sensor.
- Never use a camping gas stove, charcoal grill, or any non-wood combustion device as a heat source inside a bell tent. These produce CO at rates that are dangerous in enclosed spaces within minutes.
- Ensure at least one ventilation opening is maintained at all times when the stove is lit.
The EPA’s certified wood stoves guidance provides the most current emission standards and a searchable database of certified models. Consult it before purchasing a stove for tent use.
Frequently Asked Questions
What are the benefits of a bell tent?
Bell tents offer a combination of spaciousness, durability, and thermal performance that synthetic tents cannot match at comparable price points. Canvas at 285–360 GSM breathes naturally, regulating interior temperature in both heat and cold. The conical single-pole design creates a standing-height interior — typically 2.5–3m at the peak — with a circular floor plan that eliminates the dead corner space found in dome and tunnel tents. For glamping, the aesthetic appeal is significant: bell tents photograph well, feel genuinely comfortable, and can be furnished like a room. They also last far longer than nylon tents when properly maintained and reproofed annually.
Is a bell tent warmer than a normal tent?
Yes — a canvas bell tent is meaningfully warmer than a standard synthetic tent, for two structural reasons. First, canvas at 285–360 GSM has greater thermal mass than nylon (~70 GSM), absorbing and retaining ambient heat rather than allowing it to radiate outward immediately. Second, canvas breathes, allowing moisture from occupants to escape rather than condensing on the inner surface and freezing. This condensation management is the single most important cold-weather distinction between canvas and synthetic. With a wood-burning stove installed via a stove jack, a bell tent becomes a four-season hot tent capable of maintaining comfortable temperatures at -5°C and below.
What is the difference between a yurt and a bell tent?
The fundamental difference is portability versus permanence. A bell tent is a conical canvas shelter supported by a single central pole — highly portable, packing to around 15–20 kg for a 5m model, and pitchable by two people in under 45 minutes on any flat or gently sloping ground. A yurt is a circular semi-permanent dwelling built from a wooden lattice framework and felt covering, requiring a solid level base, multiple people for assembly, and several hours of construction time. A quality bell tent costs £300–£1,500; a complete yurt setup typically runs £2,000–£10,000+. For portable glamping and festivals, a bell tent is the clear choice. For a fixed glamping site installation, a yurt offers superior insulation.
Are bell tents easy to erect?
Yes — bell tents are among the simpler large-format tents to pitch. The single-pole system means there are no complex pole configurations to navigate. With two people and some experience, a 5m bell tent goes up in 10–15 minutes (Bell Tent Sussex, 2026). The process follows a logical sequence: peg out the groundsheet, assemble the A-frame entrance, insert and raise the central pole, then tension the guy ropes. First-time setup takes 30–45 minutes as you learn the peg pattern. Solo pitching is possible but slower — a second person holding the pole upright while you tension the guys saves meaningful time on every setup.
Can you live in a bell tent in winter?
Yes, but with the right equipment and precautions, not as a casual experiment. Canvas at 285–360 GSM provides genuine insulation and condensation management. A manufacturer-installed stove jack allows a certified wood-burning stove to heat the interior safely. Experienced hot-tenters report maintaining comfortable temperatures at -5°C with a small-to-medium stove (4–6kW), restocking every 2–3 hours overnight. The non-negotiable requirements are: an EPA-certified stove (2.0 g/hr particulate matter limit, U.S. EPA, 2020), a carbon monoxide detector at head height, at least one ventilation opening maintained at all times, and a fireproof mat under the stove. With those in place, a well-equipped bell tent is a genuinely livable winter shelter.
Choosing Your Bell Tent: The Canvas Continuum in Practice
The bell tent has earned its place in the outdoor world not through marketing, but through 170 years of structural logic. Canvas at 285–360 GSM breathes, insulates, and endures in ways that nylon simply cannot replicate. A single central pole and tensioned guy ropes create a standing-height shelter with 19.6 square metres of usable floor space — pitchable by two people in under 20 minutes. That combination of simplicity, performance, and adaptability is what we mean by The Canvas Continuum: the principle that a bell tent is the only single-pole canvas shelter capable of serving every point on the outdoor living spectrum, from a weekend festival to a January snowfield with a stove running through the night.
The decision framework is straightforward. If you need portable glamping with real weather protection and the option for four-season use, a bell tent is the right tool. If you need a permanent installation with maximum insulation and don’t require portability, a yurt or glamping pod serves you better. If you need something you can carry on your back, neither canvas option is appropriate.
Start with a 5m model — the most versatile size for families, couples, and glamping operators alike. If hot tenting is on your agenda, confirm the stove jack specification before purchasing and invest in an EPA-certified stove from day one. Your first setup will take longer than the manufacturer suggests; your third will feel effortless. Visit our guide to the best hot tents with stove jacks to compare the top models currently available, and see our full top bell tent options for glamping guide for size-by-size recommendations across every budget.
