This blog post may contain affiliate links. As an Amazon Associate I earn from qualifying purchases.
📋 Table of Contents
- Campfire Prerequisites
- Step 1: Check Regulations and Choose a Safe Site
- Check Local Fire Regulations and Burn Bans
- How to Choose a Safe Campfire Location
- The 15-Foot Safety Clearance Zone
- Step 2: Gather Your Materials
- Tinder, Kindling, and Fuel Wood: What Each Does
- Essential Tools and Supplies to Bring
- How to Source and Store Firewood Responsibly
- Step 3: Build Your Campfire
- The Teepee Method (Best for Beginners)
- The Log Cabin Method
- The Lean-To Method
- How to Light Your Fire Safely
- Step 4: Maintain and Extinguish Your Fire Safely
- Managing a Live Campfire: What to Watch For
- The Drown, Stir, Feel Extinguishing Method
- Are you supposed to put water on a campfire?
- The 30/30/30 Weather Rule Explained
- Step 5: Alternative Fire-Starting Methods
- Flint and Steel: Reliable Backup Ignition
- Friction-Based Methods: The Bow Drill
- Safe and Dangerous DIY Fire Starters
- Does Vaseline work as a fire starter?
- Mistakes, Health Risks, and Skipping the Fire
- The Most Common Campfire-Starting Mistakes
- Campfire Smoke and Asthma: What You Need to Know
- When to Skip the Campfire Entirely
- Frequently Asked Questions
- What is the proper way to start a campfire?
- Are campfires bad for asthma?
- What are common fire-starting mistakes?
- What is the best wood for a campfire?
- What are the 3 P’s of fire?
- How long is air toxic after a fire?
- What is the 30/30/30 rule for fire?
- How do you keep a campfire burning?
- Building Confident Fires, Every Time
⚠️ Before You Build Any Fire: Always check your local fire regulations and current burn ban status before building a campfire. Regulations vary by location and season. Visit readyforwildfire.org or contact your local ranger station to confirm fires are permitted at your site. Violating fire restrictions can result in fines and criminal liability.
Every year, improperly extinguished campfires and unattended flames are among the leading causes of preventable wildfires in the United States, according to the US Forest Service. Most beginners focus entirely on getting the fire started — but the real danger lies in what happens after the flames die down. One overlooked ember, one gust of wind, one fire left “almost out” can escalate into a disaster that costs lives and destroys thousands of acres.
This guide will show you exactly how to start a campfire safely — from choosing the right spot to ensuring every ember is cold before you leave. At TentExplorer, our outdoor team has evaluated campfire safety protocols against official US Forest Service and National Park Service (NPS) guidelines, cross-referencing them with EPA health advisories and Penn State Extension wilderness recommendations. We cover five essential steps, three fire-lay methods, alternative fire-starting techniques, and the health risks most guides ignore — all backed by Tier 1 sources.
Learning how to start a campfire safely means following three phases — checking regulations, building the fire correctly, and extinguishing it completely — a framework we call The Safe Fire Triangle.
- Check first: Always verify local burn bans before lighting any fire
- Clear 10 feet: Remove all debris in a 10-foot radius around your fire ring (Penn State Extension)
- Use the Drown, Stir, Feel method: If the ash is too hot to touch, the fire is not out
- Know the 30/30/30 rule: High temp + low humidity + high winds = skip the campfire
- Wood smoke is a health hazard: PM2.5 particles in campfire smoke can trigger asthma attacks (EPA)
Campfire Prerequisites
Estimated Time: 15-30 minutes
- Tools and Materials Needed:
- Tinder (dry leaves, paper, or commercial starters)
- Kindling (pencil-width sticks)
- Dry, seasoned fuel wood
- Waterproof matches or a lighter
- A bucket with at least 1 gallon of water
- A camp shovel or sturdy stick
Step 1: Check Regulations and Choose a Safe Site
Starting a campfire safely begins before you ever touch a match. The single most important action any beginner can take is confirming that fires are legal at their specific location on their specific date — then selecting a spot that keeps fire contained. Skipping this step is how preventable wildfires start. For broader outdoor preparation, review our essential tent camping safety tips.
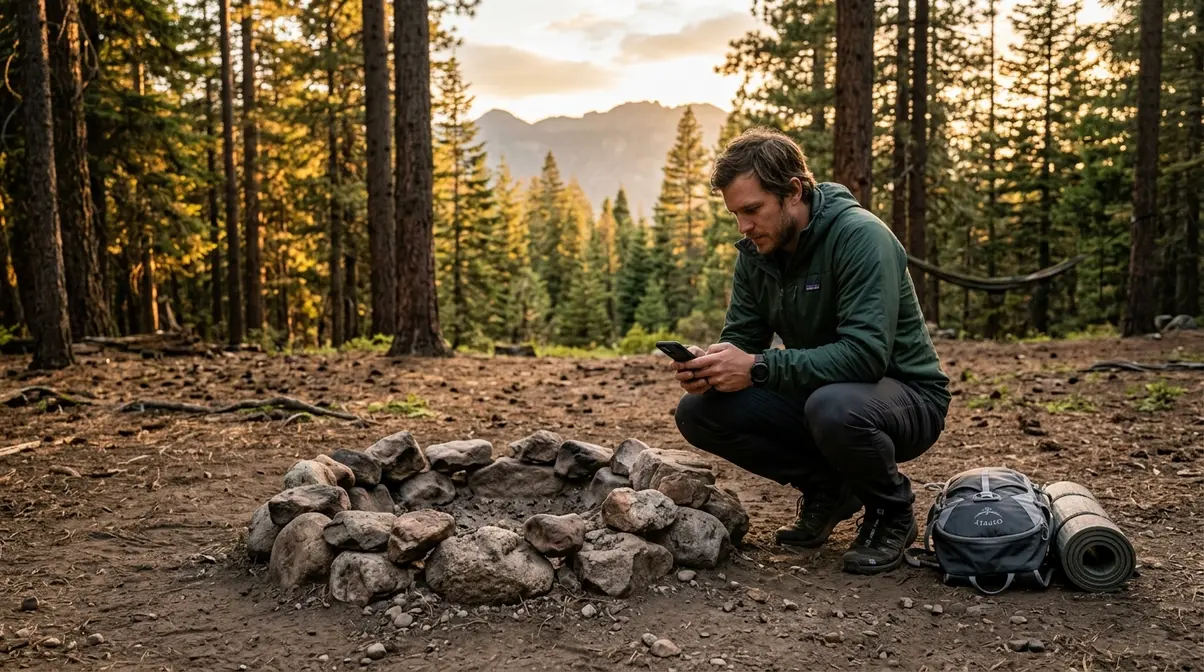
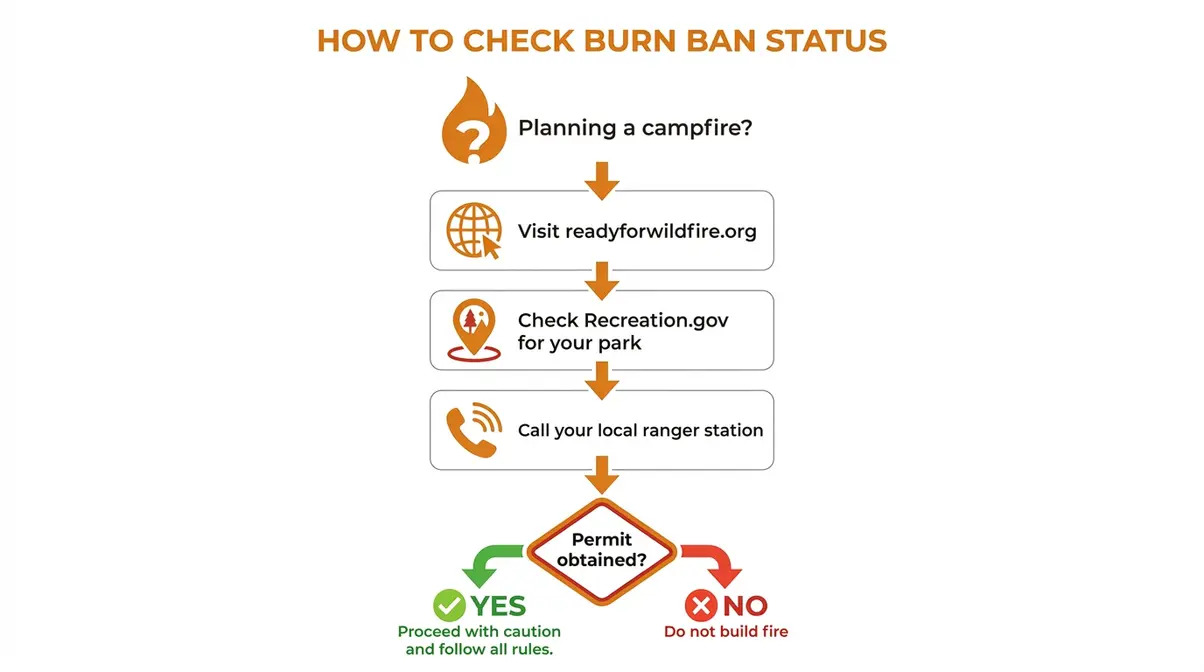
Check Local Fire Regulations and Burn Bans
Fire rules change constantly. A site that allowed campfires last month may be under a complete burn ban today due to drought, wind, or fire danger ratings. Checking takes under five minutes and is non-negotiable.
How to check your specific location:
- Visit readyforwildfire.org — California residents and visitors can find current restrictions by county and fire agency zone.
- Search your national forest or park at the Recreation.gov park listings — each park listing includes current fire alerts and permit requirements.
- Call your local ranger station directly — rangers can confirm whether a campfire permit is required and where designated fire rings are located.
- Check your state’s fire agency website — most states publish real-time fire restriction maps (e.g., CAL FIRE’s interactive map at fire.ca.gov).
A campfire permit is required in many national forests even when fire restrictions are not in effect. These permits are typically free and available online or at ranger stations. Failing to obtain one can result in fines — and more importantly, it means you haven’t been briefed on site-specific rules.
Why this matters: Fire restrictions exist because dry, windy conditions can turn a contained campfire into a fast-moving wildfire within minutes. Regulations are your first line of defense, not a bureaucratic formality.
How to Choose a Safe Campfire Location
Once you know fires are permitted, choose your site carefully. The National Park Service recommends using existing fire rings or designated fire pits whenever they are available — never building a new fire scar on bare ground unless you are in a primitive wilderness area with no existing rings.
Site selection checklist:
- Use an established fire ring or fire pit — these are placed intentionally in low-risk spots.
- Choose bare dirt or rock — never build a fire on grass, pine needles, or leaf litter.
- Stay away from overhanging branches — look up and confirm no limbs hang within 15 feet above the fire.
- Check the wind direction — position yourself so smoke blows away from your tent and sleeping area.
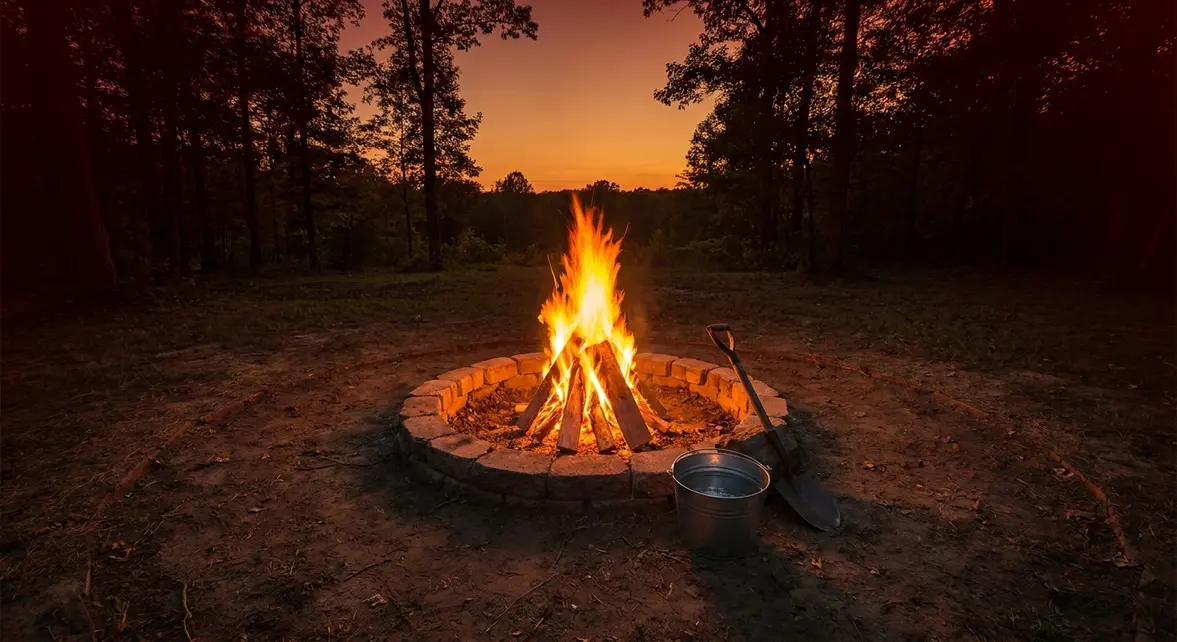
- Keep water nearby — a full bucket of water (at least one gallon) and a shovel should be within arm’s reach before you light anything.
If no fire ring exists and you must build a ground fire (such as in a backcountry setting), scrape a circle of bare dirt at least 10 inches deep and 24 inches wide, removing all organic material down to mineral soil.
The 15-Foot Safety Clearance Zone
The US Forest Service and Penn State Extension both specify a 15-foot clearance radius around any campfire. This means no overhanging branches, no dry grass, no tents, no gear, and no flammable material within 15 feet in every direction — including overhead.

Think of this zone as a circle you draw before gathering a single piece of wood. Walk the perimeter. Remove dry leaves, pine needles, and any debris. If you cannot clear 15 feet in all directions — because of trees, brush, or terrain — choose a different spot. There is no workaround for this rule.
Step 2: Gather Your Materials
Knowing how to start a campfire safely means assembling the right materials in the right amounts before you strike a single spark. Experienced campers report that most failed fire attempts come from skipping the preparation phase — not from poor technique.
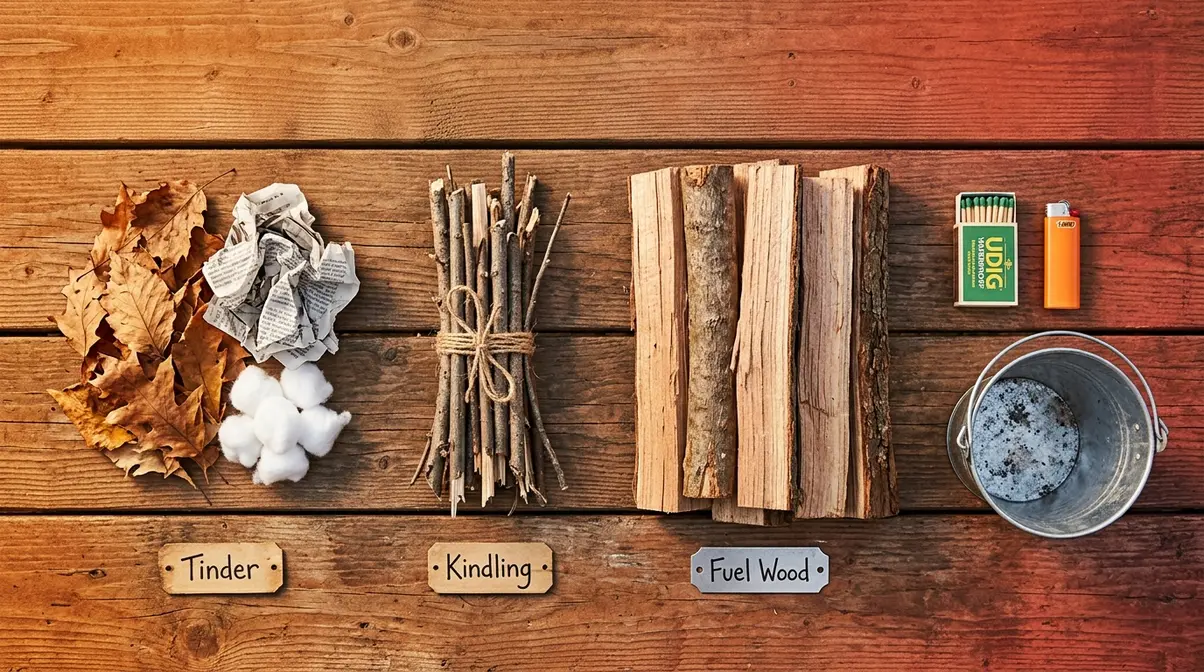
Tinder, Kindling, and Fuel Wood: What Each Does
A campfire is built in three layers. Each layer has a specific role, and skipping or skimping on any one of them is the most common reason beginner fires fail to catch or stay lit.
- Tinder (dry, easily ignitable material that lights from a single spark or flame) forms the core of your fire. Good tinder options include:
- Dry leaves, dry grass, or pine needles
- Crumpled newspaper or paper bags
- Commercial fire-starter cubes or wax-based starters
- Birch bark (peeled from fallen, dead trees only)
Kindling (thin sticks and small branches, roughly pencil- to finger-width) catches fire from the burning tinder and builds enough heat to ignite larger wood. Gather a large double-handful — more than you think you need.
Fuel wood (wrist-thick logs and split wood) is what sustains the fire once it’s fully established. Use only dry, seasoned wood. Wet or green wood produces excessive smoke, burns poorly, and generates far more PM2.5 particles (fine particulate matter harmful to lungs) than dry wood (EPA, 2023).
“Start with a small cone of kindling around a few handfuls of tinder that are loosely piled in the center of the fire ring.”
This layering sequence — tinder at center, kindling around it, fuel wood added only after flames are established — is the foundation of every fire-lay method covered in Step 3.
Essential Tools and Supplies to Bring
Gather these items before you begin building. Having everything within reach prevents you from leaving a partially lit fire unattended.
| Item | Purpose |
|---|---|
| Waterproof matches or a lighter | Primary ignition source |
| Fire-starter cubes or wax starters | Backup ignition; speeds lighting in damp conditions |
| Bucket (1+ gallon of water) | Emergency extinguishing and final dousing |
| Camp shovel or stick | Stirring ash during extinguishing |
| Work gloves | Handling hot wood and stirring coals |
| Headlamp | Visibility after dark during extinguishing |
Never use accelerants (gasoline, lighter fluid, alcohol, or aerosol sprays) to start or boost a campfire. Accelerants cause explosive flare-ups, project burning embers, and are a leading cause of campfire injuries. This is not a suggestion — it is a firm safety rule.
How to Source and Store Firewood Responsibly
Buy local firewood near your campsite. The Leave No Trace Center for Outdoor Ethics strongly advises against transporting firewood from home or across state lines. Moving firewood spreads invasive insects — such as the emerald ash borer and spotted lanternfly — that devastate forest ecosystems.
Most campgrounds sell firewood on-site, and many ranger stations can direct you to approved local vendors. As a rule of thumb: buy firewood within 10 miles of your campsite.
Storage tip: Keep firewood stacked upwind and at least 10 feet from the fire ring until you need it. Never stack wood directly next to an active fire — an unexpected ember or gust can ignite your entire supply.
Step 3: Build Your Campfire
This is where the Safe Fire Triangle’s second phase begins: building the fire correctly. There are three reliable fire-lay methods suited to different conditions. All three follow the same tinder-kindling-fuel sequence — they differ in how the wood is arranged.
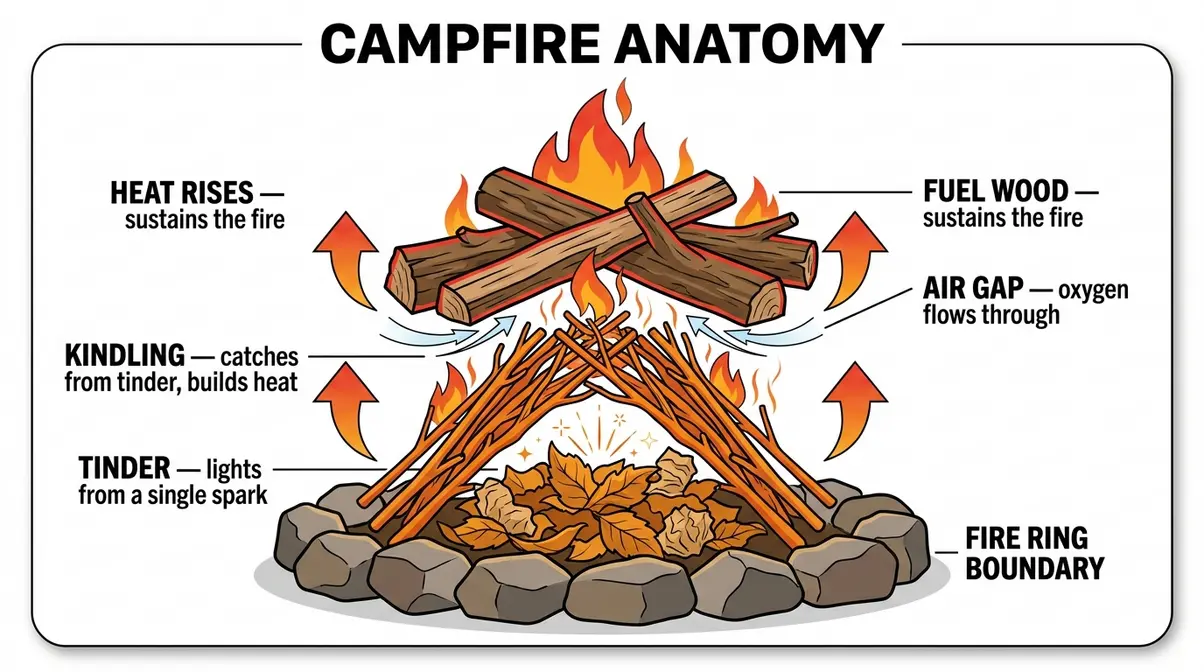
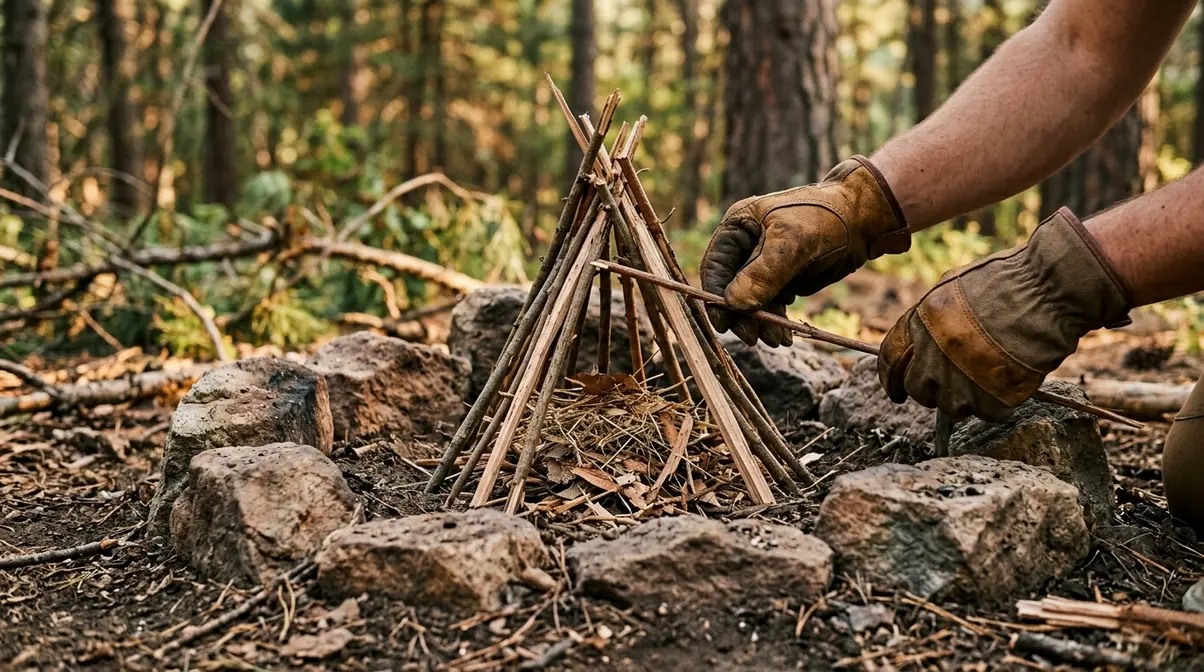
The Teepee Method (Best for Beginners)
The teepee (also called the cone or pyramid lay) is the most reliable method for beginners. It concentrates heat upward through the tinder core, lighting quickly and burning hot.
Steps:
- Place a loose handful of tinder in the center of the fire ring — don’t pack it tight, air needs to flow through it.
- Lean thin kindling sticks around the tinder in a cone shape, tips meeting at the top, leaving a small gap on the windward side as a “door” for your match or lighter.
- Add a second, slightly larger layer of kindling over the first cone.
- Light the tinder through the windward gap using a match or lighter held at the base.
- Once the kindling is burning well (bright orange flames, not just smoke), add fuel wood logs leaned against the cone from the outside.
The teepee naturally collapses inward as it burns, consolidating coals — making it easier to extinguish completely. This is why the NPS recommends it as the starting method for most recreational campfire situations.

The Log Cabin Method
The log cabin lay burns slower and longer than a teepee, making it better for cooking fires (perfect for one-pot campfire recipes) or situations where you want sustained heat over several hours.
Steps:
- Place tinder and a small teepee of kindling at the center of the fire ring.
- Lay two pieces of fuel wood parallel to each other on either side of the kindling, like the base of a square.
- Stack two more pieces of wood on top, perpendicular to the first pair — like Lincoln Logs.
- Continue alternating layers (3-4 total) until the structure is 8-10 inches tall.
- Light the tinder at the center base. The cabin structure feeds air from all sides and collapses gradually, providing a long, even burn.
The log cabin’s open structure allows excellent airflow, which is why it sustains combustion longer than a teepee. Add fuel wood to the outer walls as the fire settles.
The Lean-To Method
The lean-to is designed for windy conditions, where a standard teepee or log cabin would be blown out before it catches.
Steps:
- Drive a thick, green (non-flammable) stake into the ground at a 30-degree angle pointing into the wind, or use a large log as a windbreak.
- Pile tinder on the leeward (downwind, sheltered) side of the stake or log.
- Lean thin kindling sticks against the stake at a 45-degree angle over the tinder, creating a slanted roof that shields the tinder from the wind.
- Add larger kindling over the first layer.
- Light the tinder from the sheltered side. The lean-to structure protects the flame while it establishes, then add fuel wood once the fire is stable.
This method requires slightly more setup but is significantly more reliable in gusty winds than open-structure methods.
How to Light Your Fire Safely
Once your fire lay is built, lighting it safely takes 60 seconds — but the details matter.
- Confirm the area is clear. No loose clothing, no hair hanging forward, no flammable gear within reach.
- Crouch low, don’t lean over the fire. Position yourself to the side, not directly above.
- Strike from the windward gap. Hold your match or lighter at the base of the tinder, not the top. Heat rises — light from below.
- Use long matches or a long-reach lighter. Keep your hand as far from the ignition point as possible.
- Never use accelerants. If the fire won’t catch, rebuild — don’t pour fuel on it.
- Stay with the fire from the moment it’s lit. An unattended fire — even for 30 seconds — is a wildfire risk.
If your fire struggles to catch after two or three attempts, the tinder is likely damp or packed too tightly. Rebuild with drier, looser material before trying again.
Step 4: Maintain and Extinguish Your Fire Safely
A fire that’s burning is a fire that requires constant attention. This phase of the Safe Fire Triangle — extinguishing completely — is where most campfire accidents occur. Experienced campers and park rangers consistently report that “almost out” is not out.
Managing a Live Campfire: What to Watch For
While your fire is burning, monitor these conditions continuously:
- Ember travel: Watch for embers floating beyond the fire ring, especially when adding wood or if wind picks up. A single airborne ember landing on dry grass is enough to start a wildfire.
- Flame height: Keep flames below 2 feet. High flames are harder to control and more likely to project embers. Add smaller pieces of fuel wood rather than large logs if the fire runs hot.
- Wind changes: If wind picks up noticeably — or if you begin to feel gusts — reduce the fire immediately by spreading it out and adding no new fuel. A sustained wind above 15 mph is a signal to extinguish.
- Children and pets: Maintain a clear boundary at least 3 feet from the fire ring. Assign one adult to fire-watching duty at all times.
Never leave a campfire unattended — not to get more wood, not to use the restroom, not for any reason. If you must step away, extinguish first. According to Smokey Bear’s official guidelines, “a campfire can smolder for hours and restart without warning.”
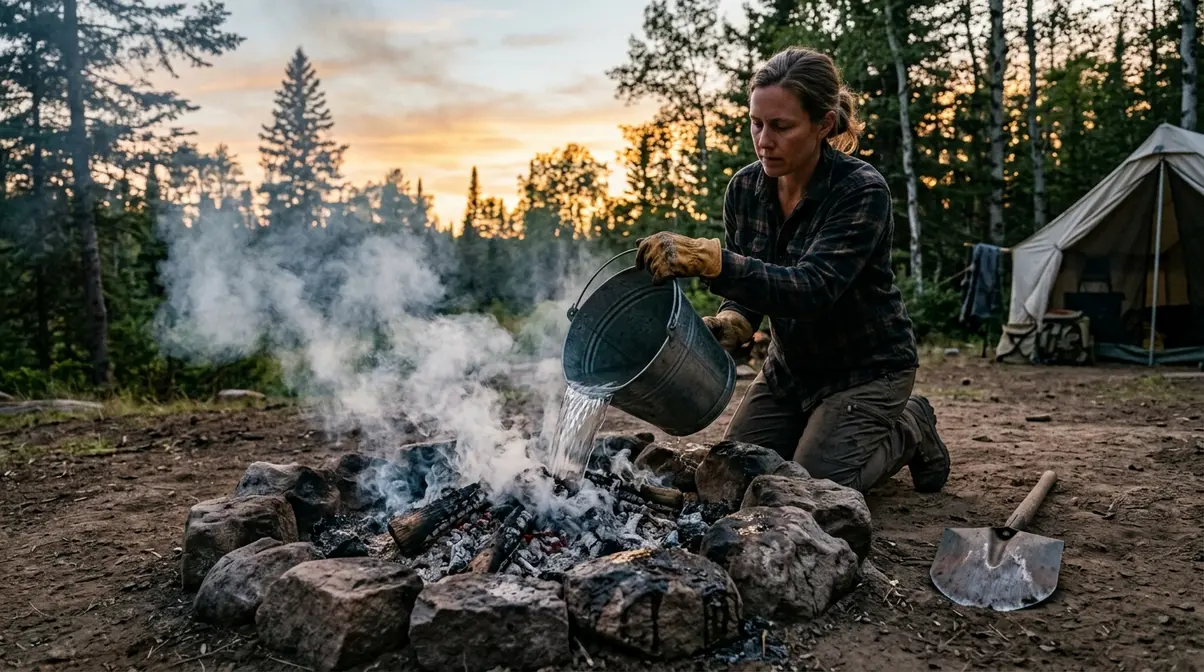
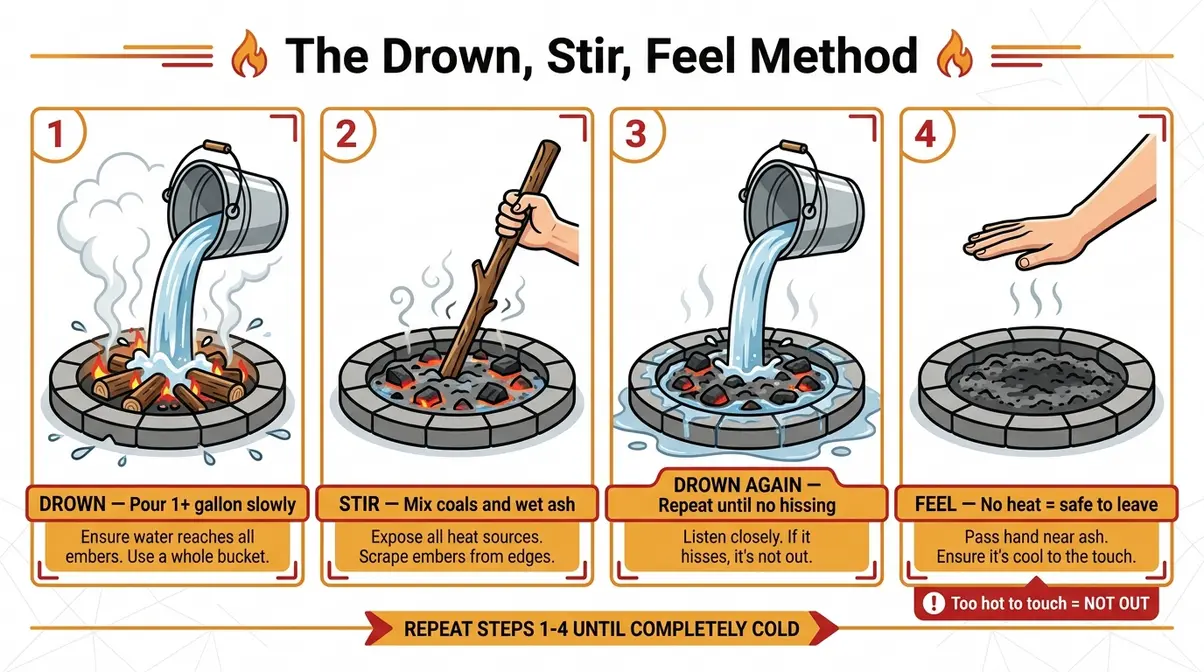
The Drown, Stir, Feel Extinguishing Method
The Drown, Stir, Feel method is the only reliable way to fully extinguish a campfire. Simply letting a fire “burn down” does not make it safe — hot coals buried under ash can reignite hours later.
Follow these steps every single time:
Step 1 — Drown: Pour at least one gallon of water slowly over the entire fire, including all coals, embers, and the edges of the fire ring. Pour, don’t splash — splashing spreads embers. You should hear a strong hissing sound. If you don’t, the fire was not as burned-down as it appeared.
Step 2 — Stir: Using a stick or camp shovel, stir the ash and embers thoroughly. Mix the wet ash with any remaining coals. Turn over larger pieces of wood and expose all surfaces to water.
Step 3 — Drown again: Pour another round of water over the stirred ash. Repeat the drown-and-stir cycle until no more hissing is heard.
Step 4 — Feel: Hold your hand 6 inches above the ash — do not touch it yet. If you feel any heat radiating upward, the fire is not out. Continue drowning and stirring. Only when you feel no heat at all should you cautiously touch the outer edge of the ash with the back of your hand.
The US Forest Service mandates that if a fire bed is too hot to touch, it is too hot to leave. This is the definitive test — not appearance, not elapsed time.
Are you supposed to put water on a campfire?
Yes — water is the correct and recommended way to extinguish a campfire. The US Forest Service endorses the Drown, Stir, Feel method: pour at least one gallon of water slowly over all coals and embers, stir thoroughly with a stick, pour again, and repeat until no heat is felt when you hold your hand 6 inches above the ash. Burying ash without water does not extinguish it — hot coals buried under dirt can smolder for hours.
The 30/30/30 Weather Rule Explained
The 30/30/30 rule is a fire-weather guideline used by wildland firefighters and the National Weather Service to assess when conditions are dangerous enough that any open flame poses an unacceptable risk.
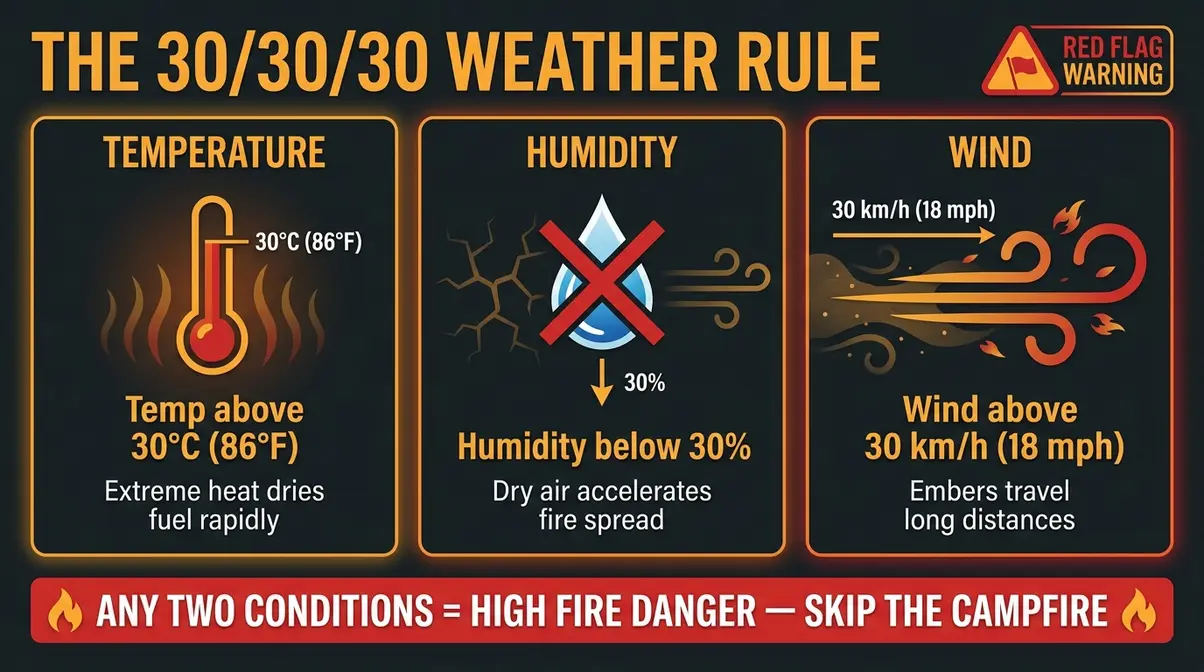
The rule states: When temperature exceeds 30°C (86°F), relative humidity drops below 30%, and wind speed exceeds 30 km/h (about 18 mph) — do not start a campfire.
These three conditions together create a fire environment where flames spread rapidly, embers travel long distances, and suppression becomes extremely difficult. You don’t need all three to be at risk — any two of these thresholds should put you on high alert.
- How to check conditions before your trip:
- Visit the weather.gov forecast portal and search your campsite location
- Look for “Red Flag Warning” or “Fire Weather Watch” alerts — these are issued by the NWS specifically when 30/30/30-type conditions are forecast
- Check the National Fire Danger Rating System (NFDRS) map for your region
If a Red Flag Warning is in effect for your area, skip the campfire entirely. No s’mores are worth the risk.
Step 5: Alternative Fire-Starting Methods
Lighters and matches are reliable — until they’re wet, lost, or empty. Knowing at least one alternative fire-starting method is a practical safety skill that experienced outdoor educators consistently recommend for anyone spending multiple nights in the backcountry.
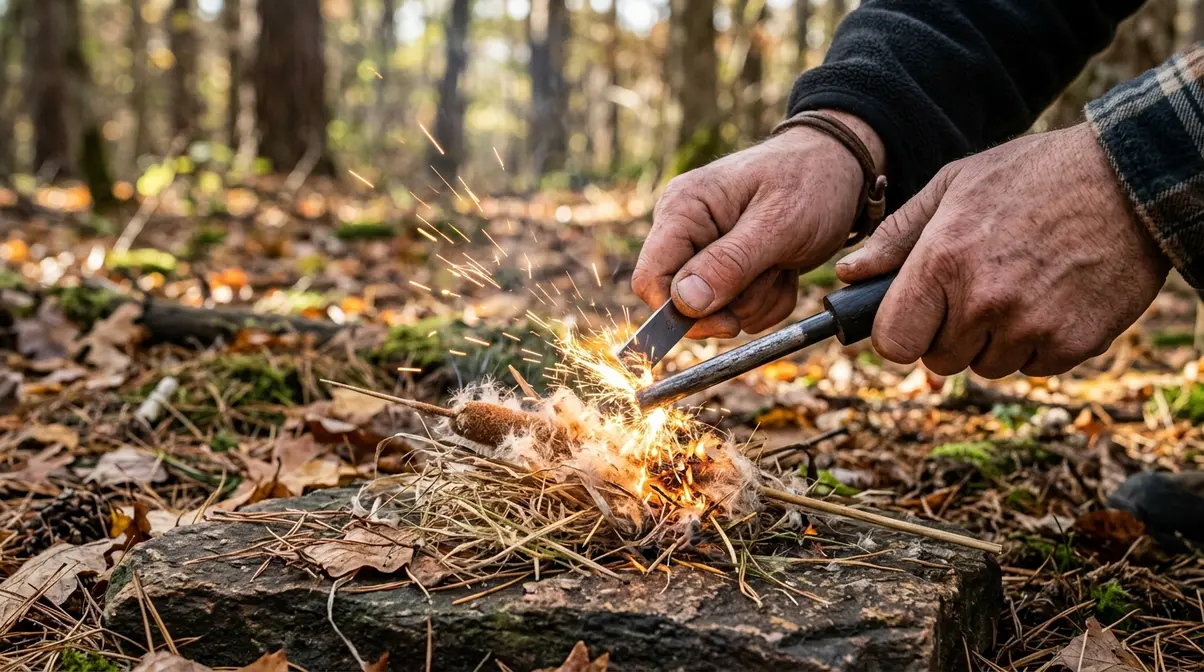
Flint and Steel: Reliable Backup Ignition
A flint and steel striker (a piece of high-carbon steel struck against a flint, chert, or quartz rock) produces a spark that can ignite prepared tinder even in damp conditions where matches fail.
How to use it:
- Prepare a tinder bundle — dry grass, cattail fluff, or char cloth works best.
- Hold the tinder bundle in one hand, flint rock in the other.
- Strike the steel striker downward against the sharp edge of the flint at a 30-degree angle, directing sparks onto the tinder.
- When a spark catches, gently fold the tinder bundle around the ember and blow softly at the base until it ignites.
Flint and steel kits are inexpensive ($10-$20), lightweight, and have no moving parts to fail. Our outdoor team evaluated several ferro rod and flint striker combinations and found that a quality ferro rod (which produces a hotter, larger spark than natural flint) is the most reliable backup option for beginners.
Friction-Based Methods: The Bow Drill
The bow drill is the most effective primitive fire-starting method and the one taught in wilderness survival courses. It requires no manufactured tools — only wood, cordage, and practice.
- Components needed:
- Fireboard: A flat piece of dry, soft wood (cedar, willow, or cottonwood work well)
- Spindle: A straight, dry hardwood stick, 12-18 inches long
- Bow: A curved branch strung with paracord or a shoelace
- Handhold: A smooth rock or piece of hard wood to press down on the spindle
Basic technique:
- Cut a small notch in the fireboard with a depression at its top edge.
- Place a leaf or bark chip under the notch to catch the coal.
- Wrap the bow string once around the spindle. Place the spindle tip in the fireboard depression.
- Apply downward pressure with the handhold while drawing the bow back and forth in long, smooth strokes.
- Continue until a dark coal forms in the notch, then carefully transfer it to a tinder bundle and blow gently.
The bow drill takes significant practice to master. Common errors reported by beginners include using wood that is too hard, not maintaining consistent pressure, or using damp materials. Practice at home before relying on this method in the field.
Safe and Dangerous DIY Fire Starters
Several household materials make effective fire starters. Others are genuinely hazardous. Knowing the difference matters.
Effective and safe DIY fire starters:
| Starter | How It Works | Notes |
|---|---|---|
| Vaseline-coated cotton balls | Petroleum jelly saturates cotton fibers, extending burn time to 4-5 minutes | Highly effective; our team found these among the most reliable tinder options in damp conditions |
| Wax-dipped cardboard egg cartons | Fill with dryer lint, pour melted wax over top, let harden | Burns for 10-15 minutes; excellent for wet-weather starts |
| Dryer lint + toilet paper roll | Pack lint into a paper tube | Burns 3-4 minutes; lightweight and free |
| Commercial fire-starter cubes | Manufactured wax-based blocks | Consistent, reliable, and widely available |
What to avoid:
- Gasoline, lighter fluid, and alcohol — explosive flare-up risk; never use these on a campfire
- Aerosol sprays — highly flammable and unpredictable; never use near fire
- Styrofoam or plastic — toxic fumes; harmful to breathe and illegal to burn in many jurisdictions
- Treated or painted wood — releases toxic compounds when burned
Stick to natural or purpose-made fire starters, and you’ll have a safe, reliable ignition source for every trip.
Does Vaseline work as a fire starter?
Vaseline (petroleum jelly) is one of the most effective DIY fire starters available. A cotton ball coated thoroughly in Vaseline burns for 4-5 minutes — long enough to establish a fire even with damp kindling. The petroleum jelly saturates the cotton fibers and acts as a slow-burning fuel. Prepare them at home, store in a small airtight container, and they remain effective for years. They are a reliable, lightweight, and inexpensive addition to any camp fire kit.
Mistakes, Health Risks, and Skipping the Fire
The Most Common Campfire-Starting Mistakes
Common errors reported by beginner campers follow a predictable pattern. Recognizing them before your first fire is far easier than troubleshooting them in the dark.
Mistake 1 — Using wet or green wood. Green wood (freshly cut from living trees) contains too much moisture to burn efficiently. It smolders, produces excessive smoke, and generates more harmful PM2.5 particles. Use only dry, seasoned wood.
Mistake 2 — Packing tinder too tightly. Fire needs oxygen. Tightly packed tinder smothers itself. Keep your tinder loose and airy — it should look almost messy.
Mistake 3 — Adding large logs too soon. Many beginners pile on fuel wood before the kindling has established a strong flame base. The weight smothers the young fire. Wait until you have sustained, bright orange flames from the kindling before adding any fuel wood.
Mistake 4 — Leaving the fire unattended. Even briefly. Especially in windy conditions.
Mistake 5 — Assuming “burned down” means “safe to leave.” This is the most dangerous mistake of all. Hot ash can reignite hours later. Always use the Drown, Stir, Feel method — every time.
Campfire Smoke and Asthma: What You Need to Know
⚠️ If you have asthma, COPD, or any respiratory condition, consult your doctor before spending extended time near a campfire.
Campfire smoke is a genuine health hazard, not just an annoyance. Wood smoke contains PM2.5 (fine particulate matter with a diameter of 2.5 micrometers or less) — particles small enough to penetrate deep into lung tissue. According to the EPA, short-term exposure to wood smoke can trigger asthma attacks, reduce lung function, and irritate the eyes, nose, and throat in otherwise healthy adults.
For people with asthma, even brief exposure to campfire smoke can cause bronchospasm (sudden airway tightening). Research cited by the EPA indicates that PM2.5 from wood combustion is particularly reactive in sensitive airways.
Practical smoke management tips:
- Sit upwind of the fire — position yourself so the smoke blows away from you.
- Burn dry, seasoned hardwood — it produces significantly less PM2.5 than wet or green wood.
- Keep fires small — a smaller fire produces proportionally less smoke.
- Move if smoke follows you — smoke naturally follows the person with the lowest pressure zone; moving around the fire often helps.
- Use a buff or face covering if you must be near heavy smoke temporarily.
How long the air remains smoky after a campfire depends on wind, humidity, and fire size. Under calm conditions, localized smoke from a small campfire typically clears within 30-60 minutes of full extinguishing. In stagnant air conditions, PM2.5 particles can linger for several hours in the immediate area. If you have respiratory sensitivities, allow at least one hour after extinguishing before sleeping in a tent that was downwind of the fire.
When to Skip the Campfire Entirely
Sometimes the responsible choice — and the safest one — is to not build a fire at all. The NPS advises skipping campfires in the following situations:
- A burn ban or fire restriction is in effect — this is non-negotiable
- Red Flag Warning conditions are forecast — high temp, low humidity, high winds
- The ground is covered in dry grass, pine needles, or leaves and no fire ring is available
- You are in a high-elevation or drought-stressed ecosystem where fire scars take decades to recover
- You or a companion has a respiratory condition and smoke exposure is a health risk
- Beach bonfires in areas without designated fire rings — sand can conduct heat to buried organic material, and ocean winds make embers unpredictable
A headlamp, a warm sleeping bag, and a hot meal from a camp stove provide everything a campfire does — warmth, light, and comfort — without the risk. There is no shame in choosing a camp stove on a windy night.
Frequently Asked Questions
What is the proper way to start a campfire?
The proper way to start a campfire begins with confirming fires are legally permitted at your location, then selecting a site with a 15-foot clearance zone. Gather tinder (dry leaves or commercial starters), kindling (pencil-width sticks), and dry fuel wood. Build a teepee lay — tinder in the center, kindling around it — and light from the windward base. Add fuel wood only after the kindling burns strongly. Never use accelerants.
Are campfires bad for asthma?
Campfires can trigger asthma attacks due to PM2.5 particles in wood smoke — fine particulate matter that penetrates deep into lung tissue. The EPA identifies wood smoke as a significant respiratory irritant, capable of causing bronchospasm even during brief exposures. People with asthma or COPD should consult a doctor before campfire exposure, sit upwind at all times, and burn only dry hardwood to minimize smoke output. A camp stove is a safer alternative.
What are common fire-starting mistakes?
The most common campfire mistake is using wet or green wood, which produces heavy smoke and fails to sustain combustion. Other frequent errors include packing tinder too tightly (starving the fire of oxygen), adding large fuel logs before the kindling establishes, leaving the fire unattended even briefly, and assuming a burned-down fire is safe without performing the Drown, Stir, Feel extinguishing test. Experienced campers report that most failed fires trace back to rushed preparation.
What is the best wood for a campfire?
The best wood for a campfire is dry, seasoned hardwood such as oak, hickory, or ash. Hardwoods burn longer and hotter than softwoods like pine or cedar, and they produce significantly less smoke and fewer sparks. Always ensure your firewood has been seasoned for at least six months to reduce moisture content, which minimizes harmful PM2.5 emissions.
What are the 3 P’s of fire?
The 3 P’s of fire refer to the three elements required for combustion: Fuel (something to burn), Heat (enough energy to ignite it), and Oxygen (air to sustain the reaction). This is also called the fire triangle in chemistry. To extinguish a fire, you must remove at least one element — water removes heat and oxygen simultaneously, which is why dousing with water is the most effective extinguishing method for campfires.
How long is air toxic after a fire?
After a campfire is fully extinguished, localized smoke typically clears within 30-60 minutes under normal wind conditions. However, PM2.5 particles — the fine particulate matter most harmful to lung health — can persist in stagnant air for several hours near the fire site, according to EPA air quality research. People with respiratory conditions should wait at least one hour after extinguishing before sleeping in a tent that was downwind of the fire, or longer if winds are calm.
What is the 30/30/30 rule for fire?
The 30/30/30 rule is a fire-weather warning threshold: when temperatures exceed 30°C (86°F), relative humidity drops below 30%, and wind speeds exceed 30 km/h (about 18 mph), conditions are dangerously favorable for rapid wildfire spread. The National Weather Service issues Red Flag Warnings when these conditions align. Wildland firefighters and outdoor safety educators use this rule as a simple go/no-go decision tool. If any two of the three thresholds are met, reconsider building a campfire.
How do you keep a campfire burning?
To keep a campfire burning safely, you must maintain a steady supply of oxygen and progressively add larger fuel wood. Start by feeding the fire with small kindling until a strong ember bed forms. Once the core is hot, add wrist-thick logs one at a time, ensuring you don’t smother the flames. Keep the fire structure loose so air can flow freely through the center.
Building Confident Fires, Every Time
Starting a campfire safely comes down to one repeatable framework — the Safe Fire Triangle. Check regulations and site conditions before you gather a single piece of wood. Build your fire correctly using dry materials and a proven lay method. Extinguish completely using Drown, Stir, Feel until the ash is cold to the touch. Every campfire accident that makes the news traces back to a failure in one of these three phases. According to the US Forest Service, improperly extinguished campfires remain among the most preventable causes of wildfire in America.
The Safe Fire Triangle works because it replaces vague “be careful” advice with a concrete, memorable protocol. Whether you’re using a teepee lay on your first camping trip or a lean-to in gusty winds on your tenth, the same three-phase check applies. The framework scales from a beginner’s first fire ring to backcountry situations where no infrastructure exists.
On your next trip, run through the Safe Fire Triangle before you light anything: confirm the burn ban status at readyforwildfire.org, pack a water bucket alongside your kindling, and commit to the Drown, Stir, Feel test before you walk away from the fire ring. A cold ash bed takes five extra minutes — and it’s the difference between a great camping memory and a preventable disaster.
