Camping Gear Layering: Beginner’s Step-by-Step Guide
 David King
Updated June 30, 2026
23 min read
David King
Updated June 30, 2026
23 min read
You packed a cotton hoodie. Maybe a spare T-shirt. You figured that’s enough — it’s just camping. Then the temperature dropped at 9 p.m., the wind picked up, and that hoodie got damp from your hike in. Suddenly, staying warm felt like a crisis.
Most beginners get camping gear layering wrong for one simple reason: they dress for the temperature they see at the trailhead, not the temperatures they’ll experience during every hour of the trip. A system that works at noon in sunshine can fail completely during a cold, static camp evening.
This guide gives you the full picture — what each layer does, what to buy at every budget, how to adjust your layers in real time, and the most common mistakes that leave beginners shivering. By the end, you’ll have a practical, beginner-proof system for staying warm and dry on your very first trip.
Camping gear layering is not a one-time outfit choice — it’s a continuous adjustment system called The Dynamic Layer Stack that you tune throughout the day.
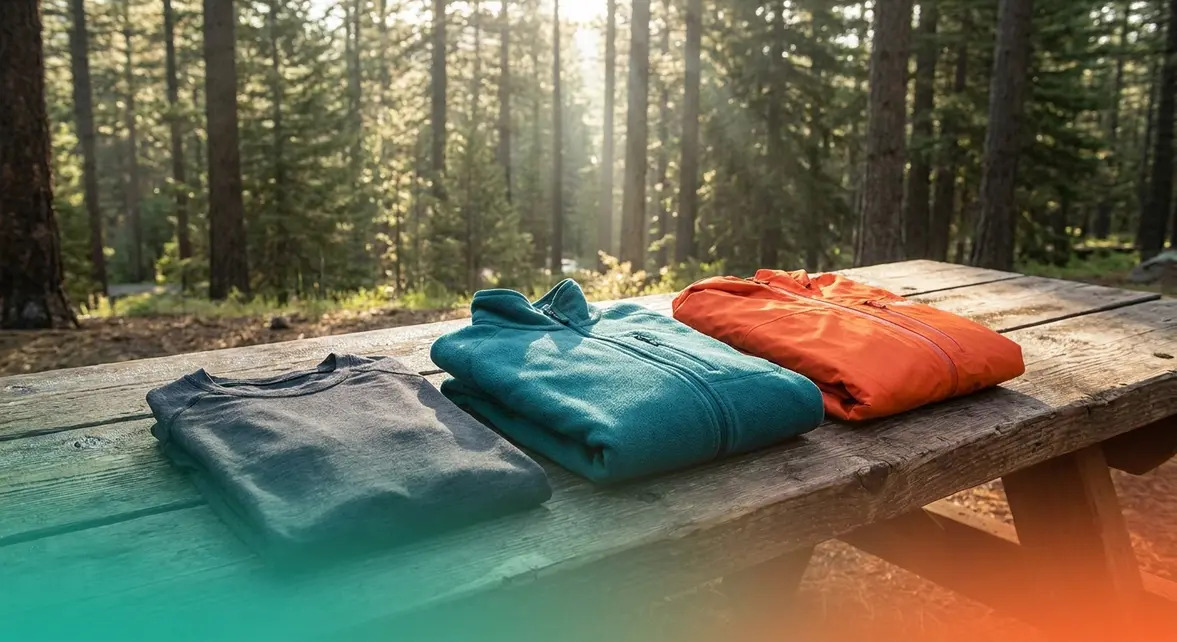
- Base layer: Pulls moisture from your skin (merino wool or synthetic only — never cotton)
- Mid layer: Traps warm air close to your body (fleece or insulated jacket)
- Shell layer: Blocks wind and rain without trapping sweat inside
- The key rule: Add a layer before you get cold; remove one before you start sweating
How the 3-Layer Camping System Works
The 3-layer system is the foundation of every outdoor clothing approach. Each layer has one job, and when all three work together, you stay comfortable across a wide range of temperatures and activity levels. Understanding what each layer does — and why — makes the whole system click into place.
What Is Camping Gear Layering?
Camping gear layering is a method of dressing in multiple distinct clothing pieces, each designed to manage a specific element: moisture, warmth, or weather protection. Rather than one thick jacket, you wear thin, purposeful layers you can add or remove as conditions change.
“I’m a big believer of layering, but the ‘base wicking layer, middle insulating layer, outer shell layer’ isn’t a precise description of my gear…”
This frustration is completely valid — and it points to something most beginner guides miss. The three-layer framework is a starting point, not a rigid uniform. What matters is understanding why each layer exists, so you can adapt it to your actual gear and conditions.
Here’s the simplest version: your body generates heat and sweat. Your goal is to move that sweat away from your skin, trap warm air close to your body, and block cold air and rain from reaching you. Three layers, three jobs.
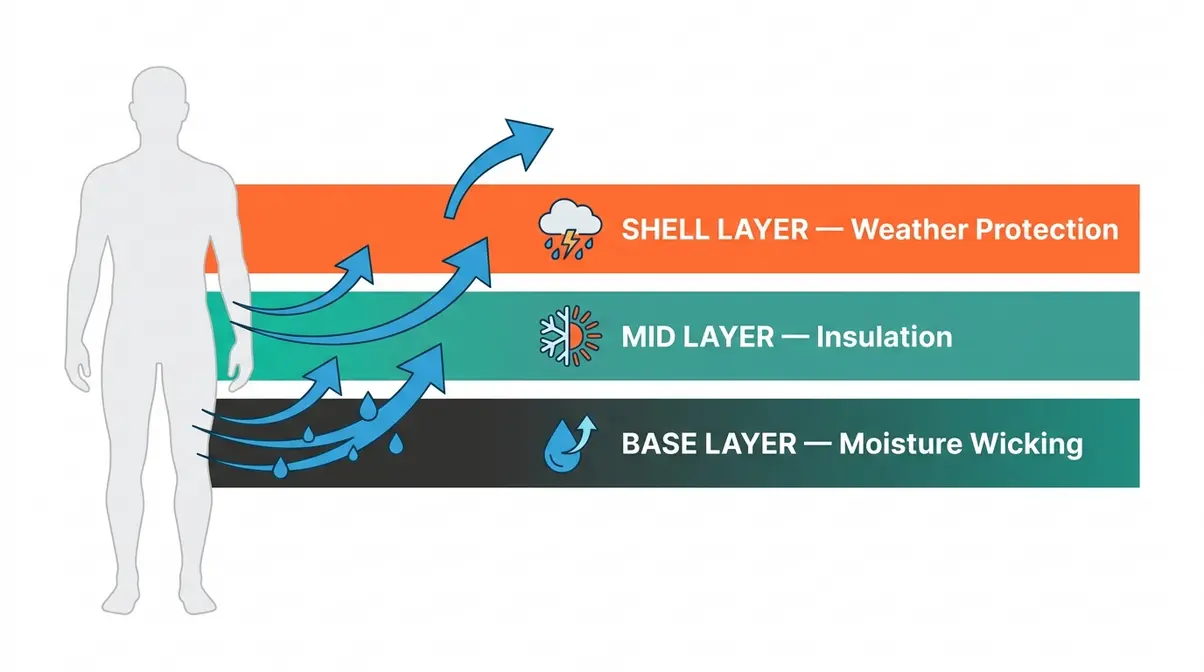
Outdoor professionals and the National Park Service consistently recommend building your camping wardrobe around this system because it gives you control over your comfort in a way that a single heavy jacket never can. A parka keeps you warm while standing still. A layering system keeps you comfortable while hiking, resting, eating, and sleeping — all in one trip.
Layer 1 — The Base Layer: Wicking Moisture Away
Your base layer (also called the base wicking layer) sits directly against your skin. Its one job is to pull moisture from sweat away from your body so that wet fabric doesn’t chill you.
Why this matters: When cotton gets wet, it loses all insulating ability and actively draws heat away from your skin. The National Park Service is direct about this: “Cotton absorbs moisture easily and won’t keep you warm if it gets wet” (NPS Winter Safety). National park rangers often use the phrase “cotton kills” as a shorthand reminder of this danger. It sounds dramatic — but it’s accurate in cold, wet conditions.
What to choose instead:
- Merino wool — Naturally pulls moisture away from your skin (this process is called wicking), resists odor, and stays warm even when slightly damp. It’s softer than regular wool and won’t scratch. The main downside: it dries more slowly than synthetics and costs more.
- Synthetic fabrics (polyester, polypropylene) — Dries faster than wool, very durable, and generally cheaper. Slightly less odor-resistant, but excellent for high-output activities.
Scenario 1 — High-output ascent: You’re hiking uphill with a full pack. You’re generating serious body heat. A synthetic base layer pulls sweat away quickly, keeping you dry. If you wore cotton, that sweat would soak in, cling to your skin, and turn cold the moment you stop moving.
Scenario 2 — Wet spring day: Light rain starts. Your merino base layer stays comfortable even with a little moisture because it retains warmth when slightly damp — something cotton and many synthetics cannot do.
Fit tip: Your base layer should fit close to your body — not tight enough to restrict movement, but snug enough to actually contact your skin and wick effectively. A baggy base layer creates air pockets that trap moisture instead of moving it.
[INTERNAL LINK: Anchor text “camping gear checklist” — link to existing gear checklist page]
Layer 2 — The Mid Layer: Trapping Heat
Your mid layer (the middle insulating layer) sits over your base and does one thing: trap warm air close to your body. Think of it as a personal heat bubble. The more loft (puffiness or thickness) it has, the more air it traps, and the warmer you stay.
The two main options:
- Fleece jacket — Breathable, lightweight, and excellent during active hiking. Fleece allows some air movement, which helps prevent overheating on the move. It’s the go-to mid layer for most 3-season campers.
- Insulated jacket (synthetic or down fill) — Warmer than fleece, better for cold evenings and static camp time. Synthetic insulation stays warm when wet; down is warmer per gram but loses insulation when damp.
Scenario 3 — Static camp time: You’ve finished your hike and you’re sitting still at camp. Your body heat drops fast. This is when you swap your fleece for an insulated jacket (or add it on top). Sitting still in just a base layer and shell is a recipe for getting cold quickly.
Scenario 4 — Sub-freezing night: Temperatures drop to 25°F. You’re in your tent. A down or synthetic insulated jacket worn over your base layer, under your sleeping bag, can add critical warmth when your bag rating isn’t quite enough for the conditions.
The insulation-to-weight ratio matters for backpackers: down delivers more warmth per ounce than synthetic, but synthetic is safer in wet conditions. For car camping, weight is less critical — a heavier fleece or insulated jacket works perfectly well.
REI Expert Advice on layering describes the mid layer as “the most variable part of the system” — meaning you might use a light fleece on a cool October afternoon and switch to a thick insulated parka for a January overnight. Having two mid layers of different weights gives you far more flexibility than one single heavy piece.
Layer 3 — The Shell Layer: Blocking Wind and Rain
Your outer shell layer (the shell layer) is your armor against the elements. It doesn’t add much warmth on its own — that’s not its job. Its job is to block wind and rain from reaching your warm inner layers.
Key terms to know:
- Waterproof — Blocks rain completely. Look for taped seams on the jacket, which seal the stitching holes.
- Breathable — Allows moisture vapor (sweat) to escape outward. Without breathability, sweat builds up inside the shell and soaks your inner layers from the inside out.
- Hydrophobic — Repels water on the surface so it beads off rather than soaking in. Most shells have a DWR (Durable Water Repellent) coating.
Two main shell types:
| Shell Type | Best For | Weight | Breathability |
|---|---|---|---|
| Hardshell (waterproof/breathable) | Rain, snow, sustained wet weather | Medium | Moderate–High |
| Softshell (wind-resistant) | Dry but cold/windy days | Light | High |
| Rain poncho | Budget car camping, casual use | Very light | Low |
Scenario 5 — Sudden afternoon thunderstorm: You’re on a trail when rain hits. A hardshell with taped seams keeps your fleece and base layer completely dry. Without it, your insulating mid layer soaks through and loses most of its warmth.
[INTERNAL LINK: Anchor text “tent selection guide” — link to existing tent selection page]
One critical mistake beginners make: wearing a shell that’s too waterproof without enough ventilation. If you’re hiking hard in a fully sealed shell, your sweat has nowhere to go. Look for shells with underarm vents (called pit zips) or at minimum a front zipper you can open slightly while moving.
The Dynamic Layer Stack — Adjusting on the Move
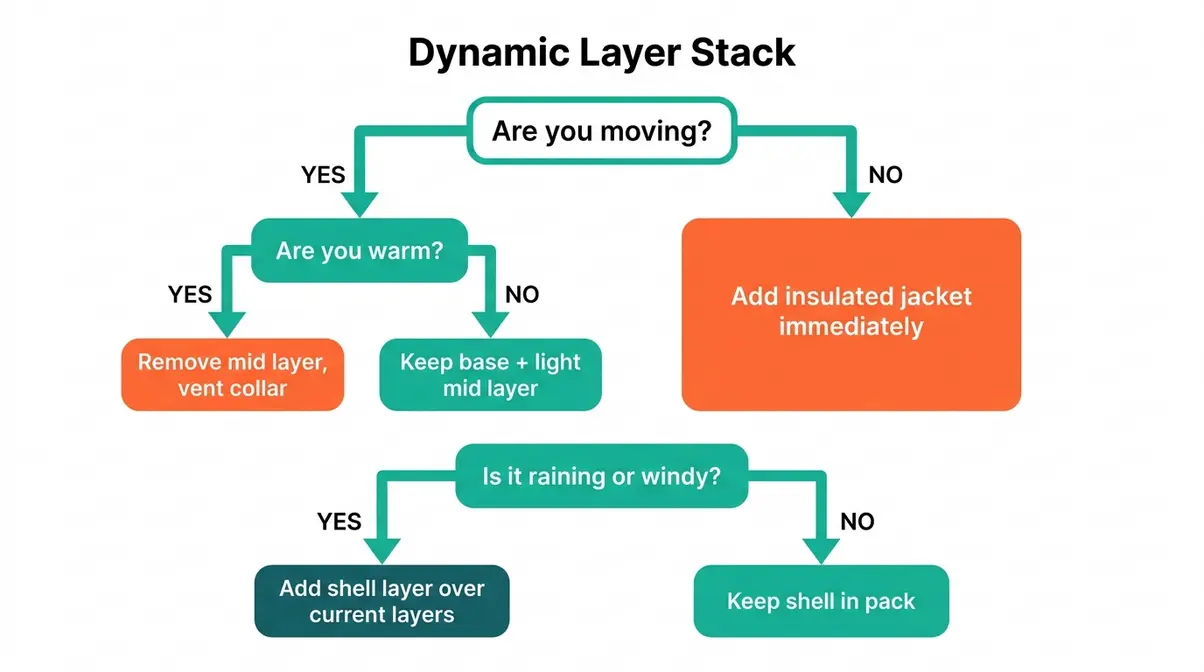
Here’s what most beginner guides skip entirely: The Dynamic Layer Stack is the active management of your layers throughout the day. Your clothing needs change every hour — sometimes every 20 minutes — based on your activity level, wind, and temperature.
The most important principle outdoor professionals teach: be bold and start cold. At the trailhead, you should feel slightly chilly, not comfortable. If you’re warm when you start hiking, you’ll be soaked in sweat within 20 minutes. That wet base layer will then chill you when you stop moving.
The Dynamic Layer Stack in practice:
- Before you start moving: Wear base layer + light mid layer. Leave the shell in your pack unless it’s raining.
- 10–15 minutes into the hike: If you’re warming up, remove the mid layer and stow it. Keep the base layer.
- On a steep climb: Vent your base layer by unzipping the collar. Slow down slightly before you start sweating heavily.
- At the summit or a rest stop: Add your mid layer back immediately — your body cools fast when you stop generating heat.
- If rain starts: Add your shell over whatever layers you’re wearing.
- At camp: Add your warmest mid layer (insulated jacket) as soon as you stop hiking.
Scenario 6 — The transition trap: You reach camp sweaty from the hike. You sit down to rest. Within five minutes, your damp base layer starts chilling you. The fix: change into a dry base layer the moment you arrive at camp. Outdoor professionals consistently report this as the single most effective cold-weather comfort habit.
The Princeton Outdoor Action Guide puts it plainly: “A good rule of thumb is to strip down until you feel just cool, not chilled, just before activity.” That slight initial discomfort is your insurance against sweating through your layers (Princeton Outdoor Action Guide).
Your Complete Camping Gear Checklist
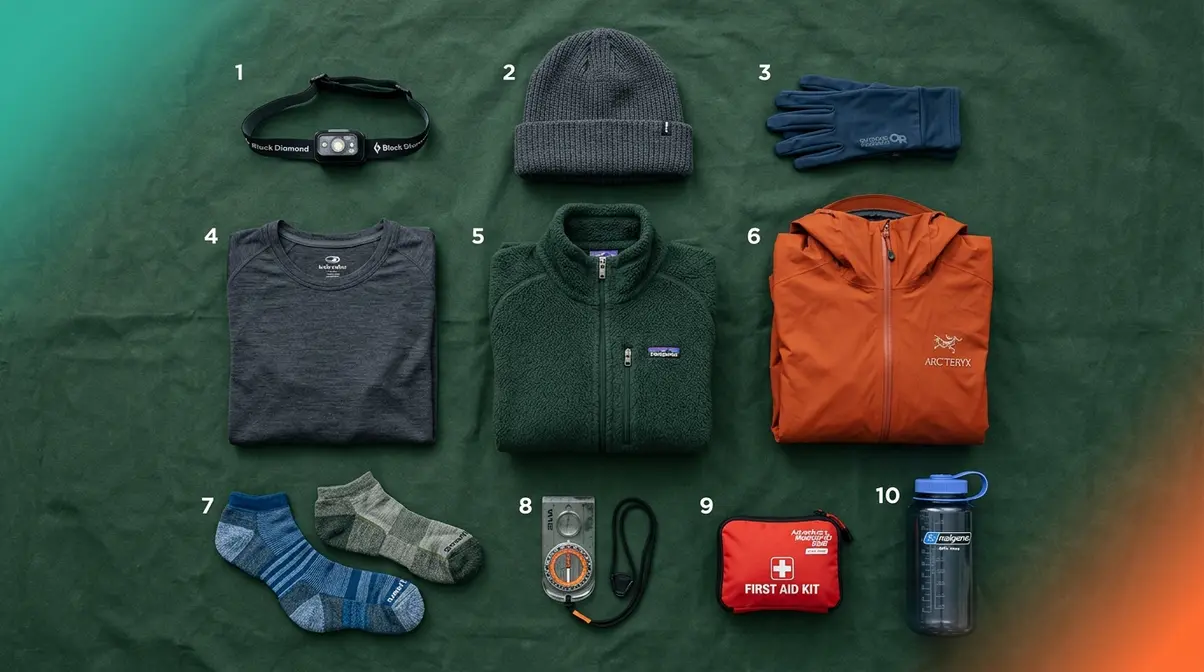
A solid layering system is only part of what you need. Having the right supporting gear around your clothing layers makes the whole system work. Across camping communities, the consistent feedback is that forgotten basics — not expensive gear — cause the most misery on trips.
The 10 Essentials Every Camper Needs
The National Park Service Ten Essentials provides the most widely accepted framework for what to bring on any camping or hiking trip. These are organized as systems, not individual items:
| # | System | What It Includes |
|---|---|---|
| 1 | Navigation | Map, compass, GPS device |
| 2 | Sun protection | Sunglasses, sunscreen, hat |
| 3 | Extra clothing | Jacket, hat, gloves, rain shell, extra layers |
| 4 | Illumination | Headlamp or flashlight + spare batteries |
| 5 | First-aid supplies | First aid kit |
| 6 | Fire | Matches, lighter, fire starters |
| 7 | Repair kit and tools | Duct tape, knife, multi-tool |
| 8 | Nutrition | Extra food (one day’s supply beyond minimum) |
| 9 | Hydration | Water and water treatment supplies |
| 10 | Emergency shelter | Tent, space blanket, tarp, or bivy |
Notice that three of the ten essentials relate directly to clothing and insulation: extra clothing, sun protection, and emergency shelter. Your layering system covers a significant portion of the NPS’s core safety framework.
The Clothing Layer Checklist
For a typical 3-season camping trip (spring through fall), outdoor professionals recommend packing this clothing layer kit:
- Base layers:
- 2–3 moisture-wicking tops (at least one long-sleeve)
- 1–2 base layer bottoms (thermal leggings) for cold nights
- Extra pairs of wool or synthetic socks (cotton socks cause blisters when wet)
- Mid layers:
- 1 lightweight fleece jacket (for active hiking)
- 1 warmer insulated jacket (for camp and cold mornings)
- Shell layer:
- 1 waterproof/breathable rain jacket with hood
- Rain pants (optional for car camping, essential for backpacking)
- Accessories:
- Wool or synthetic hat (you lose significant body heat through your head)
- Lightweight gloves (pack these even in summer — mountain evenings surprise beginners)
- Buff or neck gaiter
[INTERNAL LINK: Anchor text “winter camping gear” — link to existing winter camping page]
The Most Forgotten Item When Camping
Across camping forums and communities, the most frequently forgotten item is not a dramatic piece of gear — it’s dry socks and a spare base layer for sleeping. Beginners pack clothes for daytime but forget that sleeping in damp or dirty layers dramatically reduces warmth and comfort.
Sleeping in the same clothes you hiked in means sleeping in moisture from sweat. That moisture reduces your sleeping bag’s insulating ability. Pack one dedicated set of clean, dry base layers used only for sleeping. It’s the simplest, cheapest upgrade to your camping comfort.
A close second on the forgotten list: a headlamp. Flashlights require one hand. A headlamp leaves both hands free for cooking, setting up camp, and navigating tent zippers in the dark. Pack one for every person in your group.
Choosing Camping Gear by Budget and Performance
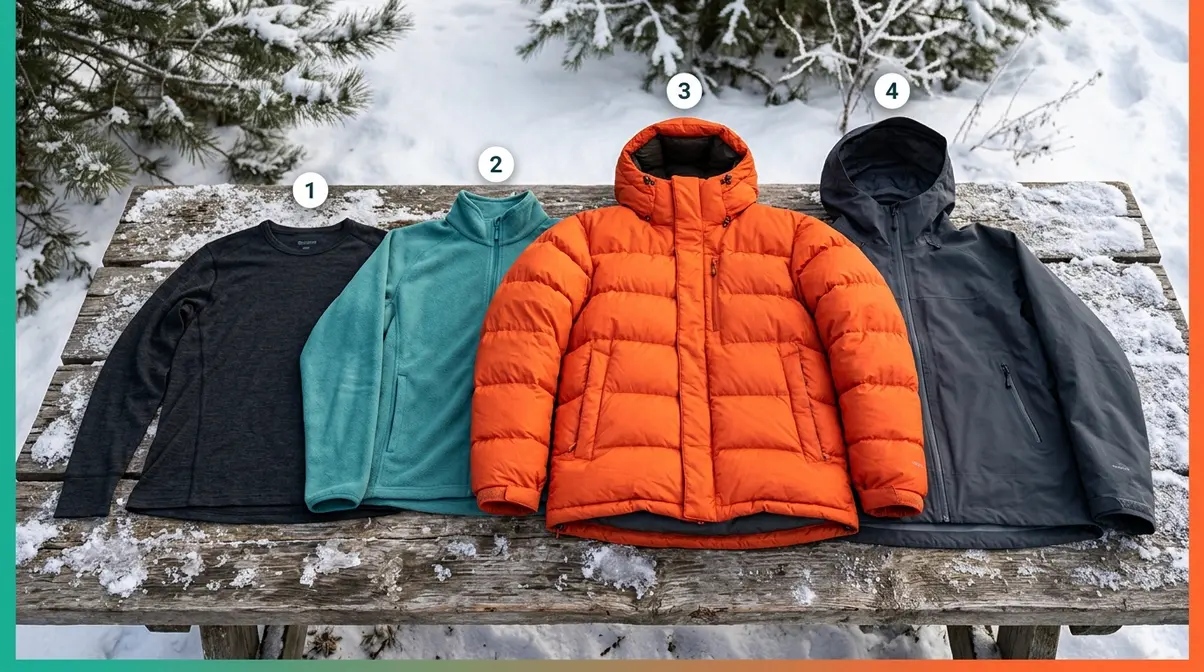
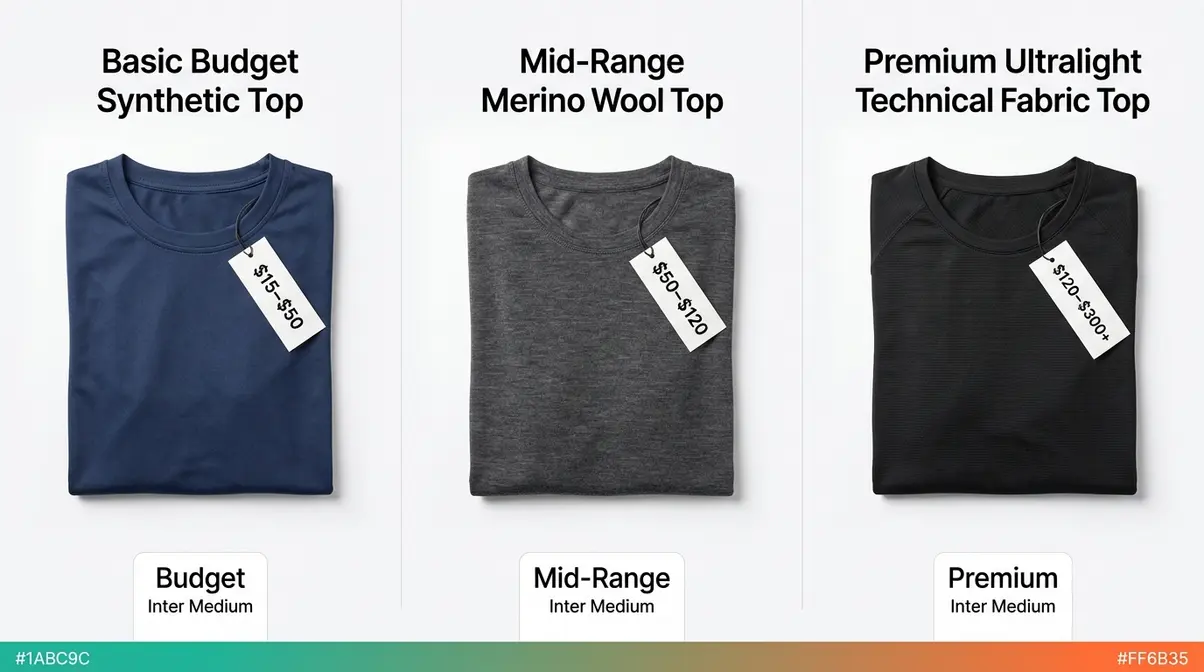
You don’t need to spend $300 on a base layer to stay warm. But you do need to understand what you actually get at each price point — because some budget shortcuts cost you comfort, while others cost you safety.
Budget vs. Premium Gear: What You Actually Get
The biggest performance difference between budget and premium gear comes down to three factors: weight, durability, and material quality.
| Tier | Price Range | What You Get | Best For |
|---|---|---|---|
| Budget | $15–$50/piece | Functional basics, heavier, less durable | Occasional camping, testing the hobby |
| Mid-range | $50–$120/piece | Better materials, longer life, lighter | Regular campers, weekend trips |
| Premium | $120–$300+/piece | Ultralight, technical fabrics, high durability | Frequent campers, backpacking |
For a first camping trip, mid-range gear is the sweet spot. Budget gear works, but the materials are often heavier and less moisture-wicking. Premium gear is worth the investment once you know you’ll use it regularly.
One area where spending more genuinely matters: your shell layer. A $25 rain poncho works for light drizzle. In sustained rain or wind, it fails. A quality waterproof/breathable shell jacket ($80–$150 range) is the one piece worth prioritizing in your budget.
[INTERNAL LINK: Anchor text “camping gear for beginners” — link to existing beginner gear guide page]
Best Base Layers for Camping
The best base layers for camping depend on your conditions and budget. Outdoor professionals and gear communities in 2026 broadly agree on two categories:
Merino wool base layers — Ideal for multi-day trips where you can’t change clothes often. Merino resists odor naturally, so you can wear it multiple days without it becoming unpleasant. It also provides gentle warmth even when slightly damp. Expect to pay $60–$130 for a quality merino top.
Synthetic base layers (polyester/polypropylene) — Best for high-output activities like steep hiking where you sweat heavily. Synthetics dry faster than merino, which matters when you’re pushing hard. Quality synthetic base layers start around $30–$60.
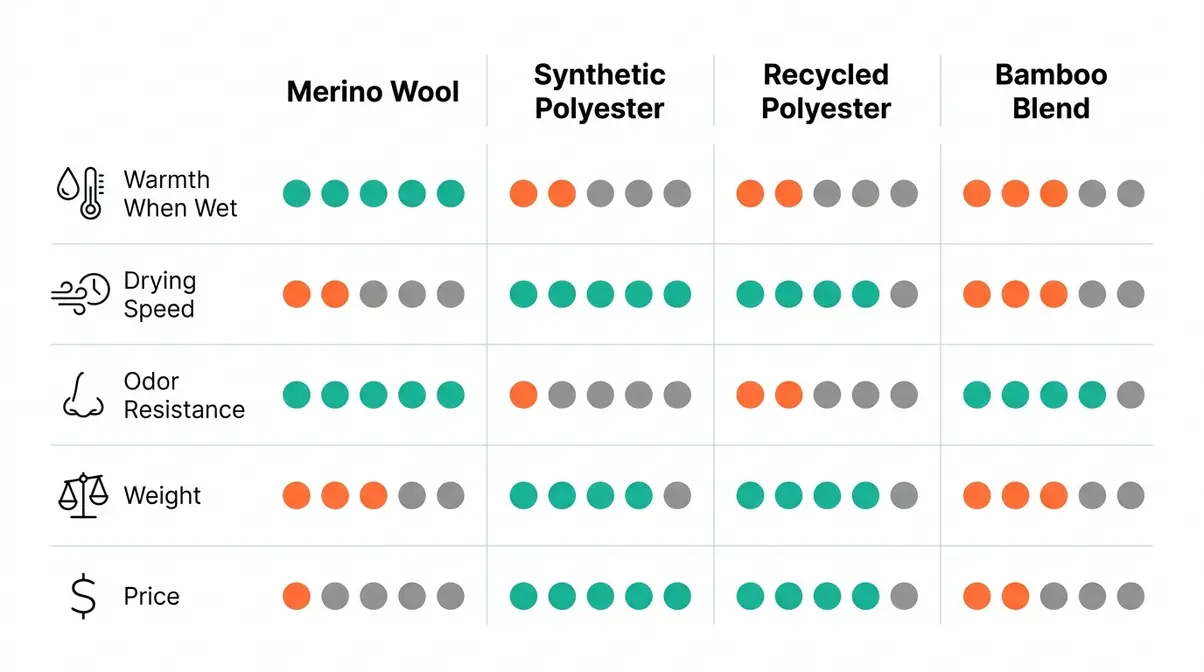
What to avoid: Any base layer with significant cotton content. Even a 50/50 cotton-polyester blend performs poorly in cold and wet conditions. Check the label before you buy.
Gear for Specific Camping Conditions
The 3-layer system is your foundation, but specific conditions require specific adaptations. Cold winter nights, multi-day backpacking trips, and family camping with kids each demand a slightly different approach.
Winter Camping Gear Essentials
Winter camping is where layering stops being comfortable and starts being critical for safety. Sub-freezing temperatures (below 32°F) require a 4-layer approach, adding an additional heavy insulation layer between your mid layer and shell.
- The 4-layer winter system:
- Base layer — Midweight merino wool or heavyweight synthetic (heavier than 3-season base)
- Mid layer — Fleece jacket or light synthetic puffy
- Heavy insulation layer — Down or synthetic parka (your primary warmth source)
- Shell layer — Waterproof/windproof hardshell
The 4 P’s of cold-weather camping is a framework for organizing your winter preparation. While the term is used loosely in outdoor education, the most practical version for campers focuses on: Perspiration management (stay dry from sweat), Protection (block wind and rain), Preparation (carry backup layers), and Prevention (de-layer before you overheat). The Princeton Outdoor Action Guide emphasizes this last point: strip down to feeling just cool before any strenuous activity — never let yourself sweat through your insulation layers.
Scenario 7 — Sub-freezing overnight camp: Temperatures drop to 20°F. You’re inside your sleeping bag but still cold. The fix is usually not a warmer bag — it’s wearing your insulated jacket and a wool hat inside the bag. Body heat warms the air pocket around you; extra insulation layers help you retain it. Backpacker magazine’s cold-weather sleep guidance also recommends eating a snack before bed, since digestion generates body heat through the night.
[INTERNAL LINK: Anchor text “sleeping bag temperature ratings” — link to existing winter camping or gear selection page]
Ultralight Backpacking Gear
Ultralight backpacking (carrying a base pack weight under 10 lbs) forces you to be ruthless about your layering system. Every ounce matters on a multi-day trail.
- The ultralight approach to the Dynamic Layer Stack:
- One merino base layer (worn every day — merino’s odor resistance makes this practical)
- One lightweight fleece or thin synthetic puffy (doubles as camp layer and mid layer)
- One ultralight hardshell (under 12 oz — look for packable rain jackets that compress to fist-size)
- No redundancy — each piece must earn its place
Scenario 8 — Three-day backpacking trip: You’re carrying everything on your back. Every item you don’t need is weight that slows you down. Experienced backpackers often report that switching from a full-size fleece to an ultralight synthetic active insulation jacket saves 8–12 oz — enough to matter over a 15-mile day.
Camping Gear for Kids
Children lose body heat faster than adults and have less ability to communicate when they’re cold before it becomes a problem. The layering system is even more critical for kids — and requires more active management from the adults in the group.
- Key differences for children’s camping gear:
- Size up slightly on the base layer — Kids move constantly; a slightly looser fit prevents restriction without sacrificing wicking function
- Prioritize easy-open zippers — Kids need to vent layers quickly; complicated closures mean they won’t bother
- Add an extra mid layer — Always pack one more insulating piece for a child than you think you’ll need
- Wool socks are non-negotiable — Children’s feet get cold and wet first; synthetic or wool socks prevent blisters and cold toes
Across parenting and camping communities, the consistent feedback is that kids in cotton sweatshirts at camp are the first ones miserable by evening. The same cotton-avoidance rule that applies to adults applies to children with even more urgency.
Buying vs. Renting Camping Gear
One of the most practical questions beginners face has nothing to do with layering technique: should you buy gear at all, or rent it first? The answer depends on how committed you are to the hobby before you’ve even tried it.
When Renting Camping Gear Makes Sense
Renting camping gear makes sense in three specific situations: you’re taking a single trip to test whether you enjoy camping, you’re traveling to a destination where bringing gear is impractical, or you need specialized equipment (like winter sleeping systems) for a one-time adventure.
The main advantage of renting: you get quality gear without the upfront cost. A full camping kit — tent, sleeping bag, sleeping pad, and basic clothing layers — can cost $400–$800 to purchase new. Renting the same kit for a weekend trip typically runs $50–$100.
The main disadvantage: rental gear is shared, often heavier than modern options, and may not be perfectly sized for your body. For clothing layers specifically, fit matters for wicking performance — a rental base layer that’s two sizes too large won’t wick effectively.
Where to Buy Camping Gear
For beginners buying their first layering kit, these are the most reliable options in 2026:
- REI — Extensive selection, knowledgeable staff, and a generous return policy. REI’s in-house brand (REI Co-op) offers solid mid-range gear at fair prices.
- Outdoor specialty retailers — Local shops often have staff with real outdoor experience who can help you choose layers for your specific region’s conditions.
- Online retailers (REI, Backcountry, Sierra) — Wider selection and frequent sales, but no ability to try before you buy. Order two sizes and return the one that fits poorly.
- Thrift stores and consignment gear shops — For fleece jackets and base layers, secondhand is a legitimate option. Avoid used shells with worn DWR coating unless you plan to re-treat them.
Pros and Cons: Buying vs. Renting
| Factor | Buying | Renting |
|---|---|---|
| Upfront cost | High ($400–$800+ for full kit) | Low ($50–$150/trip) |
| Long-term cost | Lower (gear lasts years) | Higher (costs repeat per trip) |
| Fit and comfort | Perfect (your gear) | Variable |
| Convenience | Always available | Must reserve in advance |
| Best for | Regular campers (2+ trips/year) | First-time or occasional campers |
The break-even point for most camping gear is around 3–4 trips. If you plan to camp more than twice a year, buying your own layering kit will pay for itself within two seasons.
[INTERNAL LINK: Anchor text “gear rental services” — link to existing buying/renting guide or gear resources page]
Common Layering Mistakes and How to Fix Them
The Dynamic Layer Stack only works if you avoid the patterns that undermine it. Outdoor professionals and camping forums consistently report the same beginner mistakes — and most of them are easy to fix once you know what to look for.
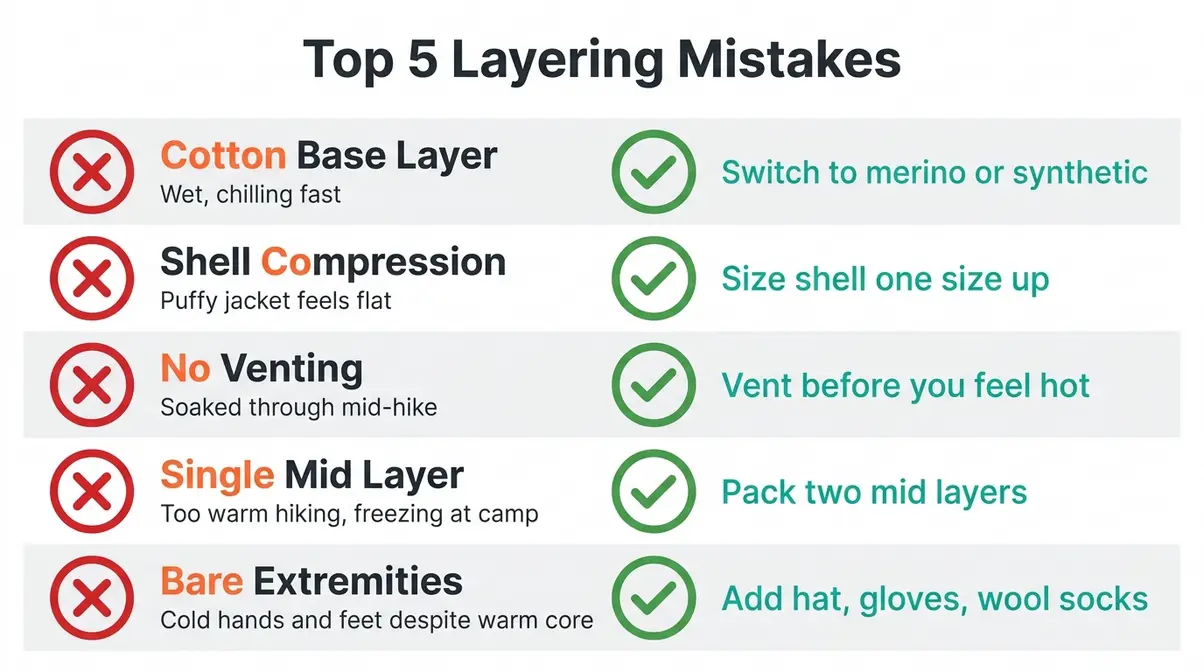
The Top 5 Layering Mistakes Beginners Make
Mistake 1: Wearing cotton as a base layer. Cotton absorbs moisture, loses all insulating value when wet, and dries extremely slowly — sometimes taking hours on a cold trail. The U.S. Army’s winter hiking guidance confirms: “Cotton does not insulate when wet; it actually draws heat away from the body” (U.S. Army Winter Hiking Safety). Replace cotton with merino wool or synthetic.
Mistake 2: Shell compression — crushing your insulation. Wearing a tight waterproof shell over a puffy jacket compresses the loft (the puffiness) that gives the jacket its warmth. Compressed insulation loses much of its effectiveness. Fix: size your shell one size up so your mid layer has room to breathe inside it.
Mistake 3: Waiting too long to vent or de-layer. You feel warm, then hot, then you’re sweating through your base layer. By the time you remove a layer, the damage is done — you have a wet base layer that will chill you. The fix: vent or de-layer the moment you feel warm, not after you’re already sweating.
Mistake 4: Packing only one mid layer. A single fleece jacket works for one temperature band. Pack two mid layers of different weights — a lighter one for active hiking and a warmer one for rest and camp. Basin Sports’ layering guidance recommends “two middle layers of different weights” as a core part of any camping kit.
Mistake 5: Ignoring extremities. Your hands, feet, and head lose heat disproportionately fast. A perfect three-layer torso system fails if your hands are bare and your feet are in cotton socks. Pack a wool or synthetic hat, lightweight gloves, and moisture-wicking socks for every trip.
When to Choose a Different Approach
The 3-layer system works brilliantly for most camping conditions — but it’s not the only approach. In very hot, dry conditions (desert camping above 85°F), the priority shifts from insulation to sun protection and moisture management. A single lightweight sun-protective shirt may outperform a base layer/mid layer combination in those conditions.
Similarly, if you run hot naturally and tend to overheat on hikes, you may find that a single breathable mid layer works better than the full three-piece system for active portions of your trip. The system is a framework, not a law.
When to Ask a Professional or Guide
Some camping conditions exceed what a beginner should navigate alone with a new layering system. Consider booking a guided trip or consulting an outdoor gear specialist if you’re planning:
- Winter camping below 20°F — Sub-freezing conditions require gear knowledge and emergency protocols that go beyond clothing layers
- Multi-day backcountry backpacking — Remote travel where gear failure has serious consequences
- High-altitude camping — Temperature swings, wind exposure, and reduced oxygen require specific gear choices
REI, local outfitters, and organizations like the Appalachian Mountain Club offer beginner-oriented guided camping trips where you can test your layering system with expert support.
Frequently Asked Questions
How do you layer clothes for camping?
Start with a moisture-wicking base layer (merino wool or synthetic) directly against your skin. Add a fleece or insulated jacket as your mid layer for warmth. Top with a waterproof/breathable shell for wind and rain protection. The key is active management: add layers before you get cold, remove them before you start sweating. REI’s expert layering guidance confirms this three-step approach as the standard for outdoor comfort across all seasons.
What is the 3-layer rule for winter camping?
The 3-layer rule for winter camping means wearing a moisture-wicking base layer, an insulating mid layer (fleece or puffy jacket), and a waterproof/windproof shell. In sub-freezing conditions, many outdoor professionals recommend a 4-layer system — adding a heavy insulation parka between the mid layer and shell. The AMC Outdoors winter layering guide describes this expanded approach as essential for temperatures below 20°F, where a standard 3-layer system may not provide enough warmth during static periods.
What are the 10 essential items for camping?
The 10 Essentials, as defined by the National Park Service, are organized as systems: (1) Navigation, (2) Sun protection, (3) Extra clothing/insulation, (4) Illumination, (5) First-aid supplies, (6) Fire, (7) Repair kit and tools, (8) Nutrition, (9) Hydration, and (10) Emergency shelter. Three of the ten directly relate to clothing layers. The NPS describes these as “a collection of first aid and emergency items that can help you in the event of minor injuries, sudden weather changes, or unexpected delays.”
What are the best base layers for camping?
The best base layers for camping are merino wool or synthetic (polyester/polypropylene) — never cotton. Merino wool excels on multi-day trips because it resists odor and stays comfortable even slightly damp. Synthetic base layers dry faster and cost less, making them ideal for high-output hikes where you sweat heavily. For most beginners, a mid-weight synthetic base layer ($30–$60) delivers excellent performance. Upgrade to merino ($70–$130) once you know you’ll camp regularly.
What is the 3-3-3 rule for clothing?
The 3-3-3 rule for clothing originated in fashion contexts — pack 3 tops, 3 bottoms, and 3 pairs of shoes for travel. In outdoor contexts, this rule doesn’t apply directly. Camping clothing selection is driven by activity level, temperature range, and weather, not fashion packing formulas. Outdoor professionals recommend thinking in terms of layer function (wicking, insulating, protecting) rather than item counts. Packing two mid layers of different weights is more useful than trying to fit your kit into a numerical formula.
What is the 3-3-3 rule when camping?
In camping specifically, the “3-3-3 rule” refers to a campsite etiquette guideline — arrive by 3 p.m., set up camp within 3 miles of your planned site, and leave by 3 a.m. (or observe quiet hours). This is unrelated to clothing layering. For layering, the useful framework is the 3-layer system: base (wicking), mid (insulating), and shell (weather protection). Don’t let the naming similarity create confusion — one is about camp behavior, the other is about how you dress.
What are the 4 P’s for cold weather camping?
The 4 P’s for cold-weather camping focus on keeping your insulation dry and your body temperature regulated. They are: Perspiration management (de-layer before you sweat), Protection (use a waterproof shell to block rain and wind), Preparation (carry backup layers for temperature drops), and Prevention (never let moisture — from sweat or rain — reach your insulating layers). The Princeton Outdoor Action Guide’s winter camping research emphasizes that managing perspiration is the single most important factor in cold-weather comfort, since wet insulation can lose 50–90% of its warming ability.
What is the most forgotten item when camping?
The most forgotten camping item is a spare, dry base layer dedicated to sleeping. Most beginners pack clothes for daytime activity but skip a clean sleeping set. Sleeping in sweat-damp clothes significantly reduces your sleeping bag’s insulating performance. A close second: a headlamp (not a flashlight) for every member of the group. Common beginner mistakes reported in outdoor forums also include forgetting wool socks, gloves, and a hat — accessories that protect the extremities where heat loss is fastest.
Staying Warm Is a System, Not a Purchase
For beginners, camping gear layering comes down to one core insight: comfort outdoors is not about one perfect piece of gear. It’s about three purposeful layers — a moisture-wicking base, an insulating mid layer, and a protective shell — managed actively throughout the day as your activity and conditions change.
The Dynamic Layer Stack is the framework that makes this practical. Start slightly cool at the trailhead. Vent before you sweat. Add your warmest layer the moment you stop moving. Change into dry base layers at camp. These habits, more than any specific gear purchase, are what separate comfortable campers from miserable ones.
Your first step is simpler than it seems. Choose one merino wool or synthetic base layer to replace any cotton you were planning to pack. Add a fleece and a packable rain jacket. That three-piece foundation will serve you well across every camping scenario from a spring weekend to a fall overnight — and it gives you the confidence to build from there.

David King
Field gear tester at Tent Explorer.