This blog post may contain affiliate links. As an Amazon Associate I earn from qualifying purchases.
📋 Table of Contents
- Know Your Tent Type Before You Buy
- Dome Tents: Best for Beginners
- Cabin Tents: For Headroom and Space
- Backpacking Tents: Built for the Trail
- Decode the Key Features That Actually Matter
- Tent Seasonality: Why 3-Season is Best
- Sizing Up: The N+1 Person Rule Explained
- Rainfly, Vents, and Condensation
- Poles, Setup Systems, and Durability
- Set Your Budget and Pick Your First Tent
- Expectations by Price Point ($50-$400)
- 4 Beginner-Friendly Tent Options
- Used Tent Inspection Checklist
- Pro Tips for Your First Tent Setup and Beyond
- Do a Practice Run at Home First
- Do You Really Need a Tent Footprint?
- Tent Care: Pack It Dry, Store Right
- Common First-Time Tent Buyer Mistakes
- 5 Buying Mistakes That Waste Money
- When to Pick a Different Tent
- Frequently Asked Questions
- What’s the most important tent feature?
- How much should I spend on a tent?
- What size tent do I need for 2 people?
- 3-Season vs. 4-Season Tents
- Do I really need a tent footprint?
- Stop Second-Guessing and Start Camping
“Choosing a tent is overwhelming! Any Advice?”
If you’ve typed something like that into Reddit, you’re not alone. Thousands of first-time campers ask this exact question every spring — and the answers they get are either vague (“it depends on your needs”) or buried under gear-head jargon that raises more questions than it answers.
Walk into any outdoor retailer and you’ll face a wall of options: dome tents, cabin tents, 3-season, 4-season, hydrostatic head ratings, denier counts. Buy the wrong one and you’re either soaked on your first night out — or hauling a 15-pound cabin tent on a trail it was never designed for. These tent buying tips for beginners exist to cut through that noise.
By the end of this guide, you’ll know exactly which tent type fits your camping style, which features actually matter, and how to get the best value at any budget. We’ll cover tent types, essential features, budgeting and specific picks, first-use tips, and the most common beginner mistakes — in that order.
Key Takeaways: Tent Buying Tips for Beginners
Choosing your first tent comes down to three non-negotiables — The Tent Trifecta: a 3-season rating, a full-coverage rainfly, and a beginner-friendly setup system. Most beginners need a dome tent in a 3-person size for a 2-person trip, with a budget of $100–$250.
- Tent Type: Dome tents are the best starting point for 90% of beginners — stable, affordable, and easy to pitch
- Sizing: Always buy one size up — a “2-person” tent is genuinely tight for two adults with gear
- Seasonality: A 3-season tent handles spring, summer, and fall — the vast majority of beginner camping trips
- Budget: Expect to spend $100–$250 for a quality first tent; below $50 typically means poor weather resistance
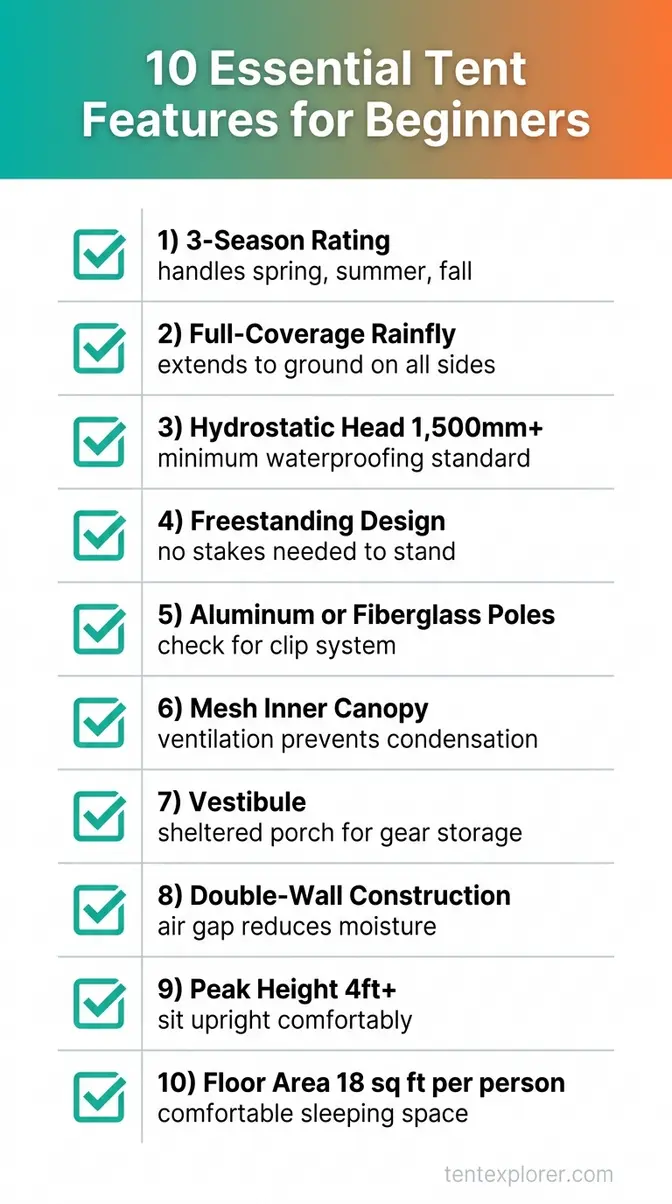
- The Tent Trifecta: Every tent you consider should pass this three-part check: 3-season rated, full rainfly included, color-coded or clip-based poles for easy setup
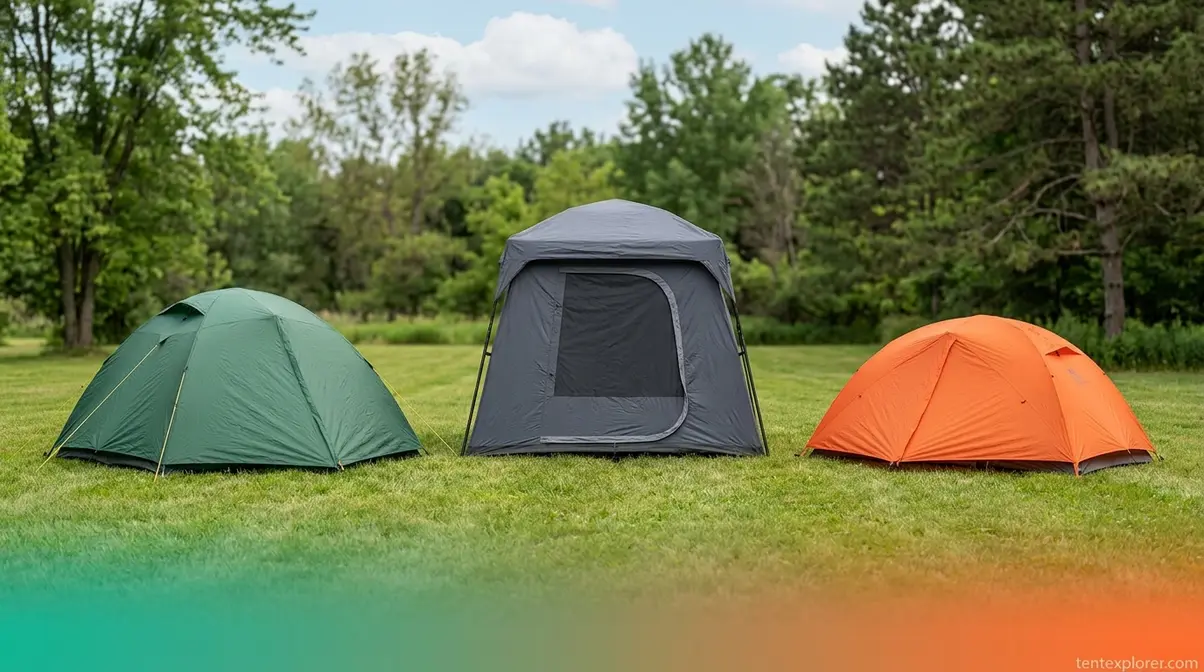
Know Your Tent Type Before You Buy
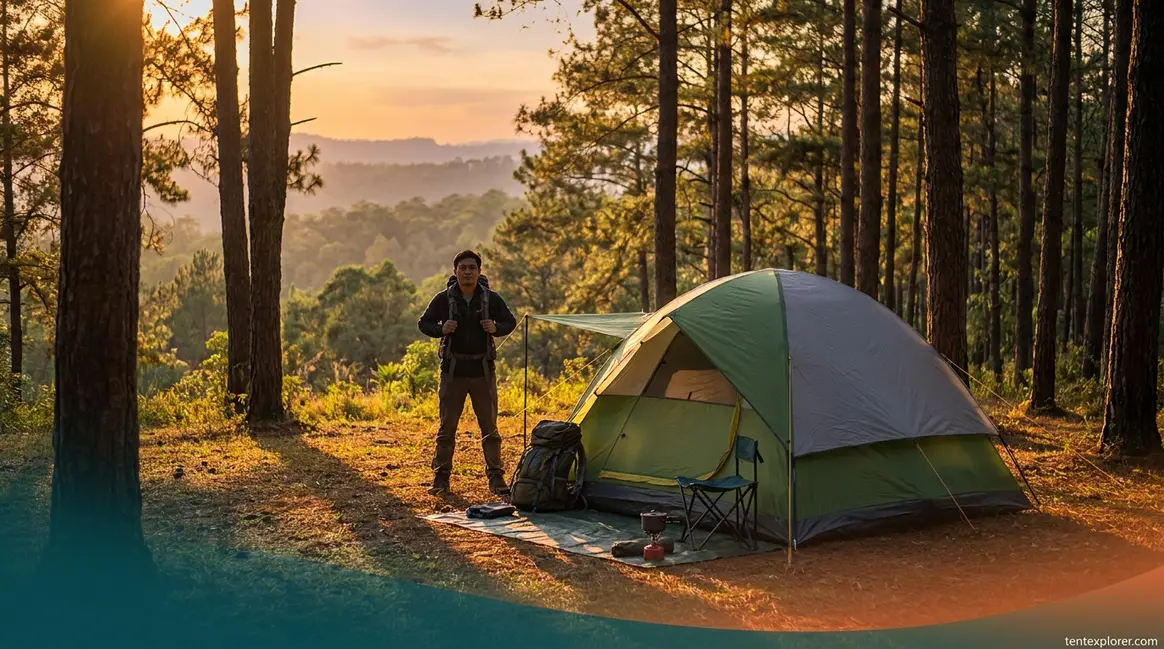
For most beginners, the single most important tent decision is matching your tent style to your camping activity. The majority of first-time campers are car campers — driving to a campsite and setting up for a weekend — which makes the dome tent the default correct starting point for most people reading this guide. Choosing the wrong style creates real, avoidable problems: a cabin tent on a hiking trip becomes an exhausting anchor, while a backpacking tent at a car campsite wastes money on features you don’t need.
For a visual walkthrough of dome versus cabin tent differences, watch our short comparison video below.
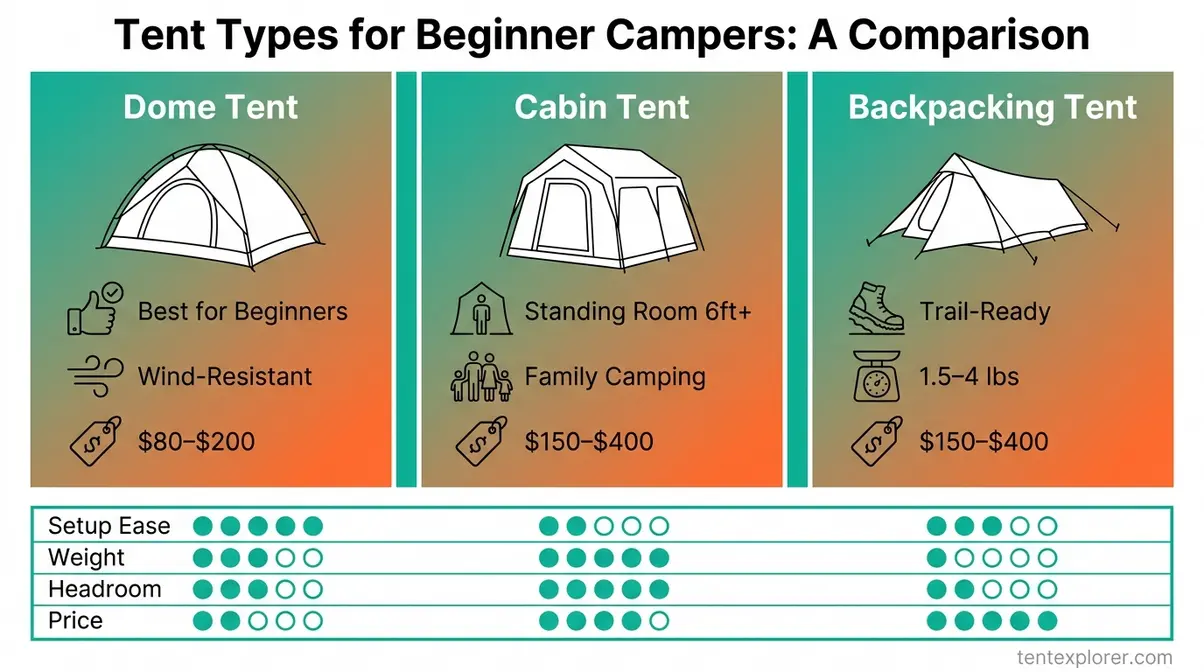
Dome Tents: Best for Beginners
Dome tents are the right choice for most beginner campers — they’re freestanding, wind-resistant, and available in quality configurations from $80 to $200 (Outside Magazine).
A dome tent is the freestanding, rounded shelter that’s the most beginner-friendly design on the market. Its curved geometry does something important that flat-walled tents cannot: it sheds wind and rain passively. For a beginner who forgets to stake out the rainfly perfectly — which happens on nearly every first camping trip — that curved shape still channels water away from the seams rather than pooling against the walls.
“Freestanding” means the tent stands on its own without requiring stakes to stay upright. This is a practical advantage competitors rarely emphasize: on rocky ground or frozen soil where stakes won’t penetrate, a freestanding dome tent still works. Most dome tents pitch in 10–15 minutes using color-coded poles that clip onto the tent body from the outside.
For car camping at a state park, entry-level dome tents start around $80–$150. The Coleman Sundome series and REI Co-op Passage 2 are frequently cited as beginner-friendly examples in this range — we cover specific picks in H2 #3. When Outside Magazine evaluates pole materials, they note that most high-quality tents use aluminum because it is significantly stronger and lighter than fiberglass. Budget dome tents often use fiberglass poles, which is acceptable for occasional car camping but worth knowing upfront.
For specific model recommendations, see our guide to the best tents for car camping.
Transition: Dome tents cover most beginner scenarios — but if you’re camping with family and want to stand up inside your shelter, a cabin tent changes the equation entirely.
Cabin Tents: For Headroom and Space
A cabin tent is a boxy, high-walled design built for car camping comfort and standing room. Where a dome tent’s curved walls slope inward, a cabin tent has near-vertical walls and a peak height that typically reaches 6 feet or more — enough for most adults to stand, change clothes, and move around without crouching.
This extra livable space comes with trade-offs that beginners should understand before they buy. Cabin tents are heavier, often ranging from 15–25 lbs, and bulkier when packed. Setup typically takes 20–30 minutes — longer than a dome tent — and requires more staking. Critically, their flat vertical walls catch wind more easily than a dome’s curved profile. A cabin tent that isn’t properly staked out in a gusty campsite can flex dramatically and even collapse. This is a practical tip missing from most competitor guides: always stake a cabin tent fully, even on calm nights.
For a family of four at a car-accessible campsite, a cabin tent delivers roughly 20+ square feet of floor space per person and genuine standing room — a meaningful comfort upgrade for multi-day car camping trips. Price-wise, family cabin tents typically run $150–$400. Larger models for six to twelve people can exceed $500. For most families of four, a quality cabin tent lands in the $200–$300 range.
Transition: If you’re planning to carry your tent on your back — even for a single overnight — neither a dome nor a cabin tent is the right choice. That’s where backpacking tents come in.
Backpacking Tents: Built for the Trail
A backpacking tent is a lightweight, packable shelter designed to be carried on the trail. Where a dome tent prioritizes ease of setup and weather resistance at a reasonable weight, a backpacking tent sacrifices interior space to achieve a packed weight of 1.5–4 lbs. Most use aluminum poles and silicone-coated nylon fabric to hit those numbers.
The decision rule for beginners is straightforward: if you’re hiking more than one mile to your campsite, a backpacking tent is worth the extra cost. If you’re driving to a campsite, a dome tent is almost always the better value choice. Carrying a 15-lb cabin tent on a 5-mile overnight hike is the difference between a manageable pack and a genuinely miserable experience — your back will make the decision for you.
Quality beginner backpacking tents start around $150–$300. The REI Co-op Half Dome series is a commonly recommended entry point. Ultralight options priced at $400 and above are built for experienced hikers who have already optimized every ounce of their kit — not the right investment for a first-time camper.
For a detailed breakdown of how these two styles compare, see our guide to the differences between backpacking and camping tents.
What About Other Styles? Beyond dome, cabin, and backpacking tents, a few niche options exist. Truck tents mount in a pickup bed for elevated sleeping — convenient for overlanders. Screen houses are open-sided mesh shelters designed for bug-free lounging, not sleeping. Ultralight tents (under 2 lbs) are engineered for experienced thru-hikers counting every gram. For most beginners, none of these are the right first purchase.
Tent Type Comparison
| Tent Type | Best For | Pros | Cons | Price Range |
|---|---|---|---|---|
| Dome | Car camping, beginners | Easy setup, wind-resistant | Less headroom | $80–$200 |
| Cabin | Family base camps | Standing room, spacious | Heavy, catches wind | $150–$400 |
| Backpacking | Trail camping, hiking | Very lightweight | Expensive, less space | $150–$400 |
Once you’ve chosen your tent style, you’ll apply The Tent Trifecta — three non-negotiable features every beginner tent must have — which we cover next.
Decode the Key Features That Actually Matter
The features that matter most for beginners are seasonality rating, tent size, rainfly coverage, and setup system. Popular Mechanics recommends that even a solo tent should have at least 18 square feet of interior space and a 38-inch peak height for adequate comfort. Understanding these four features lets you evaluate any tent in under 60 seconds — which is exactly what The Tent Trifecta — 3-season rating, full rainfly, beginner-friendly setup — is designed to help you do.
Tent Seasonality: Why 3-Season is Best
A 3-season tent is designed for spring, summer, and fall camping conditions — it handles moderate rain, wind, and temperatures above freezing, with mesh panels that keep you comfortable on warm summer nights. For most beginners, this is the only seasonality tier worth considering.
Here’s how the full rating system breaks down in plain English:
- 1-season / summer tent: Warm weather only. Minimal weather protection. Very cheap ($30–$60). Not recommended — one unexpected rainstorm and you’re soaked.
- 2-season: Light rain and wind. Budget-friendly. Acceptable for mild summer camping in dry climates only.
- 3-season: Spring, summer, and fall. Handles moderate rain, wind, and temperatures above freezing. The beginner default — covers 95% of camping scenarios.
- 4-season / winter tent: Snow loads, high winds, sub-freezing temperatures. Heavier, less ventilated, more expensive.
The reason 3-season wins for beginners goes beyond weather coverage. A 3-season tent has more mesh ventilation than a 4-season model, which matters enormously on warm summer nights when you need airflow. Popular Mechanics describes 4-season tents as “impenetrable shelters designed specifically for snow and high winds” — not what a first-time camper at a state park needs.
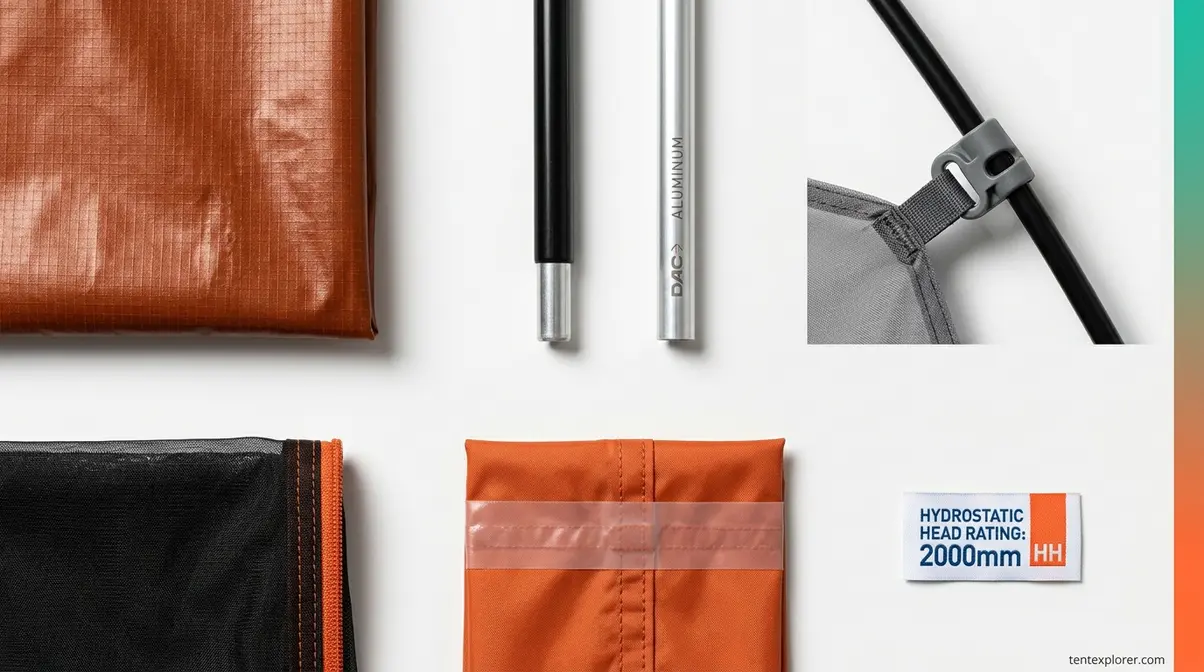
On the spec sheet, look for the hydrostatic head (HH) rating — a number in millimeters that tells you how waterproof a fabric is. Industry standards confirm that 1,500mm is the minimum for adequate 3-season protection, with 2,000mm or higher recommended for rainy climates. A 3-season tent rainfly typically falls in the 1,500mm–3,000mm range.
| Season Rating | Conditions Handled | Ventilation | Price Range |
|---|---|---|---|
| 1-season | Warm, dry weather only | High (minimal protection) | $30–$60 |
| 2-season | Light rain and wind | Moderate | $60–$100 |
| 3-season | Rain, wind, above-freezing temps | Good | $80–$300 |
| 4-season | Snow, high winds, sub-zero temps | Low | $200–$600+ |
For a full breakdown of when to upgrade, see our guide on what a 3-season tent means for your specific conditions.
Transition: Seasonality tells you how tough a tent is. Sizing tells you whether you’ll actually fit inside it — and the standard ratings are more misleading than most beginners realize.
Sizing Up: The N+1 Person Rule Explained
Tent capacity ratings consistently mislead first-time buyers. Manufacturers rate tents for the maximum number of sleeping bags that physically fit on the floor — with zero allowance for gear, personal space, or comfortable movement. A “2-person” tent is genuinely tight for two adults.
The fix is simple: always buy one size up. This is the N+1 rule, and it’s the standard recommendation across the camping community.
The N+1 Rule: + 1 =
- 1 person → buy a 2-person tent
- 2 people → buy a 3-person tent
- Family of 4 → buy a 6-person tent (if storing gear inside)
Beyond capacity, check two secondary dimensions that matter as much as floor space. First, floor area: Popular Mechanics recommends at least 18 square feet of interior space per person for comfortable sleeping. Second, peak height — and this is the editorial insight that most guides miss entirely. A tent with impressive floor space but a 3.5-foot peak height forces adults to crawl everywhere. Under 4 feet means crawling; 5–6 feet means sitting upright; 6+ feet means standing.
For two adults with weekend gear, a labeled “3-person” tent with 45+ square feet of floor space and a 4.5-foot peak height is the practical minimum for comfortable camping. Check both dimensions on every product page — floor space alone doesn’t tell the full story.
For the complete breakdown of how manufacturers calculate space, see our guide to understanding tent capacity ratings.
Transition: With the right size selected, your next concern is staying dry — and this is where the rainfly and ventilation system become the two most underappreciated features on any tent.
Rainfly, Vents, and Condensation
A rainfly is the waterproof outer layer that drapes over your tent’s inner canopy to shed rain. Two types exist: a partial (half) rainfly covers only the roof of the tent, leaving the sides exposed; a full-coverage rainfly extends down to the ground on all sides. For beginners, always choose full-coverage. A partial rainfly fails in wind-driven rain — the kind you’re most likely to encounter on a real camping trip.
Here’s the condensation problem that no competitor article explains clearly: even with a full rainfly and no rain overnight, many beginners wake up damp. The cause isn’t a leaking tent — it’s condensation. Your body heat warms the air inside the tent; that warm, humid air meets the cold tent fabric and forms moisture on the inner walls. In the morning, it drips on your sleeping bag.
The solution is a double-wall tent design — a separate inner canopy and outer rainfly with an air gap between them. Moisture from your body passes through the breathable mesh inner canopy, enters the air gap, and vents out through the rainfly vents rather than condensing on your sleeping surface. This is why mesh inner canopy panels, adjustable vents in the rainfly, and a vestibule (the sheltered porch-like area outside your tent door — ideal for storing muddy boots and wet gear) that can be left partially open matter so much.
When shopping, look for: mesh inner canopy panels, at least one adjustable vent in the rainfly, and a vestibule large enough to leave a boot-width gap for airflow without exposing your sleeping area to rain. The National Park Service lists shelter as one of the Ten Essentials for outdoor safety, specifically highlighting reliable weather protection as foundational — and a full-coverage rainfly with proper ventilation is how a tent delivers that.

Transition: The rainfly keeps rain out. The poles keep the whole structure standing — and the material they’re made from affects both your setup experience and how long your tent lasts.
Poles, Setup Systems, and Durability
Two pole materials dominate the beginner tent market, and the difference between them is more significant than price tags suggest.
Fiberglass poles are heavier, cheaper, and more flexible. They’re found in most budget tents under $100 and are entirely acceptable for occasional car camping. The catch: fiberglass splinters in cold weather. In sub-freezing temperatures, the fibers can crack and separate, leaving you with a sharp, unusable pole section. Aluminum poles are lighter, stronger, and more expensive. Outside Magazine notes that most high-quality tents use aluminum because it is significantly stronger and lighter than fiberglass. For backpackers, aluminum is non-negotiable. For car campers, fiberglass is acceptable — just know the limitation.
| Pole Material | Weight | Durability | Cold Weather | Best For | Cost |
|---|---|---|---|---|---|
| Fiberglass | Heavier | Moderate | Splinters in cold | Car camping | Lower |
| Aluminum | Lighter | High | Reliable | Backpacking + car camping | Higher |
Beyond pole material, setup system matters enormously for beginners. Clip systems (hooks that attach the tent body to the poles from the outside) are faster and more forgiving — you can see what you’re doing, and clips are easy to attach in low light. Sleeve systems (poles thread through fabric channels) provide more stability in high winds but are slower and more frustrating for first-timers. Beginners should prioritize clips and look for the word “clip” or “hub” in the product description.
Two durability numbers appear on every quality tent’s spec sheet. Hydrostatic head (HH) measures waterproofing in millimeters: 1,500mm is the industry-recognized minimum for 3-season use, with 2,000mm or higher recommended for wetter climates. Denier (D) measures fabric thread thickness — higher denier means more durable but heavier fabric. Outside Magazine notes that even budget tents using 68-denier polyester fly fabric can provide a highly durable, rock-solid pitch for car campers. For beginners, a 40D–75D flysheet is typical; 150D or higher floor fabric is more durable against ground abrasion.
For a deep dive into how tent manufacturers calculate sleeping capacity, see our complete guide to understanding tent capacity ratings.
Set Your Budget and Pick Your First Tent
Most beginners should budget $100–$250 for their first tent. While more breathable and durable tents cost more, the most expensive models are typically priced higher because they prioritize ultra-lightweight materials for backpacking — not what a first-time car camper needs, as Popular Mechanics notes. Below $100 typically means weather resistance compromises; above $250 is often paying for weight savings you won’t appreciate yet. A quality beginner tent costs between $100 and $250 — spending more than this as a first-time buyer rarely improves your experience, while spending less usually means compromising on weather resistance.
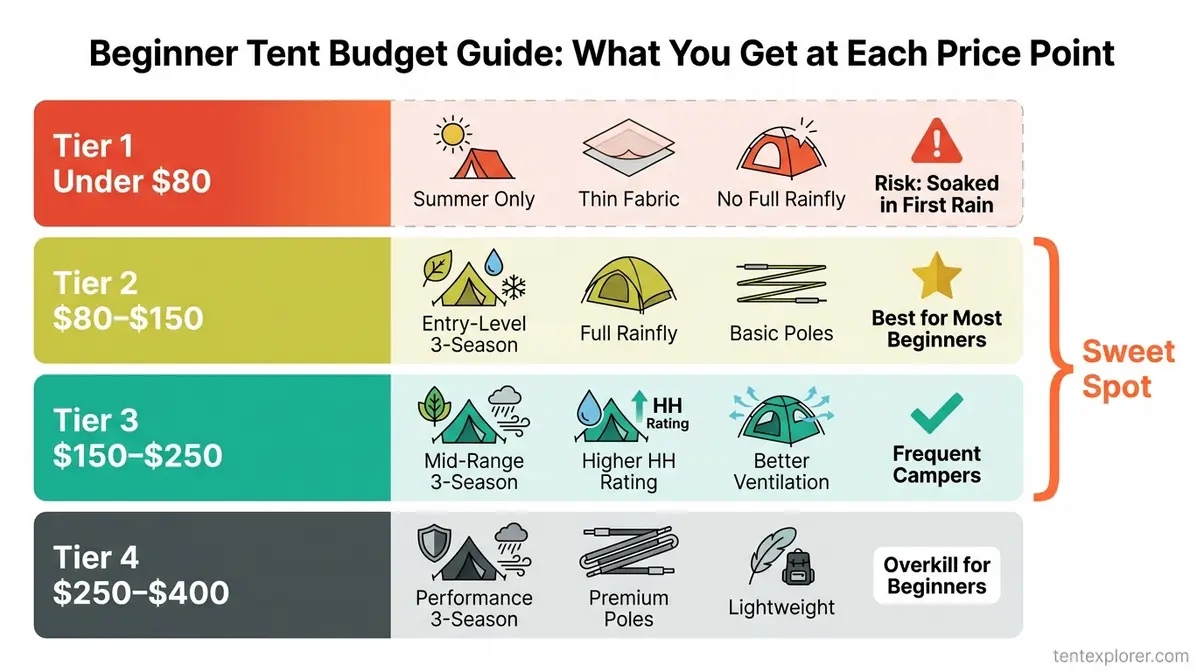
Expectations by Price Point ($50-$400)
Knowing what your money buys at each price tier prevents the most expensive beginner mistake: the “Don’t Waste $600” cycle — buying a cheap tent that fails in the first rainstorm, replacing it, and ultimately spending more than a quality first purchase would have cost.
- Under $80: Summer-only or 1-season tents. Thin fabric, minimal weather resistance, often no full rainfly. Acceptable only for dry-weather camping in warm months. Risk: one rainstorm and you’re soaked.
- $80–$150: Entry-level 3-season dome tents. Full rainfly (usually), basic aluminum or fiberglass poles, adequate for 3-season car camping. Most beginner-appropriate purchases land here.
- $150–$250: Mid-range 3-season tents. Better materials — higher denier fabric, improved HH ratings, better ventilation. Suitable for beginners who camp frequently or live in wetter climates.
- $250–$400: Performance 3-season or entry-level backpacking tents. Significant weight savings, premium pole materials, better livability. Generally overkill for a true beginner.
| Price Range | What You Get | Recommended For | Risk |
|---|---|---|---|
| Under $80 | Summer-only, thin fabric, no full rainfly | Dry-weather camping only | Soaked in first rain |
| $80–$150 | Entry-level 3-season, full rainfly, basic poles | Most beginner car campers | Fiberglass poles may splinter |
| $150–$250 | Mid-range 3-season, better HH, better ventilation | Frequent campers, wet climates | Minimal at this tier |
| $250–$400 | Performance 3-season, lightweight, premium poles | Experienced backpackers | Overkill for beginners |
Popular Mechanics confirms that while more breathable and durable tents cost more, the most expensive models prioritize ultra-lightweight materials for backpacking. For a complete breakdown across all price tiers, see our guide to tents for every budget.
Transition: With a budget in mind, here are four specific tents that consistently earn beginner recommendations — each evaluated against The Tent Trifecta.
4 Beginner-Friendly Tent Options
These tent buying tips for beginners are most useful when anchored to specific examples. After reviewing dozens of beginner tent setups and community feedback across camping forums, four models consistently surface as well-matched to first-time buyers. Each is evaluated against The Tent Trifecta: 3-season rated ✅/❌, full rainfly ✅/❌, and easy setup ✅/❌.
Coleman Sundome 4 (~$90–$110)
The most frequently recommended beginner dome tent in camping communities. The Sundome 4 is a 4-person dome tent that consistently earns beginner recommendations for its simple setup and weatherproof design — buy it for 2–3 adults and gear rather than the labeled four people. It uses fiberglass poles and a full-coverage rainfly with a sewn-in floor.
- 3-season rated: ✅ | Full rainfly: ✅ | Easy setup: ✅
- Key specs: ~55 sq ft floor space, 4.9 ft peak height, fiberglass poles, WeatherTec system with patented pin-and-ring pole connections
- Best for: First-time car campers who want proven reliability at the lowest reasonable price point
- Honest limitation: Fiberglass poles can splinter in cold weather and are not suitable for backpacking. Not the tent to take on a trail.
Where the Coleman Sundome excels at simplicity and affordability, the REI Co-op Passage 2 takes a step up in materials and versatility.
REI Co-op Passage 2 (~$149–$179)
A step-up option for couples or solo campers who may eventually try backpacking. The REI Co-op Passage 2 is a 2-person backpacking-capable dome tent with a full-coverage rainfly, aluminum poles, and 29 square feet of floor space.
- 3-season rated: ✅ | Full rainfly: ✅ | Easy setup: ✅
- Key specs: 29 sq ft floor space, 3.9 ft peak height, aluminum poles, 1,200mm rainfly HH (adequate for moderate rain)
- Best for: Solo campers or couples who want a versatile tent that works for both car camping and occasional backpacking
- Honest limitation: Rated for 2 but genuinely tight for 2 adults with gear — if budget allows, the Passage 3 solves this immediately. Apply the N+1 rule here too.
The Passage 2 is a natural upgrade from the Sundome’s fiberglass poles. For campers who want cabin-tent headroom without the cabin-tent price, the Coleman Skydome offers a middle path.
Coleman Skydome 4 (~$180–$190, REI)
A wide-door dome tent with near-vertical walls that give it more usable interior space than a standard dome at a similar price. The Skydome’s 6-foot peak height is the headline feature — you can stand up inside, which most dome tents in this price range don’t allow.
- 3-season rated: ✅ | Full rainfly: ✅ | Easy setup: ✅
- Key specs: ~56 sq ft floor space, 6 ft peak height, steel and fiberglass poles, pre-attached poles for faster setup
- Best for: Beginners who want dome-tent ease of setup with cabin-tent headroom — a genuine comfort upgrade for weekend car camping
- Honest limitation: Heavier than comparable dome tents at ~13 lbs. Not a backpacking option.
The Skydome covers car campers who want standing room. For those leaning toward trail camping, the Kelty Wireless 2 bridges the gap between car camping and backpacking.
Kelty Wireless 2 (~$139.95, REI)
A beginner-friendly backpacking tent with a simplified hub-and-spoke pole system that makes setup notably faster than traditional sleeve-based backpacking tents. At 4.5 lbs, it’s light enough for trail use without requiring the premium price of ultralight models.
- 3-season rated: ✅ | Full rainfly: ✅ | Easy setup: ✅
- Key specs: ~28 sq ft floor space, 3.7 ft peak height, aluminum poles, hub-and-spoke pole system
- Best for: Beginners who know they’ll be hiking to campsites and want a true trail-capable tent without a $400 price tag
- Honest limitation: Small vestibule limits gear storage. Not ideal for family camping or multi-day base camps where you want room to spread out.
Outside Magazine confirms that models using a 68-denier polyester fly and quality pole systems can still provide a highly durable, rock-solid pitch for car campers. For our full tested evaluation, see best beginner tents — 20+ models reviewed with real-world setup testing.
Transition: Before you commit to a new tent, it’s worth knowing that buying a quality used tent can cut your cost in half — if you know how to inspect it properly.
Used Tent Inspection Checklist
Buying secondhand is a smart move for budget-conscious campers — a $60 used tent in good condition beats a $60 new tent every time. But the risk of getting a dud is real if you don’t know what to look for. Worried about mold, broken zippers, or hidden damage? This 6-step inspection protocol covers everything.
Step 1: Smell test Unzip the tent and put your head inside. Any musty, mildew, or sour smell means mold is present. Walk away. Mold in tent fabric is nearly impossible to fully remove, and it will worsen with every use.
Step 2: Seam check Run your fingers along every seam. Look for cracking or peeling seam tape. Failed seam tape equals a leaking tent in the first rain. Resealing is possible but adds cost and effort.
Step 3: Fabric inspection Hold the rainfly up to light. Pinholes, thin spots, or UV degradation (fabric feels crinkly or powdery to the touch) indicate compromised waterproofing that DWR spray alone won’t fix.
Step 4: Zipper test Open and close every zipper fully. Sticky, snagging, or missing teeth is a serious problem. Zipper replacement often costs more than the tent itself is worth.
Step 5: Pole check Inspect each pole section for cracks, splinters (fiberglass), or bent sections (aluminum). Poles can be replaced affordably, but know the cost before you agree on a price.
Step 6: Full pitch test Always ask the seller to pitch the tent before purchase, or do it yourself. A tent that looks fine folded in a stuff sack may reveal structural problems — a bent pole section, a missing clip, a broken grommet — only when assembled.
Transition: You’ve chosen your tent type, decoded the specs, and set your budget. Now comes the part most guides skip entirely — what to actually do when your tent arrives.
Pro Tips for Your First Tent Setup and Beyond
Three actions separate beginners who have a great first camping trip from those who don’t: a practice setup at home before the trip, using a tent footprint, and packing the tent away dry every time. Once you’ve verified your tent passes The Tent Trifecta, these three habits will make your first night out dramatically more comfortable — and your tent’s lifespan dramatically longer.
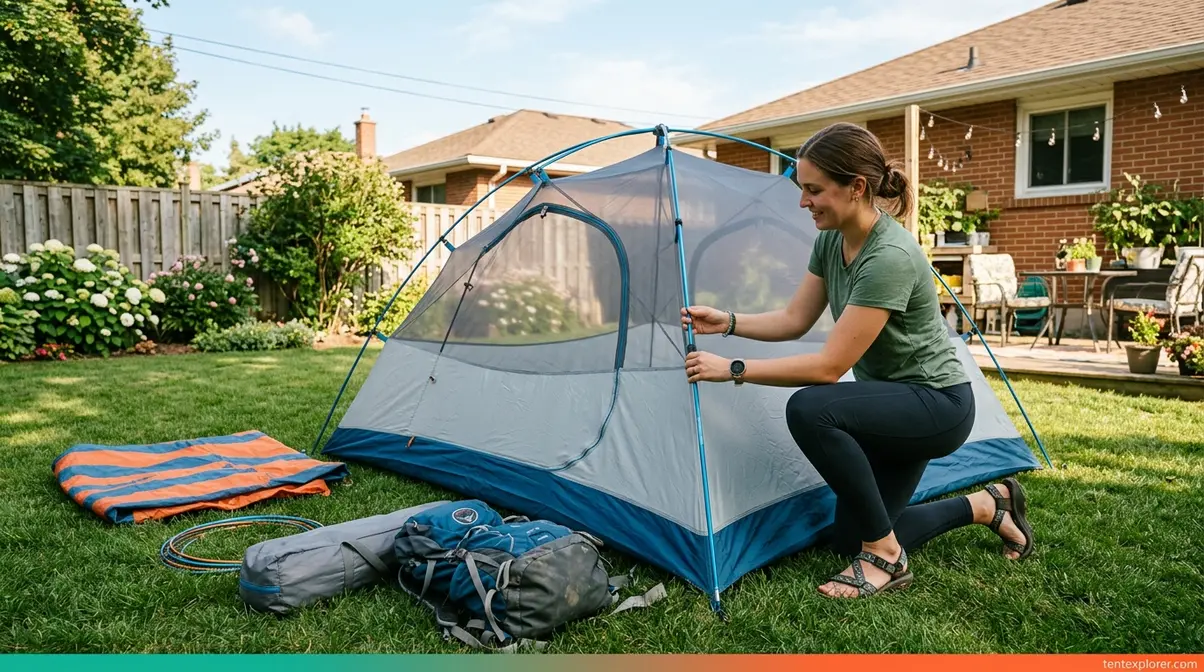
Do a Practice Run at Home First
The single most important thing a first-time camper can do is pitch their tent in the backyard before the trip — discovering a missing pole or broken clip at the campsite, not at home, is the #1 beginner setup mistake.
Here’s why the stakes are higher than they sound. Discovering a missing pole in your backyard takes 10 minutes to resolve — you check the bag, find the part, or order a replacement. At the campsite, in the dark, after a 4-hour drive, the same problem takes an hour and ruins morale for the entire group. The National Park Service emphasizes that a reliable shelter is a foundational element of any beginner’s camping checklist — knowing how to pitch it before you arrive is equally essential.
Your backyard practice run checklist:
- Pitch the full tent including the rainfly — don’t skip the rainfly even if it’s a clear day
- Check all zippers open and close smoothly
- Count pole sections against the manual to verify nothing is missing
- Test that the footprint fits correctly under the tent floor
- Sleep in it overnight if possible — this reveals any condensation issues before the real trip
For more pre-trip preparation advice, see our beginner tent camping tips guide.
Transition: With your tent pitched and verified, the next smart investment is a tent footprint — a $20–$40 accessory that can double the lifespan of a $150 tent.
Do You Really Need a Tent Footprint?
For any newbie tent owner, a tent footprint is a worthwhile investment worth prioritizing from the start. A tent footprint is a custom-cut groundcloth placed under your tent floor to protect it from abrasion and ground moisture. It shields the floor fabric against rocks, sticks, and rough terrain that gradually wear through the material, and it reduces moisture wicking up from the ground into your sleeping space.
The financial case is straightforward: tent floors are the most expensive component to repair or replace. A $30 footprint protecting a $200 tent floor is simple math — especially when you consider that floor repairs often cost $50–$100 and take weeks to complete.
One sizing detail most guides omit: your footprint must be slightly smaller than the tent floor perimeter, not the same size. A footprint that extends beyond the tent edges channels rainwater underneath the tent rather than away from it, creating exactly the wet floor problem you’re trying to prevent. When ordering a manufacturer-specific footprint, this is handled automatically. For DIY groundcloths, trim 1–2 inches inside the tent perimeter on all sides.
For a full breakdown of sizing and material options, see our guide on the importance of a tent footprint.
Transition: The footprint protects the outside of your tent. Proper drying and storage protects it from the inside — and this is where most beginners unknowingly shorten their tent’s lifespan.
Tent Care: Pack It Dry, Store Right
For any newbie tent owner, three care habits separate a tent that lasts 5–10 seasons from one that molds and deteriorates after two.
1. Never pack a wet tent. This is the single most common cause of mold and fabric degradation. If you must pack it wet on departure day due to rain, unpack and dry it completely within 24 hours at home. Hang it over a shower rod or lay it flat in a dry room. Even slight dampness sealed in a stuff sack for a week creates the conditions for mold growth.
2. Store loosely, not compressed. The elastic in guy lines and the coating on poles degrade faster when permanently compressed in a stuff sack. Use a large mesh bag or hang the tent loosely in a closet between trips rather than keeping it in the original compression sack year-round.
3. Protect from UV. UV exposure is the primary cause of rainfly coating degradation over time. Pitch the tent in shade where possible. After each season, consider re-treating the rainfly with a DWR (Durable Water Repellent) spray, which is a small investment that restores water-shedding performance.
Transition: Even with the right tent and the right habits, first-time buyers make predictable mistakes. Knowing them in advance is the cheapest insurance you can buy.
Common First-Time Tent Buyer Mistakes
Most beginner tent buying mistakes cluster around the same few oversights — the ones The Tent Trifecta framework is specifically designed to prevent. Across camping communities, the consistent feedback from experienced campers is that these errors are almost universally avoidable with a few minutes of upfront knowledge.
5 Buying Mistakes That Waste Money
- Buying by capacity label alone. A “4-person” tent is actually comfortable for 2–3 adults with gear. The capacity label reflects the maximum number of sleeping bags that fit on the floor — nothing more. Always apply the N+1 rule before you buy.
- Choosing a partial rainfly to save $20. A half-rainfly tent looks fine in product photos taken on sunny days. In wind-driven rain, the exposed sides of the inner canopy let water in from angles the roof can’t block. A full-coverage rainfly is non-negotiable — it’s one-third of The Tent Trifecta for a reason.
- Ignoring peak height. Floor space looks impressive on a spec sheet; peak height tells you whether you can sit up without hitting the ceiling. A tent with 50 square feet of floor space and a 3.5-foot peak is genuinely uncomfortable for adults. Check both dimensions on every product page.
- Buying the cheapest tent available. Tents under $50 typically lack proper seam sealing, use very thin fabrics, and often include only a partial rainfly. The “Don’t Waste $600” cycle plays out like this: buy a $45 tent, it fails in the first rainstorm, replace it with a $120 tent, total spend is $165 — more than the quality tent would have cost from the start.
- Skipping the practice setup. Setting up a tent for the first time at the campsite, in the dark, after a long drive, with a confused group watching — this is the most avoidable beginner mistake in the guide. Ten minutes in your backyard eliminates it entirely.
When to Pick a Different Tent
The dome tent recommendation is right for most beginners — but not all of them. If one of these scenarios describes you, a different tent is genuinely the better choice.
If you’re a family of five or more planning multi-day car camping: A cabin tent, not a dome, is the right call. The headroom and per-person space justify the extra weight and setup time when you’re establishing a base camp and not moving it for several days. A 6-person cabin tent at $200–$300 gives every family member genuine living space.
If you’re a solo backpacker planning hikes of five miles or more: An ultralight backpacking tent in the $250–$400 range is worth the investment. The weight savings — often 2–3 lbs compared to a standard dome tent — become critical over distance. Your back, knees, and energy levels will make this decision obvious after mile three.
If you’re camping in winter or alpine conditions with temperatures below freezing and potential snow: A 4-season tent is a safety requirement, not a preference upgrade. A 3-season tent in sustained snow conditions is a structural risk. The heavier poles and denser fabric of a 4-season design exist to handle snow loads that would collapse a 3-season shelter.
Frequently Asked Questions
What’s the most important tent feature?
The most important features for a beginner tent are weather resistance and ease of setup. A full-coverage rainfly keeps you dry in unexpected rain, while color-coded or clip-based poles make setup manageable without prior experience. Look for a 3-season rating, at minimum 1,500mm hydrostatic head on the rainfly, and a freestanding design that doesn’t require staking to stand.
How much should I spend on a tent?
A quality first camping tent typically costs between $100 and $250 (Under30Experiences). This range delivers durable weather resistance, a full rainfly, and beginner-friendly setup without paying for ultralight materials you won’t need yet. Below $100 often means compromised seam sealing and thinner fabric, while spending above $250 typically reflects weight savings valued by experienced backpackers. For most first-time car campers, $100–$150 is the sweet spot, though frequent campers in wetter climates should invest closer to $200 for better HH ratings.
What size tent do I need for 2 people?
For two people, buy a 3-person tent. Tent capacity ratings reflect the maximum number of sleeping bags that physically fit on the floor, so they don’t account for gear, personal space, or comfortable movement. The N+1 rule (buy one size larger than your group) is the standard recommendation across the camping community.
3-Season vs. 4-Season Tents
A 3-season tent is designed for spring, summer, and fall camping. It handles moderate rain, wind, and temperatures above freezing, with mesh panels for ventilation in warm weather. A 4-season tent is engineered for winter conditions with heavier-duty poles, denser fabric, and minimal mesh to withstand snow loads and sustained cold. For most beginners, a 3-season tent covers 95% of camping scenarios, while a 4-season tent is necessary only for winter camping or alpine expeditions.
Do I really need a tent footprint?
Yes, a tent footprint is a worthwhile investment for most campers. It’s a durable groundcloth placed under the tent floor that prevents abrasion from rocks and sticks, reduces moisture wicking up from the ground, and significantly extends the life of your tent’s floor fabric. One critical sizing note is that the footprint must be slightly smaller than the tent floor perimeter, otherwise it will channel rainwater underneath the tent rather than away from it.
Stop Second-Guessing and Start Camping
For first-time campers, choosing the right tent comes down to three decisions: tent type (dome for most beginners), size (always N+1), and features (The Tent Trifecta: 3-season rating, full-coverage rainfly, beginner-friendly setup). A quality first tent costs $100–$250 and, with proper care, lasts 5–10 seasons. The biggest mistake is overthinking it — most beginners are best served by a $100–$150 dome tent, a footprint, and a backyard practice pitch before their first trip.
The Tent Trifecta exists because beginners consistently get burned by the same three oversights: they buy a summer-only tent that leaks in September, they trust the capacity label and sleep cramped, and they struggle with a complicated setup at the campsite. Check all three boxes before you buy, and you’ve already avoided the most expensive beginner mistakes. Every tent recommendation in this guide passes that three-part check — use it as your filter every time you evaluate a new option.
Ready to shop? Start with our best beginner tents guide — we’ve tested and ranked 20+ models across every budget so you can skip the guesswork. Then do one backyard practice pitch before your first trip. That’s it. Your first camping trip should be memorable for the right reasons.
