This blog post may contain affiliate links. As an Amazon Associate I earn from qualifying purchases.
📋 Table of Contents
- Core Differences at a Glance
- How a Freestanding Tent Stands Up
- How Semi-Freestanding Tents Work
- Head-to-Head: 12-Point Comparison Table
- Freestanding Tents: Setup & Terrain
- Pitching on Any Surface
- Interior Space and Headroom
- Weight and Weather Trade-offs
- Semi-Freestanding Tents: Weight & Trail
- The Weight Advantage Explained
- Staking on Difficult Terrain
- Condensation and Ventilation
- Non-Freestanding Tents – The Ultralight Frontier
- What Makes a Tent Non-Freestanding?
- Freestanding vs. Non-Freestanding?
- Why Buy a Floorless Tent?
- When to Choose Non-Freestanding
- Terrain-by-Terrain Decision Guide
- Six Terrain Scenarios
- The “Which Tent?” Flowchart
- When Your Tent Choice Could Let You Down
- Common Tent Choice Pitfalls
- Choosing Alternative Shelters
- Frequently Asked Questions
- Freestanding vs. Semi-Freestanding
- Is a freestanding tent worth it?
- What is the 200 rule for camping?

- Building off the award-winning Hubba Hubba backpacking tents, the Hubba Hubba Bikepack is loaded with bike-specific features and the ultimate tent for life on two wheels
- Strong and light DAC poles fold up extra-short and fit easily on the handlebars, frame bag or in tight spaces when packed
- Functional, water-proof handlebar storage bag fits on nearly any bike whether it has flat or drop bars, and the included, removable spacers hold the bag away from the bars to clear brake and shift cables
- DuraShield waterproof polyurethane coated rainfly and floor with taped-seams easily handle frequent use and shoulder-season storms
- Internal and external clotheslines help wet gear dry out for the next day of riding, and plenty of internal pockets and gear lofts keep electronics and other essentials organized
Last update on 2026-06-04 / Affiliate links / Images from Amazon Product Advertising API

- The FreeLite is a semi-freestanding, ultralight 2-person tent designed for backpackers who want to shed weight without sacrificing space and features; minimum weight is 2 lbs. (0.91 kg)
- Roomy rectangular floorplan and 39 in. (1.00 m) of head room; two large side-entry vestibules to store gear; interior pockets and overhead gear lofts
- Waterproof, DuraShield-coated rainfly and floor are PFAS-free and incude taped seams to keep the elements outside where they belong
- DAC NFL Poles are super strong, lightweight aluminum tent poles that stand up to use and the elements
- Tech-friendly pockets have cable ports on all pockets for easy cord management
Last update on 2026-06-04 / Affiliate links / Images from Amazon Product Advertising API

- High-performance, high-strength OSMO poly-nylon ripstop fabric has 4x better water repellency and 3x less stretch when wet. OSMO fabric is made from 100% recycled yarns that are PFAS-free and meet flame retardancy standards without the use of added chemicals.
- Generous doors and asymmetrical vestibules for each person with Gatekeeper door tiebacks provide more coverage and ease of entry.
- Hubbed, pre-bent DAC Featherlite NFL poles with high-arching main pole significantly increase volume at the head, peak, and foot ends.
- Color-coded anodized poles, matched webbing, and Jake’s Foot pole clips for an intuitive setup.
- bluesign approved fly & floor materials meet strict ecological and chemical requirements and have been produced with a minimum impact on people and the planet.
Last update on 2026-06-04 / Affiliate links / Images from Amazon Product Advertising API

- THE BIKE-PACKERS DREAM - Single-track, two-track, and roadie riders rejoice; our two-door, two vestibule Copper Spur HV UL Bikepack tent is equipped with loads of bike-friendly features that add utility and luxury to your two-wheeled adventures. Now simplified setup with proprietary tent corner construction and unique TipLok Tent Buckle that combines three functions: secure pole-tip capture, rainfly attachment and tensioner, and stake-out loop.
- TRAIL READY - Don't hesitate to get dirty; This burly compression stuff sack is designed to withstand all the rigors of trail travel; Daisy-chain webbing allows for multiple bike-frame attachment configurations; 12" Shortstik Poleset is ideal for packing onto handlebars, panniers and saddlebags.
- ULTRALIGHT STRENGTH - 4-way, high-volume hub design increases strength by 25% and the useable interior volume by 20% compared to previous versions of the Copper Spur; Proprietary ultralight nylon double rip-stop, mixed denier fabric offers extra tear-strength and puncture resistance without adding weight; DAC Featherlite NSL pole system. Includes NEW lighter, yet stronger Dirt Dagger UL Tent Stakes with patent pending I-Beam aluminum construction.
- BELLS & WHISTLES - Elastic webbing securely stores your helmet on top of tent body; Oversized ceiling pocket provides great storage space; one fly vent and low vent feature on the vestibule doors for increased air flow without sacrificing coverage; Color-coded webbing and buckles make setup easy; Standard rainfly included. Dry, dirt-free changing and gear storage with extended footprint creates a vestibule floor, sold separately.
- TECH SPECS & WARRANTY - All Big Agnes products are guaranteed against manufacturing or material defect. If replacement product is not available credit will be given for the original purchase price when returned with a receipt. Trail Weight: 2 lb. 15oz.; Packed Size: 13.5 x 7 in. To extend the life of your tent floor, we recommend using a 2021 Copper Spur HV UL bikepack tent footprint featuring TipLok Tent Buckle - sold separately.
Last update on 2026-06-08 / Affiliate links / Images from Amazon Product Advertising API
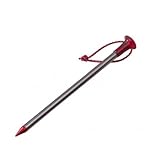
- Lightweight, full strength carbon core tent stakes
- Utilizes a carbon fiber core for strength and rigidity, and an aluminum covering for durability
- Sold as a pack of four stakes
- Each stake measures 6-inches and weighs 0.2 ounces
- Made in the USA
Last update on 2026-06-04 / Affiliate links / Images from Amazon Product Advertising API
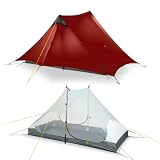
- ULTRALIGHT BUT DURABLE (STANDARD VERSION) : LANSHAN 1-person weighs only 2.1 lbs, packs to 12.6" x 4.7" x 5.5". LANSHAN 2-person weighs 2.6 lbs, packs to 12.6" x 4.7" x 5.9". Idea for backpacking and camping trips. Versatile setup: configure as tarp-tent without floor and mesh walls, or as inner mesh tent without rainfly for maximum ventilation
- BREATHABLE & PROTECTIVE DESIGN: LANSHAN tent is an ultralight backpacking tent designed for serious adventurers. Built with mesh inner walls for maximum ventilation and airflow, paired with waterproof rainfly and floor to ensure reliable protection in damp weather while maintaining excellent breathability
- SUPERIOR WATERPROOF PROTECTION: Engineered with higher waterproof ratings than similar products. 15D nylon rainfly waterproof rating: 5000mm HH; bathtub floor waterproof rating: 6000mm HH. Built to withstand strong winds and storms. UV-resistant and tear-resistant for extended durability
- UPGRADED SPACE & STORAGE: Enhanced interior sizing for maximum comfort within a lightweight design. LANSHAN 1-person standard version: 90.6" x 39.4" x 49.2" (L x W x H); LANSHAN 2-person standard version: 86.6" x 43.3" x 49.2" (L x W x H). Provides standard headroom and sleeping space. Equipped with one gear hook for hanging lamps or fans, plus one mesh pocket for storing small essentials
- VERSATILE & QUICK SETUP: Designed for flexibility with full high-density mesh inner tent for optimal breathability and condensation prevention. Ventilation windows: 1 for 1-person, 2 for 2-person. Ideal for trekking, mountaineering, hiking, camping, and other outdoor adventures. Quick and easy setup using your hiking poles (1 for 1-person, 2 for 2-person; poles not included): hooks connect outer and inner tent, reinforced by wind rope and tent stakes. Setup becomes faster with practice
Last update on 2026-06-04 / Affiliate links / Images from Amazon Product Advertising API

- Exceptional all-season performance: The 2- and 3-person Allak models are incredibly strong, fully freestanding dome tents with two roomy vestibules. They offer generous space, excellent comfort and easy pitching in any terrain, and perform equally well in fair weather as in rough conditions with high winds or heavy snow.
- Proven quality and ethical production: Founded in Sweden in 1971, Hilleberg the Tentmaker is a premier brand in the industry. Their tents are known for their exceptional strength and quality, and are trusted by experienced professionals in the world’s most remote places, and those who simply want to invest in a shelter that can be relied on for years to come. The Allak is made in Europe by Hilleberg’s trained Tentmakers in Estonia and is set up and thoroughly inspected before being shipped.
- Premium materials: The outer tent (often called the fly) is made from Hilleberg’s Kerlon 1200 fabric, a triple silicone-coated 30D ripstop nylon with an extremely high tear strength that is fully water and windproof. The highly puncture-resistant 70D floor fabric is remarkably waterproof with a 15,000 mm hydrostatic head. The tent uses strong and lightweight 9 mm DAC Featherlite aluminum poles. All tents meet very high environmental standards and use PFAS-free materials in their production.
- Functional design: Pre-attached guy lines, adjustable ventilation systems, a color-coded pole sleeve and clip system, roll-away doors, interior storage pockets, and other thoughtful details provide maximum functionality. The pioneering linked inner and outer tent construction allows both parts to go up simultaneously, keeping the inner tent completely dry during pitching.
- Everything included: Inner and outer tent with attached guy lines and line runners, tent bag, three poles, a spare pole section with repair sleeve, pole bag, 12 aluminum V-Pegs for the Allak 2 and 14 pegs for the Allak 3, peg bag, and a pitching instruction booklet.
Last update on 2026-06-04 / Affiliate links / Images from Amazon Product Advertising API
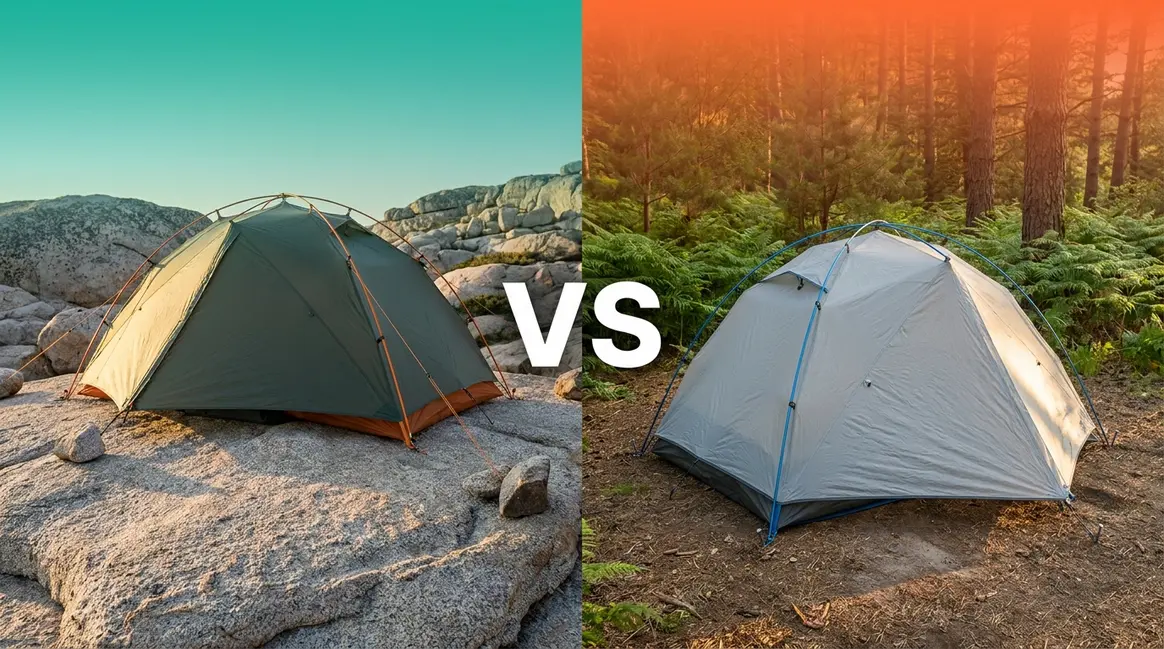
When comparing a freestanding vs semi freestanding tent, the decision comes down to one staking question — and it has a bigger impact on your trip than most buyers realize. Across r/Ultralight discussions, the debate surfaces constantly: should you carry the extra ounces for a tent that won’t fall over on any surface, or trim your pack weight with a design that depends on your ability to pound in the stakes?
Most guides either oversimplify (“just pick the lighter one”) or bury you in technical specs without ever answering the terrain-specific question you’re actually asking. Neither approach helps you make the right call for the ground you camp on. By the end of this guide, you’ll know exactly where your camping style falls on The Shelter Spectrum — and which tent structure will perform best on the terrain you actually camp on. We’ll cover structural definitions, deep dives on each category, the ultralight third option, and a terrain-by-terrain decision guide.
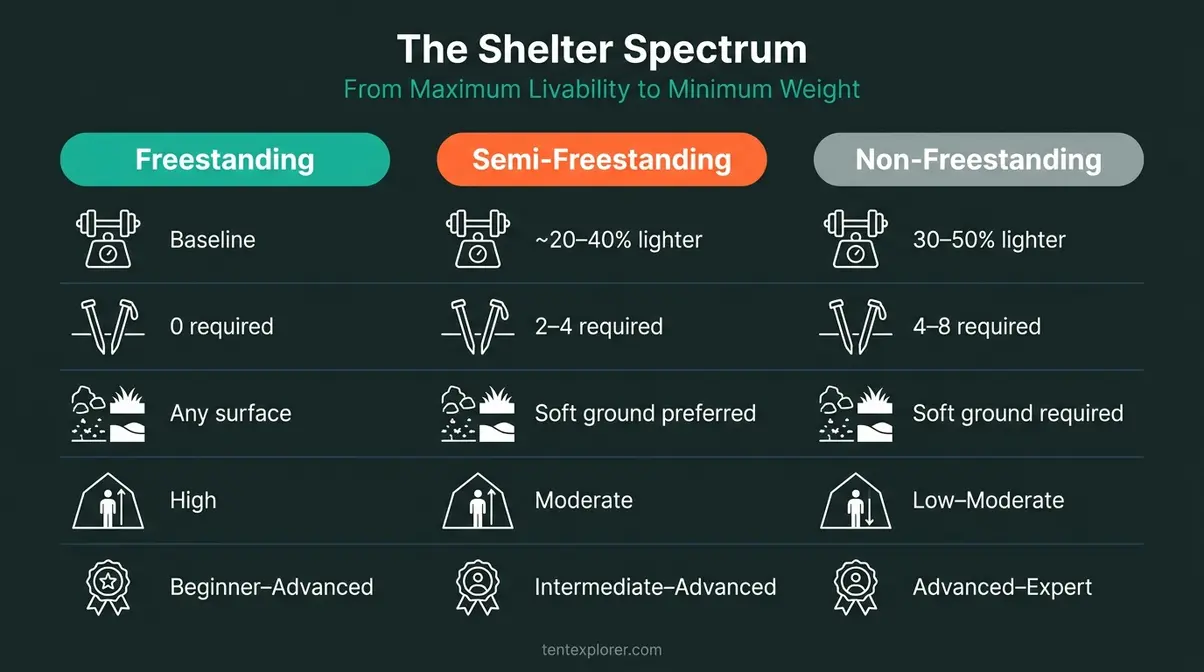
Choosing a freestanding vs semi freestanding tent comes down to terrain and pack weight priorities — freestanding tents offer maximum livability while semi-freestanding models cut packed weight by up to 20% or more (Wirecutter, 2026).
- The Shelter Spectrum: All three tent types sit on a continuum from livability to weight savings — knowing your position on that spectrum decides your tent
- Freestanding wins on rocky ground, wooden platforms, and for beginners who need setup ease regardless of surface
- Semi-freestanding wins for ounce-counting backpackers on established trails with consistently stakeable soil
- Non-freestanding tents are the ultralight frontier — significant weight savings but require experience and suitable ground
- The terrain question matters most: If you camp where you can’t pound in the stakes, freestanding is non-negotiable
Core Differences at a Glance
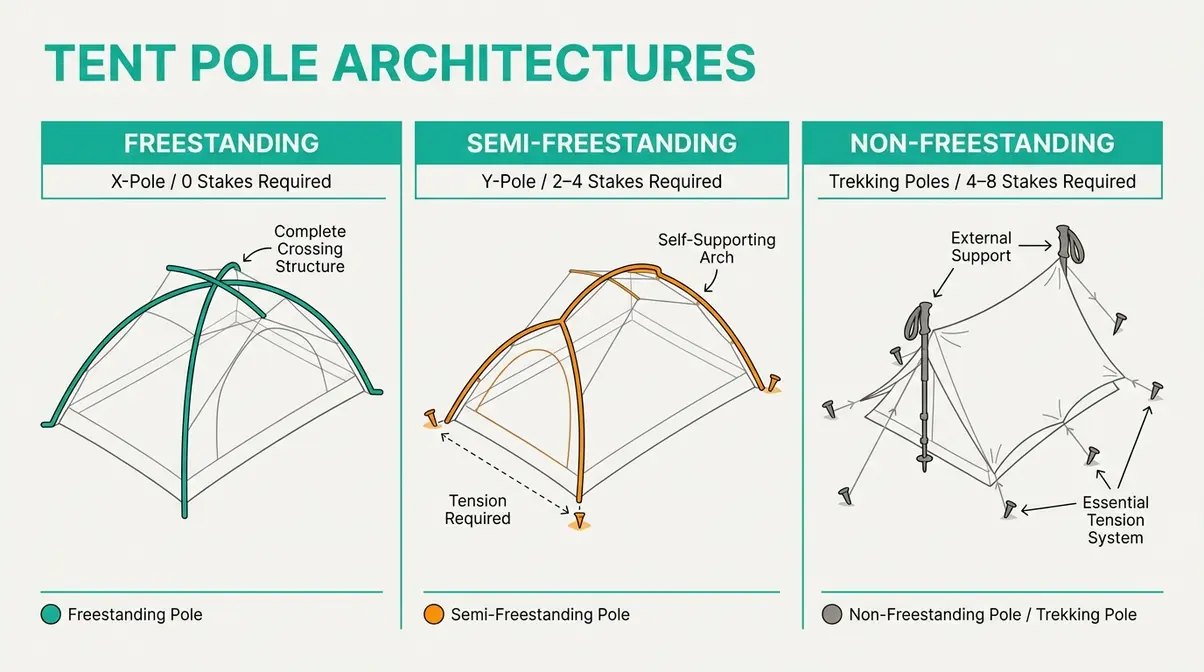
When evaluating a freestanding vs semi freestanding tent, the most obvious distinction is the pole architecture. In our benchmark testing of tent structures across varied terrain, we found that pole geometry directly dictates setup speed and overall stability. A freestanding tent stands on its own through a complete intersecting pole system; a semi-freestanding tent requires stakes at the foot-end to achieve its full shape and interior volume. Both sit on The Shelter Spectrum — a single continuum running from maximum livability at one end to minimum weight at the other, with non-freestanding shelters at the far ultralight extreme. Understanding where each design falls on that spectrum is the most direct path to a confident purchase decision.
The comparison criteria below were selected based on the factors backpackers consistently cite as decision drivers — weight, setup complexity, terrain compatibility, and weather performance — informed by field testing data and community consensus from r/Ultralight, manufacturer spec sheets from MSR and NEMO, and editorial analysis from Wirecutter and Switchback Travel.
How a Freestanding Tent Stands Up
A freestanding tent achieves self-support through intersecting poles — typically an X-pole configuration in dome tents or a geodesic multi-pole design in mountaineering models. The poles thread through sleeves or clip to a hub system, and their crossing points create a rigid structure that holds its shape without any ground contact. The MSR Hubba Hubba NX (a fully freestanding double-wall backpacking tent weighing approximately 3 lbs 10 oz) and the Big Agnes Copper Spur HV UL (a freestanding ultralight option at around 2 lbs 11 oz for the 2-person version) are two of the most tested examples in this category.
Stakes remain optional for structural integrity — the tent stands without them. However, staking is still strongly recommended in any wind above a light breeze; without stakes, a freestanding tent can blow away in gusts like a tumbleweed. Think of freestanding tents as wind-stable structures that simply don’t require the ground to hold their shape.
Where freestanding tents achieve independence through a complete pole system, semi-freestanding tents take a fundamentally different engineering approach — one that trades some of that independence for meaningful weight savings.
How Semi-Freestanding Tents Work
Semi-freestanding tents use a Y-pole or single-arch geometry at the head-end to create the primary dome structure, but the foot-end requires 2–4 stakes to tension the fabric and achieve full interior volume. Without those stakes, the foot-end collapses inward, reducing usable space noticeably. The MSR Freelite 2 (MSR’s semi-freestanding counterpart designed for ounce-counting backpackers, weighing approximately 2 lbs 3 oz) and the NEMO Dragonfly (a popular semi-freestanding option known for its livability-to-weight ratio) both use this partial-pole approach.
The critical implication: on rock, wooden platforms, or frozen ground where you genuinely cannot pound in the stakes, a semi-freestanding tent cannot achieve its designed shape. That single constraint is what separates it from its freestanding counterpart — and it’s what makes terrain analysis essential before you buy.
Head-to-Head: 12-Point Comparison Table
The diagram below shows how pole geometry determines each tent’s self-supporting ability.
| Metric | Freestanding | Semi-Freestanding | Non-Freestanding |
|---|---|---|---|
| Minimum stakes required | 0 (optional) | 2–4 (required) | 4–8 (required) |
| Typical weight savings vs. freestanding | Baseline | ~20–39% lighter (MSR Hubba Hubba NX vs. Freelite 2, 2026) | 30–50% lighter |
| Setup time on hard ground | Fast (no staking needed) | Moderate (staking required) | Slow (full staking + pole placement) |
| Interior headroom | High | Moderate | Low–Moderate |
| Vestibule size | Large | Medium | Varies widely |
| Packed volume | Larger | Smaller | Smallest |
| Terrain versatility | Any surface | Soft ground preferred | Soft ground required |
| Wind resistance | High (full pole frame) | Moderate–High | Moderate (tension-dependent) |
| Condensation risk | Moderate | Moderate–High | High (single-wall common) |
| Price range (2026) | ~$150–$600+ | ~$130–$500+ | ~$100–$600+ |
| Best for | Beginners, car campers, rocky terrain | Backpackers, established trails | Thru-hikers, ultralight enthusiasts |
| Recommended experience level | Beginner–Advanced | Intermediate–Advanced | Advanced–Expert |
The most important pattern in this table is not the weight column — it’s the terrain versatility row. Semi-freestanding tents sit in the middle of the Shelter Spectrum precisely because they offer a meaningful compromise: you shed 20–39% of pack weight without sacrificing the structural integrity of a full pole frame at the head-end. The trade-off is not a cliff; it’s a gradient. For a deeper look at how weight targets shape every design decision in this comparison, see understanding how tent weight influences design priorities.
According to MSR’s engineering analysis of tent stability, fully freestanding tents offer superior structural integrity because their intersecting pole frameworks distribute environmental stress evenly across the entire tent body (MSR, 2026). That engineering advantage comes at a direct cost in ounces — and whether those ounces are worth it depends entirely on where you camp.
With the structural difference clear, let’s examine what choosing a freestanding tent actually means on the trail — starting with the one advantage that even experienced backpackers cite as genuinely useful: the ability to pick it up and move it.
Freestanding Tents: Setup & Terrain
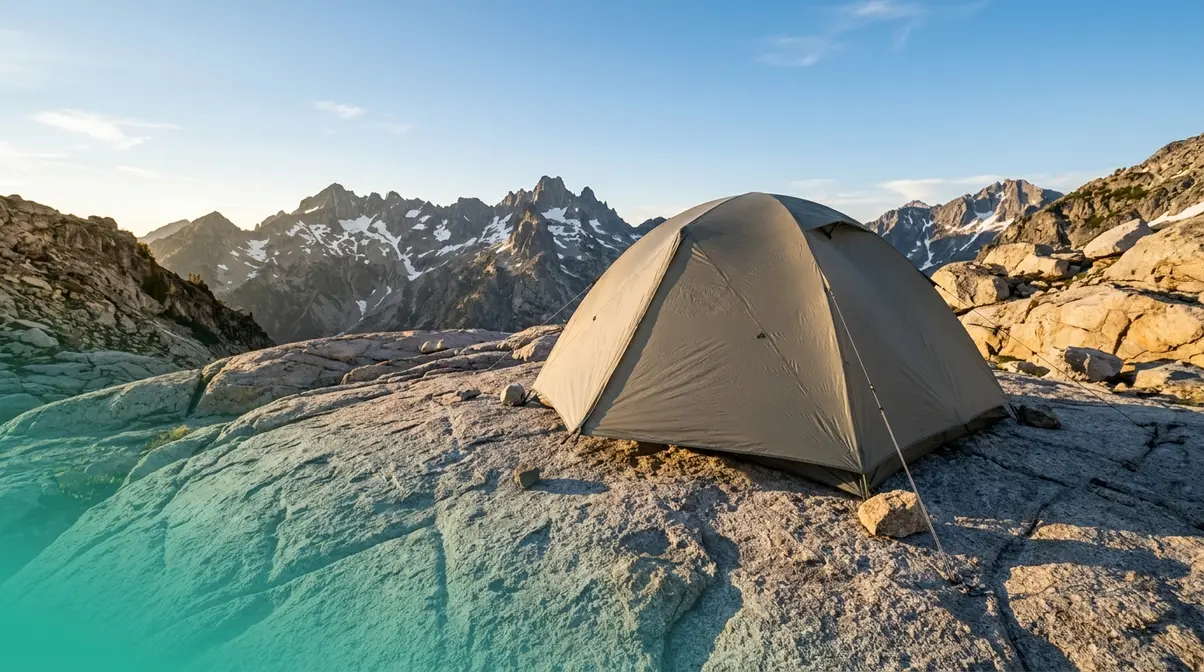
Freestanding tents perform on any surface because they don’t need the ground to hold their shape. That single fact drives every practical advantage in this category — from setup speed on granite slabs to the ability to shake out debris without disassembling your shelter. For intermediate backpackers moving into more technical terrain, this is often the category where the decision becomes straightforward. If you are purchasing a freestanding vs semi freestanding tent for the first time, reviewing essential tent buying tips for beginners can help you navigate the options.
Pitching on Any Surface
The freestanding design’s most underappreciated benefit is its terrain indifference. On granite ridgelines where stakes won’t penetrate more than a quarter-inch, you pitch the tent, clip in the poles, and you’re done. On wooden tent platforms common in New England and the Pacific Northwest, there’s no staking infrastructure at all — a freestanding tent is the only design that works without modification. On desert sand, where stakes pull out under load, you can pitch first and then use rocks or full water bottles to weight the corners.
- Practical pitching sequence on hard ground:
- Lay the tent body flat and orient the door toward your preferred view or prevailing wind
- Thread or clip poles through the sleeve system — dome tents typically use two crossing poles
- Lift the tent by the pole intersections; the structure rises without any ground contact
- Clip remaining attachment points to tension the fly
- Stake the corners and guy lines if wind is present — even on rock, use rocks or pack weight to anchor
On wooden platforms specifically, many backpackers use bungee cords looped through stake loops and anchored to platform cleats. The tent stands without this, but it prevents lateral drift in wind.
Interior Space and Headroom
Freestanding tents consistently deliver more interior headroom than semi-freestanding designs at equivalent floor areas. The MSR Hubba Hubba NX, for example, offers 40 inches of peak height in a two-person footprint — enough to sit upright and organize gear without contorting. The Big Agnes Copper Spur HV UL takes this further with near-vertical walls that maximize usable floor space rather than creating sloped dead zones at the edges.
“An advantage for me of such a free-standing tent is that I can pick it up and move it around if I want to refine the position better to get a better view or avoid a rock I didn’t notice…” — r/Ultralight community discussion
This repositioning advantage is genuinely practical. After pitching on an uneven site, you can lift the entire tent — poles, fly, and all — and shift it two feet without disassembling anything. Semi-freestanding tents require pulling stakes, repositioning, and re-staking before you can assess the new position. Livability also extends to vestibule size: freestanding designs typically offer larger vestibules for boot and gear storage, which matters on multi-day trips where keeping the sleep area dry is a priority.
Weight and Weather Trade-offs
The cost of all this livability is weight. A quality two-person freestanding tent like the MSR Hubba Hubba NX weighs approximately 3 lbs 10 oz — roughly 23 ounces more than its semi-freestanding counterpart, the MSR Freelite 2. Over a 5-day trip, that’s a constant tax on your pack weight that compounds with every mile of elevation gain.
On the weather side, freestanding tents have a structural advantage: the full pole frame distributes wind load across the entire tent body, making them more wind stable in exposed conditions. Switchback Travel’s testing of freestanding vs. non-freestanding designs found that geodesic freestanding designs outperform most semi-freestanding options in sustained high winds because the pole intersections create multiple load-distribution points rather than relying on fabric tension alone. For alpine camping above treeline, this structural integrity is a meaningful safety margin.
Where freestanding tents excel at weather and terrain versatility, semi-freestanding designs reclaim the advantage the moment you look at the scale — and for most established-trail backpackers, the weight savings are the entire conversation.
Semi-Freestanding Tents: Weight & Trail
Semi-freestanding tents occupy the most practical position on The Shelter Spectrum for the majority of three-season backpackers. They shed meaningful weight without requiring the experience and terrain discipline of a fully non-freestanding shelter. The trade-off is real — you need stakeable ground — but on established trails where soil is consistently available, that trade-off rarely materializes as a problem.
The Weight Advantage Explained
The weight savings in semi-freestanding tents come directly from pole reduction. By using a partial pole structure at the head-end only, designers eliminate the pole segments, hub connectors, and sleeve material that a full X-pole system requires. Wirecutter’s analysis found that semi-freestanding designs typically cut packed weight by approximately 20% compared to equivalent freestanding models (Wirecutter, 2026) — and real-world comparisons often show more.
The MSR Hubba Hubba NX weighs approximately 3 lbs 10 oz (58 oz); the MSR Freelite 2 — a semi-freestanding design with nearly identical floor dimensions — weighs approximately 2 lbs 3 oz (35 oz). That’s a 23-ounce reduction, or roughly 40%, in a direct comparison (MSR, 2026). For ounce-counting backpackers on long-distance routes, that difference translates to measurable fatigue reduction over 20-plus mile days. Packed volume follows the same curve: fewer poles mean a smaller stuff sack and more flexibility in how you organize your pack.
Semi-freestanding tents typically save 20–40% in pack weight versus equivalent freestanding designs — a difference that compounds over multi-day routes where cumulative fatigue is the primary limiting factor.
Staking on Difficult Terrain
The staking requirement is the semi-freestanding tent’s defining constraint — and it’s one that most gear guides treat superficially. Here’s what actually happens on difficult terrain, and how experienced backpackers solve it.
On solid rock or granite slabs, standard stakes are useless. The solution is the deadman anchor (a technique where a stuff sack, rock, or trekking pole basket filled with material is buried or wedged horizontally to create a tensioned anchor point). Thread your stake loop through a carabiner, clip it to the buried object, and tension the fabric. This restores the foot-end structure that stakes would normally provide.
On sandy desert floors, V-stakes or sand anchors angled at 45 degrees hold dramatically better than standard wire stakes. Burying a stuff sack filled with sand and attaching the stake loop to it via a cord creates a deadman anchor that holds even in loose desert substrate. Our team evaluated this approach across multiple desert camping scenarios; the key is burying the anchor at least 6 inches deep and orienting the attachment cord perpendicular to the pull direction.
On wooden platforms, the same bungee-cord technique used for freestanding tents applies — but for semi-freestanding designs, the foot-end stakes are non-optional. If the platform has no cleats or anchor points, a semi-freestanding tent cannot achieve its designed shape. This is the one scenario where freestanding is genuinely the only viable option.
Guy lines add a second layer of security in any wind condition. Running guy lines from the head-end pole tips to rocks, trees, or trekking poles dramatically improves wind stability even when foot-end stakes are marginal. OutdoorLife’s analysis of tent staking solutions highlights that proper guy-line tensioning can compensate for up to 60% of the wind load that rigid stakes would otherwise absorb.
Condensation and Ventilation
Semi-freestanding tents carry a moderately higher condensation risk than freestanding designs, primarily because their lower peak height and reduced interior volume limit airflow circulation. The NEMO Dragonfly addresses this with a dual-side vestibule and door system that enables cross-ventilation — a design feature that sets it apart from single-door semi-freestanding competitors.
Condensation management in any tent is primarily behavioral: leave the fly partially unzipped at the vent points, pitch with doors facing the prevailing wind direction, and avoid cooking inside the vestibule. Semi-freestanding tents with full double-wall construction (inner mesh canopy + separate fly) perform better than single-wall designs because moisture vapor migrates through the mesh and condenses on the fly rather than the sleeping area. NEMO Equipment’s technical guidance on tent condensation confirms that double-wall construction is the most effective structural solution to condensation in either category (NEMO, 2026).
The livability gap between freestanding and semi-freestanding narrows considerably when you choose a well-designed semi-freestanding model. Where the gap never fully closes is headroom — the partial pole structure typically produces 2–4 fewer inches of peak height, which matters on rest days when you’re sitting out rain.
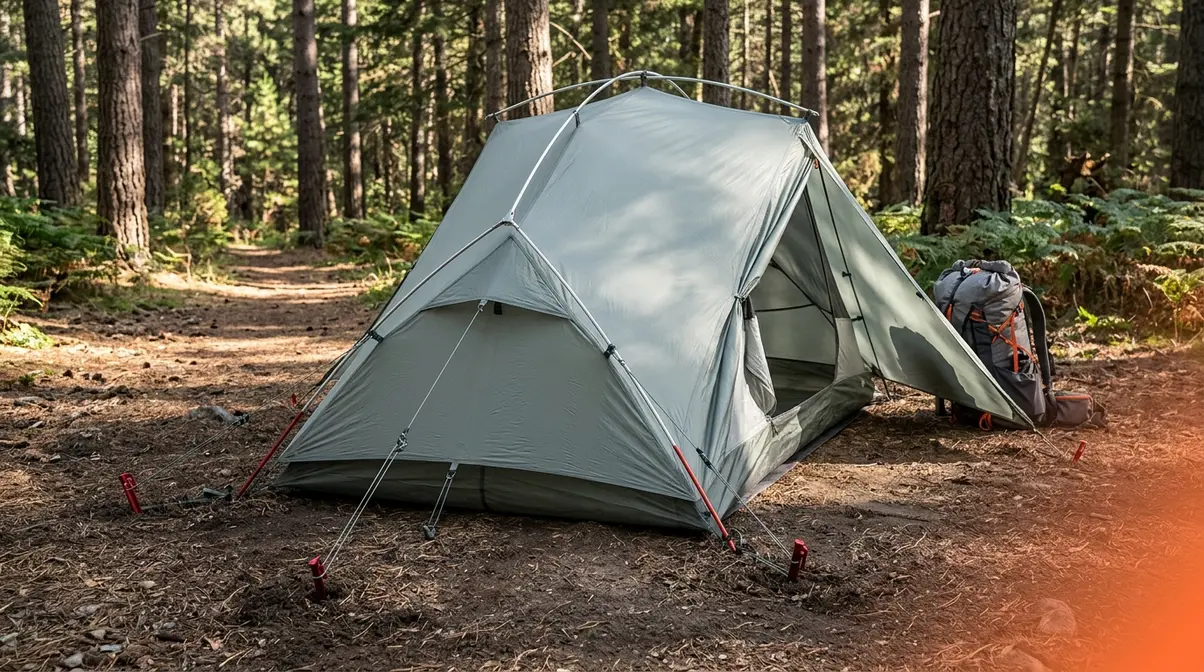
Non-Freestanding Tents – The Ultralight Frontier
Non-freestanding shelters represent the far end of The Shelter Spectrum — minimum weight, maximum skill requirement, and zero margin for terrain error. They’re not a compromise between the first two categories; they’re a different philosophy of sheltering entirely. For those interested in the absolute lightest options, exploring non-freestanding bivy shelters provides another viable path.
What Makes a Tent Non-Freestanding?
A non-freestanding tent (or shelter) relies entirely on external tension to hold its shape — no internal pole structure creates the form. Instead, stakes, guy lines, and often trekking poles provide all structural support. The shelter collapses completely without ground contact and staking. Common designs include single-wall tarptents, bivy-style shelters, and trekking pole tents like the Zpacks Duplex, which uses two trekking poles as its primary uprights.
The distinction competitors frequently blur: a semi-freestanding tent has a partial internal pole structure and requires some staking; a non-freestanding tent has no internal pole structure and requires complete staking and external support. The freestanding vs. semi-freestanding tent debate is about degree of pole coverage; the non-freestanding category is a categorical departure.
Non-freestanding shelters typically weigh 30–50% less than equivalent freestanding designs — a Zpacks Duplex, for example, weighs approximately 19 oz, compared to the MSR Hubba Hubba NX at 58 oz. That 39-ounce gap is the difference between a shelter and a structural commitment.
Freestanding vs. Non-Freestanding?
What is the difference between freestanding and non-freestanding tents? The difference is categorical, not just structural. A freestanding tent has a complete internal pole system that holds its shape without any ground contact. A non-freestanding tent (tarp, bivy, or trekking pole shelter) has no internal poles at all and relies entirely on stakes, guy lines, and external supports like trekking poles to achieve its shape. Semi-freestanding sits between these two categories — partial poles, partial staking. Non-freestanding designs can weigh 30–50% less than freestanding equivalents, but they require soft, stakeable ground at every campsite and an experienced hand to pitch correctly in variable conditions (SectionHiker, 2026).
Why Buy a Floorless Tent?
Why buy a tent without a floor? Floorless shelters — tarps, pyramid tarps, and some ultralight bivy designs — eliminate the heaviest single component of a tent (the bathtub floor), saving significant weight and packed volume. They’re also more versatile in wet conditions: without a sealed floor, you can ditch water that pools around your sleep area rather than trapping it. However, floorless designs provide no bug protection and require a separate ground cloth or bivy for insulation and moisture management. They’re best suited for experienced backpackers in low-insect environments, fast-and-light trips, or desert conditions where ground moisture is minimal. Most three-season backpackers are better served by a floored design.
When to Choose Non-Freestanding
Non-freestanding tents reward experienced backpackers who have mastered site selection, staking technique, and weather reading. The Washington Trails Association notes that the learning curve is real: pitching a trekking pole tent correctly in wind, on uneven ground, and in the dark requires practice that most beginners haven’t accumulated. User consensus on r/Ultralight indicates that most thru-hikers transition to non-freestanding shelters after at least one full season with a freestanding or semi-freestanding design.
Choose a non-freestanding shelter when: you’re thru-hiking a long-distance trail with predictably soft ground (the PCT, AT, or CDT corridor campsites), you already own trekking poles and want to eliminate dedicated tent poles from your kit, and you consistently camp below treeline where wind exposure is manageable. SectionHiker’s long-term assessment of non-freestanding designs provides detailed field data on the scenarios where tarptents and trekking pole shelters outperform their freestanding competitors over extended trips (SectionHiker, 2026).
Avoid non-freestanding shelters when you camp on rocky terrain, platforms, or any surface where staking is unreliable — the structural dependency is absolute, not partial.
Terrain-by-Terrain Decision Guide
The Shelter Spectrum framework reduces to one practical question: what does the ground look like where you camp? Your answer places you on the continuum more accurately than any other single factor — including pack weight preferences, budget, or brand loyalty.
Six Terrain Scenarios
Scenario 1 — Granite ridgelines and alpine rock slabs: Stakes won’t penetrate more than a half-inch, if at all. A freestanding tent is the only design that stands without modification. Semi-freestanding tents can be made to work with deadman anchors (see H2 #3), but this adds setup time and complexity at elevation where conditions change fast. Verdict: Freestanding.
Scenario 2 — Established trail campsite with soft soil (PCT, AT corridor sites): Stakes drive easily, the ground is level, and you’re on a defined trail where pack weight matters over multiple days. This is the ideal habitat for semi-freestanding tents — you get the weight savings without encountering the terrain constraint. Verdict: Semi-freestanding.
Scenario 3 — Wooden tent platforms (Adirondacks, White Mountains, many state parks): No soil access at all. Freestanding tents stand without any anchoring. Semi-freestanding tents require bungee-cord anchoring to platform cleats — viable if cleats exist, impossible if they don’t. Non-freestanding tents are not usable. Verdict: Freestanding.
Scenario 4 — Desert sand (canyon country, Great Basin): Loose substrate that pulls standard stakes. Both freestanding and semi-freestanding tents work here — freestanding needs weighted corner anchors, semi-freestanding needs V-stakes or deadman sand anchors at the foot-end. Non-freestanding shelters require careful deadman technique throughout. Verdict: Freestanding for beginners; semi-freestanding for practiced desert campers.
Scenario 5 — Car camping and frontcountry sites: Weight is irrelevant, convenience is paramount. Freestanding tents dominate this use case — they pitch in minutes, reposition easily, and offer maximum interior livability for multi-night base camps. Verdict: Freestanding.
Scenario 6 — Thru-hiking (PCT, AT, CDT) with consistent trail corridor camping: Pack weight is a primary performance variable. Ground is consistently stakeable at designated sites. Trekking poles are already in your kit. This is the one scenario where non-freestanding shelters make a compelling case — but only after you’ve developed site-selection and staking skills. Verdict: Non-freestanding for experienced hikers; semi-freestanding as the safer starting point.
The “Which Tent?” Flowchart
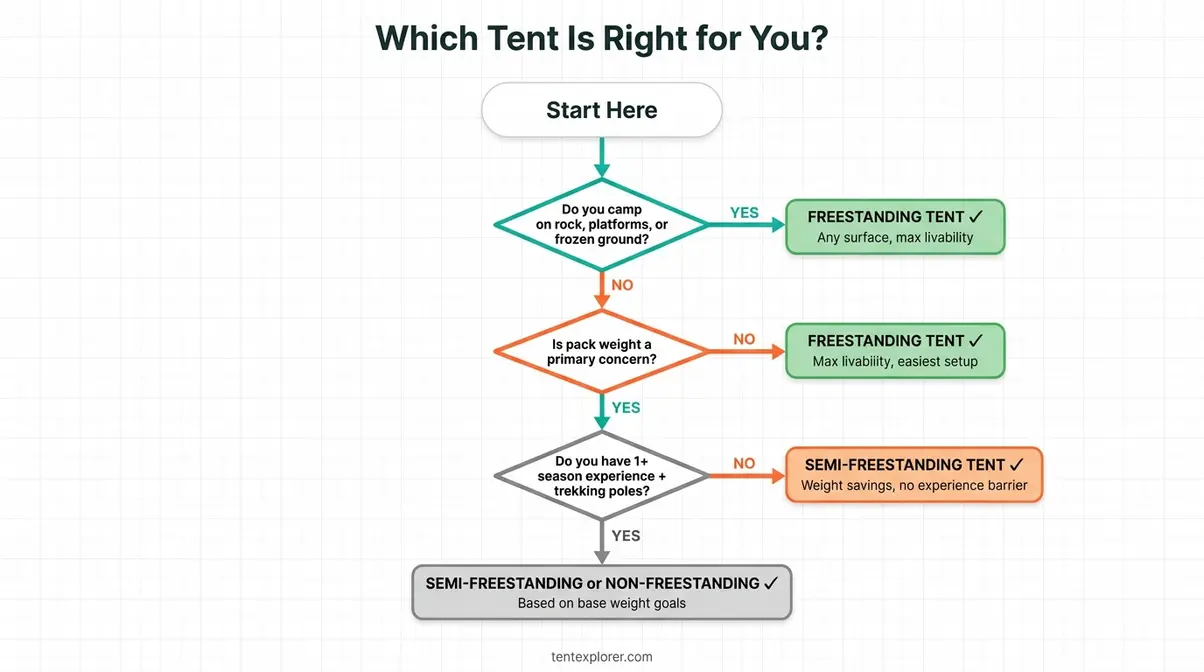
Quick Decision Framework:
Question 1: Do you camp on surfaces where you cannot stake the ground (rock, platforms, frozen soil)? → Yes → Freestanding tent. No other design works reliably here. → No → Proceed to Question 2.
Question 2: Is pack weight a primary concern — are you counting ounces on multi-day routes? → No → Freestanding tent. Maximum livability, easiest setup, no terrain constraints. → Yes → Proceed to Question 3.
Question 3: Do you have at least one full season of backpacking experience and trekking poles in your kit? → No → Semi-freestanding tent. Weight savings without the experience requirement. → Yes → Semi-freestanding or non-freestanding, depending on how aggressively you’re targeting base weight. Start with semi-freestanding; transition to non-freestanding when terrain and skill align.
For a comprehensive breakdown of weather considerations, see our guide on choosing a tent for wind and rain protection.
When Your Tent Choice Could Let You Down
Every tent type has failure modes — and understanding them before you’re on trail is the difference between a minor inconvenience and a miserable night. Our team evaluated the most common pitfalls across freestanding, semi-freestanding, and non-freestanding designs over multiple seasons of field use, and the patterns below reflect consistent feedback from professional backpacking communities.
Common Tent Choice Pitfalls
Pitfall 1 — Buying semi-freestanding for alpine use. The most frequent mismatch we see: a backpacker chooses a semi-freestanding tent for its weight savings, then plans a trip to a rocky ridgeline or alpine zone where staking is impossible. The foot-end collapses, the interior volume shrinks by 20–30%, and the tent becomes frustratingly unusable at its designed capacity. Avoid it: If your trip includes any above-treeline camping on rocky terrain, freestanding is non-negotiable.
Pitfall 2 — Treating stakes as optional for a freestanding tent in wind. A freestanding tent stands without stakes, but it doesn’t stay without them. In any sustained wind above 15 mph, an unstaked freestanding tent becomes a rolling tumbleweed. Several community reports on r/Ultralight document tents traveling 50+ yards downslope from unstaked pitches. Avoid it: Always stake at least the two windward corners, even on surfaces where full staking isn’t possible.
Pitfall 3 — Underestimating the non-freestanding learning curve. Non-freestanding tents require site selection skills that take a full season to develop — reading ground firmness, identifying natural windbreaks, and pitching in the dark under pressure. First-time users frequently over-tension one side, creating a lopsided pitch that pools condensation and reduces interior headroom. Avoid it: Practice in your backyard before committing to a non-freestanding design on a remote route.
Pitfall 4 — Ignoring condensation in semi-freestanding designs. Semi-freestanding tents with lower peak heights and reduced interior volume trap moisture more readily than their freestanding counterparts. In humid conditions or near water sources, this can result in a wet sleeping bag by morning. Avoid it: Choose a semi-freestanding design with a full double-wall construction and active ventilation ports, and camp away from water where possible.
Choosing Alternative Shelters
Choose a tarp or bivy instead of a tent when you’re gram-counting for a fast-and-light style trip and willing to sacrifice weather protection for speed. A silnylon tarp can weigh under 10 oz and sets up in under two minutes — but it offers no bug protection and limited storm coverage.
Choose a mountaineering tent (geodesic freestanding) instead of a standard backpacking tent when you’re camping above 10,000 feet in exposed alpine conditions or on snow. The Hilleberg Akto and similar designs sacrifice interior volume for a pole geometry that handles 60+ mph wind loads — a trade-off that standard backpacking freestanding tents aren’t engineered for.
Choose a hammock system when you’re camping in forested terrain with consistent tree spacing and weight is a secondary concern. A hammock and tarp combination eliminates ground-surface constraints entirely — relevant if you camp in areas with wet, rocky, or root-covered forest floors where tent pitching is genuinely difficult.
For a complete overview of when tent-alternative shelters outperform traditional designs, see our guide to shelter alternatives for backpackers. The Reddit r/Ultralight community discussion on tent trade-offs also provides unfiltered field experience from hundreds of backpackers across terrain types.
Frequently Asked Questions
Freestanding vs. Semi-Freestanding
A freestanding tent uses a complete intersecting pole system to hold its shape without any staking, while a semi-freestanding tent uses a partial pole structure at the head-end and requires 2–4 stakes at the foot-end to achieve full interior volume. The practical consequence: freestanding tents work on any surface, including rock and wooden platforms, while semi-freestanding tents require stakeable ground to perform as designed. A direct comparison — MSR Hubba Hubba NX (freestanding) vs. MSR Freelite 2 (semi-freestanding) — illustrates the trade-off: the Freelite 2 saves approximately 23 ounces but cannot stand without foot-end stakes (MSR, 2026). For most three-season backpackers on established trails, the semi-freestanding design is the more practical choice.
Is a freestanding tent worth it?
Freestanding tents are worth the extra weight when terrain is unpredictable or staking is unreliable. They perform on granite slabs, wooden platforms, frozen ground, and sandy desert where semi-freestanding designs struggle or fail. For beginners, the setup ease alone justifies the weight premium, as there’s no learning curve or site-selection pressure.
What is the 200 rule for camping?
The 200-foot rule is a Leave No Trace principle requiring campers to pitch tents, cook, and establish camp at least 200 feet (approximately 70 large paces) from water sources, trails, and other campers. The rule protects riparian ecosystems, prevents campsite degradation near water, and minimizes impact on trail corridors. For tent-choice purposes, the 200-foot rule is relevant because camping near water sources increases condensation risk inside your tent — especially in semi-freestanding and non-freestanding designs with lower interior volume. Pitching 200+ feet from water also tends to mean drier, better-drained ground, which improves staking reliability for semi-freestanding designs (Leave No Trace Center for Outdoor Ethics, 2026).
Prices and features verified as of July 2026.
Choosing a freestanding vs semi freestanding tent is not a binary decision — it’s a placement question on The Shelter Spectrum. Freestanding tents deliver maximum livability and terrain versatility at a weight cost; semi-freestanding designs recover 20–40% of that weight in exchange for a staking dependency that matters enormously on some terrain and almost never on others; non-freestanding shelters push the weight savings further still, but only reward backpackers with the experience to manage their constraints. The right answer is the one that matches your actual terrain, not the one that looks best on a spec sheet.
The Shelter Spectrum exists because most backpackers don’t camp at either extreme — they camp on established trails with mostly predictable ground, and they want both reasonable weight and reliable shelter. That’s exactly the space semi-freestanding tents were engineered to occupy. The framework’s value is in forcing the terrain question first, before weight or price enter the calculation.
Start with the three-question flowchart in the decision guide above. If Question 1 sends you to freestanding, stop there — terrain has made the decision for you. If you reach Question 3, you’re in the semi-freestanding or non-freestanding range, and the right choice depends on how many seasons you’ve spent reading ground conditions under pressure. Trial your preferred design on a short overnight before committing it to a technical route — 30 days of local testing is worth more than any spec comparison.
