
This blog post may contain affiliate links. As an Amazon Associate I earn from qualifying purchases.
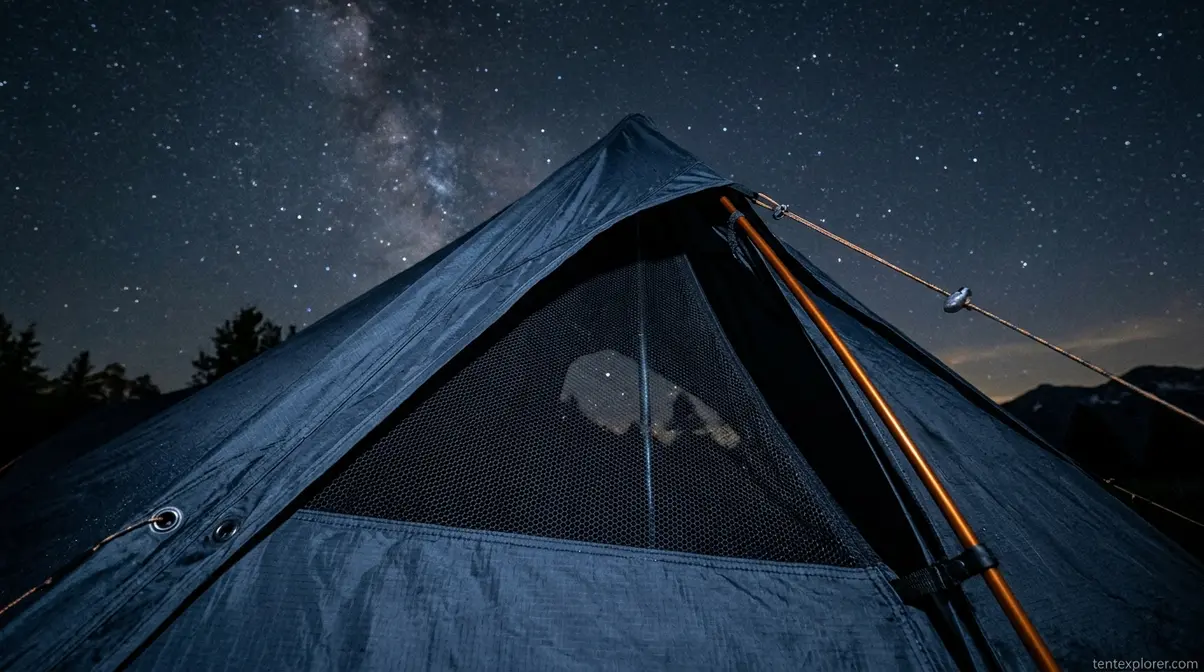
You wake up at 3 a.m. to dripping tent walls and a sleeping bag that feels like it spent the night in a cloud — everything damp, including your mood. That microclimate rainstorm inside your tent isn’t rain: it’s condensation, and it’s entirely manageable once you understand what’s causing it.
Most guides tell you to “open a vent” — but if that fixed it, you wouldn’t be reading this. The real problem is that condensation is a physics problem, and generic advice ignores the physics. Knowing why warm, moist air turns into dripping walls — and when to act — is what separates campers who wake up dry from those who stuff soggy gear into a wet bag every morning.
In this guide, you’ll learn how to prevent condensation in a tent using the 4-Phase Dry Camp System — 18 actionable techniques organized from campsite selection to morning recovery. We’ll cover the science, the setup, the overnight management, weather-specific tactics for both summer and winter, and the advanced moisture control tools (DampRid, battery fans, DIY absorbers) that no competitor bothers to test.
Key Takeaways: The 4-Phase Dry Camp System
Learning how to prevent condensation in a tent starts with understanding that condensation forms when warm, moist air from breathing hits cold tent fabric and reaches its dew point. You cannot fully prevent it, but the 4-Phase Dry Camp System can reduce it by 80%+ with the right combination of site selection, pitching technique, active management, and supplemental tools.
- Phase 1 (Site): Avoid low-lying ground and water sources — ambient humidity is measurably higher within 200 feet of standing water
- Phase 2 (Pitch): Create the chimney effect with a 2-inch rainfly gap and open top vents simultaneously
- Phase 3 (Night): Keep wet gear outside; breathe into a buff or moisture-wicking liner to reduce breath vapor
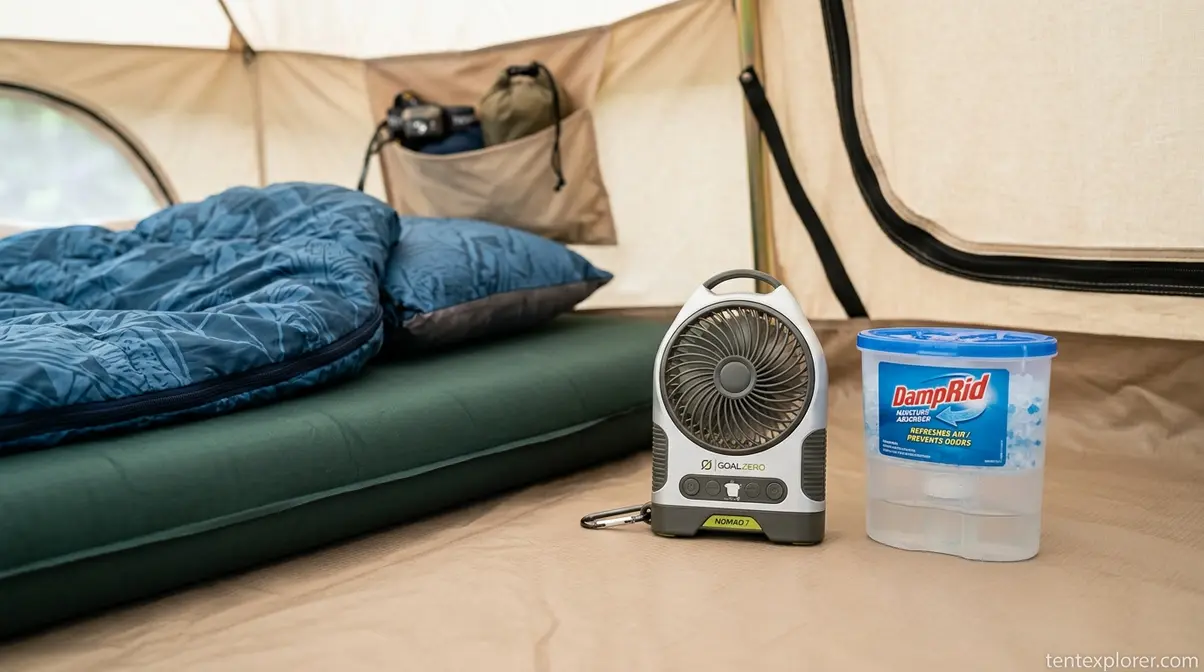
- Phase 4 (Tools): DampRid (calcium chloride) works as a supplement — not a substitute — for ventilation; battery fans outperform absorbers in calm conditions
The Science of Tent Condensation
- Estimated Time: 15-20 minutes (setup and active management)
- Tools Needed:
- Tent with adjustable vents
- Groundsheet or footprint
- Microfiber cloth
- DampRid or battery-powered fan (optional)
Condensation forms inside a tent when warm, moist air from your breath and body heat contacts the cooler tent fabric and drops to its dew point — the temperature at which water vapor can no longer stay as gas and becomes liquid. According to the National Weather Service, condensation occurs the moment air temperature drops to the dew point, turning invisible water vapor into visible droplets. In a two-person tent, this process begins within minutes of zipping up.
Our team has evaluated condensation behavior across double-wall, single-wall, and tarp shelters over multiple seasons, in conditions ranging from summer humidity to sub-zero winter nights. Here’s what the science — and the field — confirms: you cannot stop condensation entirely, but you can manage the conditions that cause it so aggressively that it rarely becomes a problem.
Dew Point & Radiative Cooling
Think of a cold glass of water on a humid summer day — droplets form on the outside of the glass because the glass surface is cooler than the surrounding air’s dew point. Your tent walls do exactly the same thing. You are the warm, humid “room,” and the tent fabric is the cold glass.
What surprises most campers is the radiative cooling effect: on clear, calm nights, tent fabric loses heat to the open sky faster than the air inside cools. The fabric surface temperature can drop 5–10°C below ambient air temperature — which is why condensation is often worse on clear, cold nights than on mild, overcast ones. Clouds act as an insulating blanket; without them, your tent fabric radiates heat directly into space. Penn State University’s meteorology department explains that once air inside a tent reaches 100% relative humidity, condensation on tent walls is physically unavoidable — the goal isn’t to prevent humidity, it’s to move it out before it reaches that threshold (Penn State, 2026).
Two sleeping adults generate roughly half a liter of moisture overnight through breathing and perspiration combined. That moisture has to go somewhere. The question the 4-Phase Dry Camp System answers is: where does it go before it hits your tent wall?
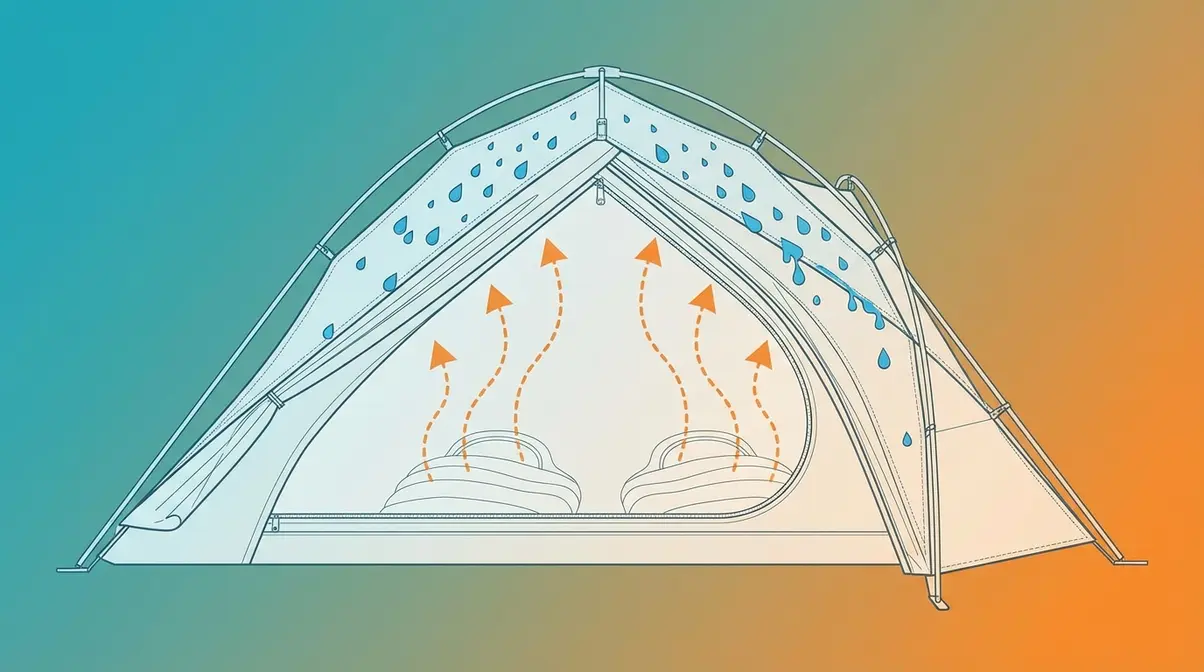
Caption: Warm, moist air from breath and body heat rises, contacts cooler tent fabric, and drops below the dew point — turning invisible vapor into the dripping walls you wake up to.
Single vs. Double-Wall Tents
Double-wall tents use a breathable inner canopy plus a separate rainfly with an air gap between them. Humid air passes through the inner mesh, enters the gap, and (ideally) exits through top vents before it ever condenses on a surface you’ll touch. Popular Mechanics testing confirms that double-wall tents significantly reduce internal condensation by utilizing this air-gap ventilation principle — it’s not marketing language, it’s physics working in your favor.
Single-wall tents — many ultralight shelters, tarps, and bivy sacks — have one layer of fabric. Warm, humid interior air contacts the cold outer wall directly, with no buffer. Single-wall users must compensate with aggressive ventilation; absorbers alone won’t solve the problem. If you own a single-wall shelter, treat every tip in this guide as non-negotiable. If you have a double-wall tent, the ventilation tips in Steps 2 and 3 are your highest-leverage actions.
Every tip in this guide maps to one of four phases — site selection, pitching, overnight management, and advanced tools — giving you a repeatable system, not a random checklist.
Step 1: Choose a Dry Campsite
Phase 1 of the 4-Phase Dry Camp System is the most overlooked variable in learning how to prevent condensation in a tent. The EPA’s moisture control guidance confirms that preventing excessive indoor humidity through proper airflow and reduced ambient moisture exposure is the most effective condensation mitigation strategy — and that starts with where you plant your tent poles (EPA, 2014). A bad site makes every subsequent technique less effective; a good site does half the work for you before you even unzip your sleeping bag.
Avoid Low Ground and Water
Cold air is denser than warm air and pools in hollows, valleys, and depressions overnight. Camping in a dip means sleeping in the coldest, most humid air pocket available — the worst possible condensation environment. The temperature differential between that cold, pooled air and your warm tent interior is exactly what drives dripping walls.
Water sources — lakes, rivers, streams, ponds — raise ambient humidity significantly. The closer you camp to standing or moving water, the higher the baseline humidity your tent must overcome all night. As a practical rule, camp as far from water sources as terrain allows; even a 200-foot buffer makes a measurable difference in overnight ambient humidity. Wet grass and vegetation also release stored moisture overnight through transpiration. Camping on dry, elevated ground — even a small rise of 10–20 feet above a hollow — reduces the ambient humidity your tent is fighting.
If you’re at a campsite and must choose between a flat spot near a creek and a slightly sloped spot on a ridge, take the ridge every time. The inconvenience of a slight incline is nothing compared to waking up with everything damp.
These site principles matter even more in winter, when cold air pooling in depressions is most severe and ground moisture can freeze directly onto your tent floor.
Use Trees and Wind Breaks
The radiative cooling effect discussed earlier is most severe on clear, open nights when tent fabric radiates heat directly to the open sky. Trees above and around your tent act as an insulating ceiling — they reduce the temperature differential between tent fabric and ambient air, directly reducing condensation. This is the condensation-specific reason to camp near trees, beyond simple wind protection.
Wind breaks serve a second function: light breezes carry humid exhaled air away from the tent exterior, preventing it from accumulating in a damp microclimate around your shelter. Dead-calm conditions — often found in sheltered hollows — allow humidity to build up around the tent. A gentle breeze is your ally, not your enemy.
Important nuance: don’t camp directly under tree canopies after rain. Dripping branches will soak the tent and the ground beneath it. The ideal spot is a clearing sheltered by trees on two or three sides, with partial overhead cover but open sky directly above — enough tree coverage to reduce radiative cooling without creating a drip zone.
Use the checklist below before you stake a single pole — it takes 60 seconds and prevents a damp night.
Dry Night Campsite Checklist
Before pitching, run through these five checks. If you can tick three or more “look for” items and avoid all five “avoid” items, you’ve optimized your condensation baseline.
- Look For:
- Elevated ground (even 10–20 feet above the surrounding terrain)
- Dry soil or grass underfoot
- Natural tree windbreak on two or more sides
- At least 200 feet from any standing or moving water
- A light breeze present at the site
- Avoid:
- Hollows, depressions, or valley floors
- Wet or marshy ground
- Camping directly under a tree canopy
- Within sight of standing water
- Completely enclosed, wind-dead spots with zero airflow
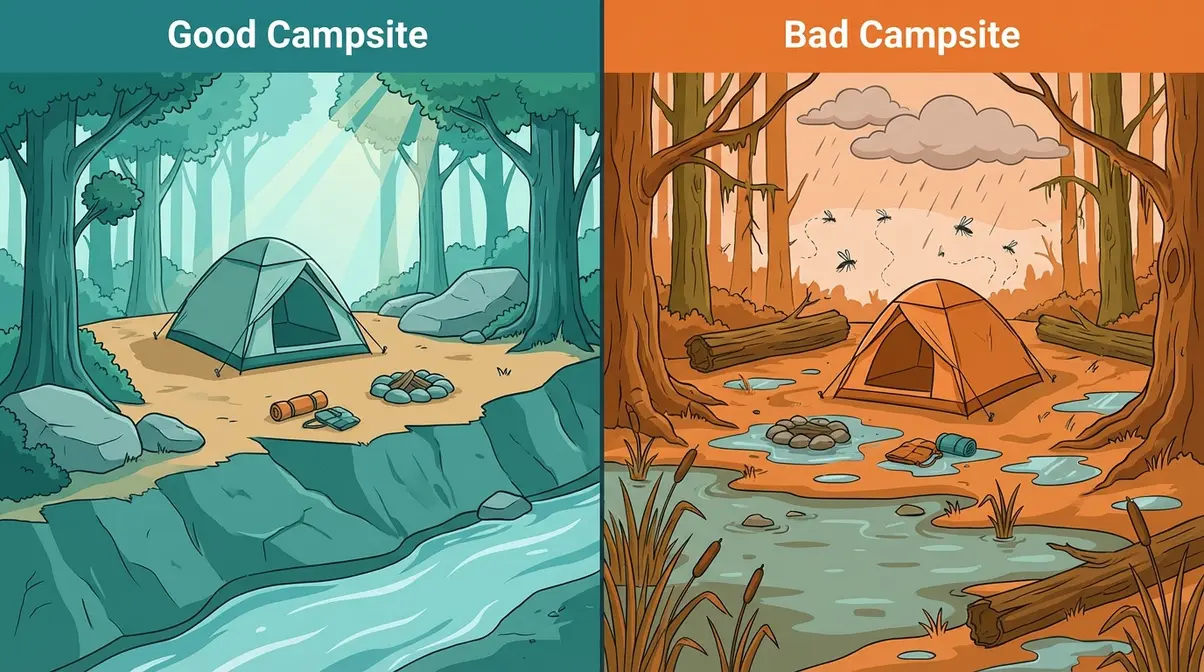
Caption: Run this five-point checklist before staking a single pole — site selection is the highest-leverage condensation variable in your entire system.
Site selected. Now let’s look at how to pitch your tent to harness the chimney effect — the single most powerful passive ventilation mechanism available to you.
Step 2: Pitch for the Chimney Effect
Phase 2 of the 4-Phase Dry Camp System is all about pitching technique. The chimney effect works by allowing cool, dry air to enter the tent at ground level while warm, humid air rises and exits through upper vents — but only if your tent is pitched to enable this airflow. Get the setup wrong and you’ve sealed a moisture trap. Pitching your rainfly with a 2-inch gap at ground level and keeping top vents open simultaneously activates the chimney effect — the most effective passive ventilation mechanism for preventing tent condensation.
Strategic Vent Positioning
The chimney effect requires two conditions to be met simultaneously: at least one low opening (a ground-level gap, mesh door panel, or lower vent) for cool air intake, and at least one high opening (a top vent, peak vent, or upper door panel) for warm, humid air exhaust. If only one is open, airflow stalls and humid air has nowhere to go.
Orientation matters significantly. Position the tent so the door faces the prevailing wind direction — even a light breeze at the entrance pushes air through the tent and out the back, supplementing the passive chimney effect with active airflow. Check which direction the wind is coming from before you stake out your footprint.
Rainfly tension is often overlooked. Pitch the fly taut with no sagging panels. A wrinkled or loose fly reduces the air gap between the inner tent and fly — and that gap is exactly where humid air should be moving before it exhausts through the top vents. Before bed, run your hand along the lower edge of the rainfly. If it’s staked flush to the ground on all sides, you’ve blocked the cool air intake. Loosen stakes to create that critical 2-inch gap.
As the diagram below illustrates, the chimney effect is a passive system — but it only functions when both the intake and exhaust pathways are open simultaneously. Closing one breaks the circuit.
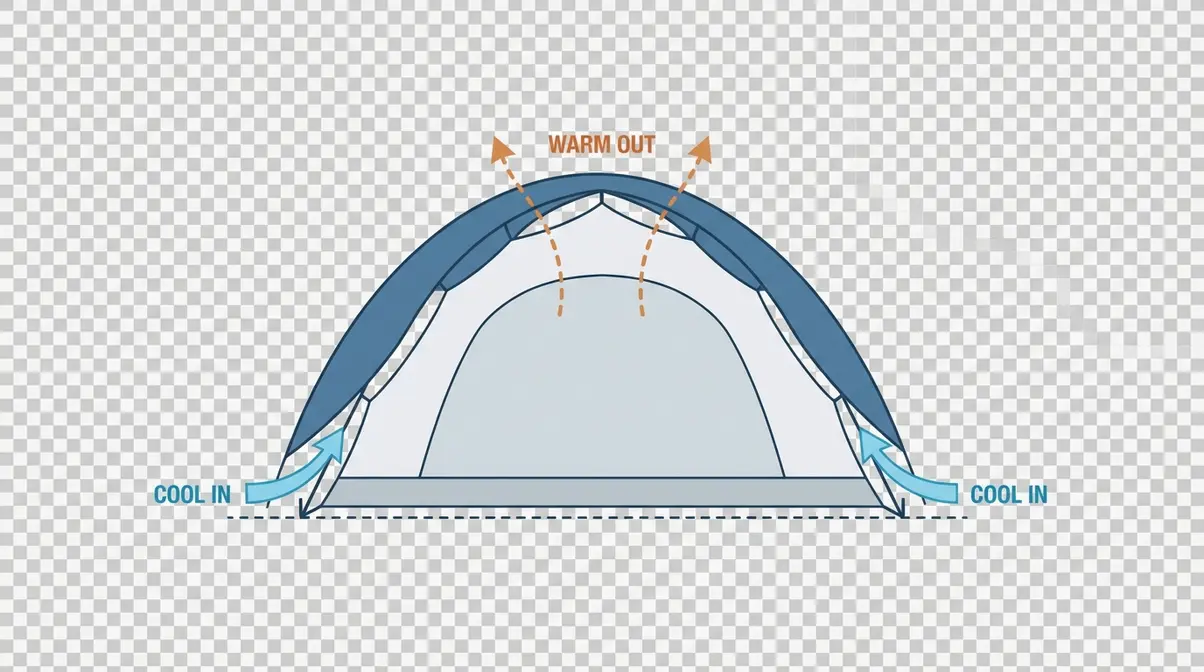
Caption: The chimney effect moves humid air from the tent interior upward and out through top vents — but only when both a low intake and a high exhaust vent are open at the same time.
For a deeper dive into vent positioning across different tent designs, the comprehensive guide to tent ventilation covers every major tent geometry.
With the airflow principle established, the rainfly gap and groundsheet are the two physical adjustments that make or break the system.
Rainfly Gap and Groundsheets
The 2-inch rainfly gap is the single most actionable pitching adjustment you can make. Stake the rainfly so the bottom edge sits approximately 2 inches above the ground on the leeward side — the side sheltered from wind and rain. This gap is the cool air intake for the chimney effect. Exception: in driving rain or sustained high wind, stake the fly fully to protect the interior, and compensate by opening top vents more aggressively to maintain some exhaust airflow.
A groundsheet or footprint placed under the tent floor blocks moisture from rising through the tent floor from damp ground — particularly important in early morning when ground dew is heaviest. One important limitation: a groundsheet addresses floor moisture only. It does nothing for wall condensation, which is driven by interior humidity and temperature differentials.
Vapor barrier liners (VBLs) are an advanced, somewhat uncomfortable technique favored by ultralight backpackers in sub-freezing conditions. A VBL — a thin waterproof layer worn between your base layer and sleeping bag — traps body moisture before it enters the tent’s air space entirely. This directly reduces the humidity load the tent has to manage overnight. It’s not for everyone, but in extreme cold it can make a significant difference.
In a standard 3-season double-wall tent, the combination of a footprint plus a 2-inch rainfly gap plus an open top vent delivers maximum passive condensation prevention with no additional gear required. That’s your baseline setup for every camp.
Your tent is now pitched correctly. The next phase is maintaining airflow through the night — including the counterintuitive moves you need to make when it starts raining.
Step 3: Maximize Night Ventilation
Ventilation is the active, ongoing work of Phase 3. The biggest mistake campers make is treating venting as a one-time setup decision rather than an all-night practice. MSR’s gear guidance identifies creating airflow through the tent as the most effective way to reduce condensation — the warm, humid air your body continuously generates needs a continuous exit path, not just an open vent you set and forget.
Open Vents Even in Rain
The most common condensation mistake is closing vents when rain starts. This feels logical — you’re trying to keep water out — but it traps all of the moisture your body is generating inside the tent. The result is dripping walls within an hour.
Modern tent vents are designed to shed rain while maintaining airflow. Open every vent your tent offers, even in light rain. The small amount of misting that may enter through a well-designed vent is far less damaging than the humidity that builds when you seal the tent entirely. In rain, prioritize upper vents — they’re typically sheltered by the rainfly overhang and shed water most effectively while still exhausting humid interior air.
The exception is a genuine storm with horizontal rain or wind-driven precipitation. In those conditions, close lower vents and door panels, but keep at least one top vent cracked. Completely sealing a tent during a rainstorm is what produces the “microclimate rainstorm” inside — dripping walls indistinguishable from the rain outside.
Door and Mesh Panel Strategy
Most 3-season tents have a mesh inner door that can be unzipped independently of the outer door panel. Use it. Sleeping with the mesh inner door unzipped but the outer door panel closed gives you significant airflow without exposing the interior to insects or light precipitation. This single adjustment can halve the humidity buildup overnight in mild conditions.
In warm, dry conditions with no rain threat, sleeping with both the inner mesh door and the outer panel partially open maximizes airflow dramatically. Pair this with an open rear vent or window and you’ve created a through-draft that continuously flushes humid air from the tent. REI’s expert advice consistently emphasizes ventilating early, often, and fully — the “often” part means checking and adjusting vents as conditions change overnight, not just at setup.
The 2-Inch Skirt Gap Rule
The 2-inch skirt gap introduced in Step 2 deserves reinforcement here as an active overnight strategy, not just a pitching tip. As overnight temperatures drop, the temperature differential between tent interior and exterior increases — which means the chimney effect becomes more powerful, but only if the intake gap is still open.
Check the skirt gap before you sleep. Wind or settling can shift the fly position and close the gap you created at pitching. A quick walk around the tent to confirm the gap is consistent on the intake side takes 30 seconds and can prevent hours of damp discomfort. In calm conditions, the 2-inch gap is your primary source of cool air intake. In breezy conditions, even a 1-inch gap is sufficient — the wind does the work.
Step 4: Eliminate Internal Moisture
Phase 3 of overnight management isn’t only about moving air — it’s also about reducing the moisture load the ventilation system has to handle. NEMO Equipment’s condensation guidance notes that reducing moisture sources inside the tent is equally important as ventilation, because every gram of moisture you keep out of the interior is a gram the chimney effect doesn’t have to exhaust.
Keep Wet Gear and Pets Outside
Wet gear brought inside a tent is one of the fastest ways to saturate interior air. A soaked rain jacket hanging inside a two-person tent adds significant moisture to the air within an hour — moisture that will end up on your walls and sleeping bag. Wet boots, damp towels, wet swimwear, and even sweaty base layers all contribute.
Use the vestibule for everything wet. Modern tents with vestibules exist precisely for this purpose — wet gear storage that keeps moisture out of the sleeping area. If your tent has no vestibule, store wet items in a stuff sack outside under the rainfly overhang, or in a waterproof bag inside the tent rather than loose. The discipline of keeping wet gear out of the main sleeping area is one of the simplest, highest-impact actions in the entire system.
Pets bring additional moisture — wet fur, heavy breathing, and body heat all increase interior humidity. If your dog camps with you, ensure they’re thoroughly dried before entering the tent and consider a dedicated pet towel in the vestibule.
Managing Breath Moisture
Two sleeping adults exhale roughly 200–300 ml of water vapor each overnight — and in a sealed or poorly ventilated tent, that vapor has nowhere to go except your tent walls. Breath moisture is the single largest controllable indoor humidity source, and it’s the one most guides ignore entirely.
The most effective fix is directing breath away from tent walls and toward the vent exhaust path. Sleeping with your head near the door (rather than the back wall) naturally positions your breath output toward the vent intake. In cold conditions, a buff worn loosely over the nose and mouth captures some of that moisture before it enters the tent air:
“Wearing a buff over your nose and mouth (although it might be uncomfortable) would decrease the condensation in the tent from your breath.”
The buff approach works because it partially traps exhaled moisture against the fabric, where it can be absorbed rather than dispersed as vapor into the tent air. It’s not a complete solution, but across camping communities, the consistent feedback is that it makes a noticeable difference on cold nights when breath condensation is most visible. A moisture-wicking liner worn the same way achieves a similar result with less discomfort than a tight buff.
Cooking inside the tent is another underestimated moisture source. A single pot of boiling water releases significant steam. If weather permits, cook in the vestibule or outside entirely. If you must cook inside, maximize ventilation during and immediately after cooking, and allow steam to fully exhaust before closing any vents. If you want a deeper dive into personal routines, check out our guide on how I prevent condensation in my tent.
Step 5: Advanced Moisture Control
Phase 4 of the 4-Phase Dry Camp System addresses supplemental tools — the products and techniques that work alongside ventilation but cannot replace it. Across camping communities, the consistent feedback is that absorbers and fans are force multipliers, not standalone solutions. If your tent is poorly ventilated, no absorber will compensate. But if your ventilation system is already working, these tools can push humidity down meaningfully.
Does DampRid work in a tent?
DampRid (calcium chloride) works in a tent as a supplemental moisture absorber, not a standalone solution. DampRid is a calcium chloride-based moisture absorber that draws water vapor from the air and collects it as liquid brine. Consumer testing by CHOICE Australia found that DampRid reduced humidity from approximately 80% to 43% in a sealed, closet-sized test chamber over three days, collecting nearly half a cup of water (CHOICE, 2026). That result is meaningful — but the key phrase is “sealed chamber.” In a tent with open vents, the effect is smaller because air exchanges continuously, reducing the absorber’s effective contact time with humid air.
In practice, DampRid in a tent works best as a supplemental tool in low-airflow conditions — early morning when vents are partially closed, or in calm, humid weather where the chimney effect is weak. Place the container near the center of the tent floor, away from walls, and replace it when the crystals have fully dissolved into liquid. A standard 10.5-oz container lasts one to three nights depending on humidity levels. Treat it as a supplement to — not a substitute for — ventilation.
The honest verdict: DampRid can reduce overnight humidity by a meaningful margin as a supplement to good ventilation. It cannot compensate for a sealed, poorly ventilated tent, and it absorbs moisture slowly compared to the rate two sleeping adults generate it.
DIY Moisture Absorbers
If you’d rather not carry DampRid, two DIY alternatives exist — and they are not equally effective.
Calcium chloride (the same active ingredient as DampRid, available in bulk as ice melt or desiccant) is significantly more effective than baking soda. Research from GoldBio confirms that calcium chloride is a deliquescent desiccant — it actively draws moisture from the air starting at around 30% relative humidity and self-regulates until equilibrium. Place it in a perforated container over a small collection tray to catch the brine that forms as it absorbs. Nanyang Technological University testing found calcium chloride and silica gel performed comparably for humidity reduction, both significantly outperforming baking soda (NTU, 2019).
Baking soda does absorb some moisture — it will harden in its container as it works — but its capacity is far lower than calcium chloride. It’s better understood as an odor absorber than a meaningful humidity control tool. If baking soda is all you have, it won’t hurt, but don’t expect it to make a measurable difference in a tent environment.
DIY calcium chloride setup: Fill a small mesh bag or perforated container with calcium chloride crystals. Place it over a lightweight plastic cup or small container to collect the liquid brine that forms. Replace when fully dissolved, typically every two to three nights.
Will a fan stop condensation in a tent?
A battery-powered fan reduces condensation by accelerating airflow, not by removing moisture. A battery-powered fan doesn’t remove moisture from the air — it moves air. The condensation benefit comes from forcing the chimney effect to work faster and more consistently than passive convection alone. In calm conditions where there’s no wind to assist the 2-inch skirt gap, a circulating or exhaust-positioned fan can meaningfully increase air turnover and prevent humid air from pooling near cold wall surfaces — the point where condensation forms.
The key distinction is circulating vs. exhaust fans. A circulating fan that moves air around the interior distributes humidity more evenly. An exhaust fan positioned at an upper vent actively pushes humid air out. Both approaches work; the exhaust positioning is more efficient.
Camping community feedback confirms that battery fans make the most noticeable difference in warm, humid, calm-night conditions — exactly the scenario where passive ventilation is weakest and the chimney effect is least active. In windy conditions, passive ventilation already works well and a fan adds minimal benefit. Choose a rechargeable USB model with at least 5–7 hours of runtime at medium speed; AA-battery models tend to run low before morning.
The honest verdict: A battery fan is a genuine condensation reduction tool in calm, humid conditions. It’s less useful on windy nights when passive ventilation already works well.
Step 6: Adapt for Winter and Rain
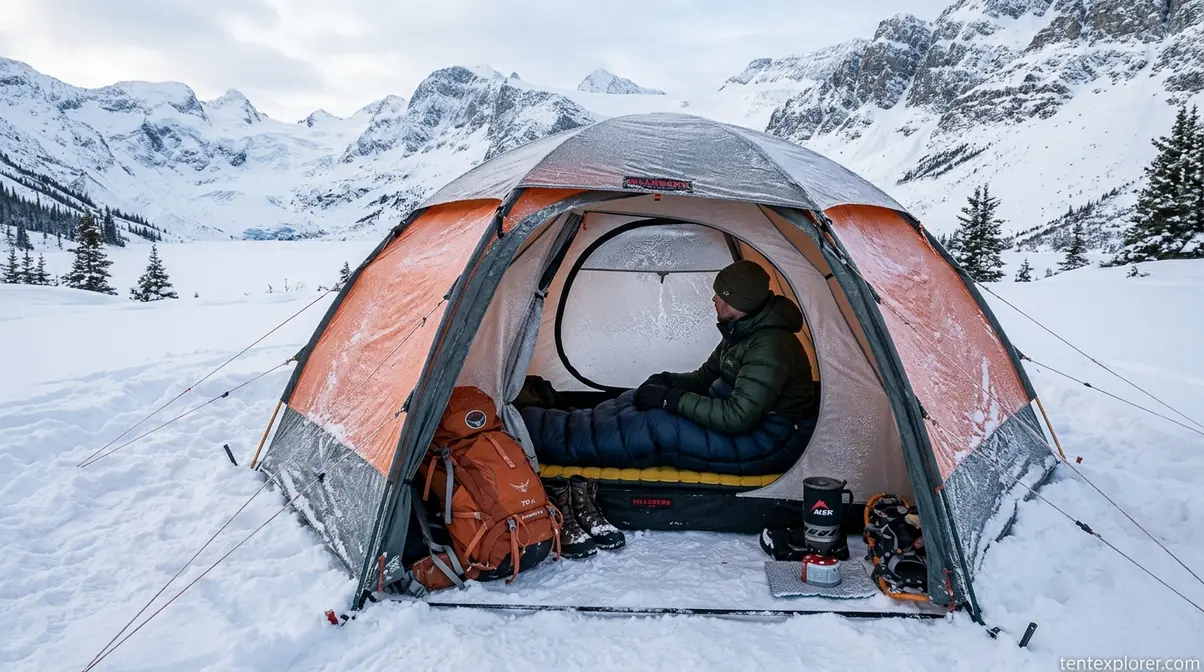
The 4-Phase Dry Camp System applies year-round, but winter and rain demand specific adjustments. The physics don’t change — but the temperature differentials, moisture sources, and ventilation trade-offs become more extreme. Condensation is generally worse in winter than summer because the temperature gap between warm interior air and cold tent fabric is larger, breath moisture freezes on contact with surfaces, and ventilation instincts (close everything to stay warm) work directly against condensation management.
Winter Camping Condensation
In sub-freezing temperatures, condensation doesn’t drip — it frosts. You’ll wake to a glittering layer of ice crystals on the inner tent wall, which melts as the tent warms and soaks everything it touches. Managing this requires a different approach than summer camping.
Ventilation must remain a priority even when it’s cold. The instinct to seal the tent for warmth is understandable but counterproductive. Keep at least one top vent open throughout the night, even if it means sleeping in a slightly cooler tent. The moisture your breath generates will condense and freeze on walls regardless of tent warmth — the only variable you control is whether it exhausts before it reaches saturation.
Vapor barrier liners (VBLs) become significantly more valuable in winter. By trapping body moisture inside the liner rather than releasing it into the tent air, VBLs can dramatically reduce frost buildup on inner walls — a technique endorsed by ultralight winter camping communities for exactly this reason.
Condensation curtains, available on some four-season tents like NEMO’s Tenshi 2P, catch frost and condensation before it drips onto sleeping gear. If your tent has one, use it. If not, a lightweight piece of breathable fabric hung loosely from the tent peak can serve a similar purpose in a pinch.
In the morning, shake frost off the inner tent before it melts. Open the tent fully to air it out — cold, dry winter air has very low absolute humidity and will quickly absorb and carry away residual moisture if you give it access. For more extreme conditions, explore our tips on how I keep warm in my tent and ensure you are using the best tent for winter camping.
Handling Rainstorm Condensation
Rain creates a specific condensation paradox: the conditions that make you want to seal the tent (rain, wind, cold) are exactly the conditions that accelerate moisture buildup inside it. Managing this well is what separates experienced campers from frustrated ones.
During rain, keep upper vents open. Rainfly overhangs are designed to shed water from upper vents — opening them during rain rarely results in water entry. Lower vents and door panels should be closed or nearly closed in driving rain, but the exhaust pathway at the top must remain open. Without it, the moisture two sleeping adults generate overnight has no exit.
Wipe down walls proactively. In sustained rain, condensation on inner walls can become heavy enough to drip onto sleeping gear even with vents open. A small microfiber cloth kept inside the tent for wall wipe-downs is a practical tool — one sweep of the inner wall before sleep and once during the night if you wake up can prevent a genuinely damp sleeping bag.
The table below shows how strategy adjusts between winter and summer conditions:
| Factor | Summer Strategy | Winter Strategy |
|---|---|---|
| Vent setting | All vents open | Top vent open minimum; lower vents as tolerable |
| Rainfly gap | 2 inches standard | 1–2 inches; close in driving snow |
| Breath management | Open mesh door | Buff or VBL; direct breath toward vent |
| Condensation form | Liquid drips | Frost → melt drip |
| Morning action | Air out tent | Shake frost before it melts; air out in dry air |
| Supplemental tools | Fan (calm nights) | VBL, condensation curtain, desiccant |
Bonus: Shed Condensation Principles
The same physics that drives condensation in a tent — warm, moist interior air contacting cooler surfaces — applies directly to sheds, garages, and outbuildings. If you’re dealing with how to stop condensation in a wooden shed or concrete shed, the 4-Phase framework translates with minimal adjustment.
Wooden sheds benefit most from ventilation and moisture barriers. Install ridge vents at the peak and low-level vents at the base to create a passive chimney effect — the same principle as your tent’s top-vent and skirt-gap system. A vapor barrier on the floor (heavy-duty polyethylene sheeting) prevents ground moisture from rising. Lapp Structures’ shed ventilation guidance recommends a minimum of 1 square foot of ventilation per 150 square feet of floor area for effective moisture control.
Concrete sheds present a more challenging problem because concrete is highly porous and absorbs ground moisture, which then evaporates into the interior. Anti-condensation paint applied to interior walls creates a thermal break that raises the effective surface temperature, reducing the likelihood of condensation forming. A calcium chloride desiccant (the same DampRid chemistry discussed in Step 5) is effective in a sealed or poorly ventilated shed as a supplemental absorber. Keter’s storage shed maintenance guide covers moisture management for plastic and resin sheds specifically, where condensation typically indicates inadequate floor-level ventilation.
The core principle remains identical: reduce interior humidity, increase surface temperatures, and create airflow. Whether you’re sleeping in it or storing tools in it, the physics doesn’t change.
Common Condensation Mistakes
Understanding the 4-Phase Dry Camp System is one thing — avoiding the habits that undermine it is another. After evaluating condensation reports across camping forums and communities, five patterns appear repeatedly in campers who still wake up damp despite following general advice.
Five Pitfalls That Trap Moisture
1. Closing all vents at the first sign of rain. This is the most common and most damaging mistake. Closing vents seals in every gram of moisture your body generates overnight. Keep upper vents open — they’re designed to shed rain.
2. Pitching the rainfly flush to the ground on all sides. This blocks the cool air intake the chimney effect needs. A 2-inch gap on the leeward side is not optional — it’s the intake valve for your entire passive ventilation system.
3. Bringing all wet gear inside the tent. A soaking rain jacket inside a two-person tent can add enough humidity to overwhelm even good ventilation. Use the vestibule. If there’s no vestibule, use a waterproof stuff sack.
4. Camping in hollows or depressions. Cold air pools in low-lying ground and ambient humidity is significantly higher in these spots. The campsite choice you make at 5 p.m. determines the humidity baseline you fight all night.
5. Treating absorbers as a substitute for ventilation. DampRid, baking soda, and fans all work as supplements to a well-ventilated tent. None of them can compensate for a sealed tent. The hierarchy is: ventilation first, tools second.
When to Change Your Shelter
Technique and tools can take you a long way, but some condensation problems are fundamentally shelter problems. If you’re consistently waking up damp despite following every step in this guide, consider whether your shelter type is the right tool for your conditions.
Single-wall tents in humid, cool climates will always produce more condensation than double-wall alternatives, regardless of technique. If you camp regularly in the Pacific Northwest, Scottish Highlands, or similar climates, a double-wall tent is a structural upgrade, not a luxury. The air gap between inner canopy and rainfly is doing work that no amount of vent management can replicate with a single wall.
Tarps and bivy sacks maximize condensation exposure — the single-wall problem taken to its logical extreme. They’re excellent in the right conditions (dry, breezy, low humidity) and genuinely problematic in others. If you use ultralight single-wall shelter and consistently struggle with dampness, the solution may be a different shelter rather than more technique.
Honest assessment of your shelter’s structural limitations is a core part of the 4-Phase System — knowing when to upgrade is as important as knowing how to optimize.
Frequently Asked Questions
How do I stop tent condensation?
Knowing how to prevent condensation in a tent requires managing both airflow and moisture sources simultaneously. Open all available vents — including upper vents during rain — and create a 2-inch rainfly gap at ground level to activate the chimney effect. Keep wet gear in the vestibule, direct breath toward the vent exhaust path, and avoid camping in low-lying ground where ambient humidity is highest. No single fix works alone; the combination of site selection, pitching technique, and active ventilation reduces condensation by 80%+ compared to a sealed, low-lying camp.
Is it worse in summer or winter?
Tent condensation is generally worse in winter due to the larger temperature differential between warm interior air and cold tent surfaces. In sub-freezing conditions, condensation forms as frost rather than liquid droplets, melting when the tent warms and soaking gear. Summer condensation is typically lighter because the temperature gap is smaller and ventilation is easier to maintain. However, warm, humid summer nights near water sources can produce heavy condensation — the specific conditions matter more than season alone.
How do I insulate a tent interior?
Insulating a tent’s interior raises surface temperatures, which reduces the temperature differential that causes condensation. A four-season tent with a full coverage rainfly and insulated inner walls is the structural solution. For existing tents, a condensation curtain (available on some four-season models) catches moisture before it drips. A sleeping bag liner and vapor barrier liner (VBL) reduce the body moisture entering the tent air. Camping with a footprint and ensuring the rainfly creates a sealed air gap also adds insulation benefit for the floor and lower walls.
What are the worst months for it?
The worst months for tent condensation are typically October through March in temperate climates, when overnight temperatures drop sharply while daytime warmth adds moisture to the air. Clear autumn and spring nights combine low temperatures with high residual humidity — the ideal conditions for the radiative cooling effect to drive condensation. Midsummer condensation is generally lightest; late summer near water sources can produce heavy dew. Across camping communities, the consistent experience is that the shoulder seasons (April-May and September-October) produce the most surprising condensation because the temperature swings are large and campers aren’t expecting winter-level moisture management.
Best homemade moisture absorber?
The best homemade moisture absorber for a tent is calcium chloride crystals in a perforated container. Calcium chloride is a deliquescent desiccant that actively draws moisture from the air starting at around 30% relative humidity — the same chemistry as DampRid, available in bulk as ice-melt pellets. Research from GoldBio and NTU testing confirms it significantly outperforms baking soda for humidity reduction. Place crystals in a mesh bag over a small collection cup to catch the liquid brine that forms. Baking soda works as a mild odor absorber but has far lower moisture absorption capacity and is not a meaningful humidity control tool in a camping environment.
The System That Keeps You Dry
For intermediate campers dealing with dripping walls and damp sleeping bags, the key to preventing condensation in a tent is not any single technique — it’s the sequence. The 4-Phase Dry Camp System works because it addresses every stage where moisture enters, builds, and condenses: site selection reduces the ambient humidity baseline before you pitch; chimney-effect pitching creates passive airflow before you sleep; active overnight ventilation keeps humid air moving before it saturates; and supplemental tools handle the remainder.
The 4-Phase Dry Camp System reframes condensation from an inevitable nuisance to a manageable physics problem. Condensation cannot be fully eliminated — Penn State’s meteorology research makes clear that 100% relative humidity against a cold surface will always produce droplets. But the gap between “inevitable” and “manageable” is 18 specific techniques that move moisture out before it becomes dripping walls and soggy gear.
Ultimately, mastering how to prevent condensation in a tent is about managing the physics of your environment. Start with site selection tonight. Pick elevated, dry ground with a natural windbreak, stake your rainfly with a 2-inch gap, open every vent before you zip up, and keep wet gear in the vestibule. Those four actions alone — executed before you close your eyes — will produce a noticeably drier tent by morning. Add the advanced tools from Phase 4 as conditions demand, and you’ll have a repeatable system that works across seasons. Check out our other guides on tent maintenance and gear selection to elevate your next trip. Get started today by testing this 4-Phase Dry Camp System on your next adventure!
