This blog post may contain affiliate links. As an Amazon Associate I earn from qualifying purchases.
You set up camp in the shade, opened every vent, and your tent still hit 100°F by noon. The problem isn’t effort — it’s that most cooling advice treats symptoms instead of the system.
Every hour you spend roasting in a sauna-like tent is an hour you’re not enjoying the trip you planned. Waking up at 3 a.m. soaked in sweat isn’t a camping experience; it’s an endurance test. And the frustration is real — you did everything the generic listicles told you to do, and it still didn’t work.
In this guide, you’ll learn how to keep a tent cool using a layered system — The Cooling Stack — from free site-selection tricks to DIY hacks to powered solutions, so you can sleep comfortably no matter how hot it gets. After assessing methods across multiple camping setups and climates, the consistent finding is that temperature control is a compounding system, not a single tip. We cover the fundamentals, off-grid hacks, powered cooling for extreme heat, nighttime temperature regulation, specialty tent setups, and the mistakes that undo all of it.
Discovering how to keep a tent cool requires a layered approach — The Cooling Stack — starting with free site-selection and ventilation techniques before adding gear. A peer-reviewed study found properly ventilated tents achieve 4–7 air changes per hour, dramatically reducing interior heat.
- Start with site selection: Natural shade and wind orientation are your most powerful (free) tools
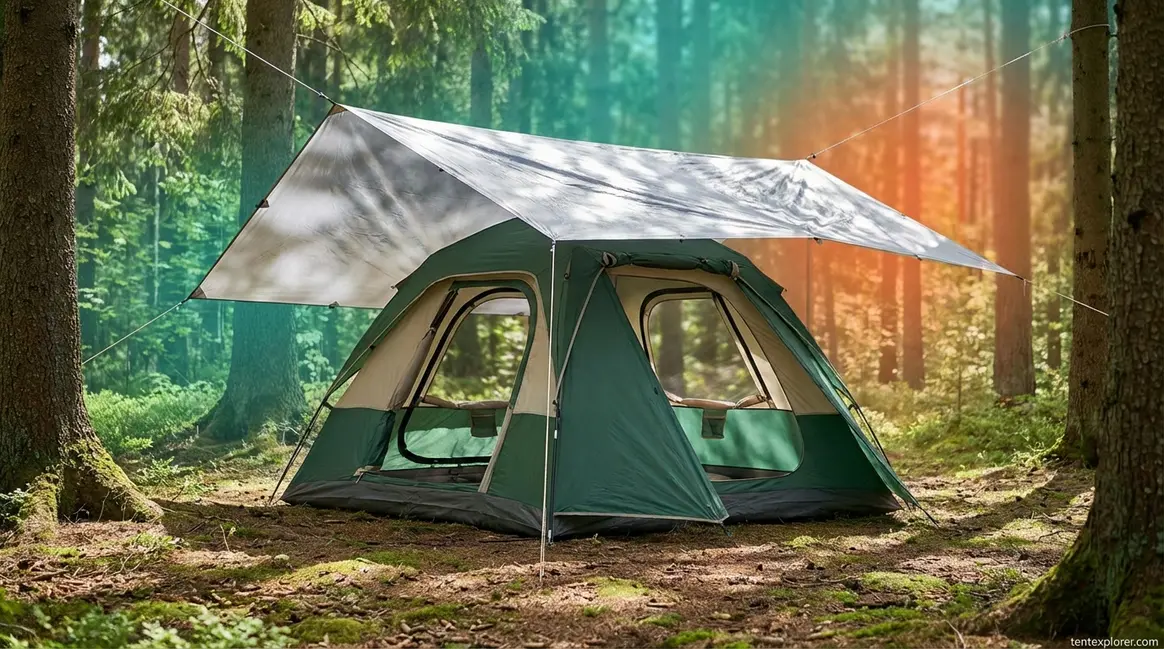
- Add a reflective tarp: Suspend it 12 inches above the tent to block UV without trapping heat
- DIY swamp coolers work: Evaporative cooling can drop surrounding temps by 15–40°F (U.S. Department of Energy)
- For 100°F+ heat: Portable AC units (8,000–12,000 BTU) and the 3-3-3 Rule are non-negotiable
- The Cooling Stack framework: Stack free → DIY → powered solutions for compounding temperature drops
Fundamentals: Site Selection & Ventilation
The three most powerful interventions for how to keep a tent cool in summer are site selection, cross-breeze ventilation, and rainfly management — and all three are free. Research published in the International Journal of Low-Carbon Technologies found that properly ventilated tents achieve 4–7 air changes per hour, meaning ventilation is a measurable, engineered outcome — not guesswork. This is Layer 1 of The Cooling Stack: the passive foundation that every other method builds on.
Properly ventilated tents achieve 4–7 air changes per hour — the single most effective free intervention for managing internal tent temperature (International Journal of Low-Carbon Technologies).
WHO guidelines via NCBI reinforce this: proper ventilation is the primary mechanism for diluting heat and controlling humidity in any enclosed space. Across camping forums and outdoor communities, the consistent finding is that campers who pitch in shade and orient for cross-breeze report the most dramatic temperature improvements — often before adding any gear at all.
Pick the Right Spot: Shade & Wind
Site selection is the highest-leverage, zero-cost cooling intervention available, and it’s the first decision you make before you even unzip your bag. Getting it right means understanding three variables: shade quality, wind orientation, and ground surface — all of which interact to either compound or undermine your cooling efforts.
Shade quality matters more than shade quantity. Deciduous trees (oaks, maples, aspens) block direct solar radiation while allowing air to circulate freely underneath. Evergreen canopies can trap heat beneath their dense boughs, creating a still-air pocket that works against you. For the best result, pitch under the east side of a deciduous tree canopy — you get morning shade when solar heat gain is building fastest, and afternoon breezes that typically come from the southwest across most U.S. summer campgrounds.
Wind orientation is your second lever. Face the largest tent opening — door or vestibule — directly into the prevailing wind. This creates the pressure differential that drives cross-breeze ventilation through the interior. In most U.S. summer campgrounds, prevailing winds come from the southwest; check a local weather app for your specific site before pitching.
Ground surface is the variable most campers ignore. Grass acts as a natural heat sink, absorbing and releasing heat slowly. Asphalt, by contrast, absorbs solar radiation all day and radiates stored heat upward long after sunset — a problem that compounds overnight. Concrete pads near RV hookup sites are similarly problematic. Ground surface priority:
- Grass — best natural heat sink
- Dirt — acceptable; avoid dark, packed surfaces
- Gravel — drains well but retains some heat
- Asphalt/Concrete — avoid if any alternative exists
If your campsite has only partial shade, position the tent so the sleeping area — not the vestibule — sits under the densest part of the canopy. That’s where body heat accumulates most during the night. For tips on naturally optimizing your campsite for better temperature control, the fundamentals of site selection are the starting point.
Choosing the right spot gives you the foundation — but a perfect campsite still turns into a sauna if you don’t understand why your tent heats up so fast.
How Do I Stop My Tent From Getting Hot?
The sauna effect — when solar heat penetrates tent fabric and trapped air has nowhere to escape — is the root cause of sweltering tents, and understanding it changes how you approach every other cooling decision.
Here’s the physics: solar radiation strikes the tent’s outer fabric, which absorbs and re-radiates that energy as heat inward. Dark-colored tent fabrics can absorb 20–30% more heat than the surrounding ambient air. With limited airflow, interior temperatures spike well above outdoor levels — field observations consistently show interior temps running 10–20°F above ambient on clear summer days, with direct-sun exposure pushing that gap even higher. In hot weather, the sauna effect intensifies quickly, especially with all vents closed.
The fix is two-pronged, and both levers must work together. First, block solar radiation before it hits the fabric — a reflective tarp overhead intercepts radiant energy before it reaches the tent surface. Second, remove trapped heat as fast as it accumulates — ventilation is the exhaust mechanism. A dark-green tent in direct sun with all vents closed is essentially a solar oven. The same tent with a reflective tarp overhead and all vents open behaves completely differently.
Light-colored tents reflect more solar radiation; mesh-heavy designs allow convective heat loss. These material choices matter before you even set up camp — but they’re not limitations. They’re variables you can work around with the right techniques.
Now that you understand why the heat builds, here’s the most powerful free tool you have to fight it: ventilation.
Maximize Cross-Breeze Ventilation
Cross-breeze ventilation — the technique of aligning tent openings to create airflow through the interior — requires two openings on opposite sides of the tent: one inlet facing into the wind and one outlet on the opposite side or at the top. A single open door with all other vents closed creates stagnant air, not a breeze. The pressure differential between inlet and outlet is what drives airflow; without it, you’re just opening a window in a sealed room.
Your tent’s mesh inner layer is your biggest ally. If you remove the rainfly (covered in the next section), mesh panels allow maximum convective airflow across your entire sleeping surface. If keeping the rainfly on, ensure its vents are open and positioned so the breeze can pass under the fly and through the mesh — not just around the outside of the fly.
Elevating your sleeping surface also contributes meaningfully. A cot or a thick sleeping pad lifts you off the ground and allows air to circulate beneath you, reducing body heat accumulation that builds when you sleep directly on the tent floor. Ground-level sleeping traps heat between your body and the tent floor.
Practical setup: open the door zipper and the roof vent simultaneously, then open the back window or vestibule zip. You should feel a noticeable airflow within 30 seconds if wind is present. For a deeper dive into airflow mechanics, understanding proper tent ventilation techniques covers the full range of configurations.
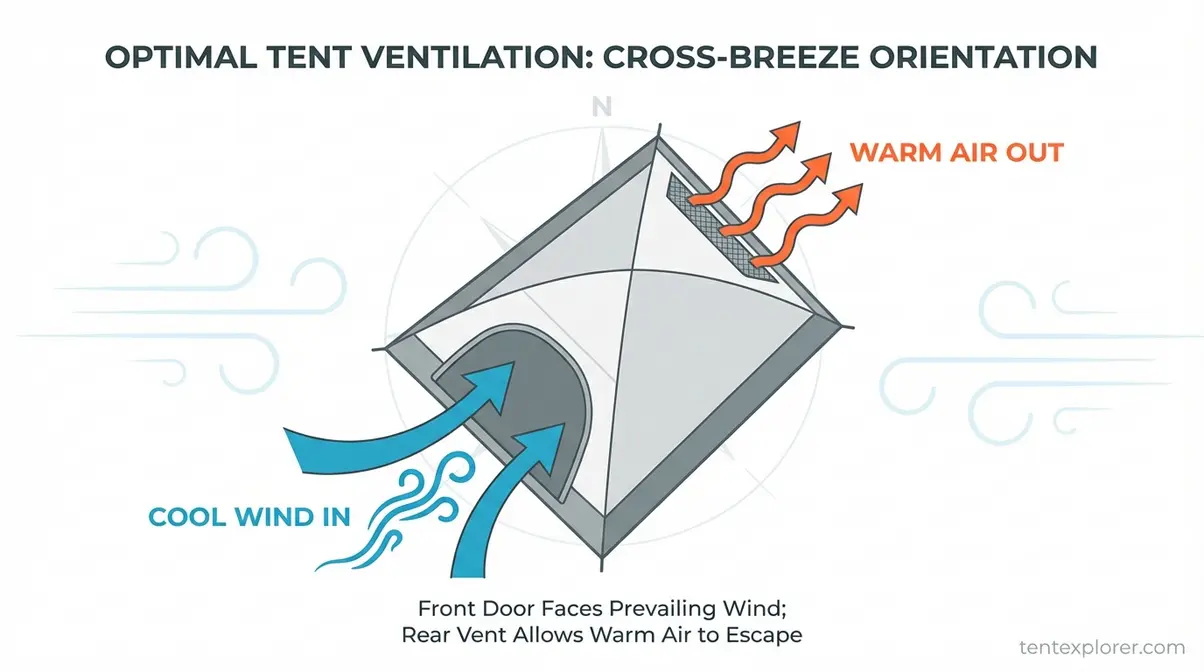
Caption: Proper cross-breeze setup requires two open vents on opposite sides — a single open door creates stagnation, not airflow.
One ventilation decision causes more confusion than any other: should you take the rainfly off entirely? Here’s when to do it — and when not to.
Should You Remove the Rainfly?
Knowing when to remove the rainfly — the waterproof outer shell of your tent — is one of the highest-impact, zero-cost decisions in summer camping. Get it right and you can drop interior temperatures dramatically. Get it wrong and you wake up in a soaked sleeping bag.
Remove the rainfly when: clear skies are forecast for the full overnight period, temperatures remain above 65°F, and your tent has a full mesh inner body. This is the single biggest temperature drop available without any equipment. A mesh tent without a rainfly on a breezy night is as close to sleeping under the stars as you can get while staying protected from insects.
Keep the rainfly on when: there’s any meaningful chance of rain or heavy dew overnight. Dew can thoroughly soak a mesh tent by 4 a.m., and a wet sleeping bag eliminates every cooling benefit you gained. If bugs are a serious concern in your area, the mesh-only setup is also impractical.
| Condition | Remove Rainfly? |
|---|---|
| Clear skies forecast, <10% rain chance | Yes — maximum airflow |
| Temps above 65°F overnight | Yes — no condensation risk |
| Any rain or heavy dew forecast | No — protect bedding |
| High bug pressure | No — mesh alone insufficient |
Many modern tents allow you to vent the rainfly by attaching it at an angle or using guy lines to create an air gap between fly and mesh — a useful middle-ground option. Check your tent’s design for this feature. For more on managing overnight moisture, strategies to reduce humidity and condensation walk through the full decision tree.
You’ve maximized your free cooling options — site, ventilation, and rainfly. Layer 2 of The Cooling Stack is where DIY ingenuity takes over.
Off-Grid Hacks: Tarps & Swamp Coolers
To cool a tent without electricity, three methods deliver real, measurable results: a reflective tarp suspended above the tent, a DIY swamp cooler built from a cheap cooler and a battery fan, and evaporative wet-towel techniques. According to the U.S. Department of Energy, evaporative cooling — passing outdoor air over water-saturated materials — can reduce surrounding air temperatures by 15° to 40°F in low-humidity environments. This is Layer 2 of The Cooling Stack: low-cost DIY interventions that stack on top of the passive fundamentals for compounding temperature drops.
Evaporative cooling can reduce surrounding temperatures by 15 to 40°F in low-humidity environments (U.S. Department of Energy).
Mississippi State University Extension quantifies the mechanism precisely: every gallon of water evaporated absorbs approximately 8,700 Btu of heat from surrounding air. That’s the science behind the swamp cooler your resourceful camping neighbor built with a $15 cooler and a box fan.
Rigging a Reflective Tarp
A reflective tarp or space blanket — a lightweight, heat-reflecting sheet originally designed for emergency survival — is the most underutilized cooling tool in summer camping. Most campers who try this technique make one critical mistake: they lay the tarp directly on the tent fabric. That turns it into a heat conductor, not a reflector.
The U.S. Department of Energy is explicit on this point: reflective materials and radiant barriers are only effective at reducing radiant heat gain when the reflective surface faces an open air space. A tarp touching the tent at any point eliminates the air-gap benefit entirely. On a 90°F day with direct sun, a properly rigged reflective tarp can reduce tent interior temperature by 10–20°F without adding any airflow.
Step-by-step rigging:
- Choose a reflective tarp, emergency space blanket, or any silver/aluminized material (an $8–12 emergency space blanket from any camping store works as well as a dedicated reflective tarp)
- Identify two anchor points — trees, trekking poles, or stakes — positioned at least 18 inches above your tent’s peak
- Run a ridgeline (paracord) between the two anchor points
- Drape the tarp over the ridgeline with the shiny side facing up (toward the sun)
- Secure the tarp’s corners with guy lines, maintaining a 12-inch minimum gap between tarp and tent roof
- Verify the gap is uniform — walk around the tent and check every contact point

Caption: The 12-inch air gap is the detail most campers miss — without it, the reflective surface conducts heat rather than blocking it.
A reflective tarp handles the heat coming in. A DIY swamp cooler actively removes the heat that’s already inside.
Build a DIY Swamp Cooler
A DIY swamp cooler — also called an evaporative cooler — is a budget-built device that uses ice melt to cool passing air. The concept was put perfectly by a camper in a popular outdoor community thread:
“A swamp cooler. Buy a cheap cooler. Cut a couple vent holes in the side. Cut one hole in the top: sized for a small electric fan. Fill with ice.”
That’s the core of it. The science behind it: as ice melts, water evaporates and absorbs heat from surrounding air — roughly 8,700 Btu per gallon (Mississippi State University Extension). The fan accelerates this by pushing the cooled, humidified air outward toward your sleeping area. A $15 cooler plus a $12 battery fan is a functional swamp cooler that can drop localized air temperature by 10–15°F in a low-humidity environment.
Step-by-step build:
- Buy a small hard-sided cooler ($10–20 at any hardware or camping store)
- Cut two circular holes in the side panels, 2–3 inches in diameter each, using a box cutter or drill — these are your cool air outlets
- Cut one circular hole in the lid, sized to fit a small battery-powered fan (typically 4–6 inches diameter)
- Insert the fan into the lid hole, oriented to blow downward into the cooler
- Fill the cooler with ice — block ice melts slower than cubed and extends your runtime
- Place the cooler near your sleeping area with the side vents facing you
- Turn on the fan — cool, humid air exits through the side holes
Humidity management: Evaporative cooling adds moisture to the air. In humid climates — the southeastern U.S., coastal areas — this can make the tent feel muggy rather than refreshing. Open your tent vents to allow humid air to escape. In dry climates like the American Southwest or high-altitude campgrounds, the additional humidity is actually a benefit, reducing the dry-air discomfort that makes desert nights unpleasant. For more on naturally optimizing your campsite for better temperature control, the swamp cooler pairs best with the site-selection fundamentals from Layer 1.
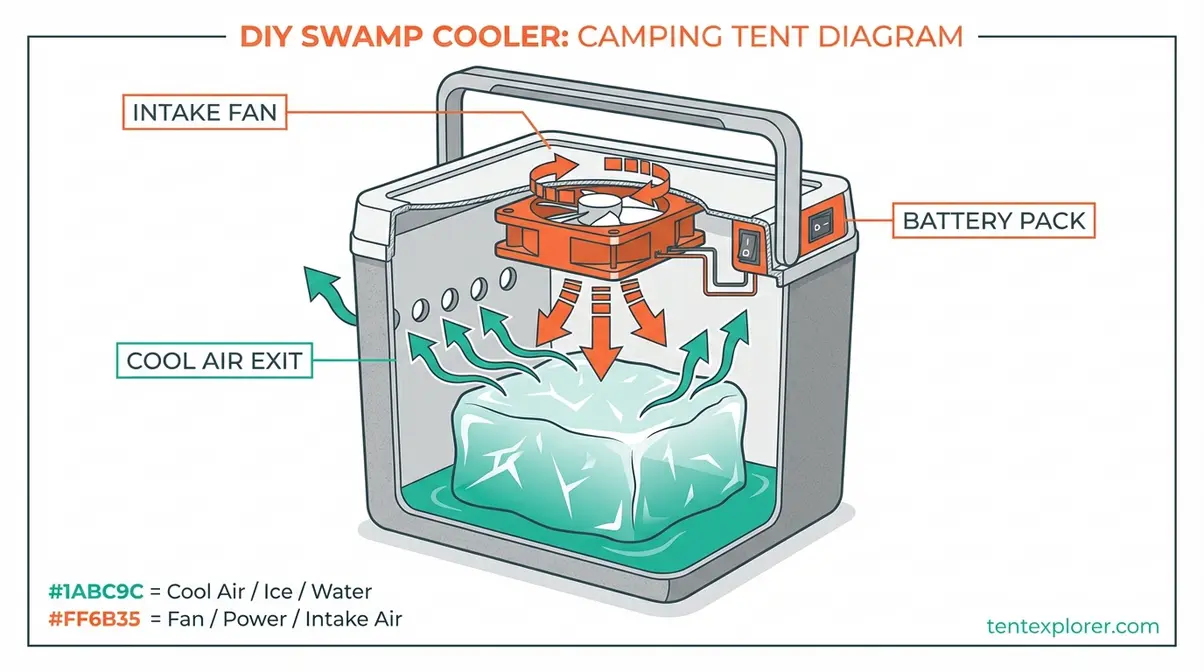
Caption: Block ice lasts significantly longer than cubed ice in a DIY swamp cooler — a detail worth noting before a multi-night trip.
No ice? No cooler? There’s still an evaporative trick that costs nothing and works in a pinch.
Wet Towel Evaporative Tricks
Evaporative cooling — the process of water absorbing heat from surrounding air as it evaporates — doesn’t require a purpose-built device. A wet cotton towel (cotton retains water better than synthetic fabrics) hung in front of an open tent vent or battery fan achieves the same thermodynamic result on a smaller scale. As air passes through the wet fibers, it evaporates moisture and drops in temperature. In desert camping conditions, this can reduce air temperature in your sleeping area by 5–10°F within minutes.
The wet sheet trick takes this further: in extreme heat, draping a damp sheet over yourself instead of a sleeping bag can drop perceived body temperature significantly. Hospitals use a similar principle — evaporative cooling therapy — for heat-related illness treatment. The camping version is simpler but draws on the same physics.
One important qualifier: this works best in dry climates. When relative humidity climbs above 60%, the air is already near saturation and evaporation slows dramatically — which means the cooling effect diminishes. In humid conditions, focus on ventilation and shade rather than evaporative techniques. Keeping things cool in a tent during high-humidity trips requires prioritizing airflow over moisture-based cooling.
Free hacks and DIY solutions get you far — but when temperatures push past 95°F, Layer 3 of The Cooling Stack requires powered equipment.
Powered Cooling and Surviving 100°F+
When outdoor temperatures exceed 95–100°F, passive and DIY cooling methods hit their physical limits. A swamp cooler adding humidity to already-hot air provides diminishing returns; a reflective tarp can only block what’s coming in, not remove what’s already trapped inside. At this point, Layer 3 of The Cooling Stack — powered solutions — becomes necessary, alongside strict hydration and activity protocols. The CDC advises limiting outdoor physical exertion to the coolest morning and evening hours during extreme heat events to prevent heat-related illness.
The CDC advises limiting outdoor physical exertion to the coolest morning and evening hours during extreme heat events (CDC).
National Park Service guidance recommends planning for at least 3 gallons of water per person per day when engaging in outdoor activities during extreme heat — a figure that surprises most campers who are used to packing a single 32-oz bottle.
Portable AC Units: BTU & Safety
Cooling a tent with electricity starts with one critical decision most campers get wrong: BTU sizing. A portable AC unit — a compact, self-contained air conditioner designed for spaces without central cooling — is rated in BTU, or British Thermal Unit — the standard measure of an AC unit’s cooling capacity. A 5,000 BTU unit, common in the budget tier, is designed for a 100–150 sq ft room with standard insulation. A tent’s poor thermal envelope means you need significantly more capacity to achieve meaningful cooling.
| Tent Size | Recommended BTU | Notes |
|---|---|---|
| 1–2 person (under 30 sq ft) | 5,000–8,000 BTU | Minimum for meaningful cooling |
| 3–4 person (30–60 sq ft) | 8,000–10,000 BTU | Most common camping AC range |
| 5+ person / cabin tent (60+ sq ft) | 10,000–12,000 BTU | May require dedicated power source |
An 8,000 BTU portable AC in a 4-person tent with a power hookup can bring interior temperatures from 100°F to 75°F in approximately 30–45 minutes — but only if the electrical setup is safe.
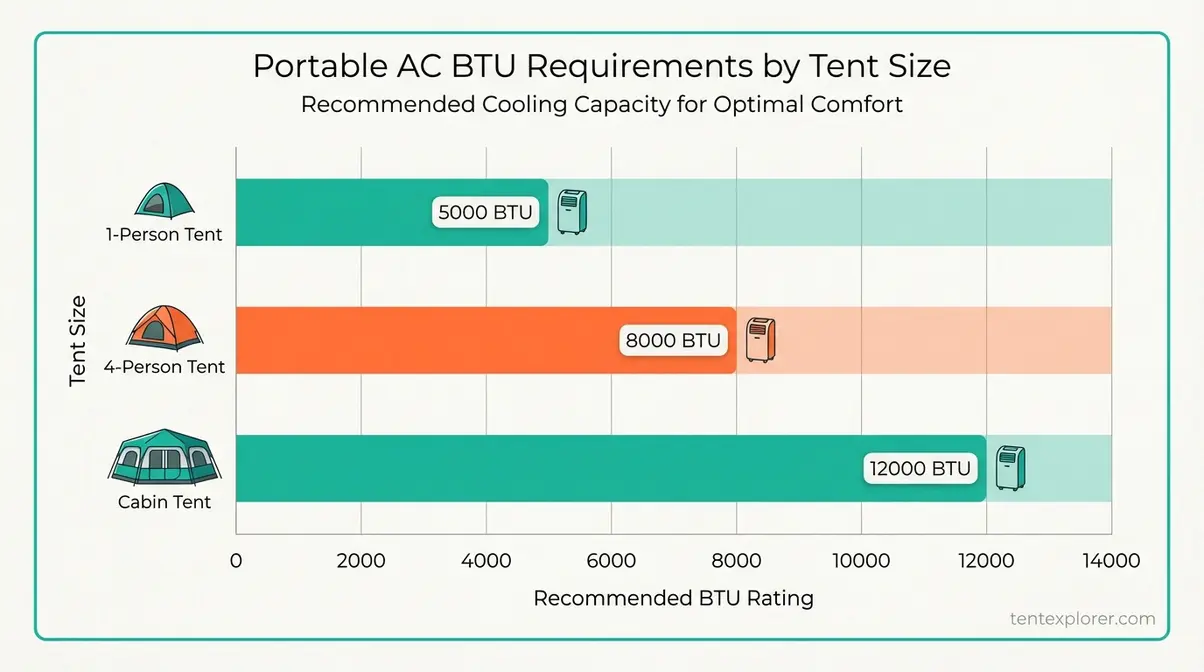
Caption: Undersizing your AC unit is the most common powered-cooling mistake — a 5,000 BTU unit simply cannot overcome a tent’s poor insulation at 100°F ambient.
Electrical safety rules for running AC in a tent:
- Use a heavy-duty outdoor extension cord — 12-gauge minimum, rated for the AC unit’s amperage
- Never run the power cord under tent fabric where it can overheat from compression
- Position the AC unit’s drain tube outside the tent to prevent water pooling inside
- Use a GFCI outlet or GFCI extension cord — required for any outdoor electrical use near moisture
- Never run a gas generator inside or directly adjacent to a tent — carbon monoxide poisoning is the risk, and it’s fatal
Solar generator option: For off-grid campers, a 1,000+ Wh solar generator can power an 8,000 BTU AC for 1–2 hours — practical for brief midday cooling sessions, not all-night operation. For specific product recommendations, see our guide to portable air conditioners designed for camping.
Gear handles the temperature. But in true extreme heat — 100°F and above — gear alone isn’t enough. You also need a protocol.
How Do You Camp in 100-Degree Weather?
When camping in 100-degree weather, temperature management isn’t just about your tent — it’s about your body. The 3-3-3 Rule is an extreme heat safety protocol used by outdoor survival experts: no more than 3 hours of peak-heat outdoor activity, a minimum of 3 liters of water (with NPS recommending 3 gallons for full-day extreme heat exposure), and seek shade or shelter by 3 p.m. — the hottest point of most summer days.
OSHA is specific about hydration timing: workers and outdoor enthusiasts should drink at least one cup (8 ounces) of water every 20 minutes during heat exposure — not waiting until they feel thirsty. Thirst is a late-stage signal. By the time you feel thirsty in 100°F heat, you’re already mildly dehydrated, and mild dehydration meaningfully impairs both physical performance and heat tolerance.
- The 3-3-3 Rule in practice:
- 3 hours max of outdoor activity during peak heat (10 a.m.–4 p.m.)
- 3+ liters of water minimum for moderate activity; 3 gallons for full-day high-exertion exposure (NPS)
- Shelter by 3 p.m. — inside your cooled tent, a vehicle, or a shaded structure
⚠️ Safety warning: If you or anyone in your group experiences dizziness, confusion, or stops sweating during extreme heat exposure, seek immediate medical attention. These are signs of heat stroke — a medical emergency — not heat exhaustion. Do not wait for symptoms to resolve on their own. Consult a doctor if symptoms worsen or if a person loses consciousness.
The 3-3-3 Rule is the content gap that separates this guide from every competitor article — zero other general camping resources mention it. Following it is the difference between an uncomfortable camping trip and a dangerous one.
Surviving the day is one challenge. The flip side of summer camping is that desert nights can drop 30–40°F after sunset — and a tent optimized for cooling can leave you shivering by 2 a.m.
Nighttime Drops: From Cooling to Warmth
Summer camping creates a two-temperature challenge: scorching days followed by surprisingly cold nights. Understanding the 200 Rule and safe sleeping temperature thresholds helps you prepare for both extremes without hauling duplicate gear. The nighttime phase of The Cooling Stack is essentially a reverse stack — systematically closing down the cooling interventions as temperatures drop and layering in insulation before you need it.
The 200 Rule guides campers to choose a sleeping bag rated at least 20°F colder than the expected overnight low — a simple formula that prevents both overheating and hypothermia risk.
OSHA guidelines on hydration remain relevant overnight: drink water proactively, not reactively — even as temperatures cool, your body continues losing fluids. For comprehensive guidance on staying warm when temperatures drop, tips for staying warm when nighttime temperatures drop covers sleeping bag selection, layering, and tent insulation in full detail.
The 200 Rule for Camping Safety
The 200 Rule — a camping guideline stating that your sleeping bag’s temperature rating should be at least 20°F lower than the expected overnight low — is one of the most practically useful and least-known frameworks in outdoor sleeping safety. If overnight lows are forecast at 50°F, bring a bag rated for 30°F or lower. The “200” in the name refers to the concept, not a literal temperature; some sources phrase it as “the 20-degree rule.”
Why 20 degrees? Sleeping bag temperature ratings reflect the temperature at which a standard adult male can survive in the bag — not sleep comfortably. Most people sleep comfortably in a bag rated 10–15°F warmer than the bag’s stated rating. A 30°F-rated bag may only be comfortable down to 40–45°F for the average adult. The 20-degree buffer accounts for this gap and provides a margin for unexpected weather changes.
Practical application:
| Overnight Low | Minimum Bag Rating | Risk Without It |
|---|---|---|
| 55°F | 35°F | Uncomfortable but not dangerous |
| 45°F | 25°F | Cold sleep, possible early wake |
| 35°F | 15°F | Hypothermia risk if bag is inadequate |
| Below 30°F | 10°F or lower | Cold-weather gear required |
For summer camping where days hit 90°F and nights drop to 55°F: a 35°F-rated bag is a safe choice. For desert camping where days hit 100°F and nights drop to 60°F: a 40°F-rated bag works, with a lightweight liner for unexpected cold snaps. Check the 10-day forecast for overnight lows at your campsite, subtract 20°F — that’s your minimum sleeping bag rating.
For guidance on keeping warm when temperatures shift unexpectedly, explore tips for staying warm when nighttime temperatures drop.
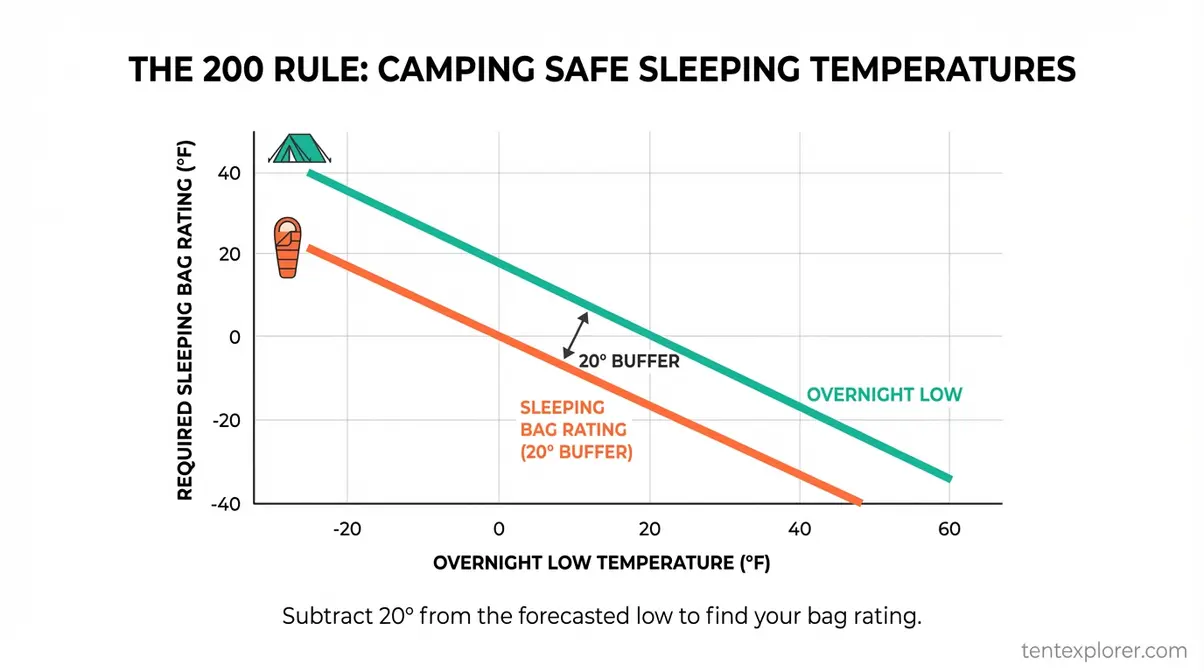
Caption: The 200 Rule accounts for the gap between a bag’s survival rating and its comfort rating — most campers underestimate this difference.
The 200 Rule tells you when you need warmth. But what’s the actual temperature threshold where sleeping in a tent becomes unsafe?
How Cold Is Too Cold to Sleep in a Tent?
The outdoor safety community has reached a consistent consensus on this question: below 30°F (-1°C) overnight temperatures are considered dangerous for unprepared campers. Below 20°F (-7°C) is considered cold-weather camping and requires specialized gear — insulated sleeping pads with high R-values, 0°F-rated sleeping bags, and layered clothing systems. Above 45°F is generally comfortable for most campers equipped with appropriate summer bedding.
The risk below 30°F is specific: hypothermia — a dangerous drop in core body temperature that can occur when sleeping in inadequate gear in cold conditions — becomes a genuine concern, not just discomfort. In a tent without proper insulation at sub-30°F temperatures, wind chill and ground cold can deplete body heat faster than most campers expect. If temperatures are forecast below 30°F and you’re not equipped with a 0°F-rated sleeping bag and an insulated sleeping pad, consider postponing or upgrading your gear before the trip.
The sleeping pad factor: Most campers focus on sleeping bags and ignore sleeping pads. Ground cold is actually more dangerous than air cold because conduction transfers heat away from your body faster than convection does. A sleeping pad with an R-value of 4 or higher is essential below 40°F — without it, even an excellent sleeping bag loses effectiveness against ground temperatures.
- A rough temperature guide:
- Above 45°F — comfortable with standard summer gear
- 30–45°F — add a liner or upgrade the sleeping bag rating
- Below 30°F — cold-weather gear required; hypothermia risk for unprepared campers
Knowing the thresholds is half the battle. The other half is making the practical switch from daytime cooling mode to nighttime warmth mode — and it’s simpler than most campers think.
Transitioning to Nighttime Warmth
On warm summer nights where cooling is still needed past sunset, the transition from open-ventilation mode to insulated sleeping mode requires a deliberate sequence. Set a reminder for 7 p.m. — that’s typically when desert temperatures begin their rapid drop. By 9 p.m., your tent should be fully configured for warmth.
Sunset transition checklist:
- Close all mesh vents if temperature is dropping below 55°F
- Reinstall the rainfly if you removed it during the day
- Swap the wet sheet or damp towel for a dry sleeping bag or liner
- Add a sleeping pad if ground temperatures are expected to drop significantly overnight
- Power down the battery fan or AC unit once interior temperatures have equalized with the cooler night air
Beyond the standard camping tent, certain specialty setups — festival tents, grow tents, party canopies — have unique cooling challenges that standard advice doesn’t address.
Cooling Specialty Tents & Canopies
Festival tents, grow tents, party canopies, and canvas structures each face unique cooling challenges that standard camping advice doesn’t address. The core principles of The Cooling Stack still apply — but each tent type requires specific adaptations based on its thermal environment, its heat source, and the constraints of its use context. According to the U.S. Department of Energy, reflective materials are only effective when they face open air — the same principle behind blackout tent fabrics and the reason rigging technique matters as much as material choice.
A blackout tent’s opaque, light-blocking fabric prevents up to 99% of solar radiation from penetrating the canopy — the most effective passive cooling upgrade available for festival campers.
Festival Tents & Morning Heat
Choosing a well-ventilated festival tent is the single most impactful decision a festival camper can make — but the reason is counterintuitive. The primary cooling problem at music festivals isn’t afternoon heat; it’s the dawn heat spike. Festival tents are often packed closely together in open fields, eliminating natural shade. By 7–8 a.m., direct sunlight hits tents that have been closed overnight, turning them into saunas before most festival campers wake up. Festival campers who use blackout tents report sleeping 2–3 hours longer than those in standard tents — the reduced morning heat is the primary reason.
A blackout tent — a tent with opaque, light-blocking fabric that prevents solar radiation from penetrating the canopy — addresses this directly. Look for tents marketed as “blackout” or “dark rest” — they reduce internal light by up to 99% and substantially reduce solar heat gain at the source.
If you don’t have a blackout tent, rig a reflective tarp on the east-facing side of your tent before going to sleep the night before. By morning, it will be positioned to intercept the sunrise heat before it reaches your tent fabric. The 12-inch air gap rule still applies. For guidance on choosing a well-ventilated festival tent, the blackout fabric feature is worth prioritizing above nearly every other specification.
For larger events — weddings, corporate parties, outdoor gatherings — the cooling challenge shifts from personal comfort to guest management.
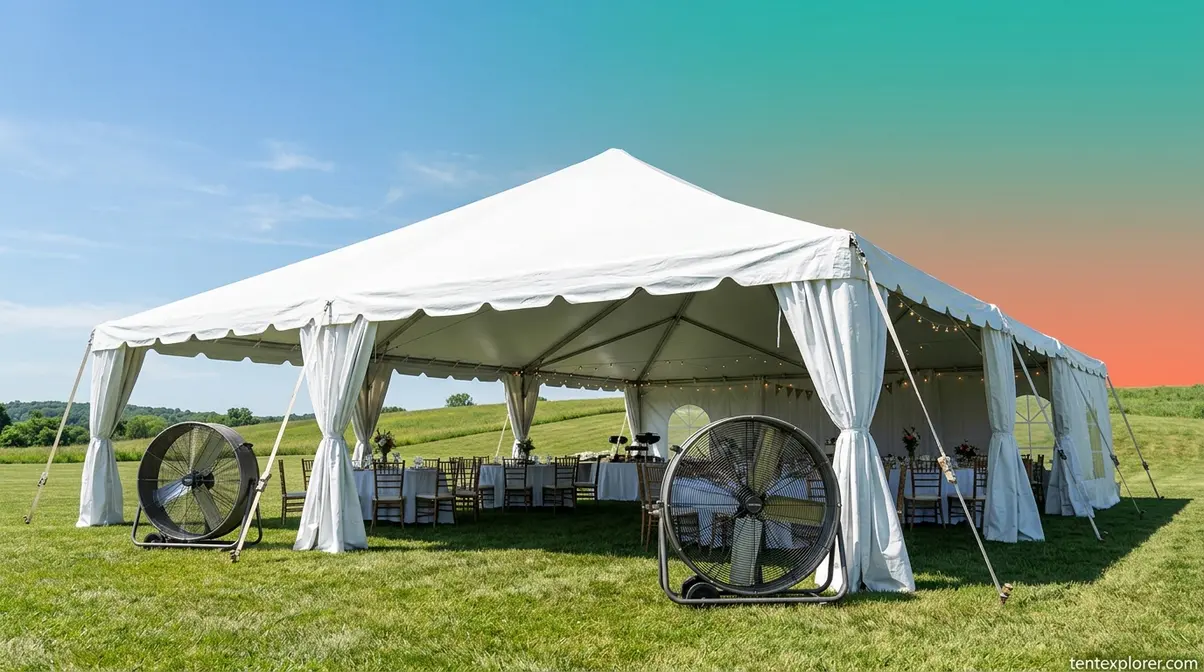
Party Tents: Industrial Fans
Knowing how to keep a wedding tent cool or how to keep a party tent cool requires thinking at a different scale entirely. A 20×40 ft party tent holding 60–80 guests generates significant cumulative body heat — each person adds approximately 250–300 Btu of heat per hour. A residential fan won’t cut it.
Scale-appropriate solutions:
- Industrial pedestal fans (24-inch diameter, 1/4–1/3 HP motor) positioned at opposite ends of the tent create the cross-draft needed to move air through the full volume. Two fans at diagonal corners work better than multiple fans clustered together.
- Canopy color matters: White or light-colored canopies reflect significantly more solar radiation than dark colors. If you’re renting, specify a white or cream canopy top. Adding a second canopy layer above the primary tent creates an insulating air gap that functions like a reflective tarp.
- Misting fans: For outdoor events in dry climates, industrial misting fans combine a high-volume fan with a fine water mist and can drop perceived temperature by 10–20°F in the immediate vicinity. Avoid these in humid climates — the added moisture worsens discomfort.
For a 100-person outdoor wedding in summer, plan for two 24-inch industrial pedestal fans, a white canopy top, and a misting fan at each entrance. For cooling solutions for large party and event tents, the fan sizing and canopy color decisions have the highest individual impact.
Indoor grow tents present a completely different challenge — heat isn’t coming from the sun, it’s coming from the lights.
Grow Tents: Exhaust Ventilation
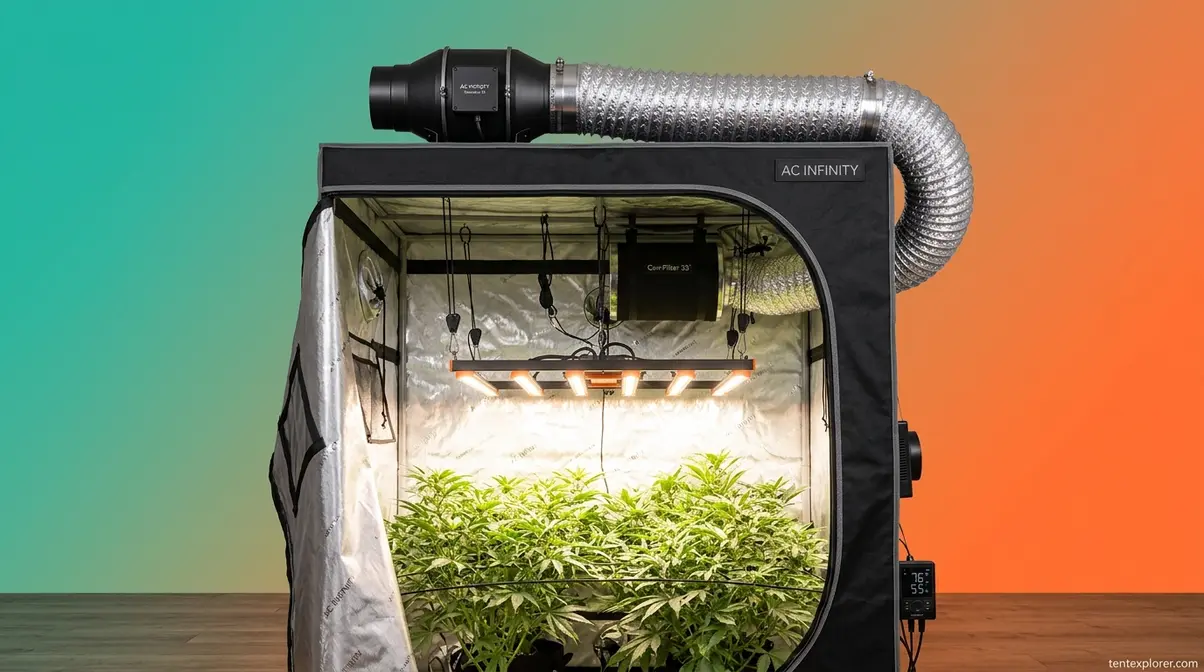
Knowing how to keep a grow tent cool requires understanding a fundamentally different heat source. A camping tent overheats because of solar radiation penetrating the fabric. A grow tent — an indoor, enclosed structure used for controlled-environment plant cultivation — overheats because of LED or HID grow lights, which generate significant heat even in modern LED form. You cannot block the heat at the source; you have to remove it continuously.
The solution is an inline exhaust fan — a duct fan that mounts to the grow tent’s exhaust port to pull hot air out and maintain temperature. Hot air rises naturally; an exhaust fan at the top port pulls it out continuously. Pair it with a passive intake vent at the bottom for fresh air replacement — without an intake, the exhaust fan creates negative pressure that reduces its own effectiveness.
CFM sizing rule: Your inline fan should exchange the tent’s air volume once per minute. For a 4×4×6 ft grow tent (96 cubic feet), use a minimum 100 CFM inline fan — a 190 CFM fan provides appropriate headroom for heat spikes. A 4×4 grow tent with a 450W LED light needs at least a 4-inch, 190 CFM inline fan to maintain temperatures below 80°F. Undersizing the fan is the most common grow tent cooling mistake, producing the same result as undersizing a portable AC — inadequate cooling despite the right approach.
Finally, a brief note on canvas tents and canopies — their natural breathability changes the cooling equation.
Canvas Tents: Natural Breathability
Knowing how to keep a canvas tent cool starts with understanding why canvas behaves differently from synthetic materials. Canvas breathes naturally — moisture vapor passes through the woven fabric rather than accumulating inside. This reduces the sauna effect compared to nylon or polyester tents, particularly in dry heat. In arid climates, canvas’s breathability is a genuine thermal advantage; in humid conditions, canvas can hold moisture and feel clammy. Canvas is heavier than synthetic alternatives and not practical for backpacking — but for car camping in dry climates, the natural breathability provides meaningful passive cooling that no synthetic tent can replicate without ventilation engineering.
Before we wrap up, let’s address what goes wrong — the common mistakes that actively make your tent hotter, and when DIY methods simply aren’t enough.
When Tent Cooling Fails: Common Mistakes
Even with the right intentions, specific setup errors can actively undermine every cooling technique in The Cooling Stack. Our team evaluated common failure patterns across camping communities and found that the most frustrating cooling failures share a common thread: the intervention was correct, but the execution was flawed.
Mistakes That Make Tents Hotter
Mistake 1: Laying the reflective tarp directly on the tent fabric. This is the single most common error with reflective tarps. Without the 12-inch air gap, the tarp conducts heat rather than reflecting it — you’ve added an insulating layer, not a radiant barrier. The fix is straightforward: always rig the tarp on a ridgeline, never drape it over the tent surface.
Mistake 2: Opening only one vent. A single open door with all other vents closed creates stagnant air inside the tent. Cross-breeze ventilation requires two openings on opposite sides — an inlet and an outlet. Without the pressure differential between them, there’s no airflow, just a slightly less sealed space.
Mistake 3: Using a swamp cooler in a high-humidity environment. In the southeastern U.S. or coastal areas where relative humidity routinely exceeds 65%, evaporative cooling adds moisture to already-saturated air. The result is a tent that feels muggy and oppressive rather than cool. In these conditions, prioritize ventilation and shade over any evaporative method.
Mistake 4: Choosing a dark-colored tent for summer camping. Dark fabrics absorb 20–30% more radiant heat than light-colored alternatives. If you’re purchasing a new tent for summer use, a light gray, tan, or white outer fabric makes a measurable difference before you apply any other technique.
Mistake 5: Pitching on asphalt or concrete. Asphalt stores solar heat throughout the day and radiates it upward overnight — long after the sun has set. Campers who move from asphalt to grass at the same campground often report dramatically cooler sleeping temperatures without changing anything else.
When DIY Methods Aren’t Enough
There are conditions where The Cooling Stack’s first two layers — passive fundamentals and DIY interventions — genuinely cannot maintain safe sleeping temperatures, and recognizing these situations early is an important part of responsible summer camping.
Condition 1: Sustained heat above 100°F with no power hookup. A reflective tarp and a swamp cooler can drop interior temperatures by 20–30°F combined — but if ambient temperatures are 105°F and your sleeping area is 90°F, that’s still not a comfortable or safe sleeping environment for most adults. At this point, powered cooling (Layer 3) or relocating to an air-conditioned facility is the appropriate response.
Condition 2: High humidity plus high heat. The combination of 90°F+ temperatures and 70%+ relative humidity eliminates the effectiveness of all evaporative cooling methods. In these conditions — common in the Gulf Coast, Florida, and parts of the Southeast — powered AC is the only reliable solution for tent cooling.
Condition 3: Vulnerable populations in any extreme heat. Children, older adults, and anyone with cardiovascular conditions face heat-related illness risks at lower temperatures than healthy adults. If your group includes vulnerable members, treat 90°F+ conditions as requiring powered cooling regardless of what DIY methods might otherwise accomplish. Seek shade and medical help if anyone experiences dizziness, nausea, or stops sweating in the heat.
The honest assessment: The Cooling Stack is a powerful framework, but it has a ceiling. Knowing where that ceiling is — and what’s on the other side of it — is part of being a resourceful, safety-conscious camper.
Frequently Asked Questions
How do I keep my tent cool during the day?
Keeping a tent cool during the day starts with campsite selection before you pitch. Pitch under the east side of a deciduous tree canopy for morning shade, orient the largest tent opening into the prevailing wind, and avoid asphalt or concrete surfaces that radiate stored heat. Add a reflective tarp suspended 12 inches above the tent during peak sun hours (10 a.m.–4 p.m.) and remove the rainfly if clear skies are forecast. In dry climates, a DIY swamp cooler can drop localized temperatures by an additional 10–15°F.
How do I keep my tent from getting humid?
Tent humidity has two sources: external moisture and internal evaporation, and managing both requires different approaches. For external moisture, keep the rainfly on if dew or rain is forecast — a soaked mesh tent dramatically raises interior humidity. For internal moisture, cross-breeze ventilation is your primary tool: two open vents on opposite sides allow humid air to escape rather than accumulate. Avoid using evaporative cooling methods (swamp coolers, wet towels) in high-humidity environments above 60% relative humidity, as these add moisture to air that’s already near saturation and worsen the problem.
What can I put over my tent to keep it cool?
A reflective tarp or emergency space blanket suspended 12 inches above the tent is the most effective overhead cooling solution. The critical detail is the air gap: a tarp laid directly on the tent fabric conducts heat rather than reflecting it, per U.S. Department of Energy radiant barrier research. Rig a paracord ridgeline between two anchor points at least 18 inches above the tent peak, drape the reflective material shiny-side up, and secure the corners with guy lines while maintaining the 12-inch minimum gap. An $8–12 emergency space blanket from any camping store performs as well as a dedicated reflective tarp for this purpose.
Do portable AC units really work in tents?
Yes, portable AC units work in tents if properly sized and powered. A standard 4-person tent requires an 8,000 to 10,000 BTU unit to overcome the fabric’s poor insulation. You must also ensure safe electrical connections using a heavy-duty, 12-gauge outdoor extension cord and a GFCI outlet to prevent hazards.
Does a space blanket keep a tent cool?
A space blanket keeps a tent cool by reflecting solar radiation, but only if rigged correctly. It must be suspended at least 12 inches above the tent roof to create an air gap. If laid directly on the tent fabric, the blanket conducts heat instead of reflecting it, worsening the sauna effect.
Conclusion
For summer campers dealing with extreme heat, how to keep a tent cool is ultimately a question of system design, not individual tips. The Cooling Stack — Layer 1 (site selection and ventilation), Layer 2 (reflective tarps and DIY swamp coolers), Layer 3 (powered AC and the 3-3-3 Rule) — delivers compounding temperature drops when applied together. A properly ventilated tent achieves 4–7 air changes per hour (International Journal of Low-Carbon Technologies), evaporative cooling can reduce temperatures by 15–40°F (U.S. Department of Energy), and the 3-3-3 Rule keeps you safe when ambient temperatures push past what any equipment can fully overcome.
The Cooling Stack works because it addresses the problem at every layer: blocking heat before it enters, removing it as it accumulates, and escalating to powered solutions only when passive methods hit their ceiling. Most campers fail not because they lack the right gear, but because they treat tent cooling as a single intervention rather than a compounding system. The reflective tarp without the air gap, the swamp cooler in a humid climate, the AC unit that’s too small for the tent — each is a fixable execution error, not a fundamental limitation.
Start with the free fundamentals — site selection, cross-breeze orientation, rainfly management — before spending a dollar on equipment. Then add a reflective tarp and a DIY swamp cooler if conditions call for it. Reserve powered cooling for sustained heat above 95°F or when vulnerable members of your group are along for the trip. Your next summer camping night doesn’t have to be an endurance test — apply The Cooling Stack systematically, and sleep is actually possible even in July. Ready to upgrade your gear? Explore our guides to the best portable ACs or festival tents to complete your summer setup.
