
This blog post may contain affiliate links. As an Amazon Associate I earn from qualifying purchases.
“Any tent experts here? I pitched my tent up to check everything’s okay and noticed it’s got mould, is this saveable or am I just better off replacing and getting a new one before download?”
The answer, in almost every case, is yes — it is saveable. Finding mould on your tent is frustrating, especially when you’re not sure whether it’s worth the effort or whether the damage is already done. Most guides online tell you to spray some vinegar and scrub — and that’s exactly why so many people end up with mould coming back within a season.
The real problem is that tent mould removal has two critical steps most guides skip entirely: killing the active spores before you clean the staining, and re-waterproofing the fabric after you’ve finished. Miss either one and you haven’t actually fixed the problem. This guide covers how to remove mould from a tent using the complete 4-Phase Tent Restoration Protocol — including exact dilution ratios, fabric-specific methods for canvas and nylon, and the re-waterproofing step that makes the restoration last.
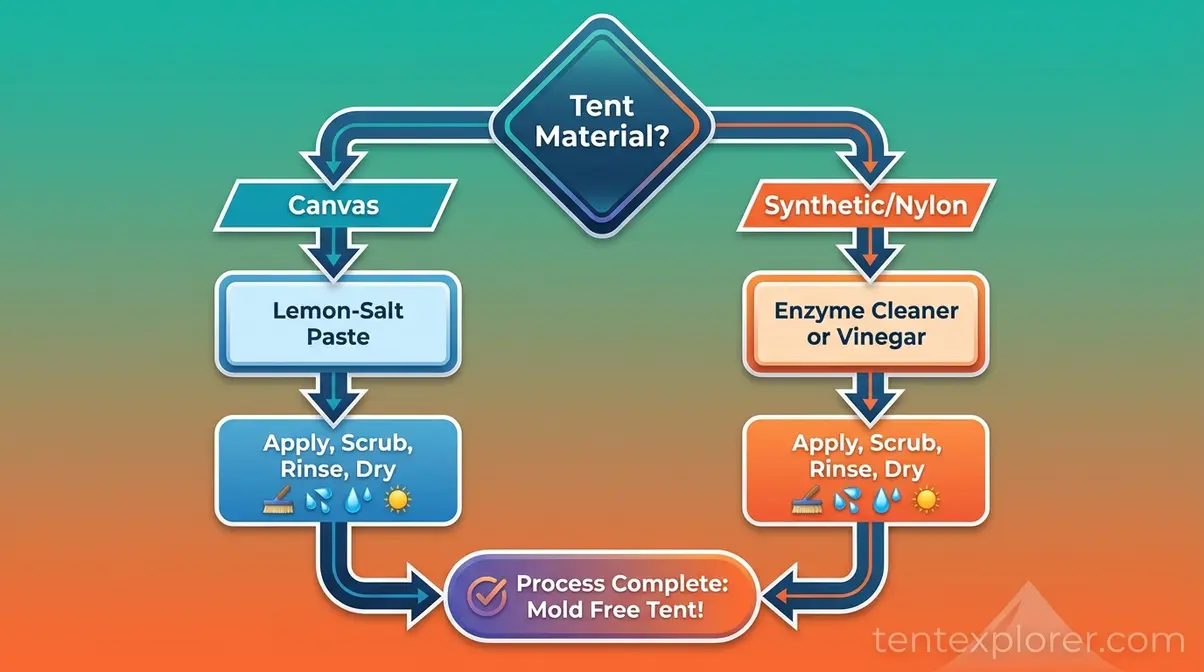
To remove mould from a tent, follow four steps: (1) kill the active spores with diluted white vinegar or an enzyme cleaner, (2) scrub away the stains with a mild soap and soft brush, (3) rinse thoroughly and dry completely in direct sunlight, and (4) re-waterproof the fabric. The full process takes 2–4 hours of active work plus drying time.
A mouldy tent can almost always be restored using the 4-Phase Tent Restoration Protocol — but only if you kill the spores before cleaning the stains. The EPA warns that mould exposure can irritate the lungs, eyes, and skin, so working outdoors with a mask is essential.
- Kill first: White vinegar (1:3 ratio) or enzyme cleaners kill spores; bleach does not
- Material matters: Canvas and nylon require different cleaning agents and dilution strengths
- Don’t skip Step 4: Re-waterproofing after cleaning is what makes the restoration last
- Drying is non-negotiable: Storing a damp tent is how mould returns within weeks
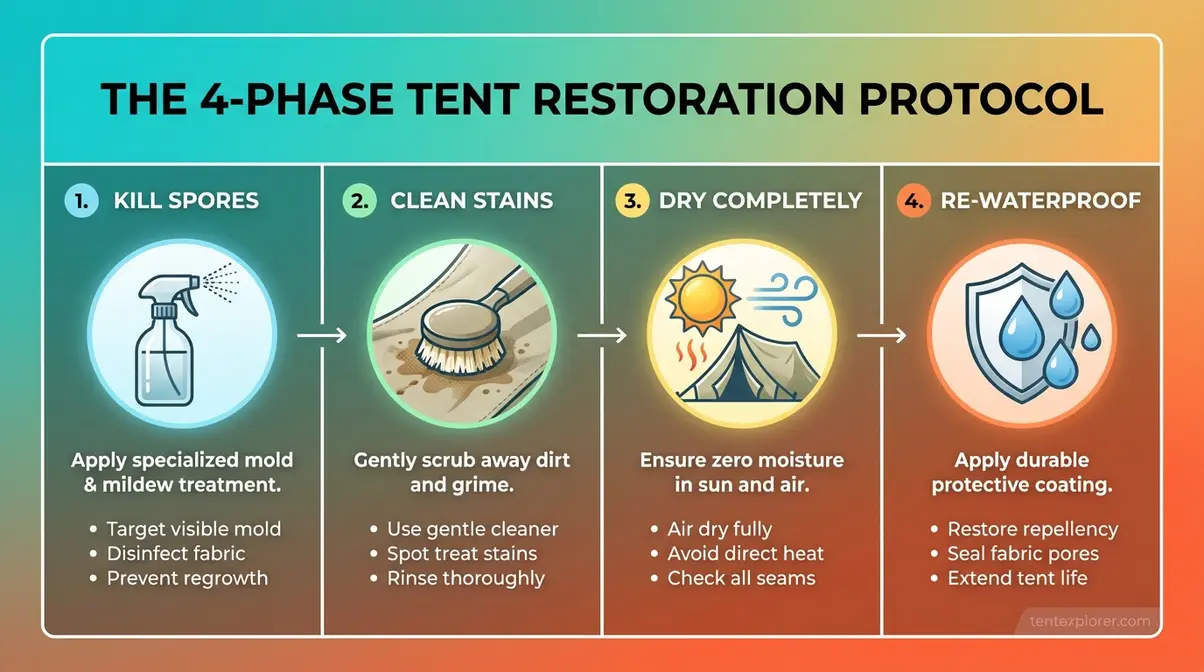
The diagram above shows the complete process at a glance — each phase builds on the last, and skipping any one of them is the single most common reason DIY mould removal fails.
What You’ll Need Before You Start
Before you touch the tent, gather everything you need and set up outdoors. Working outside is non-negotiable — you’ll be dislodging live mould spores throughout this process, and you don’t want those in your home.
⚠️ SAFETY FIRST: Work outdoors only. Wear an N95 mask (not a basic dust mask) and rubber gloves before handling a mouldy tent. According to the EPA guidelines on mould health risks, mould exposure can irritate the eyes, skin, nose, throat, and lungs of both allergic and non-allergic individuals (EPA, 2026). The CDC reports on mould exposure symptoms confirm that for some people, mould exposure causes coughing, wheezing, and skin rash (CDC, 2026). If you experience respiratory symptoms after exposure, consult a doctor.
- Protective gear:
- N95 respirator mask (not a basic dust mask)
- Rubber or nitrile gloves
- Old clothes you don’t mind staining
- Cleaning agents — choose one spore-killer:
- For most synthetic tents: Distilled white vinegar + water (1:3 ratio)
- For delicate fabrics / UK campers: Milton Sterilising Solution, a baby-safe sterilising liquid widely used in the UK for tent mould treatment (1 capful per 5 litres of water)
- For persistent mould or odour: Gear Aid Revivex Pro Cleaner, a specialist enzyme-based tent cleaning solution (follow label directions)
- For canvas tents: Salt + lemon juice paste (natural and fabric-safe)
- Tools:
- Soft-bristle brush (NOT wire or stiff-bristle — these damage fabric and coatings)
- Sponge or clean cloth
- Garden hose or large bucket
- Tent poles and pegs to pitch the tent fully during cleaning
- Post-cleaning (Step 4 only):
- Nikwax Tech Wash, a soap-free cleaner designed for waterproof outdoor fabrics (for the final rinse cycle)
- Nikwax TX.Direct Spray-On or Grangers Tent & Gear Repel (re-waterproofing spray)
Estimated time: 2–4 hours of active work + 4–12 hours drying time (weather-dependent)
For your specific tent model, always check the manufacturer’s care label before applying any cleaning agent — care requirements vary by fabric and coating type.
Step 1: Kill the Mold Spores
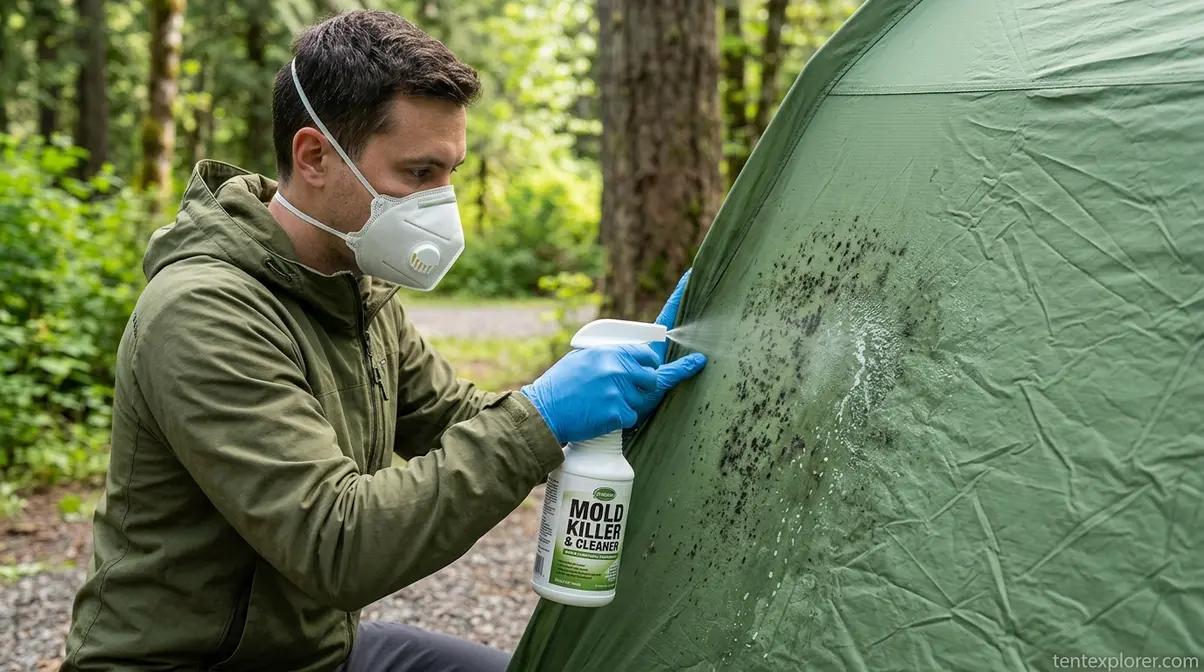
Before you scrub a single mould stain, you need to kill the active spores — or you’ll just spread them further into the fabric. The most effective spore-killers for tent fabric are white vinegar, enzyme cleaners, and lemon-salt paste. Bleach is not one of them.
The EPA recommendations against routine bleach use state explicitly that using bleach is not recommended as a routine practice during mould cleanup (EPA, 2026). This is Phase 1 of the 4-Phase Tent Restoration Protocol — and it’s the phase most guides skip entirely.
The four methods below are listed in order of suitability for most tent types. Choose the one that fits your fabric and what you have available.
Cleaning Agents Comparison
| Product | Type | Key Spec | Best For | Price Range |
|---|---|---|---|---|
| White Vinegar | Household Acid | 1:3 Dilution | Synthetic Tents | $2-$5 |
| Gear Aid Revivex | Enzyme Cleaner | pH-Neutral | Delicate Nylon | $10-$15 |
| Milton Solution | Sterilising Liquid | 1 cap/5L | UK Campers | $5-$10 |
| Lemon-Salt Paste | Natural Abrasive | Equal Parts | Canvas Tents | $3-$6 |
Why Killing Spores Comes First
Here’s the thing that separates a successful restoration from a frustrating one: mould has two distinct components. The first is the visible surface staining — the dark patches you can see. The second is the active spore structure, sometimes called mycelium, which penetrates into the fabric fibres and is completely invisible to the naked eye.
When you scrub a mouldy tent without killing the spores first, you don’t remove the problem — you spread it. Millions of live spores get pushed deeper into the fabric weave and launched into the surrounding air. The visible staining might look better, but the mould will re-colonise within weeks once the tent is stored even slightly damp.
Campers across r/camping and UKClimbing forums consistently report this outcome: those who skipped straight to scrubbing found mould returning within one to two camping seasons, sometimes faster. The basic mould cleanup steps from the EPA also emphasise that moisture control and proper treatment sequence are the foundations of effective mould removal (EPA, 2026). Now that you understand why order matters, here are the four methods that actually kill mould spores on tent fabric — starting with the one most campers already have at home.
Vinegar Method: Best for Synthetic Tents
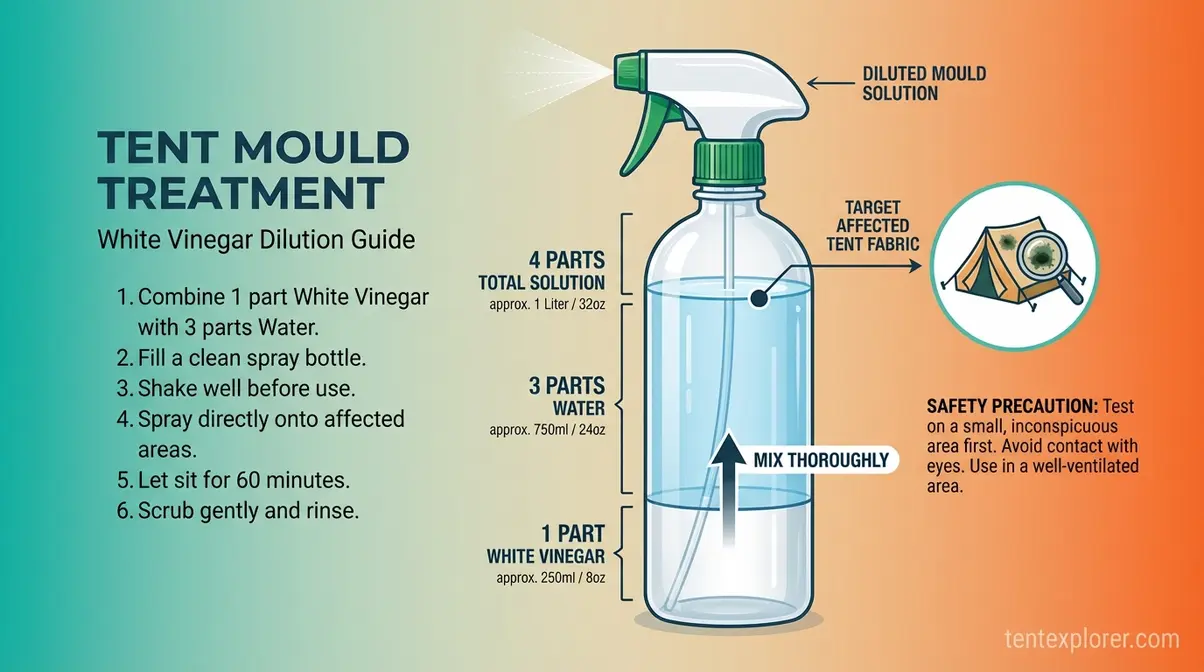
White vinegar is the most accessible spore-killer for most campers, and it works well — with one important caveat worth knowing upfront. Its acetic acid content (typically 4–5% in household white vinegar) disrupts the cell membrane of mould spores on contact. However, research into vinegar’s effectiveness on canvas specifically has found that prolonged or undiluted application can weaken canvas fibres and bug netting over time. For synthetic tents (nylon and polyester), diluted vinegar is a reliable choice. For canvas, the lemon-salt method in the next section is safer.
How to remove mould from a tent using the vinegar method on synthetic fabrics:
- Mix 1 part distilled white vinegar to 3 parts water in a spray bottle. Do NOT use apple cider vinegar — it carries a staining risk on light-coloured fabrics.
- Spray liberally onto all mouldy areas, ensuring full saturation. Do not scrub yet.
- Allow to dwell for 1–2 hours in direct sunlight. The UV radiation assists in killing remaining spores alongside the acetic acid.
- Do not rinse until Step 4. Let the solution do its work.
The basic mould cleanup steps from the EPA confirm that chemical treatment followed by thorough scrubbing and complete drying is the correct sequence (EPA, 2026).
“I had to completely soak my canvas tent in vinegar — it came out a clean and pristine tent!” — r/camping community member
That result is achievable, but note: for canvas, a brief soak (20–30 minutes in a 1:3 dilution) is safer than prolonged exposure. Always rinse canvas thoroughly and re-waterproof afterwards.
Vinegar works well for most synthetic tents, but if your fabric is particularly delicate — or if you’re dealing with a severe infestation — an enzyme cleaner offers a gentler, more thorough solution.
Enzyme Cleaners: Safe for Nylon Tents
For removing mould from a nylon tent specifically, enzyme-based cleaners are the preferred option over vinegar. Enzyme cleaners contain biological compounds that break down the organic matter of mould spores at a molecular level. They are pH-neutral, which makes them gentler on nylon fibres and less likely to stress the PU waterproof coating compared to acidic solutions. Gear Aid’s own tent mould guide recommends Revivex Pro Cleaner for removing mould and restoring DWR water repellency after treatment (Gear Aid, 2020).
The main options and how to use them:
| Option | Dilution | Dwell Time | Best For |
|---|---|---|---|
| Gear Aid Revivex Pro Cleaner | Per label (~30ml per 4L water) | 30 minutes | Nylon, polyester — severe mould or odour |
| Milton Sterilising Solution | 1 capful per 5 litres water | 20–30 minutes | Most fabrics — popular UK choice |
| Mirazyme (Gear Aid Odor Eliminator) | Per label | 30 minutes | Odour-heavy infestations; older tents |
Apply with a sponge rather than a brush on coated surfaces — sponge application reduces friction on the fabric. Rinse with cold water after the dwell time. An added benefit: enzyme cleaners are biodegradable, making them a safer choice if you’re cleaning at a campsite near waterways.
Both vinegar and enzyme cleaners are effective and fabric-safe when used correctly. Bleach, however, is neither — and it’s worth explaining exactly why, because the internet still gets this wrong.
Why You Should Never Use Bleach
“The EPA explicitly states that using a chemical or biocide such as chlorine bleach is not recommended as a routine practice during mould cleanup” (EPA, 2026).
This is the single most important fact in this entire guide, and it contradicts what many campers assume. Here’s the science: bleach is an oxidiser, not a biocide. It removes the colour from mould staining but does not penetrate porous surfaces like tent fabric to kill the root mycelium. The mould appears gone — the dark patches fade — but the spore structure remains alive in the fabric and will re-colonise rapidly.
The EPA recommendations against routine bleach use are unambiguous on this point (EPA, 2026). Beyond being ineffective, bleach actively damages your tent. It degrades nylon fibres, destroys the PU waterproof coating on synthetic tents, weakens canvas stitching over time, and voids most tent manufacturer warranties.
There is also a serious safety issue. The safety warnings against mixing bleach and vinegar from the University of Georgia Extension are clear: never mix bleach with vinegar, lemon juice, or ammonia-based cleaners — the chemical reaction produces toxic chlorine gas (UGA Extension). If you’ve used bleach and are now considering adding vinegar, stop. Rinse the tent thoroughly with water first, and allow full drying before applying any acidic solution.
If vinegar and enzyme cleaners are unavailable, there’s one more natural option worth knowing — particularly effective on canvas tents.
The Salt and Lemon Juice Paste Method
This natural alternative is especially useful for canvas tents, where the acidity concerns around prolonged vinegar exposure make a milder acid preferable. Citric acid in lemon juice acts similarly to acetic acid in disrupting mould spore cell membranes, while salt provides gentle abrasive action to help lift surface matter.
- Mix salt and lemon juice into a thick paste — roughly equal parts by volume.
- Apply directly to mould staining with a sponge or cloth.
- Leave in direct sunlight for 2–3 hours. The combination of citric acid and UV radiation targets both the staining and the spore structure.
- Check that the paste has dried and the area shows visible lightening before moving on.
This method works best on surface mould on canvas — it is not effective for deep infestations. Use it as a follow-up stain treatment after spore-killing, or as a standalone method for light mould on canvas that hasn’t penetrated deeply. For nylon and polyester tents, use vinegar or enzyme cleaners instead — concentrated citric acid can stress synthetic fibres.
Checkpoint: You should now have applied your chosen spore-killer (vinegar, enzyme cleaner, or lemon-salt paste) to all mouldy areas, and the tent should be drying in sunlight for at least 1–2 hours. The fabric will look damp but should have no active wet mould patches. Do not proceed to Step 2 until the spore-killer has fully dried.
Step 2: Clean the Stains
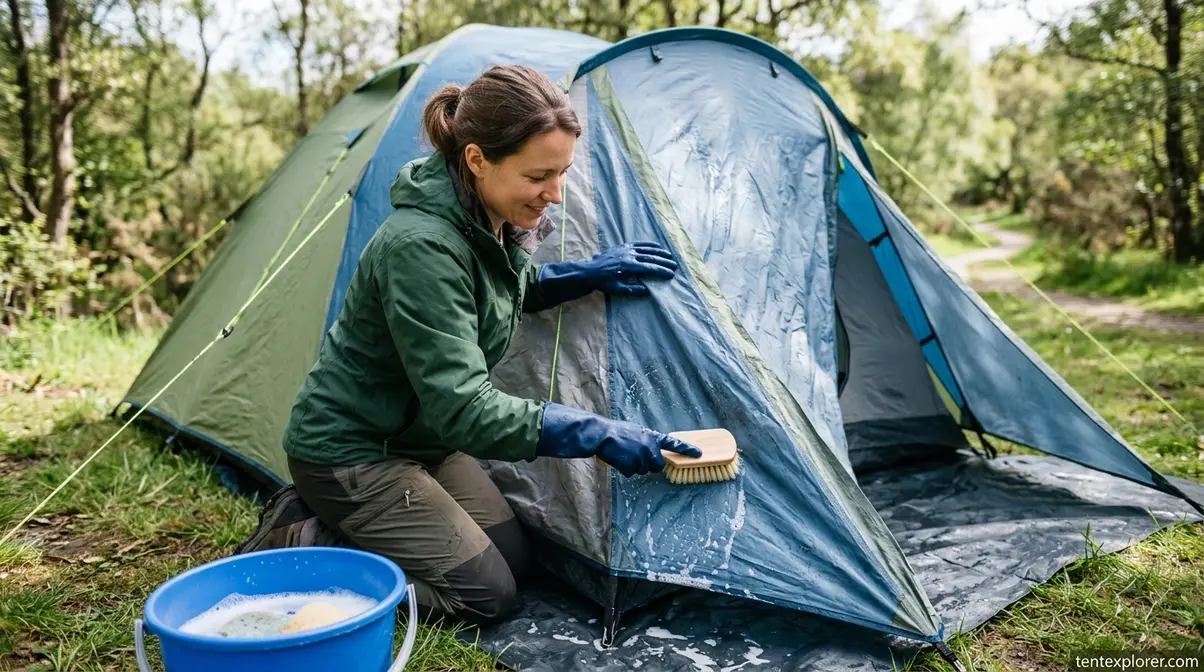
Once your spore-killer has dried completely, the visible mould staining is dead matter — but it still needs to be physically removed. The cleaning phase of removing mould from a tent follows a strict sequence: dry brushing before any water contact, then gentle wet cleaning, then targeted treatment for deep stains.
The EPA recommends scrubbing mould off hard surfaces with detergent and water, then drying completely — the same principle applies to tent fabric (EPA, 2026). The key difference with tents is the sequence and the soap choice, both of which most guides get wrong.
Dry Brushing: Remove Loose Mold First
Dry brushing is the mandatory first sub-step — and skipping it is a common mistake. When you introduce water to dead mould matter before brushing, you smear it deeper into the fabric weave rather than lifting it away.
- Put on your N95 mask. You’ll be dislodging dead spores into the air throughout this step.
- Use a soft-bristle brush. Brush in one direction only — away from the tent body — to avoid re-depositing spores back onto cleaned areas.
- Work systematically across all mouldy sections, section by section.
- Shake the tent out after brushing to dislodge loose debris before the wet wash begins.
Do this step outdoors only. Competitors like REI and Pitchup.com both recommend brushing, but neither specifies the direction requirement or the mask. Those two details are the difference between spreading spores and containing them.
Following the basic mould cleanup steps from the EPA, the sequence of treat → brush → wash → dry is the framework that works (EPA, 2026).
With the loose debris removed, you’re ready for the wet cleaning phase — and the soap you choose matters more than most guides acknowledge.
Washing with Mild Soap and Soft Brush
The wet cleaning phase of removing mould from a tent is where many campers make their second mistake: using the wrong soap. Biological laundry detergents contain enzymes that can degrade the PU coating on synthetic tents. Fabric softener blocks the DWR finish. Hot water accelerates delamination of the PU layer on nylon.
Safe and unsafe options at a glance:
| Use This | Avoid This |
|---|---|
| Nikwax Tech Wash | Biological laundry detergent |
| Mild dish soap (Dawn/Fairy) | Fabric softener |
| Specialist tent cleaner | Hot water (for synthetic tents) |
| Cold or lukewarm water | Bleach-based cleaners |
Addressing “Will Dawn and vinegar remove mildew?” — yes, but the sequence matters. Dawn (or Fairy in the UK) is effective at removing dead mould staining, but it should be used after vinegar has already killed the spores, not as a replacement. Using soap alone without spore-killing first is the primary reason mould returns. Across r/camping threads, campers who used Dawn as their only treatment consistently reported re-growth.
Application method: mix mild soap in a bucket of cold or lukewarm water. For nylon tents, use cold water only — warm water accelerates breakdown of the PU coating over repeated cleaning cycles. Apply with a soft brush in circular motions, working from the edges of the stain inward to avoid spreading. The basic mould cleanup steps using detergent and water from the EPA confirm that scrubbing with detergent followed by complete drying is the correct method (EPA, 2026).
Most mould staining will lift with the soap-and-brush method. For older, deeply embedded black staining that doesn’t shift, a targeted treatment is needed.
Treating Stubborn Deep Stains
For heavy black mould staining that survives standard soap cleaning, two additional methods can help. The University of Georgia Extension’s textile care guidance recommends a baking soda approach for treating heavy mildew stains on textiles (UGA Extension):
- Mix baking soda with a small amount of mild detergent to form a paste.
- Apply directly to the stubborn stain and leave for 20–30 minutes.
- Scrub gently with a soft brush in circular motions.
- Rinse thoroughly with cold water.
After the soap treatment, the sunlight method provides a secondary treatment: leave the tent pitched in direct sunlight for 2–4 hours. UV radiation continues breaking down mould pigment and kills any remaining spores that survived the chemical treatment. Camping communities across OutdoorAus and Outdoors StackExchange consistently recommend this as a complement to chemical treatment, not a replacement for it.
One honest note: some very old, deeply embedded black mould staining on canvas may never fully disappear. The discolouration is cosmetic. If the spores are killed and the tent is re-waterproofed correctly, it remains functionally sound. A faint stain does not mean a ruined tent — that distinction matters when you reach the FAQ section.
Checkpoint: The tent surface should now be visibly cleaner, with most or all mould staining removed. Some faint discolouration on very old canvas stains may remain — this is cosmetic and does not affect function. Proceed to Step 3 for material-specific guidance before rinsing.
Step 3: Canvas vs. Synthetic Methods

Canvas and synthetic tents look similar when covered in mould, but they require completely different treatment protocols. The wrong cleaning agent on a nylon tent can strip its PU (polyurethane) waterproof coating — the layer applied to the inner surface of most synthetic tent fabrics that keeps you dry. The wrong dilution on canvas can leave it over-saturated and mould-prone. This section covers the right method for each.
This is where the 4-Phase Tent Restoration Protocol diverges for different tent types — and it’s where most guides fail entirely, treating all tents as if they’re the same material.
Canvas vs. Synthetic Quick Reference:
| Feature | Canvas Tent | Nylon / Polyester Tent |
|---|---|---|
| Primary spore-killer | Lemon-salt paste (safer); vinegar briefly (1:3, 20 min max) | Enzyme cleaner (Gear Aid Revivex) |
| Cleaning soap | Mild soap or specialist canvas cleaner | Nikwax Tech Wash (soap-free) |
| Water temperature | Lukewarm acceptable | Cold only |
| Drying method | Full sun, pitched, 6–12 hours | Partial sun; avoid prolonged UV |
| Re-waterproofing product | Grangers Canvas Proofer or Canvak | Grangers Tent & Gear Repel or Nikwax TX.Direct |
| Machine wash safe? | No | No |
Cleaning Nylon and Polyester Tents
For removing mould from a nylon tent, enzyme cleaners are the recommended choice over vinegar. The acetic acid in vinegar, while effective at killing spores, can stress nylon fibres over repeated use and carries a risk of degrading the PU coating — particularly at higher concentrations or with prolonged contact. Enzyme cleaners are pH-neutral and gentler on coated synthetic surfaces, which is why gear manufacturers generally recommend them for synthetic fabrics. Always test any cleaning solution on a discreet area of the tent first.
The protocol for nylon and polyester tents:
- Dilute Gear Aid Revivex per the label instructions.
- Apply with a sponge rather than a brush — sponge reduces friction on the coated surface.
- Allow to dwell for 30 minutes.
- Rinse with cold water only. Never use hot water on synthetic tent fabric.
- Never machine wash a nylon tent. The agitation destroys the seam tape and PU coating, often irreparably — this is confirmed by virtually every outdoor gear manufacturer.
After cleaning, check the seam tape for lifting. Mould often grows under loose seam tape, and the cleaning process can reveal pre-existing damage. If seams are lifting, re-seal before re-waterproofing — our tent seam sealing guide covers that fix in around 30 minutes. For more on how different fabrics respond to cleaning and weather, see our guide to tent materials.
Canvas tents present a different challenge — they’re more porous, absorb cleaning agents more deeply, and require a longer drying window to avoid creating the very conditions that cause mould in the first place.
Removing Black Mold from Canvas Tents
Canvas, a natural cotton-based fabric that breathes but is highly porous and mould-prone, presents the most challenging removal scenario. Mould roots penetrate deeper into canvas fibres than synthetic fabrics, which means longer spore-killer dwell times and more thorough rinsing.
The protocol for canvas tents:
- Apply lemon-salt paste (the safer primary method for canvas) to affected areas, or use a brief vinegar soak — 1:3 dilution for no more than 20–30 minutes. Prolonged vinegar exposure can weaken canvas fibres.
- For a full soak, submerge the affected canvas panels in a diluted solution in a large tub or bath. Keep the dwell time under 30 minutes.
- Follow the vinegar or lemon-salt treatment with the baking soda paste method on any remaining dark staining.
- Rinse thoroughly — canvas absorbs cleaning agents deeply, so two to three rinse passes are needed.
- Pitch the tent fully and allow 6–12 hours of drying time in good airflow before re-waterproofing.
CanvasCamp’s canvas cleaning guide recommends setting up the tent fully and pre-cleaning before applying a specialist canvas waterproofer after mould removal (CanvasCamp). One additional tip worth knowing: “seasoning” canvas after cleaning — pitching the tent in light rain once before its next camping use — allows the fibres to swell and close the weave, reducing future water and mould penetration.
Storing canvas even slightly damp after cleaning is the single most common cause of mould returning within weeks. Canvas holds moisture far longer than synthetic fabric — when in doubt, give it another hour.
Whether your tent is canvas or synthetic, the PU coating is the invisible layer that keeps you dry — and it’s the one most cleaning methods accidentally damage.
Protecting PU Coatings During Cleaning
The PU coating is the polyurethane waterproof layer applied to the inner surface of most synthetic tent fabrics. When it degrades, the tent leaks — and no amount of re-waterproofing spray will fix a coating that has already peeled or delaminated. Signs of PU degradation include a peeling or flaking inner surface, a persistent damp smell even after full drying, and water no longer beading on the fly.
- What damages PU during mould cleaning:
- Hot water (accelerates delamination)
- Biological laundry detergents (enzymatic action on the coating)
- Concentrated or undiluted acids (full-strength vinegar)
- Machine washing agitation
- Rough brushing directly on coated inner surfaces
- What protects PU:
- Cold water throughout
- Soap-free cleaners like Nikwax Tech Wash
- Sponge application rather than stiff brush
- Gentle rinsing rather than pressure washing
Gear manufacturers and outdoor experts consistently advise testing any new cleaning solution on a small, hidden area before full application — a 10-second patch test can prevent permanent damage to an expensive tent.
Checkpoint: You should now have applied the correct method for your tent material. Canvas owners: the tent should be brushed clean with mould staining largely removed. Synthetic owners: the tent should be cleaned with enzyme cleaner or mild soap using cold water only. Both: do not rinse yet — proceed to Step 4.
Step 4: Rinse, Dry, and Re-Waterproof
The final step in removing mould from a tent is the one that makes the restoration last. Rinsing removes residual cleaning agents; drying completely prevents re-colonisation; re-waterproofing restores the DWR (Durable Water Repellent) coating — the factory-applied finish that makes water bead off your tent fly — that cleaning strips away. Skip any of these three, and mould is likely to return within one to two seasons.
This is Phase 4 of the 4-Phase Tent Restoration Protocol. A tent that completes all four phases is not just clean — it is fully restored.
How to Rinse Without Spreading Spores
Rinsing sounds simple, but the technique matters. A pressure washer will force water into seams and drive any remaining spore matter deeper into the fabric — avoid it entirely.
- Use a gentle garden hose or large bucket of clean water.
- Rinse from the top down, working systematically across all surfaces of the tent fly, inner tent, and groundsheet.
- Complete two to three rinse passes minimum — cleaning agent residue left in the fabric attracts dirt and can accelerate mould re-growth by providing organic matter for spores to feed on.
- Dispose of rinse water away from your garden or lawn — it contains dead mould spores and residual cleaning agents.
With the tent fully rinsed, the most important and most underestimated step begins: drying.
Drying Your Tent: Don’t Rush This Step
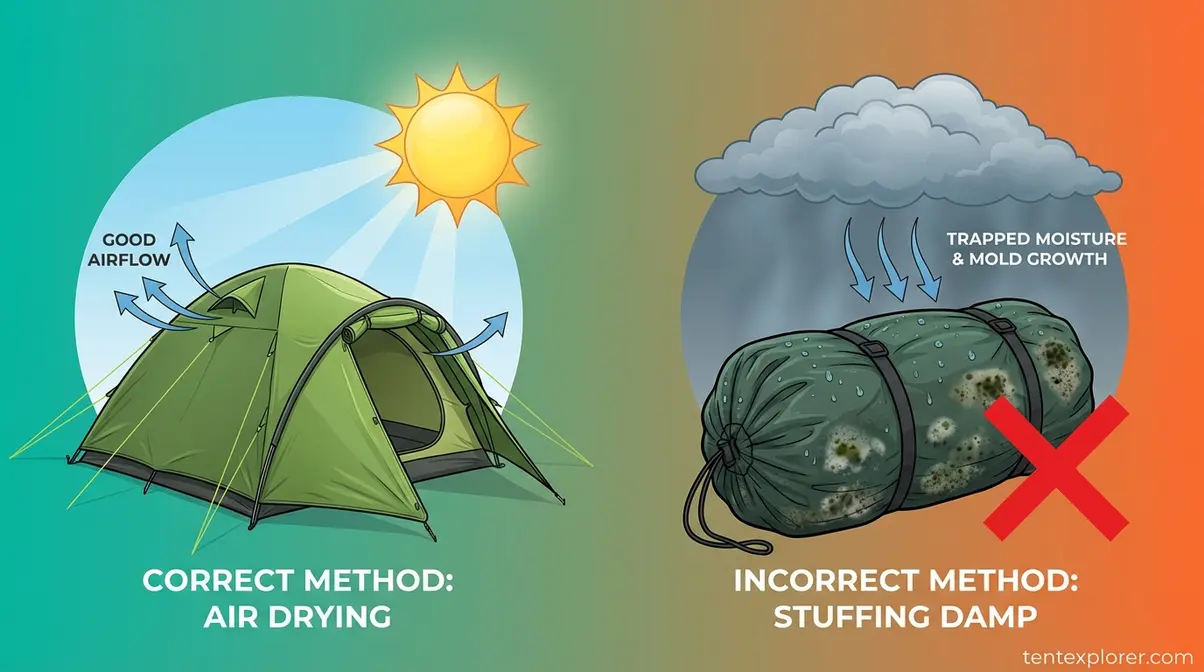
Complete drying is the step that separates a successful restoration from a recurring mould problem. Pitch the tent fully for drying — do not fold or stuff it. Every surface needs airflow, including the inner tent and groundsheet.
For canvas tents: Allow 6–12 hours minimum in good airflow — ideally sunny and breezy. Feel the fabric with your hand. It should feel completely dry, not cool or faintly damp. Canvas holds moisture much longer than synthetic fabric, and campers who rush this step consistently report mould returning within weeks.
For synthetic tents: Allow 2–4 hours in partial sun. Avoid prolonged direct UV on nylon — UV radiation degrades nylon fibres over time, which is the opposite of what you want after a thorough restoration. Pay particular attention to the inner PU coating — it retains moisture longer than the outer fly and is easy to miss.
The musty smell test is your most reliable indicator: if the tent still smells musty after drying, it is not dry enough. Mould can return within 24–48 hours of storing a damp tent in a compressed bag.
Once the tent is bone dry — and only then — you can apply the re-waterproofing treatment that completes the restoration.
Re-Waterproofing After Mold Removal
Re-waterproofing after mould removal is not optional. The soaking and scrubbing process removes the factory-applied DWR finish, and without it, water no longer beads off the fly — it soaks in, creating the damp conditions that allow mould to return. According to Nikwax’s own guidance, if your tent is no longer repelling water after cleaning, it needs a fresh waterproofing treatment before use (Nikwax, 2026).
The final step in fully removing mould from a tent and making that result permanent is applying the right re-waterproofing product for your fabric type.
- For synthetic tents (nylon and polyester):
- Grangers Tent & Gear Repel, a spray-on DWR re-waterproofer — apply to clean, damp fabric; allow to dry fully.
- Nikwax TX.Direct Spray-On, a PFAS-free waterproofing treatment — apply to damp fabric after cleaning, wipe away excess, and allow to dry naturally.
- For canvas tents:
- Grangers Canvas Proofer or Canvak Canvas Waterproofer — apply with a sponge or sprayer to clean, fully dry canvas. Allow to cure for 24–48 hours before using in rain.
Test the result before packing the tent away: spray a small amount of water on the treated surface. Water should bead and run off immediately. If it soaks in, apply a second coat and allow to dry again.
REI’s tent care guide recommends considering refreshing waterproof coatings after any deep clean (REI Expert Advice). For a full review of re-waterproofing sprays evaluated by our team, see our best waterproofing sprays for tents guide.
With the re-waterproofing complete, you’ve finished the 4-Phase Tent Restoration Protocol. One final section covers how to make sure you never have to do this again.
Preventing Mold from Coming Back
Four habits eliminate the conditions mould needs to grow — moisture, darkness, and stagnant air. Build these into your post-trip routine and you’ll significantly reduce the chances of facing this process again.
- Always pack away dry. Never store a tent wet or even slightly damp. If you pack up in rain, pitch the tent again at home within 24 hours to dry it fully.
- Store it properly. Use a breathable cotton or mesh bag rather than the original compression sack, which traps moisture. Store in a cool, dry location — not on a garage floor or in a car boot where condensation can collect.
- Control condensation inside the tent. Condensation on the inner tent walls is a significant mould contributor that many campers overlook. Keeping a door or vent slightly open overnight dramatically reduces moisture build-up — see our guide on how to prevent condensation in a tent for a full breakdown.
- Air it out after every trip. Even on dry camping trips, pitch the tent for 1–2 hours after returning home to release any trapped moisture before storage.
Checkpoint: Your tent is now fully restored. The fabric should be clean, completely dry, and treated with a fresh waterproof coating. Water should bead on the fly. The 4-Phase Tent Restoration Protocol is complete.
For a full review of re-waterproofing sprays tested by our team, see our best waterproofing sprays for tents guide — it’s the step that makes the difference between a tent that stays mould-free for years and one that develops patches again next season.
Common Mistakes That Can Ruin Your Tent
Even campers who follow most of the steps above can undo their work with a single error. Across camping communities including r/camping, OutdoorAus, and UKClimbing, the consistent warnings point to five recurring mistakes — and two scenarios where no amount of cleaning will help.
Five Mistakes That Make Mould Worse
- Scrubbing before killing spores. You see black patches and immediately scrub. The result: millions of live spores pushed deeper into the fabric weave and launched into the surrounding air. The visible staining may lift slightly, but the underlying problem gets worse. Fix: always apply your chosen spore-killer and allow full dwell time before any scrubbing.
- Using bleach. The assumption is that bleach kills mould. It doesn’t — it bleaches the stain while leaving live spores intact. It also destroys the PU coating on synthetic tents, degrades nylon and canvas fibres, and voids most tent manufacturer warranties. Fix: use white vinegar, enzyme cleaners, or lemon-salt paste.
- Machine washing the tent. A washing machine seems like a thorough option. In practice, the agitation destroys seam tape and PU coating — often irreparably. Fix: hand-wash only, always, using the methods in Steps 1 and 2.
- Storing the tent damp. You pack up in rain and plan to dry it “later.” Mould can establish within 24–48 hours inside a compressed, damp storage bag. Fix: pitch to dry within 24 hours of any wet pack-up, without exception.
- Skipping re-waterproofing. The tent looks clean, so you assume the restoration is complete. Without DWR, the fly absorbs water, stays damp, and mould returns within one to two seasons. Fix: always re-waterproof after any deep clean — it is Phase 4, not an optional extra.
Even with the best technique, some tents reach a point where cleaning is no longer the right answer.
When Cleaning Won’t Save Your Tent
Some damage is structural, not cosmetic. Faint staining after mould removal is cosmetic and does not affect function. The following scenarios are different — they indicate that the fabric or coatings have been degraded beyond what cleaning and re-waterproofing can fix:
- PU coating is peeling or flaking across large areas. Re-waterproofing spray cannot bond to a coating that has already delaminated. The tent will leak regardless of how well it’s cleaned.
- Seam tape has lifted along major structural seams. The tent will leak at every seam in rain. Re-sealing may not hold if the base fabric beneath the tape has degraded.
- Fabric has developed tears, thinning, or a “crunchy” texture in mouldy areas. This indicates the mould has degraded the fibres themselves, not just the surface. No cleaning agent reverses fibre breakdown.
If any of these apply, the mould has won this round — but the experience of working through a tent restoration is genuinely valuable. A new tent purchased with that knowledge will be stored, dried, and maintained far better from the first trip.
Frequently Asked Questions
Can a moldy tent be saved?
Yes, a mouldy tent can almost always be saved if you act before the mould degrades the fabric structure. The key is following all four phases: kill the active spores first, then clean the staining, then rinse and dry completely, then re-waterproof the fabric. Working outdoors with an N95 mask is essential to avoid inhaling spores during the process. Results may vary for very old canvas with deeply embedded black mould, but even severe infestations respond well to enzyme cleaners and extended treatment. The only exceptions are tents with peeling PU coatings, lifted seam tape across major seams, or fabric that has become brittle — those indicate structural damage beyond what cleaning can fix.
Can you remove mold from a tent?
Yes, removing mould from a tent is entirely possible using household or specialist cleaning agents. The most effective methods are diluted white vinegar (1 part vinegar to 3 parts water) for synthetic tents, enzyme cleaners such as Gear Aid Revivex Pro Cleaner for delicate nylon, or a paste of lemon juice and salt for canvas. The process typically takes 2–4 hours of active work plus full drying time. For nylon tents, enzyme cleaners are preferred over vinegar to protect the PU waterproof coating. Severe infestations may require two treatment cycles before all staining is resolved.
Is sleeping in a moldy tent safe?
No, sleeping in a mouldy tent is not recommended. Mould spores in an enclosed space can trigger respiratory irritation, coughing, wheezing, skin rash, and allergic reactions — particularly in people with asthma or mould sensitivities. The confined airspace of a tent concentrates spore levels significantly compared to an open outdoor environment. Clean and fully dry the tent before any use. If you experience breathing difficulties after sleeping in a mouldy tent, consult a doctor — this applies both to people with known allergies and those without.
Removing black mold from canvas tents?
To remove black mould from a canvas tent, apply a lemon-salt paste or a 1:3 vinegar-to-water solution to the affected area and leave it in direct sunlight for 2–4 hours — keeping vinegar contact under 30 minutes to protect canvas fibres. Then scrub gently with a soft brush, rinse thoroughly with cold water, and allow 6–12 hours of drying time before re-waterproofing with a canvas-specific proofer such as Grangers Canvas Proofer. Very old black staining may leave faint discolouration even after successful mould removal — this is cosmetic and does not affect the tent’s structural function or waterproofing ability.
What kills mold on a tent?
The most effective mould-killers for tent fabric are distilled white vinegar (diluted 1 part vinegar to 3 parts water), enzyme-based cleaners such as Gear Aid Revivex Pro Cleaner, and a paste of lemon juice and salt for canvas. Bleach should be avoided — it removes the colour of mould staining but does not kill the spore structure, and it damages both nylon fibres and PU waterproof coatings (EPA, 2026). UV sunlight also assists in killing remaining spores after chemical treatment. For UK campers, Milton Sterilising Solution (1 capful per 5 litres) is a widely used and fabric-safe alternative. Always apply the spore-killer before scrubbing, not after — sequence is everything.
Restore Your Tent and Keep It Mould-Free
Prices and product recommendations verified as of July 2026.
For any camper asking how to remove mould from a tent, the 4-Phase Tent Restoration Protocol covers the complete process: kill the spores with vinegar or enzyme cleaners, clean the dead staining, rinse and dry completely, and re-waterproof the fabric. The EPA confirms that mould exposure can irritate the lungs and airways — making a complete restoration, not just a surface clean, the only responsible approach. The best outcomes combine the right spore-killer for your fabric type, a full 6–12 hour dry, and a fresh DWR coating applied before the tent goes back into storage.
The reason most DIY attempts fail isn’t technique — it’s scope. Campers stop at Phase 2 (cleaning the staining) and assume the job is done. The 4-Phase Tent Restoration Protocol exists specifically to address that gap: Phase 3 (material-specific treatment) and Phase 4 (re-waterproofing) are what convert a surface clean into a genuine restoration. If your tent looked clean after scrubbing but mould returned next season, that’s exactly what happened. The answer to “is it saveable?” is yes — but only when all four phases are completed.
Start with our best waterproofing sprays for tents guide to choose the right re-waterproofing product for your tent material — it’s the step that makes the difference between a tent that stays mould-free for years and one that develops patches again next season. If your seam tape lifted during cleaning, our tent seam sealing guide covers that fix in around 30 minutes — worth doing before re-waterproofing so the entire tent is restored together.
