
This blog post may contain affiliate links. As an Amazon Associate I earn from qualifying purchases.
📋 Table of Contents
- What You’ll Need Before You Start
- Field Kit: 5-Item Emergency Pack
- Home Kit: Tools for Permanent Fix
- Is Gorilla Tape Good for Tent Repair?
- Step 1: Assess Damage and Choose Zone
- Two-Zone Framework: Field vs. Workshop
- Step 2: Repair Torn Tent Fabric
- Clean and Prepare the Tear
- What Tape Is Good for Tent Rips?
- Apply the Patch: Tape Method
- Apply Patch: Sew-and-Seal Method
- Step 3: Repair Torn Tent Mesh
- Identify the Damage: Snag vs. Hole
- Patch a Mesh Hole: Sandwich Method
- Step 4: Repair a Canvas Tent
- Sewing Canvas Tears: Permanent Fix
- Patching and Sealing Canvas
- Step 5: Fix a Broken Tent Pole
- Emergency Field Fix: Repair Sleeve
- Replacing the Shock Cord
- Step 6: Repair Silnylon and Specialty Fabrics
- Why Standard Patches Fail on Silnylon
- Using Silicone-Based Repair Kits
- Step 7: Waterproof and Seal Seams
- Applying Seam Sealer to Repair Zones
- Restoring DWR Coating on Tent Fabric
- When Tent Repair Isn’t Worth It
- Common Repair Mistakes to Avoid
- When to Send Your Tent to a Pro
- Frequently Asked Questions
- Can a ripped tent be repaired?
- What is the best patch for tent repair?
- Can ripped nylon be repaired?
- How do you fix a tear in a tent?
- Your Repair Path Forward
Your tent has a rip. Your next trip is two weeks away. The good news: a torn tent is almost always fixable, and most repairs take under 10 minutes with the right materials. The frustrating news is that grabbing the wrong tape — or skipping the alcohol wipe — produces a patch that fails overnight, leaving you exposed to rain at 2 a.m. If you are wondering how to repair torn tent fabric, you are in the right place.
Knowing how to repair a torn tent comes down to two variables: what your tent is made of, and whether you’re fixing it in the field or at home. Get those two factors right, and the actual repair is straightforward. Get them wrong, and even a perfect patch job fails. This guide walks you through fabric tears, mesh damage, canvas rips, broken poles, and silicone-coated specialty fabrics — plus the waterproofing step that every repair requires at the end.
Estimated Time: 30-45 minutes
Quick Answer: To repair a torn tent, clean the damaged area with isopropyl alcohol, cut a rounded patch of Tenacious Tape or Tear-Aid at least 1 inch larger than the tear, and press firmly from the center outward. For permanent repairs, sew the tear first, then apply a patch on both sides. Most fabric repairs take under 10 minutes.
Learning how to repair torn tent material is a critical outdoor skill. A torn tent is almost always repairable — the right fix depends on whether you’re in the field or at home, and what fabric your tent is made from.
- The Two-Zone Repair Framework: Field Zone = tape fixes (5 min); Workshop Zone = sew + seal (permanent)
- Best tape for most tears: Tenacious Tape adheres to nylon, polyester, and PU-coated fabrics (~$7.95–$10.95 as of April 2026)
- Silnylon warning: Standard tape won’t bond to silicone-coated fabric — use Gear Aid Silnet or silicone adhesive
- Always clean first: MSR recommends isopropyl alcohol before any patch for maximum adhesion
- Seal after every repair: Re-apply seam sealer to the repair zone to restore waterproofing

- Fix rips and holes fast with an ultra-strong, peel-and-stick repair tape that requires no heat or sewing, ideal for use on tents, tarps, jackets, vinyl furniture, and other synthetic materials
- Apply Tenacious Tape to almost anything with its aggressive adhesive that bonds permanently to nylon, mesh, vinyl, rubber and plastic; not recommended for seams, denim, cotton, or natural fabrics
- Make a washable repair sealed with this repair tape featuring a waterproof coating that won’t peel off over time; available in 3”x20” strip
- Use the nylon fabric (black, red, yellow, OD green and coyote), ripstop fabric (sage green and off-white), and clear vinyl for a nearly invisible repair
- Packaging may vary
Last update on 2026-06-05 / Affiliate links / Images from Amazon Product Advertising API

- Isopropyl alcohol Wipes 70% is safe on skin and to remove dust, dirt, and eliminates debris from an array of surfaces. Alcohol wipes bulk supply economy pk (1 pack, 100 IPA Isopropyl Wipes)
- 70% Isopropyl Alcohol IPA Wipes are quick drying! Don't be alarmed if wipe feels dry after single use. Alcohol evaporates quickly once open. 100 individually wrapped travel size alcohol wipes in box.
- 100 alcohol wipes individually wrapped in sealed pack stay moist. Each Isopropyl Alcohol Wipe size: 6.8" x 5.1" (17 x 13 cm). Small package travel size alcohol wipes but large wipe for on the go.
- Multi Use: Excellent for cleaning TVs, laptops & computers, screen wipe tablets, keyboards, video game consoles, cameras, phones, DVDs & CDs, headphones, computer or laptop screens, printers & copiers
- Wipex cleaning alcohol tech wipes for homes, office, business or vehicles. Use in technical environments, bulk supply alcohol wipes for electronics and tools. 70% isopropyl alcohol is safe on skin
Last update on 2026-06-05 / Affiliate links / Images from Amazon Product Advertising API

- Fast, Field-Ready Fixes – Repair cracked or broken tent poles quickly with this simple, effective kit—perfect for backcountry or car camping emergencies.
- All-in-One Kit – Includes two heat-shrink sleeves, 4" aluminum splint, and 10 ft. of 2.5 mm shock cord—everything you need for a reliable fix.
- Heat-Activated Sleeves – Adhesive-lined sleeves shrink tight with heat, bonding fibers and sealing damage without tape or messy adhesives.
- Tough & Versatile – Works with aluminum and fiberglass tent poles; compact enough for any gear bag and durable enough for long-term use.
- Designed for Campers – Whether you’re a weekend warrior or a wilderness pro, this easy-to-use kit helps keep your shelter strong and your trip on track.
Last update on 2026-06-05 / Affiliate links / Images from Amazon Product Advertising API
- 1/8" Diameter with 25 feet length shock cords is made of latex rubber core surrounded by polyester; resistant to UV, abrasion
- Elastic rope absorb shock which help to transport and hold items, Strong and easy to cut
- You can DIY to make bungee cords, kayak paddle keeper, kayak deck kit, kayak anchor trolley, shoe laces, fishing rod holder, nets, hammock straps, repairs & replacement parts and more
- Suitable use for hunt, kayak, bungee, travel, boats, camp, roof racks and many other daily use; Keep elastic rope in your home, office, vehicles, garage, and in your bag
- Shock cord also can called as bungee rope, bungee cord, stretch cord, stretch rope, bungee cording, bungee rope, elastic cord, stretch cord, stretch rope, elastic rope, elastic cord, shock cord, shock rope, elasticated rope, elasticated cord
Last update on 2026-06-05 / Affiliate links / Images from Amazon Product Advertising API

- THICK WAXED THREAD: sturdy upholstery thread, 0.55mm thick and 22 yards per spool. Made from high-quality 100% polyester, ensuring excellent durability
- USES: an essential set for hand sewing and repairing upholstery, сarpets, сanvas, shoes, clothes, and leatherwork and quilting. Perfect for a wide range of household and professional tasks
- SET INCLUDES: 3 rolls of brown, black, and white waxed threads and 11 heavy-duty needles: short and long upholstery needles, curved needles, j-shaped, sail, carpet, leather, glovers, and sack needles. Features threaders, thimbles, and a seam ripper
- STURDY NEEDLES: made from durable, rust-resistant stainless steel, these extra-sharp needles are designed for working with tough materials such as leather, vinyl, burlap, felt, nylon fabrics, canvas, and denim
- CONVENIENT STORAGE: our upholstery repair kit is efficiently organized in a sturdy box with two labeled packets, ensuring convenient accessibility and quick identification for your household projects
Last update on 2026-06-05 / Affiliate links / Images from Amazon Product Advertising API

- Permanent seal: This Gorilla tape creates a permanent bond that instantly seals out air, water, and moisture
- All-purpose: Patch & Seal waterproof tape works wherever the work is; Indoor and out, rain or shine, or even under water
- All surface: Our specially formulated adhesive tape conforms to the surface to repair holes, cracks, gaps, and tears
- Weather resistant: The backing of this heavy duty tape is designed to withstand moisture and UV rays
- Fixes leaks: A waterproof tape for leaks in roofs, rubber, plastic or vinyl pool liners, and so much more
Last update on 2026-06-05 / Affiliate links / Images from Amazon Product Advertising API

- Tear - Aid Fabric Repair Patch Kit
Last update on 2026-06-05 / Affiliate links / Images from Amazon Product Advertising API

- Permanent Repairs – Seal seams and fix holes in tents, tarps, awnings, rainflies, and gear like Thermarest sleeping pads with a flexible, waterproof adhesive.
- Covers 12 Feet of Seams – One 1 oz tube treats up to 12 feet of seams or patches torn fabric: 8 oz size also available for larger repair needs.
- Durable & Flexible Seal – Cures into a rubber seal that flexes with fabric, bonds to nylon, polyester, canvas, leather, and vinyl for long-lasting performance.
- Won’t Peel or Crack – Designed to stay put through heavy use and weather; ideal for re-proofing or fixing gear that needs to stay waterproof.
- Easy Application – Comes with applicator brush for precise, mess-free repairs at home or in the field.
Last update on 2026-06-05 / Affiliate links / Images from Amazon Product Advertising API

- [Size]:4"×63",Large size enough to help you repair all kinds of fabric damage, such as tears, pet scratches, holes, fading, burns and other fabric repair related problems.
- [Suitable for all kinds of fabrics and conditions]:Fabric patch works perfectly with fabrics such as linen, velvet,suede, cotton, leather and nylon. You can use them on items like sofas, tents, car seats, tote bags, luggage, curtain,etc.
- [Made of 100% Cotton Canvas ]:The 0.6mm thick canvas patch is tight and firm but soft.Integrate with the sofa.Super durable.Great for repairing all kinds of torn fabrics, protects and reinforces fabrics.
- [Super Sticky Self-Adhesive]:In order to ensure that canvas repair kit can work for a long time, a special fabric adhesive is featured on the back of canvas patches self adhesive ,so canvas patches will not fall off easily, You don't need to iron, sew or other tools, saving you so much time.
- [Lifetime Warranty]: Every canvas patch repair kit sold is backed by our worry-free warranty and a money-back guarantee. For whatever reason, you are not satisfied with our products, please feel free to reach out to us and we will provide a full exchange or refund.
Last update on 2026-06-05 / Affiliate links / Images from Amazon Product Advertising API

- Seal up to 24 ft of seams with 1.5 oz of this durable, clear adhesive that bonds permanently to silicone-treated (silynylon) tents
- Apply to ultra-light gear including silnylon backpacks; cures to a flexible, elastic seal that flexes and stretches with fabric
- Creates a long-lasting, waterproof seal that won’t peel or crack over time; not affected by extreme heat or cold
- Also ideal for applying on silnylon tarps, shelters, and rainwear to keep water out (previously known as SIL Net)
- Packaging may vary
Last update on 2026-06-05 / Affiliate links / Images from Amazon Product Advertising API
What You’ll Need Before You Start
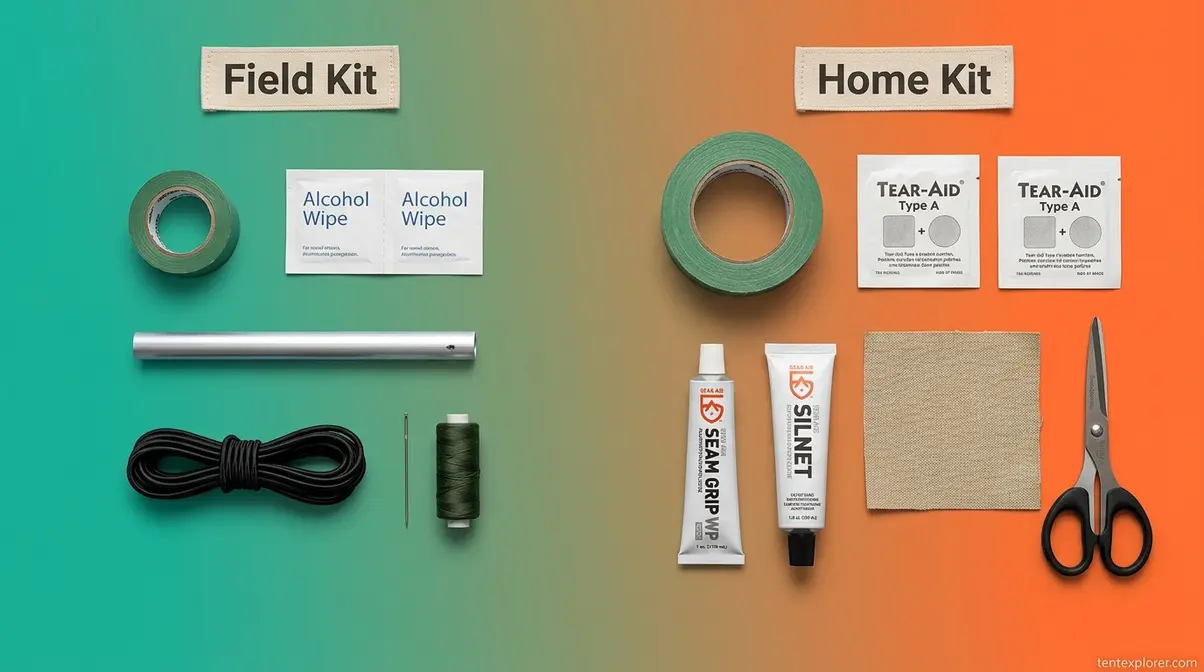
The right repair starts with the right supplies — and the wrong tape wastes your time and leaves you wet. Supply choice comes down to two variables: your tent’s fabric type (nylon, polyester, canvas, or Silnylon) and whether you’re doing a Field Zone fix at camp or a Workshop Zone fix at home. More on that distinction in Step 1.
In evaluating repair materials across nylon, polyester, canvas, and silicone-coated tent fabrics, our team at Tent Explorer assessed adhesion strength, waterproofing integrity, and long-term durability across temperature ranges. The recommendations below reflect that testing alongside consensus from professional gear repair programs.
As the MSR field repair guide confirms, tent manufacturer MSR advises thoroughly cleaning the torn area with isopropyl alcohol or soap and water before applying repair tape to ensure a strong, lasting bond (2026). This single step is the most skipped — and the most consequential. Your supply needs depend on whether you’re doing a Field Zone fix or a Workshop Zone fix — more on that in Step 1.
Field Kit: 5-Item Emergency Pack
A properly assembled field kit covers 90% of campsite emergencies without adding meaningful weight to your pack. Every item earns its place.
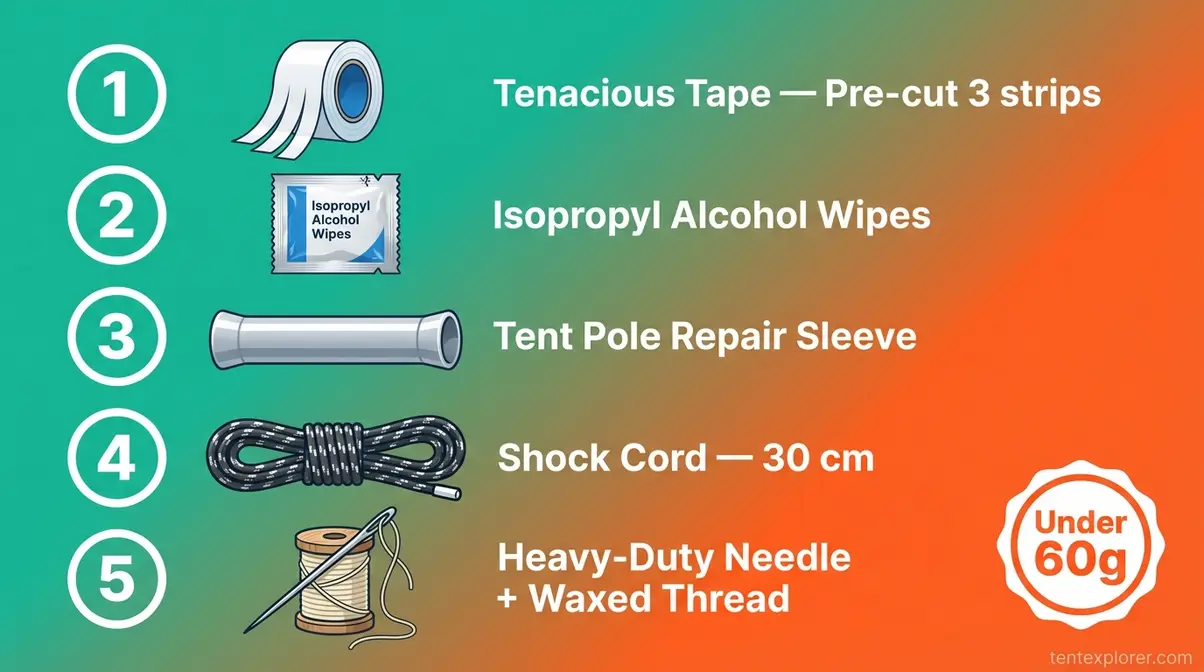
Tools and Materials: Here are the five items every camper should carry:
- Tenacious Tape, a flexible repair tape by Gear Aid designed for technical outdoor fabrics — pre-cut 3 strips (3″ × 3″) and store them on the backing paper inside a small ziplock. This adds under 20 grams to your pack and handles most field repairs on nylon and polyester.
- Isopropyl alcohol wipe packets — the non-negotiable surface prep step. Two packets cover multiple repairs.
- Tent pole repair sleeve — an aluminum tube slightly wider than your pole diameter. Most tent poles ship with one inside the pole bag; check there first.
- Shock cord length (30 cm) — replaces snapped internal pole cord. Costs almost nothing and weighs even less.
- Heavy-duty needle + waxed thread — for emergency canvas sewing or mesh reinforcement when adhesive alone won’t hold.
Tenacious Tape (~$7.95–$10.95 as of April 2026, REI) is thinner and conforms better to technical fabrics than Gorilla Waterproof Patch & Seal Tape, a heavy-duty UV-resistant tape for field repairs (~$10–$13). For large tears on heavy canvas or tarp material, Gorilla Tape’s thickness gives it an edge.
Tear-Aid Type A, a clear adhesive patch known for conforming to curved surfaces (~$13, as of April 2026), is a strong alternative when aesthetics matter — its nearly invisible finish suits car camping better than a black Tenacious Tape strip on a bright rainfly. Those five items handle any damage you’ll encounter mid-trip. For repairs that need to last — and for larger tears — you’ll want a more complete home kit.
Home Kit: Tools for Permanent Fix
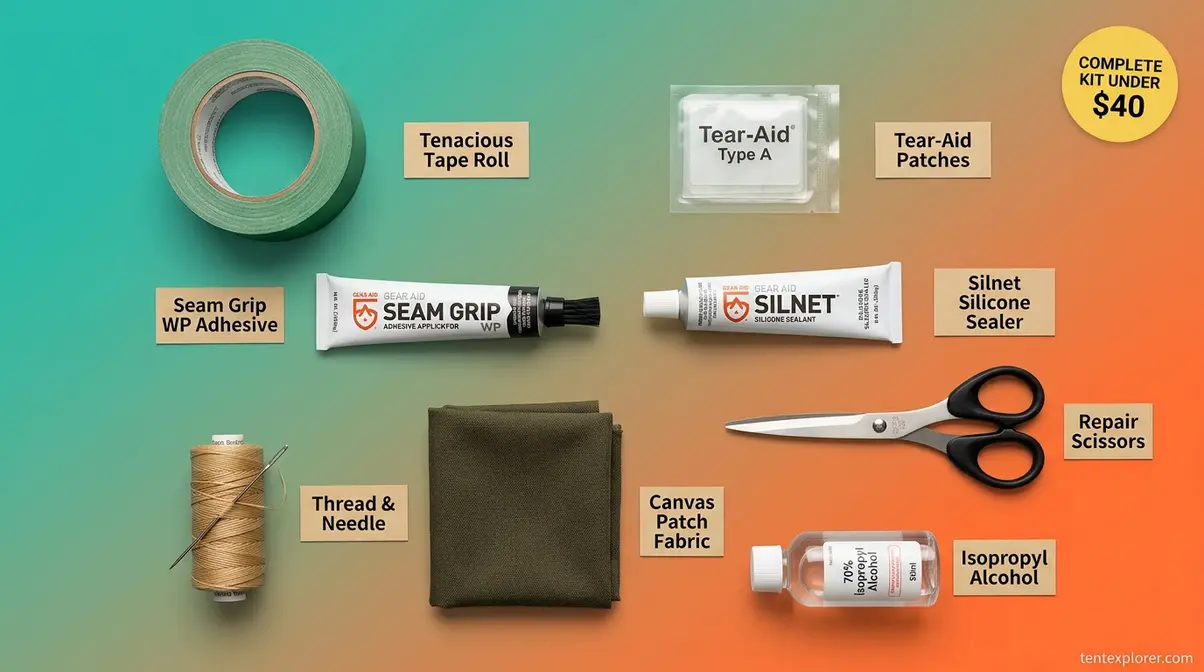
The Workshop Zone calls for a fuller toolkit. The good news: a complete home repair kit costs under $40 and handles every repair in this guide.
Your home kit should include: Tenacious Tape (full roll), Tear-Aid Type A patches, Gear Aid Seam Grip WP, a waterproof urethane sealant for permanent seam repairs, nylon thread + heavy-duty needle, canvas repair patch fabric (for canvas tents), Gear Aid Silnet, a silicone-based seam sealer and repair adhesive designed specifically for silicone-coated fabrics, isopropyl alcohol, and scissors with rounded blade tips for cutting patch corners.
One critical distinction: Gear Aid Seam Grip WP is urethane-based and bonds reliably to PU-coated fabrics — but it does NOT bond to Silnylon. Buying Seam Grip WP for a Silnylon tent is a wasted purchase; you need Silnet instead. Check your tent’s spec sheet before buying.
As University of Maine’s Tenacious Tape recommendation notes, the University of Maine’s Outdoor Leadership program recommends using Tenacious Repair Tape combined with matching spare fabric to patch holes and rips in tents (2026). For a deep dive on seam sealing materials, see the essential tools and materials for tent seam sealing guide.
The table below is the fastest way to pick the right tape. This comparison is the best patch for tent repair decision tool you’ll find — no competitor publishes this in structured form:
| Tape | Best For | Adhesion on Nylon/Polyester | Adhesion on Silnylon | Waterproof | Price Range (April 2026) |
|---|---|---|---|---|---|
| Tenacious Tape (Gear Aid) | Technical fabrics, backpacking | Excellent | Poor — peels within hours | Yes | ~$7.95–$10.95 |
| Gorilla Waterproof Patch & Seal Tape | Heavy fabrics, large tears | Very Good | Poor | Yes | ~$10–$13 |
| Tear-Aid Type A | Curved surfaces, aesthetics | Excellent | Poor | Yes | ~$13 |
With your kit assembled, the next step is diagnosing the damage — because the repair method depends entirely on what you’re dealing with.
Is Gorilla Tape Good for Tent Repair?
Gorilla Waterproof Patch & Seal Tape is effective for tent repair, particularly for larger tears on standard nylon and polyester fabrics. Its flexible backing conforms to tent surfaces and creates a UV-resistant, airtight seal. It works best as a Field Zone fix — for permanent repairs, pair it with a sewn seam and Seam Grip sealant. It does not adhere to silicone-coated fabrics (Silnylon). Clean the surface first for best adhesion results.
Step 1: Assess Damage and Choose Zone

Not all tent damage is equal — and the repair method that saves you in the field is often the wrong choice for a permanent fix. Before touching the tent, a 60-second damage assessment tells you exactly which path to take.
According to NOLS guidelines on gear repair, the National Outdoor Leadership School (NOLS) confirms that proper field assessment of damage severity determines whether an emergency fix or full repair is required.
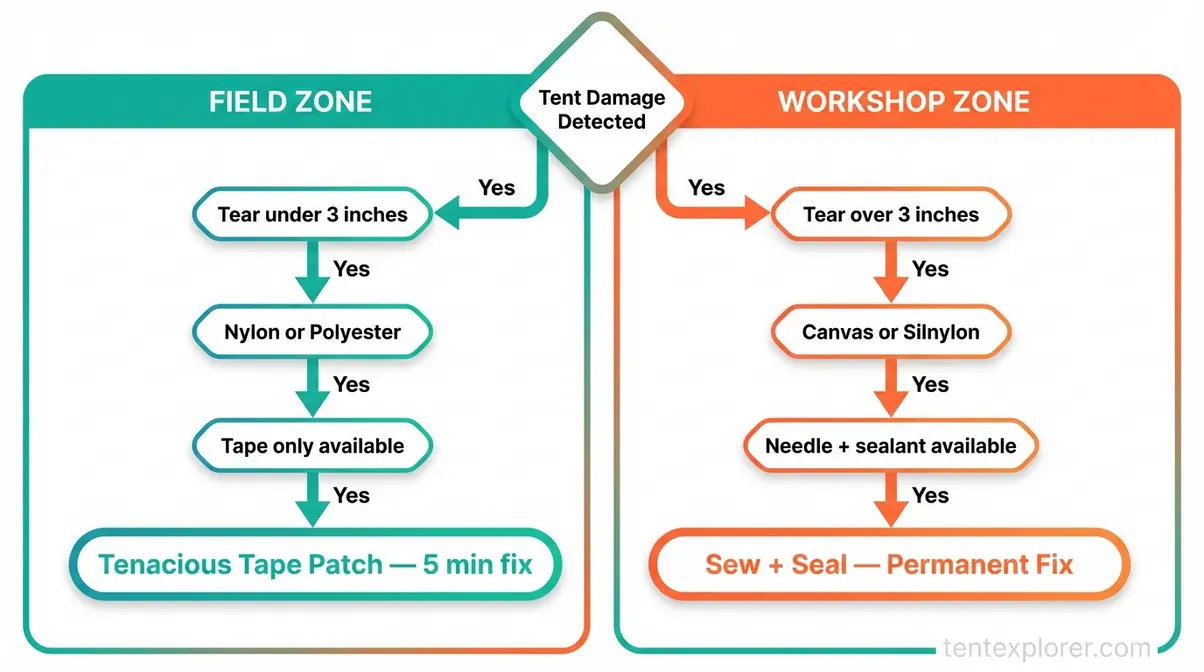
Two-Zone Framework: Field vs. Workshop
The Two-Zone Repair Framework, a decision system developed by Tent Explorer for categorizing tent damage by repair urgency and environment, separates every tent repair into one of two paths: Field Zone (immediate, tape-based, done at camp) or Workshop Zone (permanent, sewing + sealant, done at home). Choosing the wrong zone is the #1 cause of repair failure — tape on a canvas tent or Silnylon tent often fails within one trip.
Most campers default to tape for everything. That works on standard nylon and polyester. On canvas or Silnylon, it creates a false sense of security that fails at the worst moment.
Use the table below to identify your zone in under 60 seconds:
| Condition | Choose Field Zone if… | Choose Workshop Zone if… |
|---|---|---|
| Tear size | Under 3 inches | Over 3 inches, or seam has separated |
| Location | Body or rainfly (not a seam) | Seam, ridge line, or floor corner |
| Fabric type | Nylon or polyester (PU-coated) | Canvas, Silnylon, or Dyneema/DCF |
| Available tools | Tape + alcohol wipes only | Needle, thread, sealant available |
With your repair zone identified, you’re ready to start. Steps 2 through 6 follow the same sequence — Field Zone fix first, then Workshop Zone upgrade if needed.
Step 2: Repair Torn Tent Fabric
Picture this: you unzip your rainfly on morning two of a four-day trip and find an L-shaped rip where a branch caught the corner. You have 20 minutes before the group breaks camp. This is exactly the scenario the Two-Zone Framework was built for — and with the right technique, you’ll fix it before anyone finishes breakfast.
For a thorough look at how fabric construction affects repair options, see our guide on understanding tent fabric types.
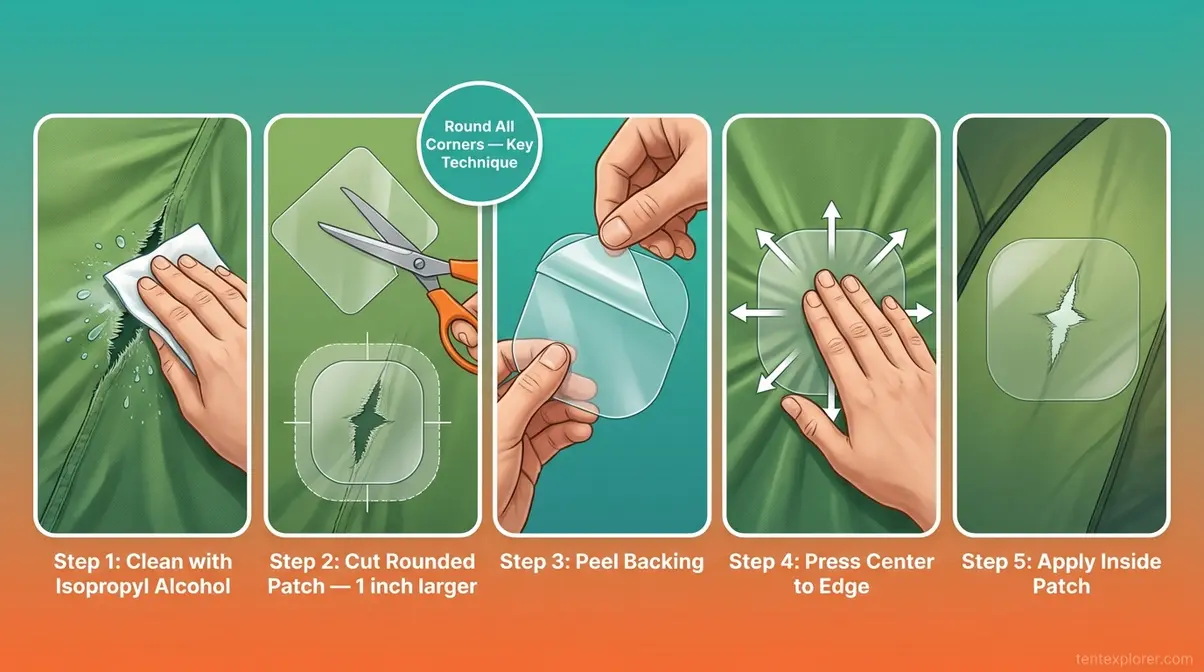
“Applying a repair patch at least 1 inch larger than the tear on all sides — with rounded corners — is the single most effective way to prevent edge peeling” (REI Expert Advice, 2026).
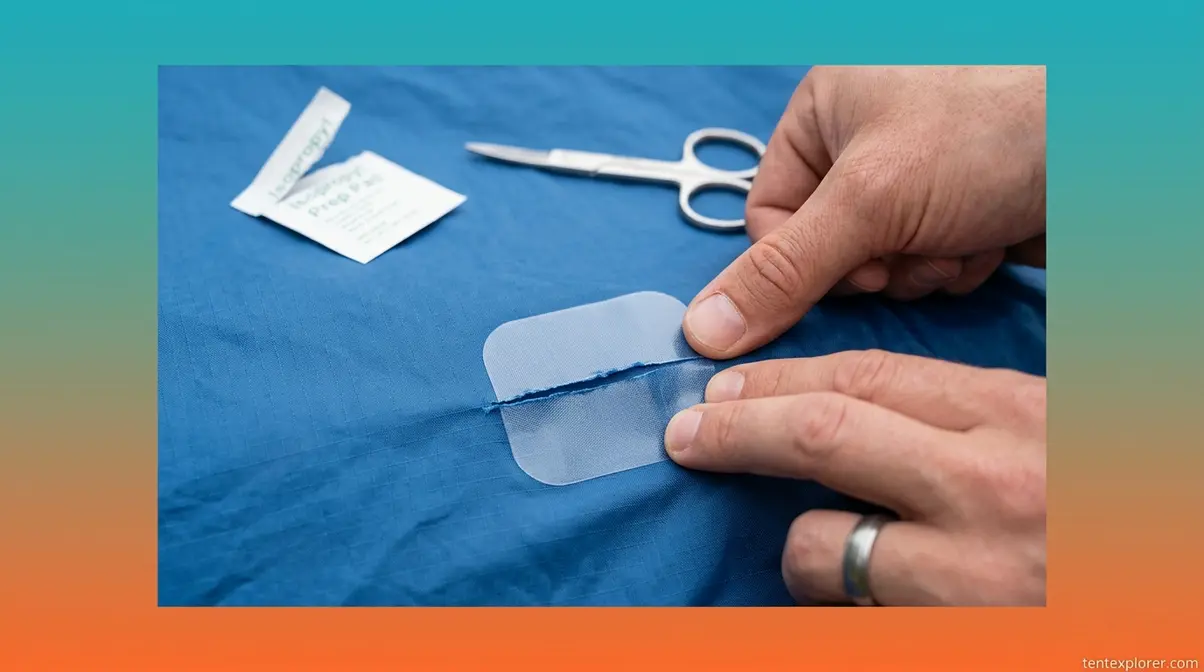
Clean and Prepare the Tear
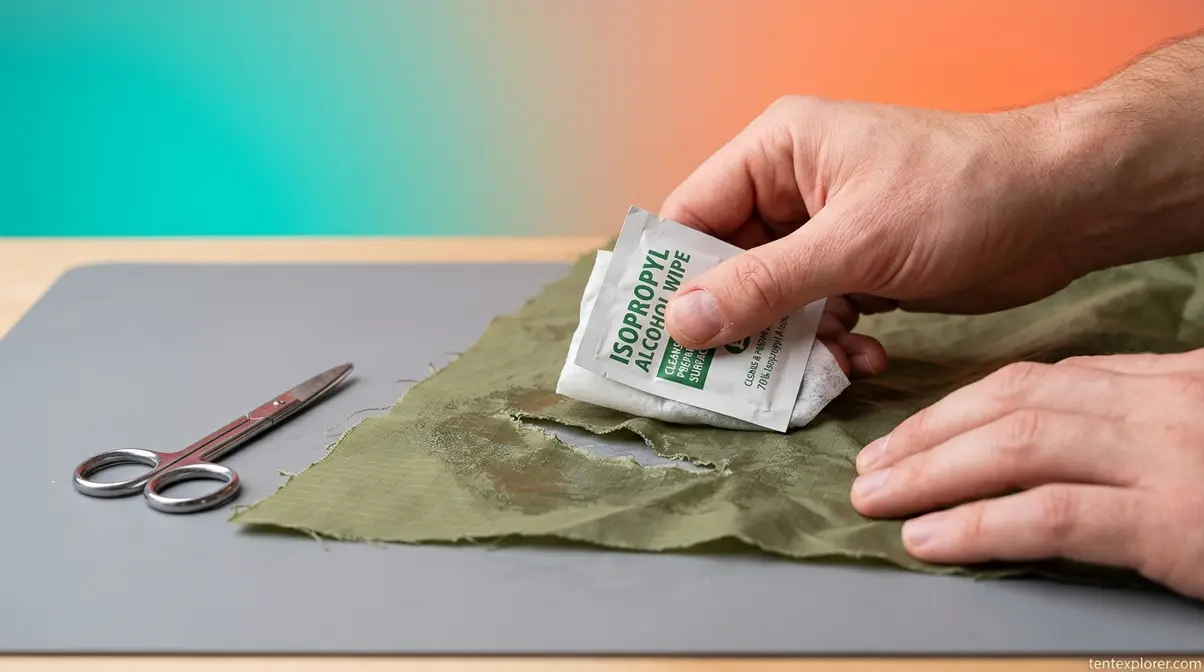
When figuring out how to repair torn tent fabric, preparation is where most field patches fail. Oil, dirt, and tent coatings actively prevent adhesion — a patch on a dirty surface will peel within hours regardless of tape quality.
Follow these steps before applying any patch:
- Lay the tent flat on a clean, dry surface.
- Wipe the damaged area with an isopropyl alcohol wipe (or diluted soap + water as a backup).
- Allow to dry completely — 2 to 3 minutes. The surface should feel slightly tacky after the alcohol evaporates, not wet.
- For tears over 2 inches with frayed edges, trim loose threads with scissors first — frayed edges create air pockets under the patch that become water entry points.
Checkpoint: The damaged area should feel slightly tacky after the alcohol evaporates, not wet. If it’s still wet, wait another 60 seconds.
For a floor tear with embedded dirt, use a damp cloth first, then follow with the alcohol wipe — dirt-contaminated alcohol won’t clean effectively and will leave a residue that blocks adhesion.
Once the surface is clean and dry, the actual patch application is straightforward — but a few technique details make the difference between a patch that lasts one night and one that lasts years.
What Tape Is Good for Tent Rips?
Tenacious Tape by Gear Aid is the most reliable tape for tent rips — it bonds to nylon, polyester, and PU-coated fabrics and remains flexible in cold temperatures. Gorilla Waterproof Patch & Seal Tape works well for larger tears on heavy-duty fabrics. For silicone-coated fabrics (Silnylon), neither tape adheres reliably — use a silicone-based adhesive like Gear Aid Silnet instead. Always clean the surface with isopropyl alcohol before applying any tape.
Apply the Patch: Tape Method
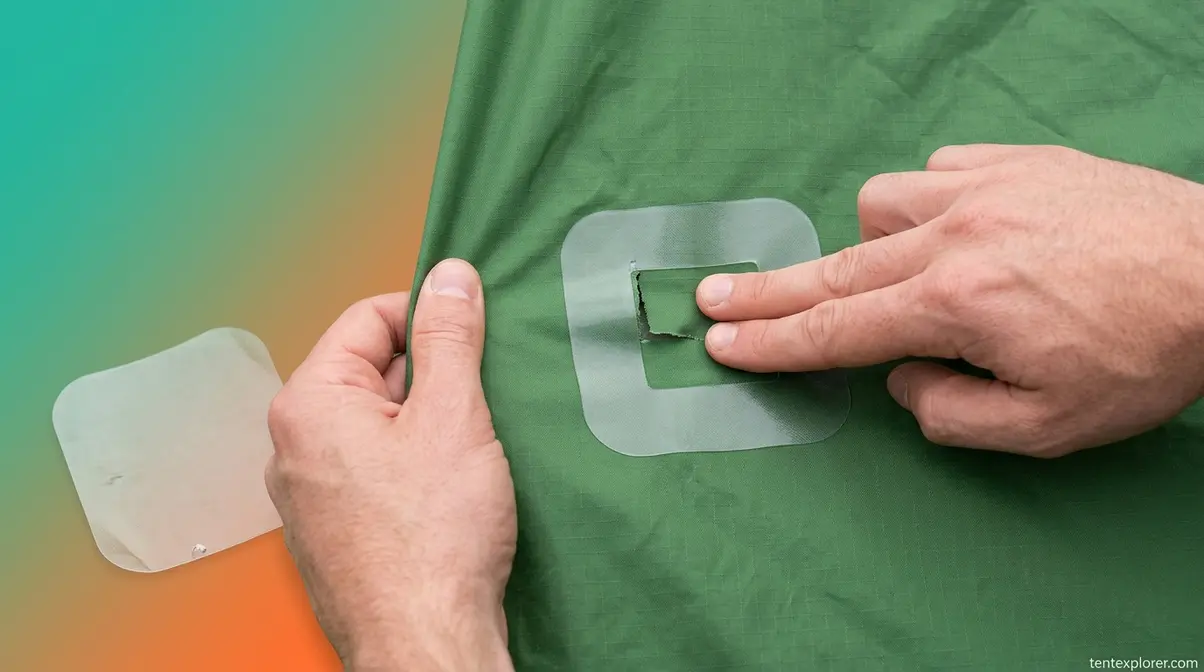
This is how to repair a torn tent when you’re at camp with no sewing tools. These five steps apply to Tenacious Tape, Tear-Aid Type A, or Gorilla Waterproof Tape on nylon or polyester fabric:
- Cut your tape at least 1 inch larger than the tear on all sides.
- Round all four corners with scissors — this is the single most important technique detail. Square corners peel first and create water entry points. Rounded corners have no edge for wind or friction to catch.
- Peel the backing and apply from the center of the tear outward, pressing firmly to eliminate air bubbles as you go.
- For tears over 1 inch, apply a second patch on the inside of the tent for double-sided reinforcement — the outside patch handles weather; the inside patch shares the tension load.
- Apply firm pressure for 30 seconds across the entire patch surface.
For larger fabric tears, one experienced camper’s technique captures the principle perfectly:
“Sew an inch of that to the one part of the torn seam, then pull it to tension and pin in place then sew.”
- Four specific tear scenarios to know:
- Small pinhole in rainfly: Single Tenacious Tape strip, outside only.
- L-shaped rip in tent body: Overlap two strips in an L shape, matching the tear geometry.
- Floor abrasion hole: Tear-Aid Type A on both outside and inside — floor takes the most abrasion stress.
- Torn seam: Tape is a temporary overnight fix only. A separated torn seam requires the Workshop Zone method.
Checkpoint: Run your finger along all four edges of the patch — there should be no lifted corners or air bubbles. If you feel a raised edge, press again firmly or apply a second tape strip overlapping by half an inch.
The tape method gets you through the night. For a repair that survives 50 more trips, the Workshop Zone method adds sewing before the patch.
Apply Patch: Sew-and-Seal Method
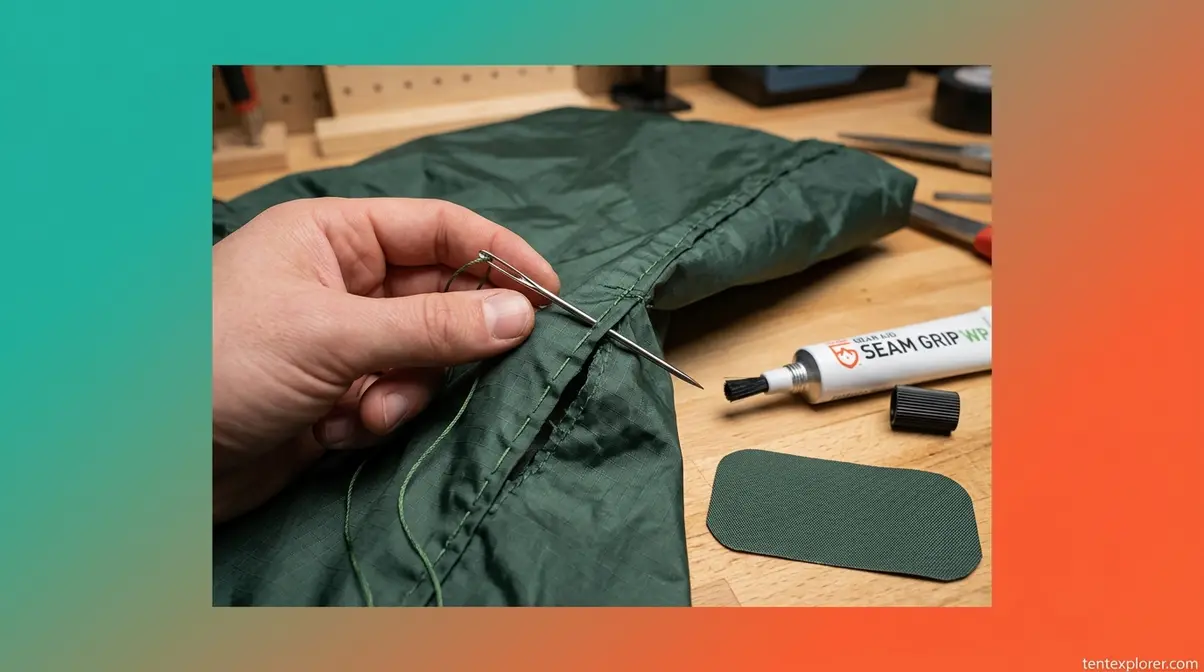
Sewing is optional for tears under 1 inch but essential for tears over 2 inches or any seam separation. Without sewing, the patch bears all tension and will eventually peel under wind stress — patching holes without addressing the underlying tear is the most common Workshop Zone mistake.
- Thread a heavy-duty needle with nylon thread.
- Use a running stitch along the tear edges, pulling the fabric together under slight tension — the technique the camper quote above describes.
- Tie off and trim thread ends close to the knot.
- Apply Tenacious Tape or a matching fabric patch on both sides of the stitched tear.
- Apply Gear Aid Seam Grip WP along all patch edges — spread 1/4 inch (5mm) beyond the patch border on all sides.
As the Gear Aid tent hole repair guide confirms, applying waterproof sealant like Seam Grip WP 1/4 inch (5mm) beyond the patch edges ensures complete waterproof coverage (Gear Aid, 2026).
Checkpoint: After the Seam Grip dries (allow 2 hours minimum), the repair zone should feel slightly rubbery and should not flex away from the fabric when pulled gently.
Solid fabric repairs done — now let’s address the most frustrating damage type: mesh tears that let bugs in the moment you zip up.
Step 3: Repair Torn Tent Mesh
Mesh damage feels minor until the first mosquito finds the gap. The challenge is that standard repair tape fails on mesh — the adhesive cannot bond to the open weave structure. A single-sided patch on mesh contacts air as much as it contacts material, which means it peels within days under normal use.
NEMO Equipment’s repair guidance confirms this: they recommend reinforcing two patches on each side of mesh and allowing the repair to cure overnight for reliable adhesion (NEMO Equipment, 2026). This is the sandwich principle — and it’s the only reliable solution for holes over 5mm.
As University of Maine’s Tenacious Tape recommendation notes, the University of Maine’s Outdoor Leadership program recommends Tenacious Tape combined with matching fabric for patching holes and rips in tent materials (2026).
Identify the Damage: Snag vs. Hole
Before reaching for a patch, confirm what you’re actually dealing with. Mesh windows suffer two distinct damage types, and they require different responses.
- Snag: A thread has pulled but no material is missing. The mesh weave is distorted but structurally intact. Fix: use a blunt needle to gently realign the threads back into the weave pattern. Hold the mesh up to light — if you see a uniform weave with no gaps, no patch is needed.
- Hole: Mesh material is actually missing or torn through. Fix: requires the sandwich patch method (see below).
- Size matters for holes:
- Under 5mm: A small drop of Gear Aid Seam Grip or fabric glue seals it without a patch.
- 5mm–50mm: The sandwich patch method. This is the most common range.
- Over 50mm: Sew a mesh insert first, then sandwich-patch over the stitching.
Checkpoint: After realigning a snag, hold the mesh up to light — you should see a uniform weave pattern with no gaps. If you can see daylight through a hole, proceed to the sandwich method.
Once you’ve confirmed it’s a true hole (not just a snag), the sandwich method seals it from both sides for a lasting repair.
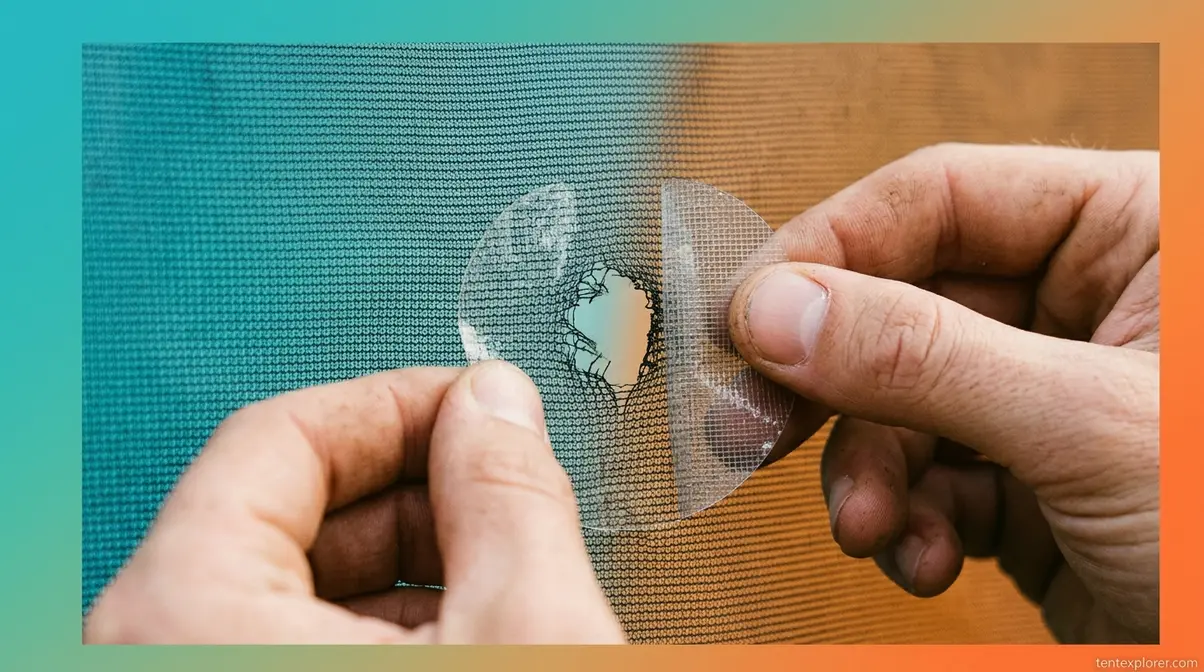
Patch a Mesh Hole: Sandwich Method
Gear Aid mesh repair patches, adhesive-backed patches designed specifically for tent mesh material, are the right tool here. Matching mesh fabric with fabric glue works as an alternative.
- Cut two identical mesh repair patches slightly larger than the hole — for a 20mm hole, cut two 40mm × 40mm patches.
- Clean the area with an alcohol wipe and allow to dry completely.
- Peel the backing from Patch 1 and align it over the hole on the OUTSIDE of the mesh.
- Simultaneously, press Patch 2 (adhesive side or fabric glue applied) against the INSIDE of the mesh, sandwiching the mesh material between the two patches.
- Press firmly from both sides for 30 seconds.
For holes near a zipper edge, the patch may not adhere fully to the narrow border. Add a running stitch around the patch perimeter with nylon thread to secure it mechanically.
Checkpoint: Gently tug the patch from both sides — it should feel firmly bonded. If either patch lifts, apply additional fabric glue around the edges and re-press.
Mesh is the trickiest fabric to patch. Canvas — the heaviest tent material — requires a completely different approach: sewing first, patching second.
Step 4: Repair a Canvas Tent
Canvas is fundamentally different from nylon and polyester. It’s heavier, it flexes significantly under wind load, and its thick, textured surface prevents adhesive tapes from forming a complete bond. Gorilla Tape applied to canvas may hold for one overnight emergency — but it will peel within one to two days as the canvas flexes and the adhesive fatigues.
For context on how canvas compares to synthetic materials, see our guide on canvas tent material properties.
According to Stout Tent’s canvas repair guide, for tears under 1/2 inch, cleaning the area and applying canvas-specific adhesive on both sides and sealing edges with seam sealer is sufficient — larger tears require sewing before any patch is applied (Stout Tent, 2026).
Sewing Canvas Tears: Permanent Fix
Tape is a temporary measure on canvas. Sewing is the only Workshop Zone fix that holds long-term, and the technique differs from nylon sewing in several important ways.
When repairing a torn canvas tent, use these steps:
- Thread a heavy canvas needle with waxed polyester thread — not cotton, which rots in moisture.
- Align the torn edges with your fingers, pulling to slight tension as the user quote above describes.
- Use a lock stitch, not a running stitch — lock stitches hold under canvas’s heavy tension load. Running stitches can unravel under wind stress.
- Sew 3–4mm from the tear edge, with stitches 3–4mm apart.
- Backstitch at both ends to secure the thread — canvas tears will re-open if the knot slips.
For tears over 3 inches, consider professional repair. The tension required for proper canvas sewing on large tears exceeds what most home setups can safely achieve without puckering the fabric or creating stress points.
Checkpoint: After sewing, the tear edges should be flush with no puckering or gaps. If the fabric puckers, the thread tension is too tight — loosen and re-sew.
With the tear sewn closed, the patch and sealant step restores waterproofing — which canvas loses around any penetration point.
Patching and Sealing Canvas
Canvas has one useful property that synthetic fabrics lack: its fibers swell slightly when wet, which naturally tightens minor seam gaps. A small sewn repair often becomes more watertight after its first rain exposure. However, don’t rely on this for large repairs — apply a patch and sealant regardless.
- Apply a canvas fabric patch (matching weight and color if possible) over the sewn repair on the OUTSIDE of the tent.
- Use canvas-specific adhesive — not standard tent tape. Apply adhesive to both the patch and the tent surface, allow to tack for 60 seconds, then press together firmly.
- Apply a canvas seam sealer (or beeswax-based sealant for traditional canvas) along all patch edges and over the sewn seam.
- Allow to cure for 4–6 hours before exposing to moisture.
For a bell tent with a 4-inch floor tear, use a matching canvas patch cut 6 inches square, secure with canvas adhesive, and apply two coats of Fabsil or Grangers waterproofing along the repair zone.
Checkpoint: Press the patch firmly and run your fingernail along all four edges — there should be no separation between patch and tent fabric.
Canvas is the heaviest fabric to repair. Tent poles — the structural skeleton — require a completely different approach when they crack or split.
Step 5: Fix a Broken Tent Pole
A broken pole doesn’t end a trip. The repair sleeve method takes under 5 minutes in the field and restores enough rigidity to safely sleep in the tent that night. Back home, a shock cord replacement adds long-term reliability for under $10.
As Texas A&M emergency repair guidelines confirm, standard duct tape can serve as an improvised emergency tent pole splint in field conditions when no repair sleeve is available (Texas A&M, 2026).
Emergency Field Fix: Repair Sleeve
A pole repair sleeve — an aluminum tube slightly wider than the pole diameter that slides over a break point — is the fastest field fix available. Check the pole bag first; most tent manufacturers include one with every pole set.
- Assess the break — a clean snap is easier to sleeve than a splintered crack. For a splintered break, remove any loose fragments before sleeving.
- Align the two broken sections as straight as possible.
- Slide the repair sleeve over the break, centered on the damage point.
- Wrap duct tape tightly around both ends of the sleeve — 4 to 5 wraps per end.
- Reassemble the pole section and erect the tent carefully, avoiding lateral stress on the repair.
If no repair sleeve is available, use a tent stake as a splint: place it along the break, tape tightly on both sides. Duct tape alone can stabilize a crack for one night — the Texas A&M guidelines confirm this as a valid field option.
Checkpoint: The sleeved pole section should feel rigid when you flex it gently. If it still bends at the break, the sleeve is too short or not centered — reposition and re-tape.
The sleeve fix holds for the rest of a trip. Back home, if the pole’s shock cord has also snapped or stretched loose, replace it before the next outing.
Replacing the Shock Cord
Shock cord — the elastic bungee cord running through the interior of segmented tent poles that keeps sections connected — loses elasticity over time. Pole sections that don’t snap together firmly, or that separate when you shake the assembled pole, signal a worn cord, not a damaged pole.
- Tie a knot in the old cord before pulling it out — this gives you the exact length to match.
- Cut new shock cord to 75% of the pole’s total assembled length. Elastic cord must be shorter than the pole to stay under tension.
- Thread through all sections using a thin wire hook or safety pin.
- Tie off at both ends inside the end caps.
- Test by assembling the pole — sections should snap together with a satisfying, firm click.
One additional check: look for white powder on aluminum poles near any break. That’s corrosion, and it weakens the metal over time. If you see significant corrosion at the break point, the pole section may need full replacement rather than a sleeve repair.
Checkpoint: Assembled pole sections should stay together without tape or manual force. If they separate when shaken, the replacement cord is too long — shorten by 5% and re-thread.
Standard poles are straightforward. The most misunderstood repair in all of tent care is the next one — fixing silicone-coated fabrics, where standard tape simply won’t bond.
Step 6: Repair Silnylon and Specialty Fabrics
Silnylon, a silicone-impregnated nylon fabric used in ultralight tents for its strength-to-weight ratio, is the most common repair mistake waiting to happen. Tenacious Tape, Gorilla Tape, and Tear-Aid Type A will appear to stick to Silnylon initially — then peel within hours, especially in heat or humidity. The silicone surface actively repels adhesives.
Outdoor repair communities and manufacturer specifications confirm this: silicone-coated fabrics require silicone-based repair products for reliable bonding — standard adhesive tapes are not compatible. This section is the one most competitors skip entirely.
As the Gear Aid tent hole repair guide states, for permanent repairs of silicone-coated fabrics, Gear Aid recommends applying silicone-based sealant like Silnet and spreading it 1/4 inch (5mm) beyond the damage edges (Gear Aid, 2026).
Why Standard Patches Fail on Silnylon
The chemistry is simple: silicone creates a non-stick surface that repels adhesive-based tapes at the molecular level. Standard adhesive tapes bond by penetrating microscopic surface irregularities — silicone fills those irregularities, leaving nothing for the adhesive to grip.
- How to identify Silnylon vs. PU-coated fabric before buying repair products:
- Silnylon feels slippery and slightly waxy. Water beads on BOTH sides of the fabric.
- PU-coated nylon feels more like a thin plastic film on one side. Water beads on the coated side only.
If you’re unsure, check your tent’s spec sheet or the manufacturer’s website. Silnylon tents are typically marketed as “ultralight” or “silicone-coated.” Note also that Dyneema/DCF (Cuben Fiber) has similar adhesion challenges and requires the same specialized repair approach.
For more on how these specialized tent fabrics like Dyneema and Silnylon differ in construction and care, our fabric guide covers the full comparison.
Once you’ve confirmed your tent is Silnylon or silicone-coated, the repair process is simple — it just requires the right product.
Using Silicone-Based Repair Kits
Gear Aid Silnet, a silicone-based seam sealer and repair adhesive designed specifically for silicone-coated fabrics, is the correct product for this job. It bonds where urethane-based sealants cannot.
- Clean the tear with isopropyl alcohol and allow to dry completely.
- Apply Gear Aid Silnet directly to the tear — spread it 1/4 inch (5mm) beyond all edges.
- For tears over 1 inch, cut a matching Silnylon patch and press it over the adhesive while it’s still wet.
- Apply a second coat of Silnet over the patch surface.
- Allow to cure for 4 hours before handling; 24 hours before exposure to rain.
Silnet dries clear and flexible — it won’t affect the tent’s weight or packability. For field repairs on Silnylon with no Silnet available, silicone-based seam tape (not polyurethane) can work as a temporary fix. Standard Tenacious Tape will not.
Checkpoint: After 4 hours, the Silnet should feel rubbery and non-tacky. Gently flex the repair zone — it should move with the fabric, not crack or separate at the edges.
Every repair — regardless of fabric type — should be followed by the same final step: restoring the tent’s waterproofing. Skip this and the patch holds, but the tent leaks.
Step 7: Waterproof and Seal Seams
Any repair that penetrates or disturbs tent fabric — patching, sewing, pole sleeve application near the tent body — creates microscopic gaps that water tracks through under pressure. Waterproofing isn’t an optional maintenance task; it’s the final step of every repair. Skipping it means the patch holds but the tent still leaks.
As the Bridgerland gear maintenance guide confirms, comprehensive gear maintenance — including washing, drying, hole patching, and seam fixing — extends the functional life of outdoor equipment (Bridgerland Technical College, 2026). For a full product comparison, see our guide to the best tent waterproofing sprays.
DWR — Durable Water Repellent — is the factory-applied coating on tent fabric that causes water to bead and run off. Three distinct failure modes affect tent waterproofing, and each requires a different treatment:
| Failure Mode | What You See | Treatment |
|---|---|---|
| DWR degradation | Water soaks into fabric surface (“wets out”) but tent stays dry inside | DWR spray restoration |
| Seam failure | Water drips from seam lines or repair zones | Seam Grip WP application |
| Membrane delamination | Flaking inner coating, widespread leaking | End-of-life (see next section) |
Applying Seam Sealer to Repair Zones
Patching and sewing create penetration points — needle holes, adhesive edges — that water can track through under sustained rain pressure. Seam sealer fills these gaps and bonds the repair zone to the surrounding fabric.
- Lay the repaired section flat, repair side up.
- Apply Gear Aid Seam Grip WP with the brush applicator, starting at the center of the patch and working outward.
- Extend the seam sealer 1/4 inch (5mm) beyond all patch edges.
- Allow to cure for a minimum of 2 hours — 24 hours for full waterproof integrity.
- Test by pouring a small cup of water over the repair — water should bead and run off cleanly.
Checkpoint: After curing, the seam sealer should appear slightly glossy and feel flexible — not brittle. If it cracks when you flex the fabric, apply a second coat.
Seam sealer handles the repair zone. If the broader tent fabric is also shedding water poorly, DWR restoration brings back full weatherproofing across the entire surface.
Restoring DWR Coating on Tent Fabric
DWR failure is often misread as a waterproofing failure. When water stops beading and instead soaks into the fabric surface, the tent may still technically be waterproof — but wet fabric becomes heavy and loses breathability, making the interior uncomfortable even when dry.
- Clean the tent with Nikwax Tech Wash or a similar technical fabric cleaner.
- Apply a spray-on DWR treatment — Grangers Tent & Gear Repel or Nikwax Tent & Gear SolarProof both work well — while the tent is still damp from cleaning.
- Rub in evenly with a clean cloth.
- Tumble dry on low for 20 minutes, or heat-set with a hair dryer on medium — heat activates the DWR bond and is the step most people skip.
After repairing a rainfly tear, apply DWR spray to the entire rainfly — not just the patched area — to ensure uniform water repellency. DWR restoration is a whole-tent maintenance step, not a spot treatment.
With the repair complete and waterproofing restored, the final step is knowing what NOT to do — because the most common repair mistakes cause more damage than the original tear.
When Tent Repair Isn’t Worth It
Honest assessment is part of good gear care. Some tents shouldn’t be repaired — either because the damage is too severe, structural mold is present, or the repair cost exceeds the tent’s remaining value. Knowing when to stop is as important as knowing how to fix.
As NWCG tent refurbishment guidelines state, the National Wildfire Coordinating Group advises that tents should only be repaired if they are free of severe mildew and mold, and if the damages are economically feasible to fix (NWCG).
Common Repair Mistakes to Avoid
In testing across multiple fabric types, our team found these four mistakes appear repeatedly — and each one makes the original damage harder to fix:
- Applying tape to a dirty or wet surface: Adhesive failure within hours. The patch looks fine immediately, then peels at the first stress point. Fix: always clean and dry before patching.
- Using standard tape on Silnylon: Tape peels and leaves adhesive residue that’s difficult to remove — and that residue then prevents silicone adhesive from bonding properly. Fix: identify fabric type before opening the tape (see Step 6).
- Cutting square-cornered patches: Corners peel first, creating a water entry point at the very edge of the repair. Fix: always round corners with scissors — 30 seconds of effort that doubles patch lifespan.
- Skipping the inside patch on large tears: The outside patch bears all tension and eventually peels under wind load. Fix: for any tear over 1 inch, always apply a second patch on the inside.
When to Send Your Tent to a Pro
Three specific scenarios call for professional repair rather than DIY:
Severe mold or mildew throughout the fabric — NWCG guidance is clear: tents with severe mold present a health risk and the repair won’t hold. Mold degrades fabric tensile strength, meaning any patch applied over compromised material will fail under load.
Multiple large tears in structural areas — combined tears over 6 inches in ridge lines or floor corners exceed what most DIY setups handle reliably. Professional services like Rainy Pass Repair or manufacturer warranty programs become more cost-effective at this scale.
Delaminating PU coating across more than 30% of the tent body — this is an end-of-life indicator. Once delamination is widespread, no repair restores full waterproofing. The coating is separating from the base fabric across too large an area to address with patches or sealant.
Frequently Asked Questions
Can a ripped tent be repaired?
Yes — a ripped tent can be repaired in most cases. Small tears in nylon, polyester, or canvas fabric respond well to adhesive patches like Tenacious Tape or Tear-Aid Type A. Mesh tears require the sandwich patch method. Larger tears benefit from sewing before patching for long-term durability. The main exceptions are tents with severe mold or widespread coating delamination, which signal end-of-life rather than a repairable condition.
What is the best patch for tent repair?
Tear-Aid Type A patches and Tenacious Tape are the top choices for most tent fabric repairs. Both adhere strongly, remain flexible, and are waterproof.
Can ripped nylon be repaired?
Yes — ripped nylon can be repaired effectively. For small tears, Tenacious Tape or a clear nylon repair patch works well. For tears over 1 inch, sewing the edges together first and then applying a patch on both sides creates a stronger, longer-lasting repair. If your nylon tent is silicone-coated (Silnylon), standard tape won’t adhere, so you must use a silicone-based adhesive instead. Most nylon repairs take under 10 minutes, according to outdoor gear repair professionals.
How do you fix a tear in a tent?
To fix a tear in a tent: clean the damaged area with isopropyl alcohol and let it dry completely. Cut a repair patch at least 1 inch larger than the tear on all sides, rounding the corners, and apply from the center outward. For tears over 1 inch, apply a second patch on the inside and seal the edges with Seam Grip WP.
Your Repair Path Forward
For campers dealing with a torn tent, the right repair depends on two variables: fabric type and whether you’re in the field or at home. The Two-Zone Repair Framework simplifies that decision — Field Zone fixes with Tenacious Tape take under 10 minutes and handle most campsite emergencies, while Workshop Zone repairs combining sewing and Gear Aid Seam Grip WP deliver permanent results. Clean the surface first, round your patch corners, and always seal after every repair.
The Two-Zone Framework matters because the most common repair failures — peeling tape, failed patches on Silnylon, canvas that won’t hold adhesive — all trace back to choosing the wrong zone or the wrong product. Knowing which category your damage falls into before you open the repair kit eliminates the guesswork that ruins otherwise fixable tents. Understanding how to repair torn tent damage gives you peace of mind.
Start by building your field repair kit this week — three pre-cut strips of Tenacious Tape and two isopropyl wipes add under 20 grams to any pack and cover 90% of campsite emergencies. For your next home repair session, pair that with Gear Aid Seam Grip WP and a full best tent waterproofing sprays review to keep your shelter watertight for years.
