 Dave King
You’ve just pulled into the campsite. The sky looked threatening on the drive up — and now it’s opened up completely. Your gear is on the ground, rain is hammering down, and your inner tent is one bad decision away from becoming a wet sponge. That “nightmare if I’m soaked” feeling? Every camper has been there.
Here’s what most people don’t realize: a soaked sleeping bag inside a flooded tent isn’t just uncomfortable — it can end the trip entirely and cause real damage to expensive gear. Most beginners freeze in that moment and make the whole process worse by rushing without a plan.
By the end of this guide, you’ll know exactly how to pitch a tent in the rain, keep the inside bone dry, and protect your gear — even if you’ve never done it before. We’ll cover campsite selection, a step-by-step pitch sequence, tarp placement, and the post-trip drying protocol that most guides skip entirely.
You can pitch tent in the rain and keep the inside completely dry — the key is working quickly and in the right order.
- Fly first: Always attach the rainfly before the inner tent gets exposed to rain
- Tarp sizing matters: Your ground cloth must be smaller than the tent floor — never larger
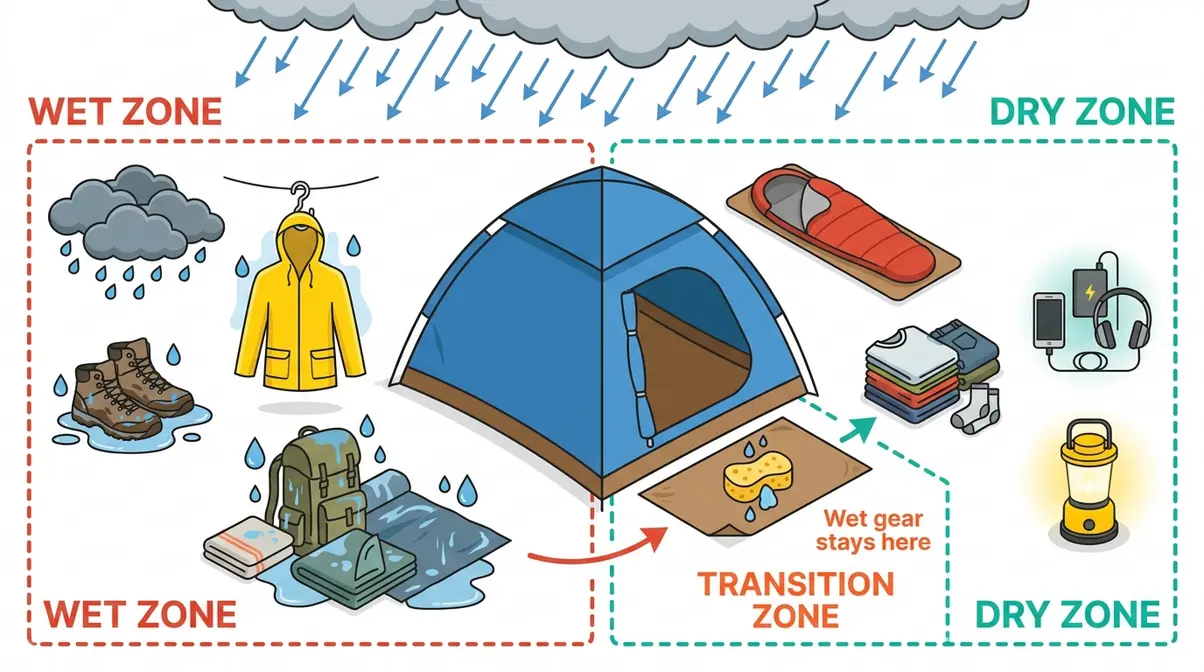
- The Dry Zone Method: Mentally split your campsite into “wet” and “dry” zones from the start — this one mental shift changes everything
- Dry it at home: A tent packed wet can develop mold within 24–48 hours — air it out immediately when you get home
Recommended Products
| # | Image | Product | Best For | Buy |
|---|---|---|---|---|
| 1 |  |
Instant Pop Up Camping Tent | Fast rain-ready setup | Buy on Amazon |
| 2 |  |
Kakadu Swift Pitch Bivy Tent | Solo ultralight camping | Buy on Amazon |
| 3 |  |
Wakeman 2-Person Pop Up Tent | Budget beginner campers | Buy on Amazon |
| 4 |  |
Wakeman Outdoor Tent (Green) | Backpacking on a budget | Buy on Amazon |
| 5 |  |
Coleman Weatherproof Rainfly | Upgrading an existing tent | Buy on Amazon |
| 6 | |
Coleman Rainfly Accessory | 4-person tent protection | Buy on Amazon |
Can You Pitch a Tent in the Rain?

Yes, you can absolutely pitch a tent in the rain — and thousands of campers do it every single weekend. With the right site, the right sequence, and a simple mental framework, your tent interior can stay completely dry even in a heavy downpour. The anxiety you feel is normal. Having a plan is what turns that anxiety into action.
Camping in the rain is a skill, not a gamble — with the right site and the right sequence, your tent interior can stay completely dry. (tentexplorer.com, 2026)
The mental framework we call The Dry Zone Method starts before you even unpack your tent. It begins the moment you choose where to stand.
Choose Your Campsite Before Rain Hits
Where you pitch matters as much as how you pitch. In wet conditions, a poor campsite can flood within minutes — even in moderate rain. Experienced campers consistently report that site selection is the single decision that separates a dry night from a miserable one.
Look for elevated, flat ground. Avoid depressions, hollows, and any area with visible water channels or dark soil staining — these are signs that water collects there. Low areas can fill with runoff fast. Even a gentle slope that drains away from your tent is far better than a flat bowl that collects water beneath you.
Apply the Leave No Trace 200-foot rule. According to Leave No Trace 200-foot rule guidance (Leave No Trace, 2026), you should camp at least 200 feet — roughly 70 to 80 adult steps — away from any lake, stream, or river. This protects riparian ecosystems, but it also keeps you well clear of flash flood zones, which can rise alarmingly quickly during heavy rain. That 200-foot buffer is one of the most practical safety rules in outdoor camping.
Orient your tent door away from the prevailing wind. Rain follows wind. A door facing into the wind will funnel water inside every single time you enter or exit. Face the opening downwind, and you’ll also reduce the wind load on your tent structure.
Avoid pitching directly under trees. Branches drip long after rain stops — sometimes for hours. More critically, dead branches and lightning-struck trees pose real hazards in storms. Choose open ground or the sheltered edge of a tree line rather than directly beneath the canopy.
“The main trick to setting up a tent in the rain is to have a ground tarp, and to get the ground tarp placed, the tent on top of it, and the tent…”
This quote from the camping community captures exactly the right instinct: sequence and preparation beat speed every time.
What to Have Ready Before You Arrive
Confidence in a rainstorm comes from preparation you did before the clouds rolled in. Our team evaluated the most common wet-weather setup failures and found that nearly all of them trace back to one cause: the camper hadn’t practiced or pre-packed.
Run through this checklist the morning of your trip:
- Check the forecast — know whether you’re facing a brief shower or a sustained downpour; this changes your urgency
- Practice your pitch at home — set up your tent once in the backyard in dry conditions before you ever need to do it in the rain
- Pack your ground tarp and guylines in an outer pocket — you need them first, so they should be the first thing you reach
- Bring a small towel or kitchen sponge — invaluable for wiping the tent door threshold and mopping up any water that sneaks in
- Use a dry bag for your sleeping bag and electronics — even inside a tent, a sustained downpour can find weak points
For essential camping safety and storm preparedness, reviewing basic protocols before a wet-weather trip takes less than ten minutes and can prevent hours of misery.
Now that you’ve found the right spot and packed smart, here’s the exact step-by-step process to pitch your tent without getting the inside wet.
How to Pitch a Tent in the Rain: Step-by-Step
When you need to pitch tent in the rain, setting up doesn’t have to be chaotic. The key is a fixed sequence — do these five steps in order, every time, and the inside of your tent stays dry. This is the practical core of The Dry Zone Method: the wet world stays outside, and the dry world builds from the ground up.
Estimated Time: 10-15 minutes
- Tools & Materials:
- Tent (inner body, rainfly, poles, stakes)
- Ground tarp or custom footprint
- Guylines
- Small towel or kitchen sponge
- Small transition mat or extra tarp
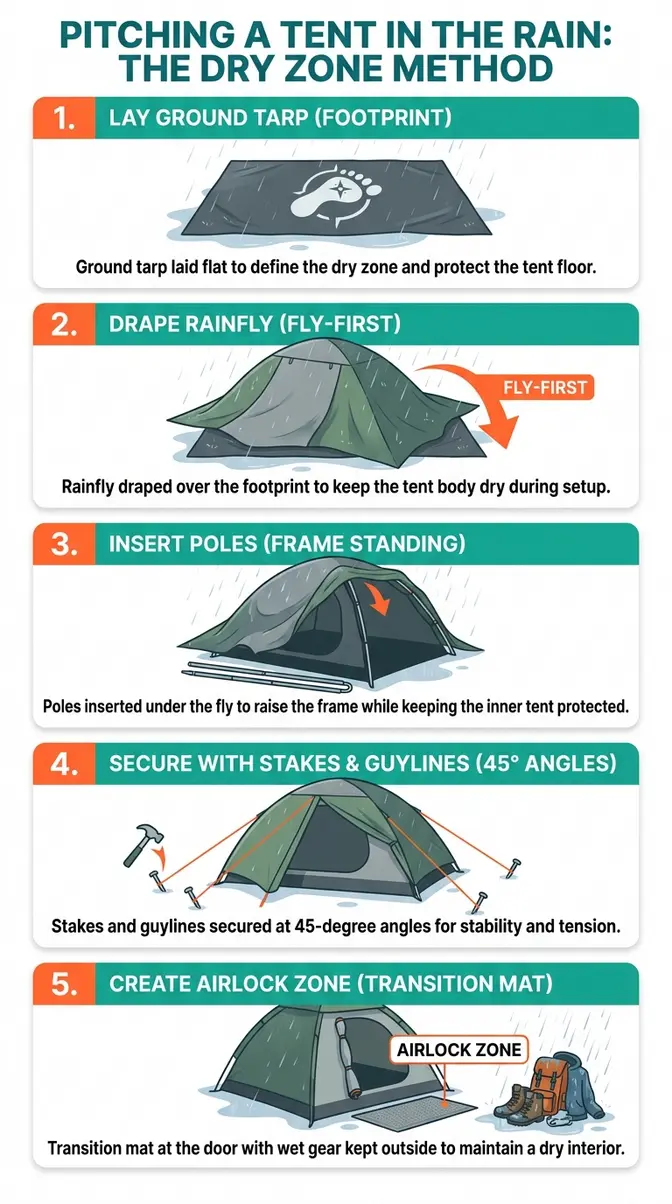
Step 1: Lay Your Ground Tarp First
Your first job is to create a dry island on the wet ground. Unfold your footprint (a custom-fit ground cloth designed to match your tent’s floor dimensions) or ground tarp and lay it flat on your chosen spot. This single layer separates your tent floor from saturated earth and standing water.
Why this matters: Ground moisture doesn’t just seep up from puddles — it wicks through tent floors under sustained pressure. A footprint blocks that transfer entirely.
Smooth out any folds or creases so there are no air pockets underneath. Weight the corners with your bag while you work — wind can shift a loose tarp in seconds. This is your dry foundation, and everything else builds on top of it.
Step 2: Build Frame Under Rainfly
This step is where most beginners make their biggest mistake: they assemble the inner tent body first and then try to throw the rainfly over a fully exposed structure. By then, the inner tent is already wet.
Instead, if your tent is a double-skinned design (meaning it has a separate inner tent and a rainfly — the outer waterproof shell), deploy the rainfly first. Lay it flat over your footprint, then crawl underneath it to connect your poles. The fly acts as your overhead cover while you assemble the frame.
Why this matters: The inner tent’s mesh panels and fabric absorb water almost instantly. Keeping them shielded under the fly during assembly is the single most effective way to keep the interior dry from the very start.
For pop-up style tents like the Kakadu Swift Pitch Bivy or the Instant Pop Up Camping Tent, this step is simplified considerably — the frame deploys in seconds, reducing your exposure window dramatically.
Step 3: Tension Rainfly Immediately
Once your poles are in and the frame is standing, clip or sleeve the rainfly into position without delay. Pull it taut on all sides — a loose rainfly flaps in wind, allows rain to blow underneath, and dramatically reduces its waterproofing effectiveness. To ensure your tent is waterproof, check that the seams are fully sealed before your trip.
Why this matters: Waterproof coatings on tent fabric (typically polyurethane or silicone-coated nylon) work best under tension. A saggy fly allows water to pool and eventually seep through — even on a “waterproof” tent. The REI tent setup guide specifically emphasizes fly tension as one of the most overlooked steps in wet-weather pitching.
Check that the fly extends to within a few inches of the ground on all sides, with no gaps where driven rain could enter horizontally.
Step 4: Stake and Tension Guylines
Guylines (tension ropes staked away from the tent body at an angle) are not optional in rain — they are essential. They prevent the tent walls from billowing inward in wind, which forces the inner tent to touch the wet fly and transfer moisture straight through.
Stake your guylines at roughly a 45-degree angle from the tent body. In soft, wet ground, use longer stakes and push them in at a steeper angle for better hold. In hard ground, cross-stake two pegs in a V-shape for extra resistance. According to advnture.com’s wet-weather pitch guide, proper stake angle in wet conditions can make the difference between a tent that holds through a storm and one that partially collapses under wind load.
Why this matters: A taut, well-staked tent sheds water efficiently. A sagging, under-tensioned tent collects it.
Step 5: Set Up Dry Transition Area
This final step is what separates a good wet-weather setup from a great one — and it’s the step that every other guide misses entirely.
Your tent door is the boundary between the wet world and the dry world. Without a transition zone, every time you enter or exit, you drag water in on your boots, rain jacket, and pack. Within a few entries, your sleeping area is damp.
Here’s how to create your transition zone:
- Place a small tarp, pack cover, or doormat directly outside the tent door — this is your “airlock,” where you shed wet gear before entering
- Leave wet rain gear (jacket, trousers, boots) outside the door or in the tent porch — never bring them into the sleeping area
- Keep a small towel just inside the door — wipe your hands and face before moving deeper into the tent
- Store wet items in a stuff sack near the door — not scattered through the interior
This is The Dry Zone Method in its purest form: the wet zone ends at the tent door, and the dry zone begins the moment you cross the threshold. Practice this discipline on every entry and exit, and your sleeping bag, clothing, and electronics stay dry regardless of how long the rain continues.
Should I Put a Tarp Under My Tent in Rain?
Yes — placing a ground cloth under your tent is one of the most effective ways to prevent floor leaks in wet conditions. Ground moisture, standing water, and abrasive surfaces all threaten your tent floor from below. A tarp or footprint blocks all three threats simultaneously.
Footprint vs. Tarp Differences
A footprint is a custom-fit ground cloth made to match your specific tent model’s floor dimensions exactly. A tarp is a generic waterproof sheet that you cut or fold to size. To choose the right ground cover for your tent, consider your budget and camping frequency.
Both work. However, they behave differently:
| Feature | Footprint | Tarp |
|---|---|---|
| Fit | Exact match to tent floor | Must be trimmed or folded |
| Weight | Lighter (custom material) | Heavier (generic poly) |
| Cost | Higher ($25–$60) | Lower ($8–$20) |
| Risk of water pooling | Low (sized correctly by design) | Higher if oversized |
| Best for | Frequent campers | Budget beginners |
For a budget beginner using a tent like the Wakeman 2-Person Pop Up Tent, a trimmed tarp works perfectly well. For regular campers, a purpose-built footprint is worth the investment. According to thebigoutside.com’s rain camping guide, a footprint also significantly extends the life of your tent floor by protecting it from rocks and roots.
Sizing Rule to Prevent Pooling
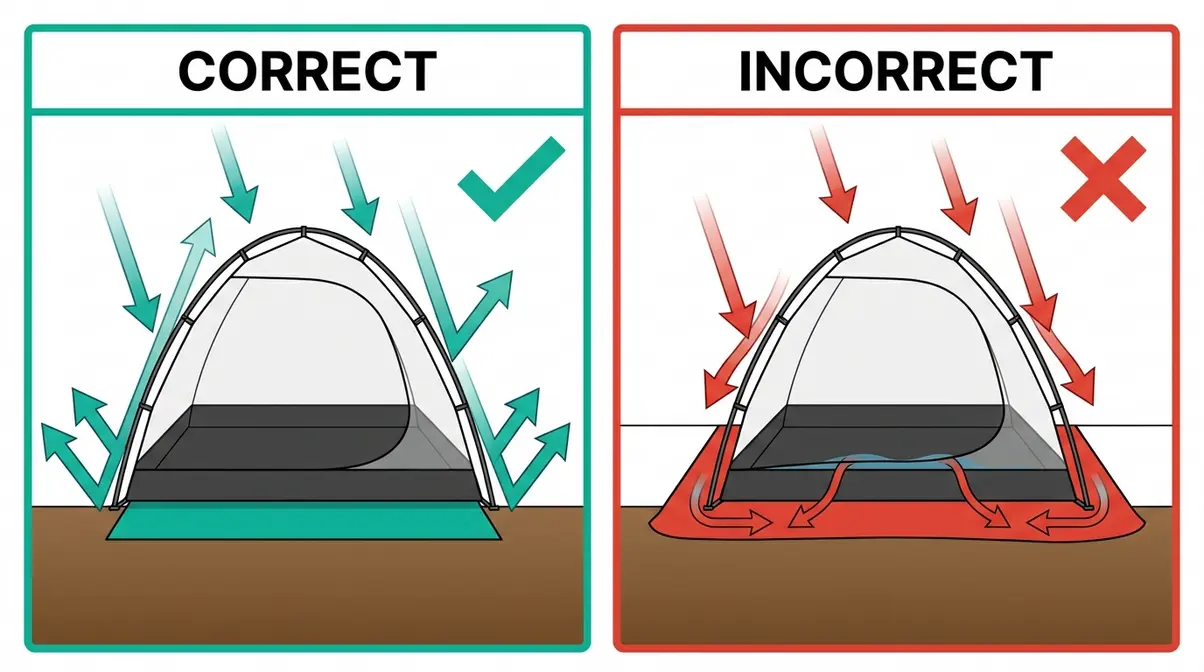
This is the most critical — and most frequently ignored — rule about ground cloths: your tarp or footprint must be smaller than your tent floor, never larger.
If your ground cloth extends beyond the edges of your tent floor, it acts like a funnel. Rainwater runs down the tent walls, hits the protruding tarp edge, and channels directly underneath your tent floor. You wake up in a puddle that your waterproof floor was never designed to stop — because the water is under it.
The fix is simple: fold the edges of any tarp underneath itself by two to three inches on all sides before you lay the tent on top. The ground cloth should be completely hidden beneath the tent footprint when viewed from above.
How to Dry Your Tent After Rain
What you do in the 24 to 48 hours after you pitch tent in the rain determines whether your tent lasts five years or one. This section covers a critical gap that nearly every other guide ignores completely.
Packing Up a Wet Tent Safely
When morning comes and it’s still raining, you have no choice but to pack a wet tent. That’s fine — but how you pack it matters enormously.
First, shake off as much surface water as possible before folding. Wipe down the poles and stakes with a dry cloth if you have one. Then separate the wet rainfly from the inner tent body before stuffing them together — this prevents the dry inner from absorbing moisture from the soaked fly during transport.
Pack the wet tent loosely in an outer pocket of your bag or a separate stuff sack. Never compress it tightly — compression traps moisture and accelerates mold growth. Keep it away from your sleeping bag, clothing, and electronics.
According to Washington State Parks’ camping guide, separating wet outer layers from dry gear during packing is one of the most practical habits experienced campers develop early. Your priority is simply getting the wet tent home in a way that doesn’t contaminate everything else.
If the rain stops even briefly, take five minutes to shake the tent out and let it breathe before packing. Every bit of moisture you shed at the campsite is moisture that won’t grow mold in your garage.
What happens if I put my tent away wet?
Storing a wet tent triggers mold growth and a process called hydrolysis — the chemical breakdown of the tent’s polyurethane waterproof coating. Mold can begin forming within 24 to 48 hours in warm conditions, leaving permanent staining and a musty smell that’s nearly impossible to fully remove. Hydrolysis degrades the waterproof coating over time, causing the tent to leak even after it appears dry. REI’s tent care guidance (REI, 2026) is unambiguous: always air-dry your tent completely before storage, and “there’s no such thing as too much drying time.”
The 24-48 Hour Drying Protocol
This is the step that separates campers who enjoy their tents for a decade from those who throw them out after three seasons. As soon as you get home from a rainy trip, your tent needs to dry fully before it goes back in the bag.
Why the urgency? Storing a tent wet triggers two destructive processes. The first is mold and mildew, which can begin forming within 24 to 48 hours in warm, damp conditions and leaves permanent staining and odor. The second is hydrolysis — a chemical breakdown of the tent’s polyurethane waterproof coating that occurs when moisture sits against the fabric for extended periods.
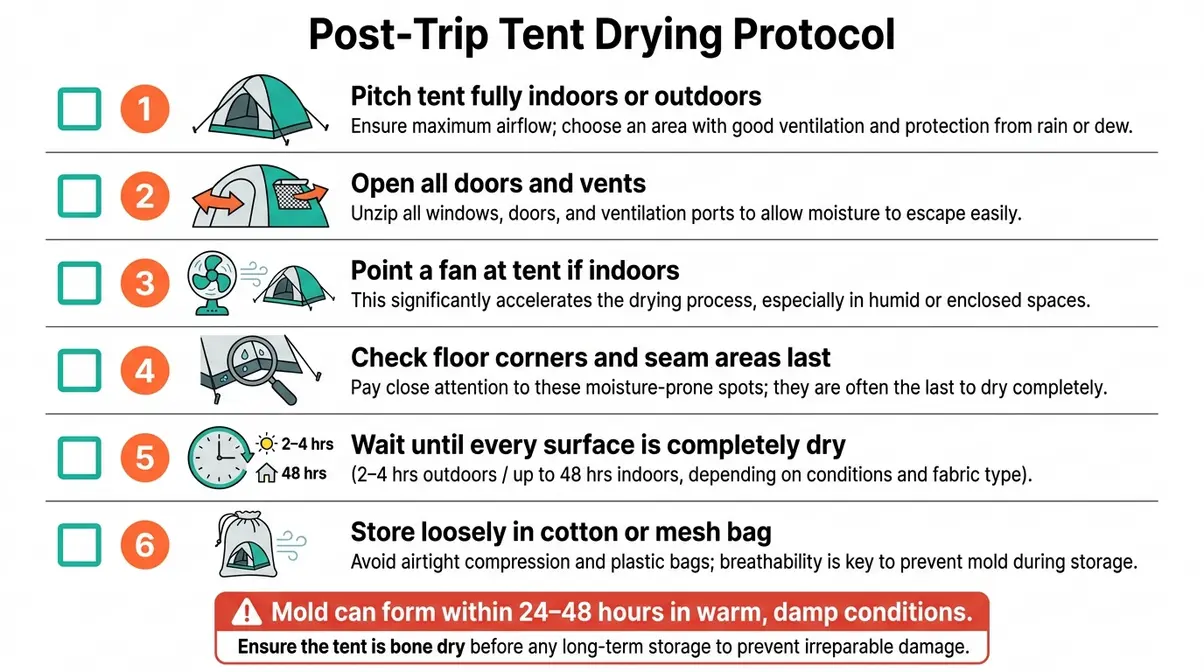
Follow this protocol when you get home:
- Pitch the tent fully in your backyard, garage, or a large indoor room — fully pitched allows maximum airflow to all surfaces
- Open all doors and vents to circulate air through the interior
- Point a fan at the tent if drying indoors — this dramatically speeds the process
- Check floor corners and seam areas last — these hold moisture longest and are the most common source of mold
- Wait until every surface is unquestionably dry — for a synthetic nylon tent in warm conditions, this typically takes 2 to 4 hours outdoors; in cool or indoor conditions, plan for up to 48 hours
- Store loosely in a cotton or mesh bag, not compressed in the original stuff sack
Canvas tents require even more patience: they can take 24 hours or longer to dry fully, even in warm weather (Boutique Camping, 2026). Never rush the process.
Safety Warnings Before You Camp in the Rain
Rain camping is manageable and enjoyable for most conditions. However, some weather situations require you to stop, reassess, and sometimes make the harder decision to stay home. Understanding the difference is part of developing real outdoor judgment.
Lightning and Flash Flood Risks
Lightning is the most serious acute risk in any outdoor storm. The American Camping Association and outdoor safety authorities consistently identify open ground, tall isolated trees, and ridgelines as the highest-risk locations during electrical storms. If you hear thunder — even distant thunder — lightning is within striking range.
- During a lightning storm:
- Move away from tall isolated trees and open ridgelines immediately
- Avoid bodies of water and metal structures
- If no shelter is available, crouch low in a depression (not a hollow that could flood) with feet together
- Stay well clear of your tent’s metal poles during an active lightning strike — they conduct electricity
Flash floods are a secondary but serious risk in heavy rain, particularly in canyon country, dry creek beds, and any low-lying area near a drainage. The US Forest Service camping safety guidelines advise always checking local terrain and weather patterns before pitching in any area with visible drainage channels. Water can rise with alarming speed — sometimes with no rain falling at your immediate location.
This is precisely why the 200-foot rule from Leave No Trace matters so much in wet weather: distance from water sources is also distance from flash flood zones.
When Rain Camping Is a Bad Idea
Honest advice from experienced campers includes knowing when not to go. Rain camping tests your fortitude — and that’s a genuine skill worth developing. But some conditions move beyond manageable inconvenience into genuine danger.
Consider postponing or seeking solid shelter if:
- An active thunderstorm is forecast to persist for your entire trip — not a passing shower, but sustained electrical activity over 6+ hours
- Flash flood watches or warnings are active for your region — these are issued for a reason
- You are camping with young children or elderly adults who cannot safely manage wet-weather exposure
- Your gear is not rated for the conditions — a three-season tent with a broken zipper in a sustained downpour is not a manageable situation
There is no shame in retreating to a solid roof when the conditions demand it. The camping community’s consensus is clear: the best rain camping skill is good judgment about when rain camping isn’t the right call.
Frequently Asked Questions
Can you pitch a tent in the rain?
Yes, you can absolutely pitch a tent in the rain — with the right sequence and preparation, the interior can stay completely dry. The key is deploying the rainfly (the waterproof outer layer) before the inner tent body is exposed to rainfall. Experienced campers consistently report that the “fly-first” method is the single most effective technique for keeping the interior dry. Practice the setup at home once in dry conditions, and the rainy version becomes much less stressful. As long as you’re not in a lightning storm or flash flood zone, rain alone is not a reason to skip the trip.
How to pitch a tent and keep it dry?
The answer is the fly-first method combined with The Dry Zone Method. Deploy the rainfly before assembling the inner tent, so the fly acts as your overhead cover during the entire setup process. For double-skinned tents (those with a separate inner body and outer fly), lay the fly flat on your footprint and crawl underneath it to connect poles. Once the fly is tensioned, clip in the inner tent from below. Additionally, create a transition zone at the tent door — a designated area where wet gear stays outside — to prevent water being tracked in during entry and exit.
How long to dry a tent after rain?
Drying time depends on fabric and conditions: synthetic tents take 2 to 4 hours on a warm, breezy day; canvas tents can take 24 to 48 hours. For indoor drying, plan on up to two full days regardless of fabric type — a fan pointed at the tent speeds the process significantly (MSR Field Service, 2026). The critical rule is to never pack a tent away until every surface, including floor corners and seam areas, is completely dry. When in doubt, leave it out longer. Compressed damp fabric is the fastest route to mold and coating breakdown.
What is the 200-foot rule for camping?
The 200-foot rule is a Leave No Trace guideline that requires camping at least 200 feet — roughly 70 to 80 adult steps — from any lake, stream, or river. According to Leave No Trace principles (Leave No Trace, 2026), this distance protects riparian ecosystems and maintains wildlife access to water sources. In wet-weather camping, it serves an equally practical safety purpose: that 200-foot buffer keeps your campsite well clear of flash flood zones, which can rise rapidly during heavy or sustained rainfall. The rule applies to dispersed camping on public lands including National Forests and Bureau of Land Management areas.
Is it okay to set up a tent in the rain?
It is completely okay to set up a tent in the rain, provided you are not in an active lightning storm or a flash flood zone. Rain alone is a manageable condition for any camper with the right gear and a clear setup sequence. The anxiety most beginners feel comes from not having a plan — once you know the five-step sequence (footprint → frame under fly → tension fly → stake guylines → set up transition zone), the process becomes routine. Thousands of campers pitch tents in the rain every weekend across the US without incident. The key is preparation and sequence, not weather resistance.
Rain Camping Is a Skill Worth Building
For anxious beginners and infrequent campers, learning how to pitch tent in the rain is one of the most confidence-building skills in all of outdoor recreation. The research is straightforward: with a proper site at least 200 feet from water, a fly-first pitch sequence, and a tensioned, staked shelter, your tent interior can stay dry through sustained rainfall (Leave No Trace, 2026; REI, 2026). The difference between a miserable trip and a memorable one usually comes down to a ten-minute preparation routine — not the weather itself.
The Dry Zone Method gives you a simple mental framework to organize every decision around one rule: wet stays wet, dry stays dry, and the tent door is the boundary between them. Apply it from site selection through your transition zone setup, and it removes the guesswork entirely. Every step in this guide flows from that single principle.
Your next step: set up your tent once in the backyard before your trip. Time yourself. Practice the five-step sequence until it feels automatic. Then, when the rain hits for real, you won’t be learning — you’ll just be executing. For more preparation guidance, review our essential camping safety and storm preparedness resource before your next wet-weather adventure.

Dave King
I'm Dave King. I publish Tent Explorer, a site built to answer the questions people actually ask before they buy.