This blog post may contain affiliate links. As an Amazon Associate I earn from qualifying purchases.
You’re at camp, it’s a super cold night, and you need clean water — but you’re not sure if your method is actually safe, or whether you’ve been boiling long enough. Most camping guides tell you to “bring water to a boil” and leave it there, skipping the critical detail that at high altitude, a standard boil isn’t enough. Contaminated water can carry Giardia or Cryptosporidium — both invisible in clear-looking water — and either one will ruin your trip faster than bad weather.
In this guide, you’ll learn exactly how to boil water when camping using any heat source available — and how long to boil it so it’s genuinely safe to drink. We cover standard stove methods, CDC sterilization rules, bushcraft survival techniques, and camp kitchen tips, all organized around a single decision framework that removes the guesswork.
To safely boil water when camping, bring it to a rolling boil for 1 minute at sea level — or 3 minutes above 6,500 feet (CDC, 2026). The fastest method is an integrated canister stove like a Jetboil (~100 seconds for 500ml). No stove? The Boil-Safe Framework covers 8 methods, from campfires to survival rock-boiling.
- Fastest method: Integrated canister stove (Jetboil Flash) — boils 500ml in approximately 100 seconds under calm conditions
- Safety rule: 1-minute rolling boil at sea level; 3 full minutes above 6,500 ft (CDC, 2026)
- No fire? A 12V car kettle, solar cooker, or chemical heating pack works under burn bans
- The Boil-Safe Framework: Choose your heat source → hit a rolling boil → time it by altitude
Before You Start: What You’ll Need
Estimated Time: 10-15 minutes (depending on method)
Before you learn how to boil water when camping, a two-minute prep check will save you from the two most common mistakes — starting a fire where it’s banned and using a cracked pot that loses heat. Here’s what you need before you touch a heat source.
Clear-looking water in the backcountry can still contain Giardia and Cryptosporidium — boiling remains the most reliable method to eliminate all waterborne pathogens (CDC, 2026). That’s the entire reason this prep step matters: no gear check means no safe water.
Throughout this guide, we use The Boil-Safe Framework — a three-stage decision process: choose your heat source, hit a rolling boil, then time it by altitude. Each major section fulfills one stage.
What can I use to boil water?
What can you use to boil water when camping? The short answer: a metal vessel, a heat source, and fuel.
- Tools & Materials:
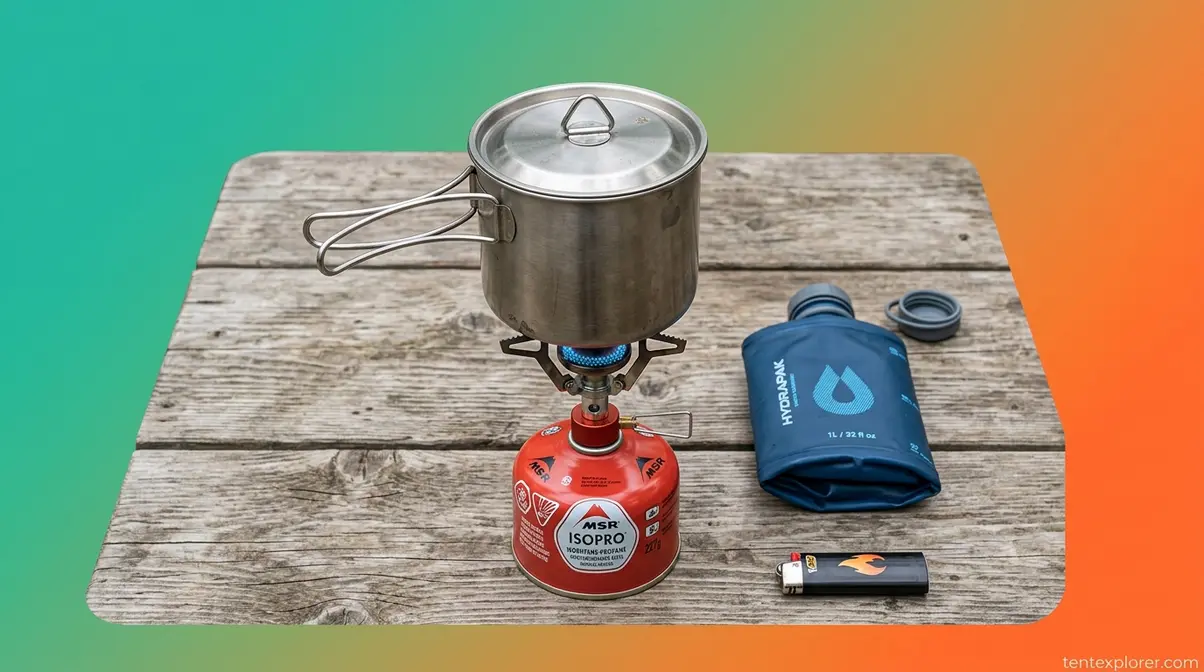
- Pot or vessel: Stainless steel or titanium pot (minimum 500ml). A stainless steel water bottle works as a backup. Avoid thin aluminum foil pots and any plastic container intended for direct-flame contact.
- Heat source: Canister stove (MSR PocketRocket, a lightweight canister stove popular with backpackers), integrated system (Jetboil, an integrated canister stove system designed for rapid boiling), campfire kit, or 12V car kettle for vehicle-based camping.
- Fuel: Isobutane canisters are compact and convenient — but they lose pressure below 20°F, making them unreliable on super cold nights. Liquid fuel stoves (like the MSR WhisperLite) handle cold far better and are refillable, which also eliminates the canister waste problem of packing out empty metal canisters on longer trips.
- Ignition: Lighter plus waterproof backup matches.
- Water collection: Collapsible bottle or hydration bladder for gathering source water before treatment.
Link to essential camp stove and cooking gear for a broader packing checklist.
Safety Checklist Before Heating
Run through these three checks before lighting anything:
- Check burn ban status at the official recreation.gov website or your state forestry agency website. Note: canister stoves are typically permitted during wood-fire burn bans — but always verify locally before assuming.
- Inspect any rocks you plan to use — smooth, wet river rocks can explode when heated (full explanation in the survival section below).
- Shake your fuel canister to estimate remaining fuel. Running out mid-trip is the most commonly reported stove frustration in camping communities, and it’s entirely avoidable.
With your gear checked and burn ban confirmed, here’s how to choose the right method for your setup — and how to execute it step by step.
Standard Camping Water Boiling Methods
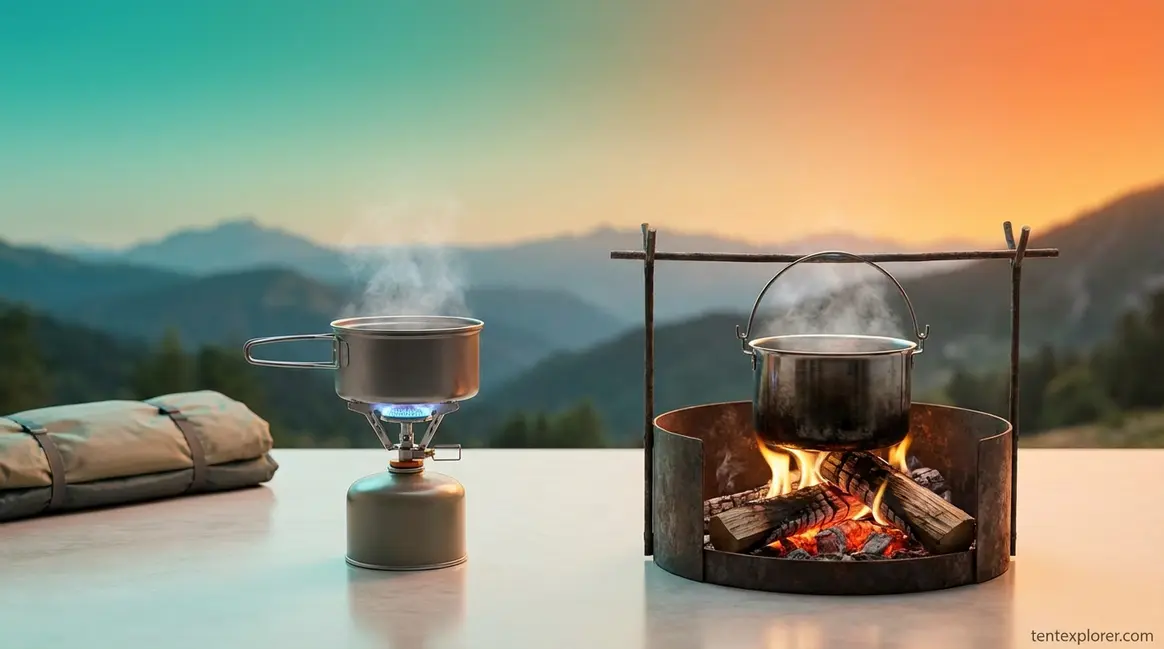
The most reliable way to boil water camping is a canister stove — it’s fast, controllable, and works in rain. For most campers, choosing the right method comes down to three factors: trip type (backpacking vs. car camping), group size, and whether a fire ban is in effect. Your wildcamp water setup will look different depending on all three.
Stage 1 of the Boil-Safe Framework: Choose Your Heat Source. The four options below cover 95% of camping scenarios — from ultralight backpacking to car camping family trips.
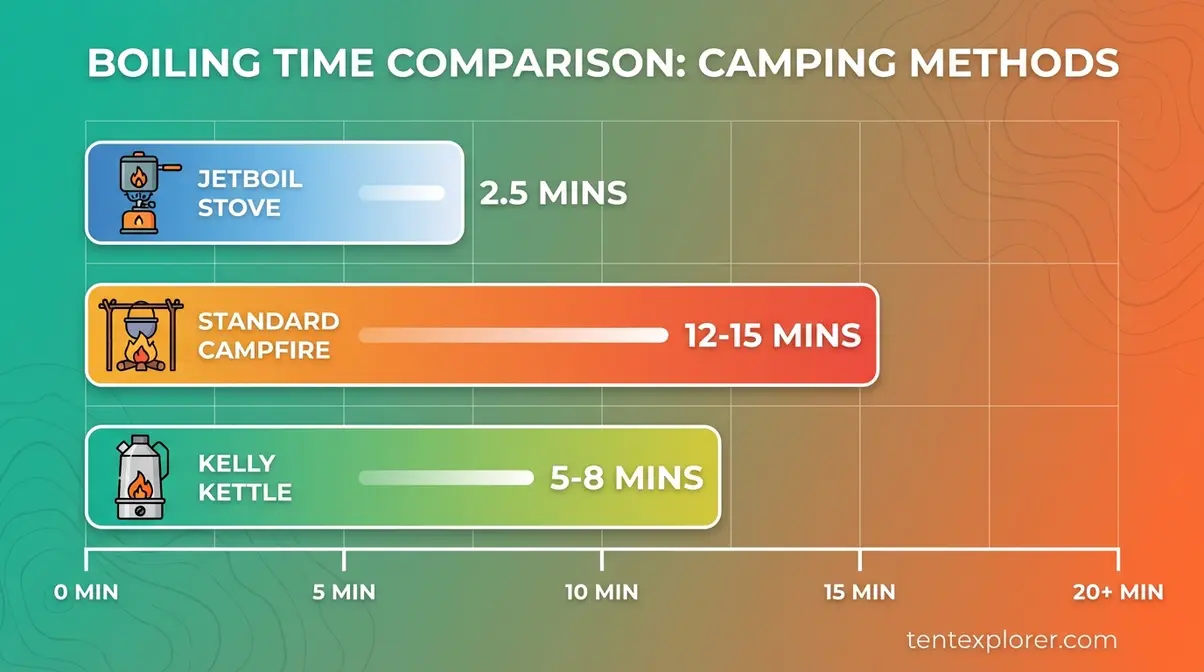
Caption: Approximate boiling times for 500ml of water across four common camping methods — conditions (wind, altitude, starting water temperature) affect all figures.
According to Forest Service water safety guidelines, the U.S. Forest Service recommends boiling water for 3 minutes at elevations exceeding 6,500 feet to ensure complete purification during backcountry recreation.
Using a Canister Stove or Jetboil
After evaluating multiple integrated stove systems for cold-weather performance, the speed advantage of integrated systems over standard canister stoves becomes clear — it’s not arbitrary marketing. The insulated cup and built-in wind protection are what drive the difference.
An integrated canister stove like the Jetboil Flash boils 500ml of water in approximately 100 seconds under calm conditions at sea level — roughly three times faster than a standard campfire setup (Jetboil, manufacturer spec). A standard canister stove like the MSR PocketRocket typically takes 3.5–4 minutes for the same volume.
Follow these steps for either system:
- Attach the canister to the burner — check the O-ring seal and twist until tight with no wobble.
- Fill your pot with water from the cleanest available source; moving water is generally preferred over stagnant pools.
- Place the pot on the burner — for integrated systems like the Jetboil, lock the cup onto the burner base until it clicks.
- Ignite and set to medium-high flame.
- Watch for a rolling boil — large, vigorous bubbles breaking the surface continuously, not just steam or small bubbles rising from the bottom.
- Time the boil per altitude rules (covered in the next section).
- Remove from heat and let cool slightly before drinking; cover during cooling to avoid airborne recontamination.
Cold-weather note: Isobutane canisters lose pressure below 20°F. On super cold nights, warm the canister inside your sleeping bag for five minutes before use, or switch to a liquid fuel stove. And remember the canister waste problem — used canisters must be packed out; liquid fuel is refillable and produces less waste on extended trips.
If you’re camping without a canister stove — or want the old-school satisfaction of a campfire — here’s how to do it right.
Boiling Water Over a Campfire
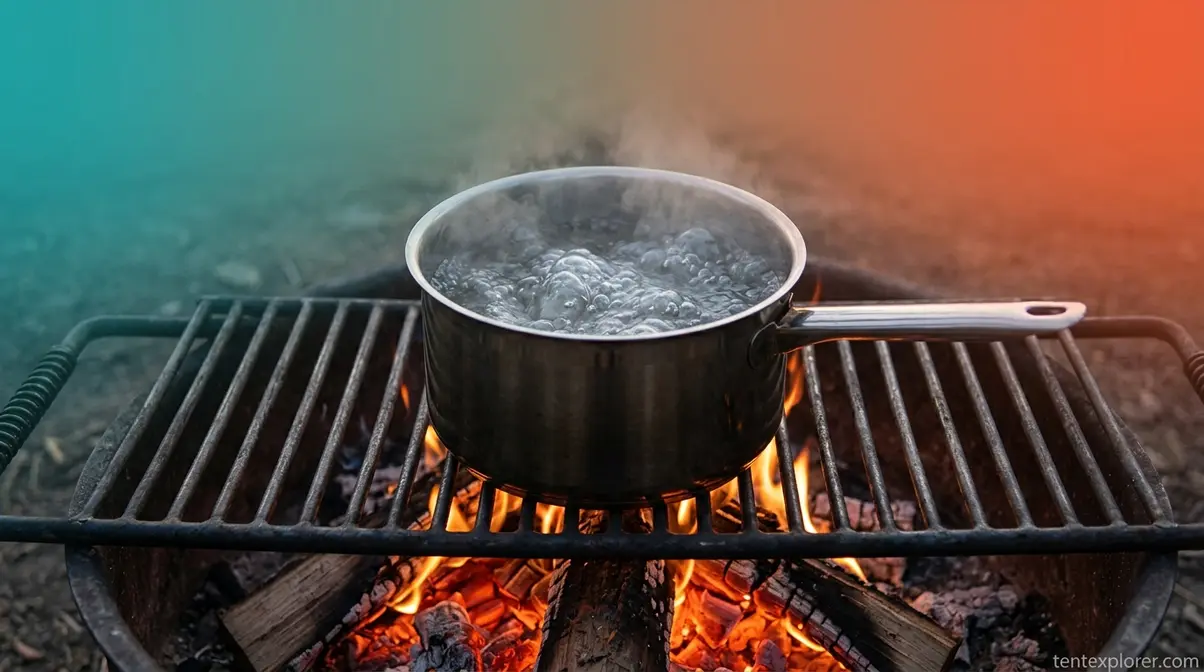
There’s something satisfying about boiling water over a fire you built yourself — but it requires more patience and setup than a stove. Campfire boiling is slower (typically 8–12 minutes to a rolling boil, depending on fire intensity and wind) but requires no purchased fuel and works anywhere wood fires are permitted.
You have three setup options: a tripod suspension, a grill grate over coals, or direct placement on hot coals. A grill grate is the most stable and controllable choice; a tripod allows height adjustment for temperature control.
- Build or establish a stable fire — hardwood coals produce more consistent, longer-lasting heat than softwood flames.
- Set up your support structure (tripod, grill grate, or flat rocks as a pot cradle).
- Fill your pot 2/3 full — overfilling causes spillage when the boil begins.
- Place the pot centered over the heat source for even heating.
- Watch for a rolling boil — vigorous, continuous bubbles you can’t stir down.
- Time per altitude rules (next section).
- Pro tip: Soap the outside of your pot with dish soap before placing it over the fire. The soot won’t bond and washes off instantly. This old-school trick takes five seconds and saves significant cleanup time — most guides skip it entirely.
As one piece of camping community wisdom puts it:
“Add water and wait for the sludge to collect in the bottom. Pour and enjoy.”
This describes sediment settling in unfiltered turbid water before boiling — a practical technique for murky water sources where pre-filtering isn’t possible. Let the pot sit undisturbed for a few minutes after heating; suspended particles will settle to the bottom.
For campers who want the speed of a stove without the fuel canister, two less-common options are worth knowing about.
Kelly Kettle and Solar Options
The Kelly Kettle — a biomass-burning camping kettle that uses twigs and leaves as fuel — is a practical middle ground between stoves and campfires. Fill the water jacket (the outer wall of the kettle), build a small fire in the fire-base using natural debris, and place the kettle on top. Boiling time runs approximately 3–5 minutes once the fire is established. The advantage: no purchased fuel. The disadvantage: it produces smoke and isn’t suitable for fire bans. It’s particularly popular in wet environments like Scotland and the Pacific Northwest, where fallen debris is abundant and fuel canisters are inconvenient to carry.
Solar cookers like the GoSun Sport, a portable solar cooker designed for outdoor use, use concentrated solar energy to heat water. On a clear day, expect 20–30 minutes to reach boiling temperature. The appeal is compelling: zero fuel, zero fire, and fully fire-ban compliant in most jurisdictions. The limitation is equally clear — cloudy days render it nearly useless, and the wait time is significant when you’re thirsty.
Regardless of which method you choose, one tip applies to all of them: controlling wind is the single biggest speed variable.
Tips for Faster Boiling Outdoors
The quickest way to boil water camping has less to do with your stove model and more to do with managing your environment. Wind is the primary enemy of fast boiling — it strips heat from the pot faster than your burner can replace it.
- Use a windscreen: A simple aluminum foil windscreen wrapped around your stove can reduce boiling time by an estimated 30–50% in moderate wind. Always position your stove in a sheltered spot — behind a rock, a pack, or a purpose-built foil shield.
- Use a lid: A pot lid traps steam and heat, reducing boiling time by an estimated 15–20%. It’s the simplest and most overlooked speed optimization.
- Start with warmer water: Fill your pot from a sun-warmed container or thermos if available. Starting at 70°F instead of 40°F meaningfully reduces time to boil.
On a 3-day backpacking trip above 8,000 feet, a simple foil windscreen consistently saved 2–3 minutes per boil — meaningful when fuel is limited and every gram counts.
You’ve got your water boiling. Now the critical question: how long do you actually need to keep it there for it to be safe?
How Long to Boil Water (CDC Rules)
According to the CDC, bringing water to a rolling boil for 1 minute kills all disease-causing organisms — including viruses, bacteria, and parasites found in wild water sources (CDC, 2026). At elevations above 6,500 feet, extend that to 3 minutes because water boils at a lower temperature and pathogens need more exposure time to die. This applies whether you’re boiling tap water for drinking or water drawn from a backcountry stream.
Stages 2 & 3 of the Boil-Safe Framework are both fulfilled here: Stage 2 is hitting the rolling boil, Stage 3 is timing it correctly by altitude.
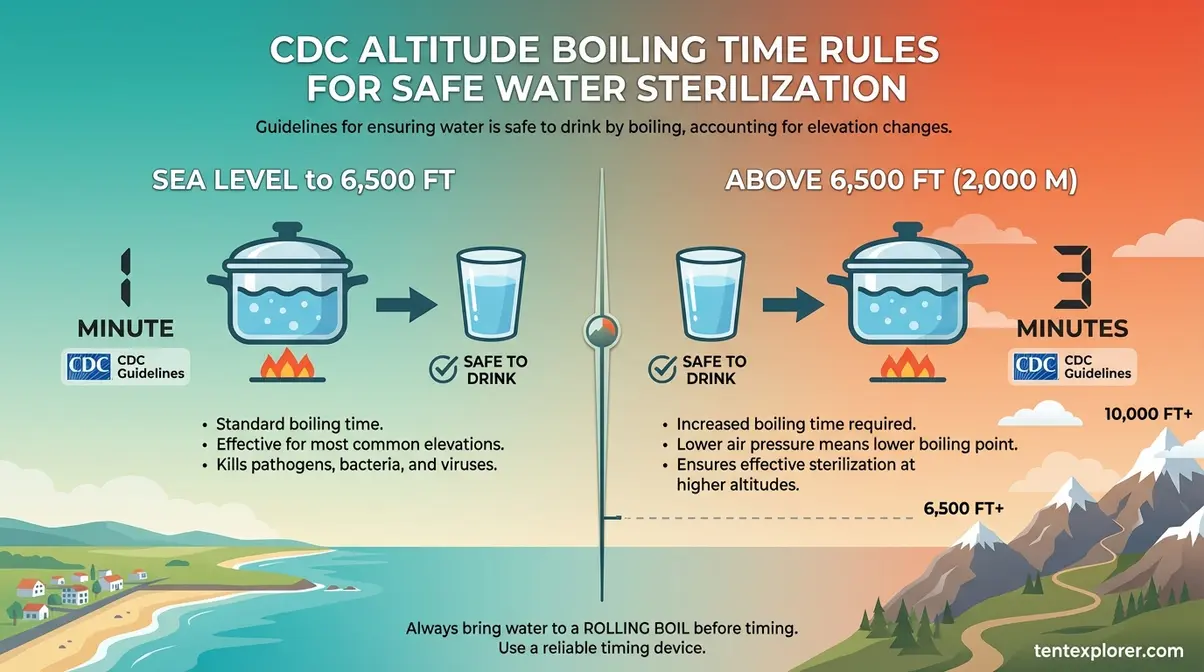
Caption: The CDC’s altitude-adjusted boiling rules — the single most important chart for backcountry water safety.
Per CDC guidelines for water safety: boiling is the surest method to kill disease-causing organisms, including viruses, bacteria, and parasites found in wild water sources (CDC, 2026). The EPA recommendations on boiling time align: water should reach a rolling boil for at least 1 minute, extended to 3 minutes above 5,000–6,500 feet.
Find safe water purification methods for broader camp safety practices.
The 1-Minute Rolling Boil Rule
How long to boil water while camping at standard elevations comes down to one precise definition: a rolling boil — large, vigorous bubbles that break the surface continuously and cannot be stirred down. This is categorically different from a simmer, where small bubbles form at the bottom of the pot. A simmer is NOT sufficient for sterilization.
Here’s the nuance most guides miss: water becomes microbiologically safe before it reaches 212°F (100°C). Princeton Outdoor Action research, citing Wilderness Medical Society data, shows pathogens die at 160°F (71°C) within 30 minutes, and at 185°F (85°C) within minutes. The rolling boil rule exists as a practical visual indicator — by the time you see vigorous, continuous bubbles, you’ve already exceeded the kill temperature with margin. The 1-minute timer is a safety buffer, not the minimum kill threshold.
Rule: Bring to a rolling boil → hold for 1 full minute → cool covered
After boiling, cover the pot during cooling. This prevents recontamination from airborne particles — a step most guides omit entirely.
At high altitude, the rules change — and this is where most campers make a critical mistake.
The 3-Minute High Altitude Rule
Altitude reduces the boiling point of water in a straightforward and consequential way. At 6,500 feet (approximately 2,000m), water boils at roughly 200°F (93°C) instead of 212°F. At 14,000 feet (4,267m) — the summit zone of many Rocky Mountain peaks — it boils at around 187°F (86°C). These lower temperatures mean pathogens need longer exposure time to reach lethal conditions.
The same rules apply whether you’re boiling tap water for drinking in a high-elevation RV park or stream water at a backcountry camp: altitude affects the water, not the source.
| Elevation | Boiling Point | Required Boil Time |
|---|---|---|
| Sea level to 6,500 ft | 212°F / 100°C | 1 minute |
| Above 6,500 ft | ~200°F / 93°C | 3 minutes |
This is the U.S. Forest Service and CDC standard (Forest Service water safety guidelines, 2026). Practical rule: if you’re camping in the Rockies, Sierras, or any mountainous region and haven’t verified your elevation with a GPS or topo map, assume you’re above 6,500 feet. When in doubt, boil for 3 minutes. The extra two minutes costs you almost nothing; the consequences of under-boiling can cost you days of illness.
Boiling is the gold standard — but what if you can’t boil? Here’s how the alternatives compare.
Boiling vs. Filtering vs. Chemicals
How to sterilize water when camping depends on what gear you have available. Boiling isn’t always the only option — but it is the most reliable. Here’s how the main methods stack up:
| Method | What It Kills | Time Required | Key Limitation |
|---|---|---|---|
| Boiling | All pathogens (viruses, bacteria, protozoa) | 1–3 min (altitude-dependent) | Requires heat source |
| Filtration | Protozoa + bacteria (not viruses, unless virus-rated) | 1–3 min | Filter integrity required |
| Chlorine dioxide tablets | Viruses + bacteria + Cryptosporidium | 30 min to 4 hours | Taste; Crypto requires extended time |
| UV light (SteriPen) | All pathogens in clear water | 60–90 seconds | Ineffective in turbid/cloudy water |
Boiling wins on reliability because it doesn’t depend on filter integrity, chemical shelf life, or water clarity. For a practical backup, carry chlorine dioxide tablets — they cover viruses that standard filters miss, and they weigh almost nothing.
Standard methods work when you have a stove or fire. But what happens when you have neither? That’s where bushcraft techniques come in — and they require careful execution.
Boiling Water Without Fire (Survival)
Knowing how to boil water without electricity or fire is a genuine survival skill — and one that most camping guides skip over entirely. Whether you’re under a fire ban, have run out of fuel, or are facing an emergency without standard gear, these three methods can produce safe drinking water using what’s available around you.
⚠️ Fire Safety: Always check local burn ban regulations before attempting any open-flame method. In a genuine wilderness emergency, prioritize signaling for rescue over water boiling. Never start an open fire in a prohibited area.

Caption: Safe rock selection is the most critical step — smooth river rocks can shatter explosively when heated.
Find additional guidance on safe campfire cooking practices before attempting any fire-based survival method.
The Hot Rock Boiling Method
This is the most primitive method covered in this guide — and the one with the highest injury risk if executed carelessly. How to boil water without a stove or microwave using rocks is a legitimate bushcraft skill, but rock selection is everything.
⚠️ Critical Safety Warning: NEVER use smooth river rocks, shale, or any rock that has been submerged in water. Smooth river rocks contain trapped moisture pockets. When heated to 212°F (100°C), that trapped moisture turns to steam and can shatter the rock with explosive force — causing lacerations, burns, and eye injuries. Use only dry, rough-textured rocks (granite, sandstone) that have been away from standing water for at least 24 hours.
Smooth river rocks contain trapped moisture — when heated to 212°F, that moisture turns to steam and can shatter the rock with explosive force. This is established safety knowledge across wilderness medicine and bushcraft communities.
Steps for hot rock boiling:
- Select 3–5 dry, rough-textured rocks (fist-sized) from high ground, away from any water source. Avoid smooth, polished, or layered stones.
- Build a fire and place the rocks directly in the hottest part of the coals — heat them for 30–45 minutes.
- While rocks heat, prepare your water container: a bark vessel, wooden bowl, or large folded leaf for small quantities.
- Use two stout sticks as improvised tongs to lift rocks — do not use bare hands. Metal tongs conduct heat poorly and risk dropping; wooden sticks give better grip and control.
- Lower rocks into the water container carefully — stand back as steam may erupt on contact.
- Replace rocks every 5–10 minutes as they cool, adding fresh hot rocks to maintain temperature.
- Bring water to a rolling boil through sequential rock additions — then time per the altitude rules above.
Container options: A birch bark bowl (fold and pin with a green stick) is the most practical natural vessel. Carved wood and large shells work for small quantities. Even a plastic bag suspended from a frame can hold water — the water keeps the plastic below its melting point as long as direct flame doesn’t contact the bag.
Paper cup trick: A paper cup filled completely with water can be held directly over a flame (not in a flame). The water absorbs heat below the paper’s ignition temperature (~450°F), keeping the cup intact long enough to heat small quantities. This is a useful emergency demonstration, though not suitable for sustained boiling.
This is the method used in primitive bushcraft demonstrations and traditional indigenous water preparation — it works, but requires patience and careful rock selection.
If rocks feel too risky, several alternative containers can hold boiling water — some of them surprisingly effective.
Boiling in Alternative Containers
When no metal pot is available, several everyday and natural materials can serve as water vessels — each with specific limitations:
- Paper cup: Fill completely, hold over flame (not in it). Works for small quantities of warm water. Not suitable for sustained boiling — treat as an emergency warm-water method only.
- Clear plastic bottle (PET): Suspend above hot coals, not direct flame. The water keeps the plastic below its melting point. This method is slow — expect 15–20 minutes — and should only be used with food-grade PET plastic (the recycling symbol #1). Avoid HDPE (#2) and other plastics. Keep flame well clear of the plastic itself.
- Birch bark container: Fold birch bark into a vessel and pin with a green twig. Can hold water over low heat. Used extensively in traditional bushcraft; requires practice to construct without leaking.
- Large shells, coconut halves, or carved wood: All viable for small quantities in true wilderness survival situations.
How do the Amish have hot water?
Traditionally, the Amish heat water using cast-iron kettles over wood-burning stoves — a low-tech method that has worked reliably for centuries. Some Amish communities also use propane or natural gas appliances, depending on their specific community’s guidelines, while others use solar water heaters or gravity-fed systems heated by wood boilers. The underlying principle is the same as any camping method: any vessel that can hold water and withstand heat can be pressed into service. It’s a useful reminder that effective water heating doesn’t require modern gear.
For situations where fire is banned or unavailable, modern gear offers reliable electric and chemical alternatives.
Fire Ban Boiling Alternatives
How to boil water while camping without fire is a real challenge during California fire season or drought-year burn bans — but three modern options make it manageable:
- 12V car kettle: Plugs into your vehicle’s 12V outlet. Boils water in 15–20 minutes. Ideal for car campers, van campers, and RV users. Fully fire-ban compliant. Limitation: requires vehicle access — not viable for backpackers.
- Portable solar cooker (GoSun Sport, GoSun Fusion): Concentrates solar energy to heat water to boiling in approximately 20–30 minutes on a clear day. Zero fuel, zero fire, and compliant with virtually all burn bans. The limitation is weather-dependence — overcast days eliminate this option entirely.
- Flameless ration heaters (FRH): Chemical heating packs originally designed for military MREs. Add water to the pack, insert your water container, and the exothermic reaction reaches boiling temperature in approximately 10–15 minutes. Expensive per use but completely fire-free and reliable in any weather.
On a California camping trip during peak fire season, a 12V kettle is often the only fully compliant option — it’s worth keeping one in your car kit year-round alongside a standard camp kit.
With your water boiling methods covered, let’s address the rest of your camp kitchen — starting with keeping food safe.
Keeping Your Camp Kitchen Safe
Once your water is safe per the Boil-Safe Framework, the next camp kitchen priority is food storage. A well-managed camp kitchen prevents wildlife encounters, reduces food spoilage, and keeps you compliant with campground regulations that carry real fines.
The 200-foot rule requires campers to cook, eat, and store food at least 200 feet (60 meters) from sleeping areas to minimize wildlife encounters — a Leave No Trace standard confirmed by the U.S. Forest Service and widely adopted across National Park and wilderness campgrounds.
Find guidance on organizing your camp kitchen layout for a full setup reference.
How to Keep Food Cold When Camping
How to keep food cold when camping comes down to thermal management — specifically, how well you protect your cooler from ambient heat before and during your trip.
- Pre-chill your cooler 24 hours before departure. Fill it with sacrificial ice the night before, drain it, and repack with your food and fresh ice on the morning you leave. A warm cooler melts ice within hours; a pre-chilled cooler can maintain safe food temperatures for 2–3 days without a resupply.
- Use block ice, not cubed. Block ice melts significantly slower than cubed ice. Freeze water bottles as a practical alternative — they double as drinking water once thawed. Layer food on top of ice, since cold air sinks and warm air rises; ice on the bottom is thermodynamically more efficient.
- Minimize cooler openings. Every time you open the lid, warm air replaces cold air. Pack a separate, inexpensive cooler for drinks — the one you’ll open constantly — and keep your food cooler sealed except during meal prep.
On a 4-day car camping trip, a properly pre-chilled 60-quart cooler with block ice can maintain food at safe temperatures through the entire trip without a single ice resupply.
Food storage is only part of the camp kitchen equation — knowing campground rules prevents wildlife encounters and fines.
What is the 200 rule for camping?
The 200-foot rule requires campers to cook, eat, and store food at least 200 feet (about 60 meters) from their sleeping area. This distance reduces the likelihood that wildlife attracted to food smells will approach your tent during the night. In practice, 200 feet is roughly 70 adult paces. The rule applies to all scented items — food, trash, cooking gear, and toiletries like toothpaste. In bear country, use a bear canister or designated bear box in addition to maintaining this distance.
Essential Campground Rules
Three terms come up repeatedly in campground planning, and they’re worth knowing before you pull into a site:
The 200-foot rule means cook, eat, and store food — including trash and scented items like toothpaste — at least 200 feet from your sleeping area. This distance reduces the likelihood that wildlife attracted by food smells will investigate your tent. In bear country, use a bear canister or bear box regardless of distance.
The 3-3-3 rule is a responsible camping guideline: arrive at your campsite by 3pm to allow adequate setup time, stay no more than 3 nights at any single site to reduce impact on popular locations, and leave by 3pm on your departure day to give the next camper time to set up before dark.
FF (First Come, First Served) is a campground reservation designation meaning sites cannot be booked in advance. Arrive early — often by 8–10am on weekends at popular sites — to secure a spot. FF campgrounds are common in National Forests and dispersed camping areas.
If you’re camping in an RV or cabin with a stove, the process is simpler — but there are still a few tips worth knowing.
Boiling Water in an RV or Cabin
RV and cabin campers often overlook water safety because the setup feels more like home — but how to boil water on a stove top follows the same CDC sterilization rules as any outdoor method, especially when drawing from a well, tank, or non-municipal source.
Find additional winter and indoor camping guidance on using indoor tent stoves safely.
Stove Top Boiling for RVs & Cabins
Stove-top boiling is the most straightforward method in this guide — but it’s worth doing correctly:
- Fill your pot with water from your source (tank, well, or filtered supply).
- Place the pot on the burner over medium-high heat.
- Cover with a lid — this reduces boiling time by trapping steam and cuts your wait from roughly 8–10 minutes to 5–7 minutes on a standard propane burner.
- Watch for a rolling boil — the same vigorous, continuous bubbles you’d look for on a campfire.
- Time the boil using the altitude rules above — if your RV is parked above 6,500 feet in the Rockies or Sierras, the 3-minute rule applies just as it would outdoors.
Electric kettle note: For glampers with shore power or a generator, a standard electric kettle is the fastest and simplest option — boiling 1 liter in approximately 3–5 minutes. If you’re using a non-municipal water source, the same sterilization timing rules apply regardless of your heat method.
One underrated benefit of boiling water on an RV or cabin stove: it can double as natural aromatherapy.
What smells good in boiling water?
Pine needles, cinnamon sticks, citrus peel, and dried herbs like rosemary or lavender all produce pleasant scents when simmered in water. These are for ambient aromatherapy only — not for drinking. Pine needles give a clean forest scent; cinnamon is warm and spiced; orange peel is bright and fresh. Use dried peels rather than fresh for longer-lasting scent and to avoid mold. Simmer on low heat and discard the water afterward.
Before we wrap up, here are the most common mistakes campers make when boiling water — and when boiling alone isn’t enough.
Common Mistakes & Safety Warnings
Health Disclaimer: This article references CDC and EPA guidelines for water safety. Always follow official guidance. In a wilderness medical emergency, prioritize signaling for rescue over water boiling. If you suspect waterborne illness, seek medical attention promptly.
The most common water safety mistake is stopping at a simmer — only a continuous rolling boil for the full prescribed time eliminates all waterborne pathogens. Following all three stages of the Boil-Safe Framework (choose heat source → rolling boil → time by altitude) prevents the majority of field errors.
Fire Safety & Exploding Rocks
Three specific pitfalls cause the most serious consequences in the field:
Burn ban violation: Starting a campfire to boil water during an active burn ban can result in fines up to $5,000 in some states, plus potential criminal liability if the fire spreads. The mistake is assuming last season’s rules still apply. Check the official recreation.gov website or your state forestry agency before every trip — conditions change weekly during fire season.
Wet river rock explosion: Grabbing smooth, wet rocks from a streambed for rock boiling is the most physically dangerous mistake in this guide. The consequence is explosive rock shattering that causes cuts, burns, and eye injuries. The mechanism is straightforward: trapped moisture in the rock turns to steam under heat, with nowhere to go. Use only dry, rough-textured rocks from high ground — never streambed rocks.
Stopping at a simmer: Seeing steam and small bubbles and assuming water is ready is the most common purification error. Giardia and Cryptosporidium can survive at simmer temperatures. Wait for large, vigorous bubbles that can’t be stirred down — that’s a rolling boil, and that’s the threshold that matters.
And finally, a note on when boiling alone isn’t sufficient.
When Boiling Isn’t Enough
Boiling is highly effective against biological pathogens — but it has real limitations:
Heavily turbid (cloudy) water: Boiling doesn’t remove sediment, heavy metals, or chemical pollutants. Pre-filter through a bandana, coffee filter, or dedicated pre-filter before boiling to remove particulates. Turbid water also reduces UV purification effectiveness, making boiling the better choice — but pre-filtering first improves both methods.
Chemical contamination: Agricultural runoff, industrial pollutants, and heavy metals are not removed by boiling. If you’re camping near farmland, mining operations, or industrial areas, use activated carbon filtration or carry bottled water. Boiling actually concentrates some dissolved chemicals by reducing water volume.
Large groups without heat: When you’re managing water for 8–10 people and have no heat source, chlorine dioxide tablets are the practical backup. They require no equipment, weigh almost nothing, and — given 30 minutes of contact time — cover viruses, bacteria, and protozoa. Safe water purification methods for group camping should always include chemical treatment as a contingency.
Frequently Asked Questions
How to sterilize water when camping?
Boiling is the most reliable method to sterilize water when camping — it kills all disease-causing organisms, including viruses, bacteria, and parasites. Bring water to a rolling boil for 1 minute at sea level, or 3 minutes above 6,500 feet CDC, 2026. Alternatives include filtration (removes bacteria and protozoa, but not viruses unless virus-rated), chlorine dioxide tablets (effective against all pathogens, including Cryptosporidium, but requires 30 minutes to 4 hours), and UV light devices like a SteriPen (effective in clear water only). For maximum reliability, boil first.
How long to boil water while camping?
Boil water for 1 full minute at sea level, or 3 full minutes at elevations above 6,500 feet — these are the CDC and U.S. Forest Service standards (CDC, 2026). The timer starts when you see a rolling boil — large, vigorous bubbles breaking the surface continuously, not a simmer. At high altitudes (Rockies, Sierras, Alps), water boils at a lower temperature, so pathogens need more time to die. When in doubt about your elevation, always default to 3 minutes.
What is the 3-3-3 rule for camping?
The 3-3-3 rule is a responsible camping guideline: arrive at your campsite by 3pm, stay no more than 3 nights, and leave by 3pm on your departure day. Arriving by 3pm gives you adequate daylight for setup; the 3-night limit reduces impact on popular sites and prevents monopolization of high-demand locations; leaving by 3pm gives incoming campers time to set up before dark. It’s a practical framework for considerate, low-impact camping — not a legally enforced rule, but widely recommended by Leave No Trace educators.
What does FF mean at a campground?
FF stands for “First Come, First Served” — a campground designation meaning sites cannot be reserved in advance. You simply arrive and claim an available site. FF campgrounds are common in National Forests, Bureau of Land Management areas, and dispersed camping zones. On popular weekends, arrive early — often by 8–10am — to secure a spot. Some campgrounds operate as hybrid systems, with a portion of sites reservable and the remainder FF. Always check the specific campground’s system on the official recreation.gov website before your trip.
Wrapping Up: Your Action Plan
For intermediate campers building a reliable wildcamp water setup, boiling remains the single most dependable purification method available — no filter to clog, no chemical shelf life to track, no battery to die. According to the CDC, a rolling boil for 1 minute (3 minutes above 6,500 feet) eliminates all disease-causing organisms, including viruses and parasites that filters can miss (CDC, 2026). The fastest execution is an integrated canister stove; the most resilient backup is hot rock boiling with careful rock selection.
The Boil-Safe Framework — choose your heat source, hit a rolling boil, time it by altitude — is the mental shortcut that replaces conflicting advice with a three-step decision process. Every method in this guide feeds into that framework, whether you’re running a Jetboil at a car campsite or improvising in a genuine survival situation. The framework works because it separates the how (your gear) from the what (a rolling boil) from the how long (altitude-adjusted timing).
Your next step: before your next trip, verify your campsite’s elevation using a topo map or GPS app, check the burn ban status at recreation.gov, and confirm you have either a full fuel canister or a backup purification method packed. If you’re heading above 6,500 feet, set a 3-minute timer and don’t pull the pot early. Safe water takes 90 seconds of attention — it’s the easiest part of any trip to get right.
