This blog post may contain affiliate links. As an Amazon Associate I earn from qualifying purchases.
📋 Table of Contents
- Before You Start: What You’ll Need
- How to Set Up a Tent Step by Step
- Step 1 — Find and Clear the Ideal Spot
- Step 2 — Lay Down the Footprint
- Step 3 — Position the Tent Body
- Step 4 — Assemble and Thread the Poles
- Step 5 — Stake Down the Corners
- Step 6 — Attach Rainfly and Guy Lines
- Solo Setup, Tarps, and Pole Systems
- Can I set up a tent by myself?
- Do I put a tarp under my tent?
- Clip vs. Sleeve Pole Systems Explained
- Setting Up in Rain and on Hard Surfaces
- How to Set Up Your Tent in the Rain
- Pitching on Concrete, Sand, or Rock
- Setup Differences by Tent Type
- Dome and Cabin Tents
- Pop-Up and Instant Tents
- Wall Tents and Canvas Tents
- How to Take Down and Pack Your Tent
- Standard Tent Takedown in 5 Steps
- How to Collapse a Pop-Up Tent
- Tent Care and Maintenance Basics
- Waterproofing and Seam Sealing
- Fixing a Stuck Zipper
- Common Tent Setup Mistakes to Avoid
- Pitfalls That Ruin Your First Night
- Which side of the footprint goes down?
- When to Choose a Different Shelter Type
- Frequently Asked Questions
- How do you set up a tent step by step?
- How do you set up a tent in 6 steps?
- What is the golden rule of camping?
- What do you put underneath a tent?
- Do all tents leak in heavy rain?
- How long does it take to set up a tent?
- Where should you not set up a tent?
- How do I keep my tent interior dry?
- Set Up Once, Sleep Well Every Time
“We just acquired a Morsan canvas tent about 10 x 10 with poles but, can’t figure out how to set it up. Can’t find any information. Can someone help please?”
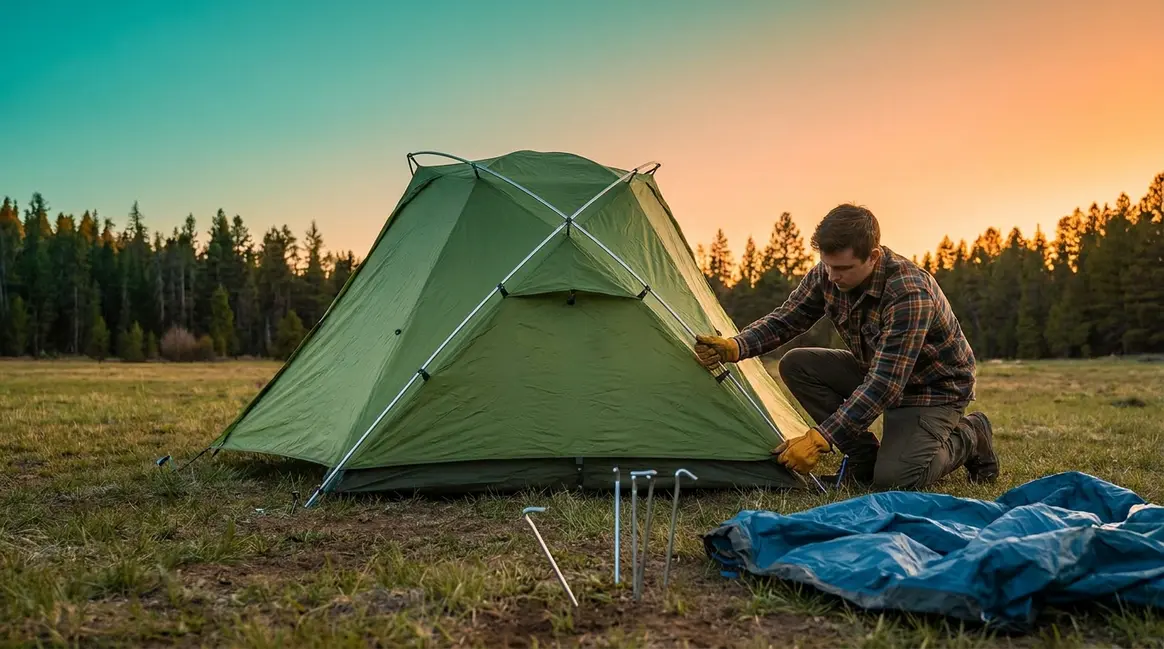
If you’ve ever stared at a pile of tent poles wondering where to even begin, you’re not alone. That feeling — equal parts excited and overwhelmed — is one of the most common first-camping experiences reported across outdoor communities.
Most guides skip the parts that actually trip beginners up: which side of the footprint (a cut-to-size ground cloth) faces down, how to thread poles without bending them, or what to do when rain starts mid-setup. That gap between “here are 5 steps” and “here’s what actually goes wrong” is exactly where first-timers get stuck.
This guide shows you how to set up a tent step by step — with clear visuals, solo hacks, and rain-day troubleshooting — guided by one simple principle: The Dry Interior Rule. We cover everything from gear prep and the core 6-step setup process to solo techniques, challenging weather, and different tent types.
Setting up a tent correctly takes 15–30 minutes and follows six core steps — every one of them governed by The Dry Interior Rule: if a decision keeps your sleeping area dry, it’s the right call.
- Choose your site carefully: Flat ground away from drainage channels prevents puddles under your floor.
- Footprint goes shiny-side down: The waterproof side faces the ground, not your tent floor.
- Stake before you raise: Anchoring two corners first prevents wind from stealing your tent mid-setup.
- Rainfly on last (usually): Attach it while the tent is fully raised for a taut, weather-resistant fit.
- Solo setup is possible: Stake two corners first, then insert poles — one person can pitch most dome tents in under 20 minutes.
Before You Start: What You’ll Need
Learning how to set up a tent for beginners starts before you ever touch a pole. Knowing what’s in your bag — and why each piece matters — removes the guesswork entirely. The National Park Service recommends choosing a flat, durable surface for tent setup and ensuring the rainfly is securely fastened to protect against unexpected weather.
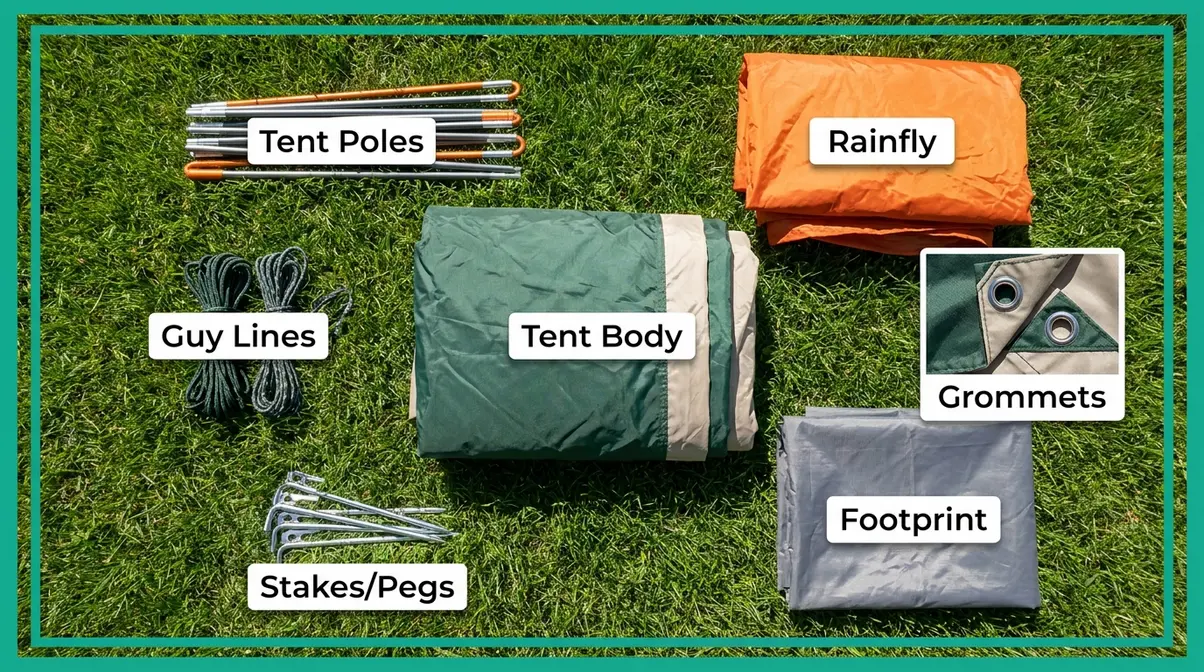
Your complete gear checklist:
- Tent body — the main fabric shell you sleep inside
- Tent poles — the flexible, sectioned rods that give the tent its shape and structure
- Stakes/pegs — metal or plastic spikes that anchor the tent to the ground
- Rainfly — a waterproof outer cover that goes over the tent body to block rain and dew
- Footprint or groundsheet — a cut-to-size ground cloth that protects the tent floor from moisture and abrasion (without one, rocks and ground moisture attack your tent floor directly)
- Guy lines — the ropes that attach to the tent and stake into the ground for wind stability
- Grommets — the metal rings at each corner that accept the stake
- A mallet or smooth rock — to drive stakes into firm or rocky soil
Check your tent bag for an instruction sheet — most brands include one, and it’s often the fastest way to identify your specific pole configuration.
The Dry Interior Rule: Every decision in tent setup should answer one question — does this keep the inside dry? That’s the filter you’ll use for every step that follows. Outdoor educator communities consistently note that practicing your tent setup in the backyard before your first trip can cut on-site setup time by half — and dramatically reduce frustration when conditions aren’t ideal.
How to Set Up a Tent Step by Step
Setting up a tent correctly means working in the right sequence — and every step below connects back to The Dry Interior Rule. Rush the order and you’ll fight the tent instead of the weather. If you are looking for broader advice before hitting the campground, read our top 10 tent camping tips for beginners. Our team evaluated dozens of beginner setup scenarios across dome, cabin, and freestanding tent designs to identify where first-timers consistently go wrong — and the steps below reflect those findings.
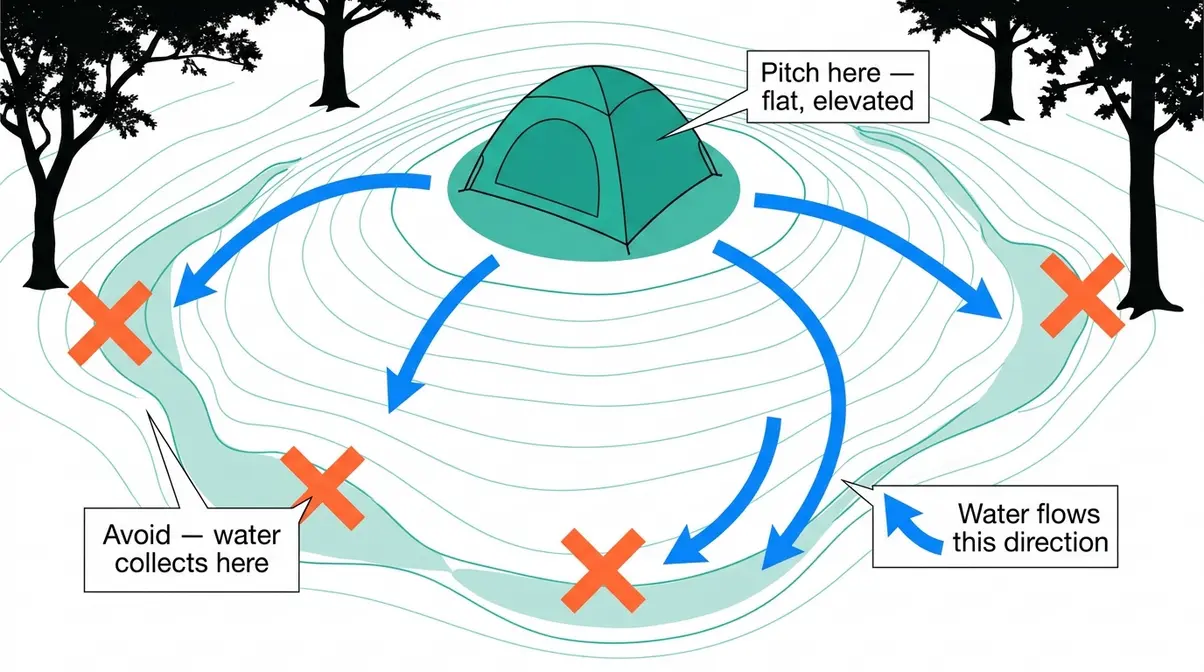
Step 1 — Find and Clear the Ideal Spot
Pick flat, dry ground — and clear it before anything else touches down.
Look for a naturally flat area with no visible rocks, roots, or depressions. Even a small rock under your sleeping pad becomes a serious discomfort problem by 2 a.m. Tilt your head and look across the ground surface — low spots collect water when it rains, even lightly.
Avoid pitching directly under trees if a storm is possible. Falling branches are a real hazard, and tree roots create uneven ground. Once you’ve found your spot, spend 60 seconds clearing sticks, pinecones, and sharp debris. This protects your tent floor and directly supports The Dry Interior Rule — a punctured floor leaks.
The Appalachian Mountain Club advises pitching on durable surfaces like established tent pads or bare dirt to minimize environmental impact — a Leave No Trace principle that also tends to be the flattest, best-draining option at most campgrounds.
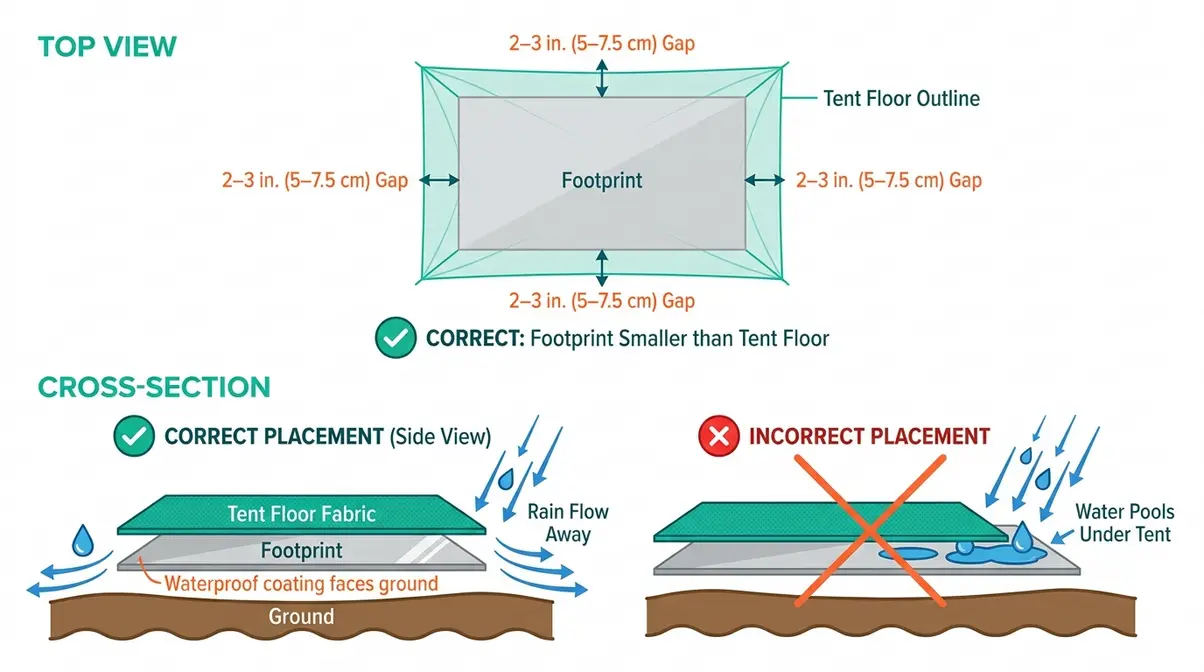
Step 2 — Lay Down the Footprint
The shiny, coated side of the footprint faces the ground — always.
Unfold your footprint (the protective ground cloth) and lay it where your tent will sit. The waterproof, coated side faces down toward the soil. The fabric side faces up, where your tent floor will rest. This matters because the coating blocks ground moisture from wicking upward — flip it and you’ve created a water-collecting tray instead of a barrier.
Size is equally important. The footprint must not extend beyond the tent’s floor perimeter. If the footprint sticks out past the tent walls, it channels rainwater directly under your tent rather than away from it — one of the most common beginner mistakes. Princeton Outdoor Action recommends sizing your footprint 2–3 inches smaller than the tent floor on all sides for this exact reason.
Align the footprint corners with the direction your tent door will face. Most tent bodies have an asymmetrical shape — one end is the door, the other is the back wall — so orientation here saves you repositioning later.
Step 3 — Position the Tent Body
Lay the tent body flat on the footprint, door facing your preferred direction.
Unpack the tent body and unfold it completely on top of the footprint. Shake it out gently to clear any debris that settled during storage. Match the tent’s corner grommets (the metal rings at each corner) to the corresponding footprint corners — these are your anchor points.
Orient the door toward a view you’ll enjoy, or away from the prevailing wind direction if weather is expected. Common pain points reported by beginner campers include setting up the tent facing into the wind — which makes opening the door in rain a soaking experience. Face the door to the side or downwind.
Before moving to poles, make sure the tent body lies completely flat with no bunched fabric. Bunched sections create uneven pole tension and make the tent harder to raise cleanly.
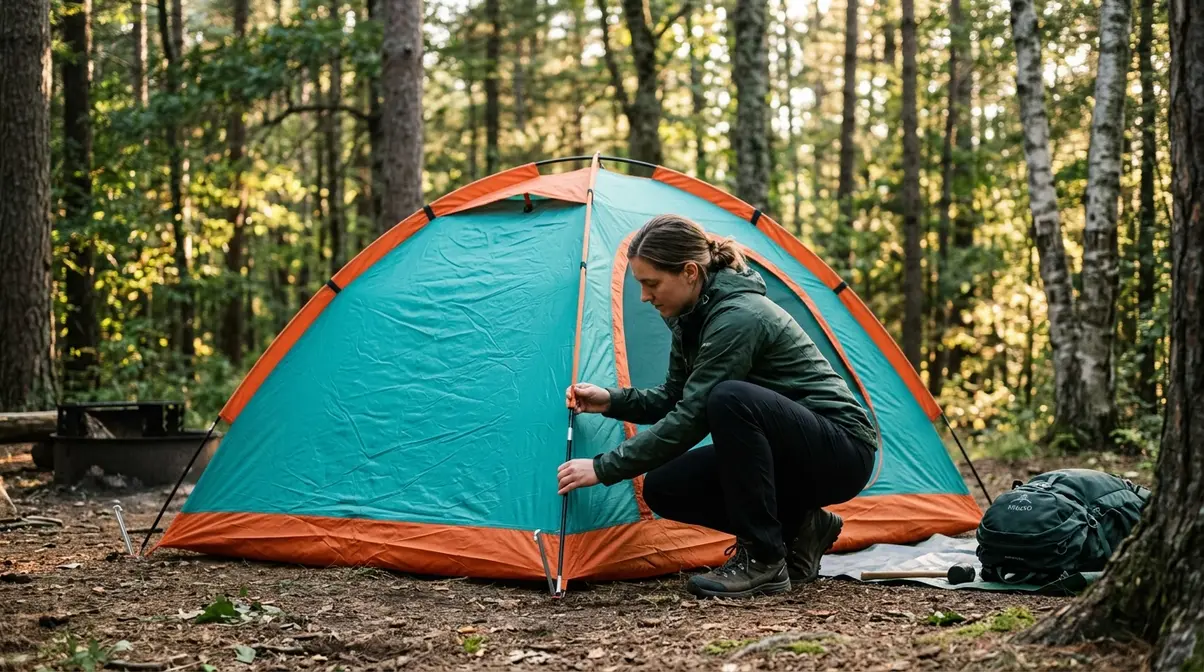
Step 4 — Assemble and Thread the Poles
Connect each pole section firmly, then thread or clip according to your tent’s system.
Most modern camping tent poles are shock-corded — the sections are pre-connected by an internal elastic cord, so you simply unfold and snap them together. Press each joint firmly until it clicks or seats fully. A loose connection will collapse under tension.
Two pole systems exist — know yours:
- Sleeve system: You thread the pole through a fabric sleeve sewn into the tent body. This creates a strong, windproof connection but takes slightly longer.
- Clip system: Small plastic clips on the tent body snap directly onto the assembled pole. Faster to set up, easier for solo campers.
Once your poles are assembled, lay them across the tent in an X pattern (for standard dome tents) and insert each pole tip into the grommet at the corresponding corner. Then gently bow each pole upward until the tent body lifts off the ground. Don’t force it — if a pole won’t bow smoothly, check that all sections are fully seated.
Step 5 — Stake Down the Corners
Stake at a 45-degree angle, leaning away from the tent — before you do anything else.
With the tent body raised by the poles, pull each corner grommet outward and push a stake through it at roughly a 45-degree angle into the ground, leaning away from the tent. This angle matters: a vertical stake pulls straight out under upward wind force; an angled stake resists that force and holds the tent down.
Start with two opposite corners to create tension across the tent floor. Then stake the remaining two corners, pulling the floor taut as you go. A taut floor prevents pooling if any moisture gets inside — another application of The Dry Interior Rule.
Use a mallet or the heel of your boot to drive stakes into firm ground. In soft soil, push stakes in at a steeper angle (closer to 60 degrees) for better holding power. Leave about an inch of the stake visible above ground so you can pull it out during takedown.
Step 6 — Attach Rainfly and Guy Lines
The rainfly (waterproof outer cover) goes on last, pulled taut on all sides.
Drape the rainfly over the fully raised tent body. Most rainflies attach via velcro tabs, buckle clips, or hooks that connect to the tent poles at specific points — your instruction sheet will show the exact attachment locations. Pull the rainfly snug on all sides so no fabric sags against the tent body. Sagging rainfly fabric touches the inner tent wall and transfers moisture directly inside — the most common cause of a “leaking” tent that isn’t actually leaking.
Next, attach the guy lines (the anchor ropes connected to the rainfly’s edges) to the stakes already in the ground, or add new stakes at 45-degree angles away from the tent. Guy lines dramatically improve wind resistance and keep the rainfly taut in gusts. The REI Expert Advice guide recommends always staking out guy lines, even on calm nights, as conditions can change rapidly.
Solo Setup, Tarps, and Pole Systems
Many first-time campers assume tent setup requires two people. It doesn’t — but solo setup does require a slightly different sequence. This section also resolves two of the most common gear questions: do you need a footprint, and what’s the difference between pole systems?
Can I set up a tent by myself?
Solo tent setup is entirely achievable — the key is sequence, not strength.
According to Wirecutter, solo tent setup is completely manageable if you use the ground as your second pair of hands. Most dome tents can be pitched solo in under 20 minutes after one practice run. Here’s the adapted sequence:
- Lay out your footprint and tent body as normal.
- Stake two opposite corners first — this anchors the tent floor so wind can’t flip it while you’re working with poles.
- Assemble your poles and insert them into the grommets or sleeves.
- Bow the poles upward from one end, working toward the other — the staked corners hold the tent body in place while you raise it.
- Stake the remaining two corners once the tent is raised.
- Attach the rainfly and guy lines last.
A clip-system tent is noticeably easier for solo setup than a sleeve system, since you can clip sections of the tent as you go rather than threading a full pole length.
Do I put a tarp under my tent?
A footprint is strongly recommended — a standard tarp works, but requires careful sizing.
The footprint (also called a groundsheet) serves three functions: it blocks ground moisture from wicking into your tent floor, it protects the tent fabric from abrasion on rough terrain, and it adds a thin layer of insulation from cold ground. Without one, rocks and moisture attack your tent floor directly — shortening the tent’s lifespan and increasing the risk of a wet sleeping bag. If you are debating between options, read our guide on tent footprint vs tarp.
If you don’t have a brand-specific footprint, a standard blue tarp works as a substitute. The critical rule: cut or fold the tarp so it is 2-3 inches smaller than your tent floor on all sides, according to Princeton Outdoor Action. A tarp that extends past the tent walls funnels rainwater underneath — the opposite of what you want. Fold the excess under itself rather than cutting if you want to reuse the tarp for other purposes.
A tent-specific footprint is pre-cut to the correct size and typically weighs less than a tarp — worth the investment for regular campers.
Clip vs. Sleeve Pole Systems Explained
Clip systems are faster; sleeve systems are stronger in wind — choose based on your conditions.
| Feature | Clip System | Sleeve System |
|---|---|---|
| Setup speed | Faster (snap clips on) | Slower (thread pole through) |
| Solo friendliness | High | Moderate |
| Wind resistance | Good | Excellent |
| Common in | Backpacking, dome tents | 4-season, expedition tents |
| Pole damage risk | Lower | Lower (fabric protects pole) |
Most beginner camping tents use a clip system for ease of use. If you’re camping in exposed, windy conditions — beach camping, alpine meadows — a sleeve system’s tighter pole-to-body connection provides meaningfully better stability. Consider how accessories play a role; learn what a tent vestibule is to maximize your storage space and wind protection.
Setting Up in Rain and on Hard Surfaces
Weather and terrain don’t always cooperate. These two scenarios — rain during setup and non-soil surfaces — are among the most stressful situations for beginner campers, and both have reliable solutions.
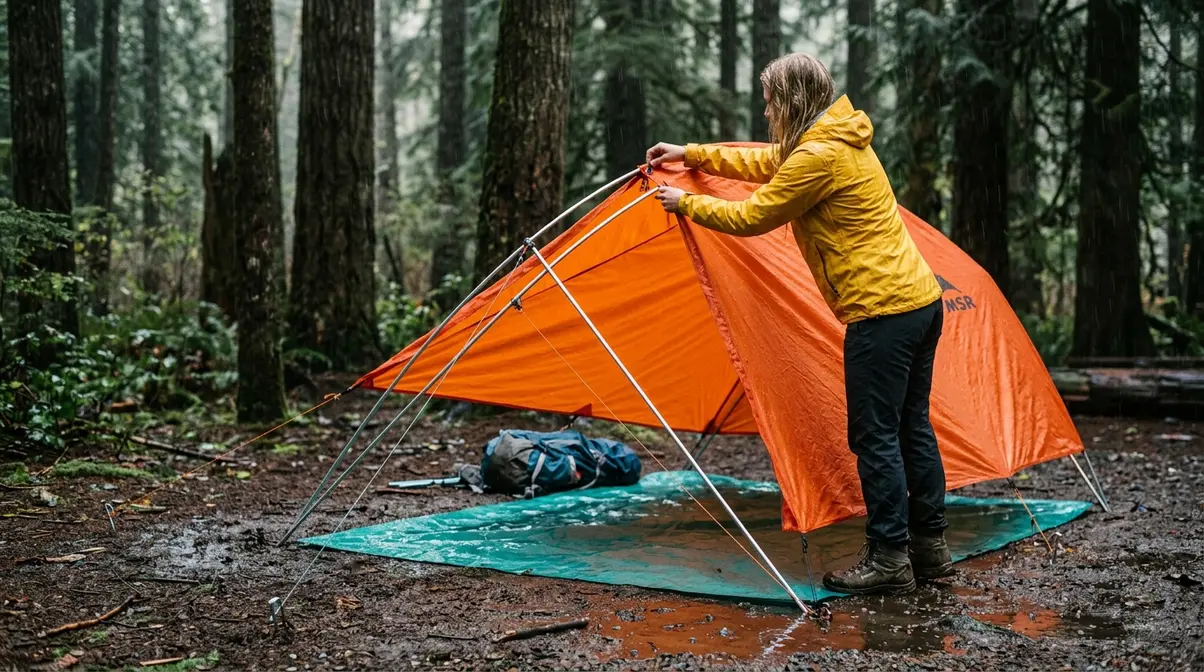
How to Set Up Your Tent in the Rain
Attach the rainfly first — before unfolding the tent body — when rain is already falling.
This reverses the standard sequence and is the single most effective technique for keeping your interior dry during a wet-weather setup. As recommended by Scouting Magazine, attaching the rainfly first creates an immediate umbrella. Here’s the modified order:
- Stake your footprint corners so it doesn’t blow away.
- Drape the rainfly over the footprint (inside-out, if needed, as a temporary shelter).
- Unpack and connect your poles under the rainfly’s cover.
- Attach the tent body to the poles from underneath, working inside the shelter of the rainfly.
- Stake corners and attach guy lines.
Keep your tent stuff sack inside your pack until the last moment — a wet stuff sack makes repacking miserable. The BLM’s camping guidance recommends always having your rainfly accessible at the top of your pack, not buried at the bottom, for exactly this scenario. If you frequently face storms, investing in the best tent for wind and rain is crucial. Families might also consider the 10 best cabin tents for rain in 2026.
Do all tents leak in heavy rain? Not if properly set up. The most common cause of interior wetness is a sagging rainfly that contacts the inner tent wall — water wicks through the contact point. Keep the fly taut and maintain that air gap between fly and body.
Pitching on Concrete, Sand, or Rock
Stakes won’t work on hard surfaces — use weight, guy lines, and creative anchoring instead.
- On concrete (car camping at a paved site) or rock:
- Fill stuff sacks or dry bags with rocks or sand and tie them to the guy line anchor points.
- Use heavy coolers or gear bags placed on the tent’s corner tabs to hold the floor down.
- Freestanding dome tents work best here — they don’t require staking to hold their shape, though anchoring is still strongly recommended.
- On sand:
- Use sand stakes (wide, paddle-shaped) if available — standard stakes pull out easily in loose sand.
- Bury standard stakes horizontally (called a “deadman anchor”) — lay the stake flat 6–8 inches deep and run the guy line up to the surface. The soil resistance across the length of the stake provides far more holding power than a vertical stake in sand.
Setup Differences by Tent Type
Not all tents assemble the same way. The 6-step core process applies broadly, but each tent type has specific quirks worth knowing before you’re standing in a campsite. The US Forest Service advises pitching your shelter on durable surfaces at least 200 feet from water, regardless of which model you choose.
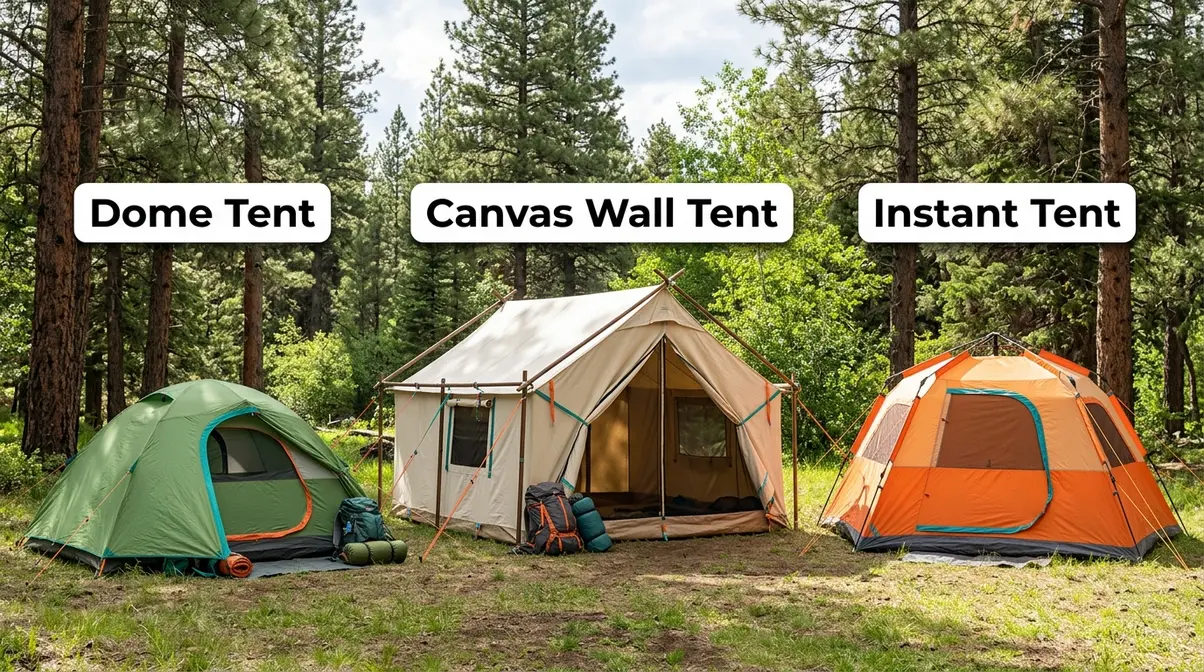
Dome and Cabin Tents
Dome tents are the most beginner-friendly design — two crossing poles create a self-supporting arch, and most use a clip system. The 6-step process in this guide was written with dome tents in mind.
Cabin tents have near-vertical walls for more interior headroom and typically use multiple poles that connect at a central hub or ridge. Setup takes longer (20–40 minutes is typical) and strongly benefits from a second person during pole insertion, since the tent body won’t stand on its own until all poles are in place. Outdoor Life’s pitching guide recommends laying all cabin tent poles out in sequence before inserting any — it prevents the common mistake of grabbing the wrong pole mid-setup.
Pop-Up and Instant Tents
Pop-up tents use a spring-loaded frame that deploys automatically when you release it from its folded state. Setup takes under 60 seconds — but collapsing one correctly is an art form beginners often struggle with (see the takedown section below).
Instant tents have pre-attached poles that unfold like an umbrella. Extend the center hub, spread the legs, and stake the corners. Most instant tents are ready in 60–90 seconds. You can explore the best instant tents for quick setup family camping if convenience is your priority. The trade-off: they’re heavier than standard dome tents and the pre-attached poles make them harder to pack tightly.
Wall Tents and Canvas Tents
Wall tents (also called canvas tents) like the Morsan 10×10 referenced above are a different category entirely. They typically use a rigid internal frame of vertical poles and horizontal ridge poles — no flexible bowing involved. Setup sequence: assemble the frame first, then drape the canvas body over it, then stake out the perimeter and guy lines. Canvas is heavy, so a second person makes a significant difference. Hunters often rely on the best wall tent for hunting, while event planners might need a DIY wedding tent. Always check the manufacturer’s instruction sheet, as frame configurations vary widely between brands.
How to Take Down and Pack Your Tent
Breaking camp cleanly protects your gear and makes the next setup faster. Rushing takedown — especially with pop-up tents — is where most gear damage occurs.
Standard Tent Takedown in 5 Steps
- Remove the rainfly first — unclip or unhook it, shake off moisture and debris, and lay it flat to air out briefly before folding.
- Pull all stakes — walk the perimeter and collect every stake. A stake left in the ground is a stake lost forever.
- Disconnect and collapse the poles — unclip or pull the pole tips from the grommets, then fold each pole section back on itself (don’t yank — let the shock cord guide the collapse). Store poles in their sleeve.
- Fold the tent body — fold in thirds lengthwise, then roll tightly from the back wall toward the door, pushing air out as you go.
- Pack in reverse order — poles and stakes go in first (they’re heavier and sit at the bottom), tent body next, rainfly on top for quick access at your next site.
Dry everything before storing long-term. Mold and mildew are the primary causes of tent fabric degradation, according to outdoor gear care communities.
How to Collapse a Pop-Up Tent
Collapsing a pop-up tent requires a specific folding technique — forcing it flat will damage the frame.
The standard method (works for most circular pop-up tents):
- Remove all stakes and guy lines.
- Flatten the tent into a disc shape by pressing the top and bottom together.
- Twist one side of the disc forward while pressing the other side back — you’re creating a figure-8 shape with the frame.
- Fold the figure-8 in half so the three loops stack on top of each other.
- Secure with the carrying straps and slide into the circular storage bag.
Practice this at home before your trip. The motion feels counterintuitive the first time — most beginners try to fold it like a regular tent and bend the frame instead.
Tent Care and Maintenance Basics
A well-maintained tent lasts a decade or more. Two maintenance tasks matter most for beginners.
Waterproofing and Seam Sealing
The rainfly’s waterproof coating (called DWR — Durable Water Repellent) degrades over time and with washing. When water stops beading on the fly surface and instead soaks in, it’s time to reapply. A spray-on DWR treatment (available at any outdoor retailer) restores water repellency in minutes.
Seam sealing — applying liquid sealant to the stitched seams on your tent floor and rainfly — prevents water from entering through needle holes. Many new tents come factory-sealed, but older or budget tents may need sealing before first use. For a full walkthrough, our guide to waterproofing spray for tents and seam sealing tutorial cover both processes in detail.
Fixing a Stuck Zipper
A stuck tent zipper is usually caused by dirt, sand, or misaligned teeth — not a broken zipper. Fix it by:
- Brushing debris from the zipper teeth with a stiff toothbrush.
- Running a zipper lubricant (beeswax, a candle stub, or a product like Gear Aid Zipper Lubricant) along both sides of the teeth.
- Gently working the slider back and forth while applying light forward pressure — don’t force it.
If the zipper slider has spread apart (the teeth pass through but don’t close), use pliers to gently squeeze the slider back together. This fixes the majority of “broken” tent zippers without any replacement parts.
Common Tent Setup Mistakes to Avoid
Even with a clear guide, first-timers make predictable errors. Knowing them in advance is the fastest way to avoid a frustrating first night.
Pitfalls That Ruin Your First Night
The Dry Interior Rule catches most of these — if you ask “does this keep the inside dry?” before each step, you’ll avoid the top mistakes:
- Footprint extends past the tent floor — channels rain underneath. Fold or trim it smaller.
- Rainfly sags against the tent body — transfers moisture inside. Pull the fly taut and stake out guy lines.
- Skipping guy lines on a “calm” night — weather changes fast. Always stake them.
- Ignoring ground slope — even a 3-degree tilt means you’ll slide toward the low end all night. Sleep with your head uphill.
- Packing a wet tent — leads to mold within days. Air it out before storage, even briefly.
- Not practicing at home first — setup takes 3× longer at the campsite the first time. One backyard run-through changes everything.
Common pain points reported by beginner campers also include forgetting to check all pole connections before raising the tent — a loose joint collapses the structure mid-raise and can crack the pole tip.
Which side of the footprint goes down?
The shiny, coated (waterproof) side faces the ground. The fabric side faces up, where your tent floor rests. This positioning blocks ground moisture from wicking upward into your sleeping area. Equally important: the footprint must not extend beyond the tent’s floor perimeter. If it sticks out, it collects rainwater and channels it directly under your tent — one of the most common beginner mistakes that leads to a wet sleeping bag.
When to Choose a Different Shelter Type
A standard dome tent isn’t the right tool for every situation:
- Hammock camping is better for wooded areas with no flat ground — no floor moisture risk at all.
- A bivy sack is better for ultralight solo overnight trips where weight is the priority over comfort.
- A screen house or tarp shelter is better for fair-weather group camping where ventilation matters more than weather protection.
If your tent is a large wall tent or canvas tent and you’re setting it up alone for the first time, consider reaching out to the manufacturer for model-specific guidance — frame configurations vary enough that a general guide can only take you so far.
Frequently Asked Questions
How do you set up a tent step by step?
Setting up a tent follows six steps: choose and clear your site, lay down the footprint (coated side down), unfold the tent body on top, assemble and insert the poles, stake the corners at a 45-degree angle, then attach the rainfly and secure the guy lines. Most standard dome tents take 15–30 minutes for beginners, according to REI’s setup guidelines. Practicing once at home before your trip cuts that time significantly, according to consistent advice across outdoor educator communities.
How do you set up a tent in 6 steps?
The six core steps are: (1) find and clear a flat site, (2) lay the footprint coated-side down, (3) unfold and orient the tent body, (4) assemble and insert the poles, (5) stake the corners at 45-degree angles, and (6) attach the rainfly and stake out the guy lines. Every step in this sequence is governed by The Dry Interior Rule — if it keeps the inside dry, it’s correct.
What is the golden rule of camping?
The golden rule of camping is “Leave No Trace” — leave your campsite in the same or better condition than you found it. This includes pitching your tent on established surfaces (bare dirt, tent pads) rather than vegetation, packing out all trash, and minimizing fire impact. The Leave No Trace Center outlines seven core principles that apply to all outdoor recreation.
What do you put underneath a tent?
A footprint (purpose-made ground cloth) is the best option — it’s pre-cut to your tent’s dimensions, lightweight, and waterproof on one side. A standard blue tarp works as a substitute if sized correctly (smaller than the tent floor). Some campers also use a thin foam pad between the footprint and tent floor for extra insulation from cold ground. Avoid using anything that extends beyond the tent’s perimeter, as it redirects rain under the floor.
Do all tents leak in heavy rain?
No — a properly set-up tent with a fully attached, taut rainfly should remain dry in most rain conditions. The most common cause of interior wetness isn’t a leaking tent — it’s a sagging rainfly that contacts the inner tent wall, allowing water to wick through. Condensation from breathing inside the tent can also be mistaken for leaking. Older tents with degraded seam sealing or DWR coating may need resealing before heavy rain. Our seam sealing guide covers the repair process in full.
How long does it take to set up a tent?
Most standard dome tents take 15–30 minutes for beginners to pitch. Practicing at home in your backyard can cut this time significantly once you understand your specific pole configuration. Always account for extra time if you are setting up in the dark, dealing with high winds, or managing a complex cabin tent.
Where should you not set up a tent?
You should never set up a tent in low-lying areas or drainage channels where water naturally collects. Avoid pitching directly under dead trees or heavy branches that could fall during a storm. It is also best to stay at least 200 feet away from lakes and streams to protect fragile riparian ecosystems. Finally, avoid setting up on delicate alpine vegetation; always look for established bare dirt or rock pads.
How do I keep my tent interior dry?
The most effective method is following The Dry Interior Rule during setup. This means ensuring your footprint is smaller than your tent floor, keeping your rainfly taut so it doesn’t touch the inner walls, and staking guy lines to prevent wind from blowing rain under the fly. Keeping wet gear in a vestibule rather than inside the main sleeping area also drastically reduces interior moisture.
Set Up Once, Sleep Well Every Time
For anyone staring at a pile of poles and fabric, knowing how to set up a tent step by step transforms a frustrating puzzle into a repeatable skill. The six-step sequence — site selection, footprint placement, tent body layout, pole assembly, corner staking, and rainfly attachment — covers the full process for most standard camping tents.
The Dry Interior Rule is the thread connecting every decision: the footprint goes coated-side down because it blocks ground moisture; the rainfly goes on last and taut because a sagging fly transfers rain inside; stakes angle away from the tent because that geometry resists upward wind force. Ask “does this keep the inside dry?” at each step and you’ll make the right call — even in conditions the guide didn’t anticipate.
Your next step: unpack your tent in the backyard this weekend and run through the six steps once before your trip. One dry run eliminates the majority of first-campsite frustration. If you’re ready to go further, explore our guides on choosing the right tent size, campsite selection tips, and essential camping gear for beginners — every one of them builds on the foundation you’ve just learned.
