This blog post may contain affiliate links. As an Amazon Associate I earn from qualifying purchases.
📋 Table of Contents
- What You’ll Need Before You Start
- Materials & Tools Checklist
- Site Assessment: Is Your Venue Ready?
- How to Size Your DIY Wedding Tent
- The Square-Footage Formula
- Tent Size Chart by Guest Count
- How many people can fit in a 40×60 wedding tent?
- How many people can a 20×40 wedding tent fit?
- Dance Floor, Buffet & Bar Space
- Standard Tent Dimensions and Capacity
- DIY vs. Renting a Wedding Tent Cost
- How much does it cost to rent a wedding tent for 100 people?
- DIY Material Cost Breakdown
- DIY Wedding Tent Budget Worksheet Template
- Comparison Table: DIY vs. Rental
- Budget-Friendly Tent Alternatives
- Permits, Safety & Weather Requirements
- Do You Need a Permit?
- Anchoring and Wind Load Requirements
- Lightning and Weather Safety
- How to Build Your DIY Wedding Tent: Step-by-Step
- Step 1 – Choose Tent Type & Material
- Step 2 – Site Preparation
- Step 3 – Assembling the Frame
- Step 4 – Attaching the Cover
- Step 5 – Anchoring and Weatherproofing
- Step 6 – Final Safety Check
- How to Decorate Your Wedding Tent
- Tent Draping: A Step-by-Step Guide
- Lighting Ideas That Create Atmosphere
- Florals, Focal Points & Entrance Decor
- Flooring Options for a Polished Look
- Common DIY Wedding Tent Mistakes
- The 5 Most Costly Setup Mistakes
- When to Hire a Professional Instead
- Frequently Asked Questions
- How do you make your own wedding tent?
- How many tents do you need for 100 guests?
- How big of a tent do you need for 150 guests at a wedding?
- How do you make a tent look pretty for a wedding?
- What is the best material for a DIY wedding tent frame?
- Do you need a permit for a backyard wedding tent?
- How do you secure a tent on concrete without stakes?
- Your DIY Wedding Tent Blueprint
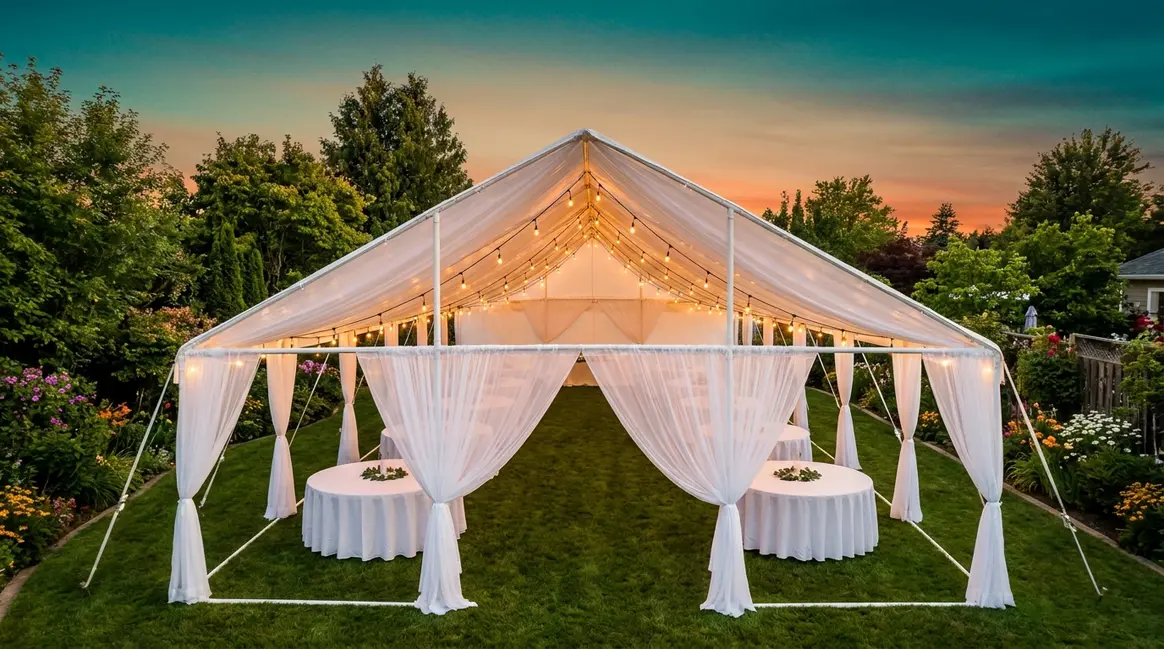
You’ve spent hours scrolling through Pinterest. The tent weddings look stunning — but every guide you find either tells you to rent a $3,000 tent or gives you five vague steps and calls it a day. That gap between inspiration and reality is exactly what stops most couples from going the DIY route.
A professional tent rental for 100 guests runs $600 to over $2,500 (Brides.com, 2026). Meanwhile, a well-built DIY wedding tent — a temporary outdoor shelter you build yourself using a PVC or metal frame covered with a waterproof tarp or fabric — can cost a fraction of that. At TentExplorer, our team has evaluated dozens of DIY tent setups, and we know the difference between a tent that holds up and one that sags by hour two.
In this DIY wedding tent guide, you’ll get the exact sizing formulas, a step-by-step build sequence, safety-first anchoring guidance, and professional draping techniques. We cover how to size your tent for 100–150 guests, compare DIY vs. rental costs, walk through the complete build process, and show you how to transform a basic frame into a beautiful backyard wedding venue.
This diy wedding tent guide proves that a DIY wedding tent for 100–150 guests requires 15–20 square feet per person — meaning roughly a 40×60 to 40×80 foot structure for a seated dinner — and costs significantly less than the $600–$2,500 rental average (Brides.com, 2026).
- The Tent Triangle: Every successful DIY tent balances Size, Safety, and Style equally — miss one side and the whole structure fails
- Sizing comes first: Calculate your square footage before buying a single pipe or tarp
- Anchoring is non-negotiable: OSHA standards require specific wind-load anchoring for all temporary structures
- Budget reality: DIY material costs typically run $300–$800 for a standard 20×40 frame setup
- Permits matter: Many municipalities require a permit for tents over 400 sq ft — check before you build
What You’ll Need Before You Start

Before you drive a single stake into the ground, you need two things locked in: the right materials and a site that’s actually ready for a tent. Skipping this prep step is the number-one reason DIY tents sag, shift, or fail on the big day. By the end of this section, and before you learn how to build your own wedding tent, you’ll have a complete pre-build checklist covering every tool, material, and site condition you need to verify.
Before you buy a single pipe, understand that a great DIY wedding tent requires three things to work together: the right Size, solid Safety, and stunning Style. We call this The Tent Triangle — and every section of this guide addresses one side of it. Neglect any single side, and the whole structure — literally and aesthetically — falls apart.
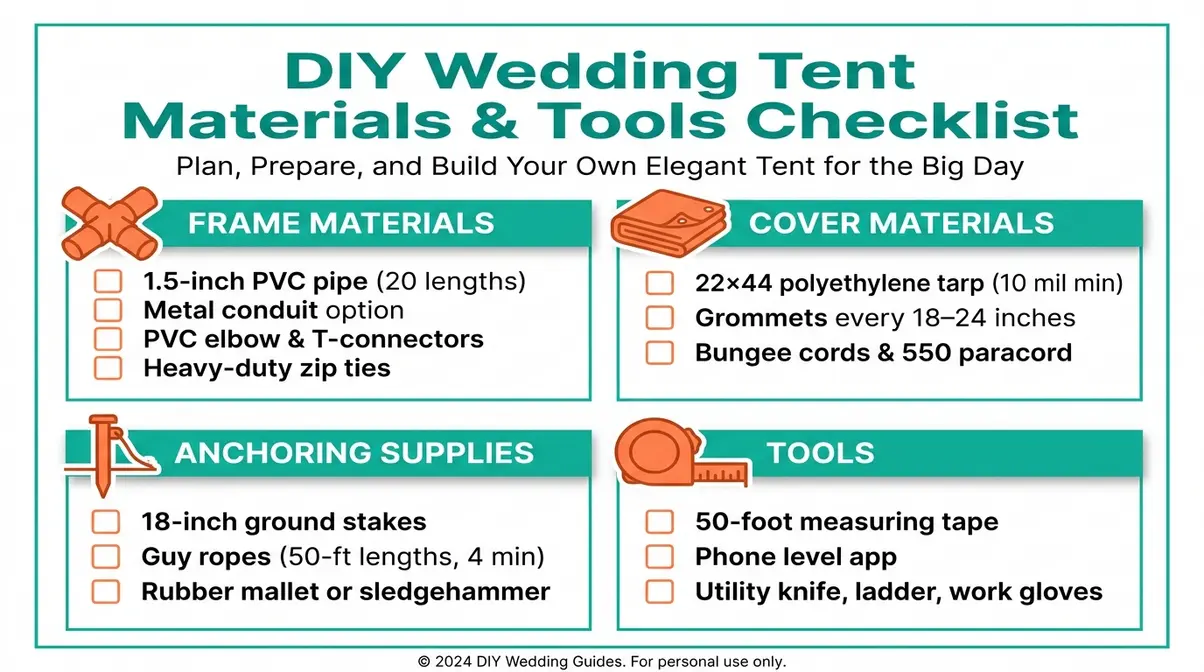
Materials & Tools Checklist
Your DIY party tent frame starts with the right pipes and connectors. Here’s everything you’ll need for a standard 20×40 tent setup, available at Home Depot, Lowe’s, or online:
- Frame Materials:
- PVC pipe (PVC pipe is a lightweight, affordable plastic tubing sold at any hardware store) — 1.5-inch diameter, 10-foot lengths; plan for approximately 20 lengths for a 20×40 frame
- Metal conduit (a heavier but more wind-resistant alternative to PVC) — use in place of PVC if your venue is exposed to open-field winds
- PVC elbow and T-connectors (to join pipe sections at corners and ridge points)
- Zip ties (heavy-duty, 50-lb rated minimum) for secondary securing
- Cover Materials:
- A heavy-duty polyethylene tarp (the most common DIY canopy tent outdoor covering) — 10 mil minimum thickness for weather resistance; a 22×44 tarp covers a 20×40 frame with overhang
- Grommets (metal rings crimped into the tarp edges for rope attachment) — verify your tarp has grommets every 18–24 inches along the perimeter
- Bungee cords or 550 paracord rope for securing the cover to the frame
- Anchoring Supplies:
- Heavy-duty ground stakes — 18-inch minimum length for soft soil
- Guy ropes (the diagonal support lines that keep the frame from leaning) — 50-foot lengths, minimum 4 per tent
- Rubber mallet or sledgehammer for driving stakes
- Tools:
- Measuring tape (at least 50 feet)
- Phone level app or physical level
- Utility knife, ladder, and work gloves
“PVC pipes are key to building an affordable DIY wedding tent.”
Site Assessment: Is Your Venue Ready?
For a backyard wedding, the most common mistake is choosing a spot that looks flat but isn’t. Run through this five-question site checklist before committing to a location:
- Is the ground flat? A slope greater than 2 degrees causes frame instability and water pooling under your tent floor. Check with a free phone level app. Fix if not: Rent a plate compactor to level the area, or shift the tent 10–15 feet to a flatter zone.
- What’s your ground type? Stakes grip best in soft soil or grass. Concrete or pavers require weighted base plates (flat metal plates that anchor the frame when staking into hard surfaces is impossible). Fix if not: Order or rent base plates — standard rental cost is $10–$20 per plate.
- Any overhead hazards? Check for low-hanging branches, power lines, or roof overhangs within 10 feet of the tent perimeter. Fix if not: Trim branches at least two weeks before the event; call your utility company for line clearance.
- Where does water drain? Identify the downhill direction. Never orient a tent opening toward the drainage flow. Fix if not: Rotate the tent 90 degrees so rain runoff flows away from guests.
- Is there clear access? Confirm a 10-foot-wide path for setup crew and any delivery vehicles. Fix if not: Remove temporary obstacles (patio furniture, planters) the day before setup.
Your site is ready. Now let’s calculate exactly how much tent you need — because sizing is where most DIY wedding tent projects go wrong before they even begin.
How to Size Your DIY Wedding Tent
Getting the size right is the first side of The Tent Triangle — and it’s the most mathematical. The good news: one simple formula handles 90% of sizing decisions. Mess this up and you’ll either crowd your guests or waste money on canvas you don’t need. This section gives you the exact numbers for 100 to 150 guests across every layout type.
The Square-Footage Formula
The standard rule is 15–20 square feet per person for a seated dinner (American Tent, 2026). That range isn’t arbitrary — it accounts for the chair itself, the space to pull it out, and comfortable elbow room between tables.
Here’s how to apply it:
Formula: Guest Count × Square Feet Per Person = Minimum Tent Area
| Layout Type | Sq Ft Per Person | Why It Differs |
|---|---|---|
| Seated dinner (round tables) | 15–18 sq ft | Tables are efficient; aisles narrow |
| Seated dinner (rectangular tables) | 12–15 sq ft | Slightly more compact layout |
| Cocktail/standing reception | 8–10 sq ft | No chairs, guests circulate |
| Dance floor included | Add 3–4 sq ft per guest | Accounts for open floor area |
| Buffet line added | Add 100–150 sq ft total | One fixed addition regardless of count |
For 100 guests (seated dinner): 100 × 18 = 1,800 sq ft minimum → a 40×50 tent (2,000 sq ft) gives you the right buffer. For 150 guests (seated dinner): 150 × 18 = 2,700 sq ft minimum → a 40×70 (2,800 sq ft) or 40×80 (3,200 sq ft) tent covers it with room for flow.
For a deeper dive into understanding wedding tent capacity, always round up to the next standard tent dimension. A tent that feels slightly spacious photographs better and keeps guests comfortable during warm weather.
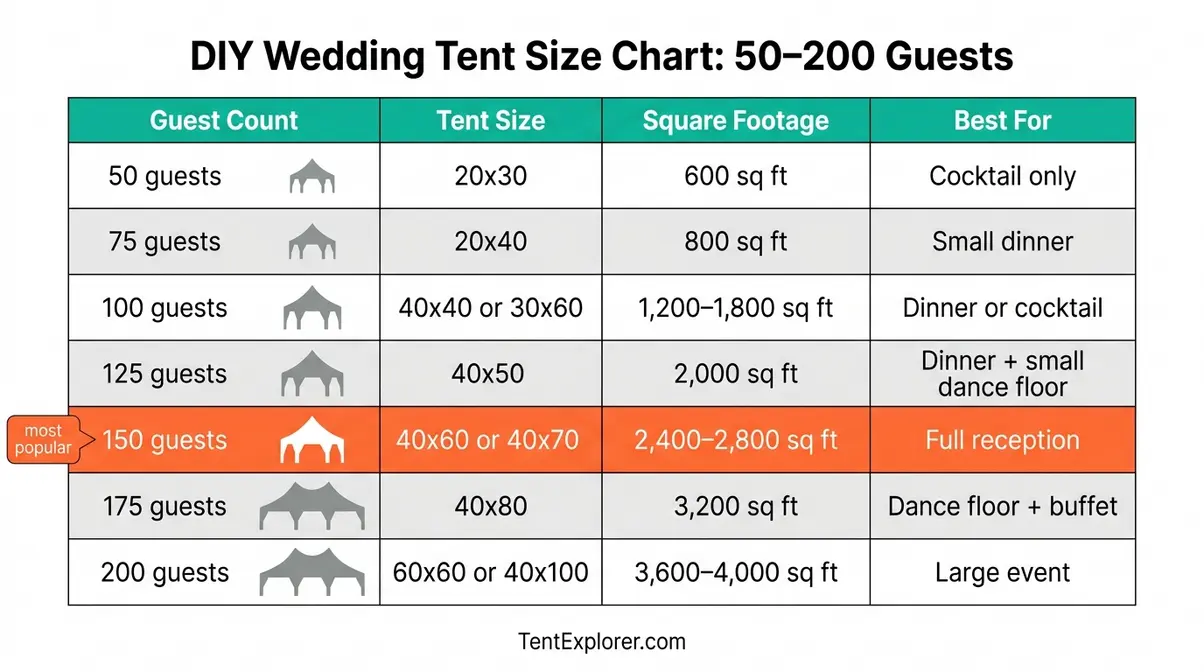
Tent Size Chart by Guest Count
Use this chart as your quick-reference sizing guide. All dimensions assume a seated dinner layout with a small dance floor included.
| Guest Count | Minimum Tent Size | Sq Footage | Notes |
|---|---|---|---|
| 50 guests | 20×30 | 600 sq ft | Tight; no dance floor |
| 75 guests | 20×40 | 800 sq ft | Comfortable cocktail; tight dinner |
| 100 guests | 40×40 or 30×60 | 1,200–1,800 sq ft | 40×40 for cocktail; 30×60 for dinner |
| 125 guests | 40×50 | 2,000 sq ft | Comfortable dinner + small dance floor |
| 150 guests | 40×60 or 40×70 | 2,400–2,800 sq ft | 40×60 tight; 40×70 recommended |
| 175 guests | 40×80 | 3,200 sq ft | Includes dance floor + buffet space |
| 200 guests | 60×60 or 40×100 | 3,600–4,000 sq ft | Two tents may be more practical |
How many people can fit in a 40×60 wedding tent?
A 40×60 tent (2,400 sq ft) comfortably seats 120–150 guests for a dinner reception using round tables (American Tent, 2026). With a cocktail layout (no chairs), it can hold up to 240 people. If you include a dance floor (15×15 ft), reduce the seated capacity to 110–130 guests to maintain comfortable spacing. The 40×60 is one of the most popular standard sizes for mid-size weddings and is widely available from both rental companies and frame kit suppliers.
How many people can a 20×40 wedding tent fit?
A 20×40 tent (800 sq ft) works for 50–65 seated guests or up to 80 guests for a standing cocktail event (GetTent, 2026). This size does not include space for a dance floor — if dancing is planned, either reduce the seated count to 40–50 guests or step up to a 20×60 or 30×40 tent. The 20×40 is the most popular starter size for DIY backyard weddings and the easiest frame configuration to build with PVC pipe.
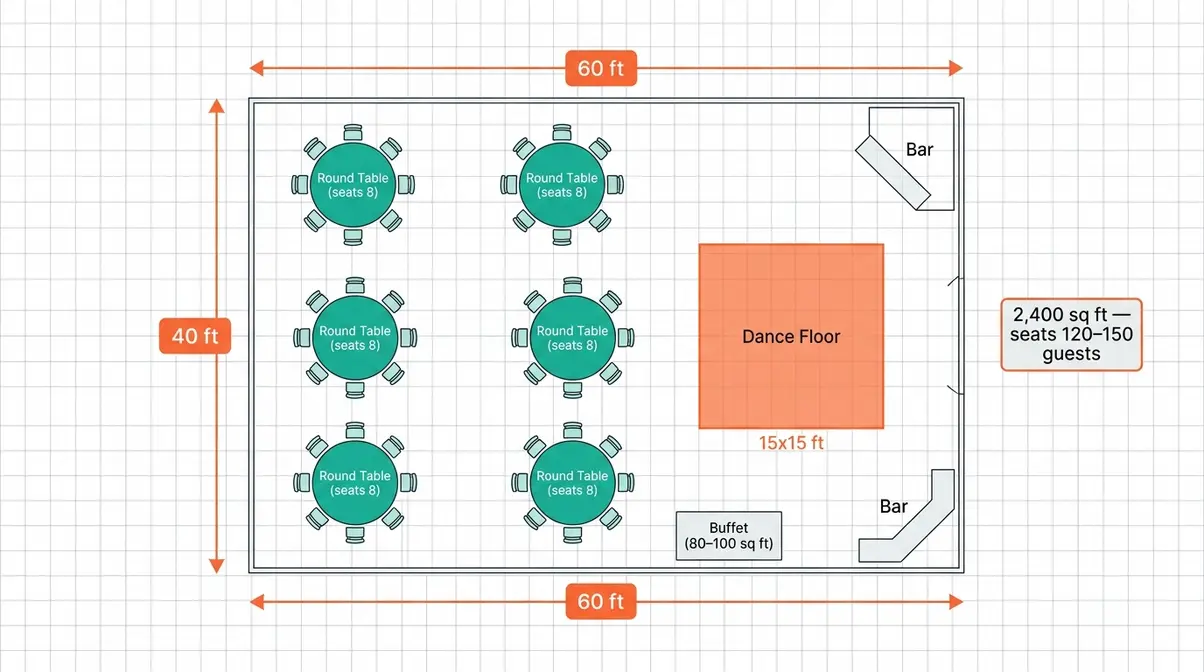
Dance Floor, Buffet & Bar Space
Sizing for guests is only half the equation. You also need to account for the functional zones inside your tent. Here’s how each element adds to your footprint:
- Dance floor: A 12×12 ft dance floor suits 50–75 guests; scale to 15×15 ft or 20×20 ft for 100–150 guests. Add this square footage directly to your guest-count calculation.
- Buffet tables: A standard 8-foot buffet table with service space on both sides needs roughly 80–100 sq ft. For a full buffet setup with two lines, budget 150–200 sq ft.
- Bar station: A single bar setup needs 80–100 sq ft including the back bar and guest queuing space.
- DJ or band: A DJ setup requires 50–75 sq ft; a live band needs 150–300 sq ft depending on size.
- Head table or sweetheart table: Add 50–75 sq ft for a raised head table with chairs accessible from all sides.
Practical tip: Draw a rough floor plan on graph paper (1 square = 5 feet) before finalizing your tent size. Arrange tables, dance floor, and service stations first — then draw the tent boundary around them with at least 3 feet of clearance from frame to nearest table.
Standard Tent Dimensions and Capacity
Tent manufacturers produce frames in standardized increments, so your sizing calculation needs to land on a real dimension. The most common standard sizes for DIY or rental tents are:
- 10×10: Personal shade canopy — suitable for a single vendor booth or photo booth, not a reception
- 20×20: Up to 30 seated guests; ideal for ceremony-only setup
- 20×40: 50–65 seated guests; the most popular starter DIY size for small backyard weddings
- 30×60: 100–120 seated guests; requires a more robust metal or aluminum frame
- 40×60: 120–150 seated guests; typically beyond PVC DIY capacity — consider a professional frame kit
- 40×80: 150–180 seated guests; professional-grade frame required
How many tents for 100 guests? One 30×60 or 40×50 tent handles 100 guests comfortably. Alternatively, two 20×40 tents connected by a shared corridor works well for separating dining and dancing zones — and it keeps each structure within a manageable DIY size.
For reference on professional sizing standards, GetTent’s tent planning guide provides detailed layout recommendations for events of all sizes.
DIY vs. Renting a Wedding Tent Cost
The second side of The Tent Triangle is Safety — but before you commit to building, you need to know whether DIY actually saves you money. The answer depends on your guest count, location, and how handy you are. Here’s the transparent comparison most guides skip. When following this diy wedding tent guide, tracking every expense is crucial to ensuring you actually save money.
How much does it cost to rent a wedding tent for 100 people?
Tent rental for 100 guests typically costs $600–$2,500 depending on tent type and region (Brides.com, 2026). That range is wide because the tent itself is only part of the bill. According to Statista data on wedding rental costs, event rentals consume a significant and growing portion of the average wedding budget in 2026.
Typical rental line items include:
| Item | Estimated Cost |
|---|---|
| Tent structure (20×40 basic frame) | $400–$900 |
| Delivery and setup fee | $150–$400 |
| Sidewalls (optional, per panel) | $50–$150 each |
| Lighting package (basic) | $100–$300 |
| Flooring (per sq ft) | $1.50–$4.00/sq ft |
| Damage deposit (refundable) | $200–$500 |
| Total (basic 100-guest setup) | $900–$2,500+ |
Prices vary significantly by region — urban markets run 30–50% higher than rural areas. Weekend premiums add another 10–20%. The rental quote rarely includes tables, chairs, or linens.
DIY Material Cost Breakdown
A well-planned DIY wedding tent using PVC pipe and a heavy-duty polyethylene tarp (a “DIY party tent with tarp” setup) can cost dramatically less. Here’s a realistic breakdown for a 20×40 frame:
| Item | Quantity | Est. Unit Cost | Total |
|---|---|---|---|
| 1.5-inch PVC pipe (10-ft lengths) | 20 | $5–$8 | $100–$160 |
| PVC connectors (elbows, T-joints) | 20 | $2–$4 | $40–$80 |
| 22×44 heavy-duty polyethylene tarp | 1 | $80–$150 | $80–$150 |
| Ground stakes (18-inch) | 16 | $3–$5 | $48–$80 |
| Guy ropes (50-ft lengths) | 8 | $8–$12 | $64–$96 |
| Zip ties, bungee cords | 1 pack | $15–$25 | $15–$25 |
| Miscellaneous (mallet, tape, etc.) | — | — | $20–$40 |
| Total | $367–$631 |
Sourcing your materials strategically can further reduce these costs. Buying PVC pipe in bulk from a dedicated plumbing supply house rather than a big-box retailer often saves 15-20%. Similarly, ordering your heavy-duty polyethylene tarp directly from an industrial supplier ensures you get the required 10-mil thickness without the retail markup. Don’t forget to account for hidden costs like extra zip ties, heavy-duty tape, and transportation if the 10-foot pipes won’t fit in your vehicle. For a 30×60 setup serving 100–120 guests, expect to spend $600–$1,100 on materials — still below most rental quotes, and you keep the materials afterward.
DIY Wedding Tent Budget Worksheet Template
To keep your project on track and avoid mid-build surprises, use this simple budgeting checklist to map out your expected costs before heading to the hardware store:
- [ ] Frame Materials: Pipe, connectors, and transport (Target: $150)
- [ ] Cover Materials: Tarp, grommet repair kit, bungees (Target: $120)
- [ ] Anchoring: Stakes, guy ropes, mallet (Target: $100)
- [ ] Tools: Level, measuring tape, ladders (Target: $0 – borrow these)
- [ ] Contingency: 15% buffer for broken parts or extra anchors (Target: $50)
Comparison Table: DIY vs. Rental
| Factor | DIY Build | Professional Rental |
|---|---|---|
| Upfront cost (100 guests) | $367–$631 | $900–$2,500 |
| Setup time | 3–6 hours (2+ people) | Included in fee |
| Customization | Full control | Limited to available inventory |
| Weather resistance | Depends on materials chosen | Engineered for load rating |
| Reusability | Yes — keep and reuse | Single-use rental |
| Permit responsibility | Yours | Often handled by vendor |
| Risk level | Higher (DIY skill required) | Lower (professional install) |
| Best for | Budgets under $1,000, handy couples | Guests 150+, limited DIY experience |
Budget-Friendly Tent Alternatives
If a full tent structure feels like too much, these alternatives to tents can deliver a similar effect at lower cost:
- Market umbrellas: Heavy-duty 9–11 ft commercial umbrellas at $80–$200 each. Cluster 5–6 for a cocktail-hour shade zone. They are incredibly easy to set up but offer zero protection from sideways rain.
- Pergola with draped fabric: Rent or build a simple wooden pergola frame and hang sheer fabric panels. Costs $150–$400 in lumber and fabric. This provides excellent aesthetics but minimal weather protection.
- Sailcloth canopy: Triangular shade sails attached between posts or trees. A 20×20 shade sail costs $60–$120. Not weatherproof but beautiful for dry climates.
- Event tarp shelter: A heavy-duty tarp strung between trees or posts with paracord — the most budget-friendly option at $30–$80. Works for ceremonies in sheltered locations.
Each alternative trades some weather protection for simplicity and lower cost. For a full dinner reception, a proper tent structure remains the most reliable choice.
Permits, Safety & Weather Requirements
⚠️ Safety Disclaimer: Building a temporary structure to shelter wedding guests is a personal safety matter. The guidance below is based on OSHA standards, NFPA fire codes, and National Weather Service protocols. It is not a substitute for consulting your local building department, fire marshal, or a licensed structural engineer. Always verify local requirements before setup.
This is the safety side of The Tent Triangle — and it’s the side most DIY guides completely ignore. Skipping permits or under-anchoring a tent doesn’t just risk a fine; it risks injury to your guests. These steps are non-negotiable.
Do You Need a Permit?
Many municipalities require a permit for any tent exceeding 400 square feet — that’s roughly a 20×20 tent. A 20×40 tent (800 sq ft) almost certainly requires one in most U.S. jurisdictions (NYC Department of Buildings, 2026).
Permit requirements vary by location, but here’s what to expect:
- Threshold: Most cities trigger permit requirements at 400 sq ft (NFPA 101, Life Safety Code). Some start as low as 200 sq ft.
- What they check: Frame anchoring method, fire extinguisher placement, exit locations, and maximum occupancy
- Typical cost: $50–$200 for a temporary structure permit
- Lead time: Apply at least 3–4 weeks before your event date — inspections are often required before setup
How to check: Call your local city or county building department directly. Ask specifically about “temporary tent structures for private events.” If your event is on rented property (a farm, vineyard, or park), the venue owner may already have a blanket permit — ask before applying.
Fire safety is equally important. The NFPA 701 standard covers flame resistance for tent fabrics — look for tarps or tent covers labeled “NFPA 701 compliant” or “flame retardant.” Many municipalities require this certification for any tent used for public or private gatherings.
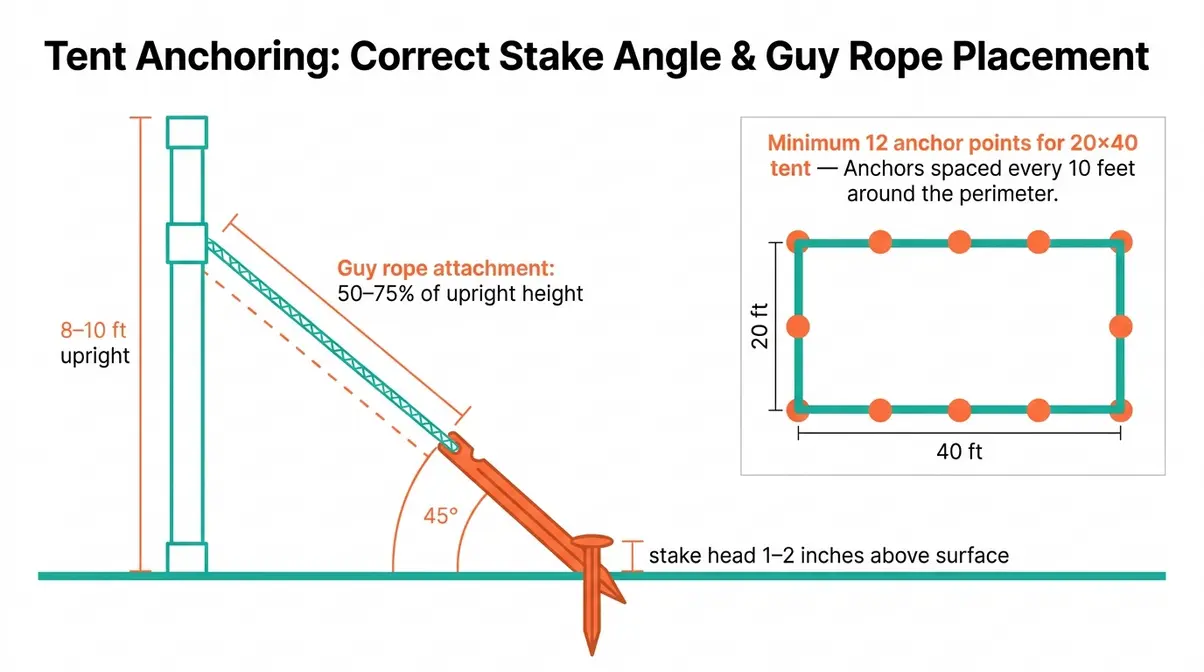
Anchoring and Wind Load Requirements
Proper anchoring is the single most critical safety step in any DIY tent build. An under-anchored tent in a 30 mph wind gust can collapse in seconds.
OSHA guidelines for temporary structures emphasize that anchoring systems must be rated for the local wind speed. Here’s what that means in practice:
- Stake depth: 18-inch stakes driven at a 45-degree angle hold significantly better than vertical stakes. Drive stakes away from the tent at a 45-degree outward angle.
- Guy rope tension: Guy ropes (the diagonal support lines) should be taut but not over-tensioned. Attach to stakes at ground level and to the frame at a point 50–75% of the frame height.
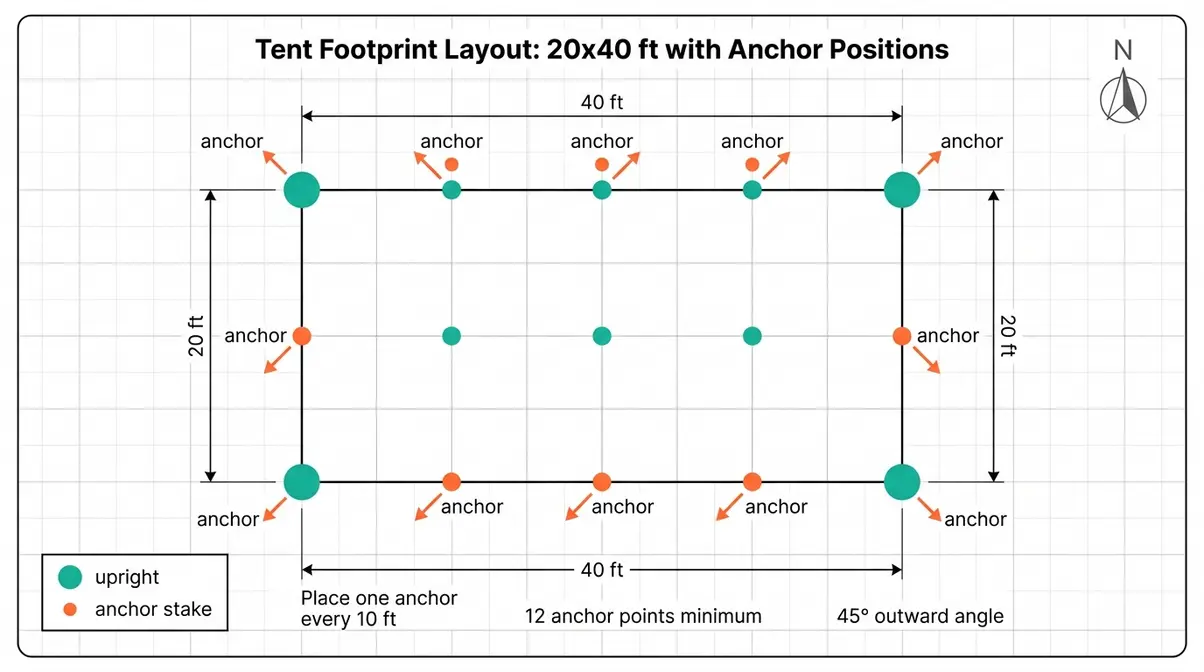
- Spacing: Place one stake-and-guy-rope anchor every 10 feet along each tent side. For a 20×40 tent, that means a minimum of 12 anchor points.
- Wind load rule of thumb: In areas with regular winds above 25 mph, double your anchor count and use 24-inch stakes instead of 18-inch.
For hard surfaces where stakes aren’t possible, use water-ballast weights (plastic barrels filled with water, weighing 8.3 lbs per gallon) or concrete block anchors. A minimum of 100 lbs of ballast per anchor point is the accepted standard for light-frame temporary structures.
Lightning and Weather Safety
The National Weather Service recommends a clear 30-minute window after the last lightning strike before returning to any outdoor structure (NWS, 2026). A tent — even a well-anchored one — provides zero protection from a direct lightning strike.
Build these weather protocols into your event plan:
- Monitor the forecast: Check the NWS hourly forecast (weather.gov) starting 72 hours before your event. Have a clear indoor backup location identified.
- Designate a weather monitor: Assign one person to watch the sky and a weather app throughout the event. Set a 15-minute evacuation threshold if lightning is visible.
- Pre-event wind check: If sustained winds above 25 mph are forecast, reinforce all anchor points and remove or secure any decorative elements (hanging lanterns, fabric panels, floral arrangements on stands).
- Have a strike plan: Know the nearest solid building. Brief your venue coordinator and caterer on the evacuation route before guests arrive.
No tent — DIY or rental — is a safe shelter during a lightning storm. Plan accordingly.
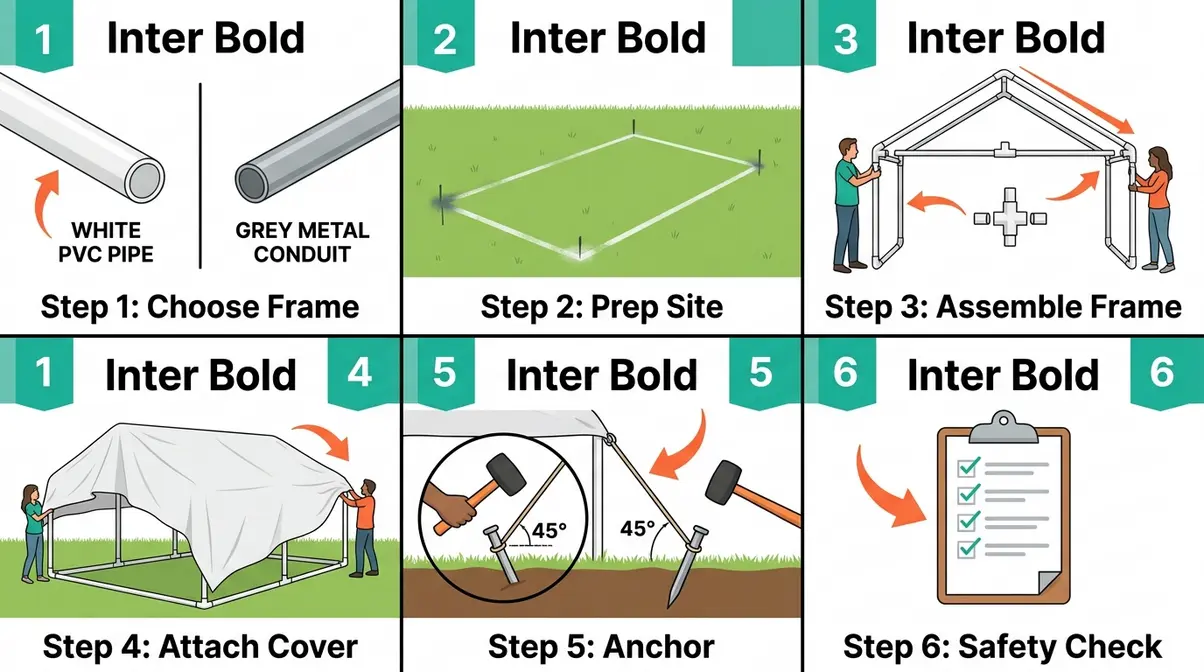
How to Build Your DIY Wedding Tent: Step-by-Step
This is the heart of the guide — and the most technically detailed section. Our team evaluated multiple PVC and metal frame assembly methods across different ground conditions, and the six-step sequence below reflects what consistently produces a stable, weather-resistant structure. Plan for 3–4 hours with a minimum of two people. Rushing this process is the leading cause of structural failure.
Step 1 – Choose Tent Type & Material
Choose your frame material based on tent size and wind exposure — not just cost. This is the decision that determines everything downstream.
PVC pipe frames work well for tents up to 20×40 feet in sheltered locations (backyards with tree windbreaks, for example). They cost 40–60% less than metal alternatives and require no special tools. The trade-off: PVC flexes under high wind loads and can crack in freezing temperatures.
Metal conduit frames (EMT conduit, available at hardware stores) handle spans up to 30×60 feet and resist wind significantly better. They weigh more and require a conduit bender for curved sections, but they’re the right choice for open-field venues or tents over 800 sq ft.
- Tent type options:
- Frame tent: No center poles; entire structure supported by perimeter frame. Best for DIY — no interior obstructions.
- Pole tent: Traditional peaked look supported by center poles. Dramatic appearance but center poles interfere with table layout.
- Clear-span tent: Aluminum arch frame — professional-grade, typically beyond DIY scope for 100+ guests.
For most DIY backyard wedding setups, a PVC frame tent is the right starting point. For 100+ guests, budget for a metal frame kit.
Step 2 – Site Preparation
Once your site passes the five-point assessment from the Prerequisites section, complete these physical prep steps:
- Mark the tent footprint using spray paint or string and stakes. Measure and mark all four corners precisely.
- Clear the area inside the footprint: remove rocks, sticks, and any sprinkler heads. Mow grass to 2 inches or less.
- Mark anchor positions every 10 feet around the perimeter, plus the four corners. Each mark represents a stake location.
- Check for underground utilities — call 811 (the national “Call Before You Dig” number) at least 3 business days before driving any stakes. This is a legal requirement in all 50 U.S. states.
- Lay out all materials in order of assembly: frame pipes, connectors, cover, anchoring supplies. Organize by step to avoid mid-build scrambling.
Step 3 – Assembling the Frame
Frame assembly goes faster when two people work in parallel — one connects horizontal sections while the other prepares vertical uprights.
- Assemble the ridge line first. Connect 10-foot PVC sections end-to-end using inline couplers to form the top horizontal spine of the tent. For a 20×40 tent, you’ll need four 10-foot sections for each of the two long ridge lines.
- Attach corner uprights. Insert vertical PVC pipes into corner elbow connectors. Standard upright height is 8–10 feet for a single-peak frame tent. Taller uprights create more headroom but increase wind load.
- Connect side horizontals. Run horizontal pipes along each long side of the tent at the top of the uprights, joining them to the ridge line with T-connectors.
- Add mid-span uprights. For a 40-foot span, add vertical uprights every 10 feet along each long side to prevent the horizontal pipes from bowing.
- Square the frame. Measure corner-to-corner diagonals — both measurements should match within 1 inch. An out-of-square frame causes the cover to pull unevenly and increases wind vulnerability.
- Secure all connections with heavy-duty zip ties at every joint. PVC friction-fit connectors alone are not sufficient for an outdoor structure.
Step 4 – Attaching the Cover
A DIY party tent with tarp cover goes on in three stages: drape, tension, and secure.
- Lay the tarp flat on the ground next to the assembled frame. Identify the center of the tarp’s long dimension.
- Lift the center over the ridge line — this requires both people. One person feeds the tarp up from one side while the other guides it over the top. For large tarps, a rope thrown over the ridge line first makes this much easier.
- Center the tarp so equal amounts of overhang fall on all four sides. You want at least 12 inches of overhang beyond the frame on every edge.
- Attach the tarp to the frame using bungee cords through the grommets (the metal rings on the tarp edges). Hook bungee cords around the horizontal frame pipes — do not pull the tarp drum-tight at this stage.
- Work corner-to-corner when tensioning: tighten one corner, then the opposite corner, then the remaining two. This distributes tension evenly and prevents the cover from pulling to one side.
- Final tension check: The cover should be taut with no visible sag. Sagging areas collect rainwater — a gallon of water weighs 8.3 lbs, and a large sag can accumulate enough weight to collapse a section of frame.
Step 5 – Anchoring and Weatherproofing
This step executes the anchoring principles from the Permits & Safety section. Do not skip or abbreviate it.
- Drive the first stake at a corner anchor point. Hold the stake at a 45-degree angle pointing away from the tent, and drive it fully into the ground with a mallet — the stake head should be 1–2 inches above ground level.
- Attach the guy rope to the frame at a height 50–75% up the nearest upright. Run the rope down to the stake at a 45-degree angle. Tie using a taut-line hitch (an adjustable knot that lets you tighten the line without re-tying it — search “taut-line hitch” for a 60-second visual tutorial).
- Repeat for all anchor points — minimum 12 anchor points for a 20×40 tent.
- Weatherproof the cover seams with seam sealer spray (available for $8–$15 at outdoor supply stores) if your tarp has any stitched seams. Polyethylene tarps are typically waterproof without sealing, but fabric covers need this step.
- Create a rain runoff channel: If rain is in the forecast, angle the tent cover slightly (3–5 degrees) toward one end by adjusting the height of the uprights on one side. This encourages water to run off rather than pool.
- Test under load: Have two team members press down on the center of the cover with moderate force. The frame should flex slightly but spring back. If any joint separates or a stake pulls, fix it now — not on the wedding day.
Step 6 – Final Safety Check
Schedule this check 24–48 hours before the event — not the morning of.
- Pre-Event Safety Checklist:
- [ ] All stake connections tight; no stakes pulling free
- [ ] All guy ropes taut; no slack in any line
- [ ] Cover fully tensioned; no sag points larger than 6 inches in diameter
- [ ] All zip tie connections intact at every frame joint
- [ ] No frame pipes cracked, bent, or visibly stressed
- [ ] Clear 3-foot clearance around all tent edges (no tripping hazards)
- [ ] Fire extinguisher placed at each exit (NFPA requirement for tented events)
- [ ] Evacuation route identified and clear
- [ ] Weather forecast checked for wind gusts above 25 mph
If the 24-hour weather forecast shows sustained winds above 30 mph or a severe weather watch, contact a professional tent rental company immediately. No DIY structure should be occupied during severe weather.
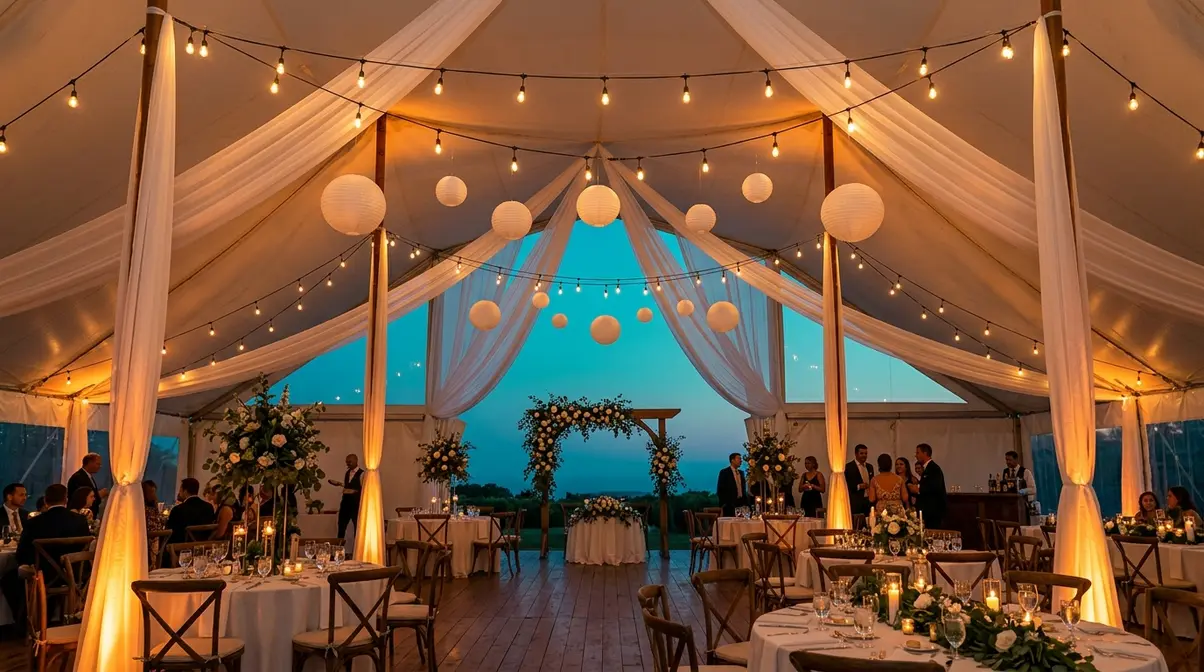
How to Decorate Your Wedding Tent
The style side of The Tent Triangle is where a functional structure becomes a venue. Across DIY wedding planning communities, the consistent feedback is that lighting and draping deliver the highest visual return per dollar spent — far more than florals alone. Here’s how to create a professional-looking tent interior on a DIY budget. For more creative wedding tent decoration ideas, consider layering textures and utilizing vertical space.
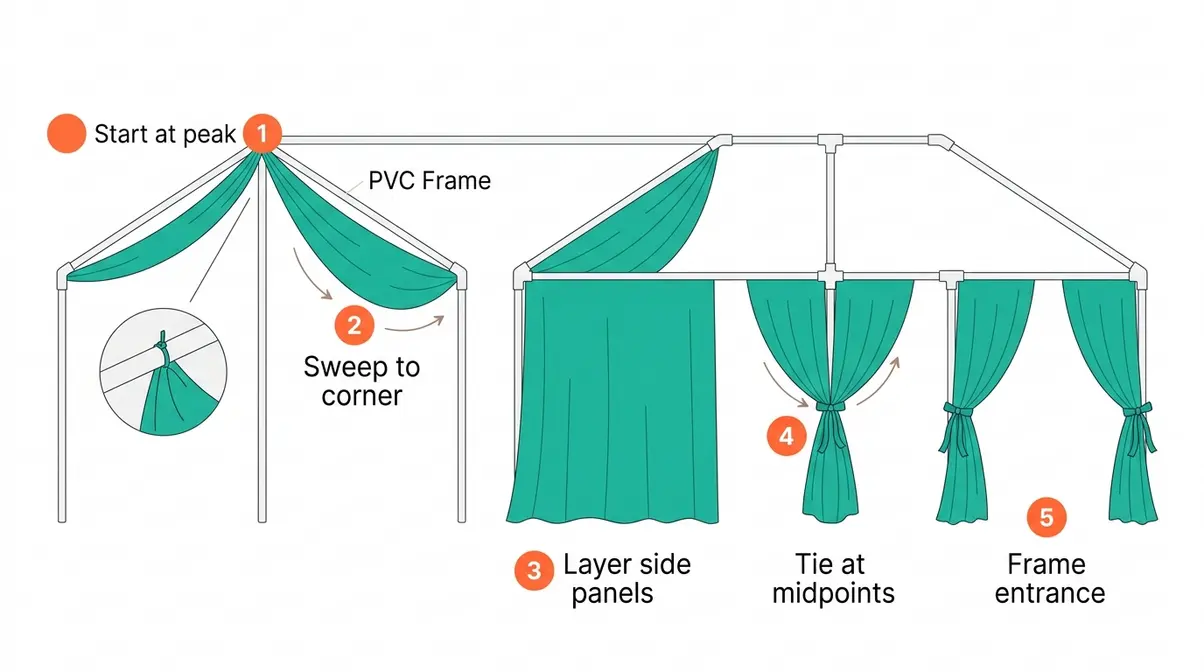
Tent Draping: A Step-by-Step Guide
Draping transforms a bare frame into a romantic interior in 2–3 hours. You need sheer fabric (chiffon or voile works best — 108-inch-wide bolt fabric from a fabric store runs $2–$5 per yard), zip ties, and S-hooks.
- Start at the peak. Gather a length of sheer fabric and attach it to the highest point of the frame (the ridge line center) using a zip tie or S-hook. This becomes your drape anchor.
- Sweep fabric to the corners. Pull the fabric diagonally from the peak to each corner upright, gathering it loosely rather than pulling it taut. Secure with a zip tie at each corner, leaving a gentle swag.
- Layer additional panels along each long side of the tent, attaching at the top horizontal pipe and letting them fall to the ground. Panels should overlap by 6–8 inches for a full, lush look.
- Gather and tie at midpoints. At each upright along the sides, gather the fabric panels and tie with a ribbon or decorative cord, creating a draped swag effect between each upright.
- Finish the entrance. Frame the tent opening with two full-length panels, tied back with ribbon to create a soft, welcoming entrance. Add a floral accent at the tie-back point for a finished look.
For detailed inspiration, this Pinterest collection of DIY wedding tent draping ideas shows dozens of real-couple implementations across different tent sizes.
Lighting Ideas That Create Atmosphere
Lighting is the single highest-impact decoration element in any tented venue. A bare tent with string lights looks intentional; a draped tent without lighting looks unfinished after dark.
Budget-friendly lighting options ranked by impact:
- Café/bistro string lights — 48-foot strands of Edison bulbs ($15–$30 each) strung in parallel rows across the ceiling, spaced 2 feet apart. For a 20×40 tent, you’ll need 6–8 strands. This is the most popular look in DIY wedding tent communities.
- Fairy lights woven into draping — Weave a strand of warm-white LED fairy lights ($8–$15 per 33-foot strand) through your fabric draping for a glowing, ethereal effect.
- Uplighting at tent poles — Battery-powered LED uplights ($15–$25 each) placed at the base of each corner upright, angled upward. Use warm white or amber for a romantic look; avoid cool white or blue.
- Paper lanterns on fishing line — Hang paper lanterns ($1–$3 each) at varying heights using clear fishing line attached to the ridge line. Mix sizes (6-inch, 8-inch, 12-inch) for a layered look.
- Chandelier focal point — A single decorative chandelier (battery-powered, $30–$80) hung from the center ridge line creates a wow-factor focal point that anchors the entire interior.
For maximum impact, use warm white (2,700–3,000K color temperature) for all lighting. Mixed color temperatures create a chaotic, unpolished look.
Florals, Focal Points & Entrance Decor
Common pain points reported by couples include the fear that a DIY tent will look cheap or unfinished. The fix is strategic placement of a few high-impact focal points rather than scattering small arrangements everywhere.
Three focal points that eliminate the “unfinished” look:
- Entrance arch or frame: A simple wooden arch ($40–$80 in lumber) or a repurposed ladder frame draped with greenery and flowers at the tent entrance. Guests photograph the entrance — make it count.
- Head table backdrop: Hang a fabric or greenery wall behind the head or sweetheart table. A 6×8 foot greenery panel ($80–$150 in faux greenery) creates a professional backdrop that photographs beautifully.
- Ceiling focal point: A cluster of hanging greenery, dried flowers, or paper flowers above the dance floor or head table draws the eye upward and makes the tent feel designed, not assembled.
For individual table florals, prioritize height variation: mix tall centerpieces (18–24 inches) with low, lush arrangements (6–8 inches) rather than using identical heights on every table.
Flooring Options for a Polished Look
Bare grass or dirt underfoot is the fastest way to undermine an otherwise beautiful tent interior. These flooring options range from free to budget-friendly:
- Outdoor rugs: Layer 8×10 outdoor rugs ($50–$120 each) to define zones (dining area, dance floor). Rugs are the most cost-effective flooring solution for grass venues.
- Interlocking dance floor tiles: Snap-together plastic or wood-look tiles ($1.50–$3.00 per sq ft) create a proper dance floor. Rent or buy — a 12×12 dance floor costs $200–$450 to rent for a weekend.
- Plywood subfloor: For a fully level, polished floor, lay 3/4-inch plywood sheets over the grass. Cover with carpet, vinyl plank flooring, or paint. This adds $300–$600 in materials but creates the most professional result.
- Artificial turf overlay: Roll-out artificial turf ($0.50–$1.50 per sq ft) gives a clean, green surface that photographs well and eliminates muddy footprints after rain.
For most backyard wedding setups, a combination of outdoor rugs for the dining area and a rented dance floor tile section delivers the best result per dollar.
Common DIY Wedding Tent Mistakes
Even well-prepared couples run into problems. Our team evaluated the most frequently reported DIY tent failures across planning forums and community feedback, and the same five mistakes appear again and again. Knowing them in advance is the difference between a smooth setup and a stressful one.
The 5 Most Costly Setup Mistakes
- Undersizing the tent. The most common mistake — couples calculate for seated guests but forget to add space for the dance floor, buffet, and service aisles. Add a minimum of 400 sq ft to your guest-count calculation for functional zones. If in doubt, go one size larger.
- Skipping the site assessment. Setting up on a slight slope seems fine until it rains. Water pooling under the tent floor creates a slip hazard and damages your flooring. Run the five-point site checklist before committing to a location.
- Under-anchoring the frame. Couples frequently use fewer stakes than required, especially on firm soil where driving stakes feels difficult. The rule is one anchor point every 10 feet — no exceptions. An under-anchored tent in a 25 mph wind gust is a serious safety hazard.
- Attaching the tarp too tight. A drum-tight tarp cover transmits wind load directly to the frame joints rather than absorbing it. Leave 2–3 inches of flex in the cover — it should billow slightly in a breeze, not strain at the attachment points.
- Building alone. A DIY wedding tent requires a minimum of two people for safe assembly — particularly for lifting the cover onto the frame and tensioning guy ropes simultaneously. Attempting solo assembly results in misaligned frames and insecure connections.
When to Hire a Professional Instead
DIY is the right choice for many couples — but not all. Be honest about your situation before committing to a full build.
- Consider hiring a professional tent company if:
- Your guest count exceeds 150 people. Tents over 30×60 feet require engineered frames and professional installation for safe occupancy.
- Your venue has no soft ground for staking. Hard-surface anchoring with ballast weights requires more expertise than most first-time builders have.
- Your event is in a high-wind region or the forecast shows gusts above 30 mph within 48 hours of your event date.
- You have less than 48 hours between setup and the event. Rushing a tent build creates safety risks that no amount of Pinterest inspiration is worth.
- Your municipality requires a structural inspection for permitted tents. A professional installation comes with documentation; a DIY build may not pass inspection.
Professional tent rental for 100 guests typically costs $900–$2,500 all-in — a worthwhile investment when the DIY risk is genuinely high. For a detailed look at professional options, GetTent’s wedding planning resource outlines what to expect from a full-service tent rental.
Frequently Asked Questions
How do you make your own wedding tent?
Making your own wedding tent involves six core steps: choose your frame material, prep the site, assemble the frame, attach the cover, anchor the structure, and complete a final safety check. For most DIY backyard weddings, a PVC pipe frame covered with a heavy-duty polyethylene tarp is the most affordable and beginner-friendly approach. Plan for 3–4 hours of build time with at least two people. Always check local permit requirements before setup.
How many tents do you need for 100 guests?
One tent is sufficient for 100 guests if it’s sized correctly — a 30×60 or 40×50 tent provides the 1,800–2,000 sq ft needed for a seated dinner layout. Alternatively, two 20×40 tents connected side by side work well for separating dining and dancing zones. Two smaller tents are easier to DIY than one large structure and allow more flexible layout options.
How big of a tent do you need for 150 guests at a wedding?
A 40×60 tent (2,400 sq ft) fits 150 guests for a seated dinner, but a 40×70 tent (2,800 sq ft) is the recommended size when you include a dance floor and buffet. Using the standard formula of 18 sq ft per person, 150 guests require a minimum of 2,700 sq ft. Add 400–600 sq ft for a 15×15 dance floor, buffet tables, and a bar station. When in doubt, size up — a tent that feels slightly spacious is far more comfortable than one that feels cramped.
How do you make a tent look pretty for a wedding?
The highest-impact decorations for a DIY wedding tent are café string lights, sheer fabric draping, and one strong focal point — an entrance arch, a ceiling greenery cluster, or a head table backdrop. Start with lighting: 6–8 strands of 48-foot Edison string lights strung across the ceiling create an immediate transformation. Layer in sheer chiffon draping from the center peak to the corner uprights. Finally, place three high-impact focal points rather than scattering small decorations everywhere. This approach delivers a professional-looking interior at a fraction of decorator costs.
What is the best material for a DIY wedding tent frame?
For structures up to 20×40 feet in sheltered areas, 1.5-inch PVC pipe offers the best balance of affordability and ease of assembly. However, for larger tents or open-field venues exposed to wind, metal conduit is vastly superior. Metal conduit resists bending under wind load far better than PVC, though it costs slightly more and requires heavier anchoring.
Do you need a permit for a backyard wedding tent?
In most municipalities, any temporary structure exceeding 400 square feet requires a specific event permit. Because a standard 20×40 DIY tent is 800 square feet, it almost always triggers this requirement. You should contact your local building department at least four weeks before your event to confirm local codes and schedule any necessary safety inspections.
How do you secure a tent on concrete without stakes?
When staking into the ground is impossible, you must use heavy water-ballast weights or concrete blocks to anchor the frame. The industry standard requires a minimum of 100 pounds of ballast per anchor point for light-frame temporary structures. Never skip anchoring on hard surfaces, as unanchored tents can easily become airborne in moderate wind gusts.
Your DIY Wedding Tent Blueprint
Every successful DIY wedding tent comes back to The Tent Triangle: Size, Safety, and Style working together as one integrated system. Get the sizing formula right — 15–18 sq ft per person for a seated dinner — and you’ll know exactly which frame to build. Anchor that frame to OSHA-backed standards with 18-inch stakes at 45-degree angles and one anchor point every 10 feet, and your tent will stand through wind and rain. Then layer in café string lights, sheer draping from the peak to the corners, and three well-placed focal points, and a basic PVC frame becomes a venue your guests remember. DIY material costs for a 20×40 setup run $367–$631 — roughly one-quarter of the average $900–$2,500 rental quote (Brides.com, 2026).
The Tent Triangle framework works because it forces you to plan all three dimensions before you buy a single pipe. Couples who skip the safety side end up with a beautiful tent that fails in a wind gust. Those who skip the style side end up with a structurally sound tent that feels like a construction site. Those who skip the sizing side end up with a tent that’s either too cramped or too expensive.
Start by calculating your exact guest count using our square-footage formula, then draft your materials checklist and confirm your site passes the five-point assessment. Order materials at least two weeks before your event to account for shipping delays. With this diy wedding tent guide, you have the blueprint to build a safe, stunning venue that saves you thousands. Build with a partner, check the weather 72 hours out, and run the final safety checklist 24 hours before guests arrive. That sequence — not inspiration alone — is what turns a Pinterest dream into a backyard wedding venue you actually built yourself.
