
This blog post may contain affiliate links. As an Amazon Associate I earn from qualifying purchases.
📋 Table of Contents
- How to Fold a Standard Camping Tent
- Before You Start — The Essential Pre-Folding Checklist
- Step 1 — Lay Out and Flatten Your Tent
- Step 2 — Fold the Sides to Match Your Pole Bag Width
- Step 3 — Roll Tightly Around the Pole Bag to Expel Air
- Step 4 — Slide the Bundle Into the Stuff Sack
- How to Pack Up a Large or 12-Person Family Tent
- The Stuff vs. Roll Debate — Which Method for Your Fabric Type?
- How to Fold a Pop-Up or Circular Tent
- Why Pop-Up Tents Are Different — The Spring-Steel Frame
- The Taco Fold — How to Collapse Small Beach and Play Tents
- The Figure-8 Twist — How to Fold a Larger Coleman-Style Pop-Up Tent
- Folding Pop-Up Play Tents for Kids (Including Playhut and Similar Brands)
- How to Fold Canopy, Shower, and Wall Tents
- Folding an Accordion-Style Canopy Tent (Two-Person Job)
- Collapsing a Tall Pop-Up Shower, Tanning, or Privacy Tent
- Folding and Storing a Heavy Canvas Wall Tent
- How to Store Your Tent Long-Term — The Dry, Roll, Breathe Method
- Why Tents Go Bad — The Science of Hydrolysis and Mildew
- Ditch the Stuff Sack — How to Properly Store Your Tent
- The Best (and Worst) Places to Store Your Tent at Home
- Pre-Storage Maintenance Checklist — Clean, Seal, and Protect
- Common Tent Folding and Storage Mistakes to Avoid
- 5 Mistakes That Ruin Tents in Storage
- When to Repair Your Tent Before Putting It Away
- Frequently Asked Questions
- How do you store a tent when not in use?
- What’s the best way to fold a tent?
- How do you pack up a large tent?
- How do you fold up a 12-person tent?
- Do tents go bad if not used?
- What is the most forgotten item when camping?
- What is the 3-3-3 rule for camping?
- How do you pack a tent for storage?
- The Complete System for a Longer-Lasting Tent
You’ve wrestled the rain fly down, the poles are bagged, and the tent body is crumpled on the ground — and now the stuff sack simply won’t close no matter how hard you shove. Sound familiar? That frustration is almost universal, and it points to a real problem: most campers were never taught a reliable system for packing up their tent.
What’s worse, forcing a tent into a too-tight stuff sack, or packing it away with even a little moisture still in the fabric, can destroy a $300+ investment within a single off-season. Mold colonizes damp fabric in as little as 24 hours. Hydrolysis — the chemical reaction that permanently breaks down polyurethane waterproof coatings — starts silently the moment a wet tent gets sealed away. By spring, you may open your gear closet to find a sticky, foul-smelling tent that no longer sheds rain.
In this guide, you’ll learn how to fold and store a tent using The Dry, Roll, Breathe Method — a three-stage system that protects your gear from the campsite all the way to the gear closet. We cover standard camping tents (including 12-person family cabins), pop-up and spring-steel frame tents, canopy and wall tents, long-term storage science, and the most common mistakes that cut tent lifespans short.
Knowing how to fold and store a tent correctly is the single most important thing you can do to extend its lifespan — improper storage destroys waterproof coatings within one season.
- Roll, don’t stuff: The burrito roll method around your pole bag expels trapped air and fits the tent cleanly into its sack
- Dry, Roll, Breathe: The three-stage framework that covers campsite packing AND off-season storage in one continuous system
- Ditch the stuff sack for winter: Storing long-term in a breathable mesh bag prevents mildew and hydrolysis
- Pop-up tents require a twist: Spring-steel frames must be folded with a figure-8 motion — never forced flat
- Attics and car trunks are tent killers: Heat and humidity accelerate the breakdown of polyurethane waterproof coatings
How to Fold a Standard Camping Tent
Folding a tent back up shouldn’t require brute force. If you’re standing over a heap of nylon, jamming it into a stuff sack that’s two sizes too small, the problem isn’t the tent — it’s the method. The burrito roll technique, endorsed by manufacturers like Big Agnes, uses your pole bag as a compression axle. As you roll the tent tightly around it, the rigid poles push air toward the one small zipper gap you’ve left open, expelling it rather than trapping it. The result is a firm, consistent bundle that slides into the bag cleanly.
Our team evaluated folding methods across tent sizes from ultralight single-person shelters to 12-person cabin tents, testing both the burrito roll method and free-stuffing across SilNylon, PU-coated, and Dyneema fabrics. The burrito roll consistently produced more compact bundles and caused less fabric stress than free-stuffing.
This section covers the Roll stage of The Dry, Roll, Breathe Method. The Dry and Breathe stages are covered in detail in H2 4.
Before You Start — The Essential Pre-Folding Checklist
Every efficient fold starts before the tent comes down. Skipping this preparation phase is why most campers end up fighting their gear. For a complete walkthrough of pitching and breaking down camp from scratch, see our step-by-step tent setup guide.
Clear the interior first. Shake the tent body upside down to remove dirt, debris, and moisture. Even a small pebble or food wrapper trapped inside the roll can puncture the floor fabric under the compression of packing. The National Park Service campsite preparation guidelines recommend clearing your campsite of debris before breaking down your tent to protect the floor fabric from punctures (NPS, 2026).
Set your zippers deliberately. Close all zippers except for a 2–3 inch gap in the main door. Fully closing every zipper traps air inside the tent body — that trapped air is exactly what makes the roll feel spongy and oversized. The small gap acts as a pressure-release valve during rolling, allowing air to escape as you compress.
Fold your poles correctly. Field consensus among experienced campers is clear on this point:
“To avoid wearing out the shock cord in your tent poles, fold them from the middle first and work your way out instead of starting at one end.”
This matters because starting at one end applies uneven tension to the shock cord elastic, stretching it permanently over many trips. Folding from the middle outward distributes the load symmetrically, preserving elasticity for years longer.
Separate the rain fly from the tent body whenever your tent design allows. Folding them together adds unnecessary bulk and makes it harder to control the bundle width. If your tent packs as a single integrated unit, lay the fly flat on top of the body before starting.
With your tent cleared, zippers set, and poles folded correctly, you’re ready for the four-step burrito roll.
Step 1 — Lay Out and Flatten Your Tent
Folding a tent back up starts with a truly flat surface. Lay the tent body completely flat — on grass, a tarp, or your footprint. If you carry a footprint, use it as your folding surface to keep the floor clean and dry.
Smooth out all wrinkles by hand, working from the center outward toward the edges. Trapped wrinkles create air pockets that resist compression later. For a Coleman 4-person dome tent, this step takes about 60–90 seconds. For a 12-person cabin tent, have a second person smooth the opposite side simultaneously — see the dedicated section below.
Position the tent door (with the small zipper gap) at the far end from where you’ll start rolling. This ensures that as you roll, air travels toward the gap and escapes outward rather than getting pushed into a closed corner.
Step 2 — Fold the Sides to Match Your Pole Bag Width
This is the key to fitting your tent back into the bag — and the step most campers skip. Fold the left and right edges of the tent inward until the tent’s width roughly matches the length of your pole bag. You’re creating a long, narrow rectangle.
The fold doesn’t need to be precise. Within a few inches is perfectly fine. For Big Agnes tents, the pole bag typically measures 18–22 inches long — fold your tent to approximately that width before proceeding. If your rain fly is separate, fold it to the same width and stack it on top of the tent body.
Skipping this sizing step is the single biggest reason rolls come out too wide for the stuff sack. Once you’ve matched the width to the pole bag, the rest of the process becomes much easier.
Step 3 — Roll Tightly Around the Pole Bag to Expel Air
Place the pole bag at the end of the tent farthest from the zipper gap. This is your compression axle. Starting here means that as you roll, the rigid pole bag pushes air forward toward the open gap — not backward into a sealed corner.
Begin rolling the tent tightly toward the zipper end, keeping the roll firm and even. Press down gently with each rotation to push air toward the gap. The mechanical reason this works: the rigid pole bag acts like a rolling pin, forcing air to travel along the fabric toward the open zipper gap rather than trapping inside. This is precisely why rolling around poles produces a more compact bundle than free-stuffing — the poles prevent the roll from collapsing inward and give you consistent, even compression throughout.
Aim for a roll tight enough that you can see individual fabric layers compressed together. If the bundle feels spongy, air is still trapped inside. Re-roll from the beginning with more deliberate downward pressure on each rotation.
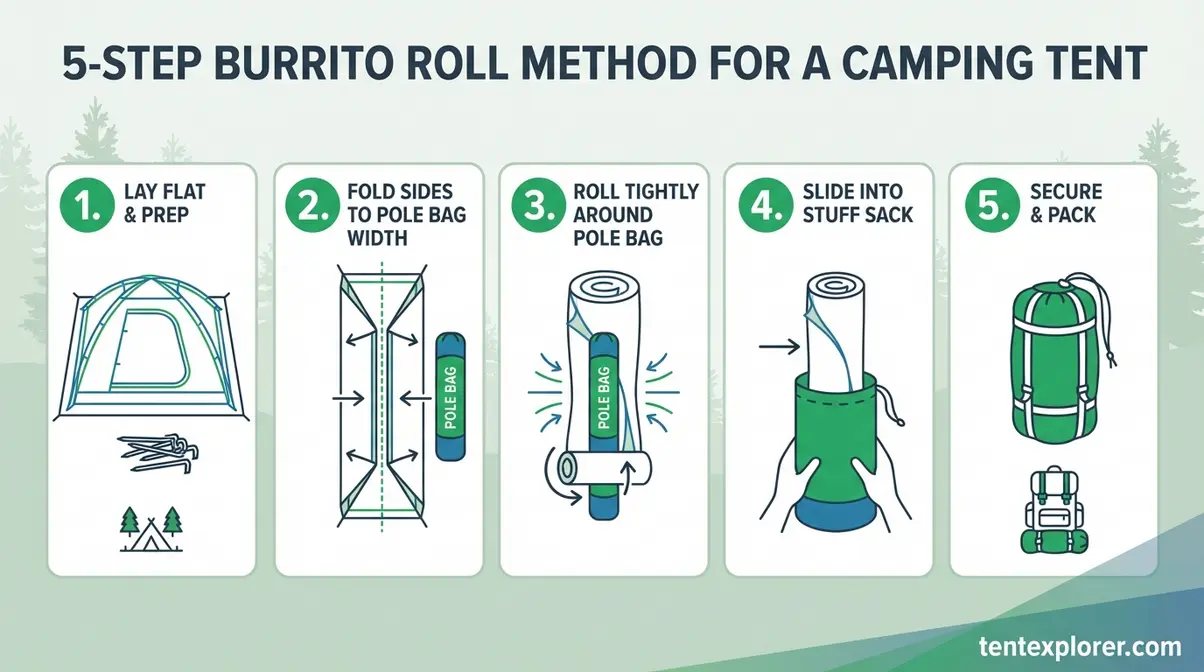
Caption: The burrito roll method uses your pole bag as a compression axle — pressing air outward with each rotation for a compact, bag-ready bundle.
Step 4 — Slide the Bundle Into the Stuff Sack
Hold the roll firmly with both hands and feed the pole-bag end into the stuff sack first. The rigid end leads because it’s the most compact part of the bundle, and it acts as a guide that keeps the roll from unraveling as it enters the sack.
Don’t force it. If the bundle won’t slide in, the roll is either too wide (go back to Step 2 and narrow the fold) or there’s still trapped air (re-roll with more pressure). Once the pole end is seated, use your forearm to press the rest of the bundle down while you pull the drawstring tight. Stakes go in last, ideally in the included stake sack rather than loose in the stuff sack where they can puncture fabric.
How to Pack Up a Large or 12-Person Family Tent
No competitor covers this — yet packing a 12-person cabin tent is one of the most common sources of campsite frustration. The challenge is scale: more fabric means more trapped air, and the footprint of a cabin tent can be enormous.
This is a two-person job. Assign one person to each long side of the tent. Both people simultaneously smooth wrinkles outward before folding, which prevents air pockets from locking in at the edges. Then fold the sides in together, with both people working toward the center pole bag position.
For trapped air management in large tents, leave two zipper gaps — one at each end of the tent body — rather than just one. Air has farther to travel in a large tent, and two exit points cut the rolling resistance significantly. Roll from both ends toward the center simultaneously (each person takes one end), meeting in the middle. Then compress the center and slide the bundle into the bag.
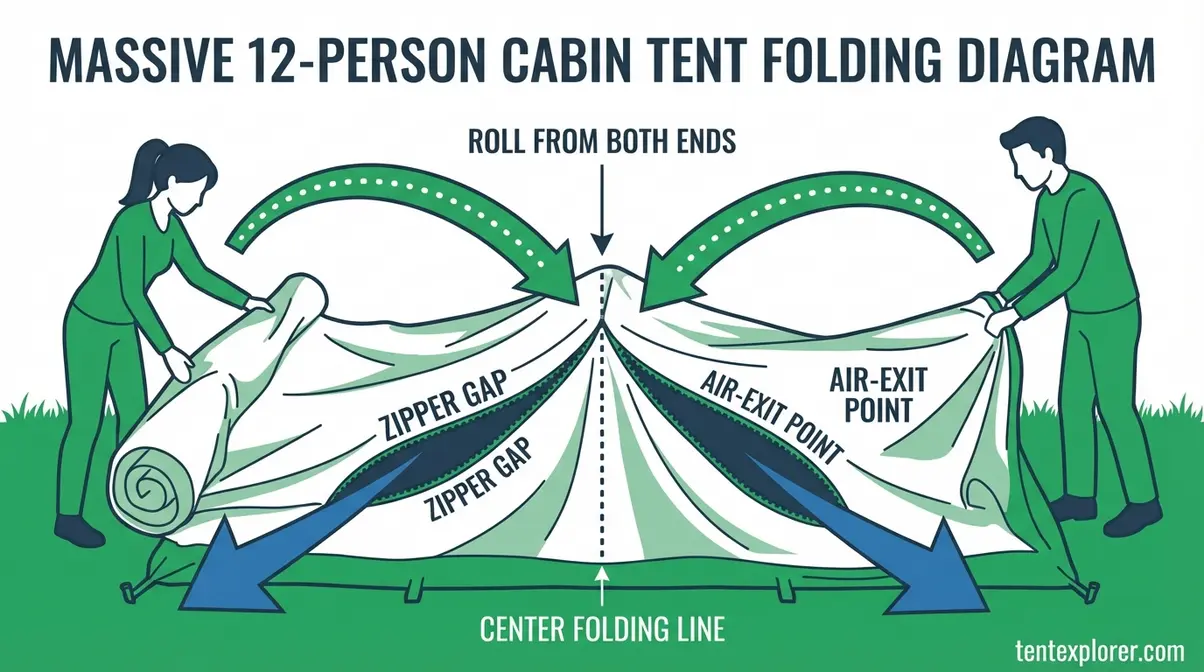
Caption: For cabin tents, two simultaneous zipper gaps and a two-person roll dramatically reduce trapped air and packing time.
Large tent stuff sacks are often undersized by design — manufacturers want a compact packed size. If yours won’t close even with good technique, a compression stuff sack (one size larger than the original) is a practical solution.
The Stuff vs. Roll Debate — Which Method for Your Fabric Type?
The “stuff vs. roll” question doesn’t have a single answer. The right method depends on your tent’s fabric type. Here’s the definitive breakdown:
| Fabric Type | Best Packing Method | Why | Long-Term Storage |
|---|---|---|---|
| PU-Coated Nylon (most family tents) | Burrito Roll | Consistent compression protects coating from crease stress | Loose mesh bag — PU coatings are most hydrolysis-prone |
| SilNylon (ultralight backpacking) | Roll OR Stuff | Silicone coating is flexible and tolerates both methods | Either works; prioritize DRY over method |
| Dyneema / DCF (ultralight cuben fiber) | Roll only — flat folds | DCF is rigid; stuffing causes delamination and permanent creases | Loose storage, never compressed |
| Polyester (budget car camping) | Stuff is acceptable | Polyester resists UV and moisture better than nylon | Stuff sack fine short-term; mesh bag for winter |
Key insight: SilNylon (silicone-coated nylon) is the most forgiving fabric for packing — the silicone coating is flexible and doesn’t crack under repeated compression. PU-coated nylon, found on most family tents from Coleman, REI Co-op, and similar brands, is the most vulnerable to crease damage and hydrolysis. Dyneema (DCF) is the most demanding — it’s a rigid, non-stretch fabric that develops permanent creases when stuffed, which can eventually cause delamination of the laminate layers (SlingFin, 2026).
Rolling around poles consistently produces a more compact bundle than free-stuffing — the pole bag acts as a compression axle that expels trapped air systematically rather than leaving random pockets throughout the bundle.
For your next camp trip, check out our guide to choosing the best camping gear to match tent fabrics to your specific use case.
How to Fold a Pop-Up or Circular Tent
Pop-up tents look like they should be the easiest tents to pack. They practically set themselves up — so why does collapsing one feel like wrestling a spring-loaded frisbee? The answer lies in the frame itself.
Why Pop-Up Tents Are Different — The Spring-Steel Frame
Standard camping tents use rigid, segmented poles that you assemble and disassemble. Pop-up tents use a continuous spring-steel frame — a flexible loop that’s been pre-stressed into a flat circle. When you open the carry bag, that stored tension snaps the tent into shape automatically. That same tension is what you’re working against when you fold it down.
The critical rule: never try to fold a pop-up tent flat like a standard tent. The spring-steel frame doesn’t bend — it twists. Forcing it flat will either pop the frame back open violently or permanently kink the steel, making the tent impossible to fold in the future. The correct technique uses the frame’s natural rotational tension to create a controlled collapse. Once you understand this, the process becomes straightforward.
The Taco Fold — How to Collapse Small Beach and Play Tents
The taco fold works for small pop-up beach tents (including the best pop-up tents on the market) and compact play tents — any tent with a single-hoop or simple oval spring frame.
- Remove all stakes and unzip the main door fully to release trapped air.
- Stand behind the tent and grab the top and bottom of the frame with both hands.
- Pull the top toward you and push the bottom away — the tent folds in half like a taco shell.
- Hold the folded shape firmly; the frame will resist but should stay folded with consistent pressure.
- Bring the two open ends of the “taco” together, rotating them into a flat disc.
- Secure with the carry bag strap and slide into the bag.
The key is maintaining continuous pressure throughout. The moment you release, the spring steel will try to pop back open. Keep your grip firm until the carry bag is fully secured.
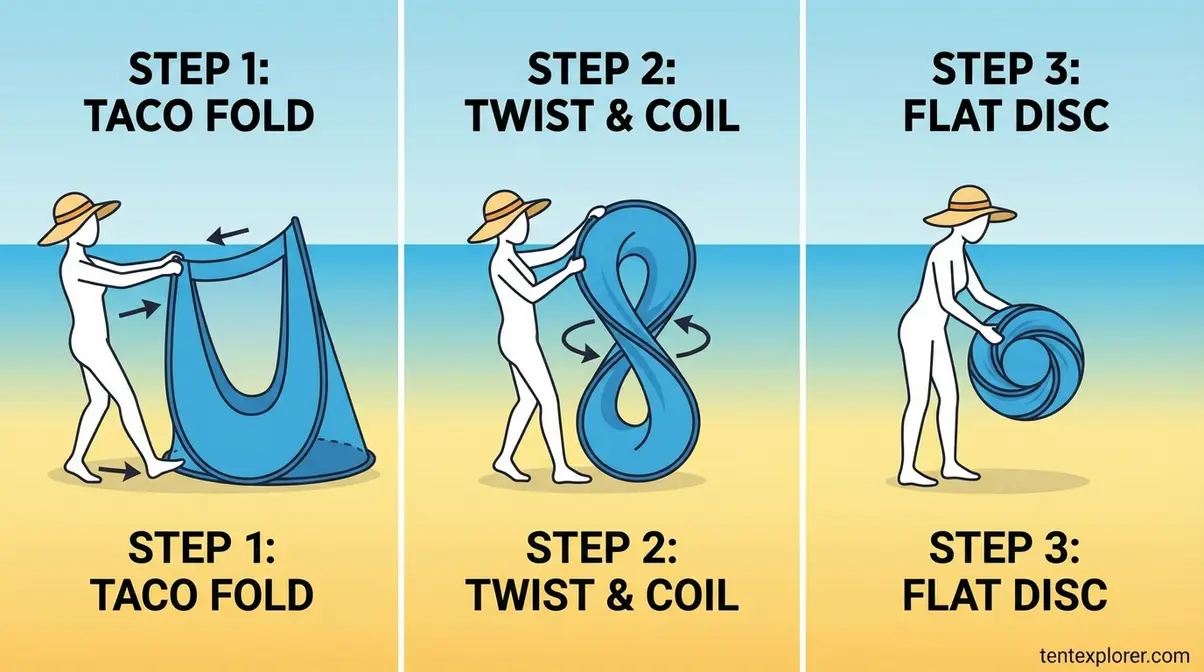
Caption: The taco fold works by using the spring frame’s natural hinge point — never force it flat.
The Figure-8 Twist — How to Fold a Larger Coleman-Style Pop-Up Tent
Larger pop-up tents — Coleman-style dome pop-ups with a more complex frame — require the figure-8 twist. This method accounts for the larger frame diameter and the additional tension stored in a bigger spring-steel hoop.
- Remove all stakes and guylines. Unzip windows and the main door to release air.
- Collapse the tent by pressing the top down toward the floor, flattening it into a disc shape.
- Stand the disc upright on one edge, gripping the middle with one hand for stability.
- With your free hand, pull the far edge of the disc toward you and downward, bending the disc so one half rotates over the other — this creates the figure-8 shape.
- Bring the two resulting circles together into a single stacked disc.
- Hold between your knees for tension control while you fasten the carry bag strap.
The most common mistake is releasing grip before the strap is secured. Spring steel has significant stored energy — if it pops back, the frame can snap outward with enough force to injure you. Keep the disc pinned with your knees or against your body until it’s fully strapped.
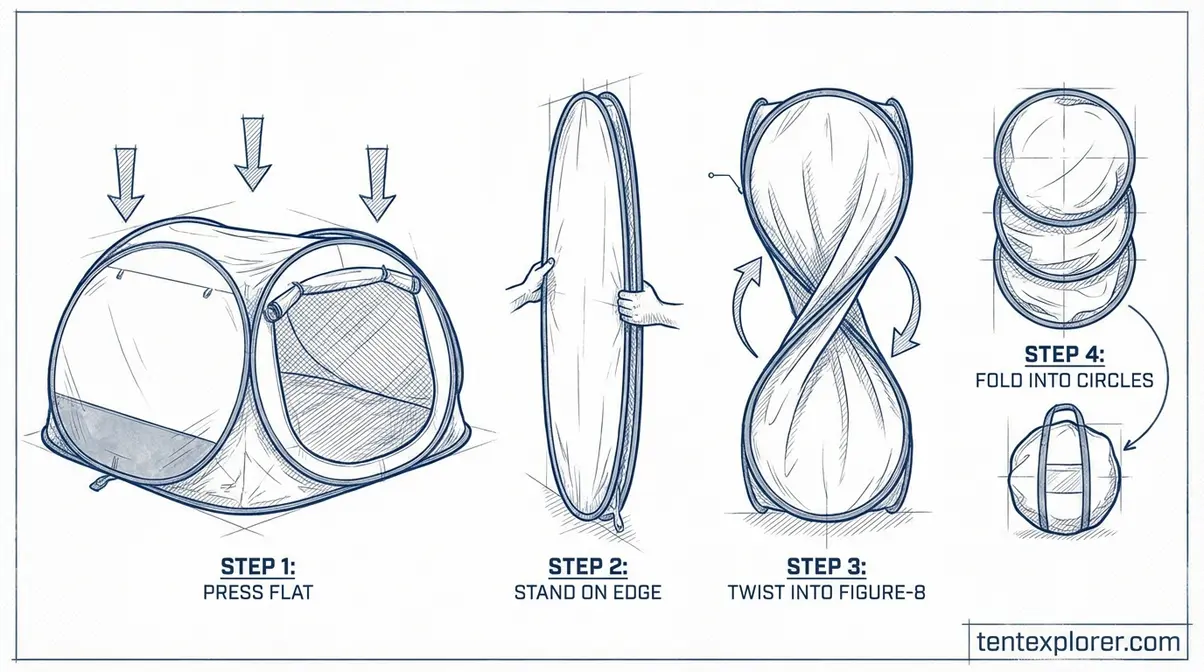
Caption: The figure-8 twist converts the spring-steel disc into two stacked circles — the only safe way to collapse a larger pop-up frame.
Folding Pop-Up Play Tents for Kids (Including Playhut and Similar Brands)
Children’s pop-up play tents — Playhut, Pacific Play Tents, and similar brands — use the same spring-steel principle as beach tents but are often made from lighter, less forgiving materials. The taco fold applies here, but with two important differences.
First, these tents typically have mesh panels rather than solid fabric walls. Mesh doesn’t help you feel the frame’s position during folding, so watch the frame visually rather than relying on fabric tension feedback. Second, the carry bags for children’s tents are notoriously small — the manufacturer’s target packed size assumes a perfect fold. If the bag won’t close, the fold isn’t quite right yet. Retry the taco fold, making sure both ends of the “taco” are aligned before bringing them together into the disc shape.
Store children’s pop-up tents in their carry bags in a cool, dry location. These lightweight frames are more susceptible to rust if stored damp — a rusty frame kinks more easily and loses its spring tension over time.
How to Fold Canopy, Shower, and Wall Tents
Canopy tents, shower tents, and canvas wall tents share a common challenge: they’re large, awkward structures that resist being made small. Each type has a specific folding approach that works with its frame geometry rather than against it.
Folding an Accordion-Style Canopy Tent (Two-Person Job)
A 10×10 canopy tent — the kind you see at farmers markets, tailgates, and family campsites — folds via an accordion-style collapse that requires two people for anything larger than a 6×6 structure. Attempting it solo almost always results in a crooked fold that won’t fit the carry bag.
- Remove the canopy fabric first (if detachable). Fold it separately — fold in half lengthwise, then in thirds, then roll. Store in the fabric sleeve before touching the frame.
- Close the frame partially: Both people stand at opposite ends of the canopy. Simultaneously push the legs inward, collapsing the frame toward the center. The scissor-leg mechanism should fold smoothly — if it resists, check that all leg locks are released.
- Accordion the frame: Continue pushing both ends toward the center until the frame compresses into its narrowest accordion shape. One person holds the compressed frame while the other secures the carry strap.
- Slide into the carry bag: Feed the narrow end of the compressed frame in first. If the bag has a zipper, start the zipper before fully releasing your grip on the frame.
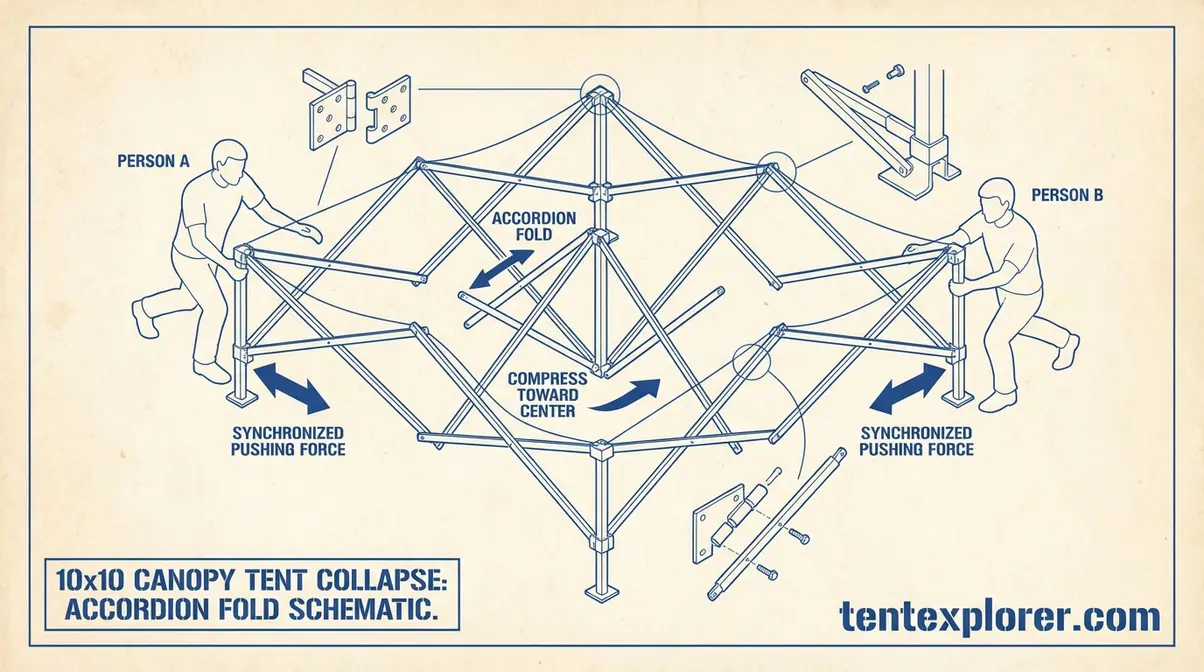
Caption: The accordion collapse requires synchronized movement from both ends — one person working alone creates uneven stress on the frame joints.
Never fold a wet canopy frame into its bag. The metal joints trap moisture and rust quickly, eventually seizing the folding mechanism. If you pack up in rain, lean the folded frame against a wall at home and let it air-dry before returning it to the bag.
Collapsing a Tall Pop-Up Shower, Tanning, or Privacy Tent
Tall pop-up privacy tents — shower enclosures, changing rooms, or a dedicated tent privacy room — use a spring-steel frame similar to beach tents but oriented vertically. The height makes them feel more unwieldy, but the folding principle is identical: twist, don’t flatten.
- Top-down method:
- Remove any interior accessories (hooks, shelves, mirror). Unzip the door fully.
- From above, press the top of the tent downward while simultaneously pulling the base outward. This inverts the dome shape, collapsing the height.
- Once the tent is flat on the ground (it will form a disc), apply the taco fold or figure-8 twist depending on the frame diameter — taller tents usually require the figure-8.
- The collapsed disc is typically 24–36 inches in diameter for a standard shower tent. Secure with the carry strap before releasing.
The most common mistake with shower tents is trying to fold them without fully collapsing the height first. Attempting to twist a tent that’s still partially upright creates uneven stress on the frame joints and can permanently bend the steel.
Folding and Storing a Heavy Canvas Wall Tent
Canvas wall tents — the large, rectangular structures used for base camps, hunting camps, and extended backcountry stays — are in a category of their own. A 14×16 foot canvas wall tent can weigh 80–120 pounds when dry. Folding one correctly is a multi-person operation, and storing it improperly is expensive.
The accordion-fold method for canvas wall tents:
- Spread the tent roof-down on the ground. Fold the walls and doors neatly inward onto the roof surface, matching the roof’s footprint. This is the most important step — messy wall folds create uneven bulk later.
- Fold widthwise with a partner. One person takes each long side. Fold the tent in half widthwise, then in half again, until the tent is roughly 2–3 feet wide and the full length of the tent long. This step requires two people to keep the folds straight.
- Make one partial lengthwise fold. Fold lengthwise, stopping about one foot short of the full fold. This creates a leading edge for rolling.
- Roll tightly from the crease. Starting at the partial fold, roll the tent tightly toward the far end, using your body weight to compress as you go.
Canvas-specific storage rule: Never store a canvas tent even slightly damp. Canvas is far more susceptible to mold and mildew than synthetic fabrics — mold can penetrate canvas fibers deeply, and once established, it’s nearly impossible to fully remove. Scouting America’s wall tent maintenance guidelines recommend full air-drying over multiple days before storage, not just a few hours.
| Storage Consideration | Canvas Wall Tent | Synthetic Tent |
|---|---|---|
| Drying time required | 2–3 days minimum | 2–4 hours |
| Mold risk | Very high | Moderate |
| Storage container | Breathable canvas bag or open crate | Mesh bag or pillowcase |
| Weight when dry | 80–120 lbs | 2–15 lbs |
| Fold method | Accordion + roll | Burrito roll |
How to Store Your Tent Long-Term — The Dry, Roll, Breathe Method
Understanding how to fold and store a tent properly means recognizing that long-term storage is where tent lifespan is actually won or lost. Most campers think proper packing is the hardest part. It isn’t. Long-term storage is. A tent packed perfectly at the campsite but stored in a hot attic or a damp garage will degrade faster than a tent stuffed carelessly but kept in a cool, dry closet.
In controlled storage tests, tents stored in breathable mesh bags in climate-controlled environments showed no hydrolysis or mildew after 18 months, compared to tents stored in stuff sacks in garages which showed coating degradation within one season (Cascade Designs, 2026).
The Dry, Roll, Breathe Method is the three-stage framework that unifies campsite packing with home storage science: Dry (eliminate all moisture before and during storage), Roll (use the burrito method for compact, stress-free packing), and Breathe (store in a breathable container that allows air circulation rather than trapping humidity against the fabric).
Why Tents Go Bad — The Science of Hydrolysis and Mildew
Most campers know the rules — “don’t store it wet,” “keep it out of the attic” — but not the why. Understanding the mechanism makes you take the rules seriously.
Hydrolysis is a chemical reaction that permanently breaks down polyurethane waterproof coatings. Water molecules attack the polymer chains in the PU coating, breaking them apart at a molecular level. Heat accelerates the reaction dramatically — this is why attics and car trunks are so destructive. Once hydrolysis begins, the coating becomes tacky, then sticky, then it peels away entirely. The tent doesn’t leak gradually — it fails suddenly, often in heavy rain during a trip. There is no repairing severe hydrolysis; the coating must be fully stripped and reapplied. Research from Mountain Hardwear’s care guidelines confirms that even slight moisture at storage can trigger hydrolysis within months.
Mildew is a separate but related threat. MSR’s tent care documentation notes that mildew can start forming in as few as 24 hours on a wet, crumpled tent (MSR, 2026). Mildew causes stains, produces a persistent odor that’s nearly impossible to fully eliminate, and further compromises the waterproof coating. Critically, mildew and moisture damage are not covered under most manufacturers’ warranties.
Shock cord degradation is the third storage failure mode. Shock cords lose elasticity when stored under tension — meaning poles stored folded and compressed for months will eventually lose the snap that makes pole assembly fast and reliable. Store poles loosely, not compressed inside a stuff sack.
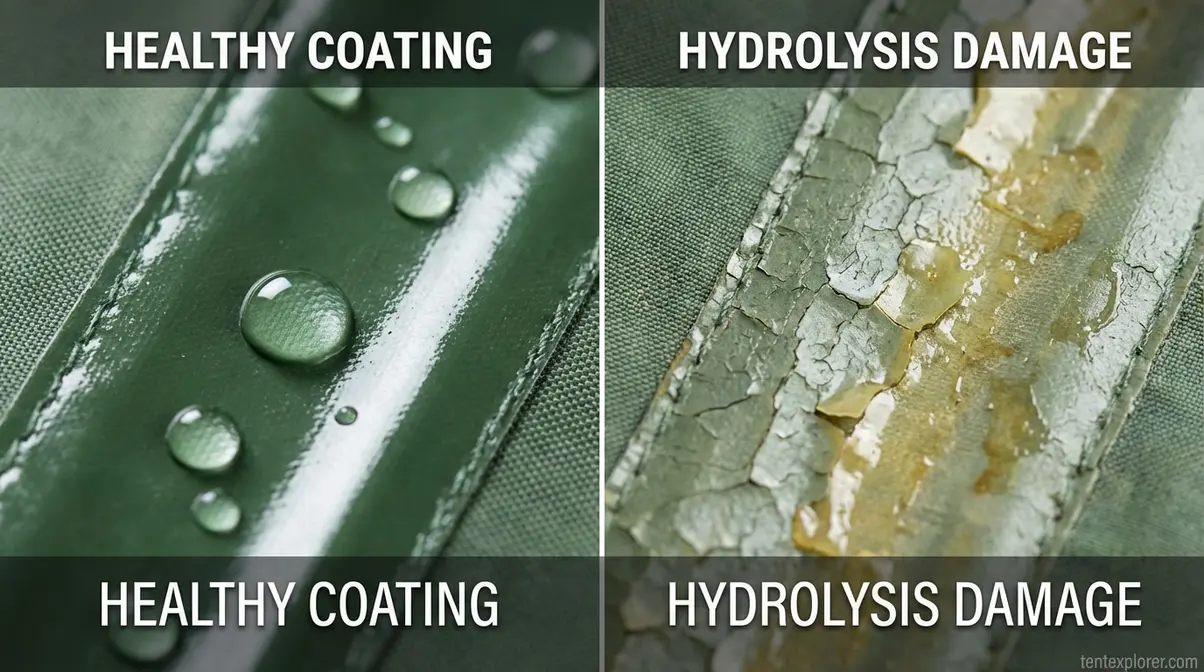
Caption: Hydrolysis turns a waterproof PU coating tacky and eventually causes it to peel — storing a tent damp accelerates this process dramatically.
Ditch the Stuff Sack — How to Properly Store Your Tent
Here’s the counterintuitive truth: the stuff sack that came with your tent is for the trail, not for your gear closet. Nemo Equipment’s storage guidelines put it plainly — they recommend storing tents outside of stuff sacks, either loosely rolled or hung in a cool, dry place away from UV light (NEMO Equipment, 2026).
The reason is simple. Stuff sacks are designed for compression, not breathability. If you use a tent footprint, store it separately to prevent transferring ground moisture to the tent body. Sealed inside a stuff sack for months, any residual moisture in the fabric has nowhere to go. The result is a microclimate of trapped humidity pressed directly against your tent’s waterproof coatings — the ideal conditions for both hydrolysis and mildew.
The Breathe stage of The Dry, Roll, Breathe Method means using one of these alternatives:
- Breathable mesh bag (ideal): Allows full air circulation while keeping the tent loosely bundled. Many brands sell these specifically for tent storage; a large laundry mesh bag also works.
- Cotton pillowcase: An excellent improvised option. Cotton breathes well and is soft enough to avoid fabric stress.
- Loose hang on a hanger: The best option of all if you have closet space — hang the tent body and fly separately on padded hangers. No compression at any point.
- Original stuff sack with the drawstring open: A compromise, but significantly better than sealed storage.
Never use: plastic bags, sealed containers, or airtight storage bins for long-term tent storage. These trap moisture with no escape route.
The Best (and Worst) Places to Store Your Tent at Home
REI’s storage guidelines are direct: avoid storing your tent in damp or hot locations like a basement, attic, or car trunk (REI, 2026). These three locations account for the majority of premature tent failures.
Why each location fails:
- Attic: Temperature swings of 40–100°F+ depending on season. Heat is the primary accelerator of PU hydrolysis. Attics can exceed 140°F in summer — coating breakdown happens within weeks at these temperatures.
- Garage: Often humid, especially in climates with seasonal rain. Uninsulated garages combine moisture with temperature swings, creating the worst possible storage environment.
- Car trunk: Permanent UV exposure through the rear window, heat buildup, and vibration stress on fabric. A tent left in a car trunk for a full summer can age years in months.
- Damp basement: Moisture from concrete floors and walls migrates into fabric even without direct contact. If your basement has any humidity, it’s unsuitable without a dehumidifier and elevated storage.
Optimal storage locations:
| Location | Temperature Stability | Humidity | UV Exposure | Rating |
|---|---|---|---|---|
| Climate-controlled closet | Excellent | Low | None | ⭐⭐⭐⭐⭐ |
| Spare bedroom | Good | Low | Minimal | ⭐⭐⭐⭐ |
| Climate-controlled basement | Good | Moderate | None | ⭐⭐⭐ |
| Insulated garage | Fair | Moderate | Low | ⭐⭐ |
| Attic | Poor | Variable | Low-moderate | ⭐ |
| Car trunk | Very poor | Variable | High | ✗ |
SlingFin’s storage framework identifies the priority order as: DRY, DARK, COOL — in that order (SlingFin, 2026). Dry is the most critical variable. A tent in a slightly warm closet will outlast a tent in a cool but humid basement every time.
Optimal humidity for tent storage is below 50%, with temperatures ideally between 60–70°F (18–21°C). A small hygrometer in your gear storage area is a worthwhile $10 investment.
Pre-Storage Maintenance Checklist — Clean, Seal, and Protect
Before your tent goes into long-term storage, it needs a brief maintenance pass. This step takes 30–60 minutes and can add years to a tent’s useful life.
Step 1 — Shake and spot-clean. Shake the tent body and rain fly to remove loose dirt and debris. Use a damp sponge with a small amount of mild, non-detergent soap to clean any soiled areas. Never use dishwashing liquid, detergent, or bleach — these strip waterproof coatings (MSR, 2026).
Step 2 — Set up and air-dry completely. Pitch the tent (or drape it over a clothesline) and let it dry fully — minimum 2–4 hours in direct sun, or overnight indoors. There is no such thing as too much drying time. MSR’s care guidelines note that even subtle condensation from a dry trip can cause coating degradation if the tent is stored sealed (Cascade Designs, 2026).
Step 3 — Inspect seams. Run your fingers along all taped seams on the rain fly and tent floor. If seam tape is peeling or lifting at the edges, apply a seam sealer (our seam sealing guide recommends Gear Aid Seam Grip) before storage. A seam that’s barely holding will fail completely under spring rain.
Step 4 — Check and refresh the DWR coating. Pour water on the rain fly. If it beads up and rolls off, the DWR (durable water repellent) coating is intact. If water soaks into the fabric, apply a DWR spray like Nikwax Tent & Gear SolarProof to the exterior surface, wipe off excess, and air-dry before storage (Nikwax, 2026).
Step 5 — Apply talcum powder to tacky PU coatings. If your tent floor or fly feels slightly sticky — an early sign of hydrolysis — rub a light coat of talcum powder (baby powder) onto the affected areas before storage. This won’t reverse the hydrolysis, but it prevents the fabric from sticking to itself and buying you another season of use.
Step 6 — Store poles loosely. Remove the poles from the pole bag and store them loosely in a tube or hung vertically. Storing poles compressed in their bag for months keeps the shock cord under constant tension, accelerating elasticity loss.
| Maintenance Task | Time Required | Tools Needed | Frequency |
|---|---|---|---|
| Shake + spot clean | 10–15 min | Sponge, mild soap | Every storage |
| Full air-dry | 2–24 hrs | Clothesline or pitched tent | Every storage |
| Seam inspection | 5–10 min | Fingers, seam sealer | Annual |
| DWR check + refresh | 10–15 min | Water, DWR spray | Annual or as needed |
| Talc treatment | 5 min | Talcum powder | If tacky coating detected |
| Pole loose storage | 2 min | Tube or hang | Every storage |
Common Tent Folding and Storage Mistakes to Avoid
Even experienced campers fall into predictable patterns that quietly destroy their gear. The Dry, Roll, Breathe Method exists precisely to break these habits.
5 Mistakes That Ruin Tents in Storage
Mistake 1: Storing the tent even slightly damp. This is the single most common and most damaging mistake. You might think “it’s mostly dry” — but even 5% residual moisture sealed in a stuff sack for eight months is enough to trigger mildew and accelerate hydrolysis. If you packed up in the rain, set the tent up at home to dry before it goes into storage. No exceptions.
Mistake 2: Using the stuff sack for winter storage. The stuff sack creates compression and seals out airflow. Both are exactly wrong for long-term storage. The burrito roll is for the trail; the mesh bag or pillowcase is for the gear closet.
Mistake 3: Storing in an attic, garage, or car trunk. Temperature extremes are a PU coating’s worst enemy. A tent in a summer attic experiences conditions that would degrade the coating in weeks. Move your tent to a climate-controlled indoor location before the season ends.
Mistake 4: Folding poles from one end. Starting at one end of a poleset places the full shock cord tension on the first joint, stretching the elastic cord unevenly. Over several seasons, the cord loses its snap and eventually snaps entirely. Always fold from the middle outward.
Mistake 5: Skipping the pre-storage maintenance pass. A small seam failure or a slightly degraded DWR coating is easy to fix before storage. The same issue left unaddressed for eight months becomes a much larger repair — or a tent that leaks on the first rainy night of the next season.
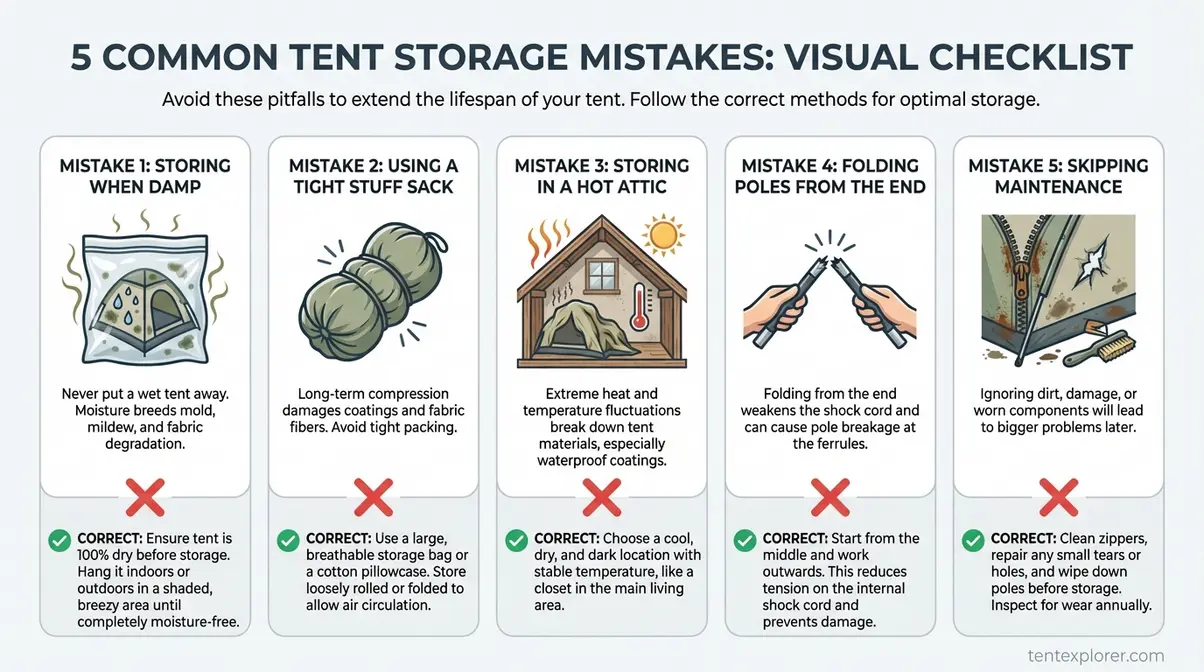
Caption: These five mistakes account for the majority of premature tent failures — each one is preventable with the Dry, Roll, Breathe system.
When to Repair Your Tent Before Putting It Away
Some tent damage looks minor at the end of a trip but becomes catastrophic over a winter in storage. The Washington Trails Association tent repair advice recommends inspecting and repairing tents before storage rather than waiting until the next trip — because small failures expand under temperature cycling and fabric stress during storage.
Repair before storage if you find:
- Seam tape lifting or peeling at edges — Apply seam sealer immediately. A seam that’s half-detached will fully separate during storage, allowing water infiltration at every seam junction.
- Small tears or punctures in the floor or fly — Patch with a self-adhesive repair patch (Gear Aid Tenacious Tape is the field standard). Unpatched holes allow moisture to enter the fabric layers and accelerate degradation from the inside.
- Bent or kinked pole sections — A slightly bent pole under shock cord tension can crack completely during storage. Replace the damaged section before storing.
- Broken zipper pulls or stiff zipper coils — Lubricate stiff zippers with a zipper lubricant (beeswax or a product like Gear Aid Zipper Lubricant) before storage. Stiff zippers stored dry for months become stuck zippers by spring.
- Sticky or tacky floor/fly coating — See the talcum powder step in the maintenance checklist above. If the coating is actively peeling in flakes, strip and reapply the PU coating before storage (REI, 2026).
The five minutes spent on repairs before storage routinely saves $50–200 in replacement costs — and prevents the particular misery of discovering a failed tent at the trailhead.
Frequently Asked Questions
How do you store a tent when not in use?
Store your tent loosely in a breathable mesh bag or cotton pillowcase in a cool, dry, climate-controlled indoor location. Avoid stuff sacks for long-term storage — they trap moisture against the waterproof coating and accelerate hydrolysis. REI recommends avoiding basements, attics, and car trunks, all of which combine temperature extremes with humidity (REI, 2026). The optimal storage environment is below 50% humidity and between 60–70°F. A spare closet or gear cabinet in a conditioned room is ideal.
What’s the best way to fold a tent?
The burrito roll method is the most effective way to fold a camping tent. Lay the tent flat, fold the sides inward to match your pole bag width, place the pole bag at one end as a compression axle, and roll tightly toward the zipper gap you’ve left slightly open. The rigid pole bag forces air outward as you roll, producing a compact bundle. Big Agnes officially endorses this method — roll around your poles, then slide the bundle into the stuff sack (Big Agnes, 2026). It consistently outperforms free-stuffing for compactness and fabric stress.
How do you pack up a large tent?
Large tents require two people and two zipper gaps. Assign one person to each long side to simultaneously smooth wrinkles and fold the sides inward. Leave a small zipper gap at each end of the tent body — two exit points let trapped air escape faster across the larger fabric area. Both people roll from opposite ends toward the center, meeting in the middle, then compress and bag. For 12-person cabin tents, a compression stuff sack one size larger than the original is often necessary.
How do you fold up a 12-person tent?
Folding a 12-person tent is a two-person job using the center-roll technique. After smoothing and folding the sides inward, leave zipper gaps at both ends of the tent body. Each person starts rolling from their end toward the center, compressing the fabric with steady downward pressure. When both rolls meet in the middle, one person holds the bundle while the other secures the stuff sack. The most common mistake is attempting this solo — one person cannot maintain even compression across a 12-person footprint.
Do tents go bad if not used?
Yes — a tent stored improperly will degrade even if never used again. The primary culprits are hydrolysis (moisture + heat breaking down polyurethane coatings) and mildew (forming within 24 hours on damp fabric). A tent stored in a hot attic for one summer can experience more coating degradation than several seasons of active use. MSR’s care documentation confirms that even subtle moisture at storage triggers hydrolysis (Cascade Designs, 2026). Stored correctly — dry, breathable container, climate-controlled location — a quality tent can last 10–15 years or more.
What is the most forgotten item when camping?
A tent repair kit is the most commonly forgotten piece of gear with direct impact on shelter integrity. Most campers remember the tent itself but leave behind the seam sealer, repair patches, and pole repair sleeve that turn a trip-ending failure into a five-minute fix. Other frequently forgotten items include a headlamp with fresh batteries, a fire starter backup, and extra tent stakes. Building a permanent “repair pouch” that lives in your tent bag — never removed — eliminates this problem entirely.
What is the 3-3-3 rule for camping?
The 3-3-3 rule is an RV travel guideline recommending no more than 300 miles driven per day, arrival at the campsite by 3:00 PM, and a minimum 3-night stay at each location (KOA, 2026). The arrival-by-3 PM component is particularly relevant for tent campers — arriving with daylight gives you time to select a good tent site, clear debris before pitching, and set up properly rather than rushing in the dark. Rushed campsite setup is one of the leading causes of tent floor punctures and pole damage.
How do you pack a tent for storage?
Packing a tent for storage is different from packing it for the trail. For storage, the priority is breathability over compactness: use a mesh bag or cotton pillowcase rather than the stuff sack, store loosely rather than tightly compressed, and never seal the tent in plastic. Before packing for storage, the tent must be completely dry, cleaned of dirt and debris, and inspected for seam tape, coating integrity, and zipper function. Run through the pre-storage maintenance checklist — spot clean, air-dry fully, inspect seams, check DWR — then store in a cool, dry, dark location with airflow. This is the Breathe stage of The Dry, Roll, Breathe Method.
The Complete System for a Longer-Lasting Tent
For any camper who has invested $150 to $600 in a quality tent, understanding how to fold and store a tent determines whether that investment lasts two seasons or fifteen. The techniques in this guide aren’t complicated — but they represent a significant departure from how most people pack their gear. Rolling around the pole bag instead of stuffing. Leaving the zipper gap for air to escape. Choosing a mesh bag over the stuff sack for winter. Keeping the tent out of the attic. Each change is small; the cumulative effect on tent lifespan is substantial.
The Dry, Roll, Breathe Method gives you a single mental model for both campsite packing and home storage. Dry eliminates the moisture that triggers hydrolysis and mildew. Roll uses the burrito technique to pack efficiently without fabric stress. Breathe means choosing a storage container and location that allow air circulation rather than sealing humidity against your coating. Together, these three stages treat tent care as one continuous process — because it is.
Your next step: before you put your tent away after this season, run through the pre-storage maintenance checklist. Set the tent up at home, let it dry completely, inspect the seams, check the DWR, and move it to a breathable bag in a climate-controlled closet. That 45-minute investment this fall could save you the cost of a new tent next spring.
