How to Improve Tent Comfort: The 3-Layer System (2026)
 David King
Updated June 23, 2026
27 min read
David King
Updated June 23, 2026
27 min read
You packed the car, drove out to nature, and ended up staring at the tent ceiling at 2 AM — cold, uncomfortable, and wondering why anyone does this voluntarily.
“My partner hates camping because it’s uncomfortable, he can’t sleep well, and everyday things are more challenging.”
That frustration is real, and it’s more common than you think. About 1 million new U.S. households are expected to try camping for the first time in 2026 (KOA, 2025 Camping & Outdoor Hospitality Report) — yet most quit after a single bad night, not because camping is hard, but because nobody showed them the right system. By the end of this guide, you’ll know exactly how to improve tent comfort using a simple three-step framework — so your next trip feels less like survival and more like a real rest. We’ll cover campsite setup, building your sleep system, weatherproofing, and the gear mistakes that silently ruin your night.
Recommended Products
| # | Image | Product | Best For | Buy |
|---|---|---|---|---|
| 1 | 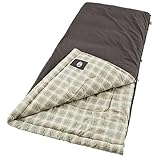 |
Coleman Heritage Big & Tall Flannel Bag | Tall adults, cold nights | Buy on Amazon |
| 2 |  |
Coleman Dunnock 20°F Big ‘n Tall Bag | Cold weather, XL sleepers | Buy on Amazon |
| 3 | No products found. | MalloMe Lightweight Sleeping Bag | Versatile 3-season camping | No products found. |
| 4 |  |
MalloMe Double Sleeping Bag | Couples or extra room | Buy on Amazon |
| 5 |  |
Lightweight Waterproof Backpacking Bag | Backpackers, weight savings | Buy on Amazon |
| 6 |  |
Coleman Brazos 20°F Sleeping Bag | Cool-weather car camping | Buy on Amazon |
| 7 |  |
Coleman Brazos 30°F Sleeping Bag | Mild nights, easy packing | Buy on Amazon |
| 8 |  |
Coleman 45°F Double Sleeping Bag | Warm weather, two sleepers | Buy on Amazon |
| 9 | No products found. | MEREZA Queen Double Sleeping Bag | Two-person, all-season use | No products found. |
Learning how to improve tent comfort comes down to three layers: insulating your floor, upgrading your sleep system, and managing temperature and condensation. About 1 million new U.S. households are expected to try camping in 2026 — but most quit after one uncomfortable trip (KOA, 2025). The 3-Layer Comfort System fixes that.
- Floor insulation matters most: Cold ground steals body heat faster than cold air — a sleeping pad with R-2 or higher is non-negotiable
- Sleeping bag temperature rating: Go 10°F lower than the coldest night you expect for a comfortable buffer
- Ideal sleep temperature: Research suggests 60–67°F is the optimal range for restorative sleep (Cleveland Clinic, 2026)
- Condensation is manageable: Open vents slightly even in cold weather to prevent a soggy sleeping bag
- Arrive by 3 PM: The 3-3-3 Rule gives you time to set up your full comfort system before dark

Last update on 2026-06-23 / Affiliate links / Images from Amazon Product Advertising API
Last update on 2026-06-23 / Affiliate links / Images from Amazon Product Advertising API
Last update on 2026-07-08 / Affiliate links / Images from Amazon Product Advertising API

Last update on 2026-07-08 / Affiliate links / Images from Amazon Product Advertising API
Last update on 2026-06-23 / Affiliate links / Images from Amazon Product Advertising API
Last update on 2026-06-23 / Affiliate links / Images from Amazon Product Advertising API
Last update on 2026-06-23 / Affiliate links / Images from Amazon Product Advertising API
Last update on 2026-06-23 / Affiliate links / Images from Amazon Product Advertising API

Last update on 2026-07-08 / Affiliate links / Images from Amazon Product Advertising API
Before You Start: What You’ll Need
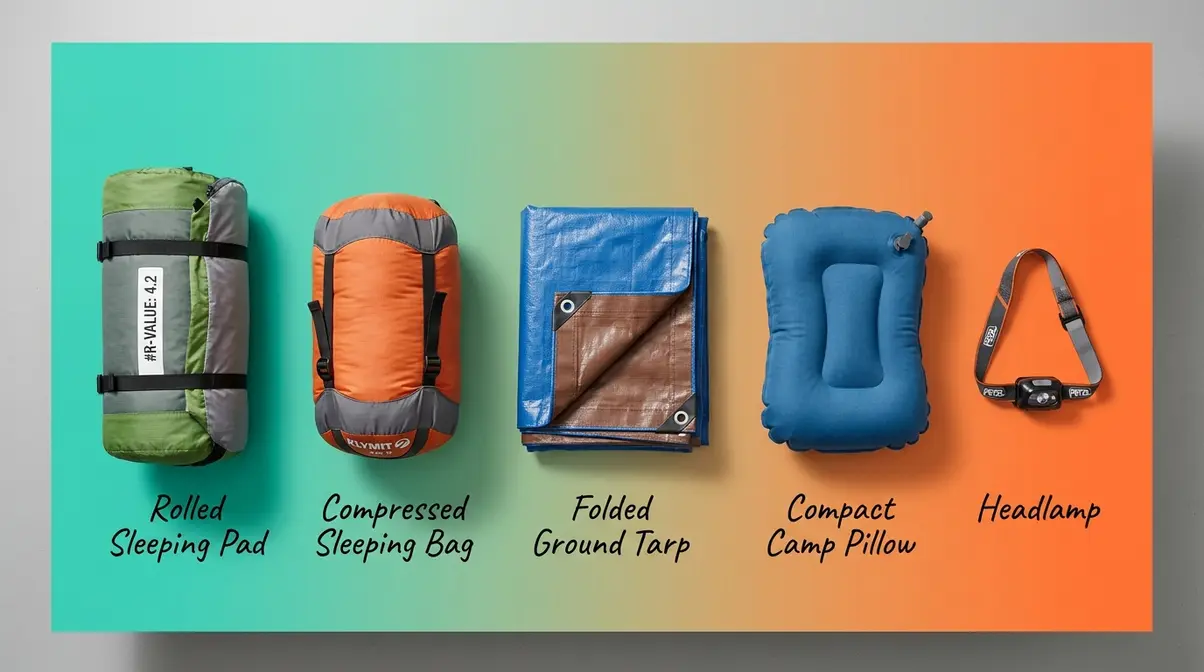
Knowing how to improve tent comfort starts before you leave the driveway. This section is your pre-trip checklist — not every item is expensive, and you may already own some of them. Everything in this guide builds on The 3-Layer Comfort System — floor insulation, sleep system, and microclimate control. Get the gear right first, and every step that follows becomes dramatically easier.
Camping participation in the US has reached tens of millions annually (Statista, 2025) — but most beginners quit after their first uncomfortable night without proper gear. The good news? The right five items solve the majority of comfort problems.
Your Comfort Gear Checklist
These are the five camping essentials every beginner needs, defined in plain English so you know exactly what to look for:
- Sleeping pad — a foam or inflatable mat that insulates you from the cold ground. The key number to look for is the R-value (a measure of how well a pad resists heat loss — the higher the number, the warmer you’ll stay). Aim for R-2 minimum for summer nights and R-4 or higher for cold-weather camping. Modern sleeping pads are rated using the ASTM F3340 standard, which means you can compare R-values across brands on an apples-to-apples basis.
- Sleeping bag — the temperature rating on the tag tells you the lowest temperature it’s designed to handle. Beginners consistently underestimate this number. Camping communities recommend going 10°F below the coldest night you expect to give yourself a real comfort buffer.
- Tent footprint or ground tarp — a protective sheet that goes under your tent. It keeps moisture from wicking up through the tent floor and adds a measurable insulation layer between you and the ground.
- Pillow — even a compact camp pillow makes a significant difference in sleep quality. If you’re car camping, bring your pillow from home. Campers who skip this step consistently report stiff necks and broken sleep.
- Headlamp or lantern — nighttime fumbling for gear is one of the most underrated sleep disruptors. A headlamp keeps both hands free. Practicing tent setup at home ensures all poles and stakes are accounted for before you reach the campsite (National Park Service camping guide, 2024).
Practice Setup at Home First
One of the most effective tent camping tips experienced campers share is this: pitch your tent at home before the trip. It sounds obvious. Most beginners skip it.
- Lay out your tent in the yard or living room. Spread everything flat — tent body, poles, stakes, and rainfly.
- Match each component to the setup diagram. Identify every pole section and its corresponding sleeve or clip.
- Assemble the tent fully, then take it down. Do this twice.
- Time yourself. Aim to pitch and strike the tent in under 15 minutes before your trip.
Arriving tired at a campsite and fumbling with poles in fading light leads to poor site selection, a crooked setup, and a miserable first night. Ten minutes of practice at home prevents hours of discomfort on the trip. Once you know how to pitch a tent confidently, you can focus your energy on building your comfort system instead.
With gear packed and setup practiced, let’s walk through Step 1 of the 3-Layer Comfort System.
Step 1: Master Your Tent Setup Before You Arrive
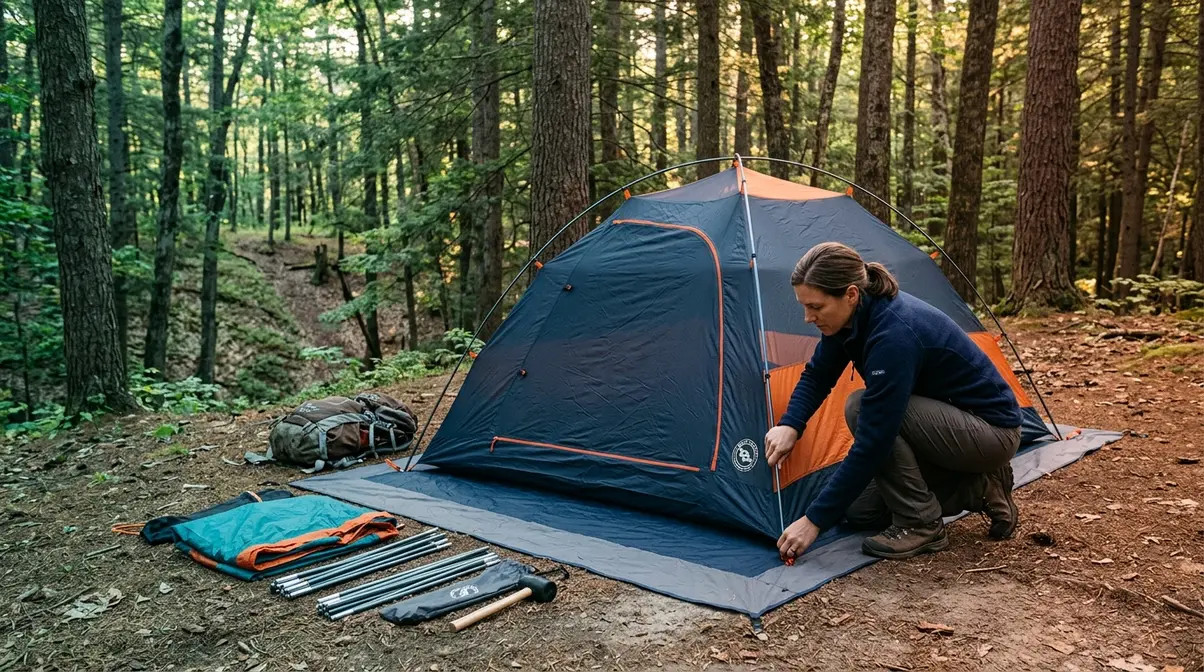
Knowing how to set up a tent properly is the single most important foundation for a comfortable camping night. About 56 million Americans went camping in 2024 (Outdoor Industry Association, 2025 Participation Trends Report), yet setup mistakes remain the top complaint from beginners. A poor campsite choice or a crooked tent can ruin your sleep before you even unzip your sleeping bag — and no amount of gear upgrades will fix a bad foundation.
Choose a Flat, Sheltered Campsite
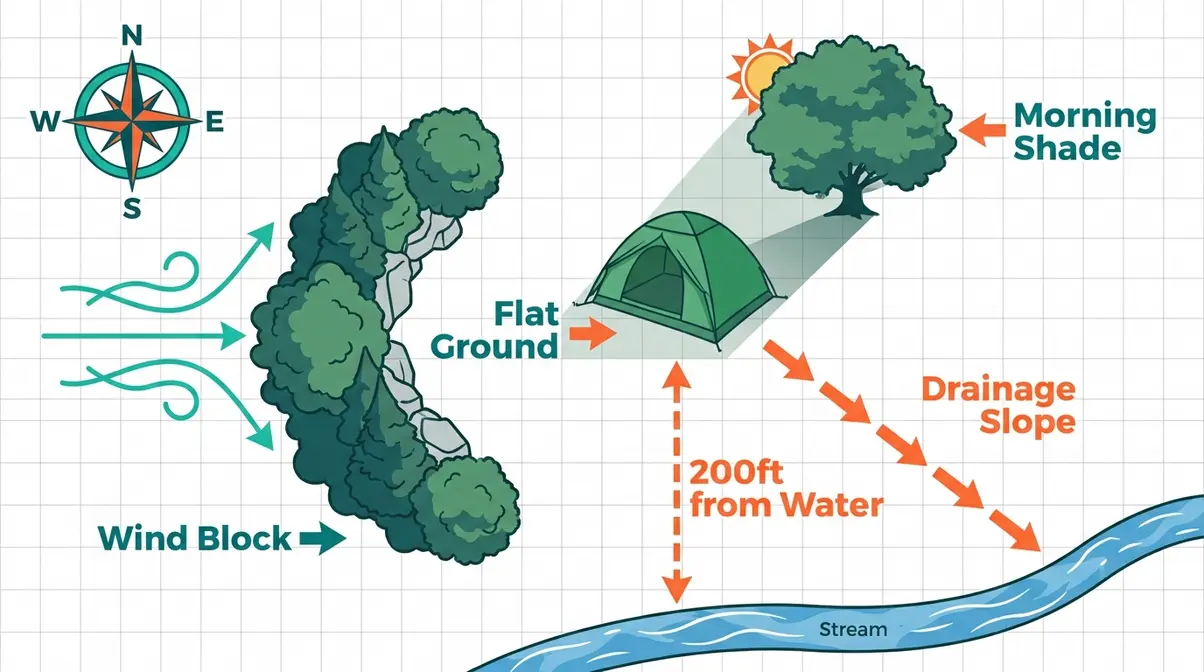
Choosing a flat, sheltered campsite is the single most impactful setup decision for tent comfort — a 5° slope is enough to slide out of your sleeping bag by morning. Walk the site in a slow circle before unpacking. It takes two minutes and prevents hours of discomfort. For more preparation strategies, check out these essential tent setup tips for beginners.
Evaluate your campsite using these four factors:
- Level ground. Even a 3–5° slope causes you to slide during the night. Test by lying down briefly before pitching. If you must camp on a slight slope, position your head uphill — never your feet.
- Wind protection. Look for natural windbreaks: rock formations, dense trees, or a hillside. Wind noise and cold drafts through tent seams are the two biggest sleep disruptors outdoors, and both are preventable with smart positioning.
- Drainage. Never pitch in a depression, hollow, or dry riverbed — rain can pool underneath you within hours. Look for a gentle rise in terrain where water naturally runs away from your sleeping area.
- Shade. Morning sun turns a tent into an oven in under 30 minutes. Position the tent door facing away from the sunrise direction so you wake up gently rather than in a sweat.
Camping recently gained over 2 million new participants in recent years, underscoring the need for beginner-friendly setup guidance (2025 Outdoor Participation Trends Report, Outdoor Industry Association, 2025). Most of those new campers never received instruction on campsite evaluation — and it shows in their first-night experience.
Once you’ve found your spot, the order in which you set up your tent matters more than most beginners realize.
Pitch Your Tent in the Right Order
Follow this numbered sequence to avoid the most common beginner mistakes. Each step has a reason — skip one and you’ll feel it later.
- Lay the footprint or ground tarp first. This is your first insulation layer against ground moisture and cold. It also protects the tent floor from abrasion.
- Assemble poles before touching the tent body. Lay all pole sections out in order. Don’t assemble them ad hoc — confused pole assembly in fading light is how beginners crack pole joints.
- Stake two corners loosely. This gives you a reference frame and prevents the tent body from blowing around while you work.
- Thread poles and clip the tent body. Follow the manufacturer’s diagram. Never force a pole into a sleeve — if it’s not sliding easily, check that the pole sections are fully locked together.
- Attach the rainfly. Do this even on clear nights. A rainfly reduces condensation inside the tent by creating an air gap between the inner canopy and the outer shell (more on this in Step 3).
- Stake out all corners and guylines. A taut tent handles wind far better than a slack one. Guylines are the thin cords attached to the tent that stake out at an angle — they add critical stability in wind.
Pop-up tent? Collapse it by rotating the frame into a figure-8 shape — the same motion in reverse of how it opened.
With your tent pitched correctly, you’re ready to use the 3-3-3 Rule to manage your arrival time and energy.
Apply the 3-3-3 Rule to Your Arrival
The 3-3-3 Rule — originally from RV camping — has been widely adapted by tent campers as a structured way to reduce setup fatigue. The core idea: drive no more than 3 hours, arrive by 3 PM, and stay at least 3 nights.
Here’s why each element matters for tent comfort specifically:
- Drive no more than 3 hours. Arriving tired from a long drive means skipping comfort steps. Campers consistently report that exhaustion at arrival is the primary reason they skip floor insulation and proper tent staking — both of which directly affect sleep quality.
- Arrive by 3 PM. This gives you time to (a) evaluate your campsite in full daylight, (b) build your floor system properly, and (c) test your sleeping pad inflation before nightfall. Rushing setup in the dark is how beginners end up on a slope they didn’t notice.
- Stay at least 3 nights. The first night is always the roughest as your body adjusts to outdoor sounds, air quality, and temperature. Staying longer means you’ll actually enjoy the trip. Most campers who “hate camping” tried it for one night, had a rough experience, and never gave the system time to work.
Actionable tip: Set a phone alarm labeled “campsite arrival” to go off 3 hours before sunset on your departure day.
Your tent is pitched and you arrived with time to spare. Now comes the most impactful part: building your comfort system inside.
Step 2: Build Your 3-Layer Comfort System
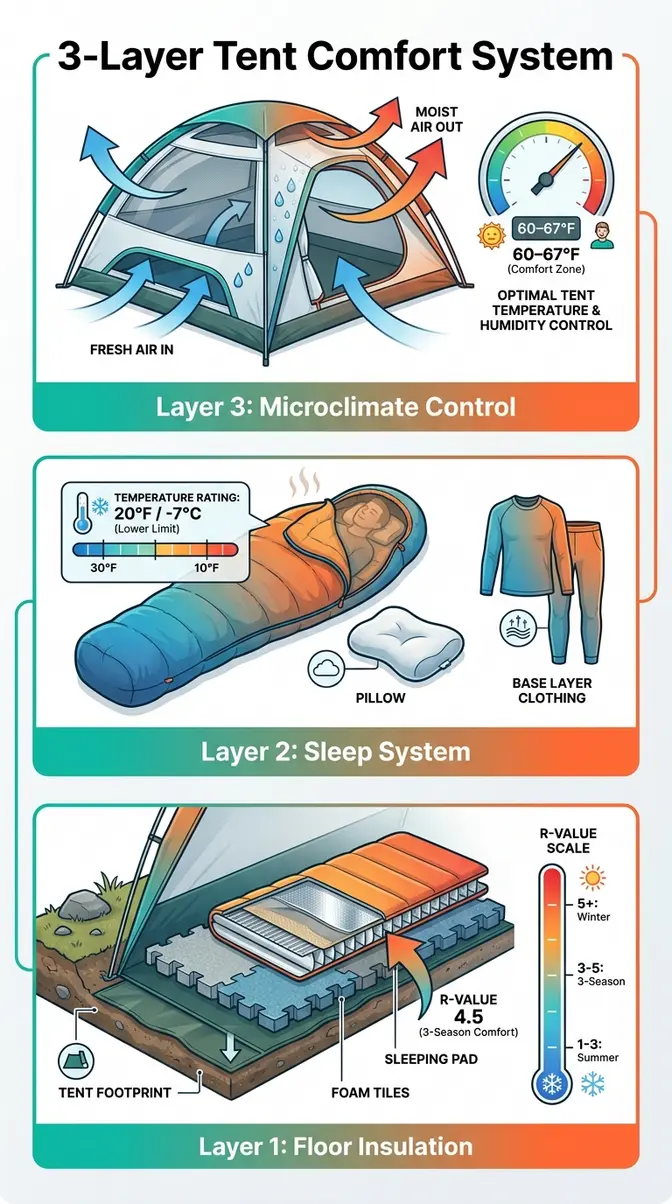
No competitor frames this as a structured system — and that’s exactly why most camping comfort guides fail. The 3-Layer Comfort System is the core framework of this guide: Layer 1 (floor insulation), Layer 2 (sleep system), and Layer 3 (microclimate control) work together as a unit. Miss any one layer and the others can’t compensate. This section is where tent camping tips become a real, repeatable system.
Layer 1: Insulate Your Tent Floor
Cold ground is the number-one comfort killer in a tent. Think of your sleeping pad like the insulation in your home’s walls — without it, heat escapes straight into the ground, no matter how warm your sleeping bag is. This is Layer 1, and it’s where most beginners underinvest.
REI, a major outdoor retailer and camping authority, consistently emphasizes ground insulation as the most impactful single upgrade a beginner can make — more than any sleeping bag upgrade.
Build your floor system in layers:
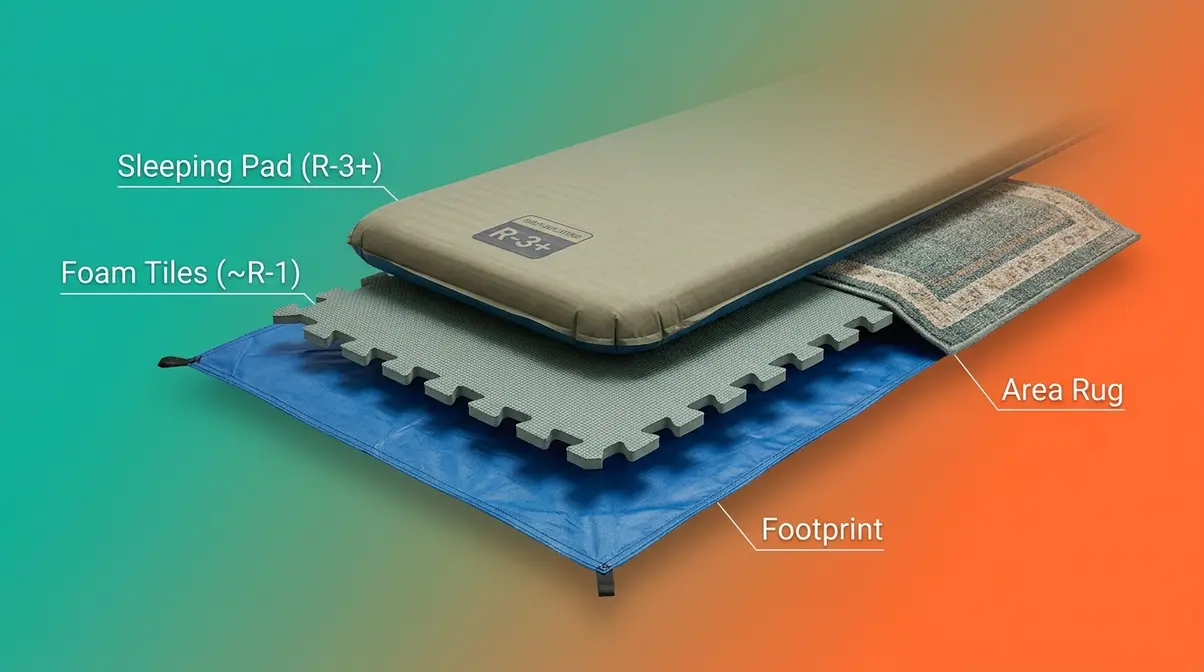
- Start with a tent footprint or ground tarp under the tent body (already placed during setup). This blocks ground moisture from below.
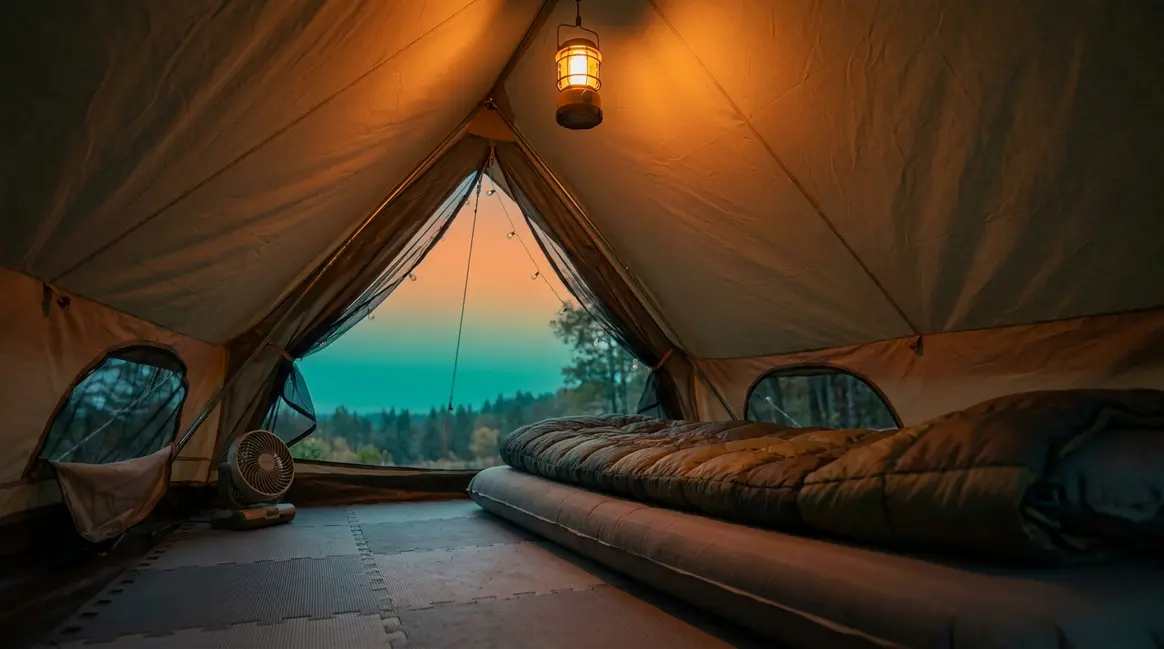
- Add interlocking foam floor tiles inside the tent. These are the same puzzle-piece foam mats used in kids’ playrooms — they’re inexpensive, lightweight for car camping, and dramatically improve both warmth and cushioning. Lay them across the full tent floor before placing any other gear.
- Place your sleeping pad on top of the foam tiles. Use a sleeping pad with an ASTM F3340-rated R-value appropriate for your conditions:
| Season | Recommended R-Value | Conditions |
|---|---|---|
| Summer (warm nights) | R-1 to R-2 | Above 50°F overnight |
| Three-season (spring/fall) | R-3 to R-4 | 25–50°F overnight |
| Winter / cold weather | R-5 or higher | Below 25°F overnight |
- Add a small area rug or blanket layer on top of the foam tiles (not on the sleeping pad). This creates a warm, soft surface for the areas where you sit and dress — reducing the “cold floor” sensation that makes every morning feel miserable.
Why R-values add up: When you stack a foam tile layer (approximately R-1) under a sleeping pad rated R-3, you effectively achieve R-4 combined. R-values are directly additive under the ASTM standard — a useful trick for campers who already own a lower-rated pad.
Common pain points reported by campers include waking up with a cold back despite a warm sleeping bag — almost always caused by an inadequate sleeping pad, not the bag. Very thin beds on cold ground are the most-cited overnight comfort complaint in camping communities.
Once your floor is insulated, you’re ready for Layer 2.
Layer 2: Upgrade Your Sleep System
Your sleep system is everything that surrounds your body at night: your sleeping bag, your pillow, and what you wear to bed. This is where most beginners focus all their attention — but without Layer 1 in place, even an expensive sleeping bag can’t keep you warm.
Sleeping bag temperature ratings explained:
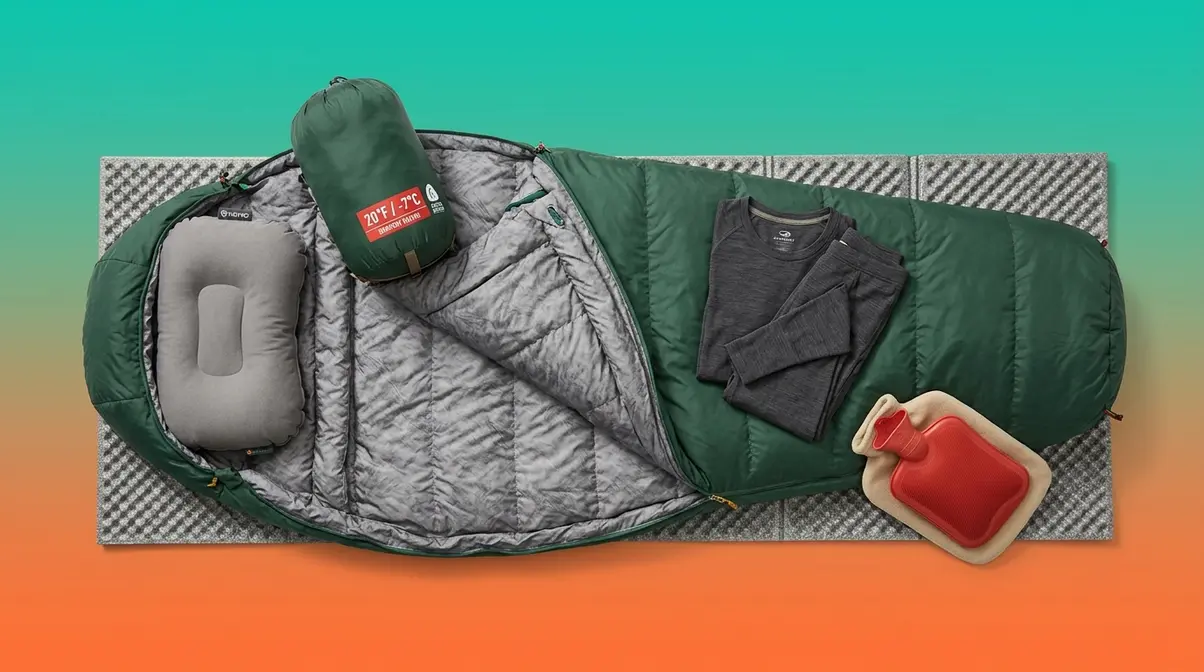
The temperature rating on a sleeping bag (for example, “20°F”) is the lowest temperature at which a standard adult should survive in that bag — not sleep comfortably. This matters. Camping communities consistently recommend choosing a bag rated 10°F below the coldest night you expect. If overnight lows will hit 40°F, use a bag rated for 30°F.
MalloMe, a lightweight sleeping bag brand popular for 3-season camping, offers versatile options for campers who want packability without sacrificing warmth. The Coleman Heritage Big & Tall is a cold-weather flannel sleeping bag designed for tall adults who find standard bags too short to seal properly at the shoulders — a common source of heat loss that beginners rarely anticipate.
How to choose the right bag for your trip:
- Check the overnight low temperature for your destination using a weather app — look at the 10-day low, not the average.
- Subtract 10°F from that number. That’s your target temperature rating.
- Match bag shape to your sleeping style. Mummy bags (tapered at the feet, with a hood) retain the most heat. Rectangular bags offer more room to move but lose heat at the shoulders and feet.
- Consider a sleeping bag liner. A lightweight fleece liner adds 5–15°F of warmth to any bag and doubles as a standalone sheet on warm nights.
What to wear inside your bag:
Experienced campers wear a lightweight base layer (long-sleeved top and leggings), wool or synthetic socks, and a light beanie. Cotton retains moisture and cools you down — avoid it entirely. Merino wool or synthetic fabrics stay warm even when damp.
Hot water bottle technique: Fill a durable water bottle with hot water (not boiling — this can damage some bottles), place it at the foot of your sleeping bag 10 minutes before bed, and it will keep your feet warm for 2–3 hours. Campers who use this technique consistently report falling asleep faster on cold nights.
For a deeper look at sleeping bag selection and pairing with the right pad, these sleeping bag tips from REI cover seasonal selection in detail.
Layer 2 handles your body’s warmth. Layer 3 handles the environment around you.
Layer 3: Control Temperature and Air Quality
The ideal sleep temperature for most adults is between 60–67°F — a range supported by sleep experts at the Cleveland Clinic and the National Sleep Foundation (Cleveland Clinic, 2026). Inside a tent, achieving this requires active management of ventilation and heat sources, not just hoping the weather cooperates.
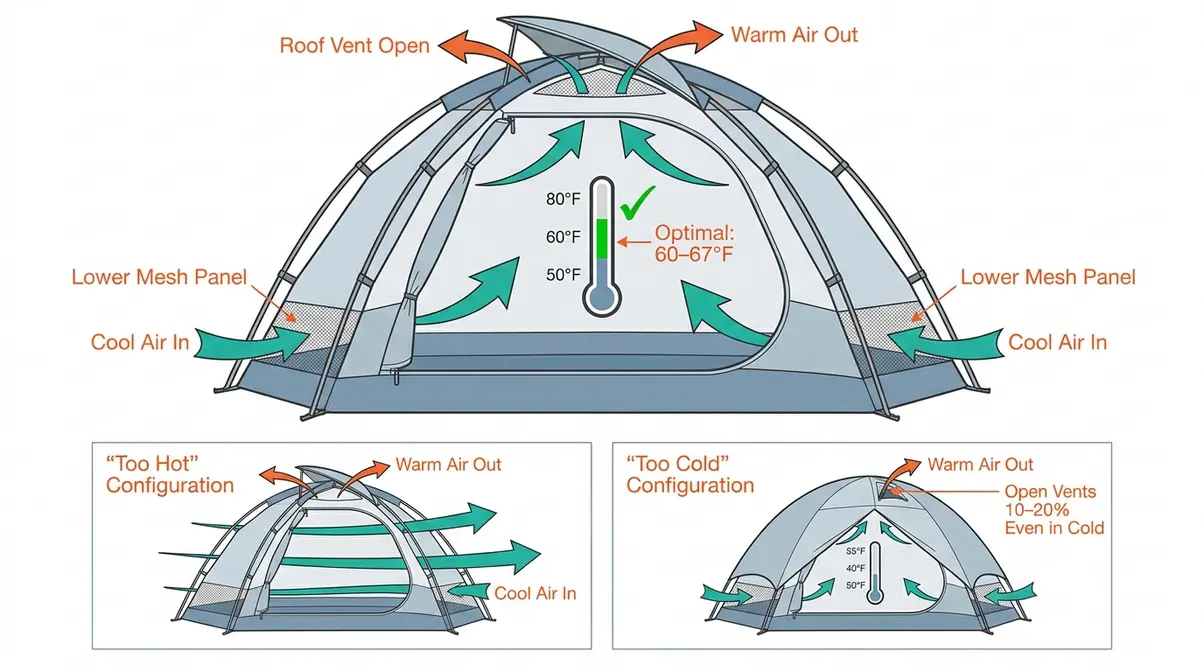
Managing tent temperature:
- Too hot: Open all vents and mesh panels. Angle tent doors to face any available breeze. Remove the rainfly if conditions are dry — sleeping under a mesh canopy drops interior temperature by 5–10°F.
- Too cold: Close vents partially but never completely. Even in cold weather, leaving vents 10–20% open prevents condensation buildup (more on this below). Wear a beanie to bed — significant heat is lost through the head and neck.
- Target the 60–67°F range: A small, battery-powered fan positioned at a vent opening can move warm air out on hot nights. On cold nights, a hot water bottle at your feet (see Layer 2) raises the microclimate inside your bag without overheating the tent interior.
Acoustic noise reduction — the forgotten comfort factor:
Wind, rain on the rainfly, nearby campers, and wildlife sounds are among the top sleep disruptors cited by beginners. Competitors ignore this entirely. Here’s what actually works:
- Foam earplugs reduce ambient noise by 25–33 decibels — enough to block most campground sounds without muffling an alarm.
- White noise apps (played at low volume through a phone speaker) mask irregular sounds like wind gusts, which are more disruptive than consistent background noise.
- A taut rainfly dramatically reduces the loud flapping and drumming that wakes campers during windy nights. Loose fabric vibrates; taut fabric doesn’t.
CPAP users: Battery-powered CPAP machines and travel CPAP devices are now widely used by campers. Pair with a fully charged power bank rated for your machine’s nightly draw, and store the unit in an insulated bag to prevent condensation in the hose on cold nights.
Add Organization and Ambiance
A cluttered, dark tent feels uncomfortable before you even lie down. The creature comforts that make a tent feel homey are not luxuries — they’re functional improvements that reduce nighttime fumbling and morning frustration.
Organization system:
- Hang a gear loft (a mesh hammock that clips to tent interior loops) above your sleeping area. Store your headlamp, phone, water bottle, and earplugs here — everything you need overnight, within arm’s reach.
- Use a hanging lantern at the tent peak for ambient light. Warm-toned LED lanterns (2700K–3000K color temperature) are less disruptive to melatonin production than cool white lights.
- Designate zones inside the tent. Shoes and wet gear go near the door. Sleeping gear stays in the center. Dry clothing and tomorrow’s layers go in the far corner. This simple system eliminates the “where is my headlamp” chaos that disrupts sleep.
- Bring one item from home that signals comfort — a favorite blanket, a small pillow, or a soft mat for sitting. Across camping communities, the consensus is that one familiar comfort object significantly reduces the psychological friction of sleeping in an unfamiliar environment.
For more tent-based hacks on organization and ambiance, these tips from Bearfoot Theory on sleeping comfortably in a tent include practical ideas from experienced outdoor travelers.
Step 3: Weatherproof and Maintain Your Tent
The best sleep system in the world fails if your tent leaks, drips condensation onto your sleeping bag, or has a zipper that won’t close. Step 3 protects the investment you made in Steps 1 and 2.
Prevent and Manage Condensation
Condensation — water droplets that form on the inside of your tent walls — is one of the most misunderstood comfort problems in camping. It’s not a sign of a leaking tent. It’s moisture from your own breath and body heat hitting a cold surface. Massive condensation issues and a soggy outer quilt are the most common overnight complaints in camping forums — and almost all of them are preventable.
Why condensation happens: You exhale approximately one liter of moisture per night. In a sealed tent, that moisture has nowhere to go. It rises, hits the cold tent walls, and condenses into droplets that drip onto your sleeping bag.
Prevention steps:
- Keep vents open. This is the single most effective condensation control. Even in cold weather, leave vents 10–20% open to allow moist air to escape. Fully sealing a tent traps humidity.
- Face tent doors and vents into the breeze. Cross-ventilation carries moist air out before it can condense. Position the tent so airflow moves through, not around, the interior.
- Keep wet gear in the vestibule, not inside. Wet jackets, shoes, and towels off-gas moisture overnight. Store them in the tent’s covered porch area (vestibule) instead.
- Avoid cooking inside the tent. A camp stove produces significant water vapor. Cook in the vestibule or outside, even in light rain.
- Wipe condensation in the morning. Use a small microfiber cloth to wipe the inner walls before packing. Then lay the rainfly and tent body in a sunny spot for 15–20 minutes before packing.
Campsite selection matters too: Avoid low-lying areas, valley bottoms, and spots near water. Cold, moist air pools in depressions overnight — a campsite near a creek will have dramatically more condensation than one on slightly elevated ground.
Waterproof Your Tent Seams and Fly
Most tents are not fully waterproof out of the box. The fabric may be water-resistant, but the seams — the stitched lines where panels meet — are often unsealed. Water enters through needle holes in the stitching, not through the fabric itself.
How to waterproof your tent seams:
- Set up the tent in your yard and let the fabric dry completely.
- Turn the rainfly inside out to expose the interior seam tape or raw seams.
- Apply seam sealer (available at most outdoor retailers) along every seam using a small brush or applicator. Work slowly and cover the full seam length.
- Allow to dry fully — at least 2–4 hours — before packing. Seam sealer bonds as it cures.
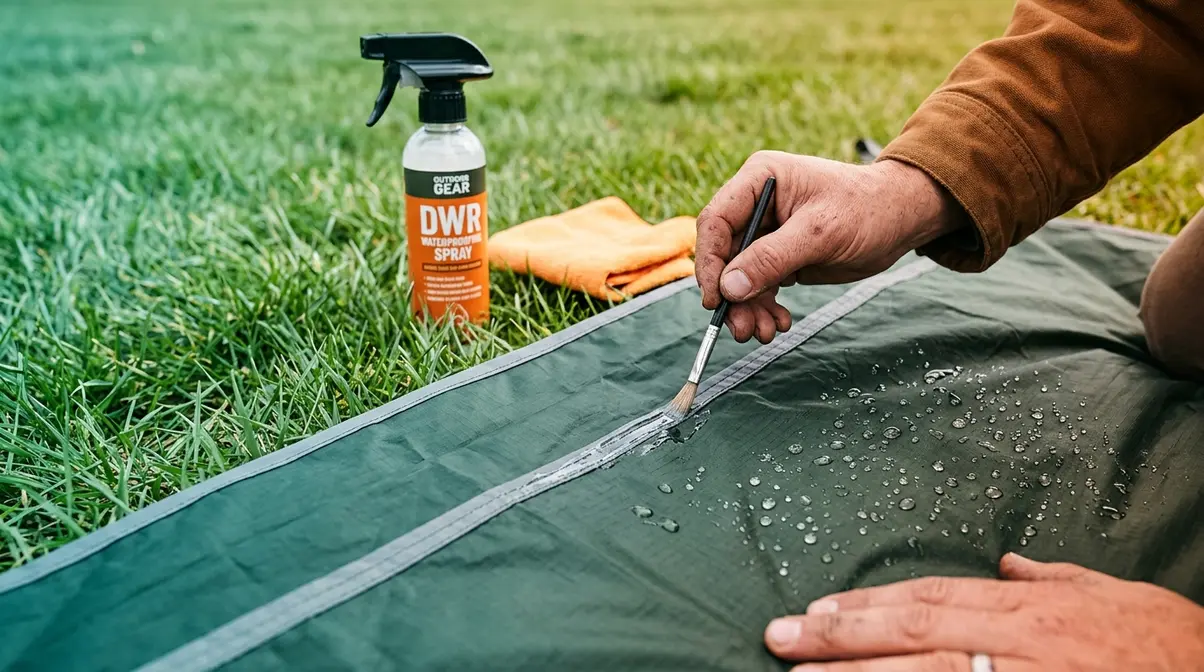
- Reapply DWR (durable water repellent) spray to the rainfly exterior. This is the coating that makes water bead up rather than soak in. It wears off with use and UV exposure and should be reapplied annually.
How to tell if your tent needs resealing: Spray the rainfly with a garden hose. If water beads up and rolls off, the DWR is intact. If water soaks in and darkens the fabric, it’s time to reapply.
Fix a Stuck or Broken Zipper
A tent zipper that won’t close is more than an inconvenience — it’s a mosquito highway and a cold-air gap. This is one of the most common frustrations beginners encounter and one of the easiest to fix.
For a stuck zipper:
- Don’t force it. Forcing a stuck zipper splits the zipper tape.
- Check for fabric caught in the teeth. Gently pull the fabric away from the zipper path and work the slider back slowly.
- Lubricate the teeth. Run a graphite pencil tip or a zipper lubricant stick along the teeth on both sides. This is the most effective fix for zippers that stick without visible obstruction.
- Work the slider gently back and forth a few millimeters to distribute the lubricant.
For a zipper that won’t stay closed:
The zipper slider has worn out and is no longer gripping the teeth properly. Use needle-nose pliers to gently squeeze the slider opening slightly narrower — this restores grip in most cases. Replacement sliders are inexpensive and available at fabric stores for any zipper size.
Carrying a small zipper repair kit (a spare slider and a tube of zipper lubricant) adds almost no weight and solves the most common tent maintenance problem before it becomes a trip-ruiner.
Common Mistakes That Ruin Tent Comfort
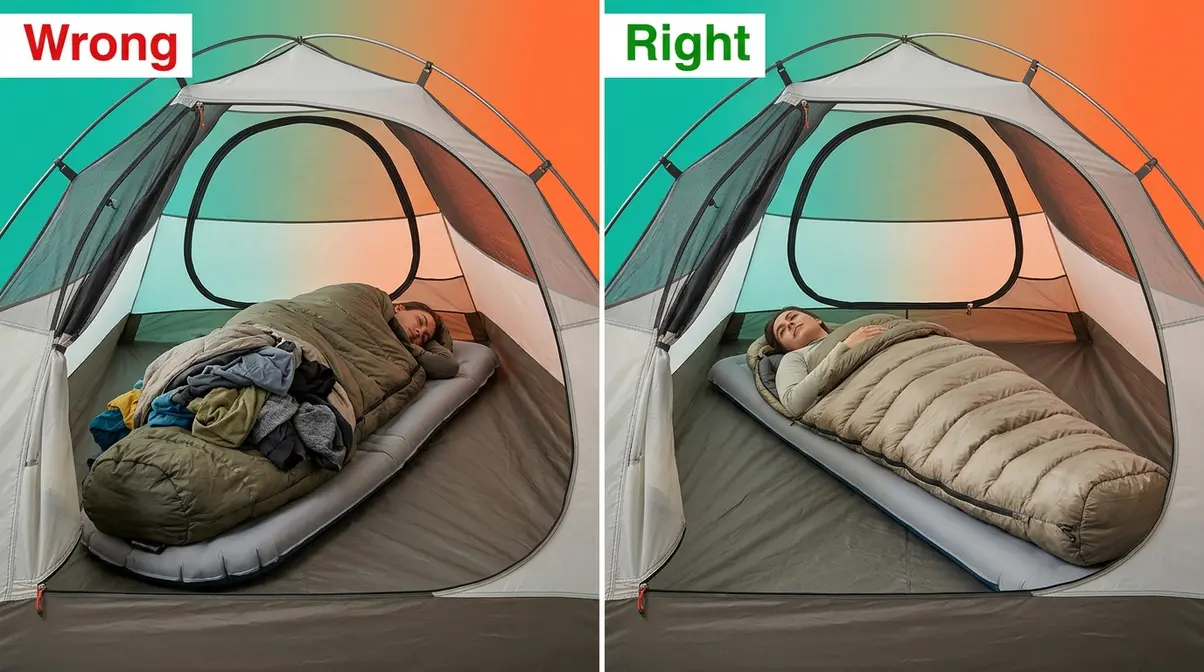
Most beginner camping guides tell you what to do. Few tell you what not to do. Our team evaluated the most frequently cited overnight comfort failures across camping communities — and the same patterns appear again and again.
3 Setup Mistakes Beginners Always Make
Mistake 1: Inflating the sleeping pad after getting into the tent.
Most self-inflating pads (foam-core pads that partially inflate on their own) need 20–30 minutes to reach full loft. Skipping this step means sleeping on a half-inflated pad that provides a fraction of its rated R-value. Open the valve before you set up any other gear inside the tent.
Mistake 2: Sleeping with your head downhill.
Even a slight slope feels dramatic after 3–4 hours. Beginners who pitch on a slope but put their head downhill consistently report waking up disoriented, with blood pooling in the head and difficulty sleeping. Always position your head uphill — even a 2° slope matters over a full night.
Mistake 3: Wearing too many layers to bed.
This sounds counterintuitive. Wearing excessive clothing inside a sleeping bag compresses the bag’s insulation (the loft that traps warm air), reducing its effectiveness. A light base layer is more effective than piling on every fleece you own. If you’re cold, add a beanie and use the hot water bottle technique rather than adding more clothing layers.
When to Upgrade Your Gear (Not Just Your Technique)
Technique improvements have limits. There are situations where no amount of tent-based hacks will fix the underlying problem — and continuing to struggle with the wrong gear wastes time and ruins trips.
Signs it’s time to upgrade your sleeping pad: You’re sleeping on a thin foam pad rated below R-2 in temperatures below 50°F. No technique compensates for inadequate ground insulation at this level. An upgrade to an R-4 self-inflating pad will produce an immediate, dramatic improvement.
Signs it’s time to upgrade your sleeping bag: Your bag is rated 20°F above the temperatures you’re camping in, and you’re consistently cold despite correct layering. A bag rated appropriately for your conditions costs less than one bad camping trip’s worth of lost sleep.
Signs your tent has reached end-of-life: Seams that re-leak within one season of sealing, zippers that fail repeatedly, and poles that bend or crack are signs that maintenance can no longer keep up with wear. Camping communities consistently recommend prioritizing a quality tent over almost any other gear upgrade — it’s the shelter for everything else.
Campers who invest in proper gear report dramatically higher trip satisfaction. The KOA 2025 Camping & Outdoor Hospitality Report notes that comfort-focused camping options are among the fastest-growing segments — evidence that the industry recognizes what beginners already know: comfort is what makes people come back.
Frequently Asked Questions
How can I make my tent more comfortable?
Making your tent more comfortable starts with the 3-Layer Comfort System: floor insulation, sleep system, and microclimate control. Begin by adding a sleeping pad with an ASTM-rated R-value appropriate for your conditions (R-3 or higher for most three-season camping). Layer interlocking foam tiles under your pad for extra warmth. Choose a sleeping bag rated 10°F below your expected overnight low. Manage temperature by keeping vents slightly open to prevent condensation. Research from camping communities consistently shows that floor insulation delivers the biggest single improvement for beginners.
What is the 3-3-3 Rule for camping?
The 3-3-3 Rule for camping means: drive no more than 3 hours, arrive by 3 PM, and stay at least 3 nights. Originally adapted from RV camping, it’s designed to reduce setup fatigue and give campers enough daylight to choose a good campsite, build their floor system, and test gear before dark. Arriving tired from a long drive is the most common reason beginners skip comfort steps. Staying at least 3 nights matters because the first night is always the roughest as your body adjusts — most campers who “hate camping” only tried it once.
What is the most forgotten item when camping?
The most forgotten camping item is consistently a sleeping pad — or an adequate one. Campers often remember a sleeping bag but underestimate how much cold ground disrupts sleep. Other frequently forgotten items include tent stakes (critical for stability in wind), a headlamp with fresh batteries, and a camp pillow. Experienced campers recommend building a printed pre-trip checklist organized by category (sleep system, shelter, lighting, food) and checking it the night before departure rather than the morning of.
How to make your tent more homey?
Making your tent feel more homey comes down to lighting, organization, and one familiar comfort object from home. Use a warm-toned LED lantern (2700K color temperature) hung at the tent peak for ambient light that doesn’t disrupt sleep. Hang a gear loft for overhead storage so essential items are within reach. Bring one item from home — a favorite pillow, a soft blanket, or a small rug near the door. Camping communities report that familiar sensory cues (warmth, soft textures, familiar scents) significantly reduce the psychological discomfort of sleeping in an unfamiliar environment.
What does FF mean in camping?
FF in camping stands for “Fill Fill Power,” a measure of the loft quality in down sleeping bags and jackets. A higher fill power number means the down clusters are larger and trap more air per ounce of material — so an 800-fill-power down bag is lighter and warmer than a 550-fill-power bag of the same temperature rating. Fill power matters most when packability and weight are priorities, such as backpacking trips. For car camping, synthetic insulation (which continues to insulate when wet, unlike down) is often the more practical choice for beginners.
What are the 7 C’s of camping?
The 7 C’s of camping are a framework covering the core categories of outdoor preparedness: Cutting tool, Combustion (fire starting), Cover (shelter), Container (water storage), Cordage, Comfort, and Cleanliness. Comfort — which includes your sleep system, organization, and temperature management — is explicitly one of the seven because experienced campers recognize that an uncomfortable camper makes poor decisions and is more likely to cut a trip short. The 3-Layer Comfort System directly addresses the Comfort and Cover categories of this framework.
What is the 200 rule for camping?
The 200-rule in camping refers to the Leave No Trace guideline of camping at least 200 feet (about 70 steps) from lakes, rivers, and trails. This distance protects water sources from contamination and preserves vegetation around high-traffic areas. For tent comfort, this rule has a practical benefit: camping 200 feet from water sources also means camping away from the humid, cold air that pools near water overnight — one of the primary causes of massive condensation issues inside tents. Following the 200-rule is both an ethical guideline and a comfort strategy.
Limitations and Common Pitfalls
Common Pitfalls
Even with the right system, there are scenarios where things go wrong. Knowing these in advance prevents frustration.
Pitfall 1: Buying a sleeping bag based on price alone.
A $30 bag rated for 50°F will not keep you comfortable at 45°F, regardless of technique. The temperature rating is not a marketing claim — it’s a tested threshold. Spending $20 more on a correctly rated bag eliminates this problem entirely.
Pitfall 2: Skipping the rainfly because the forecast looks clear.
Weather changes overnight. More importantly, a rainfly reduces condensation by creating an air gap between the inner canopy and the outer environment — a benefit that applies even on perfectly dry nights. Campers who skip the rainfly in warm weather consistently report waking up with a damp sleeping bag.
Pitfall 3: Forgetting to re-stake after setup.
A tent staked loosely “good enough” during setup becomes a problem at midnight when wind picks up. Guylines that are slack allow the tent walls to flex and flap, which creates noise and reduces the tent’s thermal efficiency. Check all stakes and guylines before you go to sleep.
When to Choose Alternatives
If you’re camping in temperatures below 20°F: The techniques in this guide are appropriate for three-season camping. True winter camping requires a four-season tent (designed to handle snow load), a sleeping bag rated for extreme temperatures, and additional insulation layers beyond what’s covered here. Consider a guided winter camping experience before attempting solo cold-weather camping.
If your partner or child cannot sleep on an air mattress: Some people genuinely sleep better on a firm surface. A high-R-value self-inflating foam pad is often a better choice than an inflatable air mattress for comfort-sensitive sleepers. The KOA camping tips resource covers alternative bedding setups for family camping situations.
When to Seek Expert Help
If you’re planning camping in backcountry locations, at high altitude, or in extreme weather, the techniques in this guide are a starting point — not a complete safety system. Consult with a certified outdoor guide or wilderness skills course before camping in environments where a failed shelter or sleep system creates a genuine safety risk.
Conclusion
For beginner campers, improving tent comfort isn’t about buying expensive gear — it’s about applying the right system in the right order. The 3-Layer Comfort System (floor insulation, sleep system, microclimate control) addresses every major comfort failure: cold ground, poor sleep temperature, condensation, disorganization, and noise. Research suggests the optimal sleep temperature for adults is 60–67°F (Cleveland Clinic, 2026), and achieving that inside a tent is entirely possible with the layered approach this guide covers.
The 3-Layer Comfort System works because it treats tent comfort as a system, not a collection of random tips. Layer 1 blocks the cold ground before it reaches your body. Layer 2 wraps your body in appropriate warmth. Layer 3 manages the environment around you so neither heat nor moisture undermines Layers 1 and 2. Each layer reinforces the others — and that’s exactly why most beginner guides fail: they address one layer while ignoring the rest.
Start with your sleeping pad. It’s the highest-impact, lowest-cost upgrade you can make tonight. Check your pad’s ASTM R-value rating, verify your sleeping bag is rated 10°F below your expected overnight low, and try the 3-3-3 Rule on your next trip. At tentexplorer.com, our team has evaluated these techniques across dozens of camping scenarios — and the campers who follow all three layers consistently report their best nights outdoors.

David King
Field gear tester at Tent Explorer.