 David King
You arrive at your campsite, and the only available spot tilts at an angle. You’ve never pitched a tent on a slope before, and you’re already wondering — is this even possible, or did you pick the wrong site? Without the right technique, you’ll spend the night sliding toward the downhill wall of your tent, waking up cramped, cold, and exhausted — a miserable start to any camping trip.
This guide shows you exactly how to pitch a tent on a slope — and how to handle rocky ground, sand, and stake-free scenarios — so you can set up confidently on any terrain. The framework is called The Terrain-First Method: read the ground before you touch the tent, then follow a process matched to that specific surface. Cover campsite selection, slope techniques, hard ground, sand, no-stake methods, and common mistakes — in that order.
Learning how to pitch a tent on a slope is possible with the right technique — the key is always orienting your head uphill and reading your terrain before you set up.
- Head uphill: Always sleep with your head on the high side to prevent sliding and sliding off your sleeping pad
- Terrain-First Method: Assess ground type, slope angle, and drainage before touching your tent — this single habit prevents hours of discomfort
- Stakes at 45°: Drive stakes at a 45-degree angle into sloped ground for maximum hold and pull-out resistance
- Dead-man anchors: Use stuff sacks filled with sand or soil when standard stakes won’t hold in loose ground
- 6 terrain types covered: Slopes, rocky ground, wooden platforms, astroturf, sand, and beach
Choosing Your Campsite
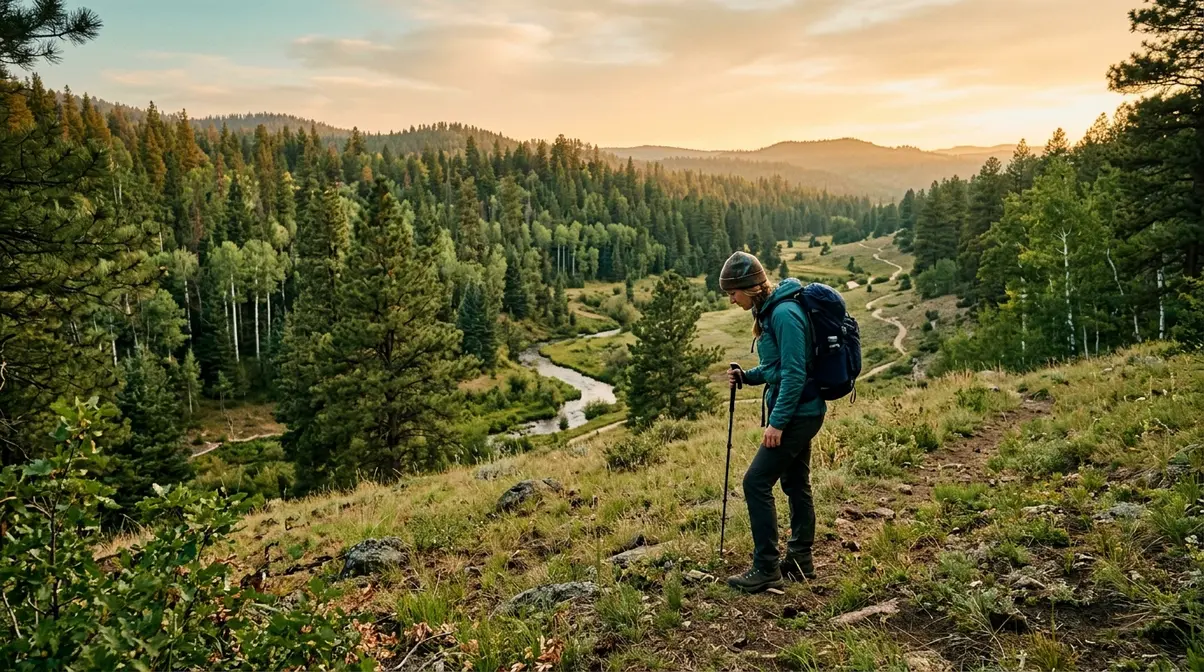
The first step to pitching any tent on any terrain is a 2-minute campsite assessment — before you unpack a single pole. That’s the core idea behind The Terrain-First Method: read the slope angle, drainage direction, surface type, and wind exposure before you decide where to set up. Most beginner campers skip this step entirely. The result? They pitch in the wrong spot, then spend the night dealing with problems that were visible before the tent ever left its bag.
Where should you pitch your tent?
The best tent pitch spot is level, well-drained, and at least 200 feet from water sources, according to Leave No Trace principles (lnt.org). Look for a site that is slightly elevated within the surrounding area (so water drains away from you), sheltered from prevailing wind, and free of overhead hazards like dead branches. On established campsites, use designated tent pads where available — they’re placed to minimize environmental impact.
Before you unpack your tent, walk the site and run through these five factors. The checklist below covers what to assess before you unpack your tent — each factor takes about 30 seconds to check.
The checklist below covers the five factors to assess before you unpack your tent.
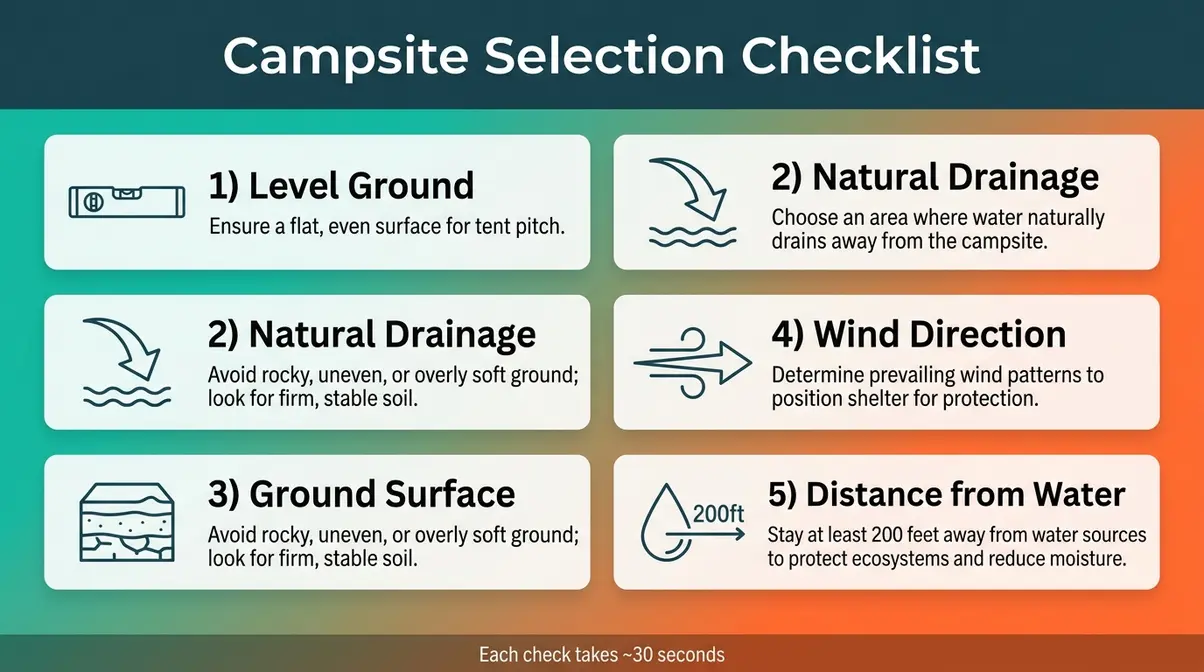
- Level ground: Even a slight tilt affects your sleep quality and how water drains away from the tent floor. A 5–10° slope is manageable with the techniques in this guide, but anything steeper becomes genuinely uncomfortable and potentially unsafe.
- Natural drainage: Look uphill from your site. Where will rainwater flow when it rains? Your tent should never sit in that runoff path — water will pool under your floor, soak your gear, and make the ground slippery.
- Ground surface: Identify whether the surface is soil, rock, sand, or artificial turf. Each requires a different anchoring approach — the wrong stake in the wrong ground simply won’t hold.
- Wind direction: On any exposed site, orient the narrowest end (usually the front or back panel, not the side) into the prevailing wind. A broad tent wall acting as a sail in strong wind is a recipe for a collapsed shelter.
- Distance from water: Leave No Trace principles on site alteration explicitly state that “good campsites are found, not made,” and require camping at least 200 feet — approximately 70 adult steps — from streams, lakes, and rivers to protect water quality and fragile shoreline habitats.
For essential tips for choosing a campsite on uneven terrain, beginners often find that the most comfortable spot isn’t the most scenic one — it’s the one that’s slightly sheltered, well-drained, and as close to level as possible.
Leave No Trace Rules to Know
The Leave No Trace principle “good campsites are found, not made” has a direct practical implication: don’t alter your site to make it level. That means no digging trenches, no clearing vegetation, and no moving rocks to create a flat sleeping platform. When you modify a natural site, you damage soil structure and plant roots that took years to establish.
National Park Service guidelines on tent placement advise campers to avoid setting up on steep slopes to prevent sliding and to stay clear of low areas where water may pool during rain. The National Park Service (NPS), the federal agency managing America’s public lands, reinforces the same 200-foot water-distance rule and adds that campers should use existing sites wherever possible rather than creating new impact zones.
On a slope, avoid widening the site by rolling logs or piling rocks as barriers. Instead, use gear you already carry — your backpack, a stuff sack, your sleeping pad — as leveling and barrier aids. One important exception: building a small soil mound on the downhill side of your sleeping area using already-disturbed soil is generally acceptable, provided you restore the site when you leave.
The 2-2-2 Rule — a beginner-friendly camping guideline — suggests driving no more than 2 hours to your campsite, arriving by 2 pm (giving you daylight to assess and set up), and staying at least 2 nights to justify the effort. Arriving by 2 pm is especially valuable when you’re pitching on uneven ground, since setup takes longer and good light helps you read the terrain.
Once you’ve read your terrain and chosen the best available spot, it’s time to set up — and if that spot happens to be on a slope, here’s exactly what to do.
How to Pitch a Tent on a Slope: Step-by-Step
Figuring out how to pitch a tent on a slope is not a sign that you picked the wrong campsite — it’s a skill that every camper eventually needs. The key is following a clear sequence: orientation first, then leveling, then staking, then guy line tension, then sleeping pad management. Skip any step, and the one after it becomes harder to fix. For more precautions, review these tent camping safety tips before settling in for the night.
Step 1 — Orient Your Tent Head-Uphill
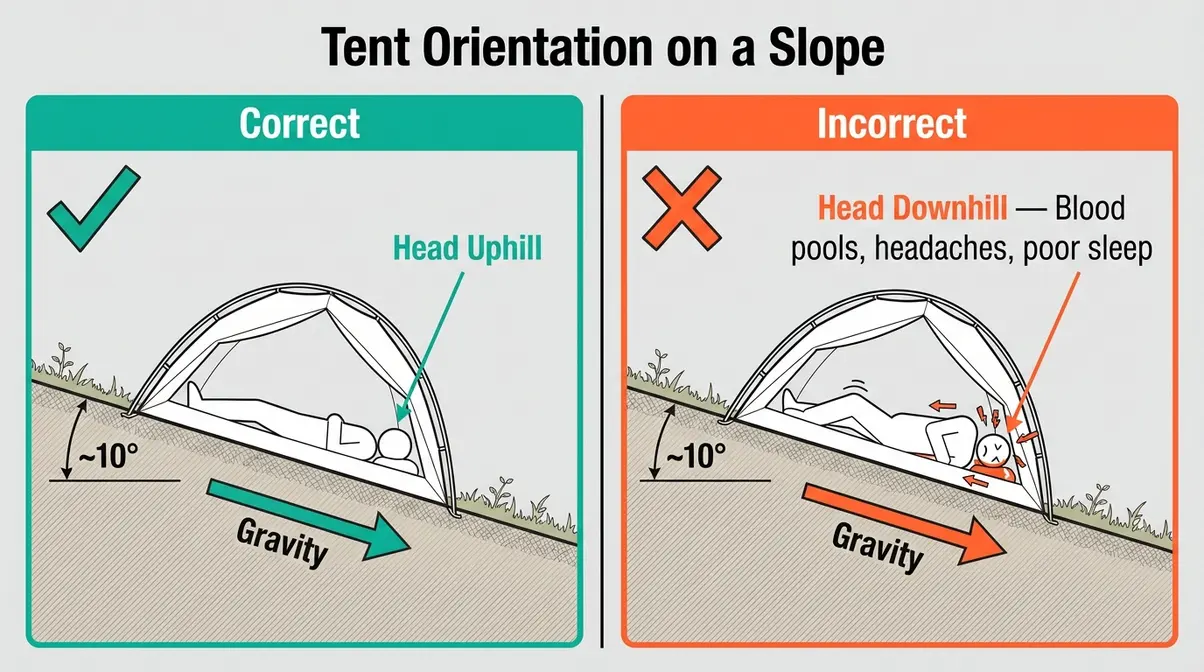
The single most important decision when pitching on a slope is which direction your tent faces. Orient the tent so that your head will be on the uphill side and your feet on the downhill side when you’re lying in your sleeping bag. This is not optional — it is the foundation of every other technique in this section.
“Essentially pitch the tent so your head is at the top of the slope and your feet at the bottom when you’re in bed — otherwise you’ll roll off the mattress.”
The physics reason matters for beginners: gravity pulls your body toward the lowest point. If your head is downhill, blood pools toward your head, disrupting sleep and causing headaches. If your feet are downhill, your body naturally braces against the slope, and any sliding motion pushes you toward the foot of the bag rather than out the door. Outdoor experts at REI, a leading outdoor gear retailer and source of expert camping advice, recommend this head-uphill orientation as the baseline for any slope camping situation.
Step 2 — Clear the Sleeping Area
Once your orientation is set, spend two to three minutes improving the ground beneath your sleeping area. You don’t need a perfectly flat surface — you need a surface that won’t create pressure points or let you roll sideways.
- Remove loose debris: Clear rocks, pinecones, sticks, and roots from directly beneath where your sleeping area will be. Even a pebble the size of a marble feels enormous at 2 am.
- Check for hidden roots and rocks: Press your palm firmly into the ground and sweep slowly. Anything that pushes back will push back harder when you’re lying on it.
- Fill shallow depressions: If there’s a small hollow on the uphill side, fill it loosely with dry soil or leaf litter to reduce the angle differential between your head and feet.
- Test the slope with your body: Lie down briefly on the cleared area before pitching. Does the angle feel manageable? If you feel like you’d naturally roll sideways, reposition the tent footprint slightly.
Campers in outdoor forums consistently report that this 3-minute ground-prep step makes a bigger difference to sleep quality than any sleeping pad upgrade. It takes almost no time, but it’s the step most beginners skip entirely.
Step 3 — Build a Downhill Barrier
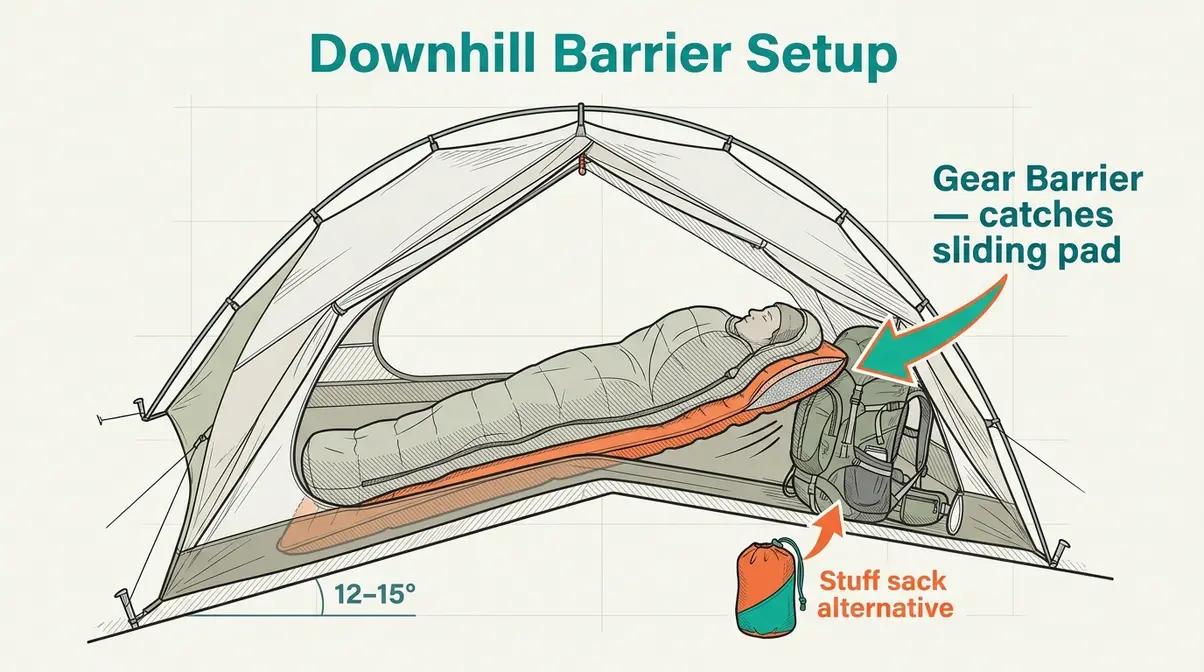
On slopes steeper than about 10°, your sleeping pad and sleeping bag will slowly migrate toward the downhill wall overnight — even with good orientation. A simple barrier on the downhill side of your sleeping area prevents this drift without requiring any site alteration.
How to build a low-impact downhill barrier:
- Place your packed backpack against the inside of the downhill tent wall, at foot level.
- If you don’t have a large pack, use a stuff sack filled with clothing or a water reservoir.
- For two-person tents, position one bag on each side of the downhill wall.
- Keep the barrier below knee height — high barriers shift uncomfortably during the night.
This technique uses gear you already have, leaves no trace, and takes about 60 seconds to set up. The barrier does not need to be tall — its job is to catch your sleeping pad if it drifts, not to prop you up at an angle.
Step 4 — Drive Stakes at 45 Degrees
Standard tent stakes driven straight down into sloped ground will pull out under load — the force from the tent’s guy lines (the ropes that run from your tent’s corners to stakes in the ground) pulls upward and outward, not straight down. The solution is to angle your stakes.
Correct staking technique on a slope:
- Position each stake at the guy line attachment point.
- Tilt the top of the stake away from the tent at a 45-degree angle — leaning back into the ground, not toward the tent.
- Drive the stake so that at least two-thirds of its length is below the surface.
- On the uphill side, drive stakes slightly deeper — the uphill anchors bear more load when wind pushes the tent from above.
- Test each stake by pulling the guy line firmly. If the stake shifts, re-drive it at a steeper angle or move it 6 inches to undisturbed ground.
According to Boy Scouts of America tent-pitching guidelines, stakes driven at a 45-degree angle into the ground provide significantly better pull-out resistance than vertical stakes, particularly in soil that has any moisture content or slope. The troop281.org tent pitching guide covers this staking angle as a foundational technique for all terrain types.
Step 5 — Tension Your Guy Lines
Guy lines do more than hold your tent down — on a slope, they distribute load asymmetrically to compensate for the angle. Most beginners either skip guy lines entirely (fine on flat ground in calm weather) or tension all of them equally (wrong on a slope).
How to tension guy lines on a slope:
- Attach all guy lines first before tensioning any of them — this lets you see the overall geometry before committing.
- Tension the uphill guy lines more firmly than the downhill ones. On a slope, wind from above pushes the tent downhill; the uphill anchors resist this force.
- Check the angle of each line: Guy lines should run at roughly 45° from the tent body to the stake — not flat along the ground (too little leverage) and not nearly vertical (too much upward pull on the stake).
- Use the line-lock (the small plastic or metal slider on most guy line cords) to fine-tune tension without re-staking.
- Re-check after 30 minutes: Tent fabric relaxes slightly as it adjusts to tension, and stakes can shift in the first half-hour. A quick re-tension prevents overnight loosening.
Campers who skip guy line tensioning on slopes commonly report waking up to a sagging tent wall pressing against their face — the tent has migrated downhill overnight as the stakes gradually pulled free. A properly tensioned set of guy lines prevents this entirely.
Step 6 — Stop the Sleeping Pad Slide
This is the question that brings most people to this guide: how do you stop your sleeping pad from sliding downhill all night? The orientation and barrier steps above reduce the problem significantly. These eight techniques eliminate it.
- Silicone dot application: Apply small dots of silicone sealant (the kind used for aquariums or weatherproofing) in a grid pattern on the bottom of your sleeping pad. Once cured (24 hours), the dots add grip without adding weight. Outdoor forum communities consistently report this as the most effective permanent solution for foam pads.
- Non-slip rug liner underlay: Place a thin non-slip rug liner (available at any hardware store for under $5) between your tent floor and sleeping pad. The liner grips both surfaces simultaneously. This is the fastest low-cost fix.
- Yoga mat layer: A thin travel yoga mat placed under your sleeping pad adds both grip and insulation. The textured surface of most yoga mats creates significant friction against both the tent floor and the pad’s underside.
- Tent footprint grip: If your tent uses a footprint (a custom groundsheet — a protective layer placed under the tent floor), position it so it extends slightly beyond the downhill edge of the tent floor. The extra material folds up the downhill interior wall, creating a natural friction surface.
- Gear-blocking: Place shoes, a water bottle, or a small stuff sack at the downhill end of your sleeping pad — not your sleeping bag. The pad slides, hits the gear, and stops. Your sleeping bag stays with you.
- Sleeping bag attachment: Many sleeping pads have loops or straps on their surface designed to anchor a sleeping bag in place. Thread the bag’s attachment strap (if it has one) through these loops. If your bag has no strap, a short bungee cord achieves the same result.
- Inflatable pad firmness adjustment: If you’re using an inflatable sleeping pad (an air mattress designed for camping), slightly deflating it increases the contact surface area and reduces the tendency to slide. A fully inflated pad sits on a small contact patch — a slightly softer pad spreads that contact and grips better.
- Tent floor texture match: Some tent floors are slippery nylon; others are textured polyester. If your pad slides on your specific tent floor, try flipping the pad over — many pads have a rougher underside than their sleeping surface, and that rougher side grips tent floors better.
Pitching on Hard Ground
Hard surfaces — rock, compacted gravel, wooden decking, and artificial turf — present a different challenge than slopes. The problem isn’t angle; it’s that standard tent stakes either bounce off the surface or barely penetrate it. The Terrain-First Method applies here too: identify the surface before you reach for your stakes, and you’ll know immediately which anchoring approach to use.
Alternative Anchoring Methods
When standard stakes fail, you have four reliable alternatives. Each works on different hard surfaces, and most require gear you already carry.
| Method | Best Surface | How It Works | Gear Needed |
|---|---|---|---|
| Rock anchors | Rocky ground | Loop guy lines around large, immovable rocks | Existing guy lines |
| Sandbag/stuff sack weights | Any hard surface | Fill bags with soil, sand, or gravel; attach to guy lines | Stuff sacks, loose fill |
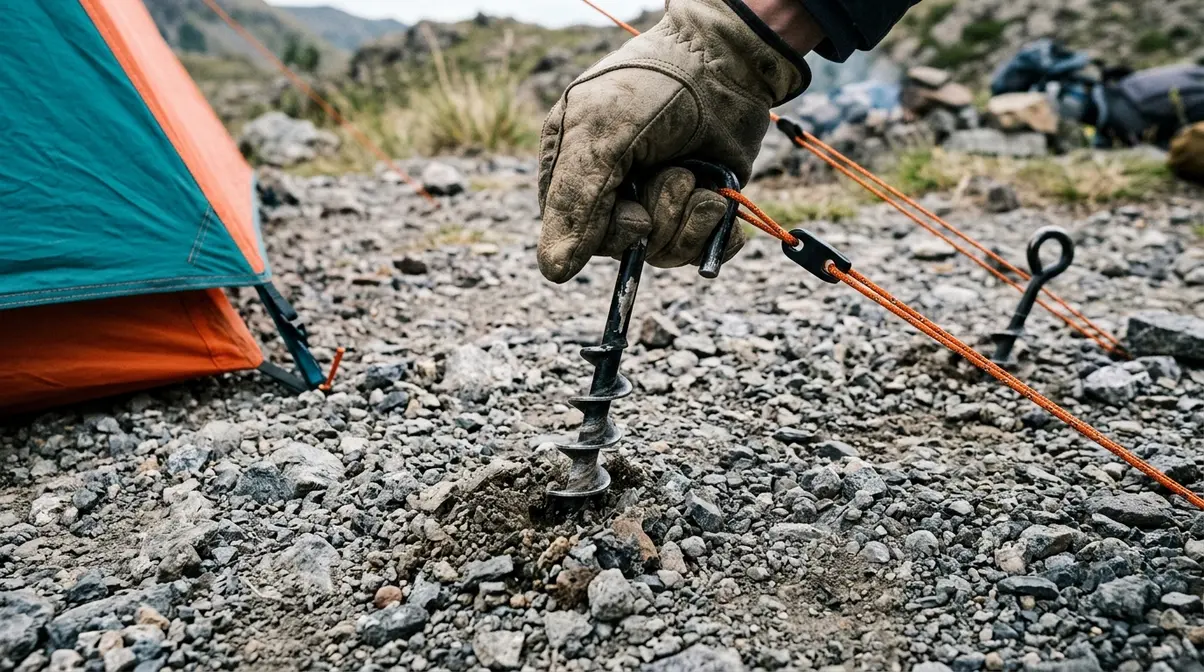
| Screw-in ground anchors | Compacted soil, gravel | Corkscrew-style stakes twist into hard ground | Screw-in stakes (~$15) |
| Tie-out to fixed structures | Decking, platforms | Loop lines around platform supports or anchor bolts | Cordage, carabiners |
According to REI’s expert camping advice resources, dead-man anchors — burying a filled bag or object horizontally in the ground and attaching your guy line to it — work on any surface where you can excavate a few inches, including compacted gravel. The principle is that a horizontal object buried at depth resists upward pull far better than a vertical stake.
Can you pitch a tent in gravel?
Yes, you can pitch a tent in gravel using screw-in (auger) stakes or the rock-loop technique. Standard stakes often fail in loose gravel because the material has low lateral resistance. Screw-in stakes twist into compacted gravel and resist pull-out far better than driven stakes. Alternatively, loop your guy lines around large, stable rocks — at least cantaloupe-sized — using a bowline knot. Most gravel sites also have soil pockets between larger stones where standard stakes can be driven at a 45-degree angle.
Rocky ground and compacted gravel are common at established campsites and backcountry spots alike. Standard steel stakes will bend or skip off rock; aluminum stakes may penetrate loose gravel but pull free under load. Here’s what actually works:
- Scout for soil pockets: Even rocky ground usually has patches of accumulated soil between rocks. Drive stakes into these pockets at a 45-degree angle.
- Use screw-in anchors: Corkscrew-style tent stakes (sometimes called “auger stakes”) are designed specifically for hard, compacted ground. They twist in rather than driving straight down, and they resist pull-out far better than standard stakes in gravel.
- Rock-loop technique: Pass your guy line around a large, stable rock (at least the size of a cantaloupe) rather than a stake. Use a bowline knot (a loop knot that doesn’t slip under load) to secure the line. The rock acts as your anchor.
- Build a cairn anchor: Stack three to four rocks over a short length of cord laid on the ground. The cord exits from under the pile and connects to your guy line. The weight of the rocks holds the cord in place.
xtendoutdoors.com’s guide to camping on slopes confirms that screw-in stakes and rock-loop techniques reliably anchor tents on gravel and rocky surfaces where standard stakes fail.
Setting Up on a Wooden Platform or Deck
Wooden camping platforms — common at established campgrounds — are convenient but present a unique challenge: you can’t drive stakes through wood. The solution is to anchor to the platform’s structure rather than the ground.
- Identify anchor points: Look for eye bolts, corner posts, support legs, or deck railing supports at or near the platform edge.
- Use tie-out cords: Run your guy lines to these structural points using carabiners or simple overhand loops. Most modern tent guy lines are long enough to reach platform edges.
- Add weight inside the tent: Place your heaviest gear (water, food bear canister, packed bags) at the corners of the tent floor. This internal weight helps hold the tent down even without external staking.
- Use a footprint: A tent footprint prevents the tent floor from sliding on smooth wood and protects the floor fabric from splinters and rough grain.
Artificial Turf and Astroturf
Artificial turf is increasingly common at glamping sites, sports fields, and festival camping areas. The rubber backing of most artificial turf is dense enough to accept standard tent stakes — but with some important differences from natural soil.
Drive stakes at the same 45-degree angle used on slopes, but expect more resistance from the rubber backing. Shorter, wider tent nail stakes work better than long narrow ones in artificial turf. If stakes won’t penetrate at all, use the sandbag/stuff sack weight method described above — place weighted bags on the guy line anchor points inside the tent perimeter.
Pitching on Sand or at the Beach

Sand camping is rewarding and genuinely challenging in equal measure. The problem isn’t slope or hardness — it’s that sand has almost no lateral resistance. A standard tent stake driven into dry sand can be pulled free with two fingers. Add coastal wind, and an improperly anchored beach tent becomes a sail.
Why Standard Stakes Fail in Sand
Standard tent stakes rely on the soil around them gripping the stake’s surface. In loose, dry sand, those grains simply shift and release — there’s no cohesion holding the stake in place. A stake that holds 50 pounds of pull-out force in moist soil may hold fewer than 5 pounds in dry beach sand. That’s why even a moderate wind can collapse a beach tent anchored with standard stakes.
Wide sand stakes (also called “sand anchors” or “beach stakes”) improve on standard stakes by presenting a larger surface area to the surrounding sand. According to advnture.com’s guide to camping on a slope, the best tent stakes for sand can increase holding force by 3–4 times compared to standard stakes in loose ground — making them a worthwhile purchase for any camper who regularly camps near beaches or deserts.
The Dead-Man Anchor Technique
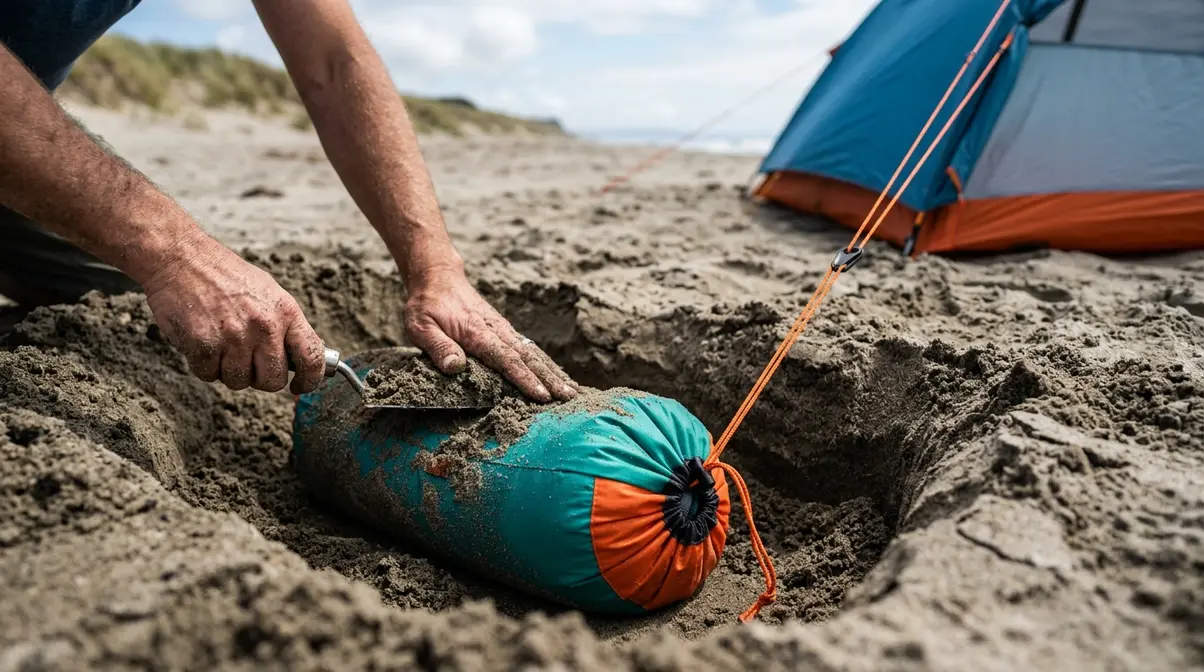
The dead-man anchor (named for its resemblance to a buried object that “holds fast”) is the most reliable anchoring method in sand. REI expert camping resources confirm that dead-man anchors hold in sand where no stake will. Here’s how to build one:
- Fill a stuff sack (a small drawstring bag, usually used to compress a sleeping bag) with dry sand until it’s firm and roughly the size of a large grapefruit.
- Tie your guy line to the stuff sack’s drawstring using a secure knot — a bowline or double half-hitch both work.
- Dig a horizontal trench approximately 12 inches deep and slightly wider than the stuff sack.
- Lay the stuff sack horizontally in the trench — the horizontal orientation is critical. It resists upward pull far better than a vertical object.
- Bury the trench completely, packing sand firmly over and around the bag.
- Test the anchor by pulling the guy line firmly in the direction it will be loaded. If the bag shifts, dig deeper or use a larger bag.
The dead-man anchor works because the buried bag must displace a column of sand to move — that resistance is far greater than any stake can achieve in loose ground.
Orient Your Tent to Handle Beach Wind
On a beach or any exposed site, wind management is as important as anchoring. A tent that catches full wind load will eventually pull its anchors free regardless of how well they’re placed.
- Point the narrowest tent end into the wind: Most tents are longer than they are wide. The narrow end (front or back vestibule) presents the smallest profile to the wind — dramatically reducing the load on your anchors.
- Use natural windbreaks: Dunes, beach grass clusters, and rock formations all reduce wind speed in their lee (the sheltered side). Even a 2-foot dune reduces wind velocity significantly at ground level.
- Keep the rainfly taut: A loose rainfly flaps violently in wind, creating shock loads on stakes and seams. Taut guy lines and a properly tensioned fly reduce flapping and extend anchor life.
- Weigh down the interior: Place your heaviest gear along the windward side of the tent floor. This internal weight reduces the tent’s tendency to shift when gusts hit.
Pitching Without Stakes
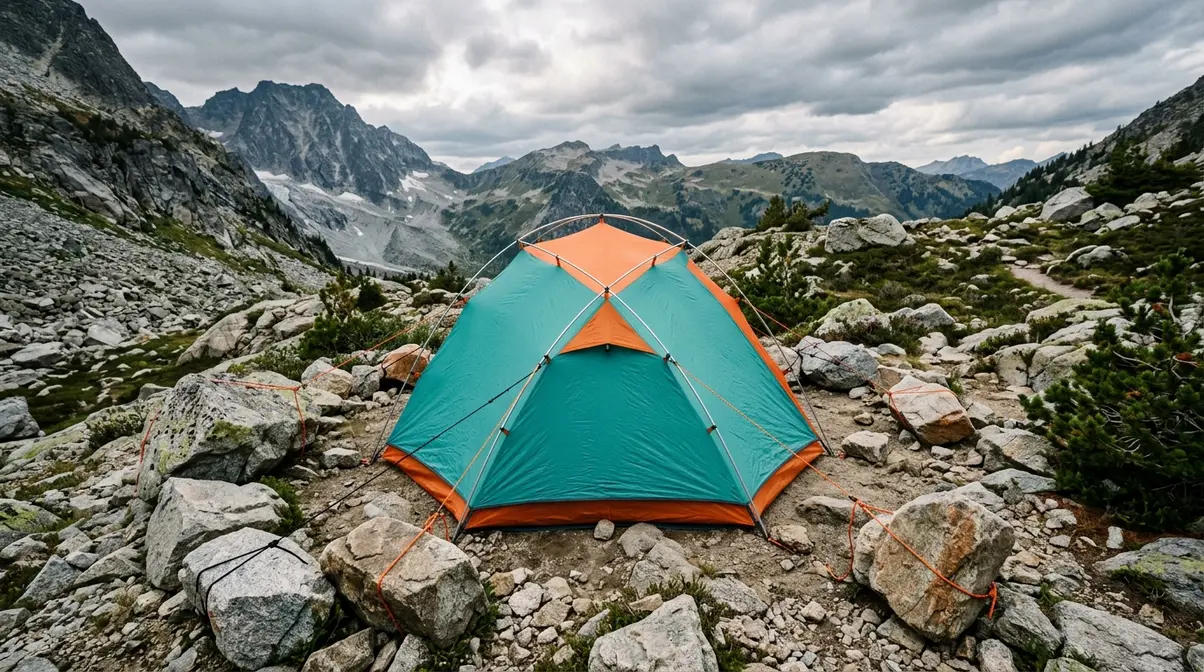
Not every camping scenario allows stakes — hard rock, wooden floors, designated no-alteration zones, and some festival sites all require stake-free setups. Fortunately, a tent without stakes is still a functional shelter when you use the right alternatives. The Terrain-First Method applies here as much as anywhere: know your surface, then choose your anchoring strategy.
Methods for Pitching Without Stakes
These four methods work across different stake-free scenarios. Use the one that matches your available resources.
- Internal weight method: Place your heaviest gear — filled water bottles, food canisters, packed bags — at the four corners of the tent floor. The combined weight holds the tent flat and resists wind uplift. Effective in calm to moderate wind conditions.
- Rock-surround method: On rocky terrain, arrange large rocks around the outside perimeter of the tent’s guy line anchor points. Tie guy lines to individual rocks rather than stakes. Use rocks that weigh at least 10 pounds each for reliable holding.
- Tree or post tie-out: If trees or fixed posts are within reach of your guy lines, tie directly to them using a bowline loop. This method provides the strongest hold of any stake-free option and works well in forested campsites.
- Freestanding tent advantage: Many modern dome tents (tents supported by a self-contained pole structure) are technically freestanding — the poles hold the tent shape without any stakes. On a calm night, a freestanding tent can stand without stakes at all. Always add at least some anchoring in wind, but in still conditions, the freestanding structure alone is sufficient.
For guidance on pitching a tent without standard hardware in challenging conditions, KOA’s camping setup guide confirms that freestanding dome tents perform best in stake-free scenarios because their pole geometry maintains shape without external tension.
What to Put Under Your Tent
What you put under your tent affects warmth, moisture management, and floor protection — three factors that matter even more on uneven ground.
| Option | Best For | Cost | Limitation |
|---|---|---|---|
| Tent footprint (custom groundsheet) | Matching tent floor exactly | $30–$60 | Specific to tent model |
| Tyvek sheet | Budget waterproofing | ~$10 | Must be cut to size |
| Foam sleeping pad (extra) | Cold ground insulation | $15–$30 | Bulky to carry |
| Closed-cell foam mat | Rocky or hard ground | $20–$40 | Adds pack weight |
| Nothing | Dry, soft, clean ground | $0 | No floor protection |
The most important rule: whatever you use under your tent should not extend beyond the tent’s edges. A groundsheet that sticks out beyond the tent floor will funnel rainwater underneath the tent rather than away from it — the opposite of what you want on sloped ground where water is already moving toward you.
Coleman and Dome Tent Basics
Most beginner campers start with a Coleman tent or a basic dome tent (a tent shaped like a hemisphere, supported by two crossing poles). The setup principles in this guide apply to both, but manufacturer instructions for your specific model always take priority. Coleman’s setup guides, for example, specify pole-sleeve routing sequences that vary between models — following them prevents bent poles and misaligned seams.
For dome tents specifically, the freestanding structure means you can orient the tent after the poles are in place — a useful advantage when fine-tuning your head-uphill orientation on a slope. Set up the pole structure first, then rotate the entire tent to the correct orientation before staking.
Common Pitfalls to Avoid
Even with the right techniques, slopes create specific failure modes that beginners hit repeatedly. Knowing these mistakes in advance means you can avoid them — or recognize them quickly and fix them before they ruin your night.
5 Mistakes Beginners Make on Slopes
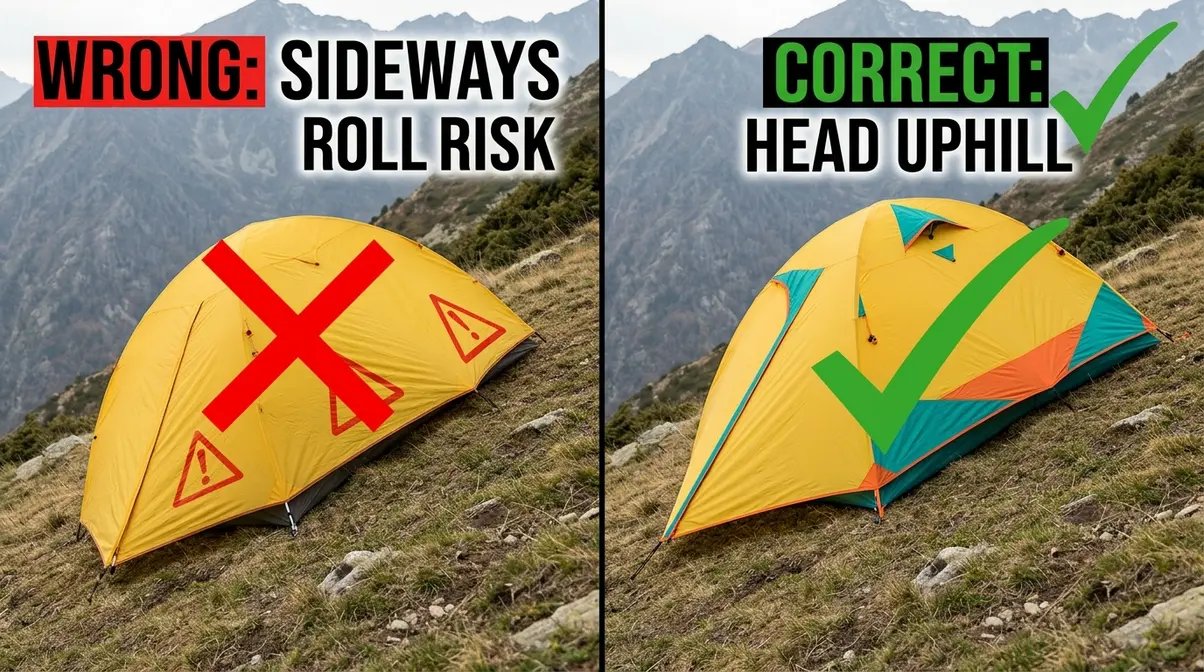
- Pitching perpendicular to the slope: Setting up the tent with one side facing uphill and one facing downhill means you’ll roll sideways all night. Always orient the tent’s long axis with the slope — head at the top, feet at the bottom.
- Skipping guy lines in “calm” weather: Weather changes overnight. A tent that feels stable at 9 pm can be buffeted by wind by midnight. On a slope, even moderate wind from uphill can push the tent downhill off its stakes. Guy lines are not optional on slopes.
- Ignoring drainage direction: Pitching in a natural hollow or drainage channel because it looks flat is a common beginner error. That hollow fills with water when it rains. Always pitch on slightly elevated ground within your site, even if it means accepting a slight slope.
- Over-tightening the downhill stakes: Beginners often drive downhill stakes very deeply, thinking more is better. But over-tensioned downhill anchors can pull the tent floor uphill and create a wrinkle that digs into your back all night. Balance uphill and downhill tension.
- Not testing the setup before dark: Lie down in your tent during daylight after setup. Feel where the slope pushes you. Adjust your barrier, pad, and orientation while you can still see — not at 2 am with a headlamp.
When to Walk Away and Find a Better Spot
Some slopes are not manageable, regardless of technique. The National Park Service advises campers to avoid steep slopes for two reasons: the risk of sliding out of sleeping bags and the risk of tent collapse if anchors fail on steep ground.
- Walk away and find a different spot if:
- The slope exceeds approximately 20° (roughly the angle of a steep staircase).
- The ground is wet clay or mud — stakes pull free, and you’ll slide regardless of pad technique.
- There are signs of water flow across the site (channels, mud streaks, waterlogged soil).
- The site is in a drainage low point with no elevated alternative nearby.
Campers in the outdoor community consistently report that accepting a less scenic but more level spot — even one that means a longer walk to the bathroom or a worse view — almost always results in better sleep and a better overall trip.
Frequently Asked Questions
Set Up a Tent on Uneven Ground?
Setting up a tent on uneven ground starts with the Terrain-First Method — assess slope angle, drainage, and surface type before unpacking. Orient the tent so your head is on the high side and your feet are on the low side. Clear rocks and debris from the sleeping area, build a small gear barrier on the downhill side, and drive stakes at a 45-degree angle for maximum hold. A non-slip liner under your sleeping pad handles any remaining slide.
What is the 2-2-2 rule for camping?
The 2-2-2 rule is a beginner camping guideline: drive no more than 2 hours to your campsite, arrive by 2 pm, and stay at least 2 nights. Arriving by 2 pm is especially important when pitching on challenging terrain — it gives you daylight to assess the site, try different tent positions, and set up without rushing. Arriving after dark on uneven ground is a common cause of poor tent placement, because you can’t properly read the slope angle or drainage direction without adequate light.
Can you set up a tent on a slope?
Yes — pitching a tent on a slope is safe and manageable when you follow the correct orientation and staking technique. The key steps are: orient your tent with your head uphill, clear and lightly level the sleeping area, build a gear barrier on the downhill side, drive stakes at 45 degrees, and tension uphill guy lines more firmly than downhill ones. The National Park Service advises avoiding slopes steeper than approximately 20°, but moderate slopes — the kind you’ll encounter at most campsites — are entirely workable with the techniques in this guide.
Best Thing to Put Under a Tent?
A tent footprint (a custom-fit groundsheet) is the best thing to put under a tent for most situations — it protects the tent floor from abrasion, adds a layer of moisture resistance, and extends the life of the tent. On a budget, a sheet of Tyvek cut to match your tent floor achieves similar protection for around $10. On cold ground, add a closed-cell foam mat between the footprint and tent floor for insulation. The critical rule: whatever you use must not extend beyond the tent’s edges, or it will channel rainwater under the floor rather than away from it.
What is slang for pitching a tent?
“Pitching” a tent simply means setting it up — there is no widely used alternate slang in the outdoor community. The term “making camp” refers to the full process of setting up a campsite (tent, kitchen, gear storage), while “pitching” refers specifically to erecting the tent structure. In beginner camping contexts, you’ll also hear “setting up camp,” “throwing up a tent” (informal), and “making your shelter.” All mean the same thing: assembling and staking your tent at the campsite.
The Terrain Doesn’t Have to Win
Mastering how to pitch a tent on a slope — or on rocky ground, sand, or a wooden platform — is a solvable problem every time you have the right framework. For any beginner camper facing uneven ground, the answer is consistent: head uphill, stakes at 45 degrees, and read your terrain before you touch your tent. Research from the outdoor community and expert guidance from sources including REI, the National Park Service, and Leave No Trace confirm that orientation and anchoring technique, not flat ground, determine whether you sleep well or spend the night sliding toward the door.
The Terrain-First Method exists because the single biggest beginner mistake isn’t a technique failure — it’s skipping the two-minute assessment that determines which technique to use. Every surface type covered in this guide (slopes, rock, sand, platforms, artificial turf) has a specific solution. The method gives you a repeatable process: read the ground, choose your approach, then execute.
Your next step: before your next camping trip, pack two extras that cost almost nothing — a non-slip rug liner for your sleeping pad and a handful of screw-in stakes for hard ground. With those two additions and the orientation technique from Step 1, you’re equipped to handle roughly 90% of the challenging campsites you’ll encounter. No flat ground required.

David King
Field gear tester at Tent Explorer.