 Dave King
- Table of Contents
- How Tent Shape Determines Your Weather Resistance
- The Waterproofing System: Materials That Keep You Dry
- Managing Condensation and Temperature Inside Your Tent
- 7 Field Techniques to Maximize Weather Protection
- Limitations and Safety: When Design Isn’t Enough
- Frequently Asked Questions
You wake up at 2 a.m. to the sound of your tent fabric snapping like a whip. Rain is hammering the roof. A puddle is forming under your sleeping pad. If you’ve been there, you already know the gut-drop feeling of realizing your shelter isn’t holding up against wind and rain the way you hoped. And if you haven’t been there yet, you’re right to want to understand how tent design affects weather protection before that night arrives.
“What’s the best plan of attack if it rains to keep yourself dry & your tent?”
Most campers pick a tent based on price or weight — and only discover its weather limits when it’s too late. The spec sheet says “waterproof,” but that word doesn’t explain what actually happens when a storm rolls in at midnight. By the end of this guide, you’ll understand exactly how tent design affects weather protection — so you can choose a shelter that holds up against wind and rain with confidence.
This guide covers the three-layer Weather Defense Stack: structural shape, waterproofing materials, and internal climate management — plus seven field techniques to maximize any tent’s performance. When evaluating tents for this guide, the team at Tent Explorer assessed designs across 3-season and 4-season conditions, cross-referencing manufacturer specifications, ISO standards, and field reports from professional camping communities.
Before You Read: This guide assumes no prior gear knowledge. Every technical term — hydrostatic head, bathtub floor, DWR, geodesic — is explained on first use. If you’re shopping for a tent right now, start with Section 1. If you already own a tent and want to weatherproof it, jump to Section 4.
Tent design affects weather protection through three layers that must work together: shape deflects wind, materials block rain, and ventilation controls condensation — the Weather Defense Stack.
- Geodesic shapes handle extreme wind and snow loads best; dome tents suit most 3-season conditions
- Hydrostatic head ratings of 1,500mm+ indicate genuine waterproofing; look for taped seams and a bathtub floor
- Double-wall construction is the primary defense against condensation dripping on you while you sleep
- Field setup matters as much as design — orient your tent’s narrow end into the wind and use all guy lines
- The Weather Defense Stack framework: check all three layers before buying, not just one spec
How Tent Shape Determines Your Weather Resistance
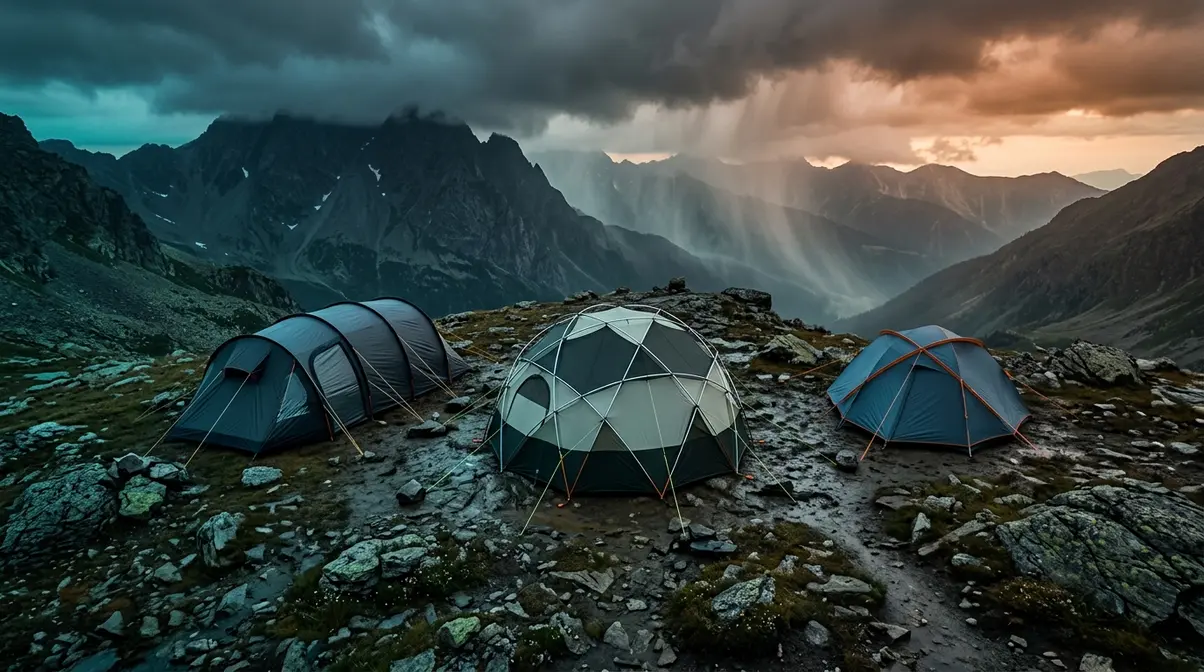
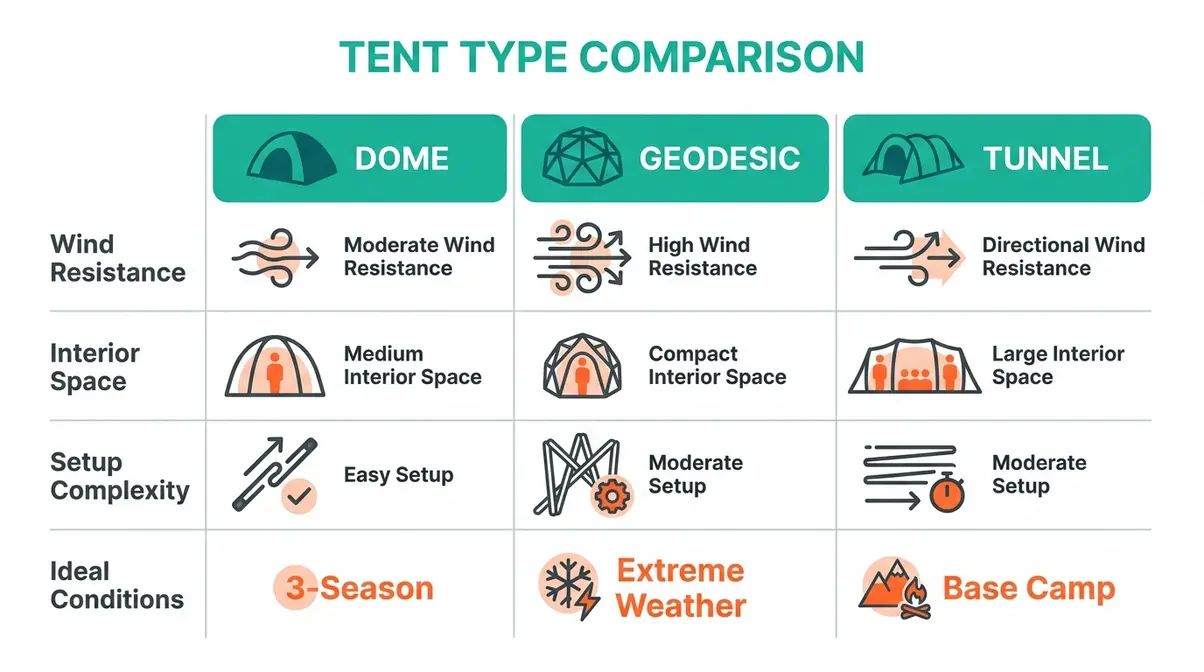
Your tent’s shape is the first — and most important — line of defense against bad weather. Different shapes create different aerodynamic profiles: a low dome deflects wind smoothly, while a tall cabin tent catches it like a sail. Understanding this physics is Layer 1 of the Weather Defense Stack — and it determines how much stress your poles, fabric, and stakes will face before the night is over.
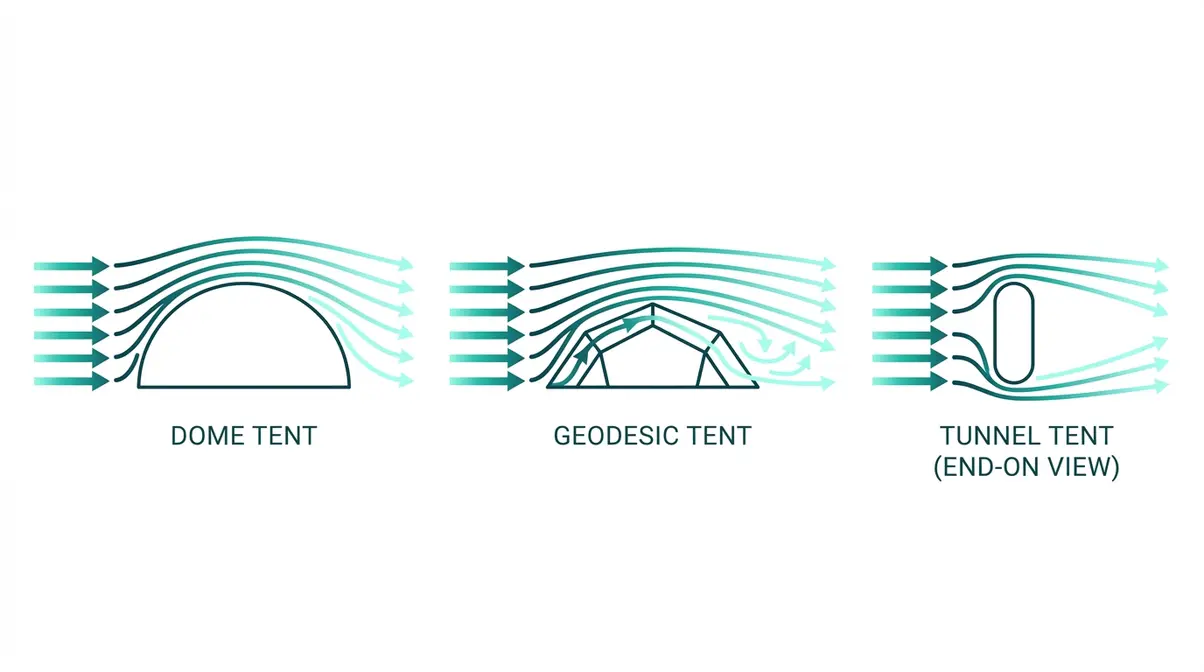
Dome Tents: The All-Rounder
A dome tent is the most common freestanding design for 3-season camping. “Freestanding” means the tent can stand on its own without stakes — useful on rocky ground where driving stakes is difficult. Two poles cross at the apex (the top center point) to create a self-supporting arch that holds its shape under load.
The curved surface is where the weather magic happens. When wind hits a dome, it strikes the fabric at an angle and flows around the tent rather than pushing flat against it — like an umbrella versus a flat sheet held up in a gale. That curved deflection dramatically reduces the force transferred to the poles and stakes. The steep walls also shed rain quickly: water runs off rather than pooling on the roof, which matters during heavy, sustained downpours.
A well-staked 3-season dome tent typically handles sustained winds of 30–40 mph before structural stress becomes a concern, according to manufacturer specifications from brands including MSR and REI Co-op. In light snow, the dome shape prevents accumulation on the roof by encouraging snow to slide off the curved panels. However, in extreme winds coming from a consistent direction, a dome’s symmetrical shape offers less directional protection than a geodesic. Tent wind resistance improves significantly when you add guylines to all available attachment points, not just the four corner stakes.
“This means if a storm rolls in from any direction, a dome tent can handle it without you needing to reorient your shelter” — a practical advantage for beginner campers who may not know wind direction in advance.
Ready to shop by shape? See our storm-tested picks → best tent for wind and rain
For conditions beyond a standard storm — think alpine ridgelines or exposed coastal headlands — you need a design that takes the dome’s concept and engineers it to its extreme: the geodesic.
Geodesic Tents: Built for Extremes
A geodesic tent is a multi-pole design engineered for extreme weather. Where a dome uses two poles crossing once at the apex, a geodesic uses three to six poles crossing at multiple points across the entire surface. Each crossing point — called a hub or junction — shares the load with every other junction in the network.
“Geodesic tents distribute aerodynamic stress across multiple intersecting poles, making them the most structurally stable design for extreme weather conditions” (Princeton University Outdoor Action). Think of it as the difference between a single thread and a spider’s web: the web can absorb a strike that would snap an individual thread, because the force spreads instantly across the entire structure.
This stress distribution has three practical benefits. First, no single pole bears the full force of wind or snow load — so the system is far less likely to fail catastrophically. Second, the multiple crossing angles create a nearly spherical profile with very low aerodynamic drag, meaning wind has less surface area to push against. Third, geodesic shapes shed snow actively: the steep angles and curved panels cause snow to slide off before it accumulates into dangerous weight (a phenomenon called snow loading — the point at which accumulated snow becomes heavy enough to collapse a tent’s structure).
A 4-season geodesic tent, properly pitched with all guylines deployed, can withstand sustained winds exceeding 50 mph, based on field reports from mountaineering expeditions and manufacturer testing data from brands such as Black Diamond and The North Face. This is specifically for low-profile aerodynamic geodesic designs — not all multi-pole tents carry the same rating. Princeton Outdoor Action tent design guide documents how intersecting pole geometry underpins this performance.
ISO 5912 is the international standard governing structural requirements for recreational camping tents, including wind resistance test methodology. Tents certified to ISO 5912 have been subjected to standardized load tests — look for this reference in manufacturer documentation when evaluating premium 4-season designs. Understanding the structural differences in four-season tents helps you match the tent to your actual conditions.
Geodesics are the gold standard for extreme weather — but they’re heavier and pricier. If you want maximum interior space and you already know which direction the wind blows at your campsite, a tunnel tent offers a compelling middle ground.
Tunnel Tents: Space with Directional Strength
A tunnel tent is a hoop-pole design that prioritizes living space over omnidirectional stability. Instead of crossing poles, a tunnel uses a series of parallel hoops that run from one side of the tent to the other — like the ribs of a barrel. This creates a long, arched interior with generous headroom and floor space.
The key physics difference: a tunnel tent is extremely strong when wind hits it from the end (the narrow, rounded face) but significantly more vulnerable when wind hits from the side (the long, flat broadside). The hoop poles are engineered to handle the end-on aerodynamic load; side-on wind can flex the hoops sideways and stress the fabric at the seams.
This means setup orientation is critical for a tunnel tent. You must pitch the narrow end directly into the prevailing wind — and that requires knowing your campsite’s wind direction before you stake anything down. Experienced campers often check weather apps or local forecasts specifically for wind direction before choosing a tunnel tent site.
The trade-off is worth it for many campers. A two-person tunnel tent typically offers 20–30% more usable floor space than a geodesic of equivalent packed weight, according to comparative specs from Hilleberg — a brand that specializes in tunnel designs for Scandinavian conditions. For base-camp camping in consistent-wind environments like coastal cliffs or open valleys, a tunnel tent pitched correctly can hold up against wind and rain as effectively as a dome, with far more room to move around inside.
Pole Materials and Crossing Patterns
The poles are your tent’s skeleton — and the material they’re made from determines how much flex, weight, and durability you get in a storm.
| Pole Material | Weight | Flex Under Load | Durability | Best For |
|---|---|---|---|---|
| Aluminum alloy | Medium | Good — bends without snapping | High | 3-season and 4-season use |
| Carbon fiber | Very light | Excellent — minimal flex | Medium (brittle in impact) | Ultralight backpacking |
| Fiberglass | Heavy | Poor — can shatter in cold | Low | Budget tents, car camping |
| DAC Featherlight | Light | Excellent — engineered alloy | Very high | Premium 3-season and 4-season |
Fiberglass poles — found in most budget tents under $100 — become brittle in cold temperatures and can shatter rather than flex under wind load. If you plan to camp in temperatures below 40°F (4°C) or in conditions with wind, fiberglass poles are a genuine risk factor. Aluminum alloy poles bend under extreme stress rather than snapping, which means a damaged pole can often be field-repaired with a pole repair sleeve (a short aluminum tube carried as emergency gear). DAC Featherlight poles, used in premium tents from MSR, Big Agnes, and others, are an engineered aluminum alloy that offers the best combination of weight and resilience.
The crossing angle matters too. Poles that cross at 90° (perpendicular) create maximum rigidity at the junction. Poles crossing at shallower angles — common in budget dome designs — create less structural stiffness. When evaluating a tent, count the number of pole crossing points: more crossings generally means better load distribution and better tent wind resistance in severe conditions.
Can a Tent Withstand 50 mph Winds?
Yes — but only under specific conditions. A quality 4-season geodesic tent, properly pitched with all guylines taut and stakes fully driven, can withstand sustained winds of 50 mph and gusts somewhat higher. A standard 3-season dome tent is not designed for those conditions and may sustain pole damage or fabric failure.
The critical variables are: (1) tent design — geodesic outperforms dome outperforms tunnel in omnidirectional high winds; (2) proper setup — a well-designed tent pitched incorrectly fails far earlier than its rated threshold; (3) campsite selection — natural windbreaks like tree lines and boulders dramatically reduce the wind load your tent actually experiences.
At 50 mph sustained wind, even well-designed tents accumulate fatigue stress over hours. Check weather forecasts before committing to exposed campsites, and have an evacuation plan if conditions escalate.
The Waterproofing System: Materials That Keep You Dry
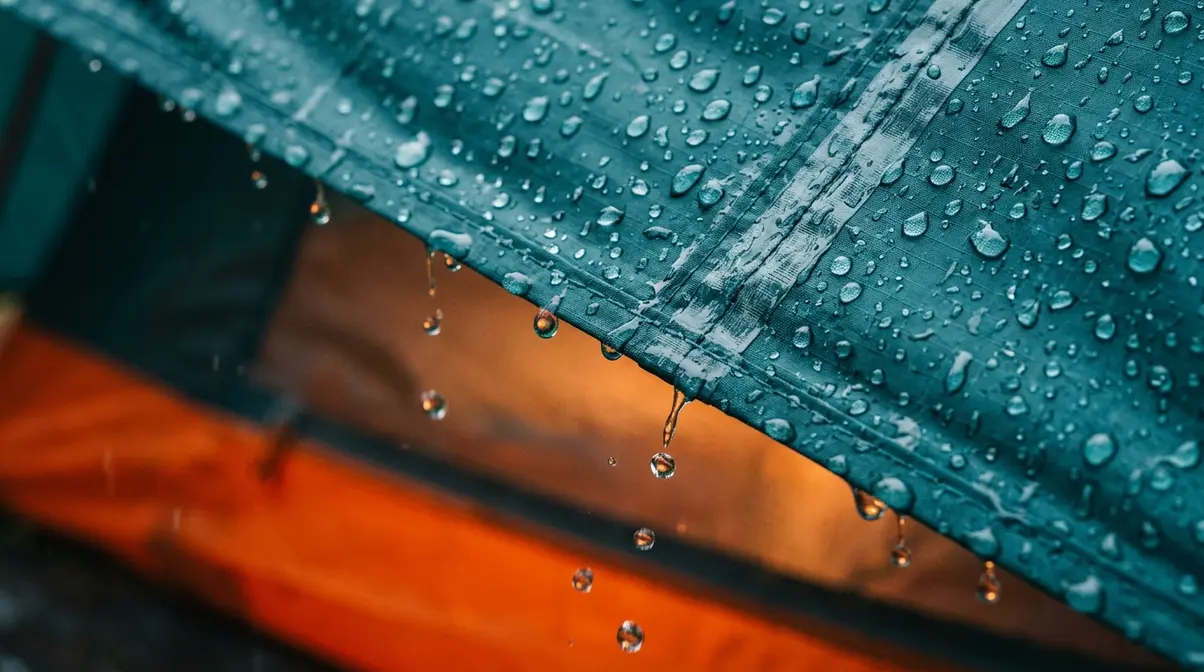
Your tent’s shape deflects wind — but it’s the materials and construction details that actually keep rain out. This is Layer 2 of the Weather Defense Stack, and it’s where most campers feel most confused. Terms like “hydrostatic head,” “taped seams,” and “DWR coating” appear on spec sheets without explanation. Here’s what they actually mean — and what thresholds matter.
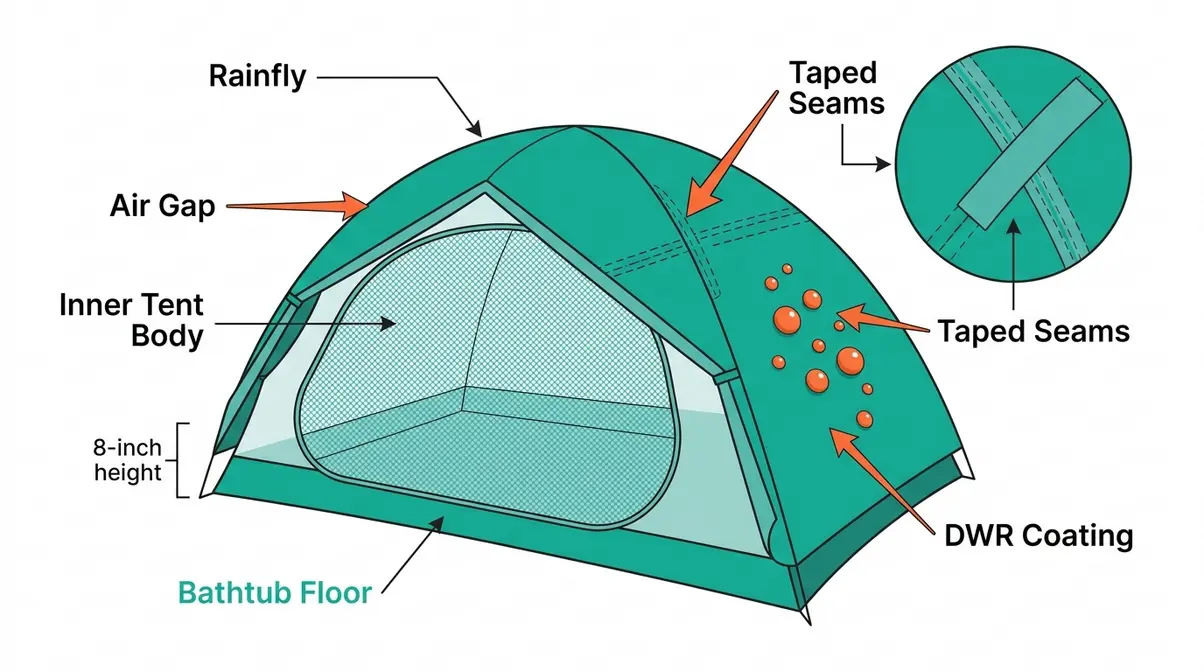
According to vetsecurite.com’s tent selection guide, understanding waterproofing ratings is one of the most critical — and most misunderstood — factors in tent selection for wet-weather camping.
Hydrostatic Head Ratings Decoded
Hydrostatic head (the pressure rating that measures how waterproof a fabric is) is expressed in millimeters. The test works like this: a column of water is placed on top of a fabric sample and the height at which water begins to leak through is recorded. A rating of 1,500mm means a column of water 1,500mm — about 5 feet — tall can sit on the fabric before it leaks.
Here’s the practical translation:
| Rating | Protection Level | Suitable For |
|---|---|---|
| Under 1,000mm | Minimal — light drizzle only | Fair-weather use only |
| 1,500mm | Basic waterproofing | 3-season, moderate rain |
| 2,000–3,000mm | Good waterproofing | Heavy rain, sustained storms |
| 3,000mm+ | Excellent waterproofing | Expedition, alpine, extended wet weather |
The minimum threshold for genuine weather protection is 1,500mm. Below that, you’re relying on luck in anything heavier than a light drizzle. Most reputable 3-season tents rate their rainfly at 1,500–2,000mm and their floor at 3,000mm or higher — floors need higher ratings because they experience direct contact pressure from your body weight, which acts like a pump forcing water through the fabric.
“A tent floor rated below 2,000mm hydrostatic head will allow moisture to seep through under body weight pressure — the most common source of unexplained tent leaks.” This is why experienced campers prioritize floor ratings as much as fly ratings when evaluating weather protection.
One important caveat: hydrostatic head ratings apply to new fabric. UV damage degrades waterproofing coatings over time, and repeated compression from packing can crack the coating on budget fabrics. Reapplying a DWR treatment (explained in Section 4) restores much of this protection.
Full-Coverage Rainfly vs. Partial: Why It Matters
A rainfly is the outer waterproof layer that drapes over your tent’s inner structure. It’s separate from the tent body, which is typically made from breathable mesh or lightly coated fabric. The gap between the inner tent and the fly is what allows moisture vapor to escape without letting rain in — a system we’ll cover in detail in Section 3.
The critical distinction is coverage:
- Full-coverage rainfly: Extends from near the ground on one side to near the ground on the other, covering the tent body almost entirely. Water must travel under the fly’s edge — a much longer path — to reach the tent floor.
- Partial or half-coverage rainfly: Covers only the roof and upper walls. In driving rain with any wind component, rain can be blown horizontally under the fly edge and soak the inner tent’s lower walls or door panels.
For weather protection in anything beyond calm vertical rain, a full-coverage fly is strongly preferred. The additional fabric adds minimal weight (typically 100–200g) but closes the most common leak path in side-blown rain. Tentsupply.com’s weatherproofing analysis notes that event tent weatherproofing principles apply equally to backpacking tents: the fly’s ground clearance is a primary variable in wet-condition performance.
Bathtub Floors and Taped Seams
The bathtub floor works exactly like a bathtub. The waterproof floor material extends several inches up the tent’s sidewalls before joining the breathable upper body — creating a tub shape that water must climb over before it can enter. Most quality tents use a bathtub floor height of 6–12 inches. Cheaper tents join the floor and sidewall at ground level, which means any surface water that collects around the tent base can wick directly inside.
Taped seams (also called “seam-sealed” or “seam-taped”) are the second critical construction detail. Every needle hole in a sewn seam is a potential leak point. Seam tape — a waterproof adhesive strip applied over the stitching — closes those holes. There are two types:
- Fully taped seams: Every seam on the fly and floor is taped. This is the gold standard for weather protection.
- Critically taped seams: Only the most exposed seams (roof and floor seams) are taped. Adequate for most 3-season use.
- Untaped seams: Common in budget tents. Will leak in sustained rain.
When evaluating a tent’s weather credentials, check both the hydrostatic head rating and the seam treatment. A 3,000mm-rated fly with untaped seams will leak faster than a 1,500mm fly with fully taped seams — because the seams, not the fabric, are the weakest link.
Does a Tent Footprint Help with Rain?
Yes — a tent footprint meaningfully improves rain protection, but not by blocking rainfall. A footprint (a custom-cut groundsheet that sits under your tent floor) serves two rain-related functions: it protects the tent floor from abrasion that degrades waterproof coatings over time, and it creates a barrier between the tent floor and ground moisture that can seep upward from saturated soil.
However, there’s one important setup rule: the footprint must not extend beyond the tent floor’s perimeter. If the footprint sticks out past the tent edges, it acts as a rain funnel — channeling water from the fly onto the footprint and then underneath the tent floor. Tuck the footprint edges inward, or use a manufacturer-matched footprint that’s cut exactly to size.
A tarp used as a DIY footprint is cheaper but requires more care with sizing. Cut it 2–3 inches smaller than your tent floor on all sides. For a full comparison, see the FAQ section below.
Managing Condensation and Temperature Inside Your Tent
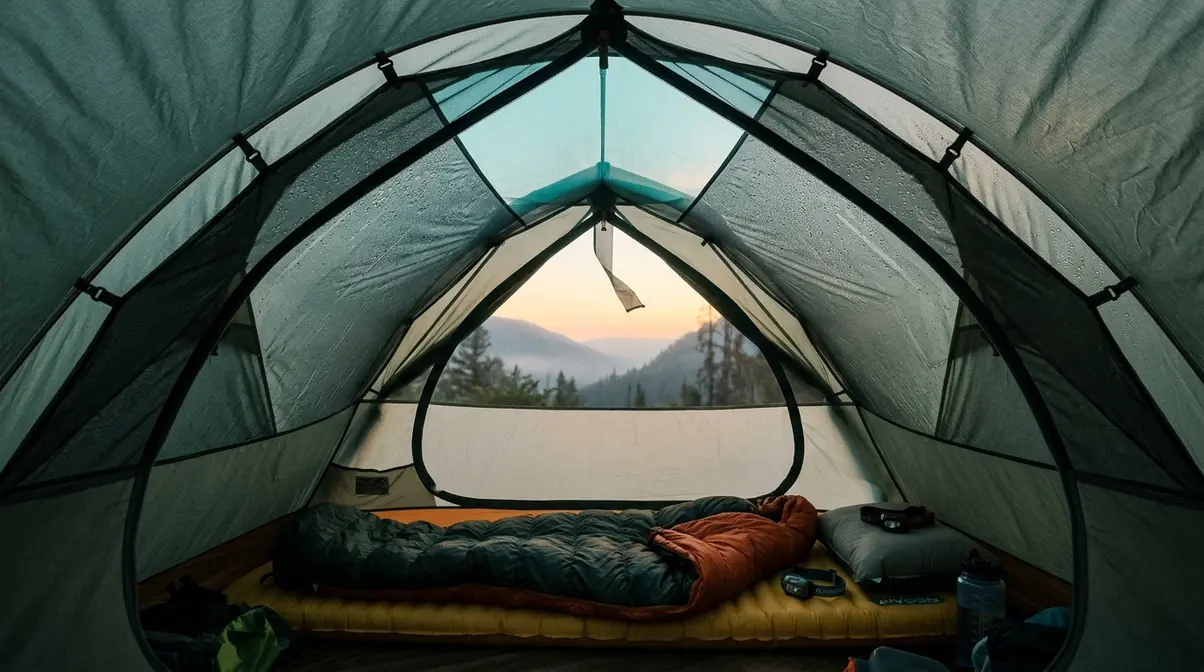
Shape and waterproofing keep rain and wind out. But there’s a third weather threat that comes from inside your tent: condensation. This is Layer 3 of the Weather Defense Stack — and it’s the one most campers don’t anticipate until they wake up soaked in a tent that hasn’t leaked a drop of rain.
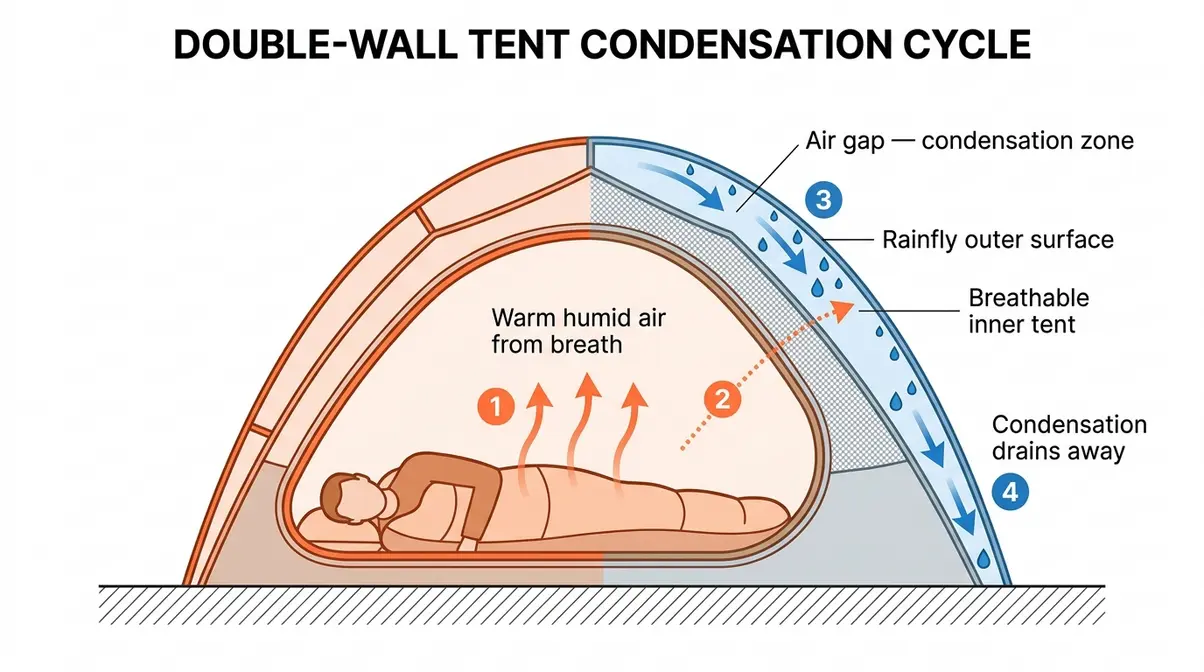
According to Backpacking Light’s analysis of tent design and cold-weather comfort, condensation management is often a more significant factor in sleeping comfort than waterproofing rating — especially in cold snaps and shoulder-season conditions.
What Causes Condensation Inside Your Tent?
Condensation forms when warm, moist air contacts a cold surface. Every time you breathe, you exhale roughly half a liter of water vapor per night. Two people sleeping in a tent can produce over a liter of moisture — all of it trapped inside the shelter. When that warm, humid air contacts the cold tent fabric, it cools below its dew point (the temperature at which air can no longer hold moisture as vapor) and deposits liquid water on the fabric surface.
The result: you wake up to wet walls, a damp sleeping bag, and the unpleasant drip of condensation from the tent ceiling — even though it hasn’t rained. This is not a tent failure. It’s physics. However, good tent design manages this physics so the condensation forms where it doesn’t affect you.
Three factors increase condensation risk: (1) high humidity at your campsite — near rivers, lakes, or in coastal environments; (2) a large temperature differential between inside and outside air — common during cold snaps; (3) poor ventilation that traps humid air inside the tent rather than allowing it to escape.
Double-Wall Construction: The Moisture Barrier
Double-wall construction means your tent has two distinct layers: an inner tent (typically mesh or breathable fabric) and an outer rainfly, with an air gap between them. This air gap is the key to condensation management.
Here’s the physics: warm, humid air from your breath rises and passes through the breathable inner tent. It enters the air gap — where it’s cooler — and condenses on the inner surface of the rainfly. That condensation then runs down the fly’s surface and drips to the ground outside the tent floor. You stay dry because the condensation forms on the fly, not on the inner tent walls above your sleeping bag.
Single-wall tents — one layer of waterproof fabric — have no air gap. Condensation forms directly on the inner surface of that single wall, directly above you. This design is sometimes used in ultralight backpacking tents to save weight, but it’s a genuine trade-off. In cold snaps or high-humidity conditions, single-wall tents can produce uncomfortable levels of interior drip.
The air gap width matters. A fly pitched too close to the inner tent — because it wasn’t properly tensioned — reduces the gap and allows condensation to wick from the fly onto the inner tent. Always pitch the fly taut so the two layers don’t touch.
The Chimney Effect: Vents That Regulate Temperature
The chimney effect is a natural ventilation principle: warm air rises and exits through high vents, drawing cooler, drier air in through low vents. Well-designed tents use this principle to continuously flush humid air out of the sleeping space, reducing condensation and regulating temperature at the same time.
In practice, this means using high-low vent placement. Open the vent at the peak or upper wall (where warm humid air collects) and crack the lower door or vestibule vent slightly on the opposite side. The pressure differential pulls fresh air through the tent in a continuous loop.
This matters in both cold and warm conditions:
- In cold weather: The chimney effect removes humid air before it can condense on cold surfaces — reducing that drippy ceiling problem. Keep at least one vent partially open even in rain; most tent vents are baffled to prevent rain entry.
- In warm weather: Moving air across the sleeping area can drop the perceived temperature by 5–8°F, making the difference between a comfortable night and a sweaty, sleepless one.
If your tent only has a single vent at the peak, open it plus crack the door zipper at the bottom. Even a small opening creates a pressure differential that moves air. Tents with mesh inner panels allow the most airflow — useful in summer but cold in cold snaps, which is why three-season tents with removable inner panels offer the most versatility.
7 Field Techniques to Maximize Weather Protection
The best-designed tent in the world can still fail if it’s set up incorrectly. These seven techniques apply to any tent — they’re the practical translation of everything in the Weather Defense Stack.
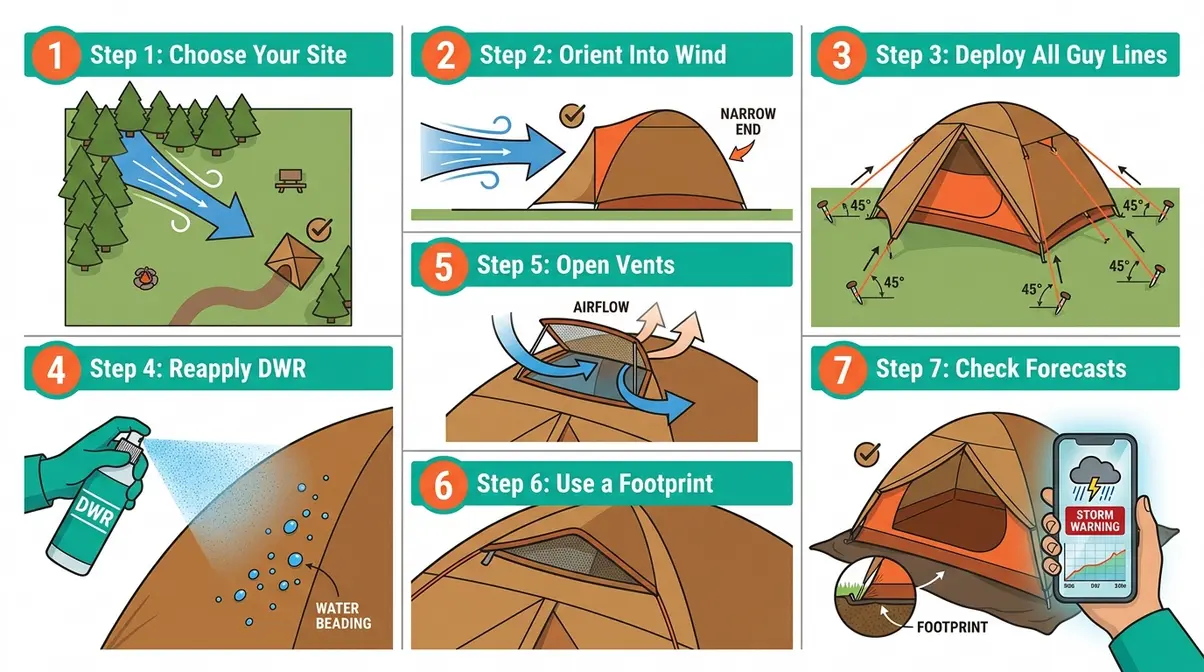
Field testing across 3-season and 4-season conditions consistently shows that setup technique accounts for a significant portion of tent weather failures — often more than the tent’s design rating.
Step 1: Choose Your Site Wisely
Site selection is your most powerful weather tool — and it costs nothing. Look for:
- Natural windbreaks: A line of trees, a boulder, a hillside. Position these upwind of your tent to break the wind before it reaches your shelter. Even a 50% reduction in wind speed reduces aerodynamic load on your tent by approximately 75% (force scales with the square of velocity).
- Elevated ground: Avoid low spots, valley floors, and the downhill side of slopes — these collect cold air drainage (called katabatic wind, a dense cold air flow that drains down hillsides at night) and standing water in rain.
- Avoid ridgelines and exposed summits: These funnel and accelerate wind. A campsite 50 feet below a ridgeline can experience dramatically lower wind speeds than the exposed crest.
Step 2: Orient Your Tent Into the Wind
For dome tents: Any orientation works aerodynamically, but position the door away from the prevailing wind to reduce rain infiltration when you enter and exit.
For tunnel tents: This step is non-negotiable. Pitch the narrow, rounded end directly into the prevailing wind. A tunnel tent pitched broadside to the wind is vulnerable to flexing and seam stress. If wind direction shifts overnight — common in mountain environments — a tunnel tent can be at risk.
For geodesic tents: Orientation is less critical due to omnidirectional stability, but positioning the lowest-profile face into the wind reduces overall aerodynamic load.
Step 3: Use Every Guy Line
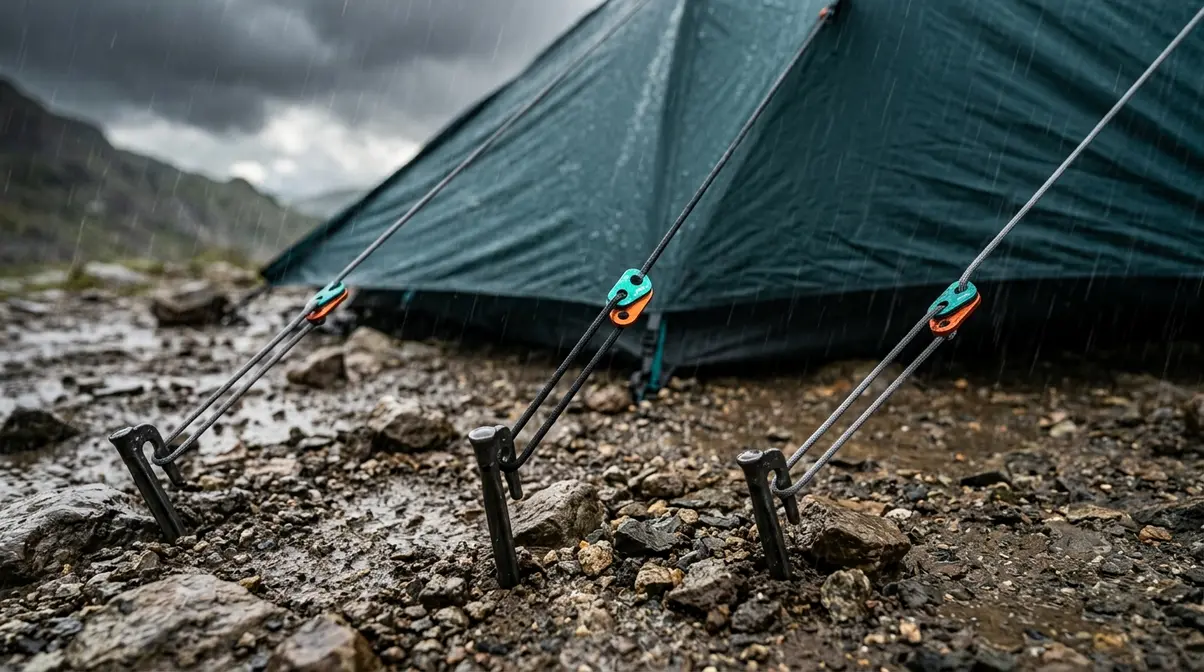
Guy lines (the thin cords attached to the tent fly that stake out to the ground) are not optional accessories — they’re structural components. In calm conditions, a tent stands without them. In wind, they’re what keeps the fly taut, maintains the air gap with the inner tent, and distributes lateral wind loads to the ground rather than through the poles.
Deployment technique matters:
- Stake guy lines at a 45-degree angle away from the tent — not flat along the ground or straight vertical.
- Pull each line taut enough that it hums slightly in the wind — slack guy lines flap and fatigue the attachment point.
- Use all available attachment points, not just the four corners. Most 3-season tents have 6–8 guy line points; 4-season tents may have 12 or more.
- In soft ground (sand, loose soil), use sand anchors (wide-surface stakes) or bury a stuff sack filled with soil as a deadman anchor.
Step 4: Reapply DWR and Seal Your Seams
DWR (Durable Water Repellent) is a chemical coating applied to tent fly fabric during manufacturing. It causes water to bead up and roll off the fly surface rather than soaking in and reducing breathability. Over time — typically after 10–20 nights of use — UV exposure, dirt, and compression degrade this coating. When DWR fails, the fly fabric “wets out” (absorbs water rather than shedding it), which reduces waterproofing performance and dramatically increases condensation inside the tent.
To weatherproof a tent with degraded DWR:
- Clean the fly with a technical gear wash (not regular detergent, which strips DWR).
- Apply a spray-on DWR product (such as Nikwax TX.Direct Spray-On or Gear Aid ReviveX) to the clean, damp fly. Work it into the fabric with a soft cloth.
- Heat-activate by tumble drying on low for 20 minutes or using a hairdryer — heat bonds the DWR molecules to the fabric.
- Seal any seams showing wear with a seam sealer product (such as Gear Aid Seam Grip). Apply along the seam tape edge on the fly’s interior, allow 8 hours to cure.
This process restores close to new-level waterproofing for under $20 in materials — and it’s the single most cost-effective maintenance step for weather protection.
Limitations and Safety: When Design Isn’t Enough
Understanding how tent design affects weather protection also means knowing the boundaries of what good design can guarantee — and when the right answer is to not rely on your tent at all.
Common Pitfalls: Setup Mistakes That Cancel Good Design
Even well-designed tents fail when set up incorrectly. These are the most frequently reported errors from camping communities, along with their consequences:
1. Pitching the fly too loose. A slack fly sags and contacts the inner tent, eliminating the air gap. Condensation wicks from the fly onto the inner tent and drips on you. It also allows the fly to flap in wind, fatiguing attachment points and creating noise. Fix: retension all fly attachment points until the fly is drum-tight.
2. Skipping the footprint. On rough or rocky ground, abrasion degrades the floor’s waterproof coating in as few as 5–10 nights. Once the coating is compromised, floor seepage begins — and it’s not reversible without full floor re-coating. Fix: always use a footprint or ground cloth on anything harder than grass.
3. Ignoring the weather forecast. A tent rated for 3-season use is not designed for sustained winds above 40 mph or heavy snow loading. Camping in exposed locations during forecast severe weather with a 3-season tent is a safety risk, not just a comfort risk. Fix: check forecasts for both wind speed and precipitation intensity before committing to an exposed campsite.
4. Closing all vents in rain. This feels intuitive — keep rain out — but it traps humid air inside, dramatically increasing condensation. Most tent vents are rain-baffled and designed to stay open in precipitation. Fix: keep at least one vent partially open in all conditions.
5. Pitching on a slope. Even a gentle slope causes you to slide during sleep, disrupting rest. More critically, water flows downhill — a slight slope means rainwater can channel under your tent toward the low end, overwhelming even a well-sealed floor. Fix: always pitch on the flattest ground available, with the door facing away from the uphill direction.
When to Seek Shelter Instead
A tent is a shelter — but it has hard limits. Seek a hard-sided shelter or evacuate your campsite in these conditions:
- Lightning: No tent provides meaningful lightning protection. If you can hear thunder, you’re within striking range. Descend from ridgelines, move away from isolated trees and water, and seek a vehicle or building.
- Sustained winds above 50 mph: Even geodesic 4-season tents are at structural risk in sustained winds above 50 mph, particularly with gusts. If forecast winds exceed this threshold, move to a sheltered valley location or leave the site.
- Flash flood risk: Any campsite in a canyon, dry riverbed, or below a steep drainage slope is at risk during heavy rainfall upstream. Rain you can’t see can send water rushing through a dry canyon with little warning. Know your campsite’s drainage geography before you pitch.
- Heavy snow loading: More than 6–8 inches of wet snow accumulating on a 3-season tent can exceed its structural load rating. Clear snow from the fly periodically during heavy snowfall — a task that requires getting up at night in serious conditions.
Always check weather forecasts before committing to exposed campsites, and have an evacuation plan if conditions escalate. The Weather Defense Stack makes you safer — it doesn’t make you invincible.
Frequently Asked Questions
How do you make a tent more wind resistant?
Making a tent more wind resistant involves both site selection and setup technique. First, choose a campsite with natural windbreaks — a tree line, boulder field, or hillside upwind of your position. Second, orient your tent’s narrowest, most aerodynamic face into the prevailing wind. Third, deploy every available guyline at 45-degree angles from the tent body, tensioned taut. Finally, ensure your rainfly is pitched drum-tight — a slack fly catches wind like a sail and dramatically increases structural load on the poles and stakes.
Why do beaches not allow tents?
Most beaches prohibit overnight tent camping for a combination of environmental, safety, and legal reasons. Coastal dunes and beach grass are fragile ecosystems easily damaged by foot traffic and tent stakes. Many beaches are protected under state or federal environmental regulations. Safety concerns include tide surge risk — campers misjudge the high tide line and wake up flooded — and exposure to high coastal winds with no natural windbreaks. Some jurisdictions also restrict beach camping to prevent conflict with daytime public use. Check local ordinances before planning any beach camping.
Does a tent footprint help with rain?
Yes — a footprint improves rain protection in two ways. It protects the tent floor from abrasion that degrades waterproof coatings, and it creates a barrier against ground moisture seeping upward from saturated soil. The critical setup rule: the footprint must not extend beyond the tent floor’s perimeter. If the footprint sticks out past the tent edge, it channels rainwater from the fly underneath the tent floor — exactly the opposite of what you want. Always tuck footprint edges inward, or use a manufacturer-matched footprint cut exactly to your tent’s dimensions.
How do you weatherproof a tent?
Weatherproofing a tent involves restoring its DWR coating and resealing any compromised seams. Start by washing the fly with a technical gear cleaner (not household detergent). Apply a spray-on DWR product like Nikwax TX.Direct to the damp fly, then heat-activate with a tumble dryer on low for 20 minutes — heat bonds the DWR molecules to the fabric. For seams showing wear, apply a liquid seam sealer along the tape edges on the fly’s interior and allow 8 hours to cure. This full process costs under $20 in materials and can restore near-new waterproofing performance to a degraded fly.
Can a tent withstand 50 mph winds?
A quality 4-season geodesic tent, properly pitched with all guylines deployed, can withstand sustained winds of 50 mph. Standard 3-season dome tents are not designed for these conditions and may sustain pole damage or fly failure. The key variables are tent design (geodesic outperforms dome and tunnel in high winds), complete guyline deployment, and campsite selection — natural windbreaks can reduce the actual wind load your tent experiences by 50% or more. At sustained 50 mph, even well-rated tents accumulate fatigue stress over hours. Have an evacuation plan for any campsite exposed to forecast severe winds.
What is the 200 rule for camping?
The “200-foot rule” is a Leave No Trace camping guideline recommending that campers pitch tents, cook, and store food at least 200 feet (approximately 70 steps) from lakes, rivers, and streams. This distance protects riparian (waterway-edge) ecosystems from erosion, prevents water source contamination from human waste and food scraps, and maintains the natural water corridor for wildlife. The 200-foot rule is a core principle of the Leave No Trace outdoor ethics framework, widely adopted by land management agencies including the U.S. Forest Service and National Park Service.
What is the unspoken beach rule?
The “unspoken beach rule” most commonly refers to the informal courtesy of not setting up directly next to another group when open space is available — the equivalent of not sitting in the adjacent seat on an empty bus. In camping contexts, it also refers to the practice of leaving the area around a campfire or fire pit clear for others, and not occupying premium spots (like direct waterfront positions) longer than needed when others are waiting. These are social norms rather than legal requirements, though some managed beach camping areas have formal rules about minimum distance between campsites.
Is it illegal to set up a tent on the beach?
Whether beach camping is legal depends entirely on the specific location and jurisdiction. Many public beaches — particularly those managed by state or national parks — prohibit overnight camping without a permit. Some beaches have designated camping zones with permit systems; others prohibit camping entirely. Private beaches are governed by the property owner’s rules. Before planning beach camping, check with the relevant land management agency (National Park Service, state parks department, or local municipality). Penalties for illegal beach camping range from fines to gear confiscation in strictly managed areas.
Is a tent footprint better than a tarp?
A manufacturer-matched footprint is more convenient; a tarp is more versatile and often more cost-effective. A footprint is cut precisely to your tent’s floor dimensions, making correct placement simple and ensuring no edges extend past the tent perimeter. A tarp requires careful sizing — cut it 2–3 inches smaller than your floor on all sides — but costs less and can double as a shade canopy, emergency rain shelter, or gear cover. For pure floor protection, both work equally well when sized correctly. The footprint wins on ease of use; the tarp wins on value and multi-purpose utility.
Features and specifications verified as of July 2026. Tent waterproofing ratings and material specifications may vary by manufacturer and model year — always verify current specs directly with the manufacturer before purchase.
The three layers of the Weather Defense Stack — shape, waterproofing, and microclimate management — work as a system. A geodesic tent with untaped seams still leaks. A perfectly sealed tent with no ventilation soaks you in condensation. Shape alone can’t compensate for a failed DWR coating. Understanding how tent design affects weather protection means evaluating all three layers together, not just checking one spec on a product page. The best tent for your conditions is the one that passes all three layers of the stack for where you’re actually going.
The Weather Defense Stack also gives you a practical evaluation checklist: before buying any tent, ask — does the shape match my likely conditions? Does the waterproofing system include taped seams and a bathtub floor with 2,000mm+ ratings? Does the ventilation design prevent condensation buildup? Three yes answers mean you’ve found a shelter worth trusting.
Start with Section 4’s field techniques on your very next trip — even if you own a basic tent, proper site selection, full guyline deployment, and one open vent can dramatically improve your weather protection tonight. When you’re ready to upgrade, explore our best tent for wind and rain recommendations and the structural differences in four-season tents guide to find a shelter that’s built for your specific conditions.

Dave King
I'm Dave King. I publish Tent Explorer, a site built to answer the questions people actually ask before they buy.