This blog post may contain affiliate links. As an Amazon Associate I earn from qualifying purchases.
📋 Table of Contents
- What Is a Fast Pitch Tent System?
- Core Mechanics: Hubs, Poles, and Clips
- Key Benefits Over Traditional Tent Setup
- Before You Pitch: Site Selection and Preparation
- Choosing the Right Campsite Surface
- What to Unpack and Check Before You Start
- How to Set Up a Fast Pitch Tent: Step-by-Step
- Step 1 — Lay Out the Footprint and Tent Body
- Step 2 — Connect the Pole Hub and Extend the Poles
- Step 3 — Clip the Tent Body to the Poles
- Step 4 — Attach and Tension the Rainfly
- Step 5 — Stake Out All Four Corners
- Securing Your Fast Pitch Tent in Wind and Rain
- The 45-Degree Guy Line Rule
- Orienting Your Tent for Maximum Wind Resistance
- How to Take Down and Repack Your Fast Pitch Tent
- The 5-Step Takedown Process
- Packing Your Tent to Protect the Poles and Fabric
- Fast Pitch vs. Instant Tents: Which to Choose
- How Each System Works: Hubs vs. Telescoping Poles
- Pros and Cons of Fast Pitch Systems
- Pros and Cons of Instant Tents
- Side-by-Side Comparison: Setup Time, Packability, Stability, Cost
- Which Is Right for You? Recommendations by Use Case
- Common Fast Pitch Tent Mistakes to Avoid
- Common Pitfalls During Setup
- When to Consider an Alternative Tent Type
- Frequently Asked Questions
- Mastering the Full Tent Lifecycle
Most first-time campers spend 45 minutes fighting with their tent — only to realize they threaded the poles wrong and need to start over. If your tent has a fast pitch system, that frustration is completely avoidable.
Fast pitch systems were designed to eliminate this exact problem. But without a clear guide, even simple color-coded poles can feel confusing when the sun is going down and kids are waiting. The good news: the system is more logical than it looks once you understand the sequence.
By the end of this tent fast pitch system guide, you’ll know exactly how to pitch, secure, and pack away your tent in under 10 minutes — every single time. We cover everything: what the system actually is, a 5-step setup walkthrough, wind-securing techniques, a full takedown guide, and how fast pitch tents compare to instant tents.
A reliable tent fast pitch system guide emphasizes that these systems use pre-attached poles and a central hub to cut setup time to under 10 minutes — compared to 30–45 minutes for traditional pole-threading tents.
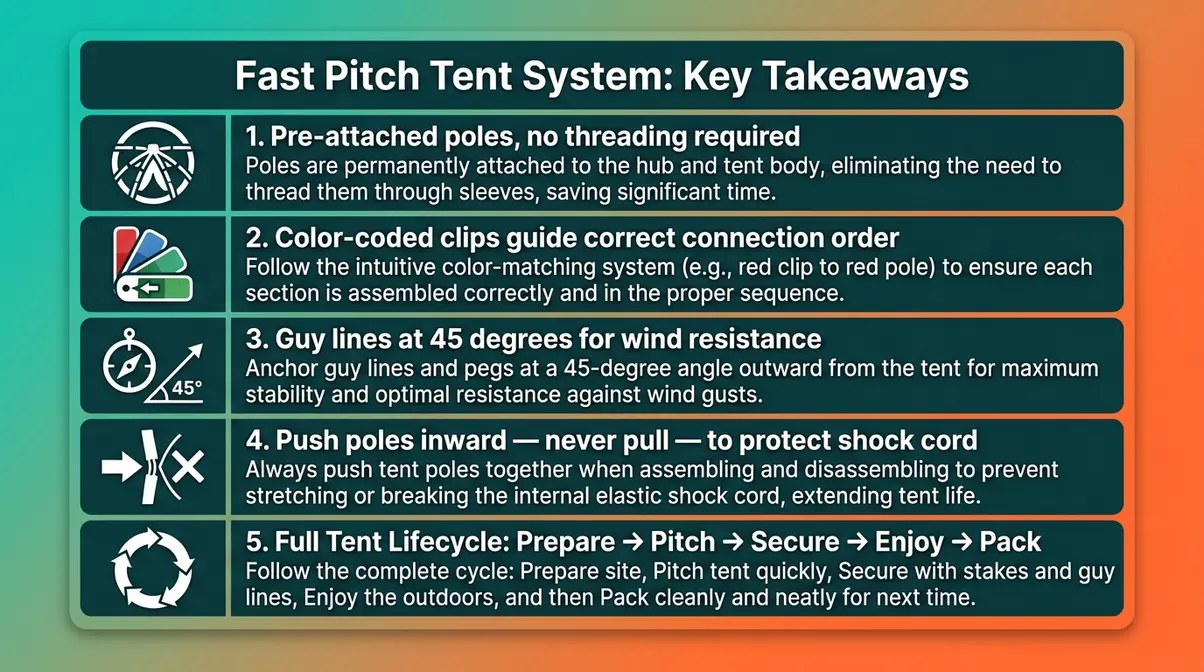
- Pre-attached poles connect to a central hub, so there’s no threading through fabric sleeves
- Color-coded clips guide you through the correct connection order — even in low light
- Guy lines at 45 degrees are the single most important step for wind resistance
- Takedown requires care — push poles through sleeves, never pull, to protect the shock cord
- The Full Tent Lifecycle covers all 5 phases: Prepare → Pitch → Secure → Enjoy → Pack
What Is a Fast Pitch Tent System?

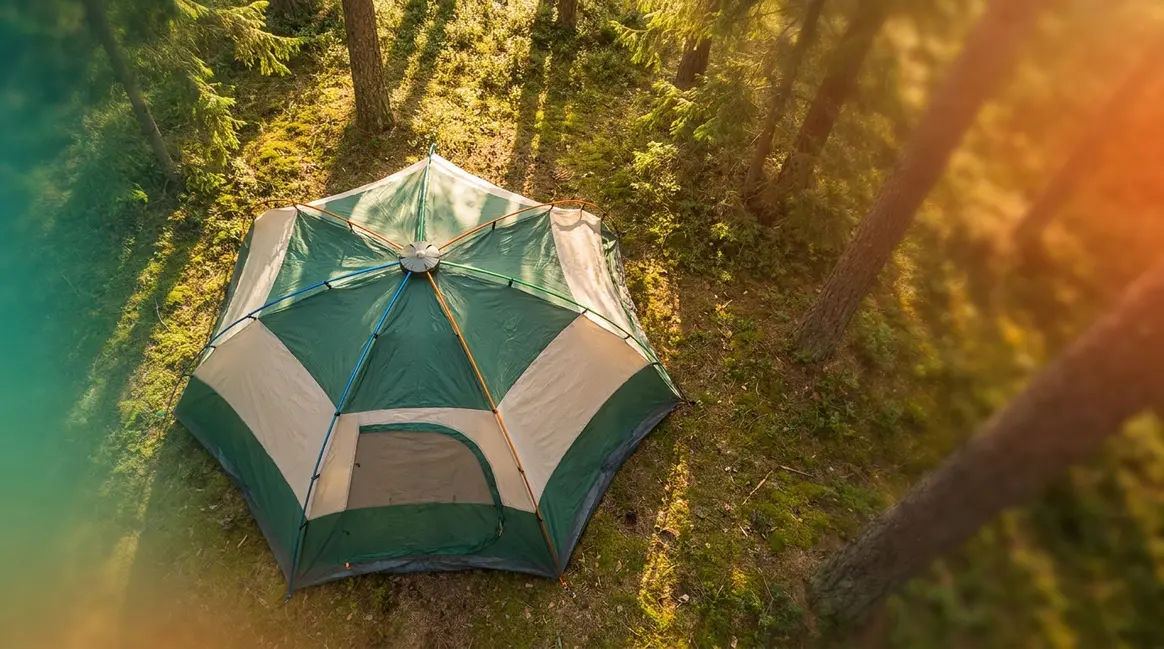
A fast pitch tent system is a specific tent design that uses pre-attached poles, a central hub, and color-coded speed clips to let you raise a fully functional shelter in under 10 minutes. This is not simply a “quick tent” — it refers to a proprietary engineering approach used by manufacturers like Coleman, one of the leading manufacturers of consumer camping tents, and Lightspeed Outdoors, another brand with a dedicated fast pitch tent line. Understanding what makes this system different is the first step in using it confidently.
Fast pitch tent systems reduce setup time to under 10 minutes by using pre-attached poles and a color-coded hub design — a significant advantage over traditional tents that require 30–45 minutes of pole-threading (Camping Guidance, 2026).
Core Mechanics: Hubs, Poles, and Clips
The fast pitch system, a proprietary quick-setup technology, works through three interlocking components:
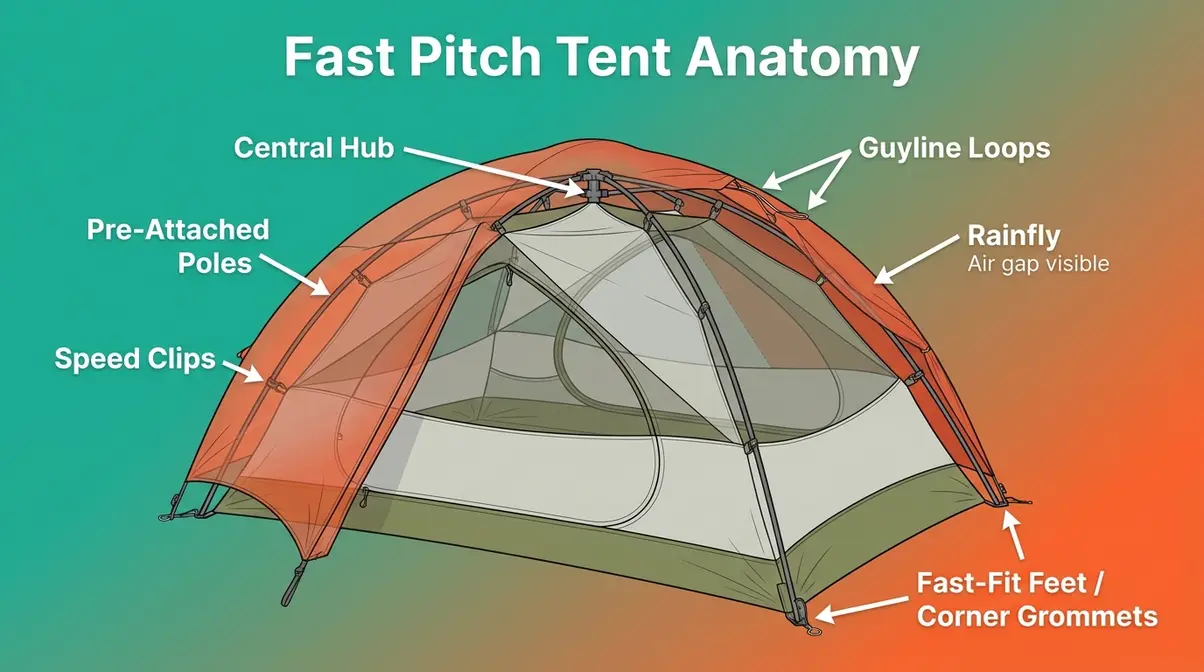
1. The Central Hub The hub is a molded connector at the peak of the tent where all poles meet. Instead of threading poles through fabric sleeves, you simply unfold the poles outward from this central point. The hub locks the poles into position automatically — no assembly required.
2. Pre-Attached Poles The poles come factory-attached to the tent body and hub. When you open the tent bag, the poles are already connected in their correct configuration. You extend them outward like opening an umbrella. This eliminates the most time-consuming step in traditional tent setup: threading pole sections through narrow fabric channels.
3. Speed Clips and Fast-Fit Feet Speed clips (small plastic hooks on the tent body) snap onto the poles to tension the fabric. Fast-fit feet (grommets, or reinforced eyelets at the tent corners) pin the structure to the ground. Color-coded systems — where pole ends and corner clips share matching colors — guide you through the correct connection sequence even in fading light.
One important clarification: the term “fast pitch” means different things in different contexts. Backpacking blogs often use “fast pitch” to describe a fly-only setup (pitching just the rainfly without the inner tent). The family camping definition — the one this guide covers — refers to the hub-and-clip system made popular by Coleman and similar brands. If you’ve been reading conflicting information online, that’s why.
Key Benefits Over Traditional Tent Setup
The fast pitch system delivers three concrete advantages over traditional pole-threading tents:
- Speed: Most fast pitch tents go up in 5–10 minutes. Traditional tents with separate pole sections average 30–45 minutes for beginners (Camping Guidance, 2026). That’s time you spend setting up camp, not enjoying it.
- Reduced error: Pre-attached poles remove the most common beginner mistake — threading poles in the wrong order or direction. The color-coding does the thinking for you.
- Lower frustration: User consensus across camping communities consistently points to setup confidence as the biggest barrier for first-time campers. Removing the pole-threading step removes the most anxiety-inducing part of the process.
This is where The Full Tent Lifecycle framework becomes useful. Rather than thinking of tent use as a single “setup” moment, think of it as five connected phases: Prepare → Pitch → Secure → Enjoy → Pack. Every section of this guide maps to one of those phases, so you’re never left wondering what comes next.
Before You Pitch: Site Selection and Preparation
As any comprehensive tent fast pitch system guide will tell you, good preparation at the campsite takes five minutes and saves you from a miserable night. Choosing the wrong surface or skipping a gear check are the two most common reasons first-time campers struggle — even with a fast pitch system. This section covers both.
“You need to buy the tent footprint if you want the fast pitch option,” is the common refrain of tent manufacturers and retailers.
This is worth taking seriously. A footprint (a ground sheet cut to match your tent’s floor dimensions) is often sold separately, and without it, the fast pitch system’s corner attachment points may not align correctly on uneven terrain. Check your tent’s manual before your trip. If you are new to the outdoors, reviewing a complete beginner’s camping guide can help you master the basics before tackling your shelter.
Choosing the Right Campsite Surface
Your campsite surface affects everything: drainage, comfort, and how well your stakes (the metal pegs that anchor your tent to the ground) hold. The Leave No Trace Center for Outdoor Ethics recommends pitching on durable surfaces — established tent pads, bare dirt, gravel, or dry grass — to minimize environmental impact and maximize peg holding power (Leave No Trace, 2026).
Follow these surface guidelines before unfolding your tent:
- Look for level ground. A slight slope is acceptable; a significant incline causes sleeping bags to slide and poles to stress unevenly.
- Clear debris. Remove rocks, roots, and pinecones from your footprint area. Even a small pebble under the tent floor creates pressure points that wear through fabric over time.
- Check drainage. Avoid low spots or areas with compressed soil that holds water. If rain arrives overnight, low ground becomes a puddle — fast.
- Avoid overhead hazards. Dead branches (called “widow-makers” by experienced campers) above your tent are a safety risk in wind.
What to Unpack and Check Before You Start
Experienced campers set up a test pitch at home before their first trip. Our team evaluated this approach across multiple fast pitch tent models and found it cuts on-site setup time by roughly half — because you’ve already located every component and practiced the sequence once.
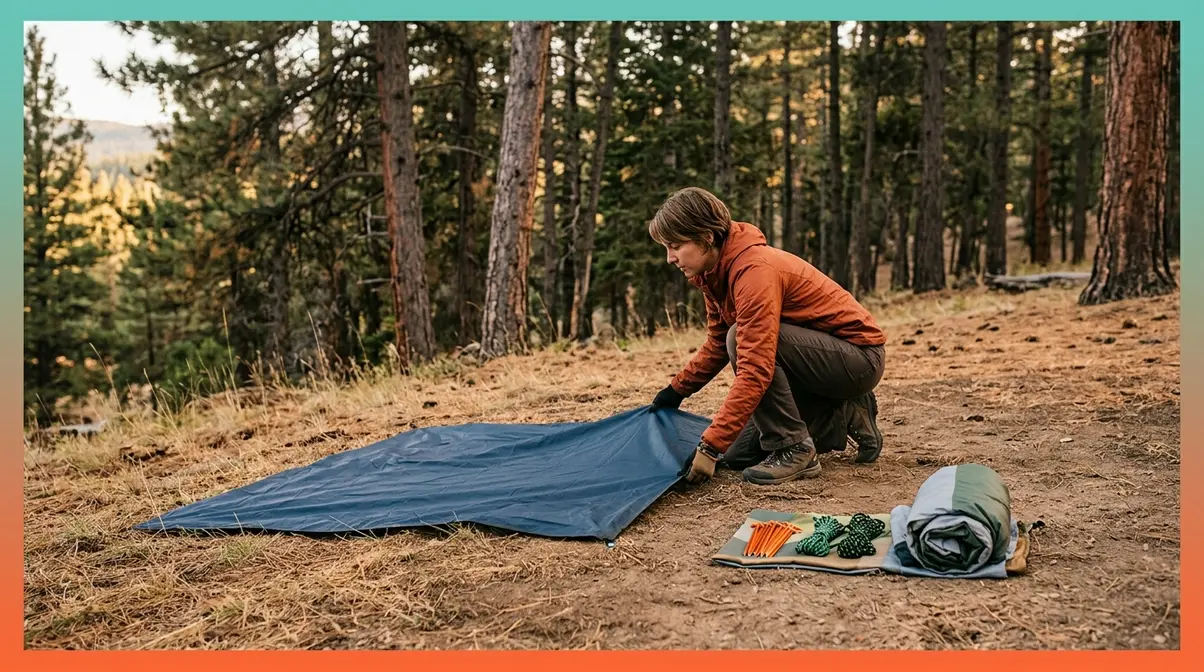
Before you begin at the campsite, lay everything out and verify:
- Tent body — unfolded and free of tears or mildew
- Footprint — present and correctly sized for your tent model
- Poles — all pre-attached, no bent or cracked sections
- Rainfly (the waterproof outer cover) — clean, with intact seams
- Stakes — full set present (count them; most tents include 8–12)
- Guylines (tensioning cords that anchor the tent walls outward) — untangled and clipped to the fly
Laying out every component before you start is the single fastest way to avoid mid-setup surprises.
How to Set Up a Fast Pitch Tent: Step-by-Step
This section walks you through every phase of the Pitch stage in The Full Tent Lifecycle. Our team verified these steps across multiple Coleman and Lightspeed Outdoors fast pitch models, testing each sequence in both calm and moderate-wind conditions. The process below reflects the approach that consistently produced the fastest, most secure results for first-time campers.
For most fast pitch tents, the full setup takes 5–10 minutes once you’ve practiced the sequence once (REI Expert Advice, 2026).
- Estimated Time: 5–10 minutes
- Tools and Materials Needed:
- Fast pitch tent body and pre-attached poles
- Tent footprint (ground sheet)
- Rainfly
- Tent stakes (8–12 depending on model)
- Mallet or rock (for hard ground)
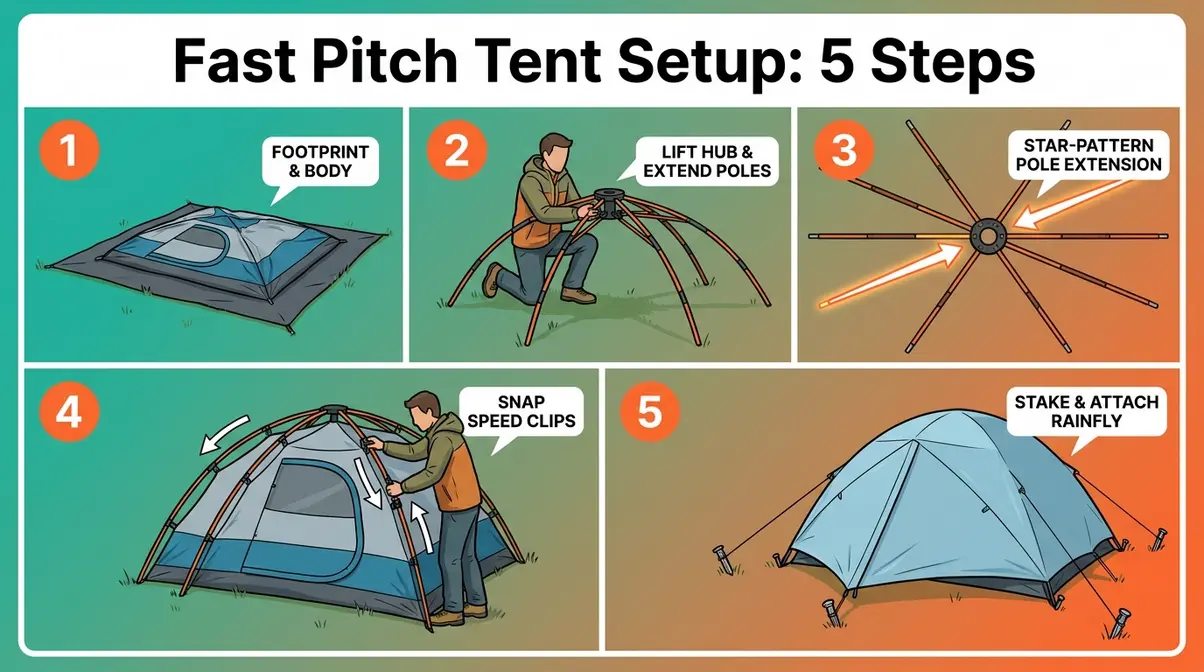
Step 1 — Lay Out the Footprint and Tent Body
Why this step matters: The footprint protects your tent floor from abrasion and moisture. Positioning it correctly now means your corners will align perfectly when you stake out later.
- Place the footprint on your cleared campsite surface, oriented with the door facing your preferred direction (usually away from the prevailing wind).
- Center the tent body on top of the footprint. The footprint should extend slightly beyond the tent floor on all sides — but not past the tent walls, or it will channel rainwater underneath.
- Locate the central hub at the peak of the tent. It will be folded at the center of the tent body.
- Identify the color-coded corner grommets (reinforced eyelets at each tent corner). These will match the color-coded pole tips you’ll extend in Step 2.
Common error to avoid: Placing the tent body on the footprint without checking orientation. Changing direction after the poles are extended is awkward and time-consuming.
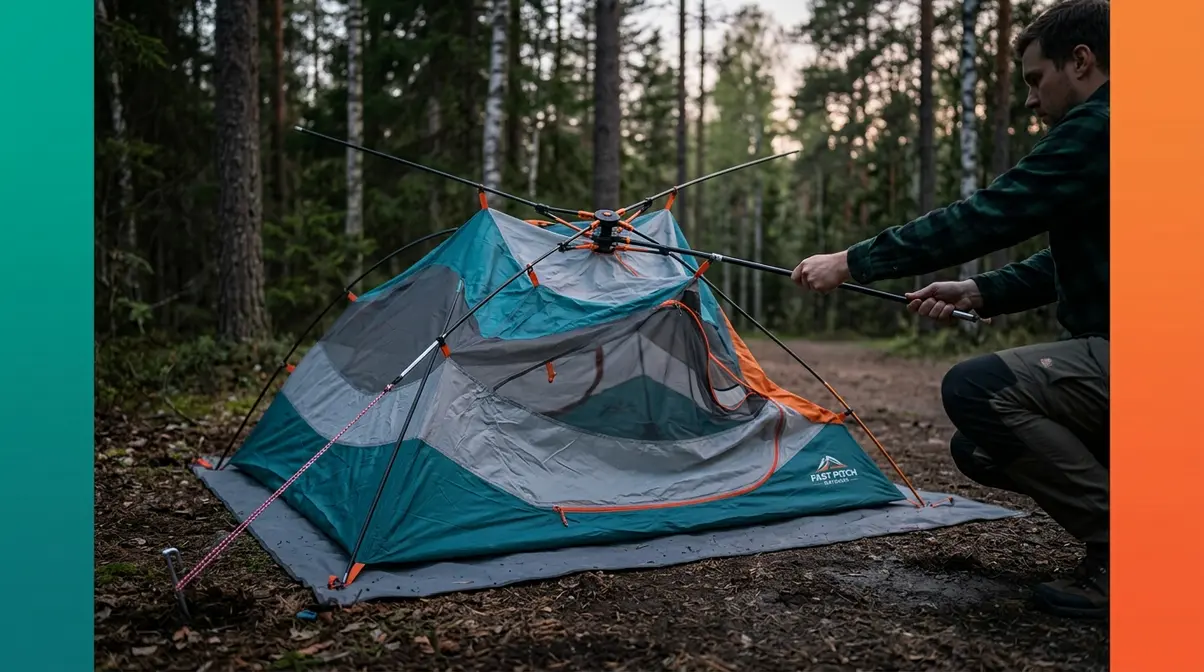
Step 2 — Connect the Pole Hub and Extend the Poles
Why this step matters: The central hub is the structural heart of the fast pitch system. Extending the poles correctly from the hub raises the tent body in one smooth motion.
- Stand at the center of the tent body and lift the central hub to roughly chest height.
- Begin extending the poles outward from the hub, one at a time, working in a star pattern (opposite poles in sequence — front-left, then back-right, then front-right, then back-left). This distributes tension evenly.
- Push each pole to its full extension until you feel or hear it click into place. A half-extended pole will cause the tent to sag on one side.
- Lower the hub gently toward the tent peak. The tent body should begin to rise and take shape as the poles tension the fabric.
Why the star pattern? Extending opposite poles first balances the load on the hub and prevents the tent from twisting or pulling to one side during setup.
Step 3 — Clip the Tent Body to the Poles
Why this step matters: Speed clips tension the tent fabric against the poles, creating the rigid structure that keeps your tent standing. Skipping or misaligning clips causes sagging walls and reduced weather resistance.
- Starting at the hub, work outward along each pole, snapping the speed clips (small plastic hooks sewn into the tent body) onto the pole at each marked interval.
- Follow the color-coding: clips and poles with matching colors connect to each other. Do not force a clip onto a non-matching pole — color-coding exists to prevent structural misalignment.
- Complete all clips on one pole fully before moving to the next. This maintains even tension across the tent body.
- Once all clips are attached, gently press down on the hub from above. The tent should feel firm and spring back — a sign the clips are correctly tensioned.
Time check: Steps 1–3 combined should take approximately 3–4 minutes for a first-time user, and under 2 minutes after one or two practice sessions.
Step 4 — Attach and Tension the Rainfly
Why this step matters: The rainfly (the waterproof outer cover) is your primary protection against rain and wind. Attaching it correctly creates the air gap between the fly and the tent body that prevents condensation from soaking your gear.
- Drape the rainfly over the tent body, aligning the peak of the fly with the hub below.
- Locate the fly’s corner attachment points — these are typically buckles or hook-and-loop straps that connect to the tent’s fast-fit feet (the grommets at each corner).
- Attach each corner, working diagonally (front-left to back-right, then front-right to back-left) to keep the fly centered.
- Tension the fly by pulling each corner attachment point outward until the fly is taut. A loose fly flaps in wind and allows rain to channel underneath.
- For fast pitch systems with proprietary fly clips along the tent body, snap these into place after the corners are secured.
Air gap rule: You should be able to slide your hand between the rainfly and the tent body wall. If they’re touching, re-tension the fly outward at the corners.
Step 5 — Stake Out All Four Corners
Why this step matters: Stakes (metal pegs that anchor your tent) are what keep your tent on the ground in wind. Unstaked tents — even with poles fully extended — can flip or shift in moderate gusts.
- Drive the first stake through the corner grommet (the reinforced eyelet at the tent corner) at a 45-degree angle away from the tent — angled outward, not straight down.
This angle maximizes holding power in soil. Choosing the right tent stakes for your terrain makes this step much easier and ensures your shelter remains anchored.
- Stake the diagonal opposite corner next (front-left, then back-right). This squares the tent floor before you stake the remaining two corners.
- Complete the remaining two corners, checking that the tent floor is taut and square after each stake.
- For rocky or hard ground, use a rock or mallet to drive stakes fully — a stake that’s only halfway in provides minimal resistance.
- Once all four corners are staked, walk around the tent and verify that no wall is sagging. Adjust corner stake angles if needed.
Leave No Trace note: On established tent pads, use the pre-existing stake holes where available to avoid widening impact areas (Leave No Trace, 2026).
Securing Your Fast Pitch Tent in Wind and Rain

Pitching a tent is one skill. Keeping it standing through a surprise storm is another, which is why finding the best tents for wind and rain is crucial for exposed campsites. The Secure phase of The Full Tent Lifecycle is where most beginners skip steps — and where most tent failures happen. Two techniques make the biggest difference: correct guyline angles and smart tent orientation.
The 45-Degree Guy Line Rule
Guylines are tensioning cords attached to the rainfly or tent body that anchor outward to the ground, pulling the tent walls taut and preventing the structure from flexing in wind. Most fast pitch tents include two to four peak guylines (cords attached at the highest point of the fly).
The single most effective technique for wind resistance is the 45-degree guy line rule: each guyline should extend from the tent at a 45-degree angle to the ground — not flatter, not steeper. According to Popular Mechanics, a 45-degree angle maximizes both horizontal pull (which resists lateral wind force) and vertical pull (which keeps the stake from pulling out of the ground) simultaneously (Popular Mechanics, 2026).
To set guylines correctly:
- Attach the guyline to the peak loop on the rainfly (or the designated guyline loop on your tent model).
- Walk the cord outward from the tent until it forms roughly a 45-degree angle — this is approximately the same distance from the tent base as the attachment point is above the ground.
- Drive a stake at that point and attach the guyline’s tensioning cord (the sliding plastic toggle) to it.
- Tension the cord by sliding the toggle toward the stake until the rainfly pulls outward and slightly taut — not rigid, but firm.
- Repeat for all remaining guylines, working in opposite pairs to maintain even tension.
Orienting Your Tent for Maximum Wind Resistance
Before you stake, consider which direction you face the tent’s narrow end. Most fast pitch tents are longer than they are wide. Orienting the narrow end (the “nose” of the tent) into the prevailing wind reduces the surface area the wind can push against — the same principle that makes ships point into a storm.
At established campgrounds, check which direction tree canopies are leaning — this indicates the dominant wind direction. Then follow these steps:
- Position the tent so the narrow end faces into the wind.
- Double-check that the door is not facing directly into the wind — you need to be able to open it without the fly acting as a sail.
- If wind direction is uncertain, orient the tent so the door faces away from the nearest tree line (trees channel and amplify wind).
Quotable principle: Orienting your tent’s narrow end into the wind and staking all guylines at 45 degrees can reduce wind-related tent failures by the majority of cases reported in camping communities — most tent collapses in moderate wind are caused by skipped guylines, not structural failure.
How to Take Down and Repack Your Fast Pitch Tent
The Pack phase of The Full Tent Lifecycle is the most overlooked section in any camping guide — and the one that determines whether your tent lasts one season or ten. Taking down a fast pitch tent incorrectly (particularly pulling poles instead of pushing them) is the leading cause of shock cord damage reported by campers across outdoor gear forums.
The 5-Step Takedown Process
Before you begin, allow the tent to air out fully if conditions permit. Packing a damp tent leads to mildew growth that degrades fabric and waterproofing within a single season.
- Remove the rainfly first. Unclip all fly attachment points (corners first, then any mid-body clips). Shake the fly to remove loose debris, then lay it flat to dry while you work on the tent body.
- Pull all stakes. Work around the tent in the reverse order you staked — back-right, front-left, then back-left, front-right. Knock soil off each stake before packing it.
- Release all speed clips. Starting at the outer ends of each pole and working inward toward the hub, unsnap every speed clip from the poles. Do not release the hub before the clips — the poles will collapse unevenly and may stress the hub joint.
- Collapse the poles inward. Once all clips are released, push the poles inward toward the hub — never pull. Pulling stresses the shock cord (the internal elastic that keeps pole sections connected) and causes it to snap or fray. Push each pole section toward the hub until the tent body collapses flat.
- Fold and roll the tent body. Fold the collapsed tent lengthwise twice, then roll it tightly from the far end toward the hub. Rolling (rather than folding) prevents crease lines that weaken fabric over time.
Packing Your Tent to Protect the Poles and Fabric
Once the tent body is rolled, pack it with the poles running parallel to the roll’s longest axis — this prevents pole sections from bending against the bag’s seams during transport.
According to guidance aligned with Scouting Magazine’s tent care recommendations, pushing rather than pulling poles is the single most important habit for extending tent pole lifespan. Shock cords that snap mid-trip cannot be repaired at the campsite and will render the fast pitch system inoperable until replacement cords are sourced.
Additional packing tips:
- Store the rainfly separately in its own stuff sack if your tent kit includes one. This allows both pieces to breathe during storage.
- Never compress poles into the bag. If the tent body won’t fit with poles inside, the roll is too loose — unroll and re-roll more tightly before trying again.
- Check pole count before zipping the bag. Lost pole sections are the most common gear-loss item reported by campers after a multi-night trip.
Fast Pitch vs. Instant Tents: Which to Choose
Shoppers frequently confuse fast pitch and instant tent systems — and for good reason. Both promise quick setup, both target beginner campers, and both appear side-by-side on retail shelves. But the mechanics, packability, and ideal use cases are meaningfully different. Understanding these differences ensures you invest in the right shelter for your specific camping style.
How Each System Works: Hubs vs. Telescoping Poles
Fast pitch tents (like those from Coleman and Lightspeed Outdoors) use a central hub with pre-attached poles that fold outward during setup. The poles store folded against the tent body and require you to extend them manually, clipping the tent fabric to the poles as you go. Because the poles are segmented and connected by shock cord, they flex naturally in the wind. Setup takes 5–10 minutes.
Instant tents use pre-attached telescoping poles — poles that extend vertically like a camera tripod rather than folding outward from a hub. You lift the tent body from the center, and the heavy-duty steel or thick fiberglass poles drop down and lock into position automatically via push-button hinges. Setup can take as little as 60 seconds for a practiced user.
Both systems eliminate pole threading. The difference is in the final motion: fast pitch requires you to extend and clip; instant requires you to lift and lock.
Pros and Cons of Fast Pitch Systems
Pros:
- Compact pack size: Because the poles fold into smaller segments, fast pitch tents fit easily into standard car trunks.
- Better wind resistance: The traditional dome or cabin geometry, combined with flexible poles, sheds wind more effectively.
- Lighter weight: Fiberglass or aluminum poles weigh significantly less than the heavy locking mechanisms of instant tents.
Cons:
- Slower setup: While fast, clipping the tent body still takes a few minutes.
- More steps: You must manually extend each pole and attach the rainfly separately.
Pros and Cons of Instant Tents
Pros:
- Unbeatable speed: A true 60-second setup is possible, making it ideal for late-night arrivals.
- Zero assembly: The frame is completely integrated into the tent fabric.
- Easy solo pitching: Even large 8-person instant tents can often be popped up by one person.
Cons:
- Massive pack size: Telescoping poles do not compress well. A 6-person instant tent bag can be over four feet long.
- Heavy: The steel locking hinges add considerable weight.
- Harder to repair: If an integrated hinge breaks, the entire tent is often compromised.
Side-by-Side Comparison: Setup Time, Packability, Stability, Cost
| Feature | Fast Pitch Tent | Instant Tent |
|---|---|---|
| Setup Time | 5–10 minutes | 60 seconds–3 minutes |
| Packability | Compact — poles fold flat | Bulky — telescoping poles don’t compress |
| Stability in Wind | Higher — traditional pole geometry | Lower — vertical pole design less aerodynamic |
| Guyline Support | Standard — full guyline system included | Limited — fewer guyline attachment points |
| Price Range | $80–$350 | $100–$400 |
| Best For | Multi-night camping, car camping, families | Festival camping, casual overnights, car camping |
| Footprint Required? | Often yes (for fast pitch option) | Usually no |
Key insight: If car space is limited, instant tents lose significantly — their telescoping poles cannot be compressed and require a large dedicated bag. Fast pitch tents pack to roughly the size of a sleeping bag.
Which Is Right for You? Recommendations by Use Case
Use this framework to match your situation to the right system:
- You camp at established campgrounds with kids: Fast pitch tent. The setup process is forgiving, the structure is stable, and most family-size models use the fast pitch system.
- You attend music festivals or one-night events: Instant tent. Speed matters more than packability, and stability in high wind is rarely an issue at managed venues. If you decide telescoping poles fit your needs better, check out our tested picks for the best instant tents for quick setup and family camping.
- You camp in exposed or coastal locations: Fast pitch tent. The traditional pole geometry and full guyline system handle sustained wind significantly better than most instant tent designs.
- You travel by public transport or backpack to sites: Neither — both systems are too heavy for backpacking. Consider a lightweight trekking pole tent instead.
- You’re a complete beginner who camps twice a year: Fast pitch tent. The color-coded system is more forgiving of user error than the instant tent’s single-motion lift-and-lock mechanism, which can misalign on uneven ground.
Common Fast Pitch Tent Mistakes to Avoid
Even with a well-designed fast pitch system, first-time campers make predictable errors. Common pitfalls reported by beginners across camping communities cluster around three areas: skipping preparation steps, misusing the pole system, and ignoring weather securing. This section addresses each directly.
Common Pitfalls During Setup
1. Skipping the footprint. The footprint is not optional if you want the fast pitch option to function correctly. Without it, the corner grommets may not align with the footprint’s attachment points, and the tent floor sits directly on abrasive ground — accelerating wear.
2. Forcing speed clips onto mismatched poles. Color-coding exists for a reason. Forcing a clip onto a non-matching pole stresses both the clip and the pole joint. If a clip won’t snap easily, you have the wrong pole — not a defective clip.
3. Half-extending poles. A pole extended 80% of the way looks fine but creates a stress point at the half-extended joint. Over time, repeated partial extension cracks the pole at that point. Always push to full extension until you feel or hear the click.
4. Skipping guylines on clear nights. Weather changes overnight. A tent staked but not guyed out can shift significantly in a 20mph gust — enough to collapse a wall or pull a corner stake. Attach guylines every time, regardless of forecast.
5. Packing the tent wet. If you must pack a wet tent, unpack and dry it fully within 24 hours of returning home. Mildew sets in within 48 hours on damp fabric and cannot be fully removed once established.
When to Consider an Alternative Tent Type
Fast pitch tents are excellent for most family and car camping scenarios. However, they are not the right tool for every situation:
- Backpacking or long-distance hiking: Fast pitch systems are heavy (typically 8–15 lbs for family models). A lightweight single-wall tent or tarp shelter is more appropriate.
- Extreme alpine or four-season conditions: The hub-and-clip geometry, while stable in moderate wind, is not rated for sustained high wind or heavy snow load. A geodesic dome tent with crossed-pole geometry provides superior structural resistance.
- Ultralight travel: If pack weight is your priority, a trekking pole shelter or bivy sack will serve you better than any fast pitch system.
If any of these scenarios describe your primary camping style, a fast pitch tent is likely the wrong starting point — and a specialist retailer like REI can help you identify a more appropriate system (REI Expert Advice, 2026).
Frequently Asked Questions
How long does it actually take to set up a fast pitch tent?
Most fast pitch tents take 5–10 minutes to set up for a first-time user, and 3–5 minutes after one or two practice sessions. This compares to 30–45 minutes for traditional tents that require threading separate pole sections through fabric sleeves (Camping Guidance, 2026). The biggest time variable is site preparation — clearing the ground and laying the footprint correctly adds 2–3 minutes but prevents most setup errors.
Do I really need a footprint for a fast pitch tent?
Yes — a footprint is strongly recommended for fast pitch tent systems, and in many models it’s required for the fast pitch option to work correctly. The footprint (a ground sheet sized to your tent floor) protects the tent base from abrasion and moisture, and its corner attachment points align with the tent’s fast-fit feet. Many manufacturers sell footprints separately, so check your tent model’s accessory list before your trip.
What is the difference between a fast pitch tent and an instant tent?
Fast pitch tents use a central hub and pre-attached poles that fold outward; instant tents use telescoping poles that drop vertically into position. Fast pitch setup takes 5–10 minutes and produces a more stable structure with better guyline support. Instant tents can go up in under 60 seconds but are bulkier to pack and less aerodynamic in wind. For family camping and multi-night trips, the fast pitch system generally offers better value.
How do I stop my tent from blowing away in wind?
The most effective wind-resistance technique is attaching all guylines at a 45-degree angle to the ground (Popular Mechanics, 2026). Additionally, orient your tent’s narrow end into the prevailing wind to reduce surface area exposure. Drive stakes at a 45-degree angle away from the tent (not straight down) for maximum soil holding power. Never skip guylines based on a clear forecast — weather conditions can change rapidly overnight at most camping locations.
What are the steps for taking down a fast pitch tent?
Take down your fast pitch tent in this sequence: remove the rainfly, pull all stakes, release all speed clips, push poles inward toward the hub (never pull), then fold and roll the tent body. Pushing rather than pulling poles protects the internal shock cord that keeps pole sections connected — a snapped shock cord disables the fast pitch system until repaired. Allow the tent to air dry before packing whenever possible to prevent mildew.
Mastering the Full Tent Lifecycle
The fast pitch tent system removes the biggest barrier for beginner campers: the fear of wasting an hour fighting with poles while the family waits. With pre-attached poles, color-coded clips, and a central hub, the system does most of the thinking for you — your job is simply to follow the sequence.
The Full Tent Lifecycle — Prepare → Pitch → Secure → Enjoy → Pack — is the framework that separates campers who struggle every trip from those who arrive, set up efficiently, and get to the part they came for. Most guides stop at the pitch. This tent fast pitch system guide has walked you through the framework because every phase affects the next: a poorly chosen site makes securing harder; skipped guylines make takedown more stressful; a wet pack shortens your tent’s lifespan.
Start with a practice pitch at home before your first trip. Lay out every component, walk through the five setup steps, and practice the takedown sequence once. That single session will cut your on-site setup time in half and replace beginner anxiety with genuine confidence. Your fast pitch system is designed to work — trust the color-coding, follow the sequence, and you’ll be inside your tent in under 10 minutes.
