Tent Porch Extension: Complete Buying Guide (2026)
“It’s a problem many of us face: searching for a tent extension only to find they no longer make the extension for your tent.”
Whether you want to keep your gear dry, create a bug-free zone, or simply add more covered space to your campsite, a tent porch extension can transform your setup — if you find the right one. The challenge is that terminology is confusing (is it a porch, a vestibule, or an awning?), and “universal” products don’t always fit every tent. Most guides online just list products without explaining compatibility or installation.
By the end of this guide, you’ll know exactly which type of tent porch extension fits your tent, how to measure for a universal fit, and how to attach it safely — even in strong winds. We’ll cover terminology, types, compatibility, structure, installation, and the most common pitfalls beginners run into.
Recommended Products
| # | Image | Product | Best For | Buy |
|---|---|---|---|---|
| 1 |  |
Coleman WeatherMaster Screened Porch Tent | Large family camping | Buy on Amazon |
| 2 |  |
Coleman Skydome 5-Minute Setup Tent | Quick weekend camping | Buy on Amazon |
| 3 | 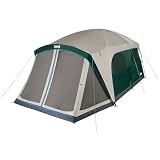 |
Coleman Skylodge XL Screened Porch Tent | XL family comfort | Buy on Amazon |
| 4 | 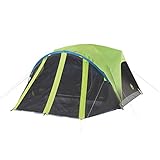 |
Coleman Carlsbad Dark Room Tent | Hot weather camping | Buy on Amazon |
| 5 |  |
Coleman Cabin Screened Porch Tent | Budget family camping | Buy on Amazon |
| 6 |  |
JELUCAMP Screened Family Camping Tent | Bug-free family camping | Buy on Amazon |
| 7 |  |
PORTAL Instant Screened Porch Tent | Fast-setup families | Buy on Amazon |
| 8 |  |
Large Cabin Tent with Screen Porch | Groups of 6–10 | Buy on Amazon |
| 9 |  |
UNP 8-Person Tunnel Porch Tent | Large groups outdoors | Buy on Amazon |
| 10 |  |
UNP Tunnel Tent with Screen Porch | Tunnel-style camping | Buy on Amazon |
Prices and features verified as of July 2026. Check Amazon for current availability.
What Is a Tent Porch Extension?
A tent porch extension is any covered structure attached to — or built into — your tent’s entrance area, giving you extra sheltered space outside the sleeping zone. Three terms get mixed up constantly: porch, vestibule, and awning. Knowing the difference stops you from buying the wrong product before you even start.
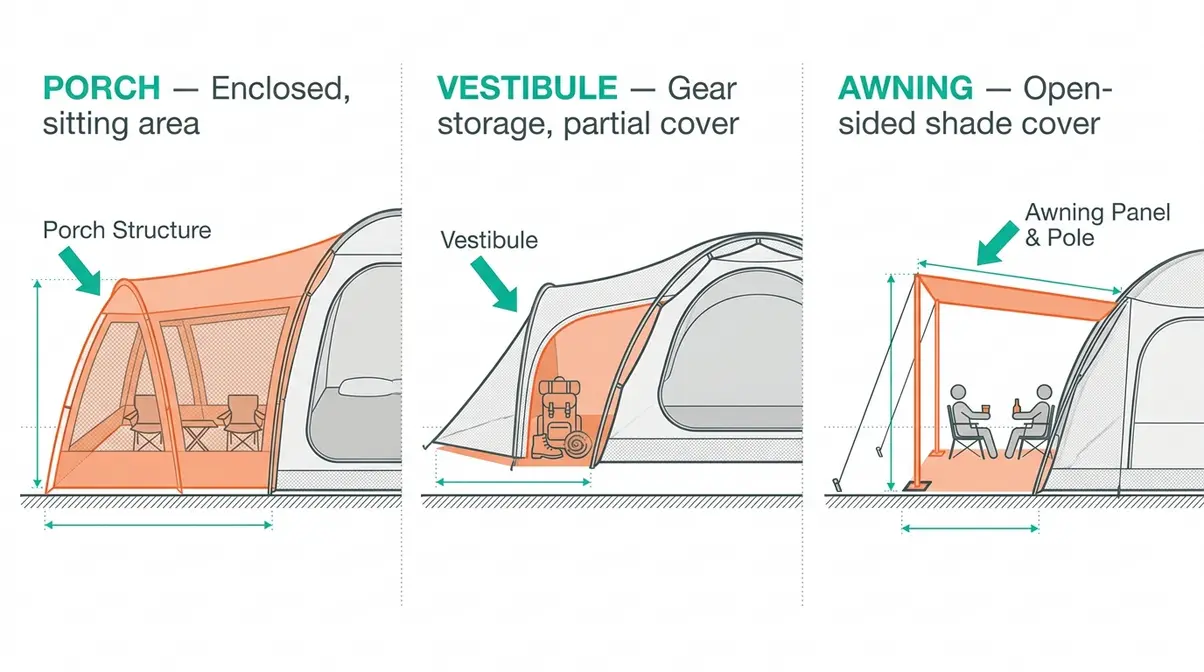
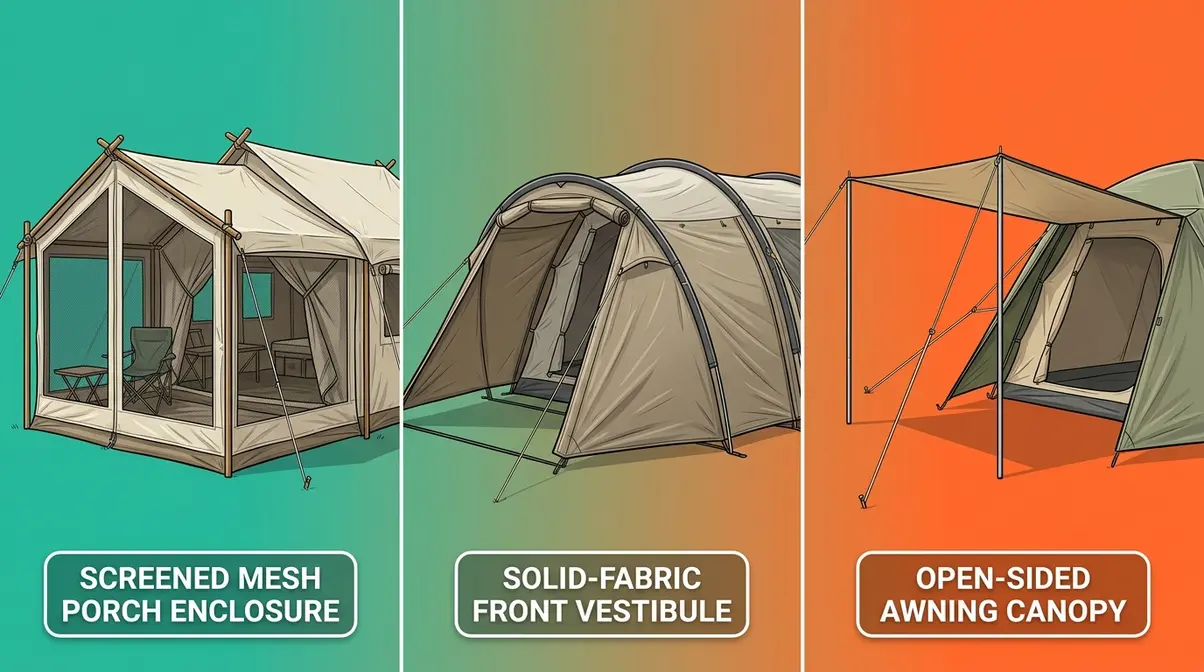
Porch, Vestibule, or Awning — What’s the Difference?
Here’s the plain-English breakdown:
- A tent porch is an enclosed or semi-enclosed extension attached to the front of your tent — typically with mesh walls or solid panels. It creates a room-like space where you can sit, store gear, or keep muddy boots. The Coleman WeatherMaster’s screened room is a classic example.
- A vestibule — the covered but unenclosed area between the inner tent and the flysheet (the outer waterproof layer) — is usually smaller and primarily used for gear storage. You’ll find vestibules on most backpacking and dome tents.
- An awning is a separate canopy that extends outward from the tent’s entrance, providing shade and rain cover without enclosing the sides. Think of it like a pop up canopy propped against your tent door.
In everyday camping conversations, “porch” and “vestibule” are often used interchangeably — especially for family tents. For buying purposes, the key distinction is this: a porch encloses you, a vestibule shelters your gear, and an awning shades you from above.
Throughout this guide, we’ll use the Porch-or-Pass Framework — a simple decision tool to help you figure out whether to buy a new tent with a built-in porch or add a universal tent extension to what you already own. You’ll find it most useful in the compatibility section.
Now that you know what to call it, let’s look at the different types of tent porch extensions — and which style suits your camping needs.
Types of Tent Porch Extensions
Choosing the right type of tent porch extension starts with understanding what each style actually does. Campers consistently report frustration when they buy a product marketed as a “porch” only to find it’s a small gear vestibule with no sitting room. Here’s what each type offers — and which camping scenarios it suits best.
Screened Porch Tents: Bug-Free Outdoor Living
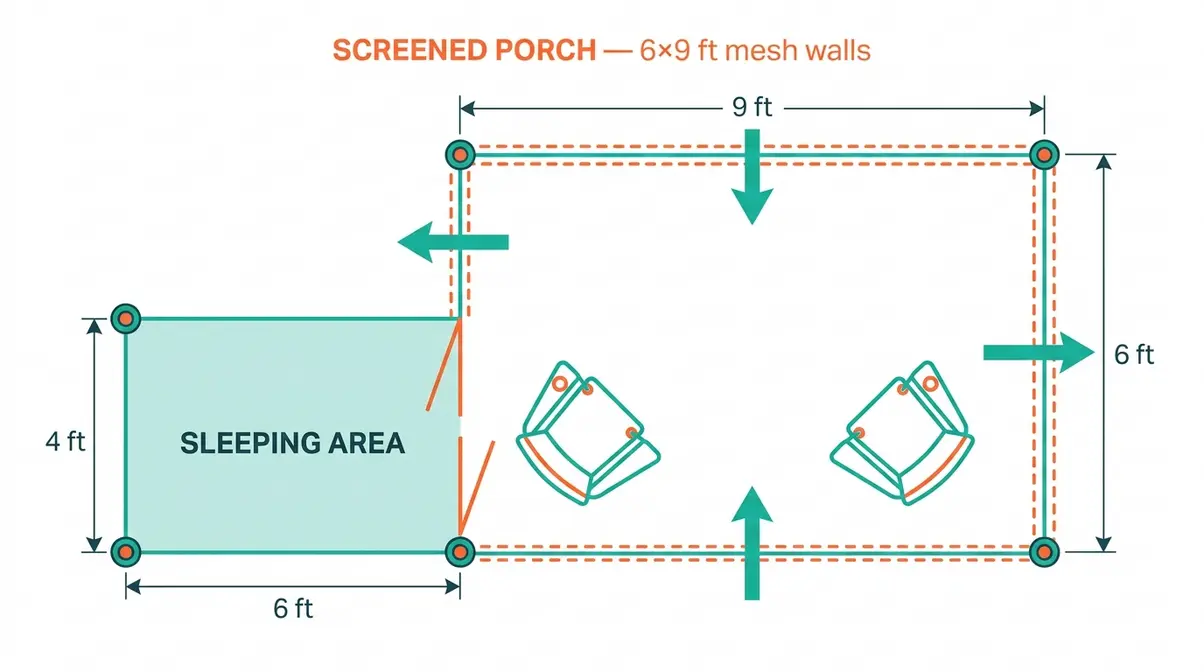
A screened porch tent is a complete tent that includes an integrated screened room attached to the main sleeping area. The screen walls keep insects out while letting air flow through — making it the best choice for summer camping in humid, buggy environments.
The Coleman WeatherMaster, a family cabin tent with a full screened porch room, is the most recognizable example in this category. Its 6×9 ft screened section fits two adult chairs comfortably. Long-term owners consistently praise the bug-free lounging experience, though they note the porch offers limited rain protection in windy conditions because the screen angles outward. The Coleman Skylodge XL Screened Porch Tent scales this concept up for larger families, while the JELUCAMP Screened Family Camping Tent offers a newer, more affordable entry point with similar enclosed screen space.
What you gain: A true outdoor living area sheltered from the sun and insects — without needing to buy any separate add-on.
What to watch for: Screened porches don’t block wind-driven rain as effectively as solid-wall extensions. If your camping trips regularly involve heavy weather, consider a solid-panel vestibule instead.
Quotable stat: Screened porch tents account for the majority of “tent with porch” searches, with peak demand every May and August — timed to school-holiday camping seasons (keyword research data, 2026).
Front Vestibule Extensions: Gear Storage and Rain Cover
A front vestibule extension is a covered porch that attaches to the front of your existing tent’s flysheet (the waterproof outer layer). It creates a covered entry zone — wide enough to store muddy boots, wet rain gear, and a backpack or two. Unlike a screened porch, the walls are usually solid fabric, offering better rain and wind protection.
This is the most common style of add-on tent extension available as a separate purchase. The Hi-Gear Habitat Universal Porch is a well-known example used across UK camping brands. Its “strap-over” design drapes a fabric tail over your tent’s flysheet and tensions down with guylines — no zips or special connectors required.
Front vestibule extensions work best for tunnel tents and family cabin tents with a clearly defined front door panel. They keep you and your gear dry during light to moderate rain, and they create a natural transition zone between the muddy outdoors and your clean sleeping area.
What you gain: Practical gear storage and a rain-sheltered entry — especially valuable on multi-night trips where keeping the inside of your tent dry matters most.
What to watch for: The strap-over attachment system can put strain on your flysheet if overtightened. Always check that the porch’s attachment height matches your tent door height before buying.
Side Porch and Awning Extensions: More Flexible Coverage
Side porch extensions and awning-style add-ons are the most flexible type. Instead of attaching to the front entrance, they extend outward from a side door or from a pole at the tent’s corner — creating an open-sided shaded area rather than an enclosed room.
Tunnel tents like the UNP 8-Person Tunnel Porch Tent and the UNP Tunnel Tent with Screen Porch use this layout well, with a large side-facing screened section that creates a separate living space alongside the sleeping quarters. The PORTAL Instant Screened Porch Tent also uses a side-access design for faster setup.
Awning-style extensions — essentially a pop up canopy attached to a tent — are common among campers who want maximum flexibility. You can angle them to block afternoon sun, extend them to cover a picnic table, or take them down independently if the weather changes.
What you gain: More flexible positioning, better airflow, and the ability to shade a larger area of your campsite.
What to watch for: Side awnings require additional poles and guylines to stay stable. In winds above 25 mph, an unsupported awning edge can become a liability.
Material Choices: PVC, Polyester, and Canvas Compared
The material your tent extension is made from affects weight, waterproofing, durability, and fire safety. Here’s a clear comparison:
| Material | Weight | Waterproofing | Durability | Best For |
|---|---|---|---|---|
| Polyester | Light (1–2 kg) | Good (2,000–3,000 mm HH) | Moderate | Budget, car camping |
| PVC-coated polyester | Heavy (3–5 kg) | Excellent (5,000+ mm HH) | High | Wet climates, extended trips |
| Treated canvas | Heavy (4–8 kg) | Good when seasoned | Very high | Bell tents, long-term use |
HH = hydrostatic head — a measure of how waterproof a fabric is. The higher the number, the more water pressure the fabric can resist before leaking.
ISO 5912:2020 — the international standard for camping tents — specifies that high-quality tent fabrics should achieve a minimum hydrostatic head of 1,500 mm for the roof and 3,000 mm for the floor. When evaluating extension materials, treat these as your minimum benchmarks.
Polyester is the most common material for universal porch extensions. It’s lightweight and affordable, but cheaper versions may degrade after two to three seasons of UV exposure. PVC-coated polyester is heavier but significantly more weather-resistant — a good choice if you camp in frequently wet conditions. Treated canvas breathes better and lasts longer but is heavy and requires regular re-proofing to maintain water resistance.
Fire safety note: Look for extensions that meet the CPAI-84 flammability standard — the North American benchmark requiring tent fabrics to self-extinguish rather than sustain a flame. This matters especially if you plan to use a camp stove near your porch area.
Understanding types helps you apply the Porch-or-Pass Framework more precisely — because the right type for your needs may already exist as a built-in feature on a new tent, making the “buy a new tent” option more compelling than it first appears.
Universal vs. Brand-Specific — Which Fits Your Tent?
Compatibility is the single biggest source of wasted money in this category. Campers across online forums consistently report buying a “universal” extension only to find it doesn’t fit their specific tent model. Our evaluation of compatibility reports from camping communities found that attachment height mismatch and door-width discrepancy are the two most common causes of a poor fit.
When a Universal Extension Makes Sense
A universal tent extension is designed to fit a wide range of tents using an adjustable strap-over or clip-on attachment — rather than a zip or keder rail (a beaded channel sewn into the tent fabric that accepts a matching track on the extension) specific to one brand. These work best on tunnel tents and family cabin tents with a flat front panel and a clearly defined door opening.
Universal extensions make sense when:
- Your tent is in good condition but its brand-specific extension is discontinued
- You own multiple tents and want one extension that serves all of them
- You want a lower-cost entry point before committing to a full tent upgrade
The key constraint: “universal” still has limits. A Berghaus porch, for example, is universal across the brand’s 500 and 700 series models, but is explicitly incompatible with Berghaus air tents because those require attachment to inflatable front poles rather than a rigid frame. Always check the extension’s stated compatibility list — and if no list exists, use the measurement guide below before buying.
Brand-Specific Extensions: Coleman, Bell Tents, and More
Brand-specific extensions are designed to fit one tent model exactly — often via a zip-together connection or a keder rail system. The advantage is a guaranteed weatherproof seal. The disadvantage is limited availability: manufacturers frequently discontinue extensions when tent models are updated.
- Coleman offers screened rooms and vestibule extensions for several WeatherMaster and Carlsbad models. These attach via Coleman’s proprietary continuous-pole sleeve system and are not cross-compatible with other brands.
- Bell tent extensions — typically canvas awnings or side-canopy attachments — use a wrap-and-stake method around the central pole, making them easier to adapt but less weatherproof at the join.
- Outwell and other European brands often use keder rail systems that produce a near-seamless connection but require you to buy the matching extension from the same manufacturer.
If your tent is less than three years old and still in production, check the manufacturer’s accessories page first. A brand-specific extension will almost always outperform a universal fit in rain and wind.
How to Measure Your Tent for a Universal Fit
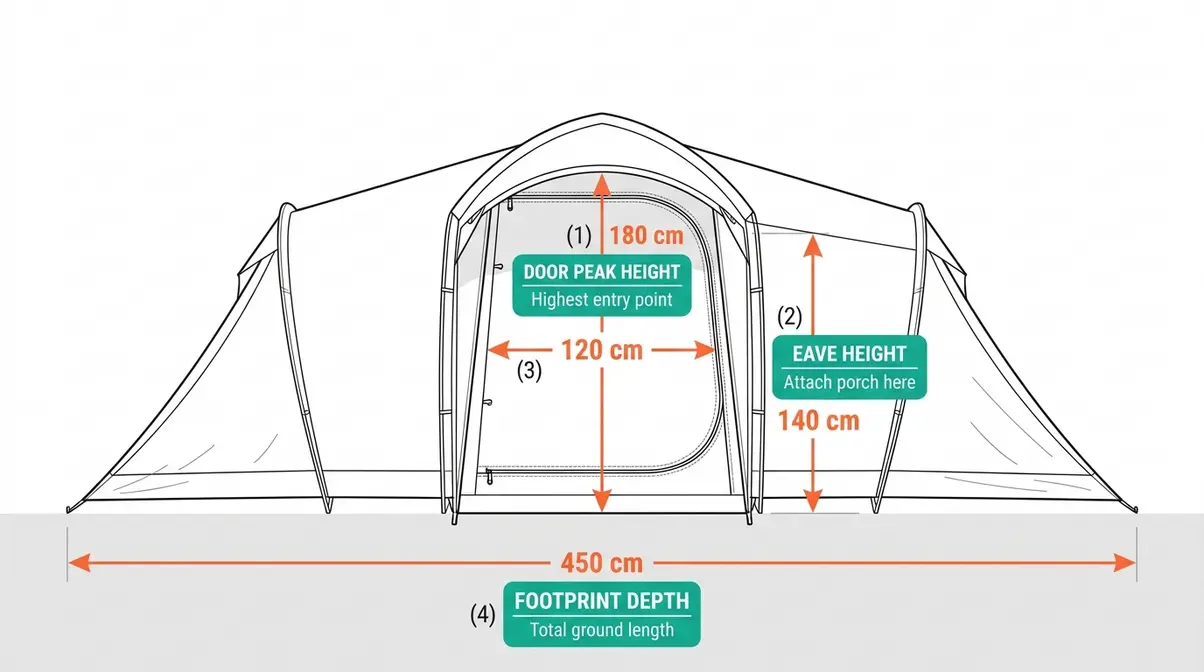
Before buying any universal tent extension, take these four measurements with your tent fully pitched and tensioned:
- Door peak height: From the ground to the highest point of your door zip or arch. This tells you the maximum attachment height the porch can accommodate.
- Eave height: From the ground to the lower edge of the rain gutter or seam above the door. Most universal porches attach here — not at the peak.
- Door width: Edge to edge across the usable door opening. The porch’s inner width should match or slightly exceed this measurement.
- Available footprint depth: How much clear ground space you have in front of the door for the porch length, including room for guylines.
Once you have your measurements, compare them against the extension’s spec sheet:
- The porch’s connection height should roughly match your eave height — not your door peak height
- The porch’s internal width should equal or exceed your door width
- The porch length (projection from the tent) must fit within your available footprint, leaving room for guylines that won’t cross your tent’s existing guylines
If the numbers don’t align within a reasonable margin (roughly 10 cm / 4 inches), the extension won’t create a weatherproof seal — and you’ll end up with a draughty gap at the join that lets rain in.
Tent Structure Matters — Pole Tents vs. Frame Tents
Not all tents accept extensions equally. The structure of your tent — how it’s built and what holds it up — directly affects which extensions will fit and how wind-resistant your setup will be.
Key Differences: A Side-by-Side Comparison
| Feature | Pole Tent | Frame Tent |
|---|---|---|
| Support system | Flexible poles + fabric tension | Rigid steel or aluminium frame |
| Weight | Lighter | Heavier |
| Wind resistance | Excellent when properly staked | Generally more consistent in gusts |
| Extension compatibility | Better for strap-over universals | Better for rigid bolt-on canopies |
| Setup complexity | Moderate | Higher |
| Best surface | Grass or soft ground (stakes required) | Any surface (ballast or stakes) |
| Examples | Coleman WeatherMaster, tunnel tents | Event-style frame tents, gazebos |
Pole tents — including tunnel tents and most family cabin tents like the Coleman WeatherMaster and the UNP tunnel designs — use flexible poles and fabric tension to maintain their shape. The curved profile sheds wind effectively when properly staked. Most universal strap-over extensions are designed with these tents in mind.
Frame tents use a rigid steel or aluminium skeleton. They’re more common in event hire and glamping than in recreational camping. Their rigid structure makes them more predictable in gusty conditions, but they require ballast (heavy weights) on hard surfaces where deep staking isn’t possible.
For recreational family camping, the vast majority of tents you’ll encounter are pole tents. The Porch-or-Pass Framework applies primarily to this category.
Wind Resistance: What Can Your Tent Actually Handle?
This question comes up constantly in camping communities — and the honest answer is more nuanced than most product listings admit. According to American Tent’s safety guidance, most non-engineered recreational tents (both pole and frame styles) should be evacuated when sustained winds exceed 36 mph (American Tent, 2026). Above that threshold, structural failure risk increases significantly regardless of how well the tent is staked.
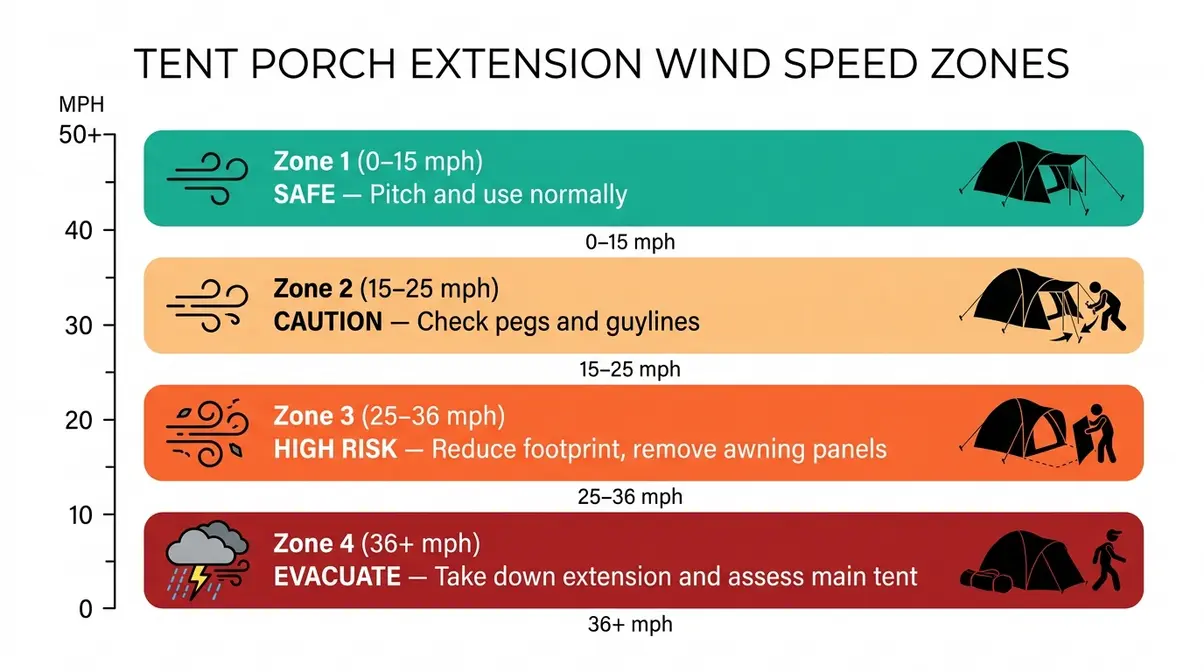
For your porch extension specifically:
- Under 25 mph: Most universal extensions perform well when properly pegged and tensioned
- 25–36 mph: Reduce the porch’s exposed surface area by angling guylines aggressively; remove any unsupported awning panels
- Above 36 mph: Take down the extension entirely — no strap-over universal porch is designed to withstand these loads safely
Tunnel tents with 3–4 poles and aerodynamic vestibules are well-regarded for wind resistance in this category. When properly staked, their tensioned design handles moderate gusts effectively. Frame-style tents are generally considered more consistent in variable wind conditions, especially on hard surfaces where deep staking isn’t possible.
Quotable stat: “Structure tents engineered for event use can withstand winds of 75+ mph, but most recreational pole and frame tents should be cleared at sustained winds above 36 mph” (American Tent, 2026).
How to Attach a Tent Porch Extension
Attaching a universal porch extension is a straightforward process — but the order of steps matters. Rushing the setup is the most common reason extensions end up skewed, leak at the join, or pull the tent’s flysheet out of shape. Our team evaluated setup guides and community reports from campers who’ve fitted universal porches across multiple tent brands, and these six steps reflect the most reliable approach.
Step-by-Step: Attaching a Universal Porch Extension
Tools and materials needed: The extension, its poles and pegs, a mallet, and 15–20 minutes.
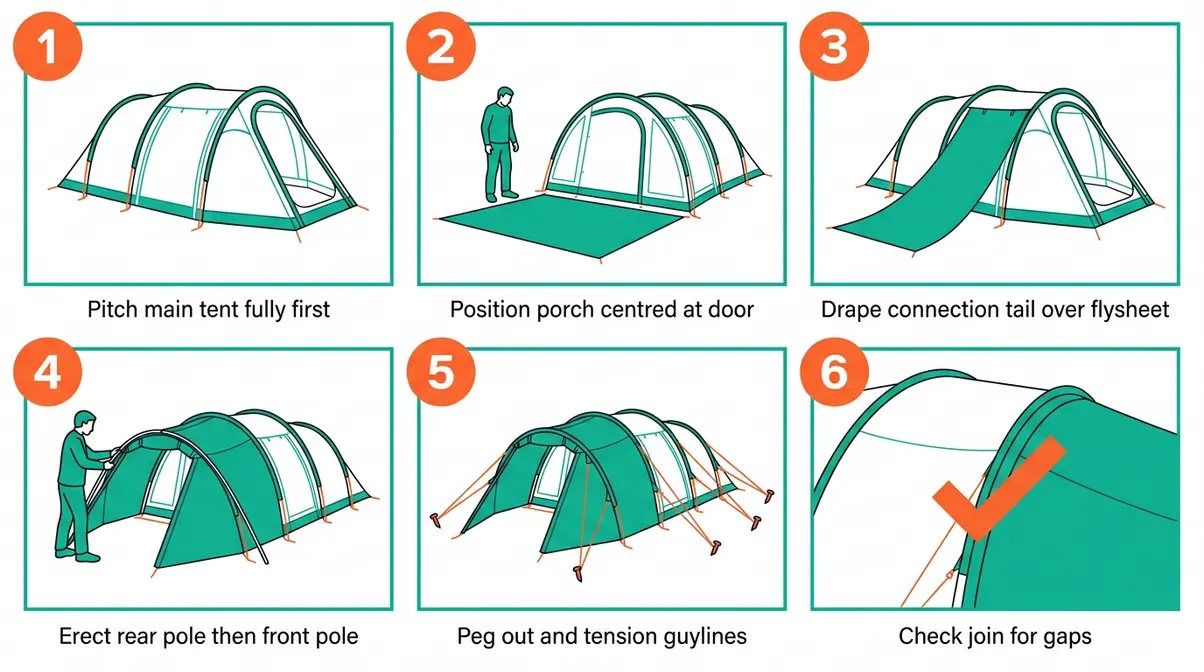
Step 1 — Pitch your main tent fully first.
Your tent must be fully erected, tensioned, and staked before you attach anything. A slack flysheet will cause the porch join to sag and gap. Estimated time: your normal tent setup.
Step 2 — Identify the correct door and position the porch.
Stand at the door you want to extend. Place the porch flat on the ground directly in front of it, with the porch’s rear pole closest to the tent. Centre the porch on the door opening — measure from the door’s centre point to each side edge to confirm it’s even.
Step 3 — Drape the connection tail over the flysheet.
Most universal porches have a fabric “tail” panel at the rear. Lift this tail and lay it over the flysheet, starting just above the door’s eave line and draping it down toward the ground on the tent’s side. The tail should sit flat against the flysheet without bunching.
Step 4 — Erect the porch poles.
Insert the porch poles into their sleeves or clips. Start with the rear pole (closest to the tent) first, then the front pole. The rear pole should sit as close to the tent wall as possible without pressing hard into the fabric — leaving a finger’s width of clearance is ideal.
Step 5 — Peg out the porch and tension the guylines.
Peg the porch’s front corners first, then the sides. Run the guylines outward at roughly 45 degrees — not back over the tent roof. Tension them enough to hold the porch shape firm, but stop before the guylines begin pulling the tent’s roofline downward. If you see the tent roof deforming, you’ve overtightened.
Step 6 — Check the connection join and adjust.
Walk around the join between the porch tail and the tent flysheet. It should sit flat with no visible gaps. If rain can run down the flysheet and find a gap at the join, water will enter. Adjust the tail position or retension the guylines until the join is snug and continuous.
Practical Usage Tips and Fire Safety Rules
Once your extension is up, a few practical habits will keep it safe and extend its life:
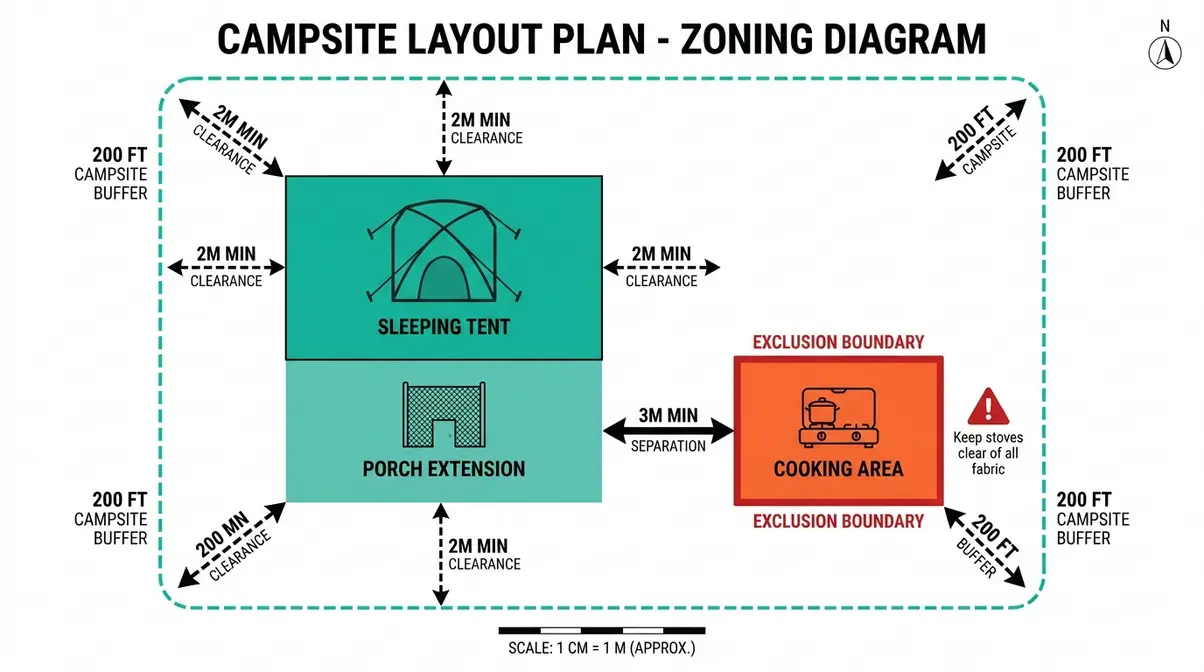
Cooking safety: The CPAI-84 flammability standard requires tent fabrics to be flame-retardant — meaning they’re designed to self-extinguish rather than spread a flame. However, flame-retardant is not fireproof. Industry safety guidance from GetTent (2026) is clear: never cook inside an enclosed tent or porch extension, and keep stoves and open flames well away from all fabric walls. Even a CPAI-84-compliant material will sustain damage from prolonged heat exposure.
The 200 rule: In many campgrounds and national parks, a “200 rule” refers to the guideline of staying at least 200 feet from water sources, trails, and other campers when selecting your campsite. This is a Leave No Trace principle — not a measurement from CPAI-84. When pitching your extension, respect this spacing guideline to avoid impeding other campers’ access.
Condensation management: A porch extension reduces airflow around your tent door. Open the porch’s ventilation panels or mesh sections overnight to prevent moisture buildup on the flysheet.
Staking in soft ground: Use wide-headed pegs rather than standard skewer pegs for porch corners. In soft or sandy ground, skewer pegs pull out under wind load. Wide-headed or screw-in pegs offer significantly more holding power.
Common Pitfalls and Limitations
Even experienced campers run into problems with tent porch extensions. Here’s what to watch for — and how to avoid the most costly mistakes.
Common Pitfalls
1. Buying a universal extension without measuring first.
This is the most frequent and most avoidable mistake. “Universal” means the extension is designed to fit many tents — not that it will fit your tent without checking. Always take the four key measurements (door peak height, eave height, door width, footprint depth) before purchasing. See the measuring guide above.
2. Attaching the porch to a slack tent.
If your main tent isn’t fully tensioned when you attach the porch, the join will gap and leak. The porch’s tail panel relies on the flysheet being taut to create a continuous waterproof surface. Pitch your tent completely before touching the extension.
3. Overtightening guylines and deforming the tent roof.
Pulling porch guylines too tight is a common setup error. When guylines run back over the tent rather than fanning outward, they pull the tent’s roofline downward — creating stress points that can damage pole sleeves over time. Always angle guylines away from the tent.
4. Using an extension in winds above its safe limit.
Most strap-over universal porches are not tested for sustained winds above 30–35 mph. Campers consistently report extension failures (torn tail panels, pole collapses) when they leave extensions up in deteriorating weather. If the forecast shows sustained winds above 25 mph, reduce the porch footprint or take it down entirely.
5. Ignoring fire safety near the porch.
Cooking under a porch extension with the sides enclosed — even in a CPAI-84-compliant fabric — creates a fire and carbon monoxide risk. Keep stoves outside the enclosed area and ensure adequate ventilation at all times.
When to Choose Alternatives
When your tent is more than 5 years old and shows wear:
Adding a porch extension to an ageing tent with degraded seams or a failing flysheet is a poor investment. The extension may outlast the tent by several seasons. In this scenario, buying a new tent with a built-in screened porch — like the Coleman WeatherMaster or the Large Cabin Tent with Screen Porch — is the better long-term value.
When you camp in consistently high winds:
Universal strap-over extensions are not engineered for high-wind environments. If your typical camping locations experience regular gusts above 30 mph, a tent with an integrated, zippered porch room (where the join is structurally part of the tent’s design) will outperform any add-on extension.
When bug protection is your primary need:
An awning or vestibule extension won’t keep insects out. For genuine bug-free outdoor living, you need a screened porch tent — either a new tent with built-in mesh walls, or a separate screened canopy that fully encloses the space.
When to Seek Expert Help
If you’re planning to use a porch extension at an organised event, campsite with specific planning rules, or in an area with fire-risk restrictions, check local regulations first. Some national parks and managed campsites have rules about the size and type of structures you can erect alongside your tent. A quick call to the site office before you travel can save a wasted journey.
Frequently Asked Questions
Can you add a porch to a tent?
Yes, you can add a porch to most family and tunnel tents using a universal tent extension or a brand-specific add-on. The key requirement is that your tent has a suitable door opening and enough flysheet surface for the extension’s connection tail to sit flat. Strap-over universal porches work on the widest range of tents. Zip-connect extensions require a matching attachment point on your specific tent model. Measure your door height and width before buying — a mismatch of more than 10 cm will result in a poor seal and rain ingress.
How do you extend a canopy?
Extending a canopy involves attaching additional poles and fabric panels to the existing structure. Most pop-up canopies accept side-wall extensions that clip or velcro onto the canopy’s frame legs. For tent-specific awnings, the process involves running a secondary pole from the tent’s front corner outward at an angle, then tensioning a fabric panel between the pole tip and a ground peg. Always stake the extended section separately — relying on the main tent’s stakes to hold an extended canopy in wind is a common cause of collapse.
Will a tent survive 50 mph winds?
Most recreational tents should not be left standing in sustained winds of 50 mph. American Tent’s safety guidance (2026) recommends evacuating non-engineered pole and frame tents when sustained winds exceed 36 mph. At 50 mph, structural failure risk is significant regardless of how well the tent is staked. Tunnel tents with aerodynamic profiles and 3–4 poles perform best in high wind, but no standard recreational tent is designed for sustained 50 mph exposure. If severe weather is forecast, take down your porch extension first, then assess whether the main tent should also come down.
What is the porch of a tent called?
The porch of a tent is most commonly called a vestibule or a screen room, depending on its design. A vestibule is the covered but unenclosed area between the inner tent and the flysheet — typically used for gear storage. A screen room (or screened porch) is a larger, mesh-enclosed extension that functions as an outdoor living space. The term “porch” is widely used in North American camping to describe any covered entrance extension, while “vestibule” is more common in backpacking and technical camping contexts.
Do I need permission to add a porch to a tent?
In most recreational campgrounds, no permission is required to add a porch extension to your tent. However, some managed campsites and national parks have rules about pitch size and structure dimensions — particularly if your extension would extend beyond your allocated pitch boundary. Organised events and glamping sites may have additional restrictions. The safest approach is to check with the campsite or event organiser before arrival, especially if your extension adds more than 2 metres to your tent’s footprint.
What is the 200 rule for camping?
The 200 rule is a Leave No Trace camping guideline recommending that campers stay at least 200 feet from water sources, trails, and other campers when selecting a campsite or disposing of waste. It’s not a tent safety standard — it’s a minimum-impact principle designed to protect natural environments and other campers’ experiences. When setting up a porch extension, respecting the 200-foot buffer from neighbouring pitches helps maintain good campsite etiquette and ensures your guylines don’t create a trip hazard for others.
What is a universal tent porch extension?
A universal tent porch extension is a freestanding or strap-over canopy designed to attach to a range of tent models without requiring brand-specific connectors. Most use a fabric “tail” panel that drapes over the tent’s flysheet and is tensioned down with guylines and pegs, creating a covered entry area in front of the tent door. They work best on tunnel tents and family cabin tents with flat front panels. Compatibility still requires measurement — universal extensions have stated height and width ranges, and a tent outside those ranges will result in a poor fit. The Outwell extension buying guide recommends checking door height, door width, and available footprint space before purchasing any universal extension.
The Porch-or-Pass Framework — Your Final Decision Tool
Before you spend money, use this simple framework to decide between buying a new tent with a built-in porch versus adding a universal extension to your existing setup.
| Your Situation | Recommendation | Why |
|---|---|---|
| Tent under 3 years old, good condition | Add a universal extension | Cost-effective; no need to replace a functional tent |
| Tent over 5 years old, worn flysheet | Buy a new screened porch tent | Extension will outlast the tent; poor ROI |
| Primary need: bug-free sitting area | Buy a screened porch tent | Extensions don’t enclose — only built-in mesh does |
| Primary need: gear storage + rain cover | Add a vestibule extension | Cheaper and lighter than a full screened tent |
| Camping in high-wind locations regularly | Buy a tent with integrated porch | Built-in joins outperform strap-over in wind |
| Budget under £100 / $120 | Add a universal extension | New screened porch tents start around $200+ |
| Want fast setup (under 10 minutes) | Coleman Skydome or PORTAL Instant | Built-in designs eliminate the extension setup step |
The Porch-or-Pass Framework comes down to one core question: is your current tent the limiting factor, or is it just missing a feature? If the tent is structurally sound and the right size for your family, an extension adds the feature you need at a fraction of the cost of a new tent. If the tent itself is the problem — too small, too old, or the wrong shape for your camping style — a new tent with a built-in screened porch is the smarter investment.
For most beginners with a family tent that’s less than three years old, the universal extension route wins on value. For campers ready to upgrade their entire setup, the Coleman WeatherMaster and Coleman Skylodge XL represent the most proven options in the screened porch tent category at the time of this guide.
For family campers who want sheltered outdoor space without second-guessing every purchase, a tent porch extension — whether built-in or add-on — solves a genuinely frustrating problem. Search interest in this category has grown 100% year-over-year (keyword research data, 2026), and the range of available options has never been wider. The best approach combines the right terminology knowledge, a careful compatibility measurement, and the Porch-or-Pass Framework to match the right solution to your specific tent and camping style.
The Porch-or-Pass Framework matters because it stops you from spending money in the wrong direction. Buying a universal extension for a tent that’s past its prime — or buying an entirely new tent when your existing one just needs an awning — are both costly mistakes that a clear decision framework prevents.
Your next step: measure your tent door height and width today (it takes five minutes), then compare those numbers against any universal extension’s spec sheet. If the numbers align, you’re ready to buy. If they don’t, you now know exactly why a new screened porch tent is the better call — and which ones to look at first.
David King
Field gear tester at Tent Explorer.