Rock Anchor Slings: Secure Your Campsite on Rocky Terrain
 Dave King
Updated June 24, 2026
30 min read
Dave King
Updated June 24, 2026
30 min read
⚠️ Safety Notice
The techniques in this guide are for educational purposes only and do not replace hands-on instruction from a certified climbing guide or outdoor professional. Rock anchoring involves life-safety risks. Always practice in a controlled, low-stakes environment before trusting any anchor in the field. Inspect all gear before every use and retire damaged or aging equipment per manufacturer guidelines. If you’re uncertain about any technique, consult a certified guide (AMGA or equivalent) before attempting it outdoors.
You grab your tent stakes, crouch down, and drive one straight into the ground. It bounces off bare granite like you’re hammering concrete. The wind is picking up on the exposed ridgeline, your tent is flapping, and you’re standing there realizing the campsite you chose has exactly zero inches of soil.
That exact moment is why you need a rock anchors sling: secure your campsite efficiently without relying on soil. Without a proper anchoring system, a strong gust can collapse or carry away your tent on exposed rocky terrain. Most campers either scramble to find softer ground (not always possible) or improvise something that holds until it doesn’t — usually at 2 a.m. in a rainstorm.
By the end of this guide, you’ll know how to select the right rock anchor sling, build a safe anchor system using the Campsite SERENE-SA Method, and inspect your gear before every trip — so your tent stays put no matter what the terrain throws at you. We’ll cover gear fundamentals, a selection guide, step-by-step setup instructions, and the safety protocols that keep everything honest.
Using a rock anchors sling: secure your campsite efficiently on bare rock where stakes fail — using UIAA-certified slings rated to 22kN, properly rigged anchors can safely hold thousands of pounds of force.
- Choose your material wisely: Nylon stretches and absorbs shock; Dyneema (a high-strength synthetic fiber) is lighter but stiffer — each suits different rocky conditions
- The Campsite SERENE-SA Method provides a 6-point safety checklist that mirrors professional climbing standards, adapted for campers without climbing experience
- Knots reduce sling strength by 50–60% — always use sewn loops or carabiners instead of tying new knots in a sling (EDELRID manufacturer test data, 2026)
- Anchor angles matter: Keep the angle between anchor legs under 60 degrees — at 60°, each leg carries roughly 58% of the load; at 120°, each leg carries 100%
- Inspect before every use: UV exposure and abrasion degrade nylon and Dyneema invisibly — retire any sling showing discoloration, fuzz, or stiffness
What Are Rock Anchor Slings?
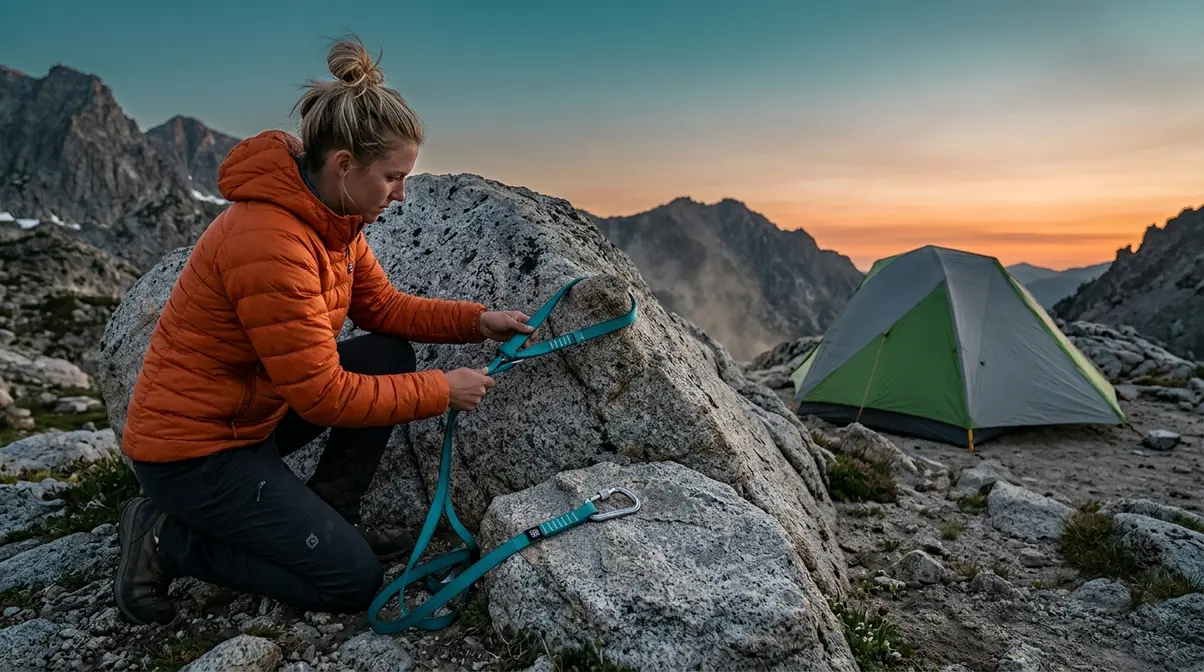
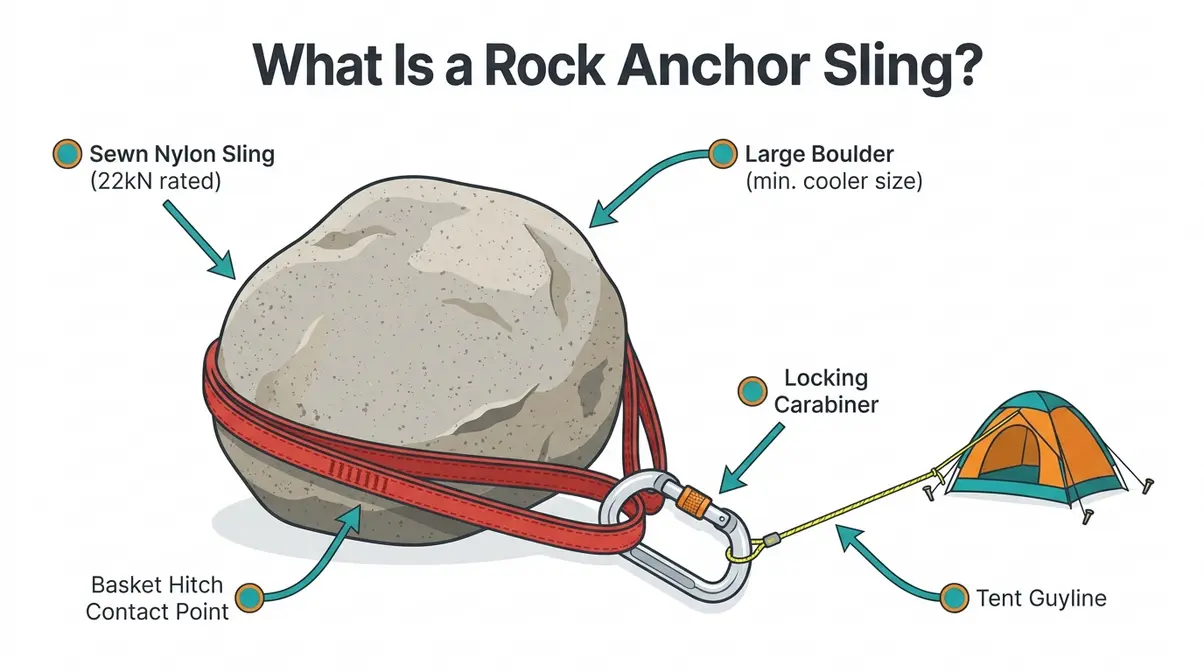
A rock anchor sling is a certified loop of webbing or cord used to create a secure attachment point on natural rock features — boulders, rock horns, or wedged chockstones — where tent stakes simply can’t reach. These slings aren’t improvised camping hacks. They are manufactured to the same safety standards used by professional climbing guides on technical routes.
UIAA Standard 104 for sling strength requires that certified sewn climbing slings withstand a minimum force of 22 kilonewtons (22kN) — roughly equivalent to 4,900 pounds — before failure. That standard has remained in force since 1994 and applies whether you’re using the sling on a climbing route or to anchor a tent in a windstorm (UIAA Standard 104). For a camper, that number means your anchor system has an enormous safety margin over the forces a tent guyline actually generates.
What Are Rock Climbing Anchors Called?
Rock climbing anchors go by several names depending on context. In climbing, the general term is simply “anchors” or “belay anchors” — a belay anchor being the point where one climber is secured while their partner climbs. Exceptionally solid anchors are sometimes called “bombproof” in climber slang, a term you’ll encounter in online forums. More specifically, anchors are named by their type: sling anchors, bolt anchors, and natural anchors.
The distinction that matters most for campers is natural anchor vs. fixed anchor. Natural anchors use existing features the mountain already provides — boulders, rock horns, trees, and chockstones (rocks wedged naturally in cracks). Fixed anchors are permanently drilled bolts installed by professional route setters. Natural anchors are what you’ll use at camp. Think of it this way: natural anchors are like using what the mountain already gives you; fixed anchors are like drilling a screw into the wall.
As a camper on rocky terrain, you’ll encounter three anchor categories. Sling anchors loop around natural rock features — this is the focus of this guide. Stake anchors are traditional tent stakes, which are useless on bare rock. Deadman anchors bury an object in soft terrain — also not applicable on solid rock. That leaves sling anchors as your primary solution, and REI Expert Advice on climbing anchors confirms this approach is standard practice across climbing and mountaineering communities.
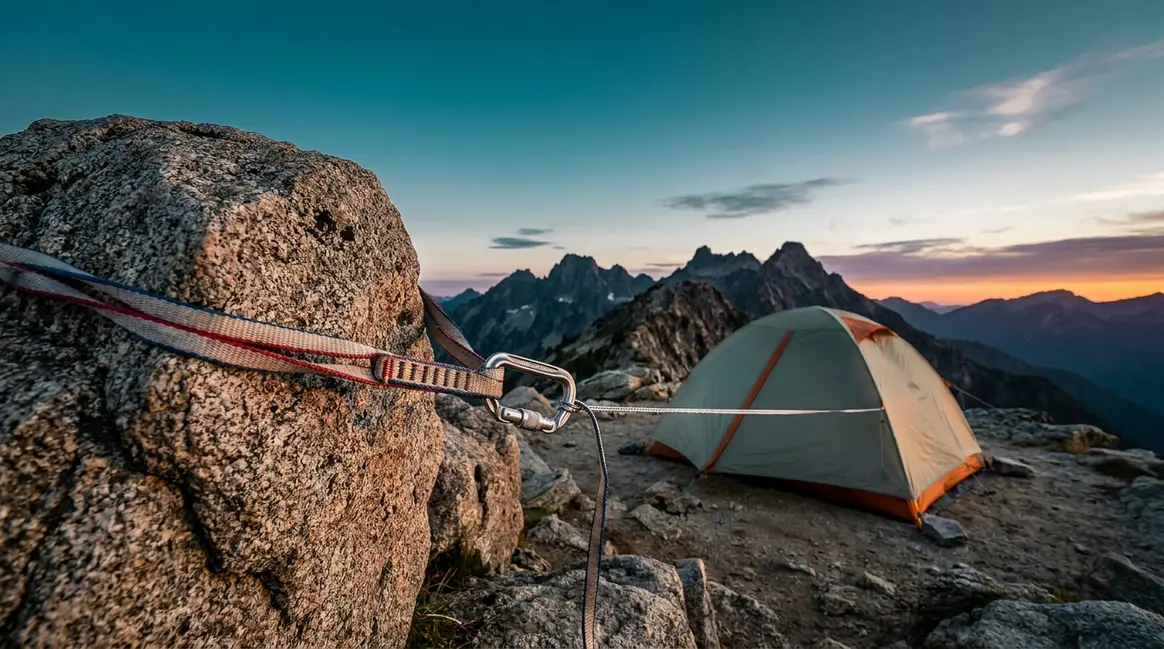
Picture a granite boulder the size of a car at your campsite. A sling anchor loops around that boulder and connects to your tent’s guyline (the cord that runs from your tent to a fixed point). That’s the core technique this guide teaches.
Rock Bolts vs. Rock Anchors
This is the single most important concept for beginner campers to understand before going further.
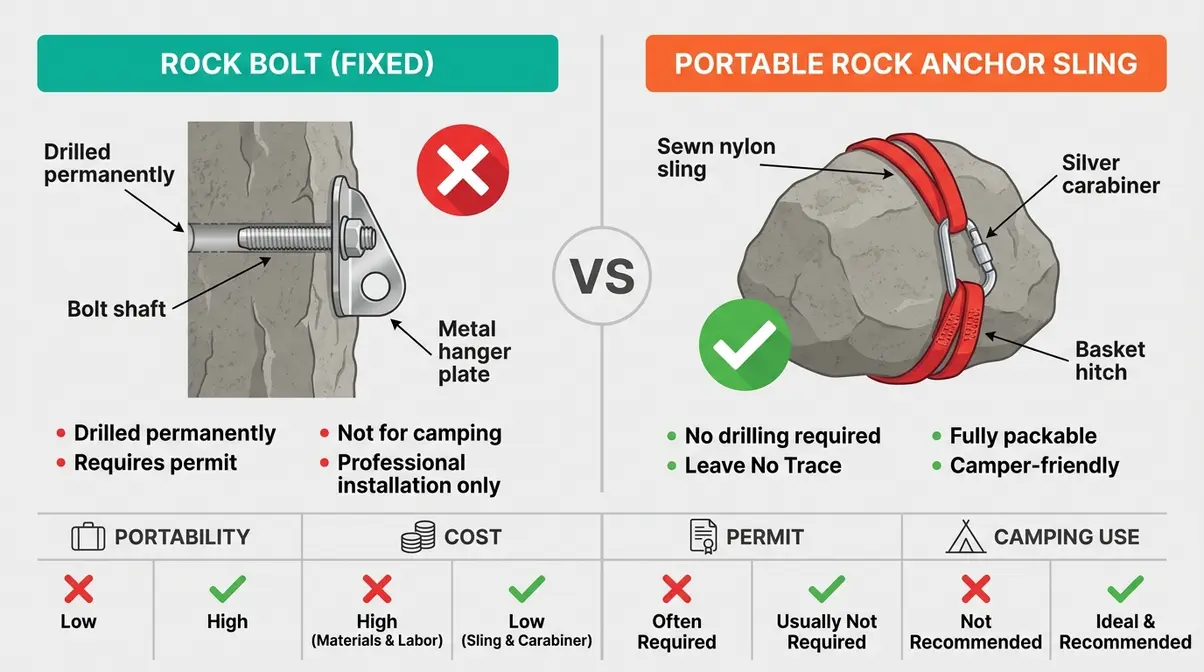
A rock bolt is a permanent metal pin drilled into a rock face by a professional route setter. You’ll see these on established sport climbing routes — shiny stainless steel hangers bolted into the wall at regular intervals. Key point for campers: you will never encounter these at a dispersed campsite, you cannot install them yourself without specialized equipment and permits, and they are completely outside the scope of this guide. As UIAA bolting and anchor classification guidelines clarify, permanent rock bolts are not classified as Personal Protective Equipment (PPE) — they are fixed infrastructure (UIAA, 2026).
A portable rock anchor sling, by contrast, is a removable loop of webbing that wraps around a natural rock feature. No drilling, no permanent modification, fully packable, and Leave No Trace compliant. This IS what campers use.
| Feature | Rock Bolt (Fixed) | Rock Anchor Sling (Portable) |
|---|---|---|
| Installation | Drilled permanently into rock | Loops around natural rock feature |
| Who installs it | Professional route setter | You, the camper |
| Portability | Permanent — stays in rock | Fully removable — Leave No Trace |
| Equipment needed | Drill, specialized hardware | Sling, carabiner |
| Camping use? | Not applicable | ✅ This is what you use |
| Permit required? | Often yes | No |
One more term worth knowing: a chockstone is a rock wedged naturally in a crack. In tradclimbing (traditional climbing using removable protection), climbers use metal “ironmongery” — nuts, hexes, and cams — to exploit these features. As a camper, you don’t need ironmongery. You just need to recognize a chockstone or large boulder as a potential anchor point.
Sling Materials: Nylon, Dyneema, Cord
Three materials dominate the sling market, and each behaves differently under load, temperature, and UV exposure. Choosing the right one for your campsite conditions matters more than most beginner guides acknowledge. If you are new to this, understanding tent anchoring fundamentals is a great prerequisite before handling advanced climbing materials.
Nylon (polyamide) is the workhorse material. It stretches 15–25% before failure, which means it absorbs dynamic shock loads — sudden jerks from a wind gust, for example — better than stiffer alternatives. Nylon slings are typically thicker and heavier, but that extra material provides more surface area when wrapped around a rough rock edge. For most camping applications, nylon is the forgiving, beginner-friendly choice.
Dyneema (ultra-high-molecular-weight polyethylene, or UHMWPE) is a synthetic fiber that is stronger than nylon at the same weight but has far less stretch — roughly 2–4% elongation at break. A 60 cm Dyneema sling can weigh as little as 30 grams, making it popular with ultralight backpackers. The trade-off: Dyneema’s low stretch means it transmits shock loads directly to your anchor points rather than absorbing them. It also degrades faster under UV exposure than nylon, and UIAA 104-based guidelines recommend shorter service lives for Dyneema — roughly 3 years with monthly use versus 5 years for nylon at the same frequency (UIAA Standard 104 / dincalculator.com, 2026).
Accessory cord (also called utility cord) is a small-diameter rope, typically 5–8mm, that can be tied into loops for anchoring. It’s the most flexible option for unusual rock shapes, since you can tie it to fit any feature. However, every knot you tie reduces its strength — EDELRID’s manufacturer testing shows that knots reduce Dyneema-class materials by an average of 54% and some high-modulus cords by up to 64% (EDELRID, 2026). For campsite anchoring, accessory cord is best used by people who understand knot mechanics — beginners should default to sewn slings.
A sewn sling (a loop of webbing stitched into a fixed shape by a machine using a bar-tack technique) is the safest choice for beginners. Think of it like a pre-tied loop of climbing-grade webbing — you don’t tie it yourself, it comes ready to use, and the factory stitching is tested to the full 22kN rating. You’ll use all three material types when we build the Campsite SERENE-SA system in Section 3.
Choosing the Right Rock Anchor for Your Campsite
Selecting the right anchor system is genuinely nuanced — and that’s not a cop-out. As many experienced campers put it: “I know there’s no definitive answer and ultimately it all comes down to…” the specific rock features at your campsite, your load requirements, and the conditions you’re camping in. To find the best rock anchors sling: secure your campsite efficiently by matching the material to your specific environment. This section gives you a clear decision framework so that uncertainty doesn’t mean paralysis.
The right anchor system depends on three factors: the available rock features, the expected load (wind exposure + tent weight), and your experience level. For most rocky campsites with boulders or rock horns present, a sewn nylon sling with a locking carabiner is the correct starting point.
What Anchor Works Best on Rock?
For camping on rocky terrain, natural rock anchors using sewn slings are the most practical and reliable option available to non-climbers. While choosing the best tent stakes for your trip is vital for dirt, natural rock anchors using sewn slings are the most practical and reliable option available to non-climbers on granite. Certified guides consistently recommend natural anchors for campers because they require no drilling, no specialized tools, and leave zero trace on the landscape.
The best anchor point is a solid, immovable rock feature — a boulder that doesn’t rock when you push it, a rock horn (a protruding spike of rock), or a chockstone wedged firmly in a crack. The sling wraps around the feature, a carabiner clips into the sling loop, and your tent’s guyline attaches to the carabiner. That three-part system — rock feature, sling, carabiner — is the foundation of every campsite rock anchor.
A personal anchor system (PAS) is a daisy-chain style sling that allows multiple attachment points at adjustable lengths. While designed for climbing, a PAS can be adapted for campsite use when you need to span a distance between your tent and a distant rock feature, or when you need to connect multiple anchor points. However, for most camping scenarios, a standard 60–120 cm sewn sling provides everything you need.
Comparing Sling Types
Strength ratings for slings are often misunderstood. Both nylon and Dyneema sewn slings meet the 22kN minimum — the difference is in their behavior, not their rated breaking point.
| Property | Nylon Sling | Dyneema Sling | Accessory Cord Loop |
|---|---|---|---|
| Min. strength (UIAA) | 22kN | 22kN | Varies by diameter |
| Stretch | 15–25% | 2–4% | 5–10% (nylon cord) |
| Weight (60 cm) | ~55–75g | ~30–40g | ~40–60g |
| Shock absorption | Excellent | Poor | Moderate |
| UV resistance | Good | Moderate | Good |
| Max service life (monthly use) | ~5 years | ~3 years | ~5 years |
| Best for camping | Exposed, windy sites | Ultralight, low-wind | Irregular rock features |
| Knot-friendly? | Yes | No — avoid knots | Yes, with care |
Cable slings (wire slings used in via ferrata and some fixed installations) are not appropriate for campsite anchoring. They are rigid, heavy, and designed for permanent or semi-permanent installations on via ferrata routes — not portable camping gear.
The practical recommendation from certified guides: for a first-time rocky-campsite setup, buy two 60 cm nylon sewn slings and two locking carabiners. This gives you redundancy, shock absorption, and a forgiving learning curve. Total cost is typically under $30.
How Long Should Your Sling Be?
Sling length is a surprisingly common point of confusion, and getting it wrong means either a sling that won’t reach your rock feature or one with so much slack it creates dangerous extension forces.
For most campsite anchoring, a 60 cm sewn sling is your default choice. It’s long enough to loop around most boulders and rock horns while keeping your anchor geometry tight. A 120 cm sling (sometimes called a “double-length” sling) works for larger boulders or when you need to extend your anchor point farther from the rock feature.
For a personal anchor system application — attaching yourself to a fixed point while setting up camp on exposed terrain — a 120 cm sling gives you enough range to clip in at a comfortable working distance. The American Alpine Club notes that a sling used as a personal anchor should allow you to maintain a taut connection without slack that could result in a shock load if you slip (americanalpineclub.org).
As a quick field guide: if your sling barely reaches around the rock feature with no slack, go longer. If your sling has more than 20–30 cm of excess after looping, consider doubling it back on itself to shorten the effective length and improve your anchor geometry.
What to Use Instead of a Sling
Sometimes a sewn sling isn’t the right tool. Three alternatives cover the remaining scenarios.
Webbing loops cut from bulk tubular webbing and tied with a water knot are the traditional DIY alternative. They’re customizable in length and inexpensive, but every water knot reduces strength — and water knots must be inspected carefully after loading, as they can loosen. Not recommended for beginners without knot-tying training.
Cordelette (a long loop of 5–7 mm accessory cord, typically 6–8 meters) is used in climbing to build equalized multi-point anchors. For campsites with multiple small rock features rather than one large boulder, a cordelette lets you connect three or four points into a single master attachment. This is the right tool for complex terrain.
Daisy chains (sewn loops with multiple pockets along their length) allow adjustable attachment at various distances. They’re useful for spanning longer distances between your tent and a distant anchor point. However, daisy chains are NOT load-rated as continuous slings — you must clip both strands to a carabiner, not just one pocket, or you risk catastrophic failure at the stitching.
For more context on ground-based setups, review our guide on understanding tent anchoring fundamentals.
How to Build a Rock Anchor Sling System
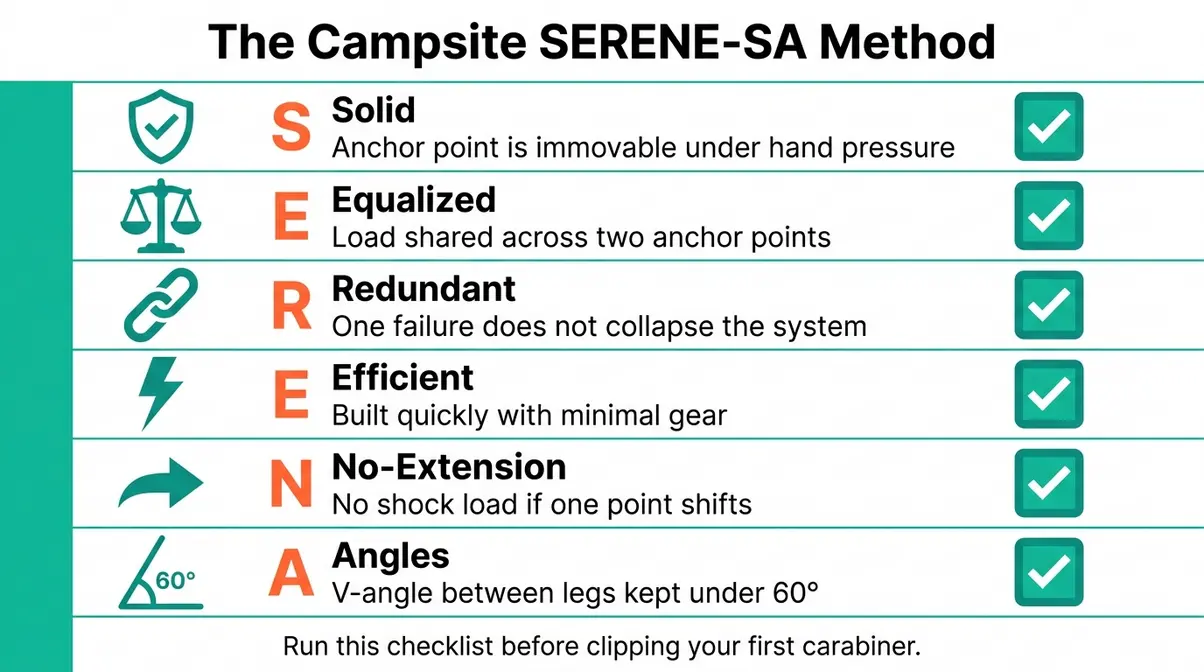
Building a safe rock anchor sling system takes 15–30 minutes the first time and drops to under 10 minutes once you’ve practiced. Once you have your rock anchors sling: secure your campsite efficiently by following the Campsite SERENE-SA Method. The step-by-step process below follows The Campsite SERENE-SA Method — a framework that adapts professional climbing anchor standards to camping use. SERENE-SA stands for: Solid, Equalized, Redundant, Efficient, No-Extension, and Angles — six criteria that, when met, confirm your anchor is safe.
Prerequisites and Gear Checklist
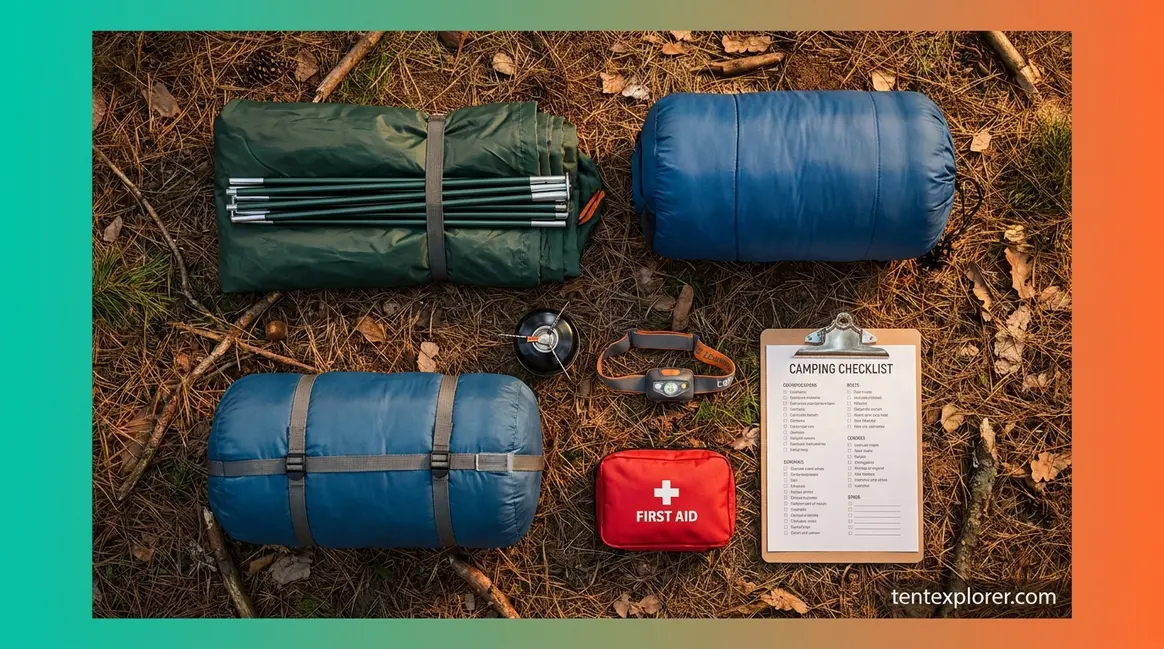
You’ll need: Two 60 cm sewn nylon slings, two locking carabiners (HMS or pear-shaped preferred), your tent’s guylines, and approximately 20–30 minutes for setup. Optional but recommended: one 120 cm sling for larger features, a headlamp if setting up at dusk.
- Gear checklist before you start:
- ✅ Two UIAA-certified sewn slings (inspect for fuzz, discoloration, or stiffness)
- ✅ Two locking carabiners (gate must open and close smoothly; sleeve must thread fully)
- ✅ Tent guylines in good condition (no fraying at anchor attachment points)
- ✅ A solid rock feature at least the size of a large cooler within 2–3 meters of your tent’s anchor point
- Prerequisites — skills you need before starting:
- You can identify a stable rock feature (push it — it doesn’t move)
- You know how to open and lock a carabiner gate
- You’ve read the Safety Notice at the top of this guide
If you’re missing any of these, pause here. Practice on a stable boulder at home before taking this system into the field.
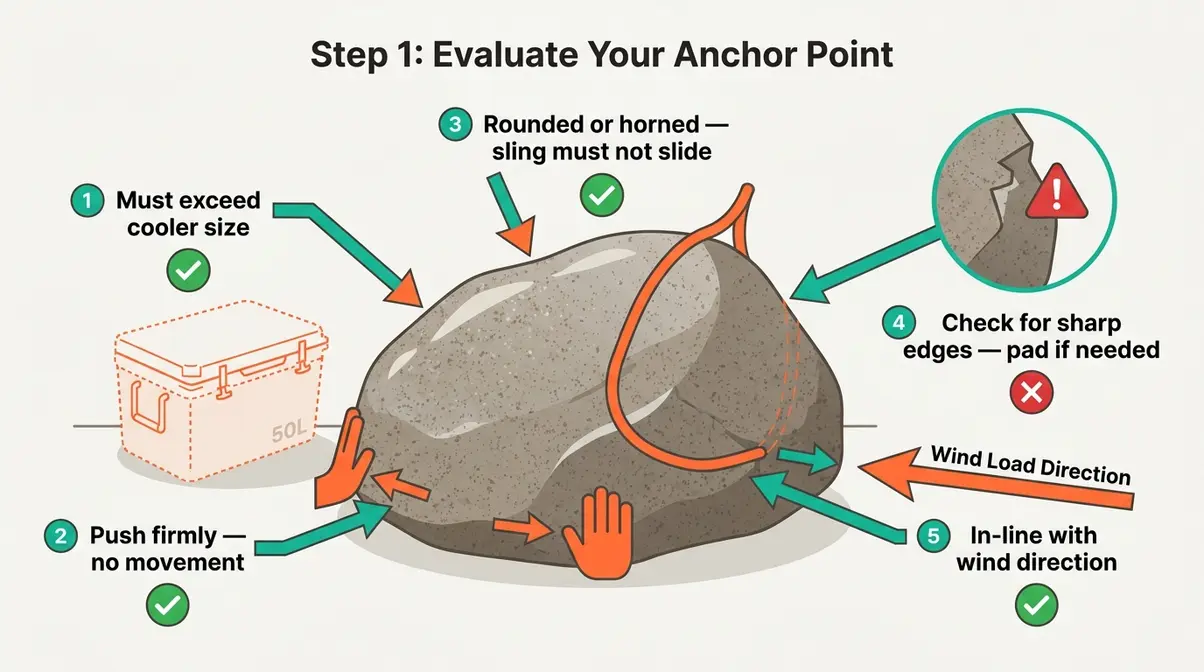
Step 1 – Select Your Anchor Points
Before you touch your sling, spend five minutes evaluating your campsite. This is the most important step — a poor anchor point will fail regardless of how perfectly you rig your sling.
- What makes a good anchor point (Part 1):
- Size: The rock feature should be at least the size of a large cooler (roughly 50 liters). Smaller rocks can shift, tip, or be pulled out of position under load.
- Stability: Push the rock firmly from multiple directions. It should not move. Any rocking or shifting disqualifies it.
- Shape: Look for features a sling can wrap around without sliding off — a rounded boulder, a protruding rock horn, or a chockstone wedged in a crack. Avoid flat, featureless slabs where the sling has no natural retention point.
- What makes a good anchor point (Part 2):
- Surface: Check for sharp edges at the contact point. Sharp granite edges can cut into nylon or Dyneema under load. If sharp edges are unavoidable, pad the contact point with a folded piece of clothing or use a thicker nylon sling.
- Position: The anchor point should be as close to in-line with the direction of expected load (wind direction) as possible. An anchor that pulls sideways on your tent is less effective than one pulling directly away from the tent wall.
Step 2 – Apply the SERENE-SA Method
Before rigging a single piece of gear, run through the SERENE-SA checklist mentally. This takes about 60 seconds and catches most errors before they happen.
S — Solid: Is your chosen rock feature immovable? If you can shift it with two hands, it fails this check.
E — Equalized: Will the load be shared across two anchor points rather than one? A single-point anchor concentrates all force on one rock feature. Two anchor points, equalized by your sling geometry, distribute the load.
R — Redundant: If one anchor point failed completely, would the other still hold? Redundancy means no single failure causes a complete system collapse.
E — Efficient: Can you build this anchor in a reasonable time without wasting gear? Efficiency matters because complicated setups introduce more error opportunities.
N — No-Extension: If one anchor point shifted or failed, would the remaining system shock-load the other? A well-built anchor prevents sudden extension — the snap that occurs when slack suddenly becomes taut.
S — Angles: Are your sling angles under 60 degrees? At 60°, each anchor leg carries roughly 58% of the load. At 90°, that rises to 71%. At 120°, each leg carries 100% of the full load — effectively doubling the stress on your system (Rope Rescue Training, 2026). Keep angles small.
A — Angles (confirmed): This is repeated deliberately in the SERENE-SA framework — anchor angles are so commonly misjudged that the professional standard calls for a double-check. Look at your setup from the side and estimate the angle visually. If it looks wide, it is wide.
Step 3 – Rig Your Sling Around the Rock
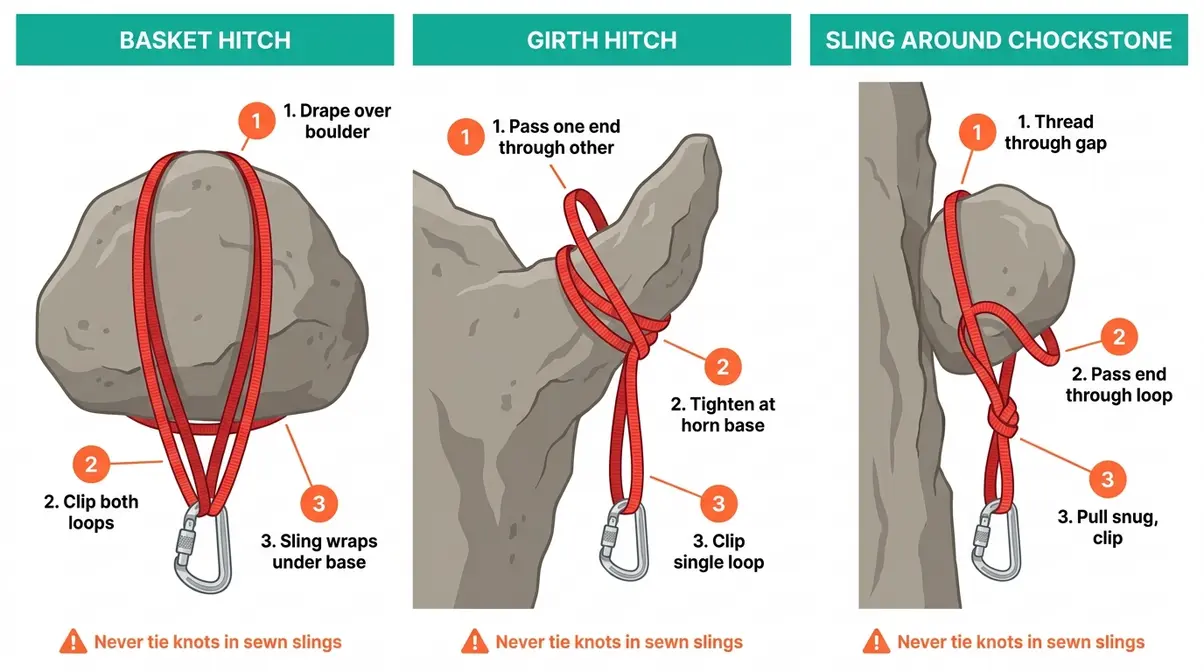
Now you’re ready to place your sling. Three rigging techniques cover the vast majority of campsite scenarios.
- The Basket Hitch (most common):
- Drape the sling over the top of the boulder so both ends hang down the same side.
- Clip both loops of the sling into your carabiner.
- The sling now wraps under the boulder’s base on the tension side, which prevents it from riding up and over the top under load.
- This configuration roughly doubles the sling’s effective load capacity because both strands share the force.
- The Girth Hitch (for rock horns):
- Pass one end of the sling through the other end.
- Tighten the resulting loop around the base of the rock horn.
- Clip your carabiner to the single loop that remains.
- Note: a girth hitch creates a stress concentration at the hitch point — use nylon rather than Dyneema here, and inspect the contact point after loading.
- The Sling Around a Chockstone:
- Thread one end of the sling through the gap where the chockstone is wedged.
- Pass the other end through the first end’s loop (like a lark’s foot, but around the stone).
- Clip the resulting loop to your carabiner.
- Pull the sling snug — the chockstone’s wedged position holds the sling in place under downward load.
Critical rule for all three techniques: Never tie a knot in your sewn sling. EDELRID’s manufacturer testing demonstrates that knots in Dyneema slings reduce strength by an average of 54%, and certain knot configurations in nylon can drop strength to as low as 25% of the original rating (EDELRID, 2026). The sling’s sewn loop is your safe connection point — use it.
Step 4 – Build the Power Point
The power point (also called the master point) is the single carabiner where all your anchor components meet and your tent guyline attaches. Building it correctly is what separates a functional anchor from a dangerous one.
- With your first sling rigged around Anchor Point A, clip its loop into a locking carabiner. This is your first anchor strand.
- Rig your second sling around Anchor Point B (a second boulder or rock horn, ideally 60–90 cm from the first). Clip its loop into the same locking carabiner.
- Adjust the sling lengths so both strands are approximately equal tension when pulled in the direction of your tent’s guyline. This is equalization — both anchor points share the load.
- Lock the carabiner gate (twist the sleeve until it stops). Give it a firm tug to confirm it’s locked.
- The locked carabiner is now your power point.
Check your angles: Look at the V-shape formed by your two anchor strands. If that V is wider than about 60 degrees, you need to either reposition one anchor point or use a longer sling to bring the angle in. Wide angles are the single most common mistake in beginner anchor building — they dramatically increase the force on each individual anchor point.
Step 5 – Attach Guylines and Test
- Connecting the Guylines:
- Thread your tent’s guyline through the power point carabiner (or tie a fixed loop in the guyline and clip that loop to the carabiner — this is cleaner and more reliable).
- Tension the guyline to your tent’s recommended tension — firm but not taut enough to distort the tent pole geometry.
- Testing the System:
- Load test: Apply steady, firm pressure to the guyline by hand — about 20–30 pounds of force — in the direction of expected wind load. Hold for 10 seconds. Watch both anchor points for any movement.
- If both anchor points hold without shifting and the sling doesn’t ride up or slip, your system passes the initial test.
- Check the power point carabiner gate is still locked after the load test.
Guyline routing tip: Route guylines at a low angle (less than 45 degrees from horizontal) toward your anchor point. High-angle guylines pull the tent walls inward and reduce stability. Low-angle guylines pull the tent outward and down, which is the direction that actually resists wind lift.
The Big Rock–Little Rock Method
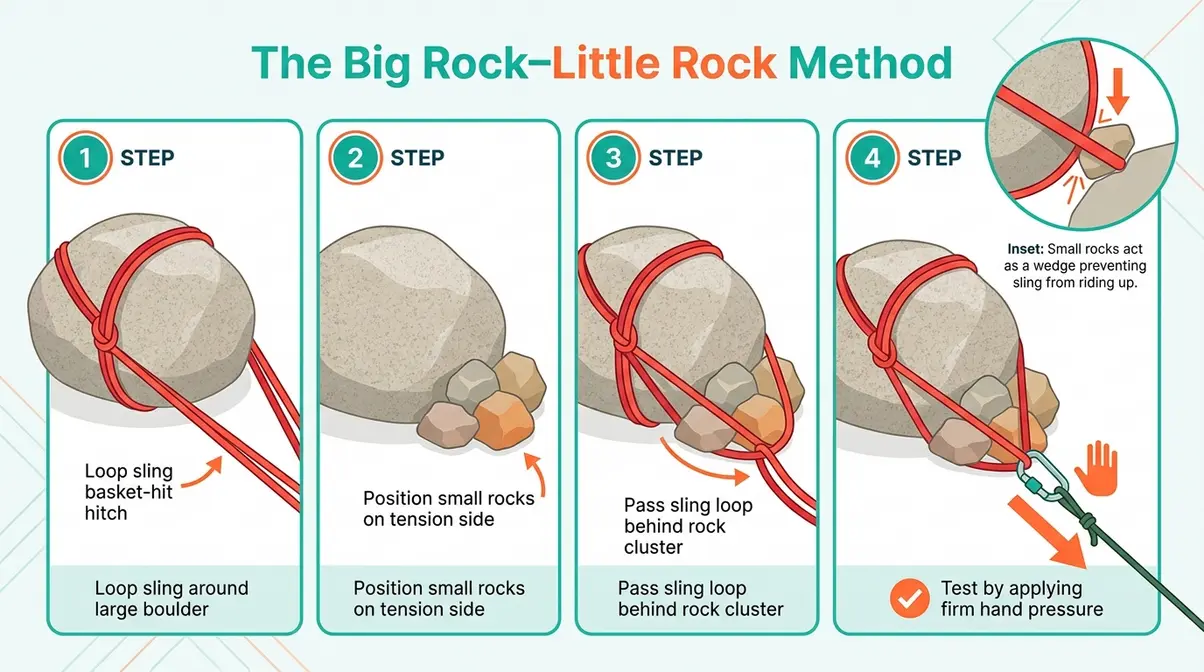
This technique is specifically for campsites where you have one large, immovable boulder and several smaller rocks nearby. It’s one of the most practical campsite anchoring methods for rocky alpine terrain. This technique complements practical tent anchoring techniques by adapting to irregular terrain.
The concept: A large boulder provides the primary anchor point. A cluster of smaller rocks (each at least the size of a cantaloupe) positioned against the uphill or wind-side face of the large boulder acts as a secondary anchor — the large rock prevents the smaller ones from sliding, and the smaller ones prevent the sling from sliding off the large rock.
- How to build it:
- Loop your sling around the large boulder using a basket hitch.
- Position two or three smaller rocks (grapefruit-to-cantaloupe size) on the tension side of the large boulder, against its face.
- Pass the sling’s lower loop under and behind the cluster of small rocks before clipping to your carabiner.
- The small rocks are now captured between the sling and the large boulder — they act as a wedge that prevents the sling from riding upward under tension.
- Test by applying firm hand pressure to the power point in the load direction. The sling should tighten against both the large boulder and the small rock cluster without moving.
This method is especially effective on rounded granite domes where a plain basket hitch would slide upward under load. Certified climbing guides confirm this approach across mountain rescue and alpine camping communities as a reliable improvised anchor technique for natural features.
Sling as a Personal Anchor System?
Yes — a sewn sling can function as a personal anchor system (PAS), but only under specific conditions and with important limitations. A personal anchor system connects you to a fixed point (like a cliff face anchor or a vehicle tie-down point) to prevent a fall while you work at height or on exposed terrain.
For camping applications — clipping yourself to a fixed anchor while setting up on a steep, exposed ledge — a 120 cm sewn nylon sling with a locking carabiner provides a functional PAS. The key limitations:
- Do not use Dyneema as a PAS. Its near-zero stretch means a slip would generate a severe shock load transmitted directly to your anchor and harness. Nylon’s stretch absorbs that energy.
- Never use a sling as a PAS without a harness. Clipping a sling to your belt loop or pack strap is not a personal anchor system — it’s a trip hazard and provides no fall protection.
- The sling must be taut, not slack. Slack in your PAS means a short fall before the system loads — enough to generate dangerous shock forces.
For serious technical terrain, a purpose-built PAS (like the Petzl Connect Adjust or Metolius Personal Anchor System) is the right tool. These are designed specifically for the task and include adjustment mechanisms that a plain sewn sling lacks.
Staying Safe: Common Anchoring Mistakes
Understanding what can go wrong is as important as knowing what to do right. This section covers the hidden risks that zero competitors address — UV degradation, knot strength reduction, and the five most common mistakes that cause anchor failures at camp.
Properly built rock anchor sling systems are highly reliable — but improperly built ones can fail catastrophically with no warning. The risks below are specific, verifiable, and directly actionable.
Risks of Old or Damaged Slings
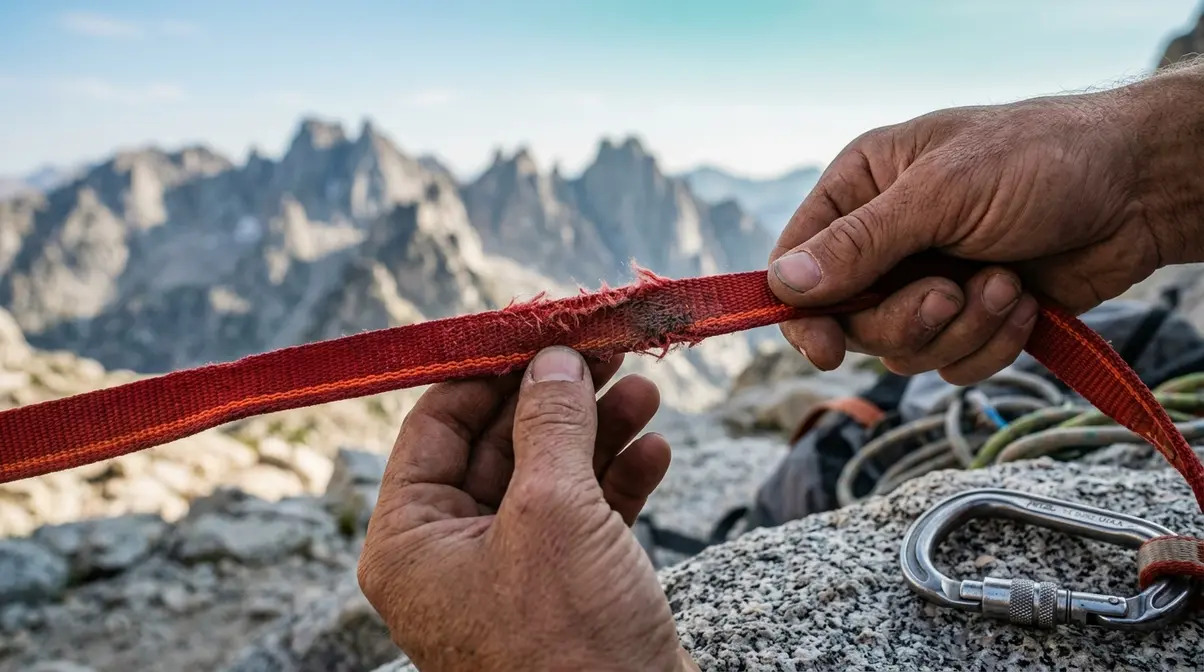
UV exposure, abrasion, and age degrade nylon and Dyneema slings in ways that are often invisible to the naked eye. This is the safety issue most camping guides completely ignore — and it’s the one most likely to cause a real-world failure.
UV degradation: Both nylon and Dyneema lose strength with cumulative UV exposure. The visible sign is color fading — a sling that was bright red or blue and is now pale pink or grey has been significantly UV-degraded. REI Expert Advice explicitly lists “discolored or faded” as an immediate retirement criterion (REI, 2026). What’s alarming is that strength loss begins before fading becomes obvious, particularly in Dyneema.
Age and service life: UIAA Standard 104-based guidelines recommend these maximum service lives based on use frequency:
| Usage Frequency | Nylon Max Age | Dyneema Max Age |
|---|---|---|
| Never used | 10 years | 8 years |
| Rarely (few times/year) | 7 years | 5 years |
| Monthly | 5 years | 3 years |
| Weekly | 3 years | 1 year |
| Daily | 1 year | 1 year |
(Source: UIAA Standard 104 / dincalculator.com, 2026)
Abrasion damage: Sharp rock edges cut into sling fibers under load. A sling that looks intact on the outside may have interior fiber damage from repeated contact with rough granite. Run your fingers along the entire length of the sling — any rough, fuzzy, or stiff patches indicate fiber damage. Retire the sling immediately.
Chemical contamination: Battery acid, fuel, and some sunscreens degrade nylon rapidly. If your sling has been exposed to any chemical, retire it regardless of appearance. The Petzl Aging Anchors initiative highlights chemical exposure as one of the leading hidden causes of PPE failure in outdoor settings (Petzl, 2026).
Static shock loads: A sudden jerk — a tent pole snapping in a gust, a guyline going taut after slack — generates a shock load many times greater than the steady tension. A sling that comfortably holds 10 pounds of steady tension can experience 100+ pounds in a shock load event. This is why slack in your anchor system is dangerous: it creates the drop distance needed for a shock load to develop.
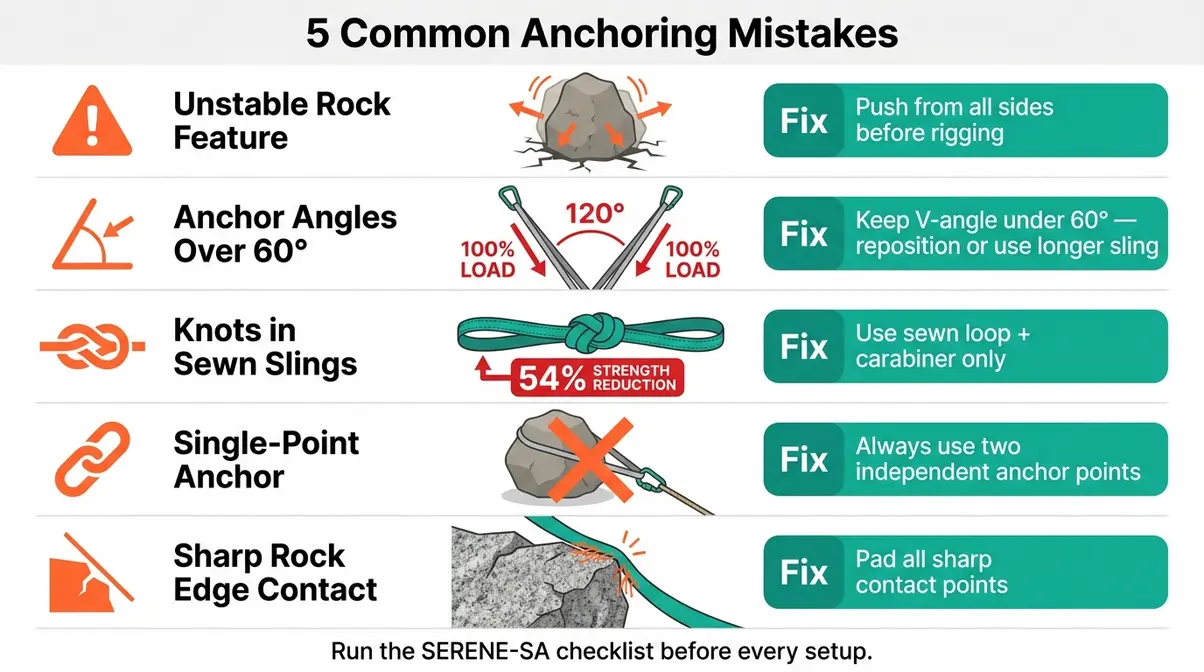
5 Common Anchoring Mistakes
Certified climbing guides and mountaineering communities consistently identify these five mistakes as the most frequent causes of campsite anchor failure.
Mistake 1: Using a rock that looks solid but isn’t.
The fix: Always test your anchor point physically before rigging. Push from multiple directions with both hands. If it moves even slightly, find a different feature. A rock that shifts 2 cm under hand pressure will shift much more under wind load.
Mistake 2: Anchor angles that are too wide.
The fix: Keep the V-angle between your two anchor sling legs under 60 degrees. At 90°, each leg carries 71% of the load; at 120°, each leg carries 100% — effectively doubling the stress on your system. Wider angles are the single most common mistake in beginner anchor building (Rope Rescue Training, 2026). If your angle is too wide, use a longer sling or reposition one anchor point closer to the other.
Mistake 3: Tying knots in sewn slings.
The fix: Never tie a knot in a sewn sling. Use the manufacturer’s sewn loop as your connection point. If you need a different configuration, use a carabiner or choose accessory cord (which is designed to be knotted). Knots reduce sling strength by an average of 50–54% for most materials — and up to 64% for some high-modulus fibers — per EDELRID manufacturer testing (EDELRID, 2026).
Mistake 4: No redundancy — single-point anchors.
The fix: Always use two independent anchor points connected to a single power point. If one anchor fails, the other holds. A single-point anchor that fails means your tent is gone. The SERENE-SA framework’s “R” (Redundant) check exists specifically to catch this mistake.
Mistake 5: Ignoring edge protection on sharp rocks.
The fix: Inspect every contact point between your sling and the rock surface. Sharp granite edges can sever a sling under load — not gradually, but suddenly. Pad sharp contact points with a folded fleece layer, a piece of closed-cell foam, or a spare garment. If you can feel the edge with your finger, it’s sharp enough to damage a sling under load.
Pre-Trip Gear Inspection Checklist
Following essential camping safety protocols, run through this checklist before every trip. It takes under five minutes and catches the conditions that cause real failures.
- Slings:
- [ ] No discoloration, fading, or bleaching (UV damage indicator)
- [ ] No fuzzy or roughened patches along the entire length (abrasion damage)
- [ ] No stiffness — sling should be pliable and flexible throughout
- [ ] No cuts, nicks, or visible fiber damage at any point
- [ ] Sewn seam intact — no loose threads, no separation of stitching
- [ ] Age within UIAA service life guidelines for your use frequency
- [ ] No chemical contamination (fuel, acid, solvents)
- Carabiners:
- [ ] Gate opens and closes smoothly with no sticking or grinding
- [ ] Locking sleeve threads completely and holds position
- [ ] No visible cracks, deep gouges, or deformation in the body
- [ ] No corrosion or pitting on gate mechanism
- [ ] Spine (major axis) shows no unusual wear patterns
- Guylines:
- [ ] No fraying at attachment points
- [ ] No kinks or permanent bends that could concentrate load
- [ ] Tensioning hardware (buckles, cord locks) functions correctly
When in doubt, leave it at home. A sling that passes 9 of 10 inspection points but fails one is a sling that should not be in your kit. The cost of replacing a sling ($10–$25) is infinitely smaller than the consequence of a failure in the field.
When Rock Anchor Slings Aren’t the Right Choice
This guide covers rock anchor slings in depth because they’re the right tool for a specific problem — bare rock with no soil for stakes. But they are not always the right tool. Knowing when to use something else is as important as knowing how to use a sling correctly.
When Slings Aren’t Appropriate
Loose or fractured rock: Rock that is visibly cracked, flaking, or shows signs of recent rockfall is not a safe anchor point regardless of how the sling is rigged. In geologically active terrain — volcanic rock, heavily weathered sandstone, or post-freeze/thaw granite — test every potential anchor point with extra skepticism. If the rock surface crumbles under your hand, move on.
No suitable natural features: On featureless slabs, smooth domes, or terrain with only small, loose rocks, there may simply be no adequate natural anchor point. In this case, relocating your campsite to a spot with better anchor opportunities is the correct decision — not improvising a risky anchor.
High-load scenarios: Rock anchor slings are appropriate for tent guylines in normal camping conditions. They are NOT appropriate for vehicle recovery, load-bearing rigging, or any application where dynamic shock loads significantly exceed what a tent anchor experiences. For high-load rigging, purpose-built rigging hardware with appropriate working load limits is required.
Wet or icy rock: A sling basket-hitched around a wet, rounded boulder can slip under load as ice or water reduces friction. In winter camping conditions, supplement sling anchors with deadman anchors (where snow or soil is available) or use slings with friction-enhancing hitch configurations on the rock surface.
When to Hire a Professional Guide
Some terrain genuinely requires professional guidance — and recognizing that threshold is a sign of good judgment, not inexperience.
- Hire a certified guide (AMGA-certified or equivalent) if:
- You’re camping on technical terrain that requires movement at height to set up your shelter
- You’re unfamiliar with the rock type and unsure how to assess stability
- Your campsite is on an exposed ledge where a slip during anchor setup would be dangerous
- You’re planning a multi-day technical route and need to build anchors for sleeping platforms
The American Alpine Club’s guide to climbing anchors emphasizes that anchor building is a skill developed through supervised practice — reading about it is a starting point, not a substitute for hands-on instruction in controlled conditions. A single day with an AMGA guide on a local crag will teach you more than any written guide, including this one.
Frequently Asked Questions
What anchor is best for rocks?
For camping on rocky terrain, a sewn nylon sling with a locking carabiner rigged around a large, stable boulder is the most reliable anchor option. Natural rock features — boulders larger than a large cooler, rock horns, and wedged chockstones — provide the foundation. The sling wraps around the feature using a basket hitch or girth hitch, and your tent’s guyline clips to the carabiner. UIAA-certified nylon slings rated to 22kN provide an enormous safety margin over the forces a tent anchor actually experiences. For beginners, two 60 cm sewn nylon slings and two locking carabiners cover the majority of rocky campsite scenarios.
Sling as a personal anchor system?
A sewn nylon sling can serve as a personal anchor system (PAS) for low-risk camping applications, but with important restrictions. Always use a harness — never clip a sling to a belt loop or pack strap. Use nylon rather than Dyneema, since nylon’s stretch absorbs shock loads that Dyneema transmits directly to your body. Keep the sling taut, not slack — slack creates drop distance and shock loads. For serious technical terrain or any situation involving real fall risk, use a purpose-built adjustable PAS from a manufacturer like Petzl or Metolius, which provides adjustment and load-rated redundancy that a plain sling cannot match.
Risks of using old climbing anchors?
Old or degraded slings can fail without visible warning — making age and condition inspection critical before every use. UV exposure causes strength loss that begins before color fading becomes obvious. UIAA Standard 104-based guidelines recommend retiring nylon slings after 5 years of monthly use and Dyneema slings after just 3 years at the same frequency (UIAA Standard 104 / dincalculator.com, 2026). Abrasion from sharp rock edges, chemical contamination, and shock-load history all accelerate degradation. REI Expert Advice lists stiffness, fuzz, and discoloration as immediate retirement signals (REI, 2026). When in doubt, retire it — a replacement sling costs $10–$25; a failure in the field costs far more.
What are common anchoring mistakes?
The five most common campsite anchoring mistakes are: using an unstable rock feature, creating anchor angles wider than 60 degrees, tying knots in sewn slings, building single-point anchors without redundancy, and ignoring sharp rock edges at sling contact points. Wide anchor angles are especially dangerous — at 120 degrees between anchor legs, each leg carries 100% of the full load, effectively doubling the stress on your system (Rope Rescue Training, 2026). Every one of these mistakes is preventable by running through the Campsite SERENE-SA checklist before committing to any anchor setup.
A Repeatable Rocky Campsite Solution
For campers who regularly pitch on granite ridges, alpine plateaus, or boulder fields, the rock anchor sling system described in this guide delivers reliable tent security where stakes fail entirely. With a proper rock anchors sling: secure your campsite efficiently and enjoy peace of mind when the wind picks up. A UIAA-certified 22kN sling, rigged correctly around a stable natural feature and checked against the SERENE-SA criteria, provides a safety margin that dwarfs the forces any tent guyline generates in real conditions. The Big Rock–Little Rock method, the basket hitch on rounded boulders, and the two-point equalized power point are techniques used by professional guides on technical routes — adapted here for the specific challenge of keeping your shelter standing overnight.
The Campsite SERENE-SA Method is the organizing principle that makes this repeatable. Solid anchor points, equalized load distribution, redundant connections, efficient rigging, no-extension geometry, and checked angles — run through these six criteria before you clip your first carabiner, and you’ve eliminated the majority of failure modes before they can develop. The method doesn’t require climbing experience. It requires five minutes of deliberate assessment before you commit to a setup.
Your next step: gather two 60 cm sewn nylon slings and two locking carabiners, and practice the basket hitch and girth hitch techniques on a boulder in your backyard or a local park before your next trip. Practice the SERENE-SA checklist until it takes under two minutes. Then, on your first rocky campsite, run the full sequence — assess, check, rig, equalize, test. The confidence that comes from a system you’ve practiced is worth more than any single piece of gear.

Dave King
I'm Dave King. I publish Tent Explorer, a site built to answer the questions people actually ask before they buy.