Outdoor Cooking Checklist for Camping: The Complete Guide
 David King
Updated June 13, 2026
26 min read
David King
Updated June 13, 2026
26 min read
Picture this: you’ve driven two hours to your favorite campsite, the sun is setting, everyone is hungry — and you realize you forgot the can opener. Again. Your canned beans are sitting right there in the cooler, completely useless. If only you had used a comprehensive outdoor cooking checklist camping framework to prevent this.
That one missing item — along with the spatula you left on the kitchen counter, the lighter that’s still in your junk drawer, and the dish soap you forgot to grab — turns an exciting evening into a frustrating scramble. If you’re organized in daily life but feel overwhelmed the moment you start packing for a camping trip, you’re not alone. Camping prep is genuinely complex, and most generic checklists don’t help because they’re just flat, alphabetical dumps of gear with no logic behind them.
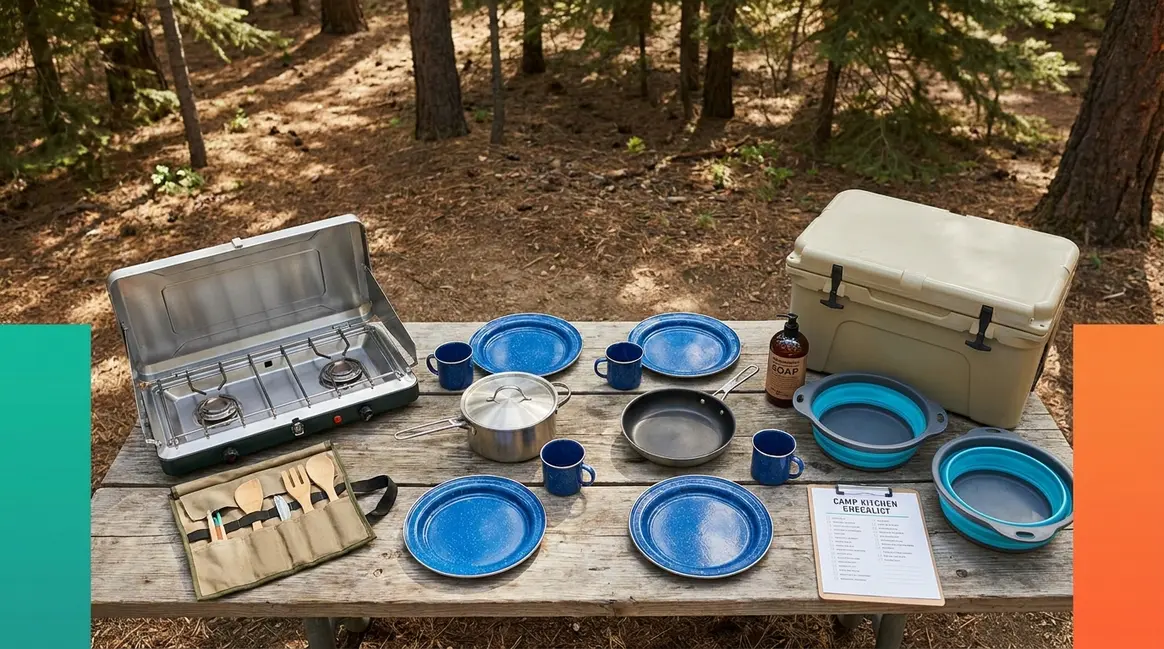
This outdoor cooking checklist for camping covers every item you need, organized into four logical categories so nothing gets left behind. We call this system The Camp Kitchen Stack (Cook → Store → Eat → Clean), and it’s the organizing backbone of everything in this guide. Your camp kitchen — all the gear you use to cook and eat outdoors — becomes far less intimidating when you can see exactly where each item belongs.
“Anything that really works but is a little left field beyond the normal things people take?”
That’s exactly what this checklist is built to answer. Download the free printable PDF version at the bottom of this guide.
A complete outdoor cooking checklist for camping organizes gear into four layers: Cook, Store, Eat, and Clean — what we call The Camp Kitchen Stack. Use this framework to pack systematically and never forget a critical item again.
- Cook Layer: Stove, fuel, pots, pans, utensils, and fire-starting tools
- Store Layer: Cooler, food containers, and bear-safe storage gear
- Eat Layer: Plates, bowls, mugs, eating utensils, and a can opener
- Clean Layer: Biodegradable soap, wash basins, trash bags, and hand sanitizer
- Pantry Extras: Cooking oil, salt, pepper, spices, condiments, and aluminum foil
Why a Camp Kitchen Checklist Changes Everything
A solid outdoor cooking checklist for camping isn’t just a memory aid — it’s a system. The Camp Kitchen Stack, our four-layer organizational framework for camp cooking gear, transforms a daunting pile of items into a logical sequence you can pack confidently, section by section. For beginners especially, knowing why each item is there (not just what it is) reduces the cognitive overload that causes things to get left behind.
Don’t worry if this feels like a lot. You probably already own half of these items. The goal here isn’t to send you on a shopping spree — it’s to give your packing list a structure that actually works.
The Cost of Forgetting One Item
Experienced campers consistently report that the lighter is the single most frequently forgotten piece of camp kitchen gear — and without it, your camp stove won’t start, your campfire won’t light, and dinner becomes trail mix eaten in the dark. That’s not a dramatic exaggeration; it’s a concrete consequence of one missing two-ounce item.
Here are the four most commonly forgotten items and what each one actually costs you at camp:
- Can opener: You can’t open the bean cans, soup, or fish tins you packed for dinner.
- Lighter or matches: Your stove won’t ignite. Your campfire won’t start. Nothing cooks.
- Spatula: Pancakes and eggs stick to the pan and fall apart when you try to flip them.
- Dish soap: You have no way to clean cookware between meals, which creates food safety risks.
The problem isn’t intelligence — it’s the absence of a system. A proper packing list prevents this scenario, but only if that list is organized in a way your brain can actually follow. Camping prep involves dozens of categories across shelter, clothing, safety, and food — and the kitchen gear often gets packed last, in a rush, from memory.
The solution isn’t memorizing a longer list — it’s organizing your gear into a system you can check off with confidence. That’s what The Camp Kitchen Stack is built to do.
If you’re also packing for shelter and sleep gear, see our comprehensive beginner camping checklist for the complete picture.
How to Use This Checklist
The Camp Kitchen Stack is a four-layer framework that organizes every piece of camp kitchen gear by its function. Here’s how the layers break down:
- Layer 1 — Cook: Stoves, fuel, pots, pans, utensils, and fire-starting tools
- Layer 2 — Store: Cooler, food containers, and bear-safe storage gear
- Layer 3 — Eat: Plates, bowls, mugs, and eating utensils (including that can opener)
- Layer 4 — Clean: Biodegradable soap (soap that breaks down naturally in the environment), wash basins, trash bags, and hand sanitizer
Throughout each section, you’ll see “Car Camping vs. Minimalist” callout notes. These tell you which items are must-haves for a full car-camping setup versus which ones you can skip if you’re going ultralight or backpacking. If you’re on your first trip with a vehicle, take everything in the Car Camping column. If you’re going minimalist, look for the Minimalist Pick notes.
These kitchen essentials are organized so you can pack confidently, layer by layer. Work through each section in order, check off items as you pack them, and grab the free printable PDF at the bottom of this guide for offline use.
Let’s start with Layer 1: your cooking hardware.
Essential Cooking & Prep Gear (Layer 1: Cook)
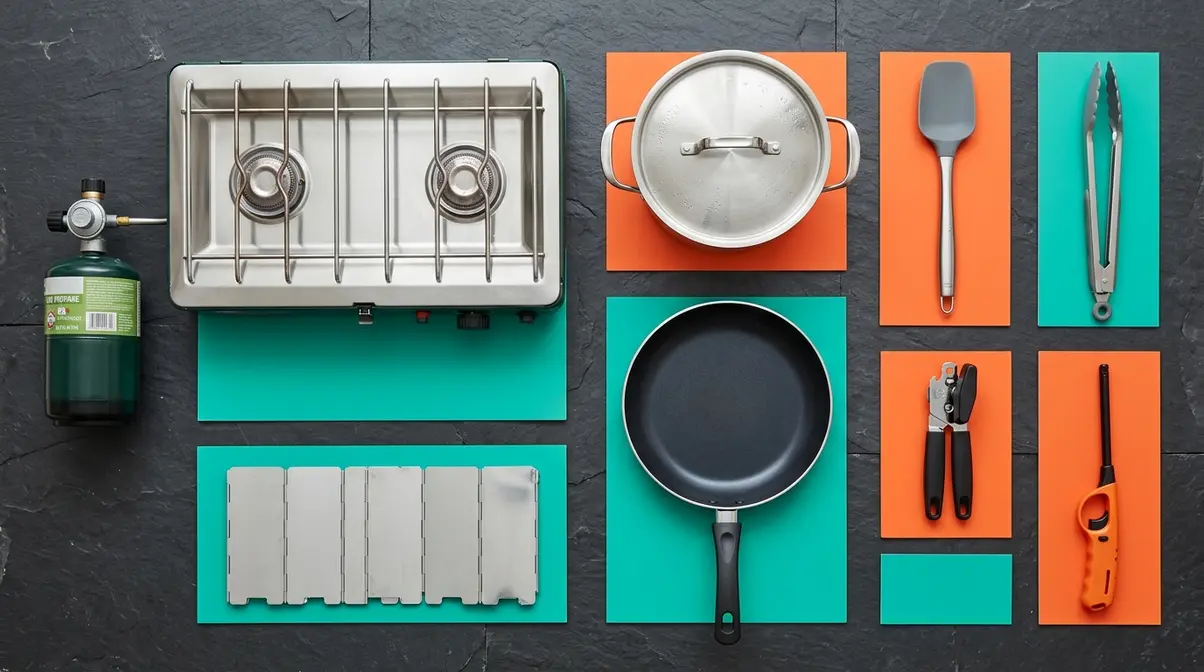
Your camp cooking hardware is the foundation of every outdoor meal. This layer covers five core categories: stove, cookware, utensils, fire tools, and ignition. Without the right hardware, the food and pantry items you carefully packed are essentially useless — you need something to cook on, something to cook in, and something to cook with.
A two-burner propane stove is the single most-recommended piece of car camping kitchen gear — it allows simultaneous cooking and eliminates dependence on campfire conditions.
Camp Stoves and Fuel
A camp stove is a portable cooking device that runs on propane, butane, or alcohol fuel. It’s the most important single item in your camp kitchen because it gives you a reliable, controllable heat source regardless of weather, fire bans, or campsite restrictions.
Car Camping Pick: A two-burner propane stove (such as the Coleman Classic) lets you boil water on one burner while sautéing on the other. Most models connect to a standard 1-lb propane canister or a larger 16.4-oz cylinder. A 1-lb propane canister provides roughly 1–2 hours of cooking time at medium heat — enough for two to three full meals.
Minimalist Pick: A single-burner canister stove (a compact stove that screws directly onto a threaded fuel canister) weighs as little as 3 ounces and fits in a shirt pocket. Butane-isobutane blends perform better in cold temperatures than pure butane.
Fuel Types at a Glance:
| Fuel Type | Best For | Approx. Burn Time (1-lb) | Cold Weather? |
|---|---|---|---|
| Propane | Car camping, two-burner stoves | 1–2 hours at medium | ✓ Good |
| Butane/Isobutane | Backpacking, canister stoves | 1–1.5 hours | ✓ Good (isobutane) |
| White gas (liquid fuel) | Extreme cold, high altitude | 2–3 hours | ✓ Excellent |
| Denatured alcohol | Ultralight backpacking | Variable | ✗ Poor |
- Camp Stove Checklist:
- [ ] Camp stove (two-burner propane for car camping; single-burner canister for backpacking)
- [ ] Fuel canisters or cylinders (pack at least one extra)
- [ ] Windscreen (a folding metal shield that blocks wind from extinguishing the flame)
- [ ] Lighter or waterproof matches (two sources of ignition — always)
- [ ] Stove carry bag or case
Car Camping: Bring a full-size two-burner stove + two 1-lb propane canisters.
Minimalist Pick: A canister stove + one 100g isobutane canister covers a weekend solo trip.
Pots, Pans, and Cookware
You don’t need a full kitchen’s worth of pots and pans. Experienced campers consistently recommend starting with a core kit of three items: one pot, one pan, and one spatula. Everything else is an upgrade, not a requirement.
- The Starter Cookware Kit:
- [ ] 2-quart pot with lid (for boiling water, making pasta, soups, or oatmeal)
- [ ] 10-inch skillet or frying pan (for eggs, bacon, pancakes, stir fry)
- [ ] Lid that fits both (a universal lid saves space and weight)
- [ ] Pot gripper or silicone handle cover (camp pots often lack handles — a gripper is essential)
- [ ] Cast iron skillet (optional upgrade for car camping)
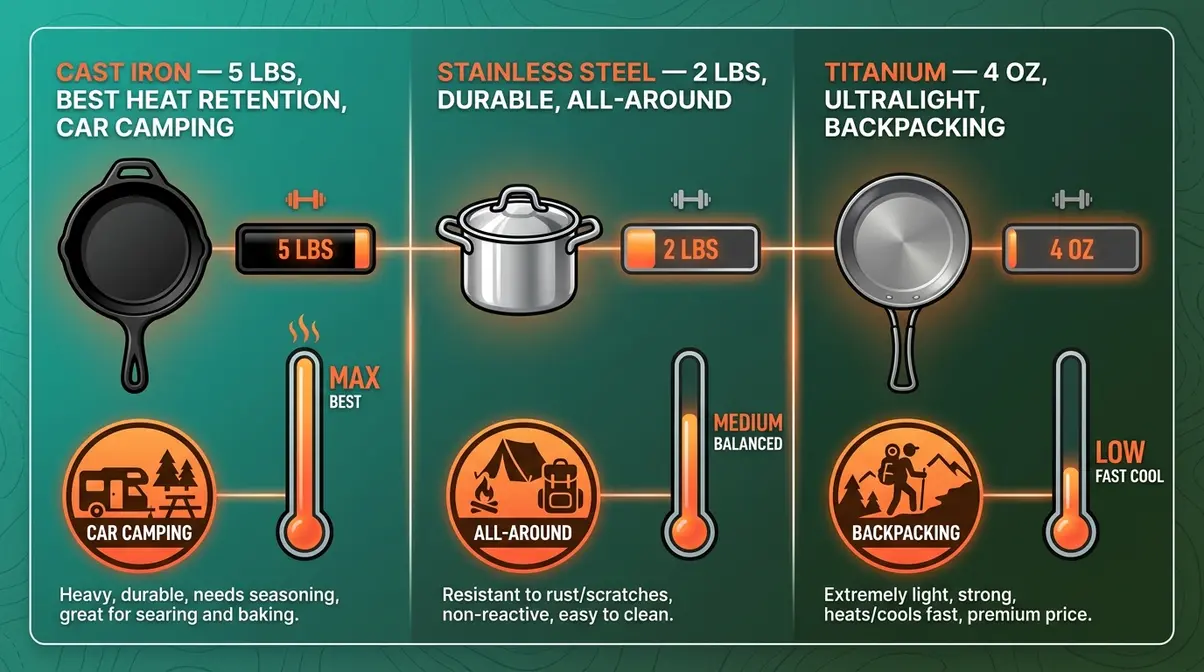
On cast iron: A cast iron skillet is a heavy but heat-retaining pan ideal for camp cooking. Cast iron is worth the weight for car camping because it distributes heat evenly across an uneven camp stove burner, holds temperature better than thin aluminum pans, and is nearly indestructible. It’s not a minimalist option — a 10-inch cast iron skillet weighs around 5 lbs — but for a car camping family trip, it’s the pan experienced campers reach for first.
Titanium cookware is the opposite: ultralight (a titanium pot can weigh under 4 oz), durable, and corrosion-resistant. The trade-off is uneven heat distribution and a much higher price point — a titanium pot set costs $60–$120 versus $20–$40 for aluminum.
Car Camping: Cast iron skillet + stainless steel pot set.
Minimalist Pick: A single titanium pot with a built-in lid/plate.
Cooking Utensils and Tools
These are the items that most often end up left on the kitchen counter. Pack them as a dedicated “utensil roll” — a fabric pouch that holds all your cooking tools together so nothing gets separated.
- Cooking Utensils Checklist:
- [ ] Spatula (silicone-tipped to protect non-stick surfaces)
- [ ] Long-handled spoon or ladle
- [ ] Tongs (12-inch minimum — essential for campfire cooking)
- [ ] Whisk (collapsible or small — for scrambled eggs and pancake batter)
- [ ] Can opener (manual; this is the #1 forgotten item — put it in your utensil roll now)
- [ ] Vegetable peeler
- [ ] Cutting board (flexible plastic or a small hardwood board)
- [ ] Chef’s knife + protective sheath (a single quality knife replaces three mediocre ones)
- [ ] Measuring cup (collapsible silicone saves space)
- [ ] Mixing bowl (collapsible silicone nests flat)
- [ ] Kitchen timer (or use your phone — but have a backup)
- [ ] Oven mitts or heat-resistant gloves
- [ ] Aluminum foil (multi-use: cooking, covering pots, wrapping leftovers)
Car Camping: Full utensil roll with all items above.
Minimalist Pick: Spatula, tongs, spork, can opener, and a small folding knife. That’s it.
Fire-Based Cooking Gear
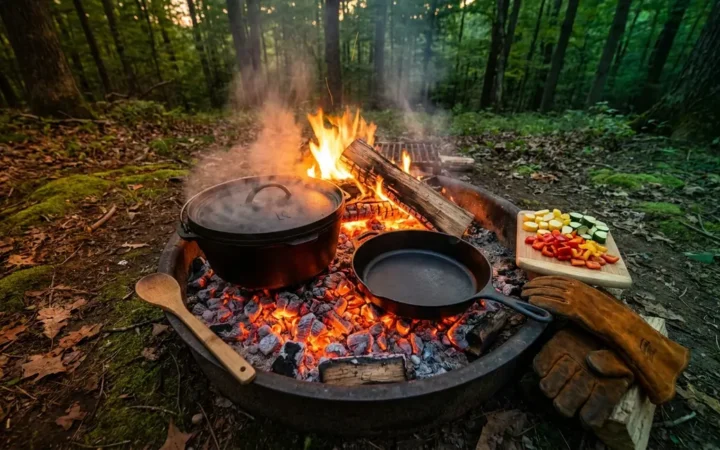
If your campsite allows open fires, a campfire grill rack — a metal grate placed over a fire for direct cooking — opens up a completely different style of outdoor cooking. Many campgrounds provide a fire ring, but not a grate. Bringing your own is a low-cost, low-weight upgrade.
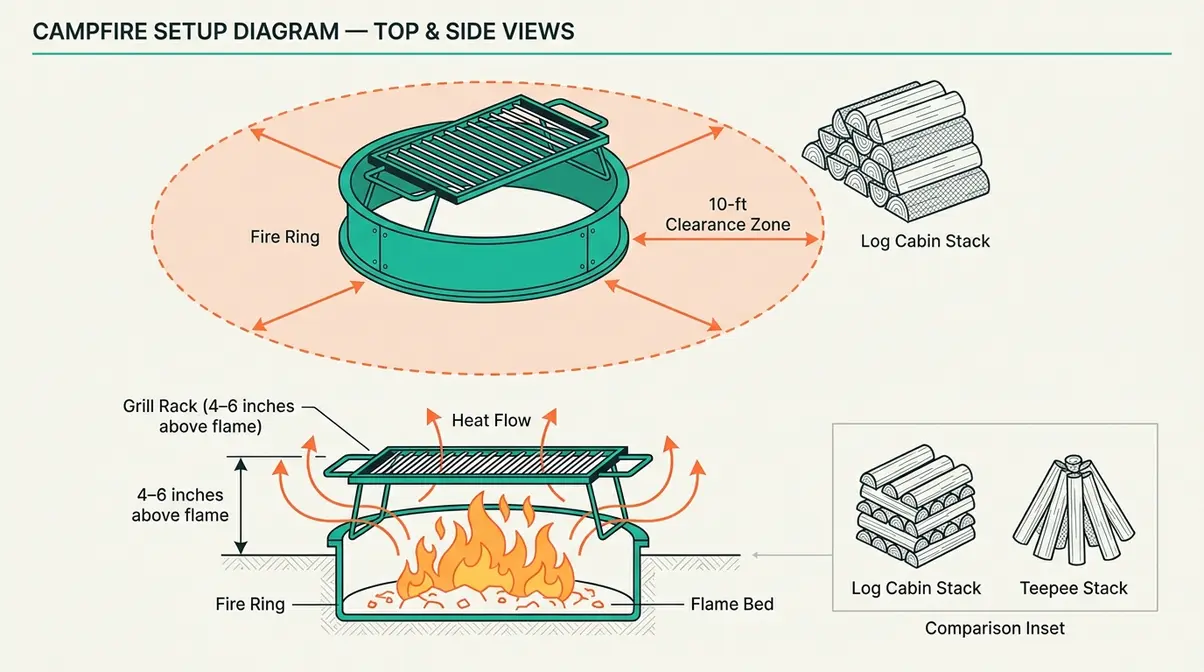
- Fire Cooking Gear Checklist:
- [ ] Campfire grill rack (folding, 12″×18″ fits most fire rings)
- [ ] Long-handled tongs (separate from your cooking tongs — these go in the fire)
- [ ] Fireproof gloves or welding gloves
- [ ] Firestarter cubes or fatwood (natural fire-starting material from pine resin)
- [ ] Lighter fluid (optional — only use in designated areas)
- [ ] Marshmallow/hot dog roasting sticks (telescoping stainless steel)
- [ ] Dutch oven with lid lifter (a heavy cast iron pot with a tight-fitting lid for campfire baking and stews)
Car Camping: Full fire kit including Dutch oven.
Minimalist Pick: Skip fire cooking entirely. A canister stove is faster, cleaner, and works everywhere.
Dining & Food Storage Essentials
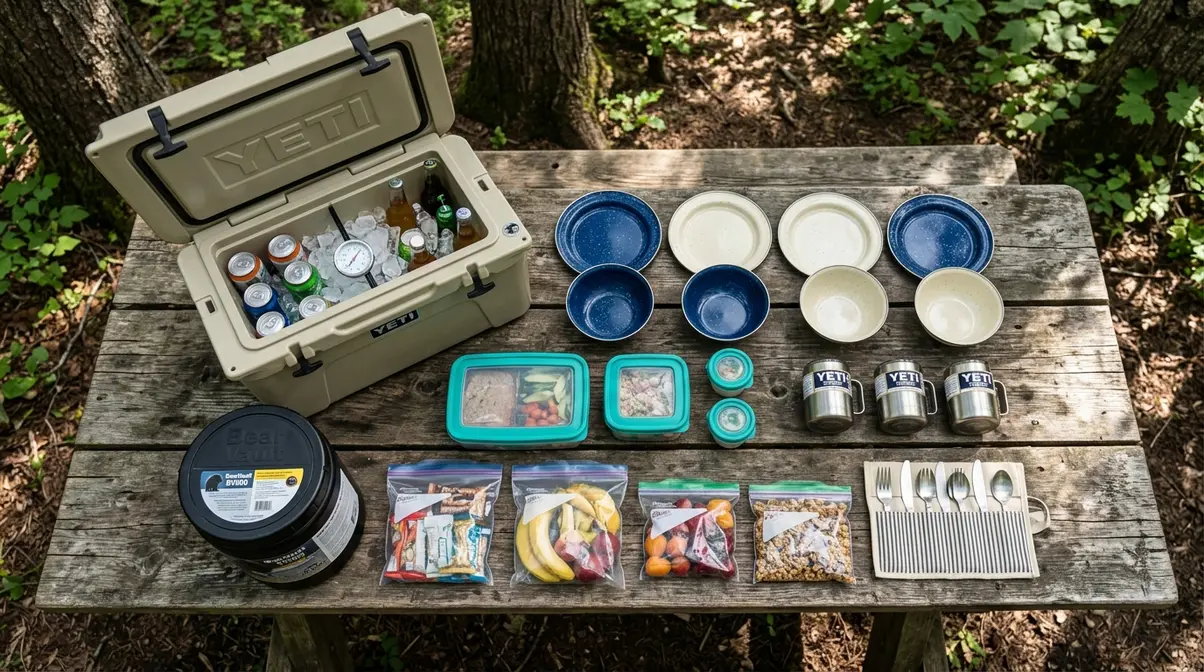
Layers 2 and 3 of The Camp Kitchen Stack cover how you keep food safe and how you actually eat it. These two layers are deeply connected — poor food storage leads directly to food safety problems at the table. The items here range from a quality cooler to a set of reusable plates, and getting them right is the difference between a relaxed camp meal and a stressful one.
Cooler and Ice: The Smart Cooler System
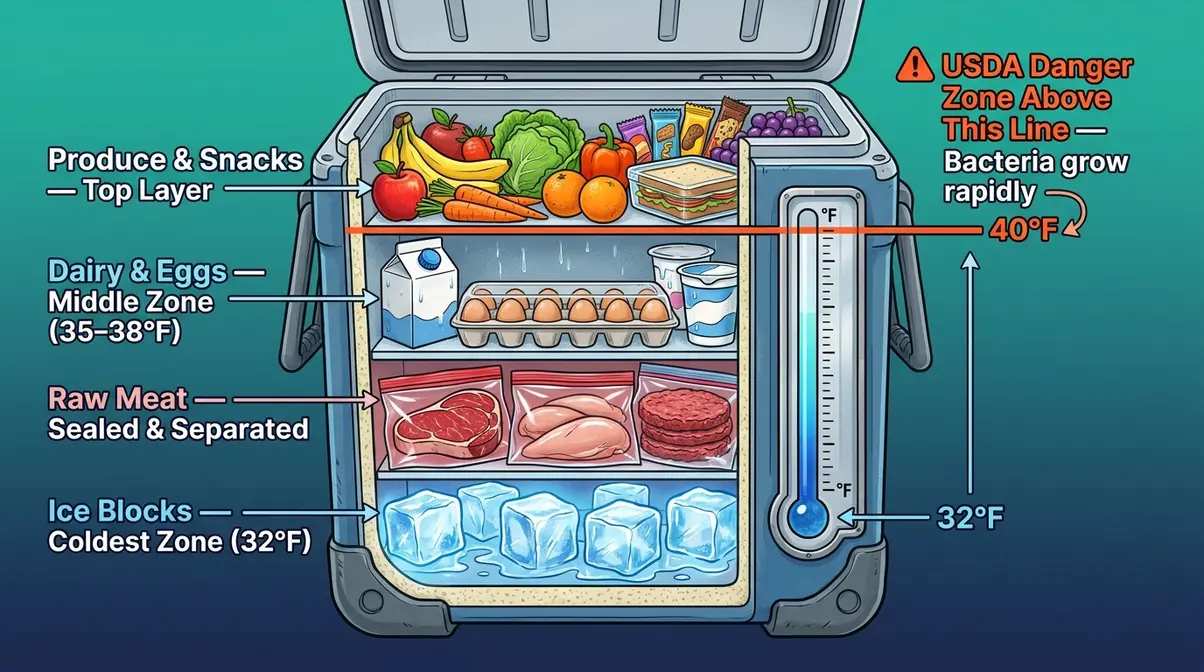
Your cooler is the most important piece of food safety equipment in your camp kitchen. The USDA Food Safety and Inspection Service recommends keeping perishable foods at or below 40°F (4°C) at all times — above that temperature, bacteria multiply rapidly, and food can become unsafe within two hours (USDA, 2026).
The Smart Cooler System is a three-rule approach that experienced campers use to maximize ice retention and food safety:
- Pre-chill your cooler for at least 2 hours before loading food — an empty cooler at room temperature will melt ice within hours.
- Layer strategically: Ice on the bottom, raw meat in sealed bags at the bottom on the ice, dairy and ready-to-eat foods in the middle, produce and dry items on top.
- Keep the cooler in shade and open it as infrequently as possible — every opening lets warm air in.
How Do You Keep Ice From Melting Too Fast?
To maximize ice retention, always pre-chill your cooler for at least two hours before loading it. Use large ice blocks rather than loose cubes, as solid blocks melt at a significantly slower rate. Keep the cooler stored in the shade, cover it with a reflective blanket if necessary, and minimize how often you open the lid.
- Cooler Checklist:
- [ ] Hard-sided cooler (minimum 40-quart for a family weekend; 20-quart for solo/couple)
- [ ] Ice blocks (last longer than ice cubes — freeze water in zip-lock bags at home)
- [ ] Ice packs (reusable; supplement loose ice)
- [ ] Cooler thermometer (small clip-on; verifies your cooler is holding 40°F or below)
- [ ] Waterproof bags for raw meat (double-bag to prevent cross-contamination)
- [ ] Bear-resistant cooler lock (required in many national parks — see the Bear-Safe section below)
Car Camping: 40–60 quart hard-sided cooler + ice blocks.
Minimalist Pick: An insulated dry bag (soft-sided, 10–15L) with ice packs for a 1–2 night trip.
Plates, Bowls, Mugs, and Eating Utensils
This is the most frequently underpacked section in a camp kitchen — and the easiest to fix. Pack one complete place setting per person, plus one extra “emergency” set for unexpected guests or breakage.
- Eating Gear Checklist (per person):
- [ ] Plate (enamel, melamine, or stainless steel — avoid glass)
- [ ] Bowl (deep enough for soup, oatmeal, and pasta)
- [ ] Mug (insulated stainless steel keeps coffee hot for 30+ minutes)
- [ ] Fork, knife, and spoon (or a spork — a combined spoon-fork utensil — to save space)
- [ ] Steak knife if serving grilled meat
- [ ] Napkins or a small cloth towel per person
Material Comparison:
| Material | Weight | Durability | Best For |
|---|---|---|---|
| Enamel | Medium | High (chips over time) | Car camping, aesthetic appeal |
| Stainless steel | Medium | Very high | All-around best choice |
| Melamine | Light | Medium | Budget car camping |
| Titanium | Very light | Very high | Backpacking |
| Paper/disposable | Very light | Single use | Minimalist, no-wash trips |
Car Camping: Full enamel or stainless steel place settings.
Minimalist Pick: One titanium spork and a single insulated mug that doubles as a bowl.
Food Containers and Leftover Storage
Proper food containers do two jobs at camp: they keep your food organized in the cooler, and they store leftovers safely between meals. The USDA advises that cooked leftovers should be refrigerated within two hours of cooking — at camp, that means getting them into the cooler quickly (USDA, 2026). Using reusable containers instead of single-use plastics aligns with EPA waste reduction strategies for outdoor eating, significantly minimizing your campsite footprint.
- Food Container Checklist:
- [ ] Reusable plastic containers with tight-fitting lids (square shapes pack more efficiently than round)
- [ ] Zip-lock bags in multiple sizes (gallon, quart, sandwich — the most versatile camp kitchen item)
- [ ] Silicone stretch lids (fit over pots and bowls to eliminate single-use plastic wrap)
- [ ] Small glass jars with lids (for spices, sauces, and pre-mixed ingredients)
- [ ] Collapsible silicone containers (flatten for packing, expand for use)
- [ ] Labeling tape and a permanent marker (label everything with the date and contents)
Car Camping: Full set of rigid containers + gallon zip-locks.
Minimalist Pick: Four quart-size zip-locks and two small silicone containers. Done.
Bear-Safe Food Storage Protocols
In many U.S. national parks and wilderness areas, bear-safe food storage isn’t optional — it’s the law. NPS regulations mandate that all food, trash, and scented items must be stored in approved bear-resistant containers or bear boxes when not in active use (National Park Service, 2026). Violations carry fines starting at $250 in many parks, and more importantly, a fed bear is a dangerous bear.
- What counts as “food and scented items” under NPS guidelines:
- All food and beverages (including sealed packaging)
- Cooking utensils, pots, and pans with food residue
- Dish soap, hand sanitizer, sunscreen, toothpaste, and lip balm
- Trash bags with any food waste
- Bear-Safe Storage Checklist:
- [ ] Bear canister (a hard-sided, bear-resistant container approved by the Interagency Grizzly Bear Committee) — required in many backcountry areas
- [ ] Bear hang kit (rope + carabiner for hanging food bags from a tree branch at least 10 feet high and 4 feet from the trunk)
- [ ] Bear-resistant cooler lock or cable lock
- [ ] Check your specific park’s regulations at National Park Service guidelines before your trip
Car Camping at a developed campground: Use the provided metal bear box if available. If not, lock food in your car’s trunk overnight.
Backcountry/Backpacking: A certified bear canister is non-negotiable in regulated areas.
Camp Pantry & Cooking Staples
The pantry layer sits between your cooler and your cookware — it’s all the ingredients and consumables that turn raw hardware into actual meals. Experienced campers consistently report that forgetting pantry staples (especially salt, oil, and a lighter) causes more ruined meals than forgetting any piece of equipment.
A successful camp kitchen relies heavily on meal prep workflows established before you even leave home. Chopping vegetables, pre-mixing pancake batter, and marinating meats in your home kitchen saves immense time and reduces the number of tools you need to pack. When building your outdoor cooking checklist camping pantry, remember that oil and butter are the most commonly forgotten items because they don’t feel like “gear.” They are absolutely essential — without them, everything sticks to the pan and nothing browns properly.
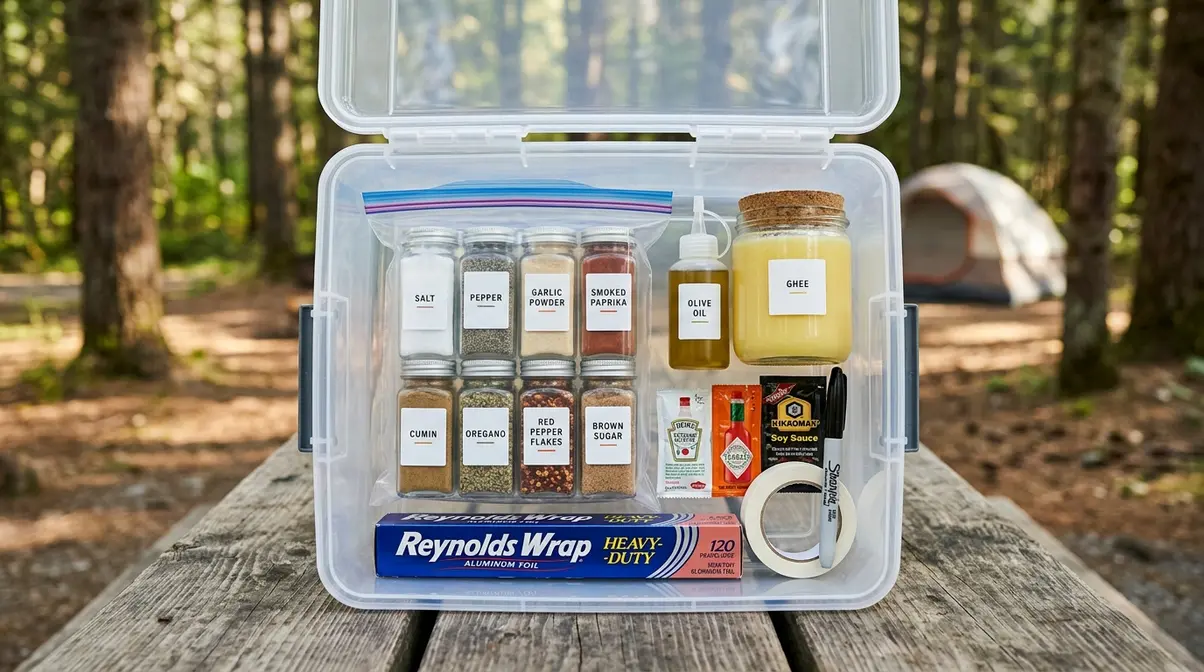
Using a clear, plastic bin for your dry pantry items keeps everything visible and protects your food from moisture and pests. Keep this bin separate from your hardware to avoid crushing delicate items like bread or chips.
The Spice Kit: Salt, Pepper, and Beyond
Salt and pepper are the foundation, but a small spice kit weighing under half a pound can transform basic camp meals into something genuinely delicious. The key is pre-mixing your spices at home and packing them in small labeled containers — this saves space, reduces packaging waste, and speeds up cooking at camp.
Consider creating a dedicated “weekend warrior” spice box using a small tackle box or pill organizer. This allows you to bring tiny amounts of 6-8 different spices without taking up valuable cooler or dry-bin space. Labeling the tops with a permanent marker ensures you don’t confuse cumin with cinnamon when making morning oatmeal.
- Core Spice Kit Checklist:
- [ ] Salt (kosher or sea salt — fine table salt clumps in humidity)
- [ ] Black pepper (pre-ground or a small grinder)
- [ ] Garlic powder (replaces fresh garlic for most camp recipes)
- [ ] Onion powder
- [ ] Smoked paprika (adds depth to eggs, potatoes, and grilled meat)
- [ ] Cumin (essential for tacos, chili, and rice dishes)
- [ ] Red pepper flakes (optional heat)
- [ ] Dried herbs: oregano, thyme, or Italian seasoning blend
- [ ] Sugar and/or brown sugar (for oatmeal, coffee, and baking)
- [ ] A pre-mixed “camp seasoning blend” in a single shaker (combine salt, pepper, garlic powder, and paprika at home)
Packing tip: Use small 1-oz plastic spice containers with screw-top lids, or repurpose mini glass jars. A full 10-spice kit fits in a quart-size zip-lock bag.
Car Camping: Full spice kit in a dedicated small bag.
Minimalist Pick: Salt, pepper, and one pre-mixed seasoning blend. Three containers total.
Cooking Oil, Butter, and Fats
Oil and butter are the most commonly forgotten pantry items because they don’t feel like “gear.” They are absolutely essential — without them, everything sticks to the pan and nothing browns properly.
- Fats and Oils Checklist:
- [ ] Cooking oil (olive oil or vegetable oil in a small squeeze bottle — glass bottles break)
- [ ] Butter or ghee (ghee, clarified butter with the milk solids removed, is shelf-stable without refrigeration for up to a month)
- [ ] Coconut oil (solid at room temperature, doesn’t require refrigeration, multi-use)
- [ ] Non-stick cooking spray (optional but saves cleanup time)
Packing liquids safely: Transfer oil from its glass bottle into a BPA-free squeeze bottle or a leak-proof silicone bottle before packing. Double-bag it in a zip-lock. Liquid spills in a camp bag are notoriously difficult to clean up.
Car Camping: Olive oil in a squeeze bottle + butter in a small sealed container in the cooler.
Minimalist Pick: Ghee in a small jar. No refrigeration needed, works for everything.
Condiments and Camp Extras
These items are small individually, but forgetting them collectively makes meals significantly less enjoyable. Pack them together in a single “extras bag” so they’re always accounted for. For short trips, grab extra condiment packets from fast-food restaurants rather than buying dedicated travel sizes. They are perfectly portioned, require zero refrigeration, and generate minimal waste if you pack them out properly.
- Condiments Checklist:
- [ ] Ketchup and mustard (travel-size packets eliminate the need for refrigeration)
- [ ] Hot sauce (a small bottle of your preferred brand)
- [ ] Soy sauce (travel packets)
- [ ] Maple syrup (for pancakes and oatmeal — small glass jar or single-serve packets)
- [ ] Honey (single-serve packets or a small bear-shaped bottle)
- [ ] Peanut butter (individual packets are mess-free)
- Camp Extras Checklist:
- [ ] Aluminum foil (heavy-duty — for foil packet meals, wrapping corn, covering pots)
- [ ] Parchment paper (for baking in a Dutch oven)
- [ ] Plastic wrap or beeswax wraps
- [ ] Toothpicks and skewers (bamboo or metal)
- [ ] Marshmallow roasting sticks (telescoping stainless steel — doubles as hot dog sticks)
- [ ] Paper towels (one partial roll is enough; avoid over-packing)
- [ ] Dish towels or microfiber cloths (2 minimum — one for drying dishes, one for spills)
Foil packet meals are one of the most underrated camp cooking techniques: place protein, vegetables, butter, and seasoning in a double layer of foil, seal the edges, and cook directly on hot coals for 20–30 minutes. Zero pots required. Zero cleanup beyond discarding the foil.
Cleanup & Safety Gear
Layer 4 of The Camp Kitchen Stack is the one most beginners skip when packing — and then spend an entire evening wishing they hadn’t. Proper cleanup at camp isn’t just about personal comfort; it’s about protecting wildlife, water sources, and the campsite for the next visitor.
Biodegradable Soap & Wash Basins
Biodegradable soap (soap that breaks down naturally in the environment without harming soil or water ecosystems) is the only type of soap appropriate for camp dishwashing. Standard household dish soap contains surfactants and synthetic fragrances that persist in soil and waterways. REI Expert Advice and Leave No Trace guidelines both recommend biodegradable soap exclusively for backcountry and campsite use.
Leave No Trace guidelines dictate that all dishwater (greywater — used wash water containing food particles and soap) must be disposed of at least 200 feet (approximately 70 adult paces) from any water source, campsite, or trail (Leave No Trace Center for Outdoor Ethics, 2026). Scatter it broadly over a wide area rather than pouring it in one spot.
Can You Use Regular Dish Soap for Camping?
No, you should never use regular household dish soap for camping. Standard dish soaps contain synthetic surfactants, artificial fragrances, and phosphates that do not break down naturally in soil. These chemicals can severely disrupt local ecosystems and harm aquatic life if they run off into nearby water sources. Always opt for a certified biodegradable soap instead.
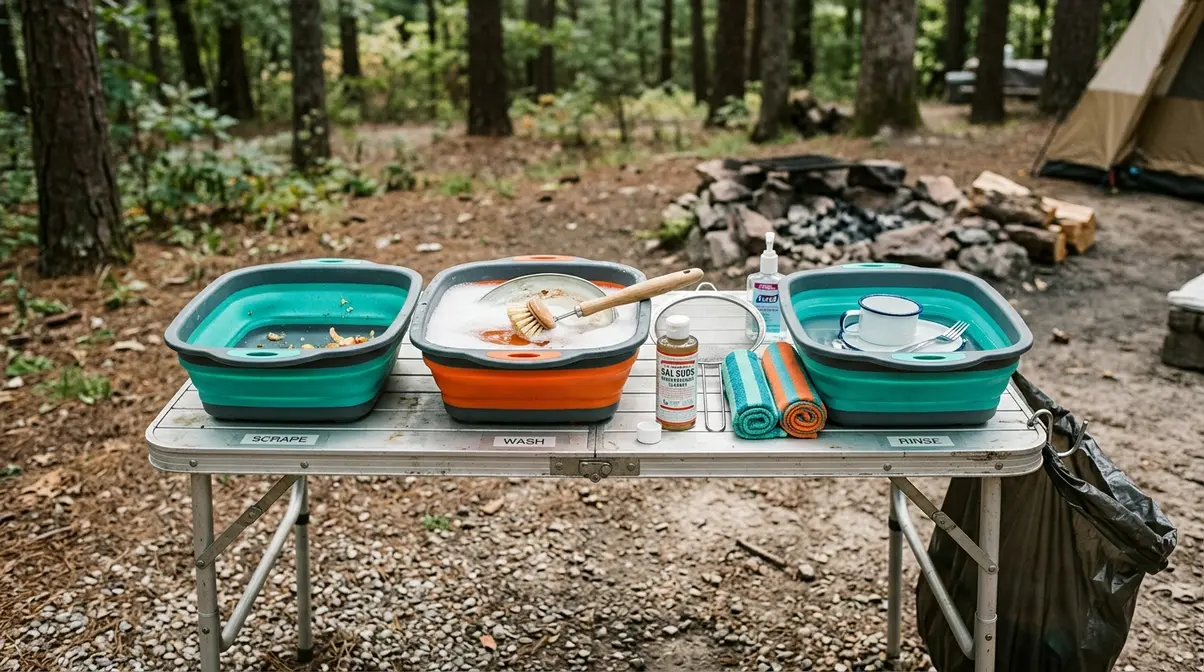
The Three-Bin Dishwashing System:
This step-by-step method is the standard used across camping communities and outdoor education programs:
- Bin 1 — Scrape: Remove all food scraps from plates and pots into your trash bag. A silicone spatula makes this fast. Never put food particles into a water source.
- Bin 2 — Wash: Fill a collapsible basin (a flexible plastic or silicone container that folds flat for packing) with warm water and a few drops of biodegradable soap. Wash all dishes with a scrub brush or sponge.
Once your dishes are washed, move on to the rinsing and disposal phases to ensure no soap residue is left behind:
- Bin 3 — Rinse: Fill a second basin with clean water. Rinse all soap residue off dishes. A small amount of white vinegar in the rinse water speeds drying.
- Dispose: Carry both basins of greywater at least 200 feet from camp. Strain out any food particles with a small mesh strainer before scattering. Pack out the strained food particles in your trash bag.
- Cleanup Gear Checklist:
- [ ] Biodegradable soap (Dr. Bronner’s or a camp-specific formula — small 2-oz bottle is enough for a weekend)
- [ ] Two collapsible wash basins (one for wash, one for rinse)
- [ ] Scrub brush or sponge (dedicated camp use only)
- [ ] Mesh strainer or camp sink strainer
- [ ] Dish drying rack (optional — a clean microfiber towel works fine)
- [ ] Microfiber dish towels (2–3)
- [ ] White vinegar in a small bottle (optional rinse aid)
Car Camping: Full three-bin system.
Minimalist Pick: One collapsible basin + a small bottle of biodegradable soap + one microfiber cloth.
Trash Management and Waste Disposal
Leave No Trace principles are clear: pack it in, pack it out. Every piece of food waste, packaging, and used aluminum foil leaves with you. No exceptions, even for “natural” food scraps like banana peels and apple cores — these introduce non-native organic matter into the local ecosystem and attract wildlife.
- Trash Management Checklist:
- [ ] Heavy-duty trash bags (at least 2 — one for dry trash, one for wet/food waste)
- [ ] Small trash bag for the cook area (a gallon zip-lock works; keeps cooking mess contained)
- [ ] Mesh strainer for greywater (to catch food particles before disposal)
- [ ] Compostable bags for food scraps (if your campground has a compost program)
- [ ] Bear-resistant trash container or bear bag for overnight trash storage
- [ ] A dedicated “wet trash” container with a lid (prevents smells and wildlife attraction)
The rule on food scraps: Even biodegradable food waste — fruit peels, eggshells, coffee grounds — should be packed out in most camping environments. Fresh Off the Grid and the NPS both advise against burying food scraps, as animals dig them up and associate human campsites with food.
Hand Hygiene and Food Safety at Camp
This is the one section most camping checklists skip entirely — and it’s also the one most likely to make you or your family sick. The Centers for Disease Control and Prevention advises using hand sanitizer with at least 60% alcohol content when soap and water are not immediately available (CDC, 2026). At camp, that’s almost always the situation before and after handling raw food.
- Critical hand hygiene moments at camp:
- Before and after handling raw meat, poultry, or fish
- Before eating any food
- After touching trash, cooler latches, or shared surfaces
- After using the restroom (soap and water preferred; hand sanitizer as backup)
- Hand Hygiene and Food Safety Checklist:
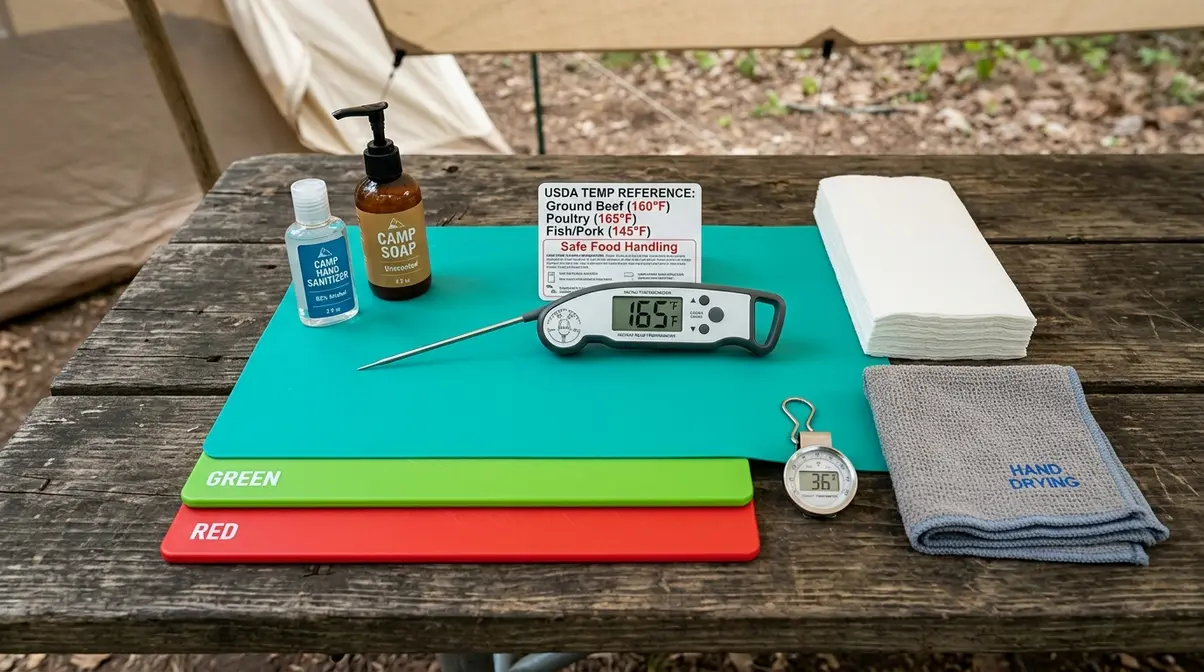
- [ ] Hand sanitizer (60%+ alcohol content; minimum 2-oz bottle per person)
- [ ] Liquid hand soap in a small pump bottle (for use at camp sinks or water jugs)
- [ ] Paper towels or a dedicated hand-drying cloth
- [ ] Cooler thermometer (verify your cooler stays at or below 40°F)
- [ ] Food-safe thermometer (instant-read; verify meat is cooked to USDA-recommended safe internal temperatures)
- [ ] Separate cutting boards for raw meat and produce (color-coded if possible — red for meat, green for vegetables)
- USDA safe minimum internal temperatures (USDA Food Safety and Inspection Service, 2026):
- Ground beef and pork: 160°F (71°C)
- Whole poultry: 165°F (74°C)
- Pork chops, steaks, fish: 145°F (63°C)
An instant-read food thermometer is a small, inexpensive item that eliminates guesswork entirely. For outdoor cooking safety tips beyond the checklist, including fire safety and first aid essentials, see our dedicated guide.
Common Camp Kitchen Mistakes
Every experienced camper has a story about a trip that went sideways because of one avoidable mistake. Our camp kitchen framework is based on gear used across dozens of outdoor trips, and these are the three pitfalls that come up most consistently — along with practical ways to sidestep each one.
Three Pitfalls That Ruin Camp Meals
Pitfall 1: Overpacking cookware
The scenario: You bring a full set of pots, pans, baking sheets, and a wok “just in case.” The result: 20 minutes of unpacking, a cluttered cook area, and half of it never gets used. The fix: Start with the core three-item kit (one pot, one pan, one spatula). Add items only after you’ve identified a specific meal that requires them.
Pitfall 2: Forgetting a second ignition source
The scenario: Your lighter runs out of fuel or gets wet. Your stove won’t start. Your campfire won’t light. The fix: Always pack two ignition sources — a lighter and a box of waterproof matches. Both weigh almost nothing and cost under $3 combined. This is a non-negotiable redundancy.
Pitfall 3: Skipping food temperature management
The scenario: You assume the cooler is “cold enough” without checking. By day two, perishables have been sitting above 40°F for hours. The fix: Pack a cooler thermometer (a $5–$8 clip-on model works perfectly). Check it each time you open the cooler. If it reads above 40°F, add ice immediately. The USDA recommends discarding any perishable food that has been above 40°F for more than two hours (USDA, 2026).
When to Simplify Your Setup
Not every camping trip needs The Camp Kitchen Stack at full deployment. If you’re going on a one-night trip, a minimalist setup actually performs better than a full car-camping kitchen because it’s faster to set up, faster to clean up, and leaves more time for the reason you came — being outside.
- Signs you should simplify:
- Trip length is one night or less
- You’re hiking more than 1 mile to your campsite
- Your vehicle has limited cargo space
- You’re cooking for one or two people only
- The Minimalist Camp Kitchen (complete list):
- Canister stove + one 100g fuel canister
- One titanium pot (1-liter)
- Spork + folding knife
- One mug (doubles as a bowl)
- Salt, pepper, and one seasoning blend
- Ghee in a small jar
- Biodegradable soap (2 oz)
- One collapsible wash basin
- Two zip-lock bags
- Hand sanitizer
That’s ten categories. Everything fits in a 20-liter daypack. For a full breakdown of beginner camping meal ideas that work with this minimalist kit, see our separate guide.
Frequently Asked Questions
What should I put on my outdoor cooking checklist for camping?
Your outdoor cooking checklist for camping should cover four layers: Cook (stove, fuel, pots, pans, utensils), Store (cooler, food containers, bear-safe gear), Eat (plates, bowls, mugs, eating utensils), and Clean (biodegradable soap, wash basins, trash bags, hand sanitizer). Add a pantry section for oil, salt, pepper, spices, and condiments. For a first trip, prioritize the Cook and Store layers — these are the most consequential if you forget something.
What food should I bring camping for the first time?
For a first camping trip, focus on simple, no-prep meals that require minimal cookware. Good beginner choices include instant oatmeal and eggs for breakfast, peanut butter wraps for lunch, and foil packet meals (protein + vegetables + butter + seasoning sealed in aluminum foil and cooked on coals) for dinner. Pack shelf-stable snacks — trail mix, granola bars, jerky — that don’t need refrigeration. Avoid raw chicken or complex marinades on your first trip; they add food safety complexity you don’t need while you’re still learning the setup.
How do I keep food cold while camping without a refrigerator?
A quality hard-sided cooler with ice blocks (not loose cubes) keeps food at or below 40°F for 48–72 hours if managed correctly. Pre-chill the cooler for at least two hours before loading. Layer ice on the bottom, raw meat in sealed bags above the ice, and ready-to-eat foods on top. Keep the cooler in shade and open it as rarely as possible. The USDA recommends never letting perishables exceed 40°F for more than two hours (USDA, 2026) — a $5 cooler thermometer makes monitoring effortless.
Do I need biodegradable soap for camping?
Yes — biodegradable soap is required for responsible camp dishwashing and strongly recommended as standard practice in all outdoor settings. Standard household dish soap contains synthetic surfactants and fragrances that don’t break down in soil and can harm aquatic ecosystems if they reach a water source. Leave No Trace guidelines require disposing of all greywater (used wash water) at least 200 feet from any water source (Leave No Trace Center for Outdoor Ethics, 2026). A 2-oz travel bottle of biodegradable soap like Dr. Bronner’s is sufficient for a full weekend trip for a family of four.
What cooking equipment do I need for camping?
The core camping cooking equipment list for beginners is shorter than most people expect: a camp stove and fuel, a 2-quart pot with lid, a 10-inch skillet, a spatula, tongs, a can opener, and two ignition sources (lighter + waterproof matches). Everything else — Dutch ovens, campfire grill racks, cast iron skillets — is an upgrade for specific cooking styles. Start with the seven-item core kit and add based on the meals you actually plan to cook. A two-burner propane stove is the most versatile starting point for car camping.
Your Camp Kitchen Is Ready – Now Go Use It
For first-time and beginner campers, the outdoor cooking checklist for camping stops feeling overwhelming the moment you have a framework. The Camp Kitchen Stack — four layers organized by function (Cook, Store, Eat, Clean) — turns a sprawling gear list into a logical sequence you can pack in under an hour and check off with confidence.
The framework works because it mirrors how you actually use the gear at camp. You cook first, store leftovers second, eat with dedicated tableware third, and clean up systematically in the fourth layer. Nothing is random. Everything has a place. Across dozens of camping trips, this layered approach consistently outperforms packing from a flat list — because you’re thinking about function, not just inventory.
Start with the core kit in each layer, then customize based on your camping style and trip length. If you’re car camping, take the full list. If you’re going minimalist, follow the Minimalist Pick callouts throughout this guide. Either way, grab the free printable PDF checklist below, work through it layer by layer before you leave home, and spend your time at camp actually enjoying the fire — not searching for the can opener.

David King
Field gear tester at Tent Explorer.