Campfire Safety Tips: Complete Beginner’s Guide (2026)
 Dave King
Updated July 1, 2026
19 min read
Dave King
Updated July 1, 2026
19 min read
⚠️ Safety Notice: Fire conditions change rapidly. Always check your local fire restrictions and any active Burn Bans before building a campfire. Visit your state’s forestry agency website or InciWeb for real-time fire restriction maps. When in doubt, don’t build a fire.
Every year, campfires that aren’t properly managed escape and ignite wildfires — including in conditions that seemed perfectly safe at the time. If you’ve ever felt uncertain about whether you’re doing it right, these campfire safety tips are for you.
A single moment of inattention — stepping away from an unattended fire, missing a shift in gusty winds, or leaving embers that aren’t fully cold — can escalate into a crisis that scorches thousands of acres and puts entire communities at risk. The stakes are real, and your caution is exactly the right instinct.
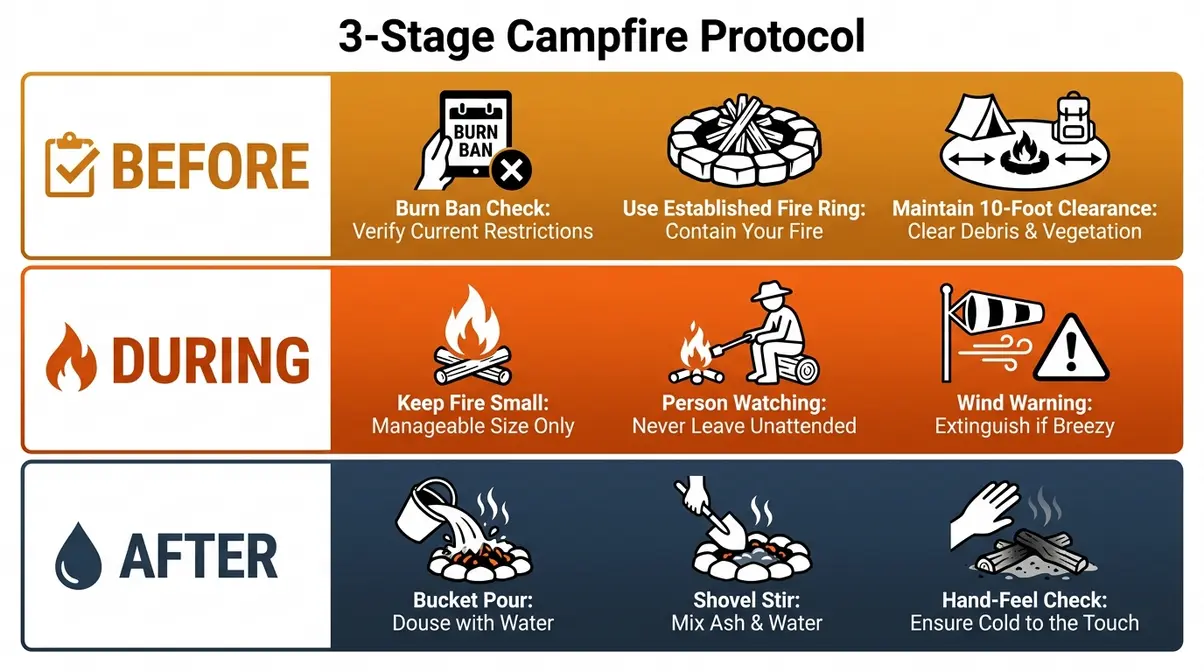
By the end of this guide, you’ll know exactly how to prepare your site, manage your fire, and extinguish it completely — so you can enjoy the outdoors with confidence. We’ll walk through The 3-Stage Campfire Protocol (Before, During, After), plus dedicated sections on campfire safety for kids and advanced concepts that most beginner guides skip entirely.
Key Takeaways: The 3-Stage Campfire Protocol
Safe campfire management follows three stages — Before, During, and After — and takes less than 15 minutes of extra effort to do correctly.
- Before: Check for Burn Bans, choose an existing fire circle, and clear a 10-foot radius of combustible materials
- During: Keep the fire small, never leave it unattended, and watch for gusty winds
- After: Use the “Drown, Stir, and Feel” method until the fire pit is cold to the touch
- For kids: Enforce a strict 3-foot safety circle around any campfire at all times
- Advanced: The 30/30/30 rule and the 3 P’s of fire are your early-warning system for dangerous conditions
Prerequisites: What You’ll Need Before You Start
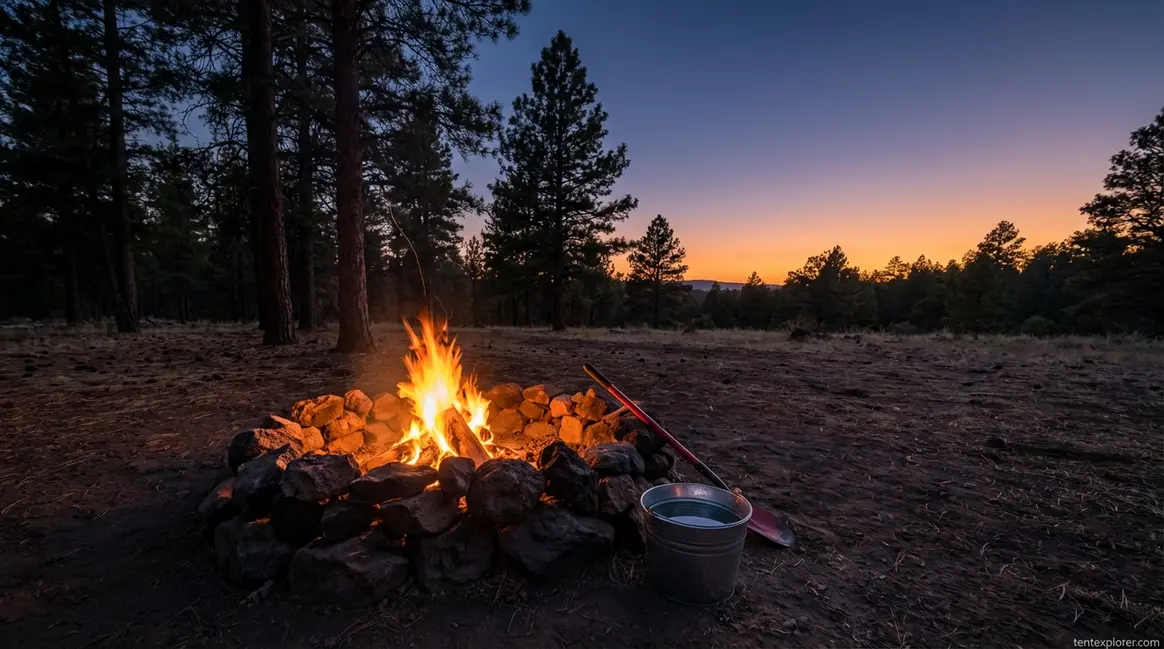
Before your first spark, gather these six items. The Boy Scouts of America’s official safety guidelines require that a water bucket and shovel must always be placed adjacent to a campfire before it is even ignited — and outdoor safety experts agree this applies to all campers, not just Scouts.
- A bucket of water or nearby water source — Non-negotiable. You must be able to douse the fire immediately if it spreads or the wind picks up. Collapsible camping buckets are excellent space-saving options.
- A shovel — Used to stir embers during extinguishing and to smother any escaping sparks with dirt. A foldable camping shovel works perfectly.
- An existing fire ring or fire pit — Always use established fire circles when available; creating a new pit scars the land and is prohibited in many campgrounds.
- Dry firewood (not wet, not green) — Wet or green wood produces excess smoke, more sparks, and unpredictable flare-ups. Use only seasoned, dry wood.
- Matches or a lighter — Store them dry and completely out of reach of children.
- Optional: a portable fire extinguisher and headlamp — A 2.5 lb ABC-rated extinguisher fits easily in most camp kits. A headlamp is also crucial for safely extinguishing fires after dark.
With your gear ready, let’s walk through the three stages of the 3-Stage Campfire Protocol — starting with the most important: what you do before the first spark.
Step 1: Site Selection and Preparation
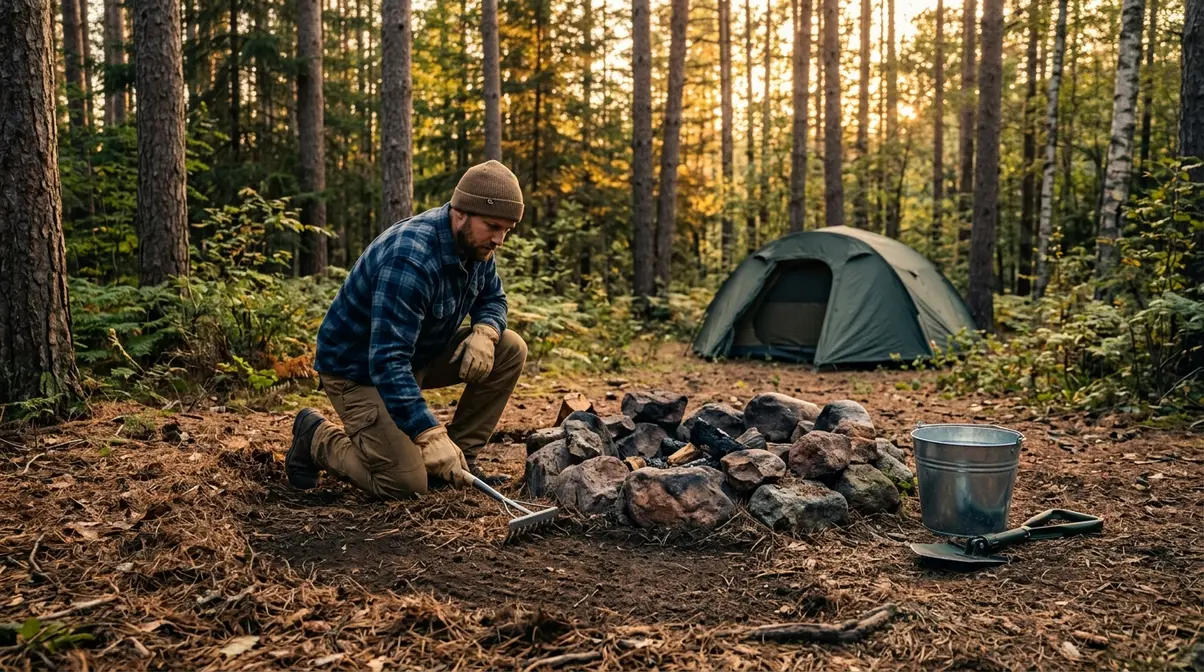
The decisions you make before lighting a campfire are the single biggest factor in preventing wildfires. According to the USDA Forest Service — the federal agency that manages national forests and campfire regulations — improper campfire placement and failure to check fire restrictions are among the leading human causes of wildland fires. Getting these steps right costs you five minutes. Getting them wrong can cost far more.
Check Fire Restrictions and Burn Bans
A Burn Ban is an official order from a government agency prohibiting open fires, including campfires, during periods of high fire danger. Violating a Burn Ban can result in significant fines — and more importantly, it puts lives at risk.
Before every trip, check these sources:
- Your campground or park’s official website — Many post active fire restrictions on their homepage.
- InciWeb — A real-time national fire restriction database maintained by the U.S. government.
- Your state’s forestry agency — Search ” fire restrictions 2026″ for current maps.
- The campground host or ranger station — Ask directly when you arrive. Conditions can change overnight.
Why this matters: A Burn Ban exists because fire danger has crossed a threshold where even a carefully managed campfire carries unacceptable risk. No campfire experience is worth ignoring that signal.
Choosing a Safe Campfire Location
The National Park Service — which oversees campfire rules in national parks — recommends using existing fire circles (pre-built rings of rocks or steel fire rings) whenever they are available. Creating a new fire pit damages the environment and is prohibited in most managed campgrounds.
If no existing ring is available and fires are permitted, follow these distance rules:
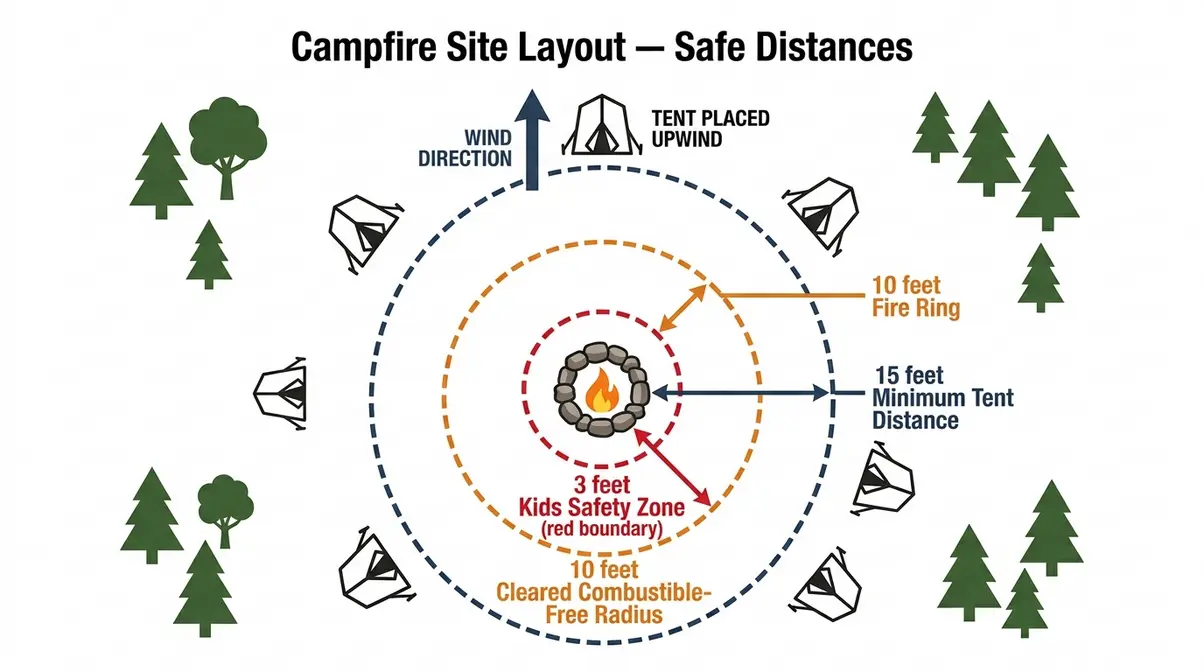
- At least 15 feet from your tent, sleeping area, and any structures — Sparks travel further than most people expect, especially in light wind. Always factor in the prevailing wind direction to ensure embers blow away from your tent.
- At least 15–25 feet from overhanging branches, dry grass, and shrubs — Combustible materials (anything that can catch fire, including dry leaves, pine needles, and bark) must be well outside this zone.
- Never build under a tree canopy — Heat rises directly and can ignite overhead branches.
- Choose a flat, open surface — Sloped ground allows burning material to roll away from the pit.
For more comprehensive advice, review these essential campfire safety practices before heading out.
Clearing and Preparing Your Pit
Even when using an existing fire ring, you must clear the surrounding area before lighting.
- Remove all combustible materials within a 10-foot radius — This includes dry leaves, pine needles, wood chips, and paper. Rake them away from the pit entirely.
- Check overhead clearance — Look up. No branches should hang within 10 feet directly above the pit.
- Dig or confirm a contained pit — The fire ring should be at least 6 inches deep with non-combustible walls (rock, dirt, or a metal ring). Never build a fire directly on grass.
- Position your water bucket and shovel within arm’s reach — Place them before you light anything, not after.
Why this matters: The 10-foot clearance radius is a standard recommended by Smokey Bear’s official campfire guidelines. A single burning ember landing on dry pine needles just outside an unprepared ring can ignite within seconds.
Step 2: Active Campfire Management
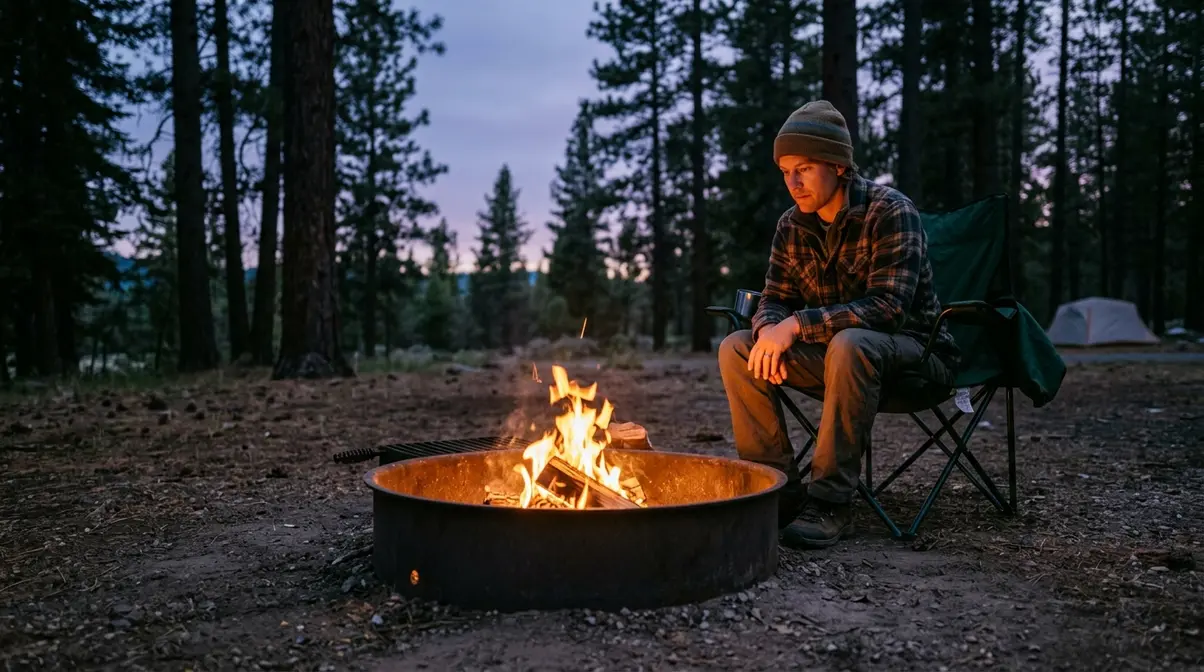
Once your fire is lit, your job shifts to active management. The Ready for Wildfire program, operated by CAL FIRE (California’s Department of Forestry and Fire Protection), emphasizes that most campfire escapes happen not during lighting, but during the burn — when campers relax their attention.
Keep Your Fire Small and Controlled
A campfire does not need to be large to be useful or enjoyable. Outdoor safety experts and the USDA Forest Service consistently recommend keeping flames no higher than your knee — roughly 1 to 2 feet tall.
- Use small pieces of wood — Logs no longer than the diameter of the fire ring. Smaller fuel means smaller flames and fewer sparks.
- Add wood gradually — Never dump a large load onto the fire at once. Add one piece at a time and wait for it to catch.
- Never use flammable liquids — Gasoline, lighter fluid, and aerosol cans can cause sudden, explosive flare-ups that are impossible to control.
- Keep a clear perimeter — No camping chairs, gear, or clothing within 3 feet of the fire ring edge.
Why this matters: A fire that stays small is a fire you can manage. A fire that grows past knee height begins to generate embers that travel on the wind.
Never Leave a Campfire Unattended
This rule has no exceptions — not even for a minute. The National Park Service states clearly: an unattended campfire is the single most preventable cause of campfire-related wildfires.
Before you step away for any reason, even briefly:
- Reduce the fire — Stop adding wood and let it burn down.
- Assign a responsible adult — Someone must stay at the fire at all times while it is burning.
- If no one can stay, extinguish it — Follow the full Drown, Stir, and Feel method (see Step 3 below) before walking away.
Responding to Red Flag Warnings
Most campfire guides tell you to avoid building fires in windy conditions. What they don’t tell you is what “dangerous” wind actually looks like — or what a Red Flag Warning means.
A Red Flag Warning is an official alert issued by the National Weather Service when a specific combination of conditions exists: relative humidity below 15% combined with sustained winds above 25 mph. These two factors together create extreme fire spread potential. When a Red Flag Warning is active in your area, campfires should not be lit, period.
Watch for these practical warning signs even without an official alert:
- Gusty winds that shift direction frequently — embers travel in unpredictable paths
- Visible dry conditions — cracked soil, brown grass, dust clouds
- Humidity below 25% — your lips feel dry; wood snaps rather than bends
- Smoke from nearby fires — indicates active fire activity in the region
“Do not build a fire in dry or windy conditions, especially if there are fire restrictions — the risk simply isn’t worth it.”
If conditions deteriorate while your fire is burning, extinguish it immediately. Do not wait to see if the wind settles.
5 Basic Fire Safety Practices
If you are wondering, “What are the 5 basic fire safety practices?”, they are the core pillars of active management. They include: (1) always check fire restrictions and Burn Bans before building; (2) select a safe, cleared location using an existing fire ring; (3) keep the fire small and never leave it unattended; (4) maintain a 3-foot safety boundary for children; and (5) extinguish completely using the Drown, Stir, and Feel method. These five practices, endorsed by agencies including the USDA Forest Service and the National Park Service, cover the most critical decision points across the full campfire lifecycle — from site selection to cold ash.
Step 3: Drown, Stir, and Feel Method
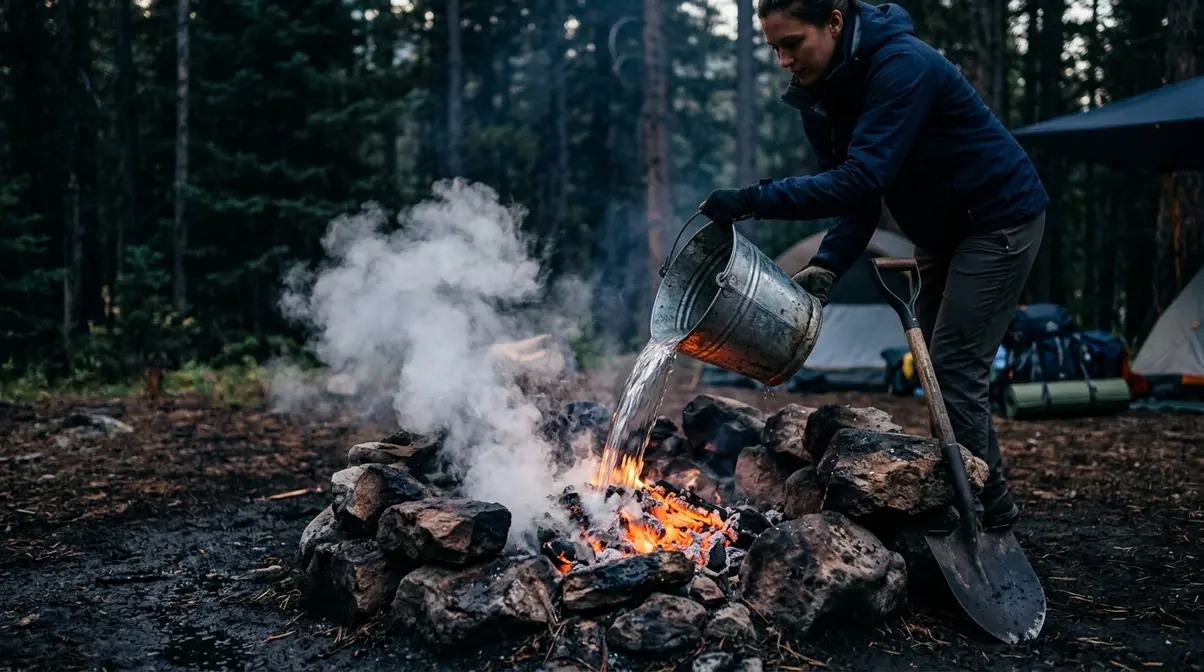
Extinguishing a campfire completely is the most critical step in the entire 3-Stage Campfire Protocol — and the step most often done incorrectly. According to Texas A&M Forest Service wildfire prevention guidelines, a campfire that appears to be out can reignite hours later if embers remain hot beneath the surface. “Appeared out” is not the same as “is out.”
Step-by-Step Extinguishing Guide
Tools needed: Water source (bucket or water bottle), shovel. Estimated time: 10–15 minutes.
- Stop adding wood at least 20–30 minutes before you plan to leave. Let the fire burn down to ash and coals naturally. Smaller embers cool faster.
- Pour water slowly over all embers and ash. Don’t dump it all at once — pour steadily so the water reaches embers at the bottom of the pit. You will hear hissing. That hissing means heat is still present.
- Stir the ash and embers with your shovel. Mix the wet ash thoroughly to expose any buried hot spots. Continue pouring water as you stir.
Once the initial heat is reduced and the flames are smothered, you must proceed with the final verification steps to ensure the fire is completely dead:
- Pour more water. Repeat the pour-and-stir cycle until you no longer hear hissing. Make sure you use a dedicated water container, rather than relying solely on leftover drinking water.
- Feel the ash with the back of your hand — hold it 6 inches above the surface first, then gently touch the cooled ash. If you feel any warmth, repeat steps 2–4.
- Scatter the ash if campground rules permit, or leave it in the ring if at a managed site.
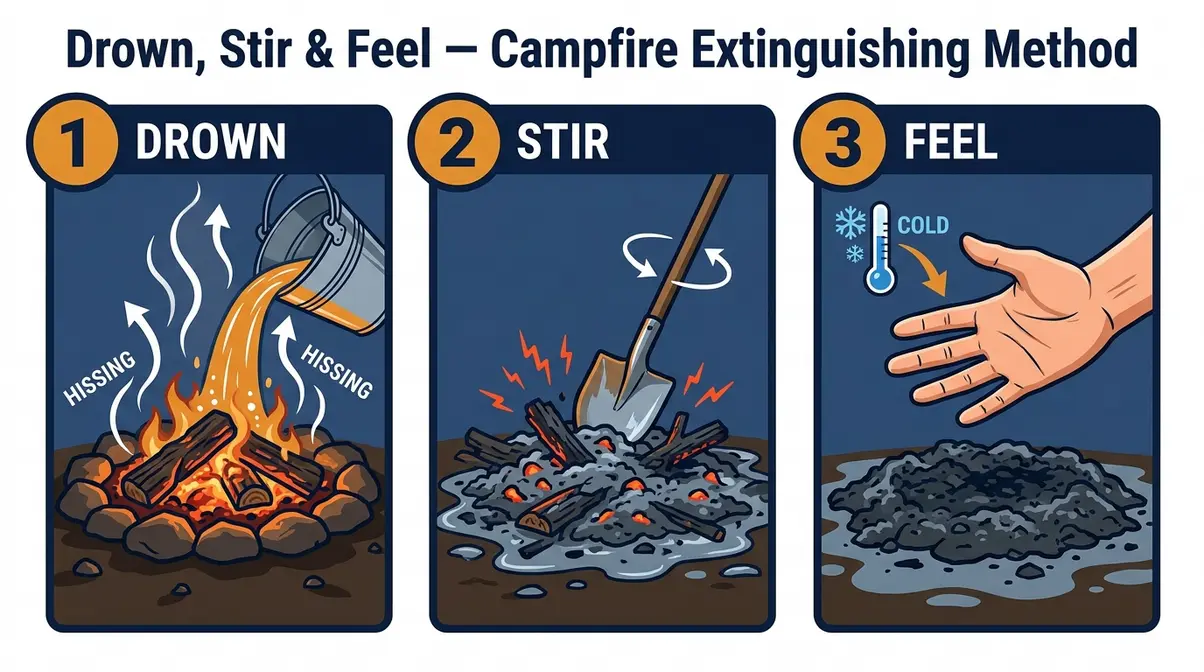
Verifying Your Campfire Is Out
The campfire is out when all three conditions are true simultaneously:
- No hissing when water is poured
- No steam or smoke rising from the ash
- No warmth felt when you hold your palm 3 inches above the surface
If any one of these conditions is not met, the fire is not out. Continue the Drown, Stir, and Feel cycle. A shovel and bucket of water are not optional equipment — they are the only tools that guarantee a cold fire.
Why this matters: Wind can rekindle an ember buried under ash for hours after you leave. A campfire that “felt cool enough” has started wildfires that burned for days.
Campfire Safety for Kids
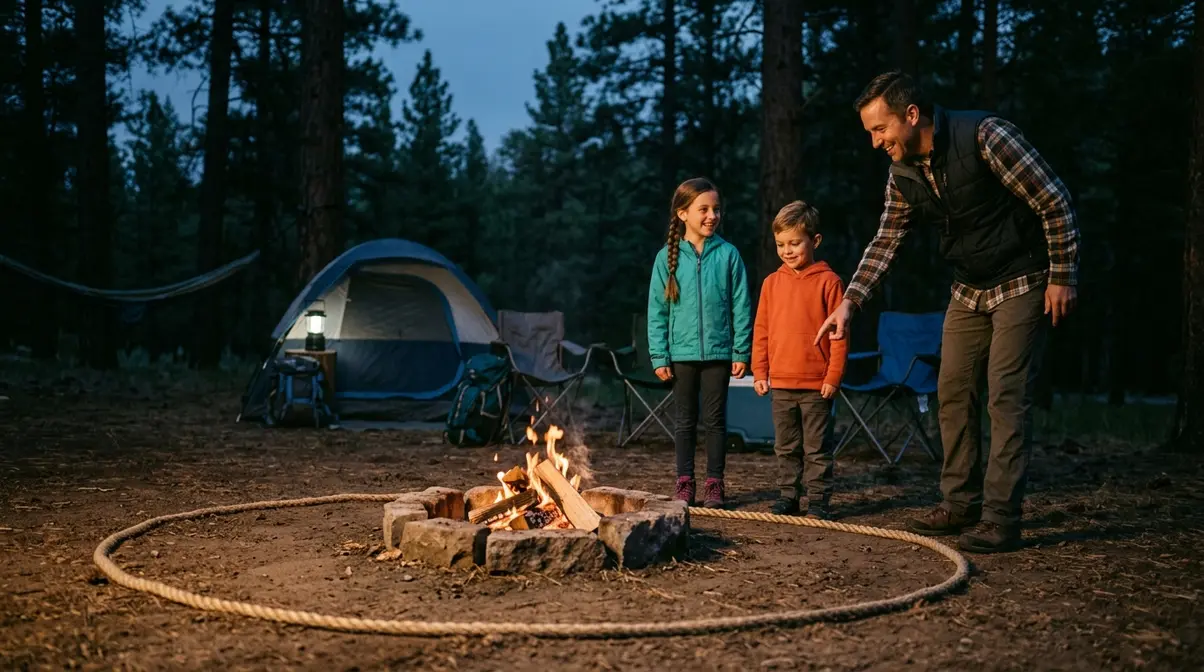
Teaching children campfire safety rules early builds habits that last a lifetime. The American Red Cross recommends establishing clear, physical boundaries around any campfire whenever children are present — and reinforcing those boundaries consistently, not just once.
The 3-Foot Safety Circle Rule
Establish a 3-foot safety circle — a clearly marked boundary around the fire ring that children are not permitted to enter. Outdoor safety instructors consistently recommend using a physical marker: a ring of stones, a rope laid on the ground, or a chalk line on a flat surface. At night, placing glow sticks in a circle is a highly effective visual boundary.
Practical enforcement tips:
- Explain the rule before the fire is lit, not after it’s burning and exciting.
- Practice the boundary while the fire ring is cold — walk the perimeter together so children understand the physical space.
- Designate a “fire captain” among older children — a responsible older sibling or Scout who helps remind younger kids of the boundary.
- Never allow children to add wood, stoke the fire, or handle fire-starting tools.
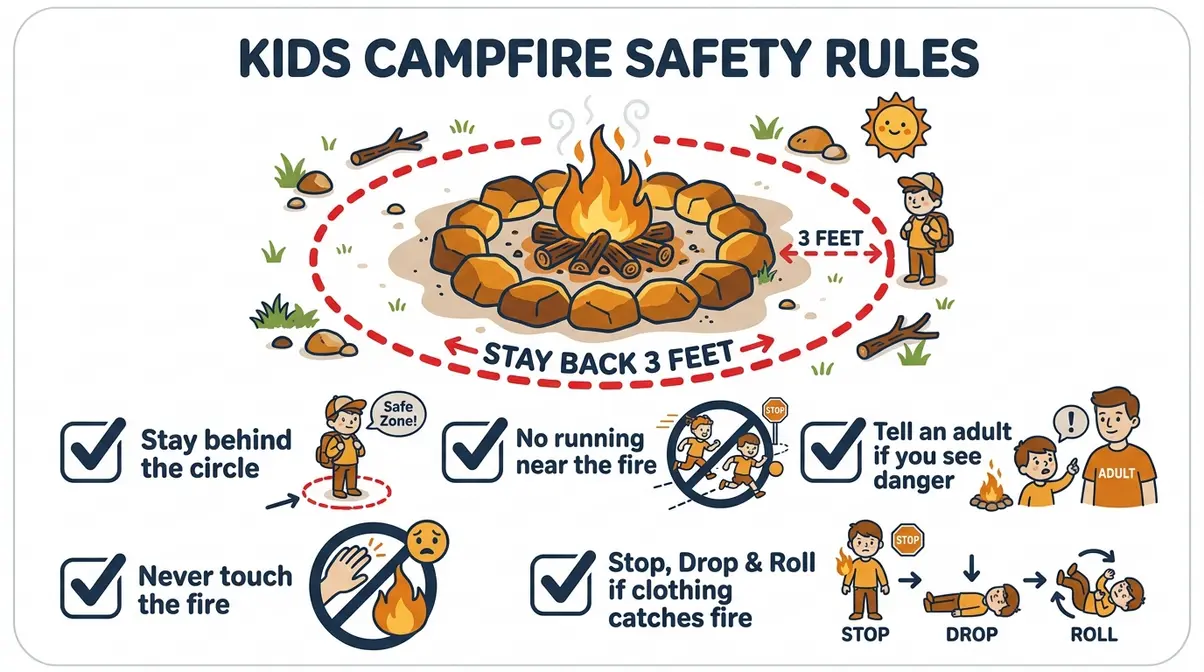
Stop, Drop, and Roll for Kids
If clothing catches fire, children need to know exactly what to do — before the situation ever arises. Practice this with children as a drill, not just a verbal explanation.
- Stop, Drop, and Roll:
- Stop — Do not run. Running fans flames and spreads fire to more clothing.
- Drop — Fall to the ground immediately and cover your face with your hands.
- Roll — Roll back and forth until the flames are smothered.
After rolling, move away from the fire and call for an adult. Cool the burned area with cool (not cold) running water for at least 10 minutes. Seek medical attention for any burn larger than a coin.
Why practice matters: The instinct to run is powerful and nearly automatic. Children who have rehearsed Stop, Drop, and Roll are significantly more likely to override that instinct in a real emergency.
Fun Ways to Teach Fire Safety
Effective campfire safety education uses repetition and engagement, not fear. These approaches work well for families and Scout troops:
- The Safety Pledge: Have children recite a simple pledge before every campfire — “I will stay 3 feet back, I will never touch the fire, and I will always tell an adult if I see danger.” Repetition builds habit.
- Identify Safe Zones: Walk the campsite together and let children point out where they can and cannot go. Ownership of the rule increases compliance.
- The “Hot or Not” Game: While the fire ring is cold, point to various objects and ask children “hot or not?” — teaching them to assess fire risk as a game.
- Read Together: Smokey Bear’s official kids resources (smokeybear.com) include age-appropriate stories and activities that reinforce fire safety messages in an engaging format.
Advanced Campfire Safety Rules
Beyond the foundational steps, two frameworks give you a sharper early-warning system for dangerous conditions. Zero competitors currently explain either of these concepts — making this section a genuine resource for campers who want to go beyond the basics.
What is the 30/30/30 rule for fire risk?
The 30/30/30 rule is a fire-risk assessment framework used by wildland fire professionals to identify conditions where fire behavior becomes extreme and unpredictable. The three “30s” stand for:
- 30% relative humidity or below — At this threshold, vegetation dries out rapidly and becomes highly combustible.
- 30 mph sustained winds or above — Wind at this speed drives fire spread and can carry embers more than a mile ahead of the fire front.
- 30 days without significant rainfall — Prolonged drought creates fuel conditions that allow fires to burn with unusual intensity.
When any two of these three conditions are present simultaneously, the risk of a campfire escape increases dramatically. When all three are present, many land management agencies will issue a Burn Ban automatically. Check current humidity and wind conditions using the National Weather Service forecast before any campfire — not just the temperature.
Why this matters: Most campfire guides tell you to watch for wind. The 30/30/30 rule gives you three specific, measurable thresholds — not vague warnings — so you can make an informed decision before you ever strike a match.
What are the 3 P’s of fire?
The 3 P’s of fire is a preparedness framework used in fire safety education to organize prevention thinking into three actionable categories: Prevention, Protection, and Preparedness.
- Prevention — The actions you take to stop a fire from starting in the first place. This includes checking Burn Bans, using existing fire circles, and clearing combustible materials.
- Protection — The steps you take to protect yourself, your group, and the environment while a fire is burning. This includes the 3-foot kid zone, keeping the fire small, and never leaving it unattended.
- Preparedness — Having the tools, knowledge, and plan in place to respond if something goes wrong. This includes your water bucket and shovel, knowing Stop, Drop, and Roll, and having an evacuation plan from your campsite.
The 3-Stage Campfire Protocol maps directly onto the 3 P’s: Before = Prevention, During = Protection, After = Preparedness in action. Using both frameworks together gives you a complete mental model for campfire safety.
Free Campfire Safety Resources
Outdoor safety experts recommend keeping a quick-reference guide at your campsite — especially useful when camping with children or new campers.
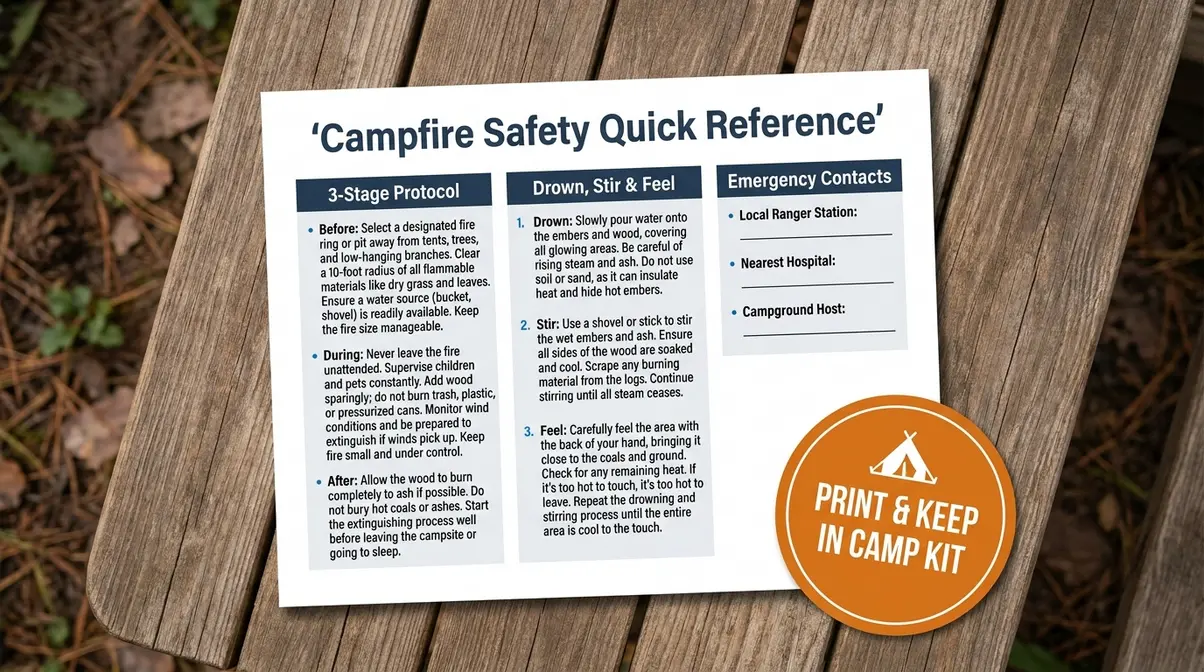
- Free official resources:
- Smokey Bear Campfire Safety — Printable guides and kids’ activity pages
- Ready for Wildfire — CAL FIRE’s prevention resource library
- Recreation.gov Campfire Safety Guide — Federal campsite-specific guidance
When Not to Build a Campfire
Knowing when not to build a fire is just as important as knowing how to build one safely. Responsible campers recognize that conditions sometimes make any campfire — no matter how carefully managed — an unacceptable risk.
Common Campfire Mistakes to Avoid
Outdoor safety instructors and park rangers consistently identify these as the most frequent errors made by beginner campers:
- Leaving the fire unattended “just for a moment” — Even a 60-second absence is enough for an ember to escape in gusty winds.
- Building a fire during high-wind conditions — If you can feel a sustained breeze on your face, conditions may already be too risky.
- Using too much wood too fast — Oversized fires are harder to extinguish and generate far more sparks.
- Skipping the “Feel” step during extinguishing — The most common mistake. A fire that looks cold and produces no steam can still have hot spots 2–3 inches below the surface.
- Ignoring posted fire restrictions — Signs at campground entrances and trailheads are legally binding notices, not suggestions.
- Burning trash or cardboard — These materials produce unpredictable flames, toxic smoke, and embers that travel much further than wood.
Safer Campfire Alternatives
When a Burn Ban is active, winds are gusty, or conditions are dry, these alternatives let you enjoy the camping experience without the wildfire risk:
- Propane camp stove — Provides cooking heat with a controlled, extinguishable flame. No open fire risk.
- Battery-powered LED lanterns — Modern LED lanterns produce warm-toned light that closely mimics firelight — ideal for ambiance without risk.
- Candle lanterns with enclosed glass — Safe for calm conditions; extinguish before sleeping.
- Solar-powered string lights — Charge during the day, provide evening ambiance with zero fire risk.
If you’re camping with children who are disappointed about no campfire, frame the alternative as a “special camp night” with the LED lantern as the centerpiece. The experience doesn’t have to feel like a compromise.
Frequently Asked Questions
What are the 10 fire safety tips?
The 10 core campfire safety tips are: (1) always check for active Burn Bans before building a fire; (2) use existing fire circles whenever possible; (3) clear combustible materials within a 10-foot radius (Smokey Bear); (4) keep a bucket of water and a shovel within arm’s reach; (5) keep flames no higher than knee level; (6) never leave a campfire unattended; (7) enforce a 3-foot safety circle for children; (8) avoid building fires in dry or windy conditions; (9) use the Drown, Stir, and Feel method to extinguish completely; and (10) verify the fire is cold to the touch before leaving. Following all 10 consistently is the foundation of the 3-Stage Campfire Protocol.
What are the 4 golden rules of fire safety?
The 4 golden rules of fire safety are: (1) Prevent — eliminate ignition sources and combustible hazards before they become dangerous; (2) Detect — stay alert to changing conditions like shifting wind, rising temperatures, and dry fuel; (3) Contain — keep any fire within its designated, prepared boundaries at all times; and (4) Extinguish — fully drown, stir, and feel the fire until it is cold to the touch before leaving. These four rules apply whether you’re managing a campfire, a fireplace, or a controlled burn, and they map directly onto the Before/During/After stages of safe campfire management.
What are the 7 safety tips for campfires?
The 7 essential campfire safety tips are: (1) check for Burn Bans and fire restrictions; (2) use an existing fire circle or ring; (3) clear a 10-foot radius of combustible materials; (4) keep flames small and manageable; (5) never leave the fire unattended for any length of time; (6) enforce the 3-foot safety zone for children; and (7) extinguish completely with water — never with dirt alone. Dirt smothers visible flames but traps heat in the embers below, creating a hidden reignition risk that can last for hours.
What is the 30/30/30 rule for fire in general terms?
In general fire safety terms, the 30/30/30 rule is a three-threshold warning system: humidity below 30%, wind above 30 mph, and drought lasting 30+ days (National Weather Service). Meeting even two of these thresholds significantly elevates the risk that any open flame — including a carefully managed campfire — can spread beyond its intended boundaries. This rule is used by wildland fire professionals and land management agencies to trigger precautionary fire restrictions. For campers, the practical takeaway is simple: check current humidity and wind conditions before every campfire, not just the weather forecast.
Your 3-Stage Campfire Protocol
Safe campfire management follows a clear, repeatable structure. For any camper — beginner or experienced — applying the 3-Stage Campfire Protocol (Before, During, After) transforms a vague set of rules into a practical pre-trip and on-site habit. Research and field guidance from CAL FIRE and the USDA Forest Service consistently show that the majority of campfire-related wildfires are preventable through preparation and attention, not specialized skills.
The 3-Stage Campfire Protocol gives you exactly that structure. Before you light: check restrictions, choose your location, clear your ring. While it burns: keep it small, stay present, watch the weather. After you’re done: Drown, Stir, and Feel until every ember is cold.
Start with the prerequisites checklist before your next trip. Gather your shovel and bucket of water, verify no Burn Ban is active in your destination area, and walk through Stage 1 before you ever strike a match. Confidence around campfire safety doesn’t come from experience alone — it comes from knowing the steps before you need them.
Author Note: This guide was developed using field guidance from the USDA Forest Service, CAL FIRE, the National Park Service, the American Red Cross, and the Boy Scouts of America. All safety measurements and procedural recommendations reflect current agency guidelines as of 2026. Always verify local fire restrictions before your trip.

Dave King
I'm Dave King. I publish Tent Explorer, a site built to answer the questions people actually ask before they buy.