This blog post may contain affiliate links. As an Amazon Associate I earn from qualifying purchases.
📋 Table of Contents
- Step 1: Determine True Tent Capacity (The N+1 Rule)
- Why Manufacturer Tent Ratings Are Misleading
- How to Calculate Your True Tent Capacity
- 7 Scenario-Based Sizing Examples
- Season Ratings Explained
- Step 2: Match Your Tent to Your Camping Activity
- Car Camping Tents — Space, Comfort, and Convenience
- Backpacking Tents — Weight, Pack Size, and Durability
- Thru-Hiking and Ultralight Setups
- Canoe Camping, Bike Touring, and Other Activities
- Step 3: Evaluate Key Tent Features and Materials
- Tent Shape — Dome vs. Cabin Style
- Poles — Aluminum vs. Fiberglass
- Fabric and Waterproofing — Denier Ratings and Hydrostatic Head Explained
- Vestibules, Doors, and Peak Height
- Freestanding vs. Non-Freestanding Designs
- Which Tent Brands Are Most Reliable?
- Premium and Backpacking-Focused Brands
- Family and Budget-Friendly Brands
- How to Choose a Brand Based on Your Activity
- Essential Camping Rules and Etiquette Every Camper Should Know
- The 200-Foot Rule — Why Distance from Water Matters
- The Golden Rule of Camping — Leave No Trace
- The 3-3-3 Rule for Campsite Selection
- What Counts as Bad Camping Etiquette?
- Common Tent-Buying Mistakes and How to Avoid Them
- When to Skip the Budget Tent
- When a Bigger Tent Isn’t Better
- When to Consult a Gear Expert
- Frequently Asked Questions
- What is the 200 rule for camping?
- How do I know what tent to buy?
- What is the most forgotten item when camping?
- What is the golden rule of camping?
- What is the 3-3-3 rule for camping?
- What is not proper camping etiquette?
- What tent brands are most reliable?
- What not to take camping?
- Conclusion
“Choosing a tent is overwhelming! Any Advice?”
You’re not alone — and the answer is simpler than the gear industry wants you to think. Knowing how to choose the right tent comes down to three decisions: how many people, what weather, and what type of camping. According to the U.S. Forest Service, a person can survive only three hours without proper shelter in harsh conditions — which means the tent decision isn’t just a comfort question, it’s a safety one.
Buy the wrong tent and you’ll spend your first night wet, cramped, or hauling 15 pounds up a mountain that demanded 3. The whole point of choosing well is to keep out the rain, sleep comfortably, and wake up ready for the next day — not to regret a rushed purchase.
By the end of this guide, you’ll know exactly which tent fits your group, your season, and your adventure — so you can buy once and camp confidently. We’ll walk through three core steps (Capacity → Activity → Features), then cover reliable brands, essential camping etiquette, and the most common mistakes beginners make.
Key Takeaways: How to Choose the Right Tent
A reliable shelter matters more than almost any other piece of camping gear — use the N+1 Rule to get sizing right from the start when choosing the right camping tent.
- N+1 Rule: Always buy a tent rated for one more person than your group size for real-world comfort
- 3-Season tents handle 90% of camping trips; 4-season tents are for winter expeditions only
- Car campers can prioritize space; backpackers must prioritize weight (aim for under 3 lbs total)
- Hydrostatic Head (HH): Look for 1,500mm minimum; 3,000mm+ for wet climates
- Reliable brands include Big Agnes, MSR, REI Co-op, NEMO, and Hilleberg — each specializing in different camping styles
Step 1: Determine True Tent Capacity (The N+1 Rule)
Choosing the right tent for camping starts with one critical insight: manufacturer capacity ratings are not designed for comfort — they’re designed to fit sleeping pads. The Washington Trails Association notes that a “two-person” tent is sized for the exact footprint of two sleeping pads, meaning two adults fit with zero extra room for gear, movement, or a comfortable night’s sleep. That’s why we use the N+1 Rule: always buy a tent rated for one more person than your actual group.
“A tent rated for two people will comfortably sleep one — the N+1 Rule corrects this industry-wide mismatch before it costs you a miserable night.”
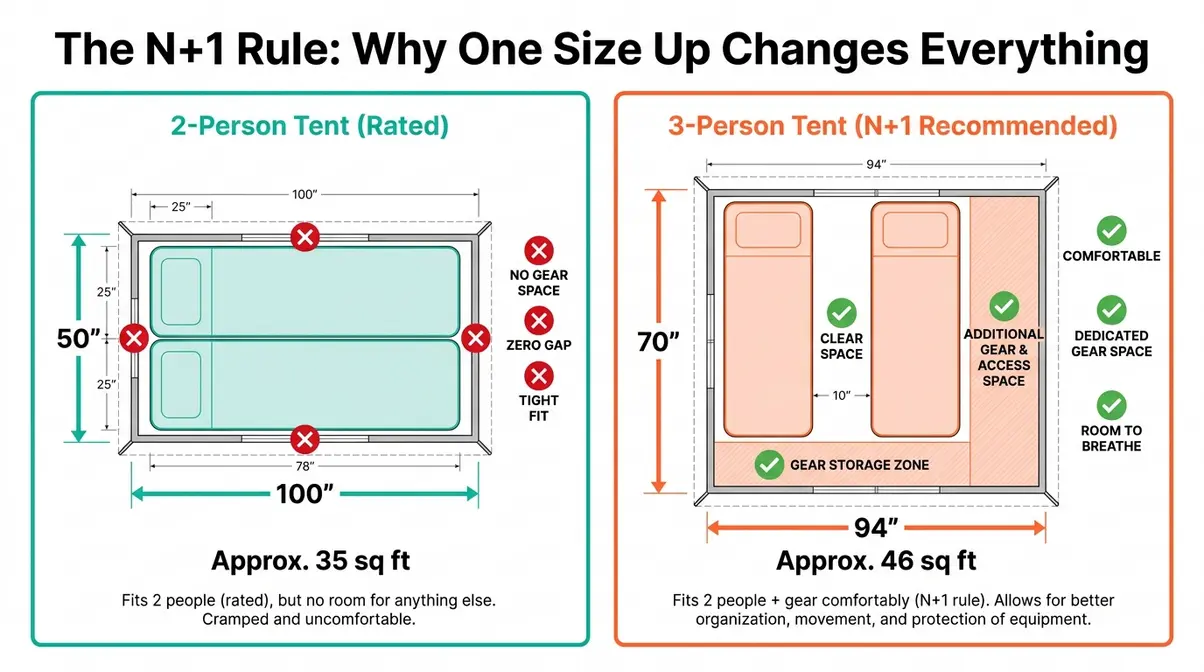
As the floor plan above illustrates, the difference between a 2-person and 3-person tent is the difference between a restless night and a comfortable one. Before you buy, start here — everything else in the selection process builds on getting capacity right.
Why Manufacturer Tent Ratings Are Misleading
Choosing the right tent means understanding a frustrating industry truth: the number printed on the box is a minimum, not a recommendation. Manufacturer ratings are based on minimum sleeping pad dimensions — roughly 20″ × 72″ per person — not on actual camping comfort. That math leaves no space for your boots, your pack, your dog, or any natural human movement during the night.
The Washington Trails Association confirms this directly: a labeled “2-person” tent literally fits two adults with zero extra room for gear. This isn’t a flaw in one brand — it’s a systemic pattern across the entire tent industry, from budget big-box options to premium expedition gear. Manufacturers optimize for a smaller box on the shelf, not for your comfort on the ground.
The real-world impact is predictable: buy to rating and you’ll wake up with your face against the tent wall, your boots outside in the rain, and your tent partner annoyed before breakfast. A Coleman Sundome 2-Person tent, for example, has a floor area of 35.5 sq ft — that’s 17.75 sq ft per person, roughly the size of a large yoga mat. That’s enough for a sleeping pad, but nothing else.
For a deeper breakdown of how these numbers are calculated, see our guide on understanding tent capacity ratings.
Now that you understand why the rating system is flawed, here’s the simple fix: the N+1 Rule.
How to Calculate Your True Tent Capacity
The N+1 Rule is the simplest, most reliable framework for determining how to choose the right camping tent size: take your total group size (people plus large dogs), then add one. That final number is the minimum tent rating you should buy. A couple camping together should buy a 3-person tent. A family of three should buy a 4-person tent. It’s that straightforward.
The formula works because that extra “person” of floor space absorbs the real-world variables manufacturer ratings ignore: gear storage, pet sprawl, getting dressed without elbowing your partner, and the general human need not to feel like a sardine. Across professional camping communities, the consistent feedback from experienced campers is that the single biggest beginner regret is buying too small — never too large.
To apply the N+1 Rule, follow these three steps:
- Count your group size — include every person sleeping in the tent, plus any dogs larger than 30 lbs.
- Add one — this is your minimum tent person-rating.
- Check floor area — aim for at least 25–30 sq ft per person for comfortable sleep with gear.

7 Scenario-Based Sizing Examples
The N+1 Rule becomes intuitive once you see it applied to real camping scenarios. Here are seven examples covering the most common group configurations:
| Scenario | Group | N+1 Tent Size |
|---|---|---|
| Solo camper wanting gear space | 1 person | 2-person tent |
| Couple on a weekend trip | 2 adults | 3-person tent |
| Couple with a large dog | 2 adults + 1 dog | 4-person tent |
| Family with one child | 2 adults + 1 kid | 4-person tent |
| Family of four | 2 adults + 2 kids | 5-person tent |
| Group of three friends | 3 adults | 4-person tent |
| Two adults on a thru-hike (weight priority) | 2 adults | 3-person ultralight OR 2-person (accept tight fit) |
The thru-hiking exception is worth noting: when every ounce matters, experienced backpackers sometimes accept a tighter fit to save weight. However, for your first tent, apply N+1 without compromise — comfort on an early camping trip builds the habit, and a miserable first night is the fastest way to quit camping altogether.
Mid-article tip: For a deeper breakdown of manufacturer rating systems and how floor area is calculated across tent categories, see our complete guide on understanding tent capacity ratings.
Season Ratings Explained
Season ratings are the second axis of the capacity decision — after you know how many people, you need to know what weather conditions your tent must handle. There are three primary categories, and choosing the wrong one is as costly as getting capacity wrong.
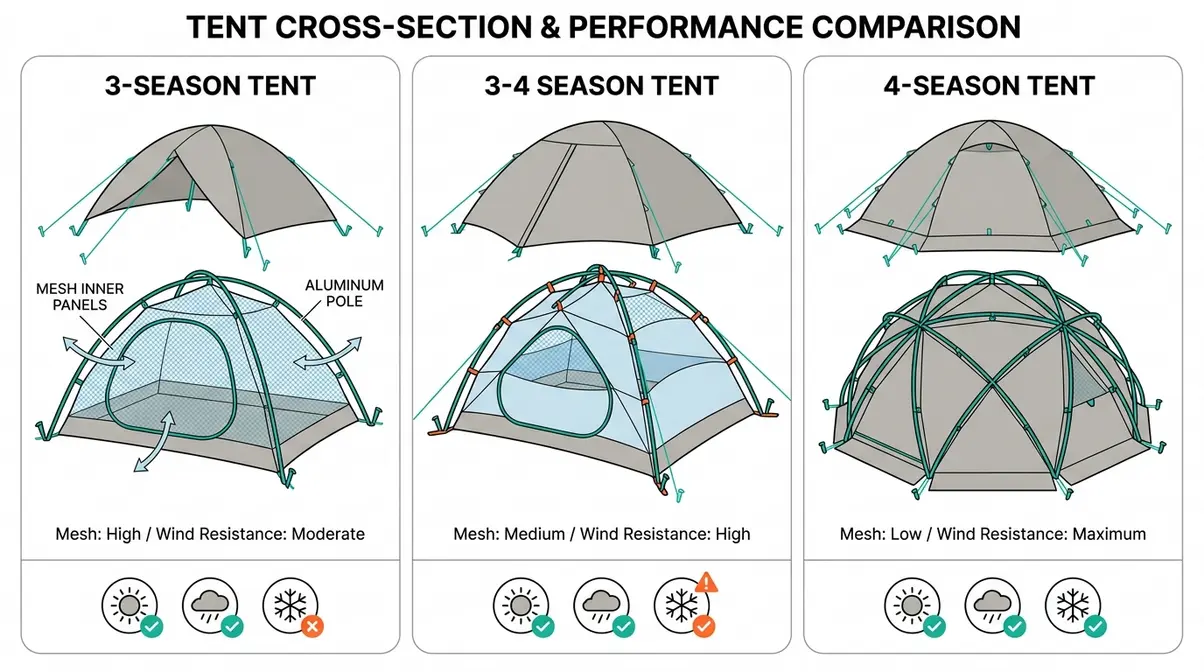
3-Season Tents are designed for spring, summer, and fall camping — and they cover approximately 90% of all recreational camping trips. They handle rain, moderate wind, and light frost effectively. Most feature mesh inner panels for ventilation and a rain fly that extends to ground level. The REI Co-op Passage 2 is a widely cited example of a well-executed 3-season design. If you’re reading this guide as a first-time buyer, a 3-season tent is almost certainly your answer.
3-4 Season (Transitional) Tents bridge the gap between casual camping and winter use. They typically feature fewer mesh panels (better insulation), stronger poles, and a more robust rain fly. They’re suitable for shoulder-season trips into alpine environments where unexpected snow is possible, but they’re heavier and more expensive than a standard 3-season option.
4-Season (Winter/Expedition) Tents are engineered for sustained snowload, high winds, and sub-zero temperatures. They use heavier fabrics, geodesic or semi-geodesic pole structures for maximum stability, and minimal mesh. The Hilleberg Keron is a benchmark example. These tents are not for casual camping — they’re purpose-built for mountaineering and winter expeditions, and they carry a price to match.
| Season Rating | Best For | Typical Weight | Typical Price Range |
|---|---|---|---|
| 3-Season | Spring/Summer/Fall camping | 3–6 lbs | $100–$500 |
| 3-4 Season | Shoulder season, alpine trips | 4–8 lbs | $300–$800 |
| 4-Season | Winter expeditions, mountaineering | 5–12 lbs | $500–$2,000+ |
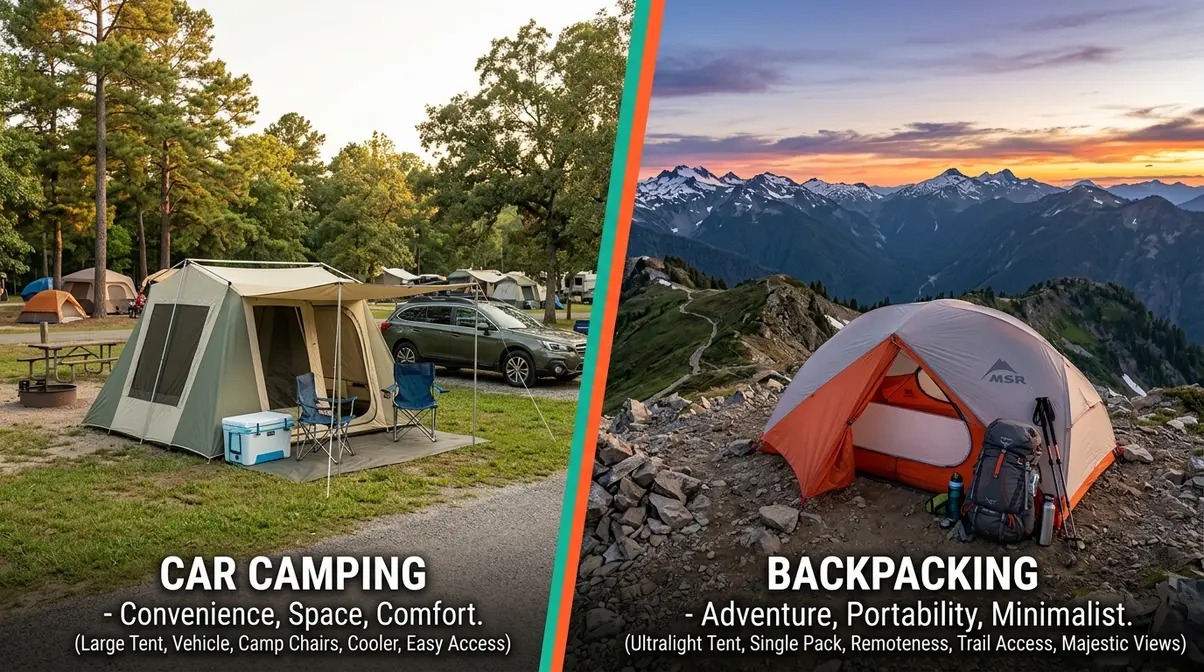
Step 2: Match Your Tent to Your Camping Activity
The N+1 Rule gives you the right size — but activity type determines the right design. A car camper and a backpacker both need shelter, but the trade-offs they’re willing to accept are almost opposite. This step applies the capacity framework from Step 1 to four distinct camping contexts, so you can match your tent to how you actually camp.
Car Camping Tents — Space, Comfort, and Convenience
Car camping is the most forgiving context for a tent purchase, and that’s genuinely good news for beginners. When your tent travels 20 feet from the trunk to the campsite, weight is irrelevant — space, comfort, and ease of setup become your primary criteria.
Car camping tents typically feature cabin-style or large dome designs with near-vertical walls, peak heights of 6 feet or more, and multiple rooms or dividers. These features make them feel like a genuine living space rather than a survival shelter. Common configurations include screen rooms for insect-free lounging, gear lofts for storage, and E-port access for running a power cord from a campsite electrical hookup.
For car camping, apply the N+1 Rule generously — there’s no weight penalty for going up a size. A family of four should comfortably target a 6-person tent, gaining a divider room and meaningful gear storage. Look for a floor area of at least 30 sq ft per person plus additional storage space. The Coleman Skydome 6 and REI Co-op Base Camp 6 are frequently cited examples of reliable, spacious car camping designs.
- A few key specs to prioritize for car camping:
- Peak height: 5’7″ minimum for adults to stand upright; 6’+ preferred
- Hydrostatic Head: 1,500mm minimum; 2,000mm+ recommended for rainy climates
- Setup time: Look for color-coded poles and hub systems — beginner-friendly setup matters on arrival day
Backpacking Tents — Weight, Pack Size, and Durability
Backpacking tents require a completely different set of priorities. Every ounce you carry over miles of trail is a tax on your energy, and a heavy tent is one of the most common mistakes beginner backpackers make. The general target for a two-person backpacking tent is under 3 lbs (1.4 kg) total packed weight — that’s the threshold where weight stops meaningfully affecting your trail experience.
To hit that target, backpacking tents use thinner fabrics (measured in Denier — covered in Step 3), lighter pole materials (aluminum over fiberglass), and more compact stuff sacks. The trade-off is reduced living space and, in budget options, reduced durability. The Big Agnes Copper Spur HV UL2 is a benchmark in this category: roughly 2 lbs 10 oz packed, with a generous peak height for its weight class and two doors for easy entry.
For backpacking, the N+1 Rule still applies, but weight forces a practical compromise: two backpackers often share a 2-person tent and accept the tighter fit rather than carry the extra weight of a 3-person. Experienced backpackers compensate by minimizing in-tent gear — boots go in the vestibule, packs go under the rain fly. Plan your kit accordingly.
- Key backpacking tent specs to evaluate:
- Packed weight: Under 3 lbs for two people; under 2 lbs for ultralight setups
- Pack size: Should compress to roughly the size of a Nalgene bottle or smaller
- Pole material: Aluminum only — fiberglass adds weight without strength benefit at this use level
- Vestibule area: At least 8–10 sq ft per door for gear storage
Thru-Hiking and Ultralight Setups
Thru-hiking — completing long-distance trails like the Appalachian Trail, Pacific Crest Trail, or Continental Divide Trail — demands lighter set ups than standard backpacking. When you’re covering 15–25 miles per day for months at a time, the cumulative weight savings of an ultralight tent compound into real physical and logistical advantages.
Ultralight tent designs typically fall into two categories: freestanding ultralight tents (like the Big Agnes Tiger Wall UL2 at around 1 lb 14 oz) and non-freestanding shelters that rely on trekking poles for structure (like the Zpacks Duplex or Hyperlite Mountain Gear Dirigo 2). Non-freestanding designs save significant weight but require flat ground and some setup experience — not ideal for first-time campers.
For thru-hikers, the standard recommendation across the r/ultralight and r/AppalachianTrail communities is a base weight (everything except food, water, and fuel) under 10 lbs, with the shelter system (tent, stakes, footprint) ideally under 1.5 lbs per person. The trade-off is cost: ultralight materials are expensive, and a quality ultralight tent typically starts at $400–$600.
If you’re planning your first thru-hike, consider starting with a standard lightweight backpacking tent for your shakedown trips, then upgrading to ultralight once you’ve confirmed your trail style and priorities.
Canoe Camping, Bike Touring, and Other Activities
Multi-day canoe and camping trips and bike touring occupy an interesting middle ground between car camping and backpacking. Weight matters — but not in the same way it does on foot. For canoe camping, the relevant constraint is pack size and water resistance, not pure ounces. Tents need to fit in dry bags or waterproof barrels, and the vestibule becomes critical for wet gear management.
- For canoe tripping, look for:
- Compact pack size (fits inside a 70L barrel or dry bag)
- Strong rain fly with full coverage to ground level (1,500mm HH minimum; 2,000mm+ recommended)
- Freestanding design — portage sites are often rocky and staking isn’t always possible
For bike touring, weight matters more than canoe camping but less than backpacking. Most bike tourers target a tent system under 4 lbs, prioritizing durability over minimum weight since bikes absorb the load. The MSR Hubba Hubba NX is frequently recommended in bike touring communities for its balance of weight, durability, and livability.
For any activity involving water proximity, also review the 200-Foot Rule in the camping etiquette section below — campsite placement relative to water sources directly affects how much weather exposure your tent will face.
Step 3: Evaluate Key Tent Features and Materials
Once you’ve determined capacity (N+1 Rule) and activity type (Step 2), the final step is evaluating the construction features that separate a tent that lasts from one that fails. This is where most beginner campers get lost in jargon — so we’ll translate every technical term into plain English with practical decision thresholds.
Tent Shape — Dome vs. Cabin Style
The two dominant tent shapes each represent a different design philosophy, and the right choice depends entirely on your camping context.
Dome tents use crossing poles that create a curved, aerodynamic structure. The dome geometry distributes wind and snow load efficiently, making dome tents more stable in adverse conditions. The curved walls mean reduced headroom near the edges, but the structure is inherently strong without staking — most dome tents are fully freestanding. For backpacking and any camping where weather unpredictability is a factor, dome designs are the reliable default.
Cabin-style tents feature near-vertical walls supported by multiple poles, creating a box-like interior with maximum usable floor space and headroom. The vertical walls make them feel genuinely spacious — a 6-person cabin tent can feel like a small room. The trade-off is that the flat walls catch wind rather than deflecting it, making cabin tents less stable in high winds. They’re excellent for established car camping sites with electrical hookups and wind protection, but a poor choice for exposed campsites or weather-uncertain trips.
A third category worth knowing: geodesic tents use multiple intersecting poles to create a near-spherical structure. Used primarily in 4-season and expedition contexts, they’re the most wind and snow-resistant design available, but also the heaviest and most expensive.
Poles — Aluminum vs. Fiberglass
Pole material is one of the clearest quality indicators in tent construction, and the choice is simpler than most gear guides suggest: aluminum is almost always the better option, and the price difference is smaller than it used to be.
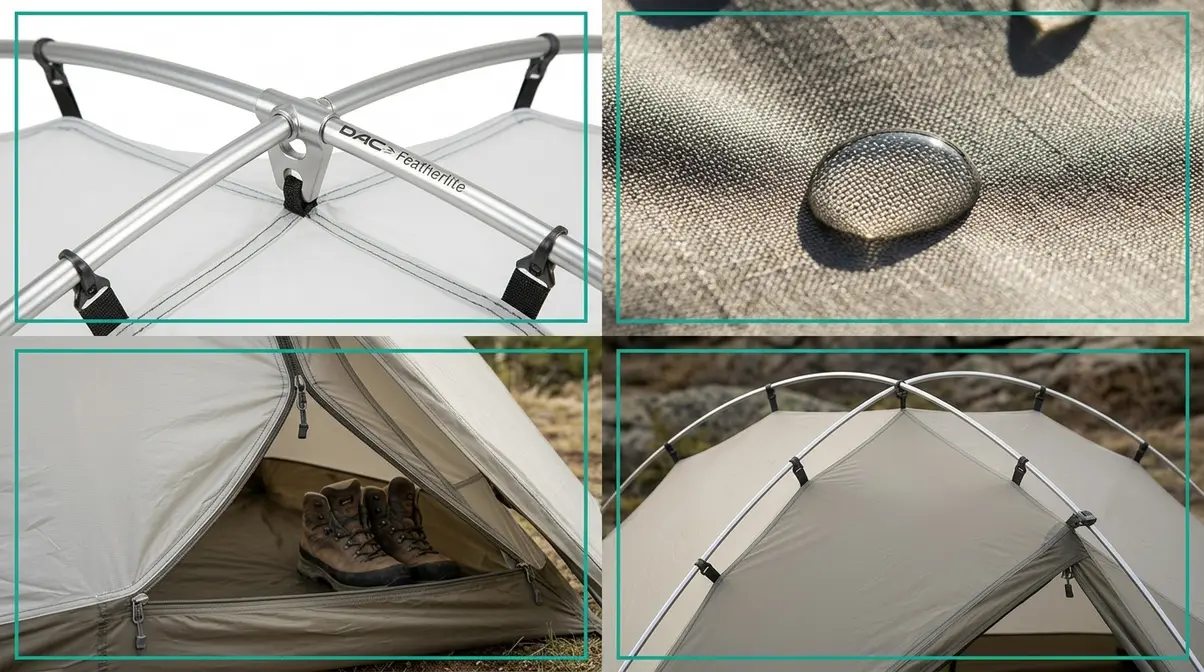
Aluminum poles (typically 7000-series or DAC Featherlite aluminum) are lighter, stronger, and more resilient than fiberglass. When an aluminum pole bends under stress, it stays bent — you can straighten it in the field. Aluminum poles are the standard in all mid-range and premium tents.
Fiberglass poles are heavier, more flexible, and prone to shattering rather than bending when overloaded. A shattered fiberglass pole mid-trip is a genuine emergency — the sharp fibers can puncture the tent body, and the structural failure is difficult to repair in the field. Fiberglass poles appear in budget tents under $80 because they’re cheaper to manufacture, but the weight and durability penalty is real.
The practical decision threshold: if your tent budget is over $100, insist on aluminum poles. If you’re evaluating a budget option with fiberglass poles, factor in the cost and weight of a pole repair kit and the risk of field failure.
Fabric and Waterproofing — Denier Ratings and Hydrostatic Head Explained
This is the section that trips up most beginner campers — and where the gear industry’s jargon does the most damage. Two numbers matter: Denier (D) and Hydrostatic Head (HH). Both are measurable, comparable, and straightforward once you know what they mean.
Denier (D) measures fabric thread thickness and, by extension, durability. A higher Denier number means thicker, heavier, more abrasion-resistant fabric. A lower Denier number means lighter, more packable fabric with less durability. Tent manufacturers typically use 20D–75D nylon or polyester for the canopy and 70D–150D for the floor (which takes more abuse).
| Denier Range | Typical Use | Trade-off |
|---|---|---|
| 10D–20D | Ultralight backpacking tents | Very light; less puncture resistance |
| 30D–40D | Standard backpacking tents | Good balance of weight and durability |
| 68D–75D | Car camping and family tents | Heavier; highly durable |
| 100D–150D | Tent floors (all categories) | Maximum ground abrasion resistance |
Hydrostatic Head (HH) measures waterproofing — specifically, how many millimeters of water pressure a fabric can withstand before leaking. The measurement comes from a standardized test where a column of water is applied to the fabric; the height of water (in mm) at which the fabric begins to leak is its HH rating.
Here’s what the numbers mean in plain English:
| HH Rating | Rain Resistance | Recommended For |
|---|---|---|
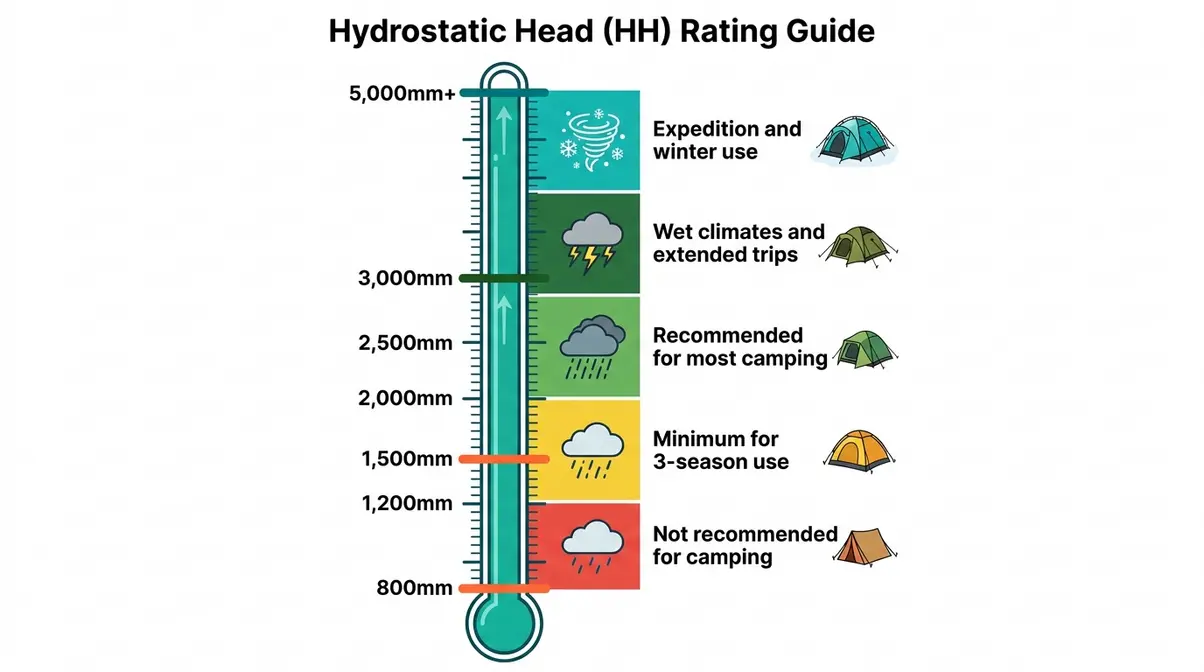
| 800mm–1,200mm | Light drizzle only | Not recommended for camping |
| 1,500mm | Moderate rain | Minimum acceptable for 3-season use |
| 2,000mm–2,500mm | Heavy rain | Recommended for most camping |
| 3,000mm+ | Sustained downpour | Wet climates, extended trips |
| 5,000mm+ | Extreme conditions | Expedition and winter use |
The practical rule: 1,500mm HH is the floor for any tent you’d trust in real rain. For camping in the Pacific Northwest, coastal areas, or anywhere with regular heavy rainfall, target 2,000mm or higher. Rain fly and floor ratings are often different — floors typically carry a higher rating (3,000mm+) because ground moisture is constant, not intermittent.
Fabric manufacturers including Toray and Tejin publish Denier and HH specifications for their tent fabrics — reputable tent brands will list these numbers clearly in their product specifications. If a budget tent doesn’t list its HH rating, that’s a meaningful warning sign.
Vestibules, Doors, and Peak Height
Three features that beginners routinely overlook — and then regret overlooking on their first trip.
Vestibules are the covered porch areas created when the rain fly extends beyond the tent body. They serve as covered gear storage (boots, packs, wet clothing) and as a transitional space between the tent interior and the outside. A vestibule keeps your interior dry and your gear accessible without bringing mud inside. For any trip involving rain or wet conditions, look for at least 8–10 sq ft of vestibule space per door.
Number of doors matters more than most beginners expect. A single-door tent means the person sleeping against the back wall has to climb over their tent partner every time they need to exit — at 2 a.m., in the dark, this creates real friction. Two-door tents cost slightly more and add minor weight, but they’re worth it for any tent shared by two or more adults. Two doors is the standard recommendation across professional camping communities for shared tents.
Peak height determines whether you can sit upright, kneel, or stand inside your tent. For car camping, a 6-foot peak height is achievable and makes the tent genuinely livable. For backpacking, peak heights of 3–4 feet are common — enough to sit up and change clothes, but not to stand. Know your priority: car campers should insist on standing height; backpackers should accept the trade-off.
Freestanding vs. Non-Freestanding Designs
This distinction matters more than most beginner guides acknowledge, and it’s worth understanding before you shop.
Freestanding tents hold their shape using poles alone — no stakes required for the structure to stand. This makes them easy to set up on hard or rocky ground, allows you to pick up and reposition the tent after pitching, and generally makes setup faster and more forgiving for beginners. The vast majority of 3-season and car camping tents are freestanding. For first-time campers, freestanding is the strongly recommended default.
Non-freestanding tents (also called semi-freestanding or trekking pole shelters) rely on stakes, guylines, or trekking poles for structure. They cannot stand without external anchor points. The payoff is significant weight savings — a non-freestanding shelter can weigh 30–50% less than a comparable freestanding tent. The trade-off is setup complexity: you need flat, stake-able ground, and the learning curve is steeper. Non-freestanding designs are popular with experienced thru-hikers who’ve accepted the constraints in exchange for lighter set ups.
The practical guidance: if this is your first or second tent, buy freestanding. Learn the fundamentals of campsite selection and tent setup before introducing the additional variables of a non-freestanding shelter.
Which Tent Brands Are Most Reliable?
Evaluating tent brands is genuinely useful for beginners — knowing which manufacturers have earned consistent trust across the camping community helps you filter thousands of options down to a manageable shortlist. Our assessment draws on community consensus across r/CampingGear, r/ultralight, and established gear publications including CleverHiker and REI’s expert advice resources.
The evaluation criteria used across professional camping communities: build quality and field durability, pole material and construction, waterproofing specifications (HH and seam sealing), warranty and customer support, and value relative to use case.
Premium and Backpacking-Focused Brands
These brands are consistently cited as the most reliable for performance camping — they dominate gear lists for backpacking, thru-hiking, and technical camping.
Big Agnes (Steamboat Springs, CO) is widely regarded as the benchmark for lightweight backpacking tents. Their Copper Spur HV UL series and Tiger Wall series are among the most recommended tents in backpacking communities for their weight-to-livability ratio. Big Agnes uses DAC aluminum poles and specifies HH ratings clearly across their product line.
MSR (Mountain Safety Research) has built a four-decade reputation for expedition-grade reliability. Their Hubba Hubba NX is a go-to recommendation for backpacking and bike touring; their Remote 2 and Access series address winter and alpine use. MSR publishes detailed fabric specifications and backs their tents with strong warranty support.
NEMO Equipment is a newer brand (founded 2002) that has earned rapid credibility for design innovation — their Dragonfly OSMO series uses a hybrid fabric that reduces condensation and weight simultaneously. NEMO tents consistently score highly for livability features (peak height, vestibule size) relative to packed weight.
Hilleberg (Swedish, founded 1971) is the premium standard for 4-season and expedition tents. Their Keron and Nammatj series are used by polar expeditions and professional mountaineers. Hilleberg uses proprietary Kerlon fabric with HH ratings up to 5,000mm. The price point is significant ($600–$2,000+), but the build quality is unmatched for sustained harsh-weather use.
Family and Budget-Friendly Brands
Not every camping trip demands premium gear, and several brands deliver reliable performance at accessible price points.
REI Co-op produces its own line of tents (Passage, Half Dome, Base Camp series) that consistently earn high marks for beginner-friendliness, setup ease, and value. The REI Co-op Passage 2 is among the most recommended first tents for beginners — it’s not ultralight, but it’s durable, genuinely weatherproof (1,500mm HH rain fly), and sold with REI’s generous return policy. REI’s expert advice resources are also among the best free educational content available for new campers.
Coleman dominates the car camping and family camping space with accessible price points and wide availability. Coleman tents use fiberglass poles in budget models (a trade-off worth knowing) but offer excellent floor area and cabin-style livability at prices under $150. They’re the “great all rounder” for weekend car camping — reliable enough for the vast majority of recreational use, but not suited for backpacking or technical weather.
Kelty occupies the middle ground between Coleman and premium backpacking brands. Their Wireless and Late Start series offer aluminum poles, decent HH ratings, and good livability at $150–$300. Kelty is frequently recommended as a first “serious” tent for campers moving beyond big-box gear.
How to Choose a Brand Based on Your Activity
The simplest brand-matching framework aligns with the activity categories from Step 2:
- Car camping and family trips: Coleman, REI Co-op Base Camp, Kelty
- Backpacking and weekend hiking: REI Co-op Half Dome, Big Agnes, MSR Hubba series
- Thru-hiking and ultralight: Big Agnes Tiger Wall, NEMO Dragonfly, Zpacks (non-freestanding)
- Alpine and winter expeditions: Hilleberg, MSR Access/Remote, Black Diamond
For a deeper look at how activity type shapes the full equipment list, our complete camping gear checklist walks through every category from shelter to cookware.
Essential Camping Rules and Etiquette Every Camper Should Know
Choosing the right tent is only part of the preparation. Where you pitch it — and how you behave at the campsite — affects your safety, your neighbors’ experience, and the long-term health of the places you’re camping in. These aren’t arbitrary rules; they’re practical frameworks developed by land management agencies and outdoor ethics organizations over decades of real-world observation.
The 200-Foot Rule — Why Distance from Water Matters
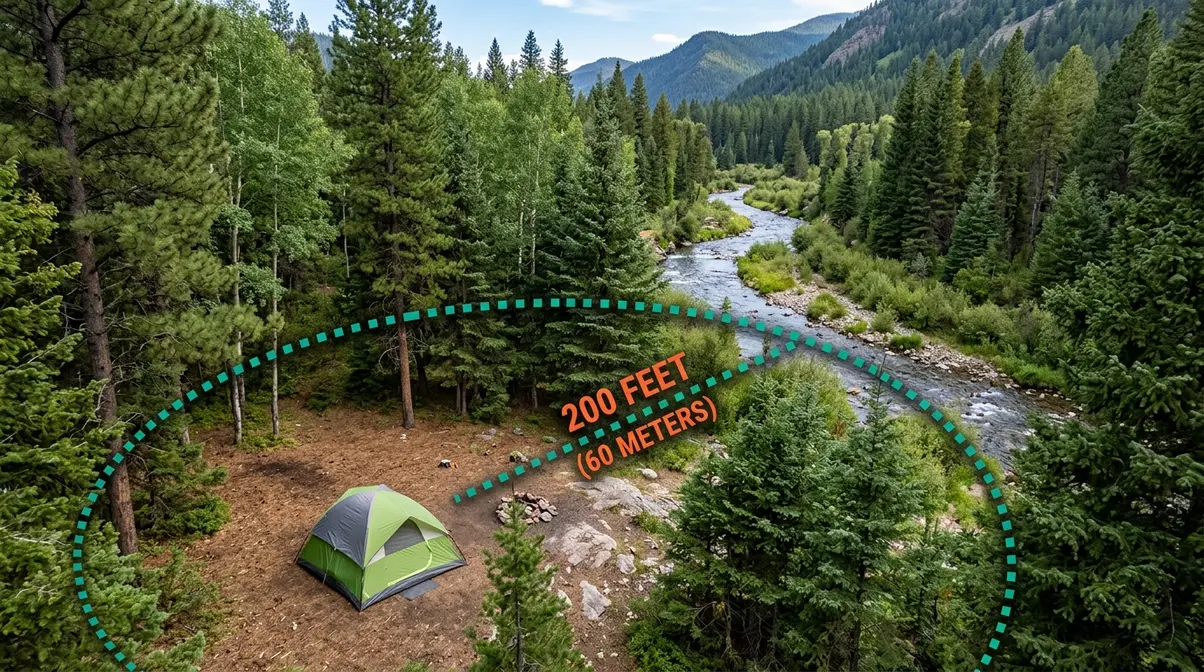
The 200-foot rule is one of the most important — and most commonly violated — principles in outdoor camping ethics. The rule states that you should camp, cook, and dispose of waste at least 200 feet (approximately 70 adult steps or 60 meters) from any water source: lakes, streams, rivers, and wetlands.
The reasoning is ecological and practical: camping too close to water damages fragile riparian vegetation, increases the risk of water source contamination from waste and soap, and disrupts wildlife that depends on water access — particularly at dawn and dusk when animals are most active. The Leave No Trace Center for Outdoor Ethics identifies water proximity as one of the highest-impact camping behaviors for ecosystem damage.
The 200-foot rule also has a self-interested dimension: campsites near water are exposed to more wind, more insects, and more wildlife activity. Pitching your tent further from the water often means a better night’s sleep in addition to a lower environmental impact.
The Golden Rule of Camping — Leave No Trace
The golden rule of camping is the core principle of the Leave No Trace (LNT) framework: leave every campsite in the same condition — or better — than you found it. The National Park Service formally endorses the seven LNT principles as the ethical standard for all backcountry and frontcountry camping.
- In practice, Leave No Trace means:
- Pack out everything you pack in — no food waste, wrappers, or gear left behind
- Use established fire rings; never create new ones
- Dispose of human waste properly (cat holes 6–8 inches deep, 200 feet from water)
- Minimize campfire impact — use a camp stove when possible
- Respect wildlife — never feed animals, store food properly in bear canisters or hang bags
- Be considerate of other visitors — quiet hours, trail right-of-way, and campsite spacing
The LNT principles aren’t camping bureaucracy — they’re the reason the places you want to camp still exist in a condition worth visiting.
The 3-3-3 Rule for Campsite Selection
The 3-3-3 Rule is a practical framework for trip planning and campsite selection, particularly useful for beginners who are still building their outdoor judgment. The rule states:
- Drive no more than 3 hours to your campsite — keeping travel reasonable reduces fatigue and arrival-day stress
- Arrive by 3 p.m. — gives you enough daylight to set up camp, orient yourself, and handle unexpected problems before dark
- Stay for at least 3 nights — allows you to truly settle in, explore the area, and recover from travel before breaking camp
The 3-3-3 Rule is especially valuable for families and first-time campers because it builds in margin for the unexpected: the campsite that looks different than the photos, the tent setup that takes longer than expected, the weather that rolls in before dinner. Arriving with daylight and not rushing out the next morning makes the entire experience more enjoyable and more likely to become a habit.
What Counts as Bad Camping Etiquette?
Bad camping etiquette is a broader category than most beginners realize — and it’s worth knowing before your first trip, not after your neighbor politely (or not so politely) explains it.
Common violations that experienced campers consistently flag:
- Noise after quiet hours — most campgrounds enforce quiet hours between 10 p.m. and 6 a.m.; generators, loud music, and shouting are the most frequent complaints
- Cutting through other campsites — treat neighboring campsites like private property; walk around, not through
- Leaving food unattended — attracts wildlife and creates safety risks for everyone in the campground; use bear boxes, bear canisters, or hang bags per site regulations
- Washing dishes or bathing in water sources — even biodegradable soap degrades water quality; wash 200 feet from any water source
- Picking up or moving campsite furniture — fire rings, picnic tables, and tent platforms are shared resources, not personal equipment
- Feeding wildlife — habituated animals are a danger to future campers and often face lethal removal by land managers
- Not following fire restrictions — fire bans exist for real reasons; check current conditions before every trip
The overarching principle behind all of these: the campground is a shared space, and your choices affect the experience of everyone around you — including the wildlife that was there first.
Common Tent-Buying Mistakes and How to Avoid Them
Even with a solid framework, beginner campers repeat a handful of predictable mistakes. Knowing them in advance is the fastest way to avoid them.
When to Skip the Budget Tent
Budget tents — typically under $60–$80 — are tempting for first-time buyers who aren’t sure they’ll continue camping. The logic is understandable: why invest $200+ in a hobby you haven’t confirmed you enjoy? The problem is that a tent that fails on your first trip is the most effective way to ensure you don’t take a second one.
The most common failure modes of budget tents: seam tape that peels after one season, fiberglass poles that shatter in moderate wind, and rain fly HH ratings so low (800mm or under) that a light drizzle soaks through. Common pain points reported by beginner campers include waking up in a puddle because the tent floor leaked — a failure that ruins the trip and often ruins the tent.
The practical threshold: spend at least $100–$150 for a 3-season tent from a reputable brand (REI Co-op, Kelty, Coleman’s mid-range Skydome line). At that price point, you get aluminum poles, adequate HH ratings, and seam-sealed construction. You don’t need to spend $400 on your first tent — but you do need to clear the quality floor.
When a Bigger Tent Isn’t Better
The N+1 Rule recommends going up one size — but there’s a ceiling. A solo backpacker carrying a 6-person family tent to “have more space” is making a weight and packability mistake that will ruin their trip in a different way. The N+1 Rule is a one-size correction for comfort, not a license to maximize tent size without constraint.
For backpackers, the weight penalty of going too large is immediate and cumulative. Every extra pound in your pack is roughly a 2% reduction in daily mileage for most hikers over a full day. For car campers, a tent that’s too large for the designated campsite pad creates setup problems and potentially violates campsite regulations at developed campgrounds.
Apply N+1, then stop. If you’re a solo camper, a 2-person tent is your answer — not a 4-person tent.
When to Consult a Gear Expert
Some camping contexts genuinely require expert guidance that a buying guide can’t fully replace. If any of the following apply to your situation, visit a specialty outdoor retailer (REI, MEC, local outfitter) and speak with a staff member who has field experience:
- You’re planning a trip in genuinely extreme conditions (winter mountaineering, high-altitude expeditions, polar environments)
- You’re camping in an area with specific wildlife concerns (grizzly bear country, venomous snake habitat) that affect campsite setup
- You have specific physical needs (mobility limitations, back conditions) that affect tent entry, floor padding, or setup requirements
- Your trip involves children under 10 in variable weather
The staff at specialty retailers have typically used the gear they sell — their first-hand experience fills gaps that any written guide leaves open. There’s no shame in asking; it’s the fastest path to a confident purchase.
Frequently Asked Questions
What is the 200 rule for camping?
The 200-foot rule requires campers to pitch their tent, cook, and dispose of waste at least 200 feet (approximately 70 adult paces) from any water source. This distance protects riparian ecosystems from contamination, reduces wildlife disturbance at water access points, and actually improves your campsite experience by reducing exposure to insects and wind. The Leave No Trace Center for Outdoor Ethics (lnt.org) identifies water proximity as one of the highest-impact camping behaviors for ecological damage. The rule applies to lakes, streams, rivers, and wetlands — not just drinking water sources.
How do I know what tent to buy?
Start with the N+1 Rule: count your group size, add one, and that number is your minimum tent person-rating. Then match your tent to your activity — car camping prioritizes space and livability; backpacking prioritizes weight under 3 lbs. Finally, check the Hydrostatic Head rating (1,500mm minimum for 3-season use) and confirm aluminum poles. For most first-time buyers, a 3-season tent from REI Co-op, Kelty, or Coleman’s mid-range line at $100–$200 covers 90% of camping scenarios. If you’re still unsure, visit a specialty retailer and describe your specific trip plans.
What is the most forgotten item when camping?
The most commonly forgotten camping items are a tent footprint (ground cloth), a headlamp with fresh batteries, and a tent repair kit. The footprint protects your tent floor from abrasion and puncture — skipping it is the most common cause of premature tent floor failure. A headlamp is irreplaceable at 2 a.m. in a dark campground; a phone flashlight drains your emergency communication device. Experienced campers across r/CampingGear consistently flag these three as the items most likely to be missing on a first trip.
What is the golden rule of camping?
The golden rule of camping is Leave No Trace: leave every campsite in the same condition — or better — than you found it. This principle, formally endorsed by the National Park Service, covers seven practices including packing out all waste, minimizing campfire impact, respecting wildlife, and being considerate of other visitors. In practical terms, it means your camping choices shouldn’t create additional work for land managers, damage to ecosystems, or negative experiences for the campers who arrive after you.
What is the 3-3-3 rule for camping?
The 3-3-3 Rule is a trip-planning framework: drive no more than 3 hours, arrive by 3 p.m., and stay for at least 3 nights. It’s designed to reduce arrival-day stress and give you enough daylight to set up camp before dark. The “3 nights” component is especially valuable for beginners — it gives you time to settle in, explore the area, and actually enjoy the experience rather than spending most of your trip breaking camp. The rule isn’t a hard regulation, but it’s widely recommended by family camping guides and outdoor educators as a practical default.
What is not proper camping etiquette?
Improper camping etiquette includes making noise after quiet hours, cutting through neighboring campsites, leaving food unattended, washing dishes in water sources, and feeding wildlife. These behaviors affect both other campers and the ecosystem. Fire violations — ignoring burn bans or leaving fires unattended — are the most serious category, both legally and ecologically. The underlying principle is simple: a campground is a shared space, and your choices affect everyone around you. Checking campground-specific rules before arrival is the easiest way to avoid unintentional violations.
What tent brands are most reliable?
The most consistently reliable tent brands, by use case, are Big Agnes and MSR for backpacking, REI Co-op and Kelty for beginner and family camping, NEMO for innovative lightweight designs, and Hilleberg for expedition-grade 4-season performance. Community consensus across r/CampingGear and established gear publications including CleverHiker identifies these brands as the most recommended for build quality, warranty support, and real-world durability. Coleman is reliable for car camping at budget price points. The “most reliable” brand depends entirely on your activity — a Hilleberg is overkill for a summer car camping trip, and a Coleman is inadequate for a winter mountaineering expedition.
What not to take camping?
Avoid bringing glass containers, scented toiletries in bear country, cotton clothing, single-use electronics without backup power, and anything you’d be devastated to lose or damage. Glass breaks and creates hazardous waste in the backcountry. Scented items (deodorant, soap, sunscreen) attract wildlife — use unscented or bear-safe alternatives in areas with active bear populations. Cotton clothing loses all insulating value when wet — the outdoor community’s phrase “cotton kills” reflects a real hypothermia risk in cold, wet conditions. Pack synthetic or merino wool base layers instead.
Conclusion
For overwhelmed first-time buyers, knowing how to choose the right tent is genuinely straightforward once you have the right framework. Start with the N+1 Rule — buy one size up from your actual group — to get capacity right from the start. Then match your tent to your activity: car campers can prioritize space and comfort, backpackers need to stay under 3 lbs, and thru-hikers should target ultralight systems once they’ve confirmed their trail style. Finally, check the specs that matter: 1,500mm HH minimum, aluminum poles, and a season rating matched to your climate. A 3-season tent handles 90% of all recreational camping trips, and the brands with the strongest reliability records — Big Agnes, MSR, REI Co-op, NEMO, and Hilleberg — each specialize in specific use cases.
The N+1 Rule isn’t just a sizing trick — it’s the foundation of a confident purchase. Every other decision in this guide (activity type, features, brand) builds on getting capacity right first. The campers who regret their tent purchase almost always made the same mistake: they trusted the number on the box instead of accounting for how real humans actually camp.
Your next step: measure your group using the N+1 Rule, identify your activity type from Step 2, and visit a specialty retailer or browse REI’s tent category with those two numbers in hand. If you’re car camping with a partner this summer, a 3-person 3-season tent at $150–$200 from REI Co-op or Kelty is your answer. Buy it, set it up in your backyard once before your trip, and go camping.
