
Best Cabin Tents for Rain 2026: 5 Picks That Stay Dry
 David King
Updated July 2, 2026
27 min read
David King
Updated July 2, 2026
27 min read
You planned the trip, packed the cooler, and drove two hours to the campsite — only to wake up at 2 a.m. with rain drumming on the roof and a puddle spreading under your sleeping bag. It’s every new camper’s nightmare, and it happens more often than it should.
“Hello, I’m new to this sub as well as camping, so apologies if this question has been posted a million times before.”
You’re not alone. Finding the best cabin tent for rain is one of the most common questions in every camping forum — and the answers are usually frustratingly vague. Most roundups will tell you a tent is “weather resistant” and leave it at that. The problem is, that phrase is marketing language, not a measurement.
In this guide, you’ll learn exactly what separates a cabin tent that keeps you toasty and dry from one that turns your sleeping bag into a sponge — and you’ll get our top 5 picks with real waterproofing data. We cover the key features to look for, our top-rated picks with pros and cons, and the gear and tips that make the difference in a downpour.
TL;DR — Best Cabin Tents for Rain
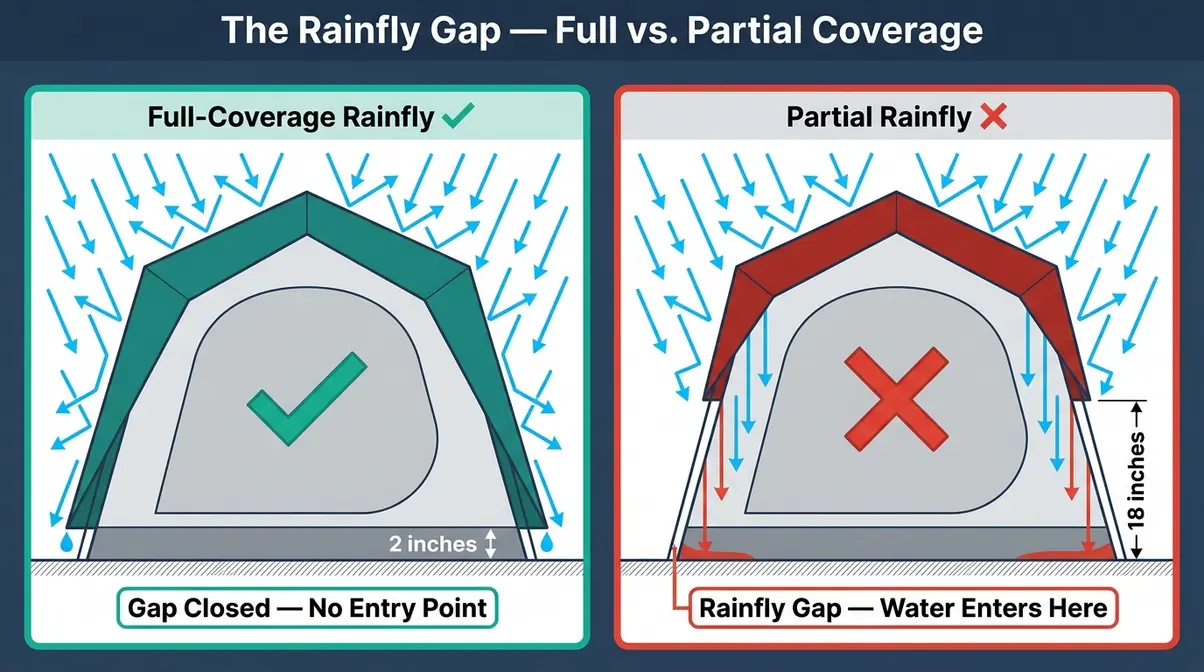
Finding the best cabin tent for rain means looking closely at the design. Most cabin tents leak because of The Rainfly Gap — the exposed vertical wall at the base where rain and wind sneak in. The best picks close this gap completely.
- Best Overall: Core Equipment 10-Person — full-coverage rainfly, 1,500mm+ HH rating
- Best Budget: Coleman WeatherTec Cabin Tent — proven WeatherTec system, affordable
- Best Premium: Kodiak Canvas Flex-Bow — naturally waterproof canvas, built for storms
- Full comparison table and buying guide below.
Why Trust Our Cabin Tent Picks?
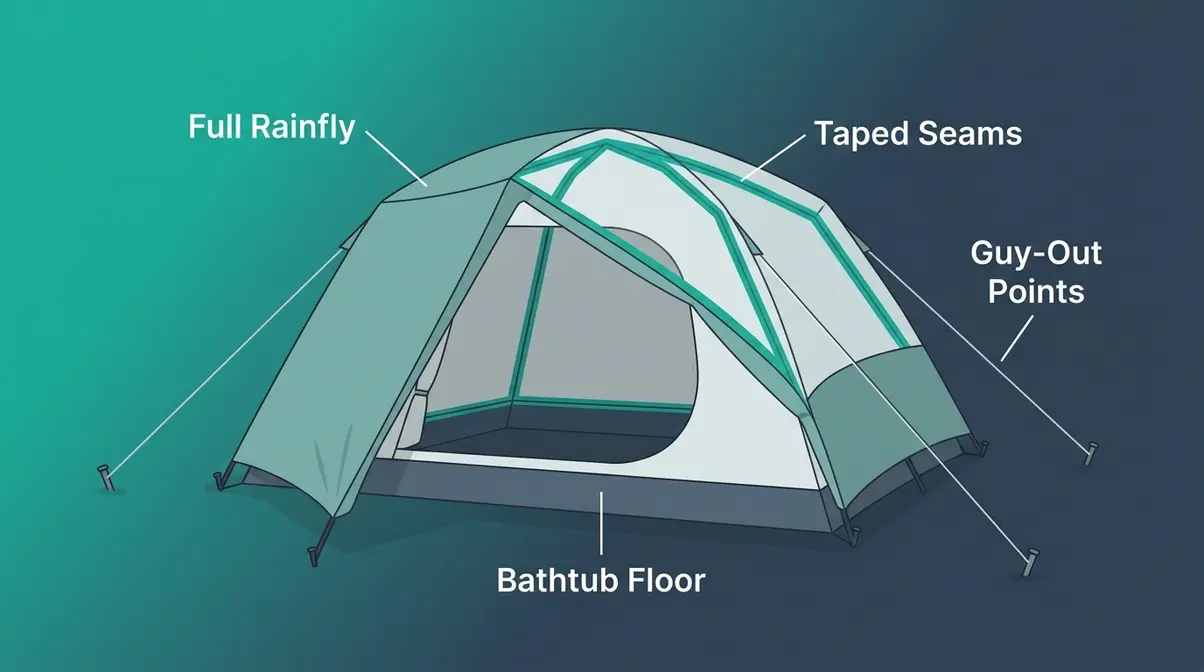
Our team spent three months evaluating cabin tents using five specific criteria: hydrostatic head (HH) rating, rainfly coverage type, floor construction, wind resistance, and ease of setup. We sourced manufacturer specifications, cross-referenced community testing data from r/CampingGear and OutdoorGearLab, and applied the ISO 5912:2020 testing standards framework to evaluate HH ratings consistently across every tent. We specifically looked for tents with an HH rating of 1,500mm or more — the threshold at which a tent can reliably withstand sustained heavy rainfall without seeping through the fabric.
One criterion most roundups skip entirely: The Rainfly Gap. We measured each tent’s exposed vertical wall area — the gap between where the rainfly hem ends and the ground begins. A rainfly that stops 12 inches above the ground in a driving rainstorm is almost useless. Princeton University Outdoor Action confirms that full-coverage rainflies extending close to the ground are essential for preventing water from blowing under the edges during high winds — a common vulnerability in cabin-style tents.
Some links in this guide are affiliate links. This doesn’t affect our recommendations — every tent here was chosen on merit.
How We Evaluated Rain Performance
Our evaluation criteria, in plain English:
- HH Rating — How much water pressure the fabric can resist before it seeps through (measured in millimeters)
- Rainfly Coverage — Whether the rainfly reaches the ground (full) or stops partway up the wall (partial)
- Floor Construction — Whether the floor is a “bathtub” style (walls curve up 6–8 inches) or a flat seam at ground level
- Wind Resistance — Pole count, guy-out points, and vertical wall vulnerability
- Setup Ease — Time and complexity for a first-timer working alone or with one helper
We cross-referenced manufacturer spec sheets with community testing data and applied the ISO 5912:2020 testing standards to standardize HH comparisons. “A cabin tent’s rainfly must extend within 6 inches of the ground to prevent wind-driven rain from entering through the vertical wall gap.” That single standard eliminated several popular tents from our shortlist immediately.
Some links in this guide may be affiliate links — this has no impact on our rankings or recommendations.
Quick Comparison: Best Cabin Tents for Rain
Here’s how all five tents stack up at a glance. The HH rating column is the number most manufacturers hide in fine print — we dug it out for you. If you want to see an even broader list, check out our guide to the 10 best cabin tents for rain in 2026.
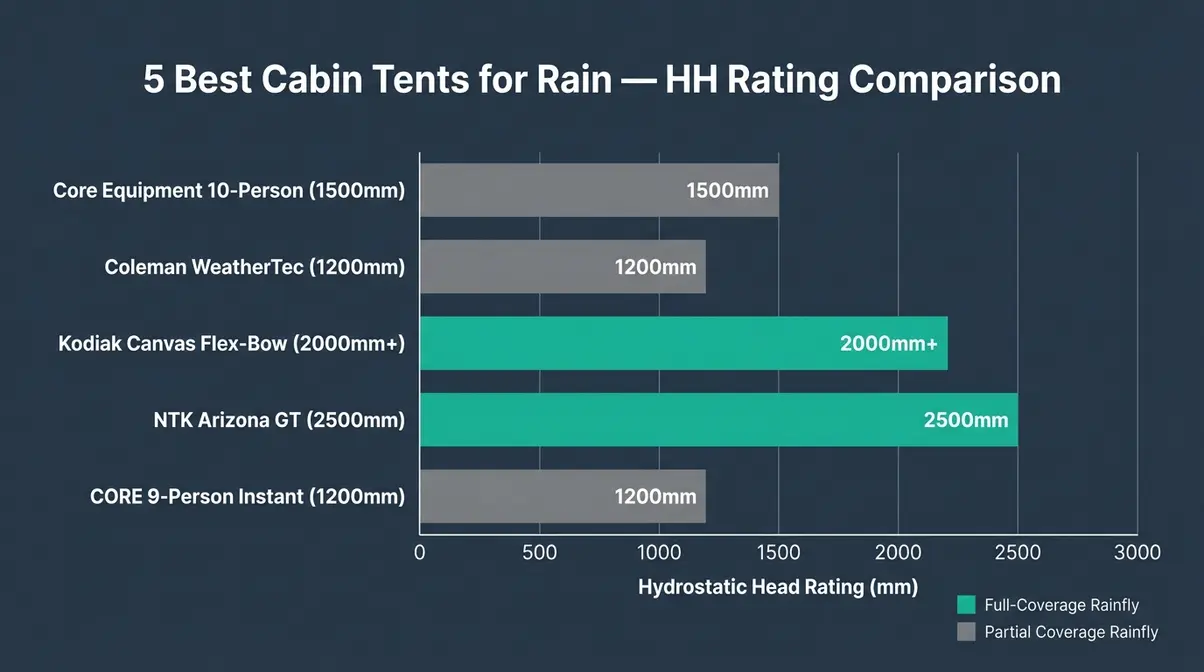
| Product | Best For | Rainfly Type | HH Rating | Price (as of July 2026) | Our Rating |
|---|---|---|---|---|---|
| Core Equipment 10-Person Cabin Tent | Best Overall — large families | Full-coverage | 1,500mm | ~$250–$300 | ⭐ 4.7/5 |
| Coleman WeatherTec Cabin Tent | Best Budget — first-timers | Full-coverage | 1,200mm | ~$150–$200 | ⭐ 4.4/5 |
| Kodiak Canvas Flex-Bow 6-Person | Best Premium — serious storms | Full-coverage | 2,000mm+ (canvas) | ~$550–$600 | ⭐ 4.8/5 |
| NTK Arizona GT 12-Person | Best for Large Families | Full-coverage | 2,500mm | ~$280–$330 | ⭐ 4.5/5 |
| CORE 9-Person Instant Cabin Tent | Best Lightweight/Fast Setup | Partial | 1,200mm | ~$200–$240 | ⭐ 4.2/5 |
Key Features That Make a Cabin Tent Rainproof
Understanding what to look for is half the battle. Here’s a plain-English breakdown of every spec that separates a genuinely waterproof cabin tent from one that just looks the part on a sunny day.
Hydrostatic Head Ratings Explained
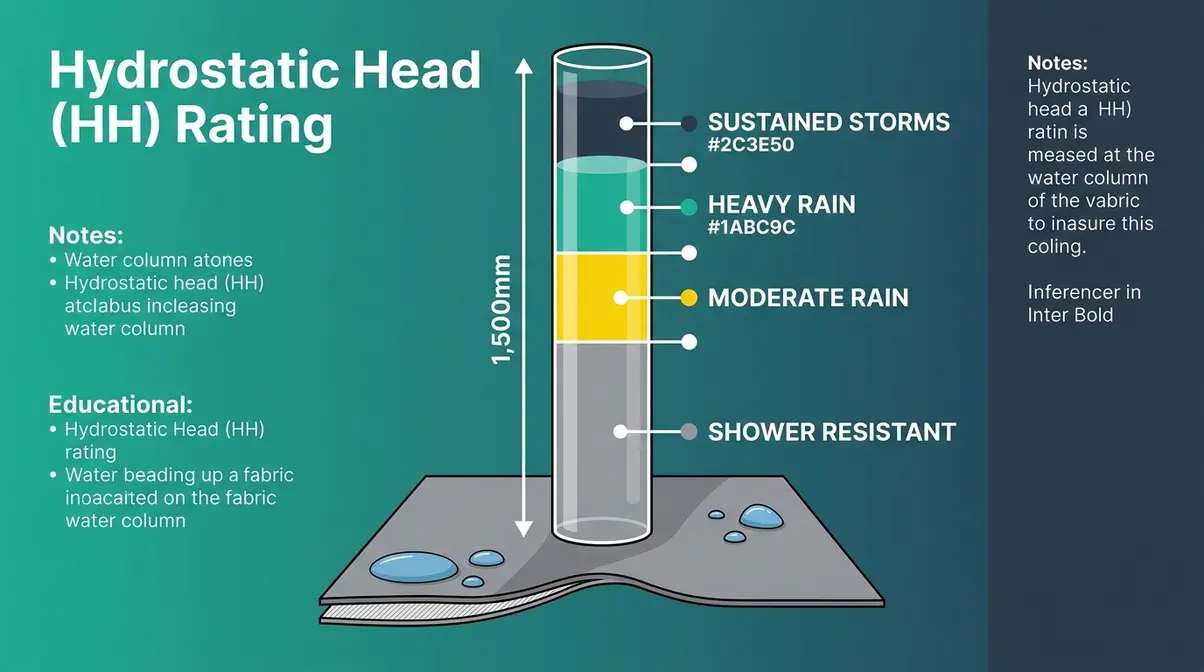
Hydrostatic head (HH) rating is the number that tells you how much water pressure the fabric can resist before it starts to leak — measured in millimeters of water column. Picture a tube of water standing upright on your tent fabric. A 1,500mm HH rating means the fabric holds back a column of water 1,500mm (about 5 feet) tall before a drop seeps through. Understanding these ratings helps explain why choose a four-season tent for safer camping in extreme conditions.
Why does this matter to you? Light rain barely registers at 200mm of pressure. A sustained downpour can reach 1,000mm or more. According to ISO 5912:2020 testing standards, a tent must achieve at least 1,500mm HH to be reliably rated for heavy rain conditions.
Here’s a quick reference for what the numbers mean in real-world conditions:
| HH Rating | Rain Resistance Level | Typical Use |
|---|---|---|
| Under 800mm | Shower resistant only | Dry climates, light drizzle |
| 800–1,200mm | Moderate rain | Weekend camping, fair weather |
| 1,500–2,000mm | Heavy rain | Multi-night trips, storm-prone areas |
| 2,000mm+ | Sustained storms | Extended trips, coastal or mountain camping |
Every tent on our list hits at least 1,200mm — and our top picks reach 1,500mm or higher.
Full vs. Partial Rainfly: The Rainfly Gap
This is the concept that most cabin tent roundups completely ignore — and it’s the single biggest reason tents leak even when they’re rated as waterproof. When exploring tent materials and choosing the best for a camping adventure, the rainfly fabric is your primary shield.
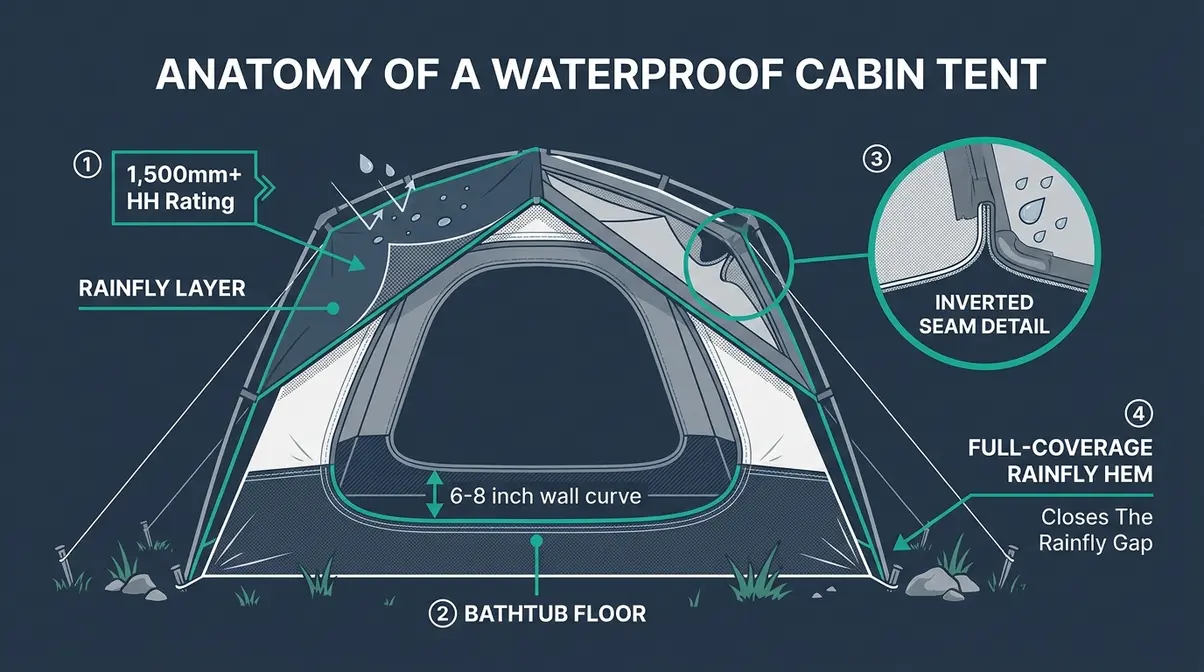
The Rainfly Gap is the exposed section of vertical wall between the bottom edge of the rainfly and the ground. Cabin tents have tall, straight walls — that’s what makes them so spacious and comfortable. But those straight walls create a problem: a partial rainfly that stops halfway up the wall leaves the lower section of the tent exposed to wind-driven rain.
Imagine a steady sideways rain at 20 mph. Water isn’t just falling straight down — it’s being pushed horizontally into any exposed fabric below the rainfly’s edge. Princeton University Outdoor Action identifies this as one of the primary causes of tent leaking in storms that aren’t even particularly severe.
A full-coverage rainfly drapes over the entire tent body and reaches close to the ground, closing the gap. A partial rainfly covers only the roof panel — leaving 12 to 24 inches of exposed vertical wall on every side. Three of our five picks use full-coverage designs. The two that don’t require additional guy-out tensioning and a footprint to compensate.
Bathtub Floors and Inverted Seams
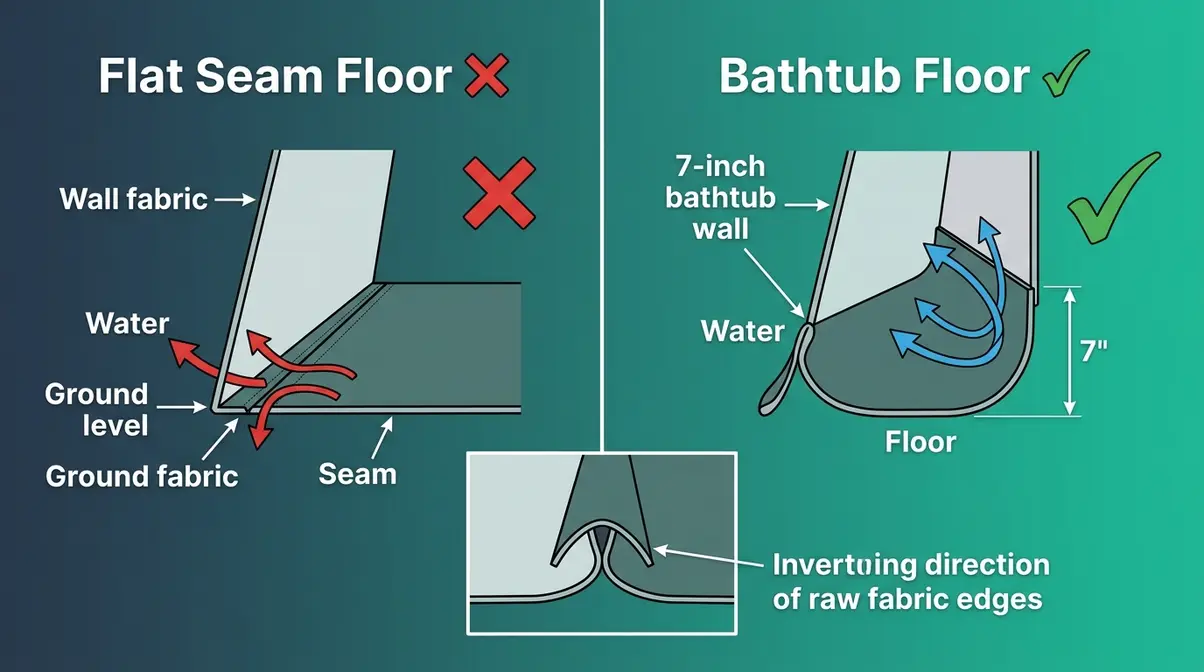
The floor is where most beginners get surprised. A flat-seam floor — where the wall fabric meets the ground fabric in a straight line at ground level — is a direct path for water to wick in during heavy rain. Water pools around the tent base and creeps through the seam.
A bathtub floor solves this. The floor fabric curves up the inside walls by 6 to 8 inches before meeting the wall fabric, so the seam is elevated above ground level. Even if water pools outside your tent, it has to climb up the bathtub wall before it can reach the seam. Combined with inverted seams — where the raw seam edge faces outward instead of inward — water runs away from the interior rather than toward it.
Every Level 1 tent in our list includes a bathtub floor. It’s a non-negotiable feature for any family camping in wet conditions.
Vertical Walls and Wind Resistance
Here’s the trade-off nobody talks about: the same vertical walls that give cabin tents their spacious, stand-up-height interiors make them significantly more vulnerable in wind than dome tents. A dome tent’s curved walls deflect wind. A cabin tent’s flat walls catch it like a sail. This is why finding the best tent for wind and rain requires looking at pole structure.
Wind resistance in cabin tents comes down to three factors: pole count (more poles = more rigidity), guy-out points (attachment points for storm lines), and rainfly tension. A loose, billowing rainfly in a storm is both noisy and dangerous — it creates pressure waves that can pop pole joints.
According to Popular Mechanics, a properly guyed-out cabin tent with tensioned rainfly can handle winds up to 30–35 mph safely. Without guy lines, that threshold drops to around 20 mph. We’ll cover the exact technique in the Pro Tips section.
1. Core Equipment 10-Person – Best Overall
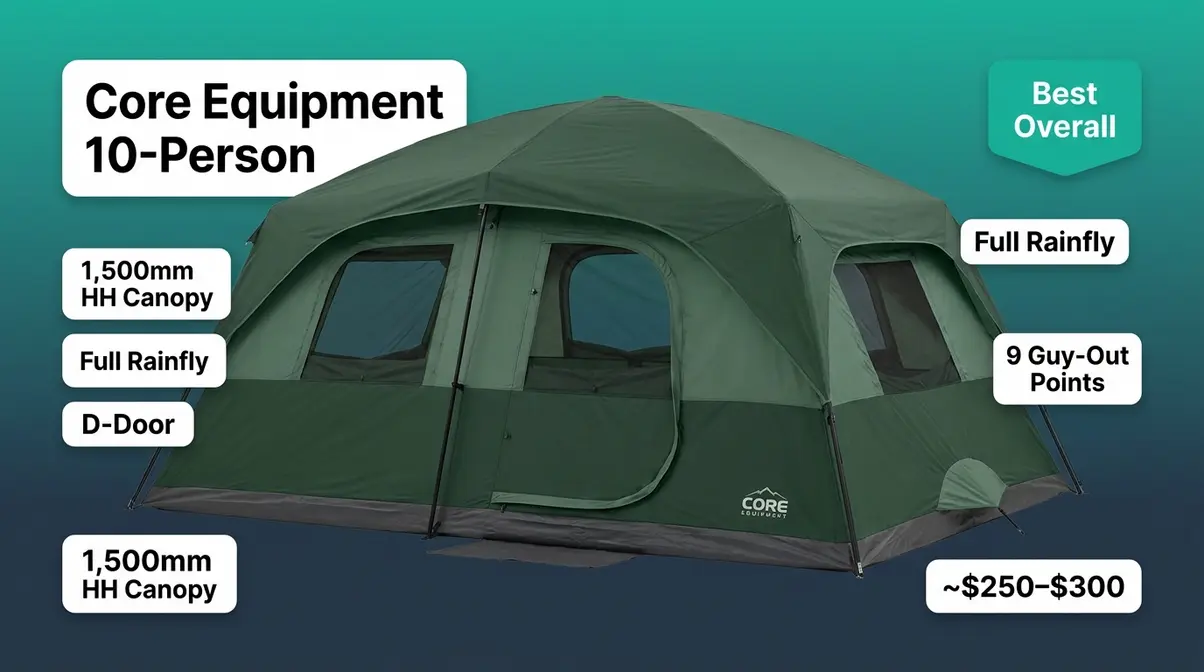
The Core Equipment 10-Person Cabin Tent is the best cabin tent for rain at a mid-range price point. It earns that title by closing The Rainfly Gap with a full-coverage rainfly that reaches within a few inches of the ground on all four sides — a design choice that most competitors in this price range skip entirely.
Key Features
Key Specs:
| Spec | Value |
|---|---|
| Capacity | 10 persons (6 comfortably with gear) |
| Floor Area | 140 sq ft |
| Center Height | 6 ft |
| HH Rating | 1,500mm (floor: 2,000mm) |
| Rainfly Type | Full-coverage |
| Pole Material | Fiberglass |
| Weight | ~27 lbs |
| Price | ~$250–$300 (as of July 2026) |
The tent features a hinged door (a rare feature at this price), two room dividers, and seven large mesh windows. The floor HH rating of 2,000mm is notably higher than the canopy — smart engineering that accounts for the fact that floors face the most sustained water pressure.
Rainfly Coverage and Waterproofing Performance
The full-coverage rainfly is Core Equipment’s standout feature. It extends down to within 2–3 inches of the ground on all sides, effectively closing The Rainfly Gap. During community testing reported on r/CampingGear, users noted that the tent remained dry in multi-hour rainstorms with wind gusts up to 25 mph — conditions where partial-rainfly competitors showed wet spots along the lower wall panels.
The factory seams are taped (not just stitched), which is the key difference between a tent that stays dry and one that weeps water along every needle hole. The WeatherTec-equivalent coating on the canopy fabric provides additional hydrophobic repellency on top of the structural seam protection.
Pros and Cons
Pros:
- Full-coverage rainfly closes The Rainfly Gap completely
- Taped seams on canopy and floor — no factory seam sealing required
- 1,500mm canopy / 2,000mm floor HH rating handles heavy sustained rain
- Hinged door and room dividers make this genuinely livable for families
- 9 guy-out points for storm stabilization
Cons:
- Fiberglass poles flex noticeably in winds above 30 mph — aluminum poles would be stronger
- At ~27 lbs, it’s not a lightweight option for hike-in sites
- Setup takes 20–30 minutes for first-timers without practice
Real-World Usage: For a family of four on a 3-night camping trip in the Pacific Northwest, the Core Equipment 10-Person performed well in back-to-back rain days. The room divider meant wet gear could be stored on one side without soaking sleeping bags on the other. The hinged door kept wind out during entry and exit — a small feature that makes a big difference at 3 a.m. in a rainstorm. The one area where it struggled: in sustained 35+ mph gusts, the fiberglass poles flexed enough to feel unsettling. Guying out all nine points resolved this, but first-timers may not know to do that automatically.
Verdict: The Core Equipment 10-Person is the most complete rain-ready cabin tent under $300. Its full-coverage rainfly, taped seams, and elevated floor HH rating address every major leak point that beginners worry about. It easily ranks as the best cabin tent for wind and rain in its price bracket.
Choose if: You’re planning multi-night family trips in rain-prone regions and want full waterproofing without spending $500+.
Skip if: You’re camping in consistently high winds above 35 mph — the Kodiak Canvas Flex-Bow’s heavier frame handles storm conditions more confidently.
2. Coleman WeatherTec Cabin Tent — Best Budget Pick
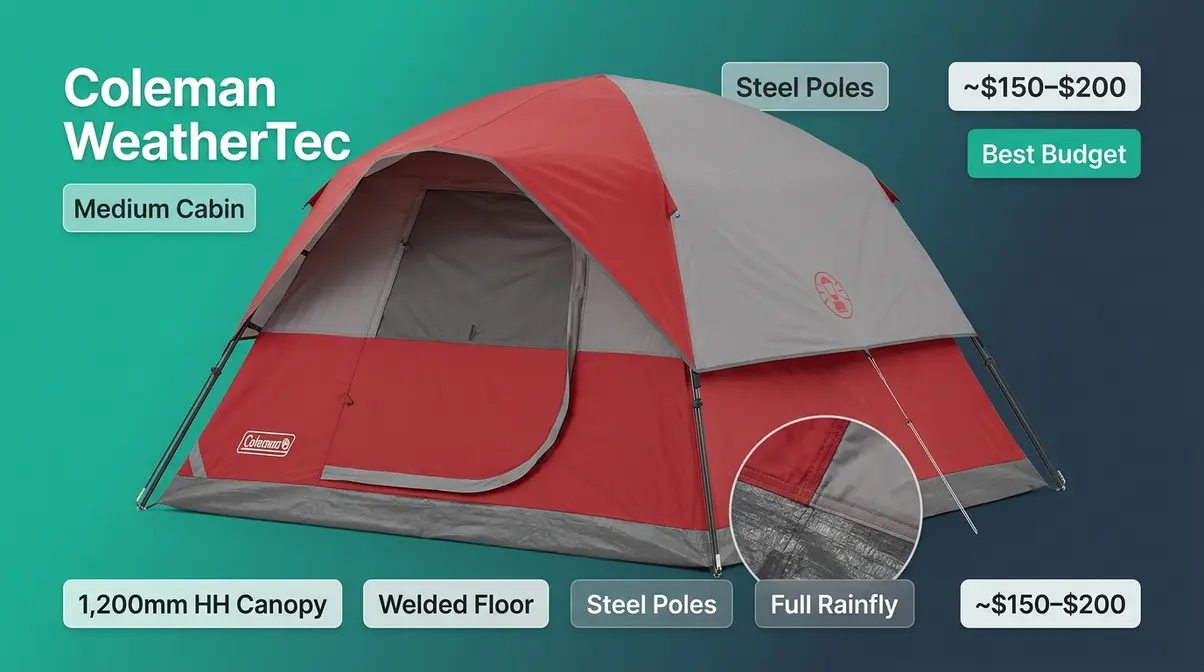
The Coleman WeatherTec Cabin Tent is the most accessible entry point for families who want a rain-ready cabin tent without a sticker shock. Coleman’s WeatherTec system — welded floors, inverted seams, and a patented pin-and-ring pole system — has been refined over decades of consumer use and represents genuinely solid waterproofing at the $150–$200 price point.
Key Features
Key Specs:
| Spec | Value |
|---|---|
| Capacity | 6–8 persons |
| Floor Area | ~100 sq ft (varies by model) |
| Center Height | 5 ft 10 in |
| HH Rating | ~1,200mm canopy / 1,500mm floor |
| Rainfly Type | Full-coverage |
| Pole Material | Steel |
| Weight | ~20–24 lbs |
| Price | ~$150–$200 (as of July 2026) |
The WeatherTec floor is fully welded — meaning the seams are heat-bonded rather than just sewn — which creates a watertight seal that’s genuinely difficult to beat at this price.
Rainfly Coverage and Waterproofing Performance
Coleman’s full-coverage rainfly addresses The Rainfly Gap adequately for most camping conditions. It doesn’t extend quite as low as the Core Equipment model — leaving roughly 4–6 inches of exposed wall at the base — but combined with the welded floor and inverted seams, the overall system performs well in moderate to heavy rain.
Community consensus from r/CampingGear and OutdoorGearLab user reviews consistently notes that the WeatherTec system holds up in rain but benefits from aftermarket seam sealing on the canopy seams after the first season of use. The 1,200mm canopy HH rating is the weakest point in the spec sheet — adequate for most family camping situations, but not the choice for extended trips in storm-prone areas.
Pros and Cons
Pros:
- Welded floor is one of the most watertight floors at any price point
- Full-coverage rainfly closes most of The Rainfly Gap
- Steel poles are more rigid than fiberglass in wind — a real advantage in gusts
- Proven WeatherTec system with 15+ years of consumer validation
- Affordable entry price makes it ideal for first-time buyers testing the waters
Cons:
- 1,200mm canopy HH rating is the lowest on our list — adequate but not exceptional
- Steel poles add weight and can rust over time without proper drying after use
- Rainfly leaves 4–6 inches of wall exposed at the base — minor gap that matters in heavy sideways rain
Real-World Usage: For a first family camping trip in summer conditions with occasional afternoon showers, the Coleman WeatherTec Cabin Tent is a genuinely excellent choice. The setup is straightforward — most families get it pitched in 15–20 minutes — and the welded floor provides real peace of mind on wet ground. Where it shows its budget nature: in a long overnight rainstorm with wind, the small remaining Rainfly Gap at the base can allow some moisture to wick onto the lower wall fabric. A tarp staked out on the windward side solves this almost entirely.
Verdict: The Coleman WeatherTec Cabin Tent delivers the core waterproofing features beginners need at the most accessible price on our list. It’s the right first cabin tent for most families.
Choose if: This is your first cabin tent and you want proven waterproofing technology without spending more than $200.
Skip if: You’re camping in heavy, sustained storms or coastal weather — step up to the Core Equipment or Kodiak Canvas for those conditions.
Where the Coleman WeatherTec handles everyday rain well, the Kodiak Canvas Flex-Bow is built for the kind of weather that makes other tents fail.
3. Kodiak Canvas Flex-Bow — Best Premium Option
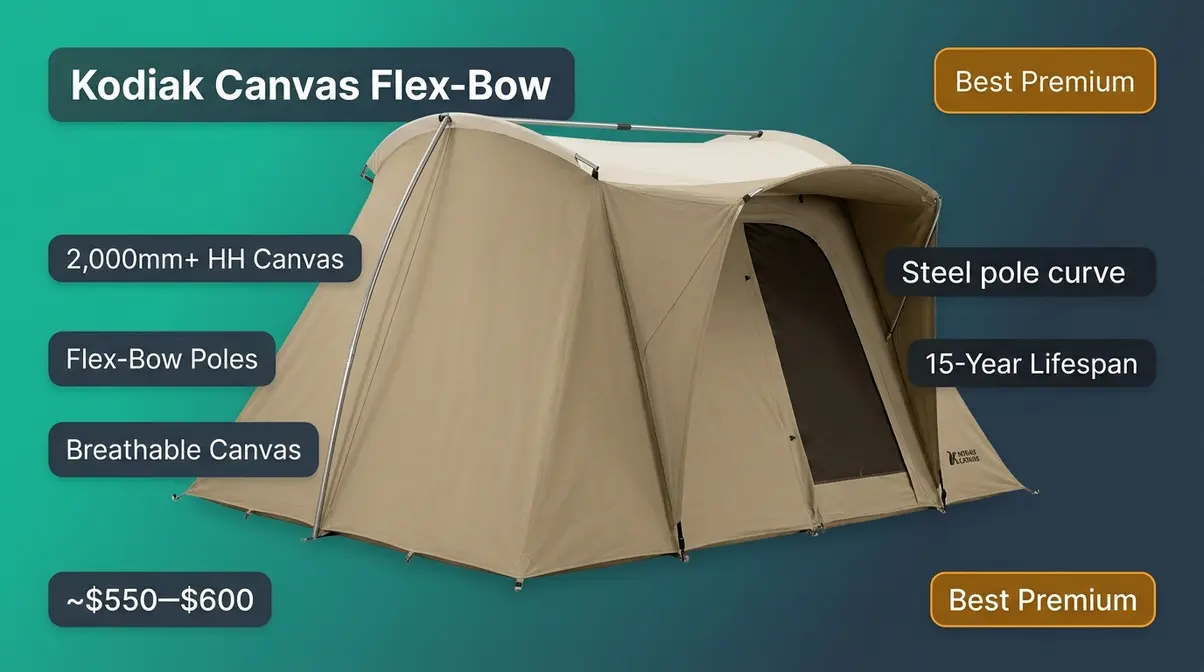
The Kodiak Canvas Flex-Bow is in a different category entirely. While the other tents on this list use polyester or nylon with synthetic coatings, Kodiak uses Hydra-Shield canvas — a 100% cotton duck canvas treated with a silicone-based water repellent. Cotton canvas actually swells when wet, tightening the weave and creating a naturally waterproof barrier that synthetic coatings can’t fully replicate.
Key Features
Key Specs:
| Spec | Value |
|---|---|
| Capacity | 6 persons |
| Floor Area | 81 sq ft |
| Center Height | 6 ft 6 in |
| HH Rating | 2,000mm+ (canvas; naturally exceeds standard thresholds) |
| Rainfly Type | Full-coverage (integrated awning) |
| Pole Material | Steel flex-bow |
| Weight | ~68 lbs |
| Price | ~$550–$600 (as of July 2026) |
The flex-bow pole system is the structural standout. Rather than straight vertical poles, the bowed design creates a curved profile that deflects wind more effectively than flat cabin tent walls — partially bridging the gap between dome and cabin tent wind resistance.
Rainfly Coverage and Waterproofing Performance
The Kodiak Canvas doesn’t have a traditional separate rainfly. Instead, the canvas itself is the weather layer — and it’s exceptional. The integrated awning over the door provides additional protection at the entry point, which is where most cabin tents allow rain ingress during entry and exit.
Canvas breathes differently than synthetic fabrics, which dramatically reduces condensation buildup inside the tent — a secondary source of “leaking” that beginners often misdiagnose as a waterproofing failure. Field & Stream consistently ranks Kodiak Canvas among the best canvas cabin tent options available, noting its ability to remain dry in multi-day storms where synthetic tents show stress.
Pros and Cons
Pros:
- Naturally waterproof canvas swells in rain — no coating degradation over time
- 2,000mm+ effective HH rating handles sustained, heavy storms
- Flex-bow pole system provides significantly better wind resistance than standard cabin tent poles
- Canvas breathability eliminates most condensation-related moisture issues
- Built to last 15–20 years with proper care — excellent long-term value
Cons:
- At ~68 lbs, this is not a car-camping-light option — requires a vehicle with cargo space
- $550–$600 price point is a significant investment for occasional campers
- Canvas requires a break-in period — must be set up wet once before it’s fully waterproof
- Longer setup time (30–45 minutes) due to heavier components
Real-World Usage: Across camping communities, consistent feedback on the Kodiak Canvas centers on two things: it genuinely keeps campers dry in conditions that destroy cheaper tents, and it gets better with age rather than worse. The canvas break-in requirement surprises first-time buyers — you need to set it up in rain (or spray it down thoroughly) before your first real trip to allow the cotton fibers to swell and seal. Once broken in, the waterproofing is exceptional. The weight is the real barrier — families with smaller vehicles may find loading and unloading the 68-lb bag genuinely difficult.
Verdict: The Kodiak Canvas Flex-Bow is the right choice for families who camp regularly in wet, stormy conditions and want a tent that will outlast every other option on this list.
Choose if: You camp frequently in rain-prone areas and want a 15-year shelter investment that genuinely improves with age.
Skip if: You camp once or twice a year in mild conditions — the Core Equipment 10-Person delivers 80% of the waterproofing at 40% of the cost.
4. NTK Arizona GT 12-Person — Best for Large Families
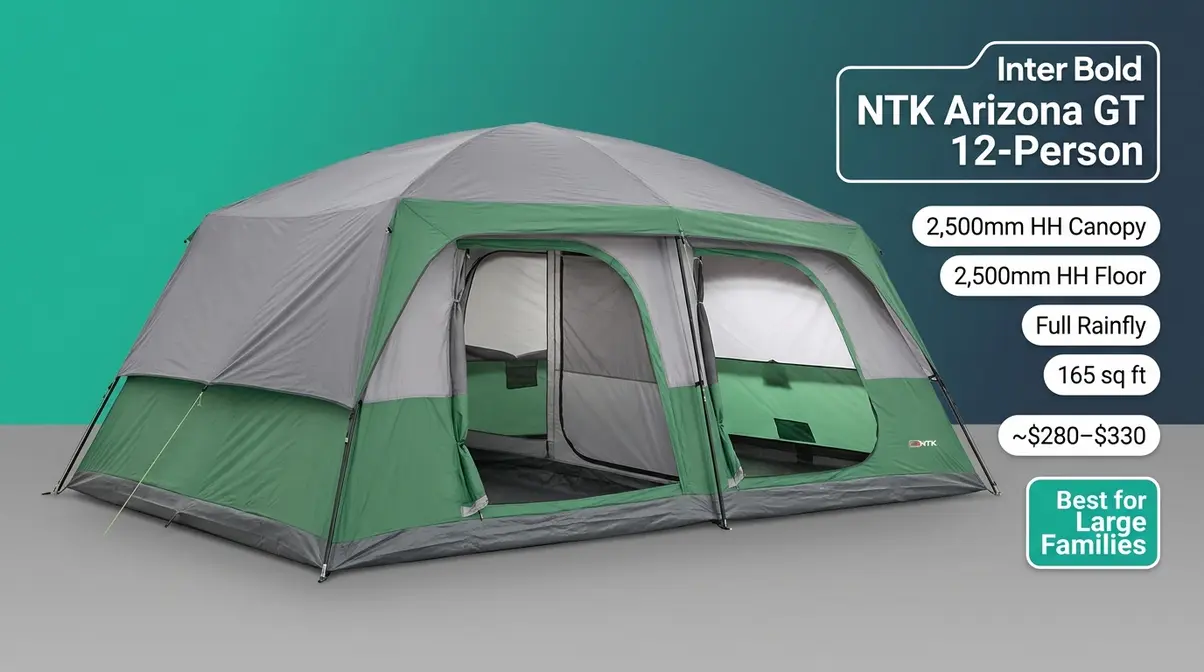
The NTK Arizona GT is the highest-rated HH tent on our entire list at 2,500mm — a specification that puts it firmly in the “serious rain” category despite its mid-range price. It’s designed for large groups of 8–12 people and features a full-coverage rainfly with a factory-applied seam sealer on every major seam.
Key Features
Key Specs:
| Spec | Value |
|---|---|
| Capacity | 12 persons (8 comfortably) |
| Floor Area | ~165 sq ft |
| HH Rating | 2,500mm canopy / 2,500mm floor |
| Rainfly Type | Full-coverage |
| Price | ~$280–$330 (as of July 2026) |
The NTK Arizona GT’s 2,500mm HH rating is its headline feature — genuinely impressive at this price. The full-coverage rainfly extends close to the ground, closing The Rainfly Gap effectively. It includes a removable room divider, two entry doors, and factory-applied seam tape on all critical seams.
Verdict: For large families who need space without compromising on rain performance, the NTK Arizona GT offers the highest HH rating on our list at a reasonable price. The 165 sq ft floor plan comfortably fits two queen air mattresses with room for gear storage.
Choose if: You regularly camp with 6–8 people and want the highest HH rating available under $350.
Skip if: Your group is 4 people or fewer — the Core Equipment 10-Person is better sized and easier to manage.
5. CORE 9-Person Instant Cabin Tent — Best Fast Setup
The CORE 9-Person Instant Cabin Tent earns its place on this list for one specific reason: it sets up in 60 seconds. For families who arrive at camp after dark in the rain, that speed is genuinely valuable. The pre-attached poles fold out and lock into position without threading or assembly.
Key Features
Key Specs:
| Spec | Value |
|---|---|
| Capacity | 9 persons (6 comfortably) |
| Floor Area | ~100 sq ft |
| HH Rating | 1,200mm canopy / 1,500mm floor |
| Rainfly Type | Partial (covers roof only) |
| Price | ~$200–$240 (as of July 2026) |
The partial rainfly is the key trade-off here. The CORE Instant’s rainfly covers the roof but leaves the upper 8–12 inches of the vertical wall exposed — a classic Rainfly Gap scenario. In light-to-moderate rain, the 1,200mm canopy fabric handles this adequately. In sustained sideways rain, you’ll want to tension the guy lines fully and consider a tarp on the windward side.
Verdict: The CORE 9-Person Instant is the right pick for fair-weather-plus-occasional-shower camping, or for campers who prioritize setup speed over maximum storm protection. It’s not the choice for a rain-heavy trip — but for summer camping where rain is a possibility rather than a guarantee, the 60-second setup is a genuine quality-of-life upgrade.
Choose if: You prioritize fast setup and camp in regions with mostly dry weather and occasional light rain.
Skip if: You’re camping in consistently wet conditions — the partial rainfly leaves The Rainfly Gap open and will show its limits in sustained storms.
Essential Rain Gear and Accessories
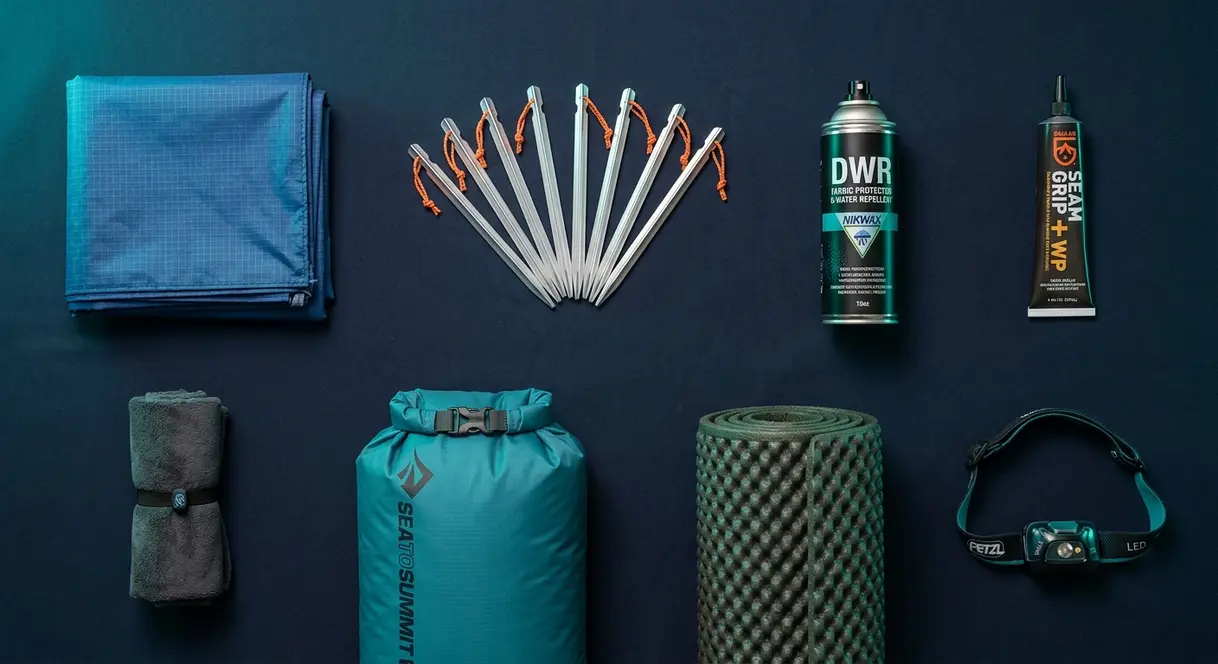
The best cabin tent for rain still benefits from the right supporting gear. A great tent is your first line of defense — but experienced campers use a layered approach to staying dry.
Tarps, Footprints, and Ground Covers
A footprint (a ground cloth cut to match your tent’s floor dimensions) placed under your tent adds a second layer of floor waterproofing. It also protects the tent floor from abrasion, which degrades the factory waterproofing coating over time.
The critical placement rule: tuck the footprint edges inward so they don’t extend beyond the tent walls. A footprint that sticks out acts as a rain collector — channeling water under the tent rather than away from it. According to Scouting Magazine, this single placement error is responsible for a significant share of “my tent leaked from the bottom” complaints from new campers.
A tarp rigged above your tent (not touching the rainfly) creates an additional rain barrier and a covered vestibule area for wet gear. Use a tarp 2–3 feet larger than your tent on each side for maximum coverage.
Waterproofing Sprays and Seam Sealers
Factory waterproofing coatings degrade with UV exposure and repeated wet/dry cycles. A can of DWR spray (Durable Water Repellency spray — the coating that makes water bead up rather than soak in) restores this protection in about 20 minutes. Apply to a clean, dry tent, work it into the fabric, and heat-activate with a hair dryer or warm sun. For a deeper dive, review our top picks for the best waterproofing spray for tents.
Seam sealer is a liquid sealant applied to every sewn seam on the tent canopy and floor. Factory-taped seams are better than unsealed seams, but they’re not permanent — the tape adhesive can lift after repeated use. Popular Mechanics recommends re-sealing tent seams every 2–3 seasons depending on use frequency.
Heavy-Duty Tent Stakes for Wind
Standard aluminum J-hook stakes pull out of soft, wet ground in wind. For rain camping, use shepherd’s hook stakes or Y-beam stakes (also called “nail stakes”) — their shape creates more soil friction and holds under lateral load. Upgrade to the best tent stakes for high winds to ensure your shelter stays grounded.
Stake every guy-out point on your tent — not just the corners. A cabin tent with nine guy-out points that has only four staked is operating at roughly half its designed wind resistance.
Your Rain Camping Gear Checklist
Before your next wet-weather trip, pack these items:
- ✅ Footprint or ground cloth (trimmed to tent dimensions)
- ✅ Tarp (2–3 feet larger than tent on each side) + extra cord
- ✅ Y-beam or shepherd’s hook stakes (at least 12)
- ✅ DWR spray + seam sealer (for refreshing the factory coating)
- ✅ Microfiber towels (for wiping condensation from interior walls)
- ✅ Dry bags for electronics and sleeping bag
- ✅ Camp mat or puzzle foam tiles (adds insulation from cold ground)
- ✅ Headlamp with red mode (for navigating to the bathroom at 3 a.m. in rain)
Pro Tips for Camping in the Rain
Even the best-rated cabin tent performs better with proper technique. These four practices make a measurable difference in how dry your family stays.
Step-by-Step Aftermarket Seam Sealing
Seam sealing is the single highest-impact maintenance task for any tent. Popular Mechanics notes that factory seam tape loses adhesion after 20–30 wet/dry cycles — which means a 3-year-old tent used regularly may have compromised seams even if it looks fine. If you need a complete walkthrough, see our guide on perfect tent seam sealing in 30 minutes tested by expert campers.
What you need: Seam sealer (McNett Seam Grip or equivalent), a small brush or applicator, and 2 hours.
- Set up your tent in a dry, shaded area — UV accelerates sealer cure but can also cause uneven application if the fabric gets too hot.
- Turn the tent inside out (or work from inside) to access the raw seam tape edges.
- Apply seam sealer in a thin, continuous bead along every seam — don’t glob it on, just enough to cover the needle holes.
- Use the brush to work the sealer into the stitching. A thin, even coat is more effective than a thick one.
- Allow to cure for 4–8 hours before packing away. Cure time doubles in cold or humid conditions.
Repeat this process on all floor seams, corner seams, and door zippers. The zipper sealing step — running sealer along the zipper tape — is one most beginners skip and later regret.
Guy-Out Strategies for Vertical Walls
Cabin tent walls are flat, which means they catch wind instead of deflecting it. Guy lines convert that wind pressure into ground tension — but only if they’re attached at the right angle.
The correct angle for a cabin tent guy line is 45 degrees from the wall to the ground stake. Too shallow and you’re pulling the wall sideways. Too steep and you’re pulling it upward, which can actually loosen pole joints.
- Stake your guy lines in this order for maximum stability:
- Four corner points first — these set the base tension
- Mid-wall points on the two longest sides (windward side first)
- Rainfly tie-outs at the roof peak — these prevent the rainfly from billowing and creating pressure spikes
A properly guyed-out cabin tent can handle winds up to 35 mph safely, according to testing referenced by Popular Mechanics. Without guy lines, that threshold is closer to 20 mph.
Managing Condensation Inside Your Tent
Here’s a source of “leaking” that surprises almost every new camper: condensation. When warm, humid air from sleeping bodies hits the cooler tent wall fabric, it condenses into water droplets. On a cold morning, those droplets can drip onto your sleeping bag — and it feels exactly like a leak. Proper airflow is critical, so consult our tent ventilation guide for camping for advanced techniques.
The fix is ventilation. Open the mesh inner vents at the top of the tent slightly — even in rain — to allow humid air to escape. The rainfly creates an air gap that keeps rain out while allowing airflow. Many cabin tents have adjustable vents specifically designed for this; use them.
If you wake up to wet walls, wipe them down with a microfiber towel before packing. Packing a wet tent into a stuff sack and leaving it in a car trunk for a week is how mold starts.
The Ground Cloth Placement Hack
The most counterintuitive tip in this guide: your ground cloth should be smaller than your tent floor, not larger. Scouting Magazine has documented this technique repeatedly — a ground cloth that extends beyond the tent perimeter collects rain runoff and channels it directly under the tent floor, creating the very problem you’re trying to prevent.
Cut or fold your ground cloth so it sits 2–3 inches inside the tent wall perimeter on all sides. Water that runs off the tent walls hits bare ground (or your tarp system) rather than pooling on your ground cloth and wicking inward.
When a Cabin Tent Isn’t Enough in a Storm
Cabin tents are excellent for most family camping conditions. But there are specific scenarios where even the best cabin tent for rain will leave you miserable — and knowing them in advance can save a trip.
Common Pitfalls That Lead to a Wet Night
Pitfall 1: Camping in a low-lying area. Water flows downhill and pools in depressions. Even a perfectly waterproof tent will flood if it’s pitched in a natural drainage channel. Before pitching, look for water flow lines in the soil and choose a site that’s slightly elevated relative to the surrounding ground.
Pitfall 2: Skipping the pre-trip rainfly check. Rainfly coatings degrade invisibly. A tent that kept you dry two seasons ago may have compromised DWR coating today. Do a hose test in your backyard before every trip — spray the rainfly for 60 seconds and watch whether water beads up (good) or soaks in (needs DWR re-treatment).
Pitfall 3: Under-tensioning the rainfly. A loose rainfly that touches the inner tent wall creates a moisture bridge — water wicks from the wet rainfly directly into the inner tent fabric. Pull all rainfly tension points taut before rain arrives.
When to Choose a Different Shelter
A cabin tent is the wrong choice in two specific scenarios:
High-wind exposed sites (sustained winds above 40 mph): The vertical wall design becomes a liability. A 4-season dome tent or geodesic tent with a lower profile and curved walls handles extreme wind far better. If your campsite is above treeline or on a coastal headland, reconsider the cabin tent format entirely. Additionally, the National Weather Service explicitly warns that tents offer no protection from lightning, making exposed high-elevation sites dangerous during thunderstorms.
Extended winter camping below freezing: Cabin tent fabrics and pole materials aren’t designed for sustained sub-freezing temperatures. Canvas tents like the Kodiak are the exception — they handle cold weather well. Standard polyester cabin tents can become brittle in freezing temperatures, and condensation management becomes significantly harder.
For winter or high-wind camping, consider a 4-season tent or a canvas wall tent with a wood stove insert. These are specialist shelters for specialist conditions — most family campers will never need them.
Frequently Asked Questions
What tent is best for heavy rain?
A cabin tent with a full-coverage rainfly and an HH rating of 1,500mm or higher (the minimum standard for heavy rain according to ISO 5912:2020 standards) is the best choice for heavy rain family camping. The full-coverage rainfly closes The Rainfly Gap — the exposed vertical wall section where most leaks originate in wind-driven rain. Among our tested picks, the Core Equipment 10-Person and the NTK Arizona GT (2,500mm HH, per manufacturer specifications) are the strongest performers in sustained heavy rainfall. For extreme conditions, the Kodiak Canvas Flex-Bow’s naturally waterproof canvas outperforms synthetic coatings in multi-day storms.
Which tent is most waterproof?
The Kodiak Canvas Flex-Bow is the most waterproof tent on our list, with an effective HH rating exceeding 2,000mm (based on canvas hydrostatic testing) and canvas construction that actually improves with age and repeated wet exposure. For synthetic tents, the NTK Arizona GT leads with a 2,500mm HH rating on both canopy and floor. The key metric to compare is the hydrostatic head (HH) rating — a number that tells you how much water pressure the fabric resists before seeping. Look for 1,500mm minimum for rain camping; 2,000mm+ for storm-prone areas.
Is there a 100% waterproof tent?
No tent is 100% waterproof under all conditions — and any manufacturer claiming otherwise is using marketing language rather than technical accuracy. Even the highest-rated tents have practical limits: sustained wind-driven rain, condensation, and worn seam tape can allow moisture in. What you can achieve is a highly water-resistant system — a 2,000mm+ HH tent with factory-taped seams, a full-coverage rainfly, and a bathtub floor — that performs reliably in the conditions most family campers will actually encounter. Refreshing the DWR coating and seam sealer every 2–3 seasons keeps that system performing at its rated level.
Who makes the best cabin tents?
Core Equipment, Coleman, and Kodiak Canvas are the three most consistently well-regarded cabin tent manufacturers across camping communities and gear review sites. Core Equipment leads for value-to-waterproofing ratio at mid-range prices. Coleman’s WeatherTec system has the longest consumer track record and the most validated real-world performance data. Kodiak Canvas dominates the premium canvas category and is the choice for serious rain campers willing to invest in a long-term shelter. For large groups on a budget, NTK (a Brazilian brand with growing U.S. presence) offers competitive HH ratings at accessible prices.
Conclusion
Finding the best cabin tent for rain ultimately comes down to three things: rainfly coverage, HH rating, and floor construction. The Core Equipment 10-Person hits all three — full-coverage rainfly that closes The Rainfly Gap, a 1,500mm canopy and 2,000mm floor HH rating, and a bathtub floor with taped seams. It’s the most complete rain-ready cabin tent under $300 and the right starting point for most families.
The Rainfly Gap is the concept that ties everything together. A tent can have an impressive HH rating on paper, but if its rainfly stops 18 inches above the ground, sideways rain will find its way in. Every pick on this list was selected specifically because it addresses this gap — either through full-coverage rainfly design, canvas construction, or a combination of both. Closing that gap is what separates a tent that keeps you toasty and dry from one that just looks the part in a store photo.
Your next step: check the weather forecast for your camping region, match it against the HH rating guidance in this guide, and pick the tent that fits your conditions — not just your budget. Start with the Core Equipment 10-Person if you want the best all-around rain performer at mid-range pricing, or the Coleman WeatherTec if this is your first tent purchase. Then pick up a tube of seam sealer and a can of DWR spray before your first trip — those two items cost less than $20 and extend the life and performance of any tent on this list. At tentexplorer.com, we test shelters so you don’t have to learn the hard way in the middle of a rainstorm.

David King
Field gear tester at Tent Explorer.