 David King
It’s 7 PM. The sun is dropping fast. You’ve just pulled a large cabin tent out of its bag for the first time, and you’re staring at a pile of poles, stakes, and fabric wondering where to even begin. That feeling — anxious, uncertain, overwhelmed — is exactly what this guide is here to fix.
Most how-to guides assume you already know what a “ridge pole” is or that you have an extra pair of hands standing by. Large cabin tents have nearly vertical walls and a boxy shape that catches wind like a sail — they require a specific order of operations that generic guides never explain. Skip that order, and your tent becomes a kite before a single pole is raised.
In this guide, you’ll learn exactly how to pitch a cabin tent step by step — from choosing the right campsite to tensioning your final guyline (the tension cord that anchors the tent to the ground) — so you can sleep confidently no matter the weather. We’ll also cover the 2-2-2 Rule for smart trip planning, wind anchoring for high-wind nights, and condensation prevention that zero competitors address.
Pitching a cabin tent correctly means staking corners first, then raising poles — never the reverse. The 2-2-2 Rule (arrive by 2 PM, stay no more than 200 miles from home base, allow 2 hours for setup) gives you the time and daylight you need for a safe, confident setup.
- Stake first: Secure all four corners before touching the poles — this prevents wind from flipping the frame mid-setup
- Face the door away from prevailing wind, not toward your view
- Never over-tension the first rain fly corner — attach all clips first, then tension evenly
- Ventilate immediately: Open a vent at setup to prevent condensation overnight
- The 2-2-2 Rule gives you daylight, time, and the right mindset to pitch correctly
What Is a Cabin Tent?
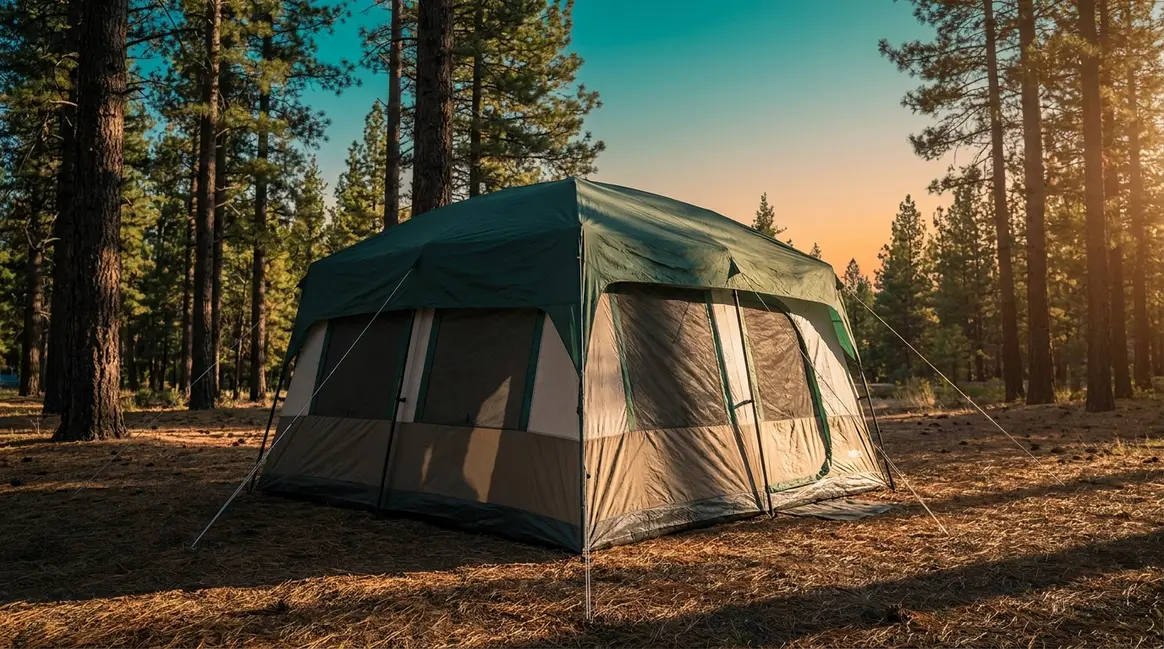
A cabin tent is a large camping shelter with nearly vertical walls and a high ceiling, typically 6–7 feet tall at the peak. Unlike dome tents (the curved-arch style most beginners picture when they think of camping), cabin tents rely on a combination of upright vertical poles and horizontal ridge poles to create their boxy shape. That shape maximizes interior space — enough to stand up, arrange cots, and move around comfortably — but it also catches wind like a sail if you try to raise the frame before staking the corners.
A cabin tent’s vertical walls create significantly more wind resistance than a dome tent during setup — which is why the stake-first rule is non-negotiable.
Cabin tents are designed for car camping, family trips, and multi-night base camps where comfort matters. They’re not for backpacking — they’re too heavy and too large to carry on your back. But for a campground site where you drive up, unload, and stay for a few nights? They’re an excellent choice. Before you learn how to pitch a cabin tent, understanding what makes it structurally unique will save you real trouble at the campsite.
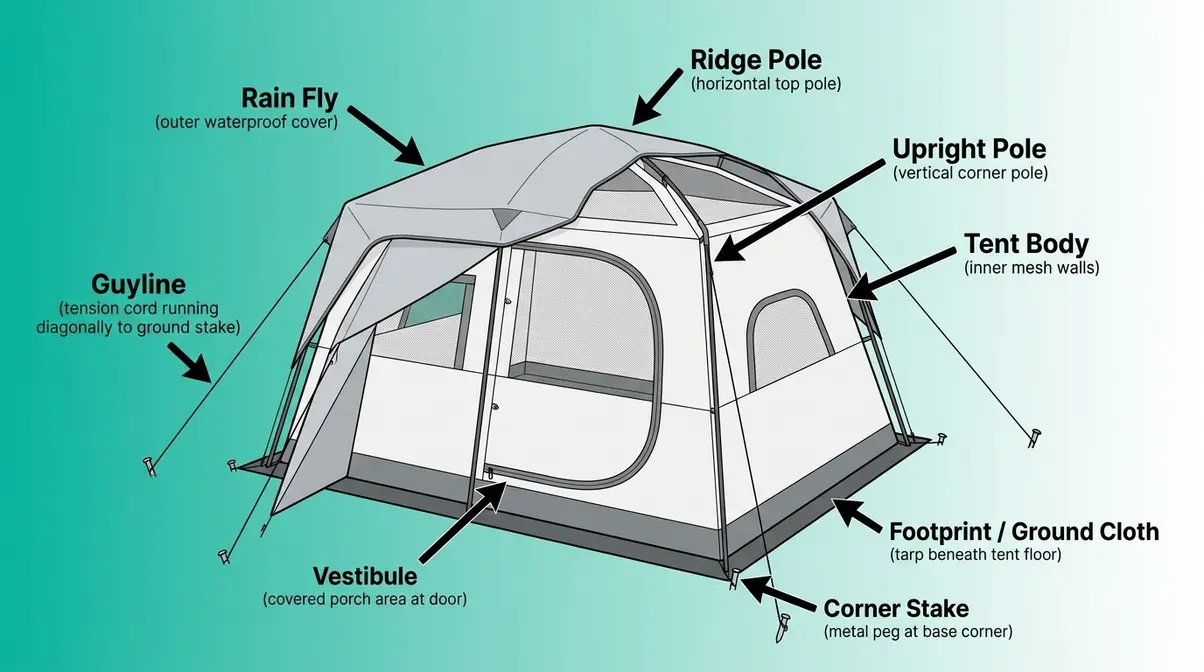
Cabin vs. Dome Tent Differences
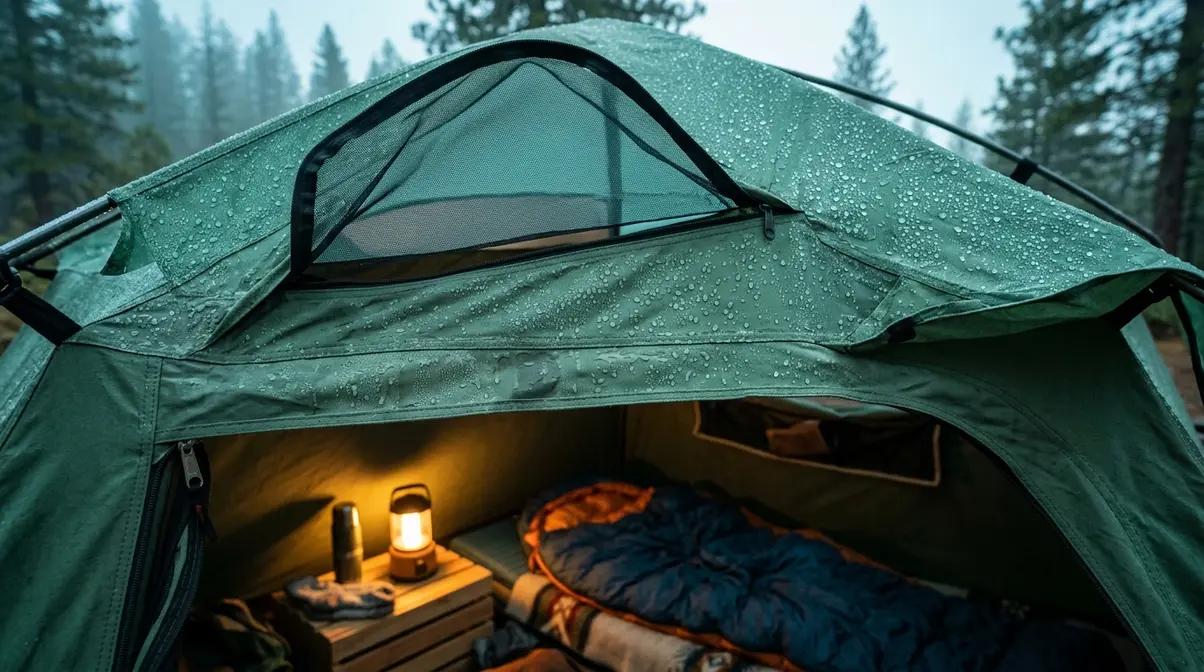
Think of a cabin tent as a box and a dome tent as an igloo. A cabin tent’s walls rise at nearly 90 degrees from the ground, then meet a flat or gently sloped roof. A dome tent’s walls curve inward from the ground up, creating a self-supporting arch. That arch is the key difference: dome tents can stand on their own once the poles are connected, even without stakes. Cabin tents cannot. Because a cabin tent has no self-supporting arch, the tent body is completely floppy until all poles are connected AND corners are staked — meaning wind can flip the entire structure during setup. If you want a faster setup experience, see our guide to quick-setup instant tents.
Can One Person Pitch a Cabin Tent?
Yes — one person can absolutely pitch a cabin tent, but the order of operations matters more than with smaller tents. Two specific challenges come up for solo campers. First, the rain fly (the waterproof outer cover) is large and flat, making it difficult to throw over the structure without it catching wind or sliding off one side. Second, upright poles must be held in position while you connect horizontal poles — a task that’s easy with two people but requires a specific workaround alone.
The key is the lean-and-clip method for the frame: stake all four corners first, then insert poles into grommets and clip the tent body one clip at a time rather than trying to raise the entire frame at once. Popular Mechanics recommends practicing tent setup at home before a trip to avoid first-time setup issues in the field. Common beginner reports from camping communities indicate that solo setup of a standard 4-person cabin tent takes about 30–40 minutes the first time and drops to 15–20 minutes with practice.
The best way to manage these solo challenges is to give yourself time and prepare your campsite properly. That starts before you even leave home.
Before You Pitch: Gear Check and Site Selection
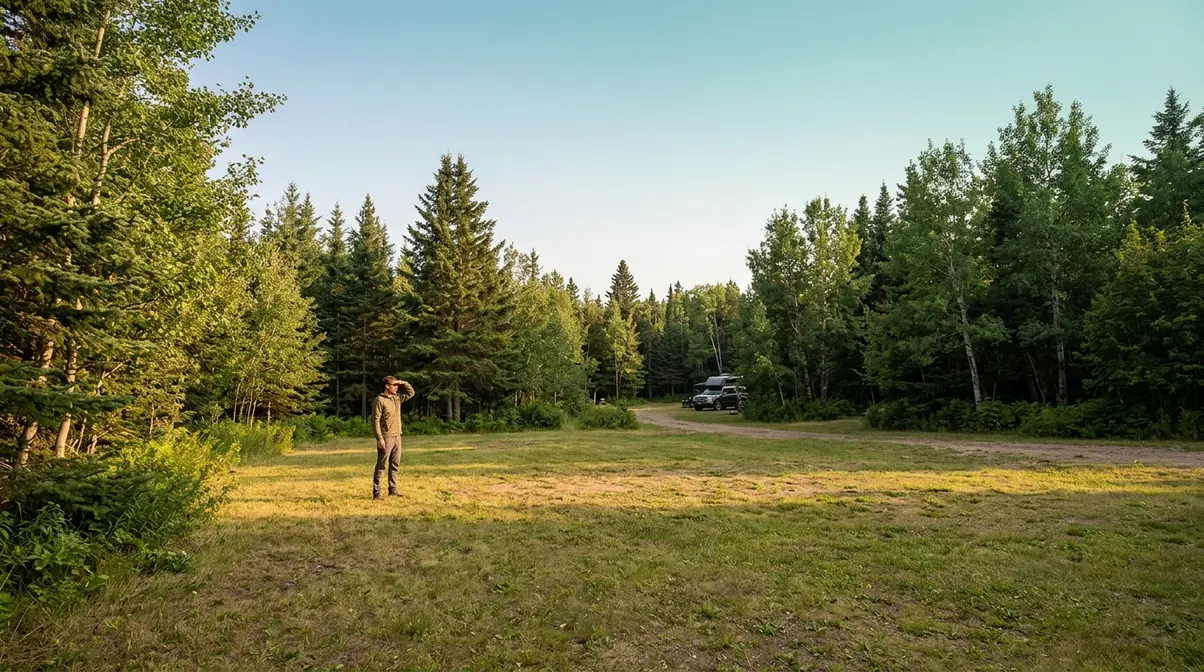
Before a single stake goes into the ground, two things determine whether your setup goes smoothly: when you arrive and where you pitch. Experienced campers consistently report that poor site selection and late arrivals account for most beginner setup disasters. Getting these right takes five minutes of planning and saves hours of frustration. If you are new to the outdoors, brushing up on the top 10 tent camping tips for beginners can also help you prepare.
The 2-2-2 Rule for Smart Setup
The 2-2-2 Rule — the camping travel habit of driving no more than 200 miles per travel day, arriving at your campsite by 2 PM, and staying at least 2 nights — is the single most underrated piece of setup advice for beginner campers. The rule originated in RV travel communities as a pacing guideline, but it applies just as well to cabin tent camping (Jackery Camping Guide, 2026).
Here’s why it matters for your setup specifically. Arriving by 2 PM means you have 3–4 hours of good daylight. That’s enough time to walk your site, clear debris, orient your tent correctly, and work through any setup hiccups without panicking. Arriving at 7 PM — with 20 minutes of light left — is how beginners end up with crooked tents, skipped guylines, and flooded floors. The 2-2-2 Rule gives you daylight, time, and the right mindset to pitch correctly. That’s why experienced campers follow it religiously, and it’s the foundation of everything else in this guide.
Where Should You Not Pitch a Tent?
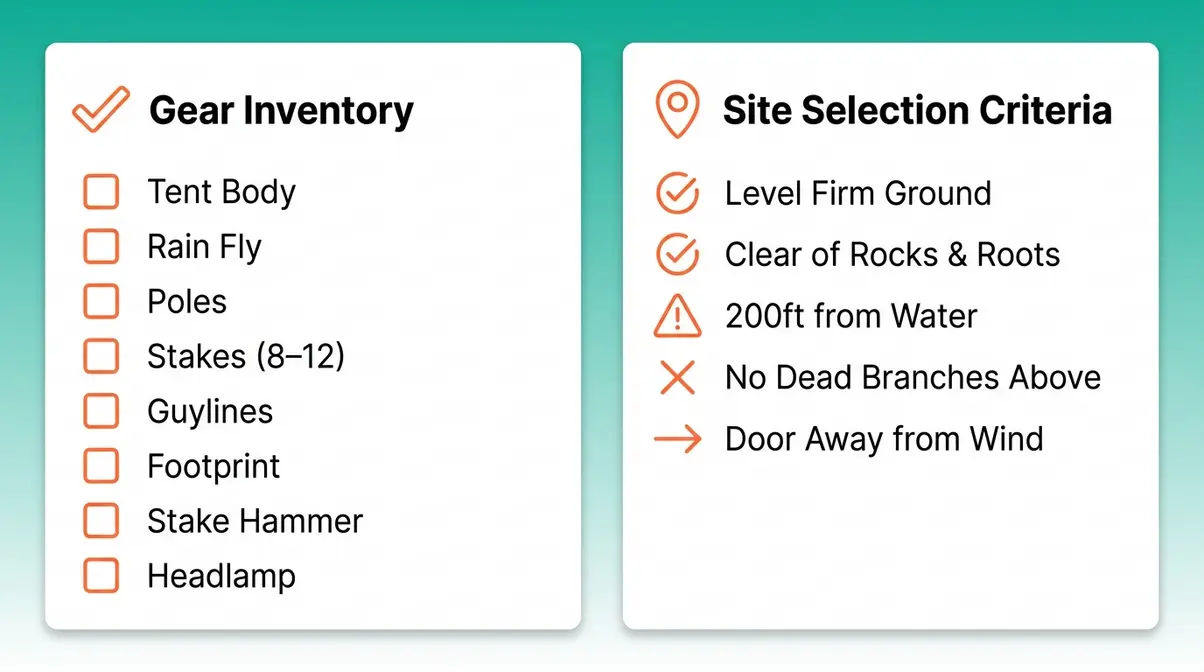
Site selection affects your setup, your sleep, and your safety. Avoid low-lying areas, valley floors, and ground within 200 feet of water sources — these spots collect cold, moist air overnight, dramatically increasing condensation and flooding risk. Never pitch directly under dead branches or lone tall trees in storm-prone areas, and avoid ridgelines in lightning season. Steer clear of dry creek beds, which can flood rapidly during rain even when the sky above you is clear. Our team evaluated cabin tent setups across multiple campground conditions to confirm that these criteria make the biggest difference for beginners:
- Look for level, firm ground. Slopes cause sleeping bags to slide and tent floors to puddle. Even a few inches of tilt becomes uncomfortable overnight.
- Clear the area first. Remove rocks, pinecones, and sticks before laying your footprint (the ground cloth placed under the tent floor). Sharp objects can puncture the tent floor.
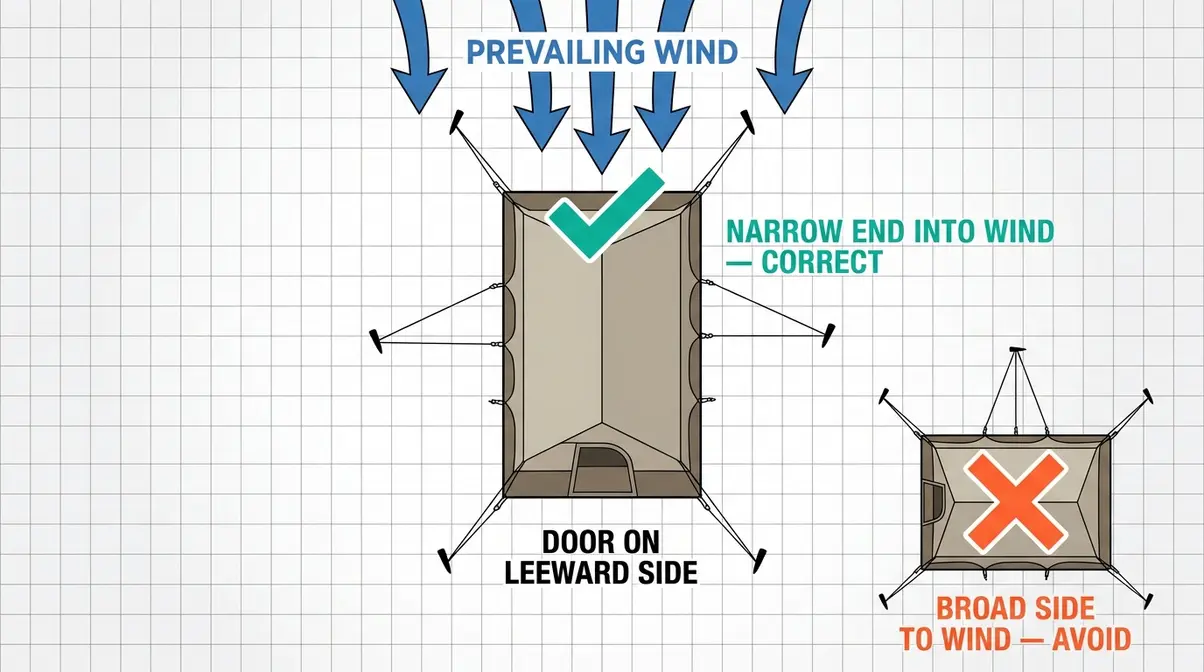
- Face your door away from prevailing wind. Point the narrowest end of the tent into the wind, not the broad side. The broad side of a cabin tent acts like a sail; the narrow end cuts through wind instead. REI’s tent setup guide specifically recommends positioning your tent so the strongest structural side faces the likely direction of wind.
Your Pre-Pitch Gear Inventory
Before you start pitching a cabin tent, lay everything out and confirm you have each item. Nothing is more frustrating than discovering a missing stake bag after dark.
| Item | What to Check |
|---|---|
| Tent body | No tears; all clips and loops present |
| Rain fly | Correct fly for your tent model |
| Poles | All segments connected; no bent sections |
| Stakes | Count matches tent’s stake loops (usually 8–12) |
| Guylines | Attached to fly or in separate bag |
| Footprint / ground cloth | Matches tent floor dimensions |
| Stake hammer or mallet | Optional but highly recommended |
| Headlamp | Even if you plan to finish before dark |
How to Pitch a Cabin Tent Step by Step

Setting up a cabin tent follows a specific order that protects the structure from wind at every stage. Skip a step or reverse the sequence, and a gust can undo everything you’ve built. Our team evaluated this sequence across multiple setups — the workflow below is specifically optimized for solo campers pitching a large cabin tent.
Estimated Time: 30-45 minutes
Tools and Materials Needed: Tent body, rain fly, poles, stakes, guylines, footprint, and a stake hammer or mallet.
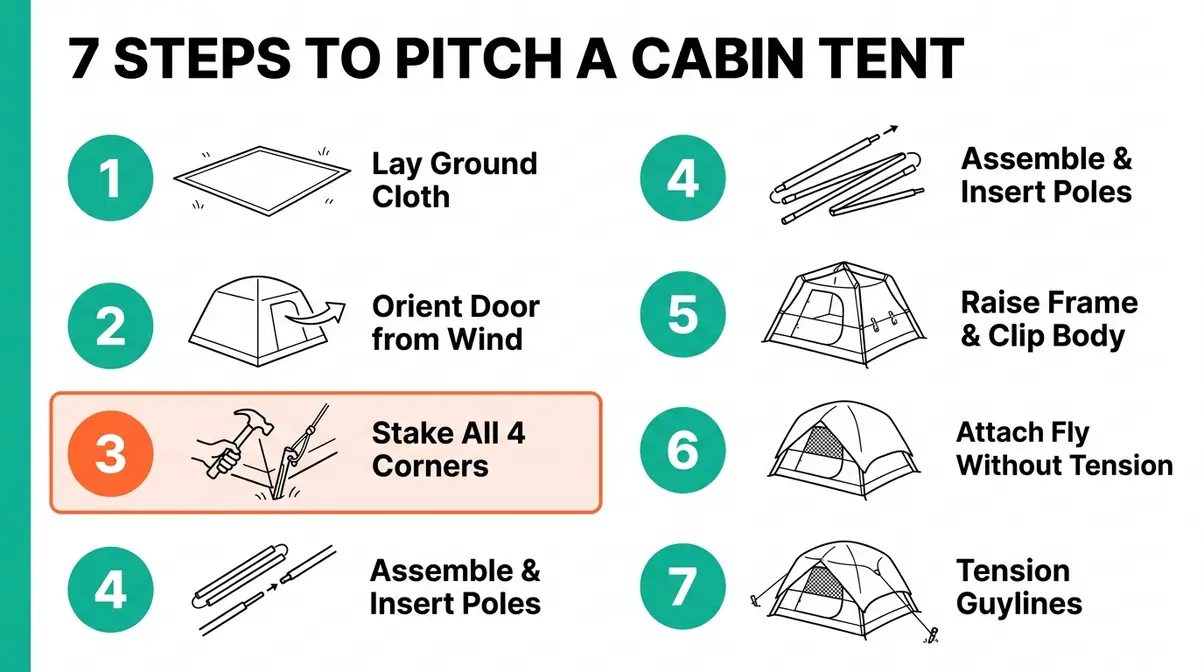
Step 1: Lay Out the Ground Cloth
Lay your footprint (also called a ground cloth — the protective tarp that goes under the tent floor) flat on your cleared site, shiny side up according to the Appalachian Mountain Club’s tent setup guide. Match the footprint’s corners to the corners of your intended tent position. Why this matters: The footprint protects your tent floor from abrasion and moisture wicking up from the ground. Without it, repeated nights on rough soil will wear through the waterproof coating on your tent floor within a season or two. Make sure the footprint does not extend beyond the tent’s edge — if rain runs down the tent walls and hits an exposed footprint edge, it channels water directly under the floor.
Step 2: Orient Door Away from Wind
Place your tent body on top of the footprint and orient it so the door faces away from the prevailing wind — not toward your best view. Why this matters: Wind entering through an open door creates internal pressure that stresses every pole and seam. Facing the narrow, structurally stronger end of the tent into the wind reduces that load significantly. If you’re unsure which direction the wind is coming from, wet your finger and hold it up — the cool side is the windward direction. Align the tent before staking anything; repositioning after stakes are in is slow and frustrating.
Step 3: Stake Corners Before Raising
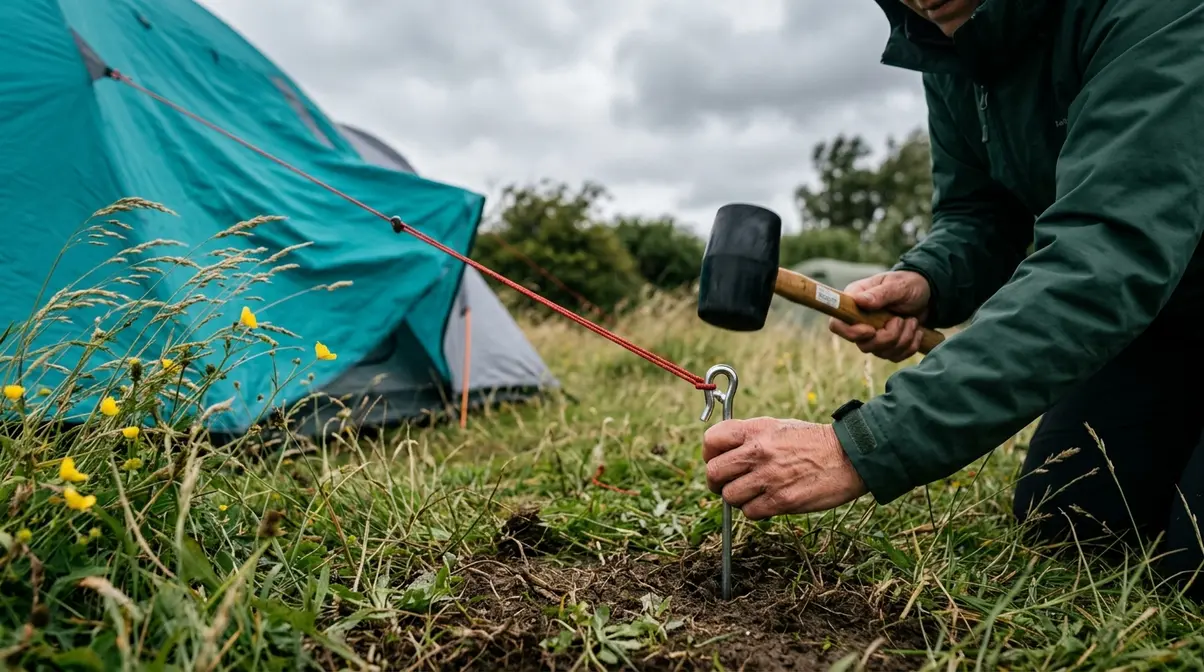
This is the most important step in the entire process. Before touching a single pole, stake all four corners of the tent body to the ground. Push each stake through the corner webbing loop and drive it into the ground. Why this matters: A cabin tent’s flat walls catch wind the moment the frame is raised. Without staked corners, a gust can flip the entire structure — poles, fabric, and all — before you’ve finished connecting the frame. KOA’s camping guide (updated 2026) specifically notes that staking corners first “gives you extra stability, especially in windy weather.”
Stake technique matters here. Drive each stake fully into the ground so only the hook or head is exposed — a half-buried stake has a fraction of the holding power and tends to lever itself loose in wind (REI Expert Advice, 2026). If you hit a rock, move the stake a few inches rather than bending it. Use a medium-sized rock to hammer stakes in tough soil — never kick them with your boot.
Step 4: Assemble and Insert Poles
Now that your corners are anchored, assemble the poles fully on the ground. Take time to seat each pole segment carefully into the next — a pole that isn’t fully connected will pop apart under load. Match each pole to its corresponding corner grommet (the metal ring or eyelet at each corner of the tent body). Why this matters: Poles that aren’t fully seated create weak points. In a wind event, those weak points bend or snap rather than flexing. For cabin tents with separate upright and horizontal ridge poles, start with the upright poles at each corner, then connect the horizontal ridge poles across the top.
Step 5: Raise Frame and Clip Body
With poles inserted into their grommets, it’s time to raise the frame. For solo campers, use the lean-and-clip method: start at one corner, flex the upright pole slightly to create tension, then clip the nearest tent body clip to the pole. Work your way around the tent — one clip at a time — rather than trying to raise the entire frame at once. Why this matters: Trying to raise a full cabin tent frame in one motion solo is nearly impossible and risks bending poles. The lean-and-clip method keeps the tent anchored while you work, distributing the load gradually as clips are added.
Once all clips are attached and the frame is standing, step back and check that the tent body hangs evenly from all poles. Adjust corner stakes if needed to square up the base.
Step 6: Attach Fly Without Tension
Drape the rain fly (the waterproof outer cover) over the raised frame, matching the fly’s corners to the tent’s corners. Attach all clips, buckles, and Velcro tabs before applying any tension. This is the step beginners most often get wrong.
“During initial setup, don’t over-tension the first fly corner; wait instead until the fly is fully on and then tension all corners evenly.”
Why this matters: If you fully tension one corner of the fly before the others are attached, you pull the fly off-center. The seams no longer align over the poles, creating gaps where rain can enter and stress points where fabric wears prematurely. Attach every connection point first, then go around the tent tightening each corner in small, even increments — like tightening lug nuts on a wheel. This ensures even tension across all seams.
Step 7: Tension Guylines for Support
Guylines (the tension cords that run from the tent’s fly attachment points out to stakes in the ground) are the last step — and the most skipped by beginners. Attach guylines to the designated points on the rain fly, pull each line directly outward from the pole beneath that attachment point, and stake it to the ground. REI’s expert advice (2026) recommends pulling guylines perpendicular to the fly wall for maximum holding strength.
Why this matters: Guylines are what keep your tent standing in serious wind. A cabin tent without guylines is relying entirely on corner stakes — which can pull out in soft ground or heavy rain. Guylines distribute load across a wider footprint, dramatically increasing stability. For a beginner’s first night, deploying guylines on at least the windward side of the tent is the minimum. For any forecast with winds over 15 mph, run guylines on all four sides. See our guide on camping in windy conditions for additional anchoring techniques.
How to Anchor a Cabin Tent in High Wind
Wind is the primary reason cabin tents fail overnight. The same vertical walls that make them so livable create enormous wind resistance — and a poorly anchored cabin tent in a 20 mph gust can collapse entirely. The good news: proper anchoring takes an extra 10 minutes at setup and provides dramatically better protection.
Which Direction to Face in Wind
Point the narrowest, most structurally reinforced end of your tent into the prevailing wind. For most cabin tents, this is the end with the most pole structure — often the end opposite the main door. The broad side of a cabin tent acts as a wind sail; the narrow end cuts through gusts instead. Slower Hiking’s wind-pitching guide (updated June 2026) recommends staking the upwind side first, then the downwind side, so the tent remains controlled throughout setup. If you’re unsure of wind direction at your site, check a weather app for the forecast wind bearing before you begin pitching.
The 45-Degree Stake Angle Technique
Stake angle is one of the most debated topics in camping communities. Here’s what the research actually shows: REI’s wind tunnel testing found that stakes driven fully vertical into the ground provide maximum holding power in most soil types (REI Expert Advice, 2026). A slight outward lean — top of the stake angling away from the tent — is acceptable and widely practiced, but driving stakes at a steep 45-degree angle away from the tent can actually reduce holding power by reducing the soil wedge the stake displaces.
The practical guidance: drive stakes as close to vertical as your soil allows, with just the hook or head exposed above ground. In soft or sandy soil, longer stakes or screw-in spiral stakes provide significantly better hold. In hard ground where you can’t drive stakes deep, use a rock as a hammer — never kick stakes with your boot, which bends them. For high-wind situations, KOA’s tent setup guide recommends pegging out each corner “taut — a tight tent base will make the rest of the tent easier to assemble.”
Guyline Setup: Angles & Distances
Guylines work best when they run perpendicular to the fly wall — directly outward from the pole beneath each attachment point. Place the guyline stake well away from the tent corner: 2–3 feet of distance gives the line a better angle and prevents the stake from interfering with the tent’s stake loops. In high wind, prioritize the windward guylines first (the side the wind is coming from), then add the leeward side once the windward anchors are set. REI’s 2026 guidance confirms: “At minimum, attach guylines at the guyout points on the windward side of the tent.”
| Guyline Position | Priority in Wind | Stake Distance from Tent |
|---|---|---|
| Windward side | Highest — do first | 2–3 feet minimum |
| Leeward side | Second | 2–3 feet minimum |
| Side panels | Third | 2 feet minimum |
| Peak/ridge points | Use if available | 3–4 feet for best angle |
Managing Condensation in Your Cabin Tent
Condensation is the problem no one warns you about — and the one that most reliably ruins a first camping trip. You wake up to wet sleeping bags, dripping walls, and the sinking feeling that your tent is leaking. It isn’t. It’s physics. Understanding why condensation happens is the first step to preventing it.
Why Condensation Happens Inside
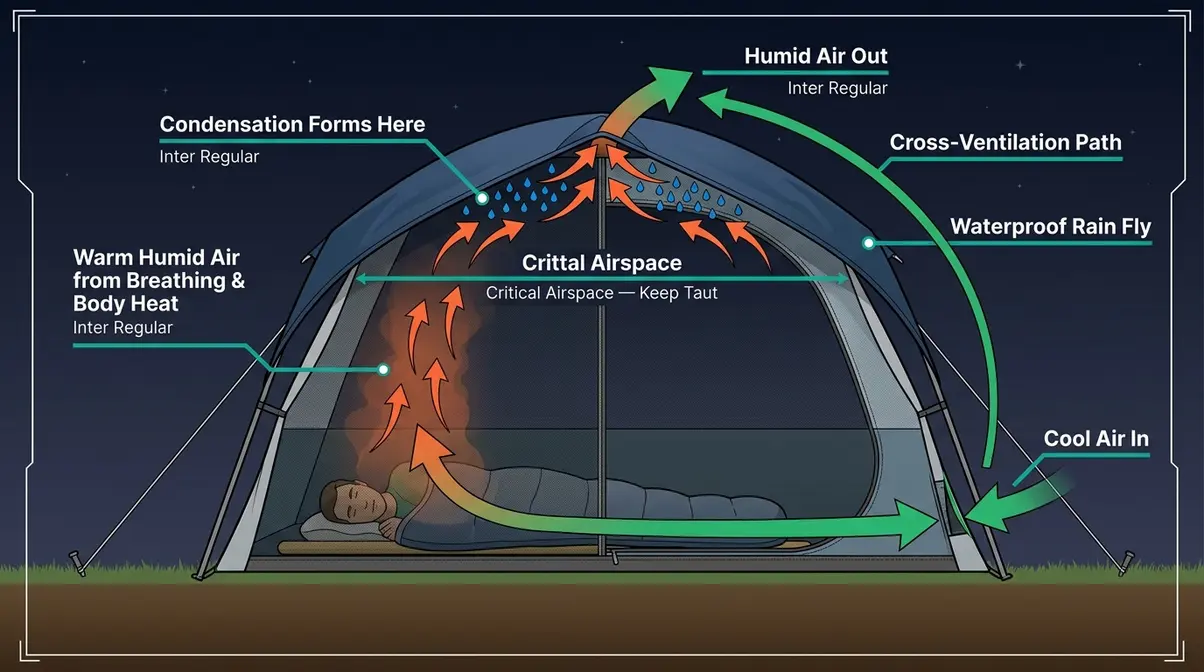
Condensation forms when warm, humid air inside your tent contacts the cooler tent walls or rain fly, causing water vapor to turn into liquid droplets. The primary moisture source is you: one person exhales up to roughly a pint of water overnight through normal breathing (Ultralight Outdoor Gear, 2026). Add body heat, sweat, and any wet gear you’ve brought inside, and the interior humidity rises quickly.
Cabin tents are particularly susceptible because their large interior volume traps more humid air, and their solid rain fly — necessary for rain protection — limits airflow unless vents are actively opened. Camping near water, in valley floors, or on damp ground makes the problem significantly worse, because the surrounding air already carries more moisture. The solution isn’t a better tent — it’s better ventilation and smarter site selection.
Ventilation Strategies That Work
REI’s condensation guide (2026) summarizes the consensus: “Ventilate, ventilate, ventilate.” Experienced campers consistently report that opening vents at setup — before you go to sleep, not after you wake up wet — is the single most effective habit for managing condensation inside a cabin tent. According to Princeton University’s guide on winter camping, utilizing a breathable inner tent and maintaining proper airflow are critical to managing moisture.
Here’s what actually works:
- Open opposing vents immediately at setup. Cross-ventilation (air entering one side, exiting the other) is far more effective than opening a single vent. Most cabin tents have vents near the peak of the rain fly — open both.
- Pitch the tent tautly. A properly tensioned rain fly creates an airspace gap between the fly and the tent body. That gap is where airflow happens. A saggy fly touches the inner tent walls and eliminates the gap entirely.
- Face the door into a gentle breeze. For condensation management, a gentle breeze through the door mesh is beneficial — just keep the rain fly door closed if rain is forecast.
- Keep wet gear outside. Wet boots, rain jackets, and towels release moisture as they dry overnight. Store them in the vestibule (the covered porch area in front of the tent door) or bag them separately.
- Never cook inside the tent. Steam from boiling water adds significant humidity that condenses immediately on the cooler fly fabric (Ultralight Outdoor Gear, 2026).
- Choose higher, drier ground. Camping away from lakes, rivers, and low spots reduces ambient humidity before you even open a vent (REI Expert Advice, 2026). See our guide on choosing the best campsite for a full site-selection checklist.
How to Take Down and Pack Your Cabin Tent
Takedown is the reverse of setup — but the order still matters. Rushing takedown is how tent poles get bent, rain flies get torn, and bags never close properly again. Allow 30–45 minutes for your first takedown, and the process will feel natural by your second trip.
Collapsing the Frame in the Right Order
Start by removing the rain fly first. Detach all buckles, clips, and Velcro tabs, then lift it off the frame and shake out any moisture before setting it aside to dry. Next, unclip the tent body from the poles — work from one side to the other so the body lowers gradually rather than collapsing all at once. Then disassemble the poles by folding each section back on its elastic cord. Start with the horizontal ridge poles, then the upright poles. Never yank poles apart at the middle — always fold from one end, letting the elastic cord guide each section. Yanking stresses the pole joints and eventually cracks the ferrules (the metal sleeves that connect pole segments).
Pull stakes from the ground by rocking them side to side, not straight up. Straight-pull removes soil that packs against the stake; rocking breaks the seal and saves the stake from bending. Wipe stakes clean before bagging them — soil left on stakes rusts the metal over time. Additionally, a UC Davis guide on field preparation notes that properly tucking and managing your tarps prevents water pooling and damage during sudden weather shifts.
Rolling vs. Stuffing Your Tent
Common beginner reports from camping communities indicate that stuffing a tent into its bag (crumpling the fabric loosely) actually extends the life of the waterproof coating compared to tightly rolling. Rolling creates the same crease in the same spot every time, which degrades the coating along those fold lines. Stuffing distributes stress randomly across the fabric, preventing crease buildup. That said, poles should always be folded neatly and stored in their own bag — never shoved loose into the tent bag, where they can puncture the fabric. For more detail on gear care, see our guide on how to clean and store a tent.
8 Common Mistakes When Pitching a Cabin Tent
Our team evaluated cabin tent setups across multiple configurations to identify the mistakes beginners make most consistently. These eight scenarios account for the vast majority of collapsed tents, wet floors, and broken poles.
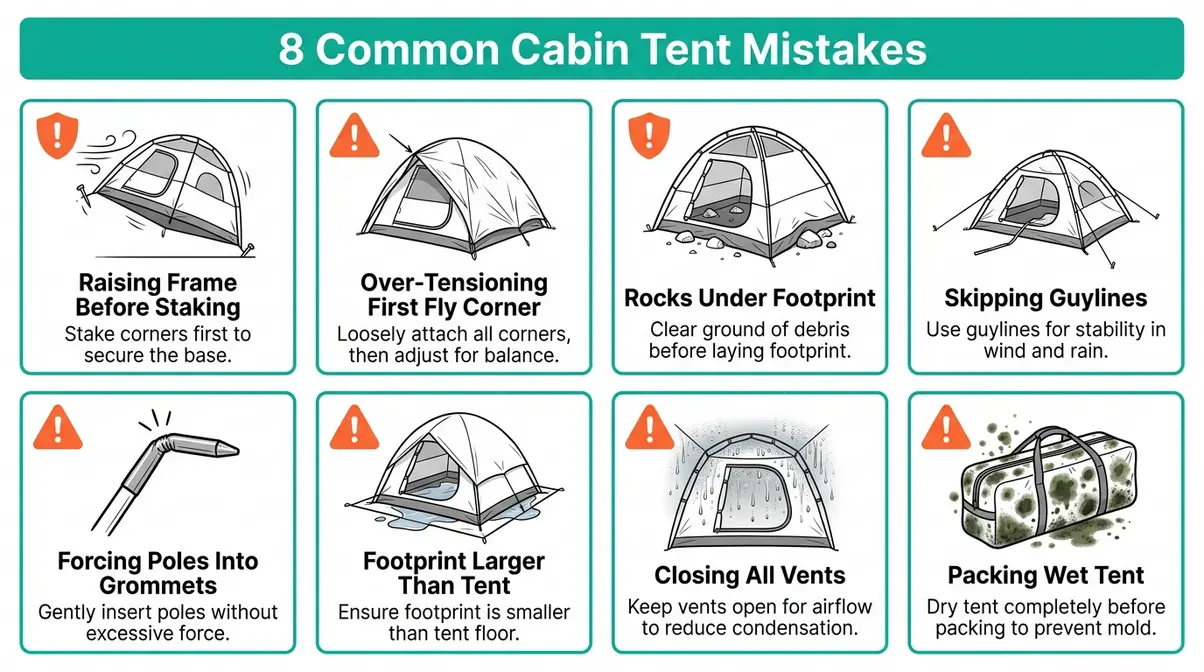
Mistake 1: Raising the frame before staking corners.
What happens: A gust catches the tent body mid-setup and flips the entire structure. Fix: Stake all four corners first — every time, without exception.
Mistake 2: Over-tensioning the first rain fly corner.
What happens: The fly pulls off-center, seams misalign over poles, and gaps form where rain enters. Fix: Attach all fly connection points before applying any tension, then tension all corners evenly.
Mistake 3: Not checking for rocks and roots under the footprint.
What happens: You feel every lump through the tent floor all night, and sharp objects eventually puncture the waterproof coating. Fix: Clear the site before laying the footprint, even if it takes five extra minutes.
Mistake 4: Skipping guylines on a clear night.
What happens: Weather changes overnight; without guylines, even a moderate wind event can collapse the tent or pull corner stakes free. Fix: Always deploy windward guylines, regardless of the forecast.
Mistake 5: Forcing poles into grommets.
What happens: Pole tips pop off or grommets tear when forced. Fix: If a pole doesn’t slide in smoothly, check that the segment is fully seated. Never force it.
Mistake 6: Laying the footprint larger than the tent floor.
What happens: Rainwater running off the tent walls hits the exposed footprint edge and channels directly under the floor. Fix: Fold under any excess footprint so it doesn’t extend beyond the tent’s edge.
Mistake 7: Closing all vents on a cold night.
What happens: You wake up to dripping tent walls and wet sleeping gear — condensation, not rain. Fix: Keep at least two opposing vents cracked open, even in cold weather. A warmer sleeping bag solves the cold; nothing fixes condensation after the fact.
Mistake 8: Packing a wet tent into its bag.
What happens: Mold and mildew develop within 24–48 hours, permanently damaging the waterproof coating and creating an odor that won’t wash out. Fix: If you must pack wet, set up and dry the tent at home within 24 hours of returning. See our article on tent maintenance and waterproofing for full drying instructions.
Safety Precautions and Limitations
Cabin tents are excellent shelters — but they have real limits. Understanding those limits before you’re in the field is part of camping safely.
Campsite Hazards to Avoid
Three hazards account for most campsite-related incidents for tent campers:
Dead overhead branches (“widow makers”): Always look up before staking down. Dead branches can fall in wind without warning. If you see large dead branches directly above your intended site, move.
Proximity to water: Most U.S. national forests and many state parks require camping at least 200 feet from any water source — including lakes, streams, and wetlands. This protects water quality and reduces your condensation risk. Check your specific campground’s rules before pitching, as requirements vary by jurisdiction.
Lightning-prone terrain: Avoid camping on ridgelines, open hilltops, or near lone tall trees during storm season. A tent provides zero lightning protection. If a storm develops, move to a low point in the landscape and wait it out in your vehicle if possible. For detailed weather safety guidance, the National Park Service’s camping safety resources provide current best practices.
When a Cabin Tent Isn’t Right
Cabin tents are the wrong tool for certain trips — and recognizing that early saves money and frustration. If you’re backpacking more than a mile from your vehicle, a cabin tent is too heavy and too bulky to carry. If you’re camping in high-elevation alpine environments with regular 40+ mph winds, a lower-profile dome or tunnel tent with a geodesic frame will hold up far better — cabin tents are not designed for sustained high-wind exposure. And if you’re camping solo for one night and prioritize quick setup, a smaller dome or pop-up tent will serve you better. The cabin tent shines in its intended context: car camping, families, multi-night stays, and base camps where comfort is the priority. For those trips, nothing else compares.
Frequently Asked Questions
What are two common mistakes to avoid when pitching a tent?
The two most consequential mistakes are raising the frame before staking the corners and skipping guylines on clear nights. Raising the frame first turns your tent into a sail, while skipping guylines leaves you vulnerable to sudden weather changes overnight. Experienced campers consistently report that these two habits prevent the majority of tent failures.
What direction should I pitch my tent?
Point the narrowest, most structurally reinforced end of your tent into the prevailing wind — not the broad side. For condensation management, face the door toward a gentle breeze to promote cross-ventilation. For rain protection, face the door away from the direction rain typically blows. When these goals conflict, wind orientation takes priority: a collapsed tent in a storm is far worse than a slightly less ventilated one. REI’s tent setup guide specifically recommends avoiding the wind hitting the broad side of the tent, which turns it into a sail.
What is a cabin style tent?
A cabin tent is a large camping shelter with nearly vertical walls and a high ceiling, typically 6–7 feet at the peak. Unlike dome tents, which use curved crossing poles to create a self-supporting arch, cabin tents use separate upright and horizontal ridge poles to build a boxy, room-like structure. This vertical wall design makes them incredibly spacious for families, but also means they catch more wind during setup.
Limitations and Common Pitfalls
Common Pitfalls
Pitfall 1 — Pitching in failing light: Arriving after sunset forces every step to go faster, which means corners get skipped and guylines get ignored. The fix is the 2-2-2 Rule — arrive by 2 PM, give yourself time.
Pitfall 2 — Trusting “it won’t rain tonight”: Weather forecasts are directionally accurate, not precise. Campers who skip the rain fly because skies look clear frequently wake up to wet sleeping bags. Always attach the rain fly fully before sleeping, regardless of the forecast.
Pitfall 3 — Over-tightening guy cords in cold weather: Synthetic tent fabrics and cords contract in cold temperatures. Guy cords tensioned tightly at 60°F may over-stress seams by morning when temperatures drop to 40°F. Tension guylines snugly, not drum-tight.
When to Choose Alternatives
If you’re camping in sustained winds above 40 mph, a geodesic dome tent or a low-profile backpacking tent will hold up better than any cabin tent. Cabin tents are not engineered for alpine or coastal high-wind environments. For a quick one-night car camping trip where setup time matters, an instant or pop-up tent will have you inside in under 5 minutes. See our guide on the best family camping tents for side-by-side comparisons across tent styles.
When to Seek Expert Help
If you’re camping in wilderness areas with no cell service, consider taking a basic outdoor skills course from an organization like the Appalachian Mountain Club or REI before your first trip. If your campsite requires special permits, fire restrictions, or Leave No Trace compliance in sensitive ecosystems, contact the managing agency directly — the National Park Service and U.S. Forest Service both provide pre-trip planning consultations for first-time visitors.
Conclusion
For anxious first-time campers, pitching a cabin tent correctly comes down to one principle: sequence matters more than speed. Stake corners first, raise the frame second, attach the rain fly without over-tensioning, and deploy guylines before you sleep. Follow that order, and a large cabin tent becomes manageable — even solo, even on your first night. Research from REI, the Appalachian Mountain Club, and KOA all confirm the same stake-first workflow as the foundation of safe tent setup (REI Expert Advice, 2026; AMC, 2026; KOA, 2026).
The 2-2-2 Rule — arrive by 2 PM, stay within a reasonable travel distance, allow 2 hours for setup — is the framework that makes all of this achievable. It’s not just a travel tip; it’s the reason you’ll have daylight to choose the right site, time to work through unfamiliar steps, and the calm that comes from not rushing. Every specific technique in this guide, from the lean-and-clip solo method to the opposing-vent condensation fix, works best when you’re not racing the sunset.
Your next step: unpack your cabin tent in your backyard this weekend and do a practice pitch before your first campsite night. Run through all 7 steps, deploy the guylines, and open the vents — so that when you arrive at the campsite, your hands know what to do before your brain has to think about it. Whether you are prepping for a weekend in the woods or setting up a DIY wedding tent in your backyard, the first real setup will feel completely different when it’s a rehearsal, not a premiere. Grab your gear, head outside, and master your setup today!

David King
Field gear tester at Tent Explorer.