This blog post may contain affiliate links. As an Amazon Associate I earn from qualifying purchases.
Imagine you’re out in the wilderness, ready to relax under the stars, when you discover that your tent peg loops are damaged. Frustrating, right?
But here’s the good news—you can fix them yourself, and it’s easier than you think. Whether you’re a seasoned camper or just starting out, learning how to repair tent peg loops can save you time, money, and hassle. Plus, it ensures you’re prepared for anything Mother Nature throws your way.
Curious about how you can tackle this common camping problem with confidence and skill? Stick around, and you’ll find the simple steps to get your tent back in top shape, ready for your next adventure.
Tools And Materials Needed
Repairing tent peg loops requires specific tools and materials. Choosing the right ones ensures a successful fix. This guide will help you gather everything needed for the task. Ensure you have all items before starting repairs.
1. Sewing Kit
A basic sewing kit is essential. It should include a needle and thread. Opt for heavy-duty thread for durability. Ensure the needle is sharp and suitable for fabric.
2. Replacement Loops
Purchase replacement loops from camping stores. They should be the correct size for your tent. Check the material matches your tent for consistency.
3. Fabric Patches
Fabric patches cover damaged areas. Choose waterproof patches. This keeps your tent dry and secure. Ensure they are large enough to cover any tears.
4. Scissors
Scissors are needed to cut thread and fabric. Use sharp scissors for clean cuts. This prevents fraying and enhances precision.
5. Measuring Tape
Measuring tape helps ensure correct loop placement. Accurate measurements are crucial for a snug fit. Use it to mark where loops should be sewn.
6. Marker Or Chalk
A marker or chalk outlines the repair area. Choose a washable option. This avoids permanent marks on your tent fabric.
7. Seam Sealer
Seam sealer waterproofs repaired areas. Apply it after sewing. This ensures your tent remains leak-proof. Choose a sealer compatible with your tent’s fabric.
With these tools and materials, you’re ready to repair your tent peg loops. Proper preparation leads to effective and lasting repairs.
Also Read: How to Use Tent Pole Repair Kit: Quick & Easy Guide
Assessing The Damage
Evaluating the extent of damage to tent peg loops is crucial. Identify frayed or broken loops requiring repair. Secure the tent effectively by replacing or reinforcing these loops with durable materials.
Camping trips can be the highlight of any summer, but what happens when you notice your tent peg loops fraying or damaged? Before you pack up and head home, take a moment to assess the situation. Assessing the damage is the first step in repairing your tent peg loops, ensuring your shelter remains sturdy and reliable. Understanding the extent of the damage can save you time and effort.
Inspect The Tent Peg Loops
Begin by laying your tent flat on the ground. Carefully check each peg loop for tears, frays, or weaknesses. Do the loops feel loose or look stretched? A quick inspection can reveal whether the loops need a simple stitch or a complete replacement.
Identify The Type Of Material
Tent peg loops come in various materials like nylon, polyester, or even metal. Knowing what you’re dealing with is crucial. Nylon might require different repair tools compared to metal. Do you have the necessary materials on hand?
Evaluate The Location Of Damage
Is the damage near the base of the tent or at the loop itself? Damage near the base might affect the structural integrity of your tent. Consider how this impacts your repair strategy and the tools you might need.
Consider The Severity Of Damage
Minor frays can often be fixed with a needle and thread, but larger tears might require patch kits or replacement loops. Are you prepared for a quick fix or should you plan for a more extensive repair session?
Think About Future Prevention
While assessing, think about why the damage occurred. Could it be due to wear and tear, or was it an accidental snag? Understanding the cause can help you prevent future issues. What precautions can you take next time to protect your tent peg loops? Assessing the damage is more than just identifying problems; it’s about understanding your tent’s needs. By taking these steps, you can ensure your tent remains a reliable haven for many camping trips to come.
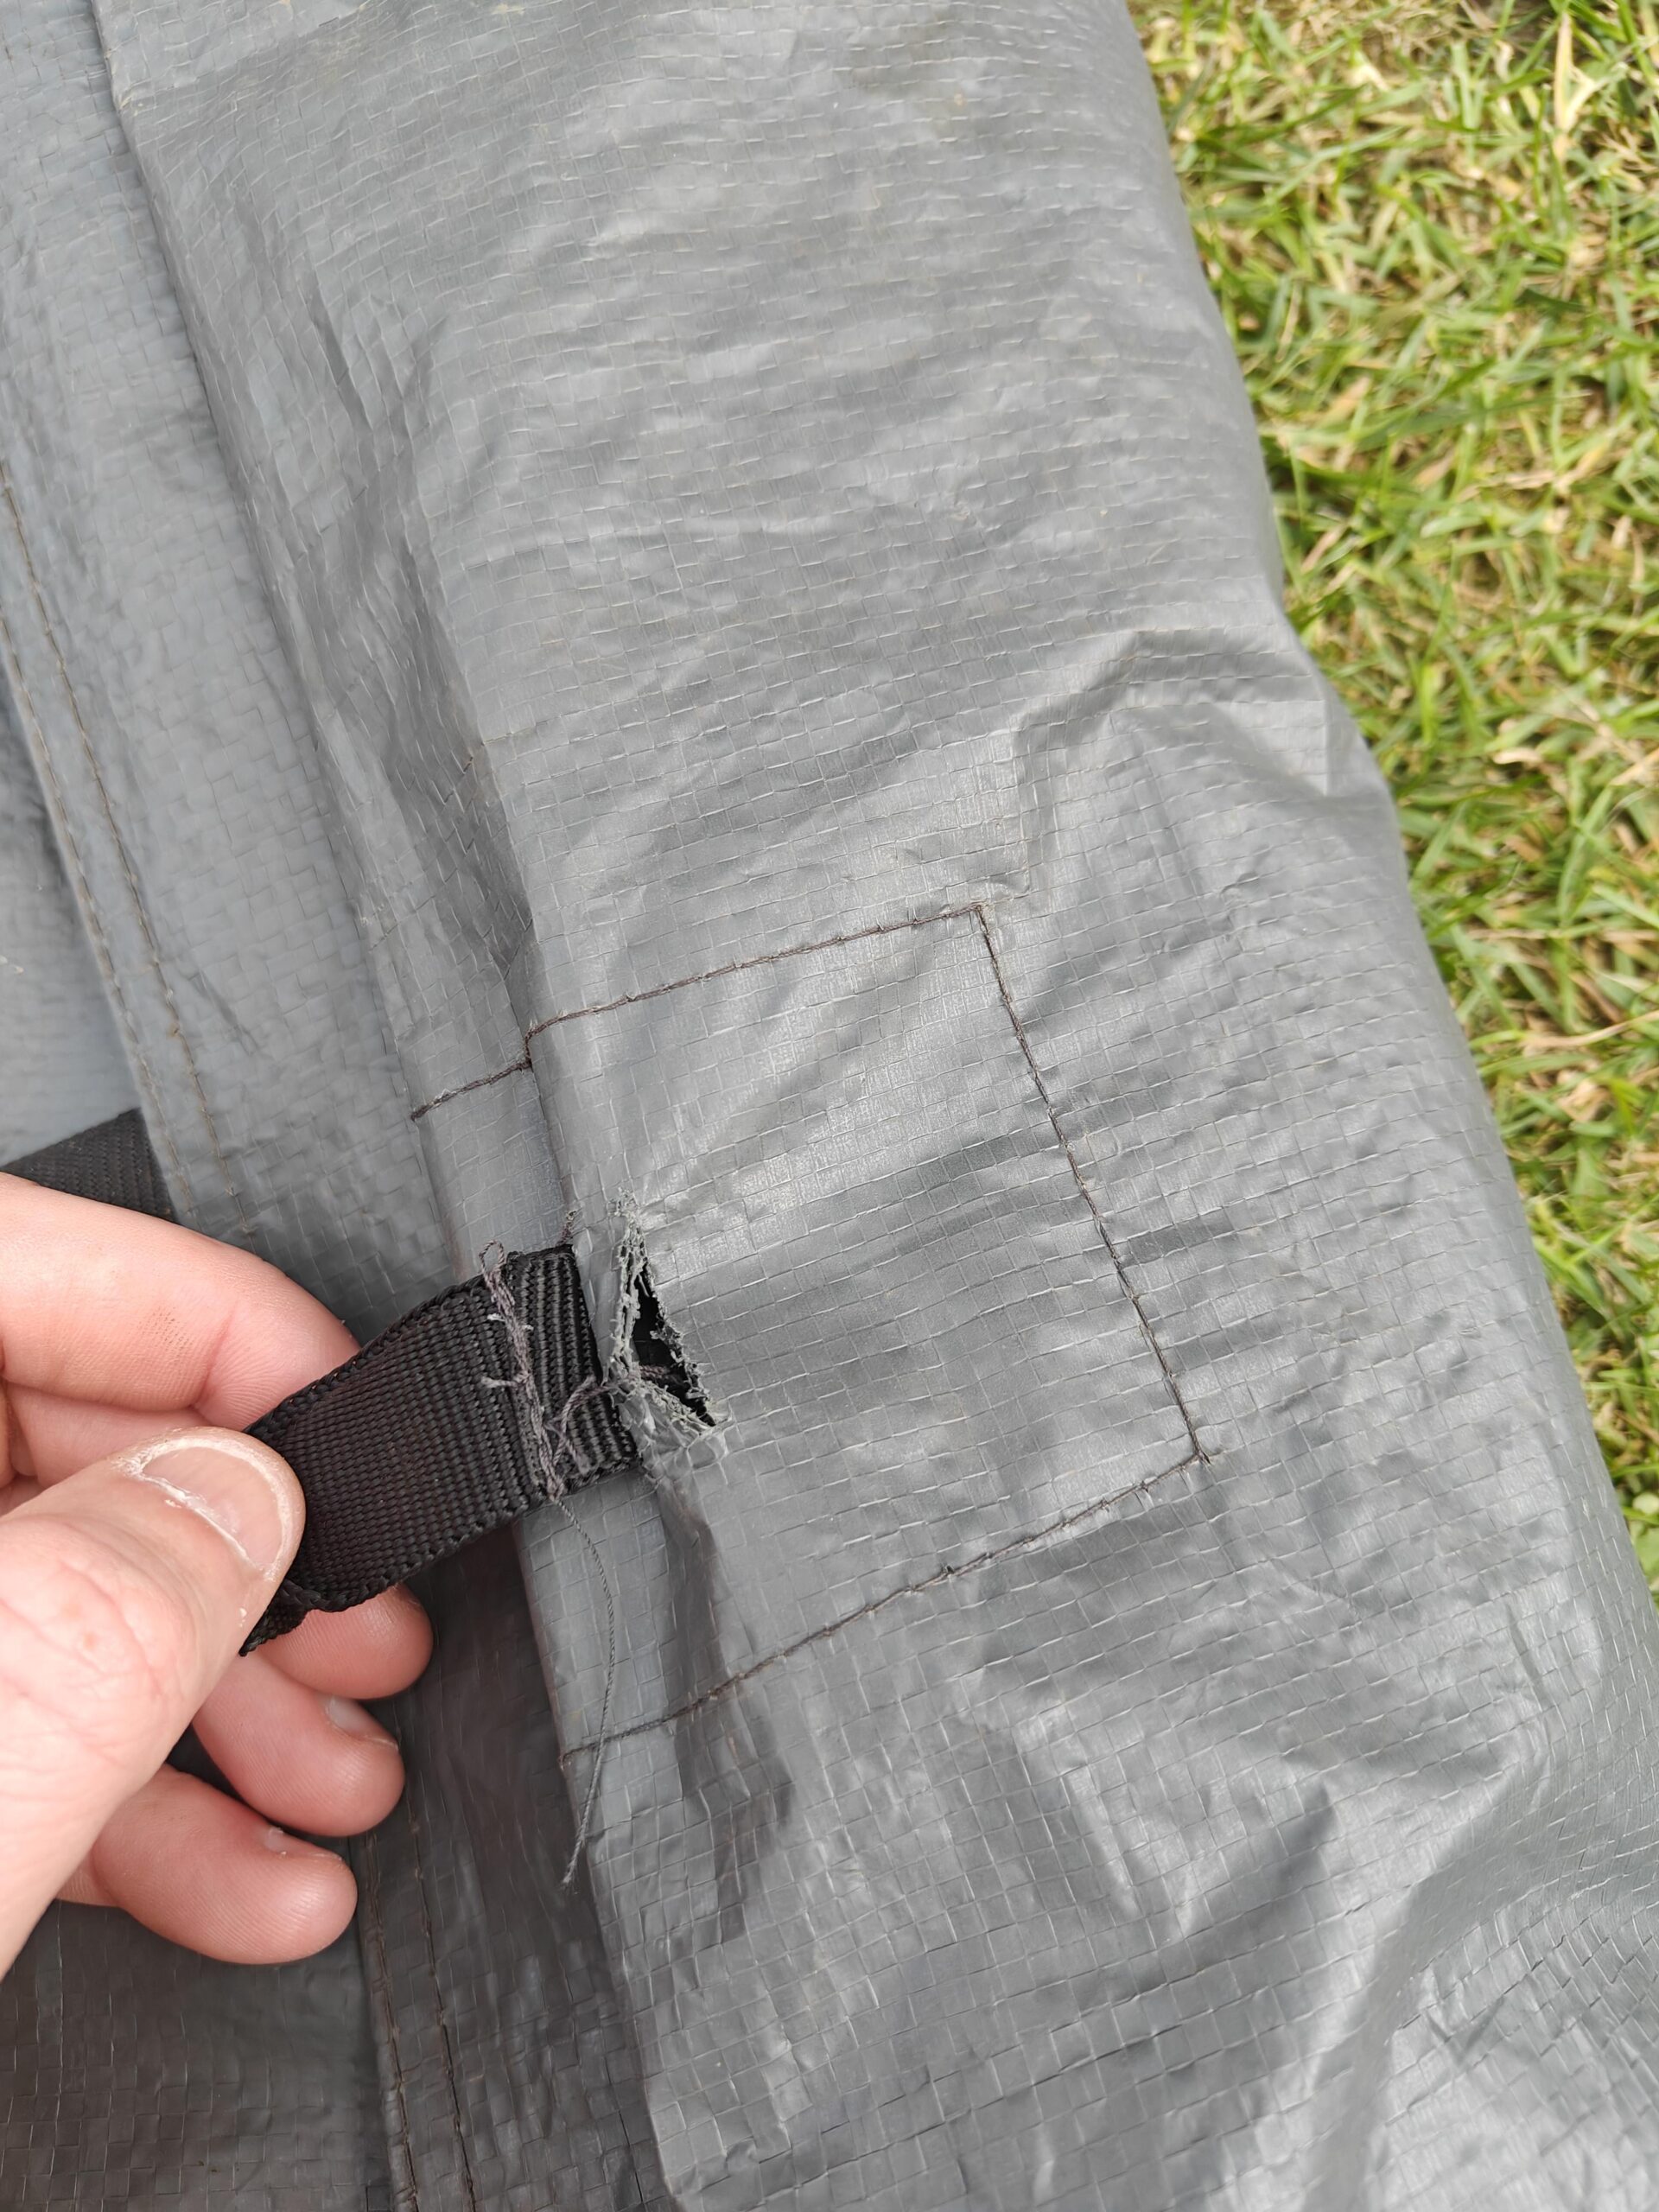
Detaching The Damaged Loop
Repairing tent peg loops can extend your tent’s life. A crucial step is detaching the damaged loop. This process requires care to avoid further damage. Follow these simple instructions to ensure a smooth repair.
Gathering The Necessary Tools
Before starting, gather all necessary tools. You will need scissors, a needle, and strong thread. A seam ripper can help in removing stitches. Ensure your tools are clean and in good condition.
Identifying The Problem Area
Locate the damaged loop on your tent. Check for signs of wear or tearing. Make sure only the loop needs repair, not the fabric. This step is crucial to avoid unnecessary work.
Cutting The Stitches
Use a seam ripper to cut the stitches holding the loop. Be careful not to damage the tent fabric. Work slowly to ensure precision. Remove all thread remnants from the area.
Removing The Damaged Loop
Gently pull the damaged loop away from the tent. Ensure no fabric is pulled along with it. Dispose of the loop properly to avoid clutter. Your tent is now ready for the next repair steps.

Credit: www.reddit.com
Choosing Replacement Materials
Selecting the right materials is crucial for repairing tent peg loops. Opt for durable fabrics and sturdy thread. Ensure compatibility with your tent’s design.
When you’re out camping and discover a broken tent peg loop, it can feel like a daunting task to fix it. But the secret to a successful repair often lies in choosing the right replacement materials. Selecting durable and appropriate materials can ensure your tent remains sturdy and secure, ready to protect you from the elements. Let’s delve into how you can choose the best materials to repair those pesky tent peg loops.
Understand The Material Types
Not all materials are created equal. Consider nylon or polyester for their strength and resistance to wear and tear. Both are widely used in tents and are readily available in most outdoor stores. Think about the environment where you’ll use your tent. Nylon is generally more suitable for humid conditions because it absorbs water less readily. Polyester, on the other hand, resists UV rays better, making it ideal for sunny climates.
Consider Elasticity And Flexibility
Elasticity is crucial for maintaining tension. Look for materials that offer a bit of stretch, like bungee cords or shock cords. Flexibility ensures the loops can withstand movement and pressure. This means they won’t snap easily when you’re setting up your tent or during windy conditions.
Evaluate Durability
Durability is key for longevity. Reinforced nylon or polyester webbing is an excellent choice. Reflect on your past camping trips. Did you encounter rugged terrain or harsh weather? If so, opt for materials known for their toughness.
Check Availability And Cost
You don’t need to spend a fortune. Many effective materials are affordable and easy to find. Visit local outdoor shops or check online retailers. Compare prices to ensure you’re getting good value without compromising quality.
Test And Adjust
Before committing, test a small section to see how it performs. Does it hold tension? Is it easy to attach and detach? Adjust your choice based on these tests. It’s better to take time now than face issues when you’re out in the wilderness.
Seek Recommendations
Ask fellow campers about their experiences. What materials did they find effective? Community forums and online reviews can provide insights you might not have considered. Do any materials consistently receive praise or criticism? Choosing the right replacement materials for your tent peg loops can make all the difference in your camping experience. So next time, before heading out, take a moment to ensure you have the best materials in hand. Your tent—and your peace of mind—will thank you.
Reattaching The Loop
Repairing tent peg loops is a simple process. Start by removing the damaged loop carefully. Replace it with a strong cord or strap. Ensure the new loop is securely attached to the tent fabric. This quick fix helps maintain your tent’s stability during camping adventures.
Reattaching a tent peg loop can save your camping trip. A secure loop ensures your tent stays stable. With the right tools, the repair is straightforward. Whether you sew or use adhesive, follow these steps for success. Choose the best method for your situation.
Sewing Method
Needle and thread work well for fabric loops. Use strong thread for durability. First, thread the needle and tie a knot. Then, align the loop with the tent fabric. Start sewing with small, tight stitches. Sew around the loop several times. This strengthens the attachment. Trim any excess thread. A well-sewn loop should hold firm.
Using Adhesive
Adhesive is another option for reattaching loops. Choose a fabric adhesive for the best result. Clean the area around the loop first. Apply a small amount of adhesive to the loop. Press it firmly onto the tent fabric. Let the adhesive dry completely. Check the package for drying time. A properly glued loop should withstand tension.
Alternate Methods
Other methods can also work for reattaching loops. Duct tape is a quick fix in emergencies. Wrap the tape securely around the loop and fabric. Replace with a more permanent solution later. Safety pins can hold a loop temporarily. They are not a long-term fix but work in a pinch. Consider these options if you lack tools or time.

Credit: qualitynylonrope.com
Reinforcing The Repair
Reinforcing a repaired tent peg loop ensures durability and strength. A strong repair can make your camping adventures stress-free. Knowing how to reinforce this repair is crucial. It saves your tent from further damage. Let’s dive into some simple techniques to enhance your repair.
1. Adding Extra Stitching
Start by examining the repaired loop carefully. Use strong, outdoor-grade thread. Sew around the loop twice for added strength. Ensure stitches are tight and even. This extra stitching helps hold the loop securely.
2. Using Fabric Glue
Fabric glue can add an extra layer of support. Apply a small amount over the stitched area. Let it dry completely before use. This step helps bond the fabric together. It also prevents any further fraying.
3. Applying a Patch
Patches offer additional reinforcement to the loop area. Cut a patch slightly larger than the repair. Use a strong adhesive to attach it over the loop. Smooth out any wrinkles for a clean finish. This patch acts as a protective barrier.
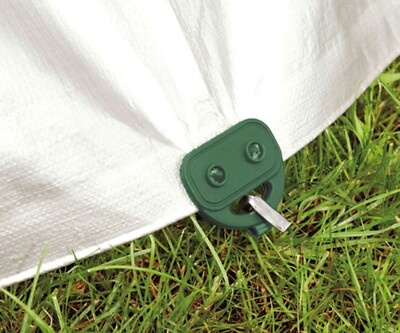
4. Using a Grommet
Grommets can provide excellent support for tent loops. Install a grommet over the repaired loop area. Follow the instructions on the grommet kit. Ensure it’s tightly secured for best results. This method keeps the loop from tearing again.
5. Testing the Repair
Once reinforced, test your repair for strength. Pull gently on the loop to check its hold. If it feels secure, the repair is successful. Make sure it withstands the pressure of use. This testing ensures your tent is ready for the next adventure.
Testing The Repair
Fixing tent peg loops involves simple steps. First, check for breaks or frays in the loops. Replace or sew damaged loops using strong thread or cord. Test the repair by gently pulling the loop to ensure it’s secure. This ensures your tent stays anchored.
Testing the repair of your tent peg loops is a crucial step in ensuring that your tent remains secure during your outdoor adventures. You’ve done the hard work of fixing them, but how can you be sure they’re up to the task? Testing not only gives you peace of mind but also helps you avoid any unpleasant surprises when you’re out in the wild.
Simulate Outdoor Conditions
Set up your tent in your backyard or a local park. This allows you to see how your repaired loops hold up under real-world conditions. Make sure to mimic the tension and weight your tent would typically face. Try attaching the pegs and giving the tent a gentle tug. Do the loops hold firm, or do they stretch excessively? Look for any signs of weakness.
Check For Durability
Once your tent is up, examine the loops closely. Are they fraying or showing signs of wear? A quick visual inspection can reveal if any part of the repair needs reinforcement. You can also gently pull on the loops to test their strength. If they feel solid and secure, you’re likely good to go. If not, it might be time to revisit your repair technique.
Test In Various Weather Conditions
If possible, leave your tent up for a day or two to see how the loops handle different weather elements. Windy conditions, in particular, can highlight weaknesses in your repair. Rain can also test your tent’s overall resilience. Check if water affects the loops, especially if you used a waterproof adhesive.
Consider Feedback From Fellow Campers
Ask friends or family to help test your tent setup. Sometimes, an extra set of eyes can spot issues you might have missed. Would they trust the repaired loops for their own camping trip? Their feedback can provide valuable insights into the reliability of your repair.
Reflect And Adjust If Necessary
After testing, reflect on the results. Did the loops perform as expected? If not, consider what changes might improve their strength and durability. Testing is an ongoing process. Each camping trip offers a new opportunity to learn and improve. Are you confident in your repair skills, or is there room for improvement? Your next adventure depends on it.
Preventive Measures
Taking care of your tent pegs ensures a stress-free camping experience. Strong and secure tent peg loops make a difference. Protect your camping gear with simple preventive measures. These steps save time and effort during your outdoor adventures.
1. Regular Inspection
Inspect tent peg loops before each camping trip. Check for signs of wear or damage. Early detection prevents bigger problems later. Feel each loop with your fingers. Look for frayed or weak spots. Replace weak loops promptly to avoid issues.
2. Use Quality Materials
Choose high-quality materials for your tent pegs and loops. Durable materials withstand harsh weather conditions. Avoid cheap materials that break easily. Invest in products designed for outdoor use. They last longer and offer better protection.
3. Proper Storage
Store your tent and pegs in a dry place. Moisture weakens fabric and metal. Use a storage bag to protect your gear. Keep it away from sharp objects. Proper storage extends the life of your tent accessories.
4. Avoid Over-tightening
Do not over-tighten tent peg loops. Excessive force can cause damage. Tighten loops just enough for stability. Check if the tent remains stable and secure. Loosen and re-tighten if necessary. This prevents unnecessary stress on the loops.
5. Reinforce Weak Spots
Reinforce weak spots with fabric patches or tape. Use materials designed for outdoor gear. Reinforcement strengthens the loops and prevents further damage. This simple step ensures reliability during your camping trips.
Credit: www.ebay.com
Frequently Asked Questions
How Do I Fix Broken Tent Peg Loops?
To fix broken tent peg loops, use durable nylon or polyester thread. Sew the loop back onto the tent fabric. Reinforce the stitching with a strong adhesive like seam sealer. Ensure it’s fully dry before use. This method restores functionality and prolongs tent life.
Can I Use Duct Tape For Tent Peg Repairs?
Yes, duct tape can temporarily repair tent peg loops. Clean the area, then wrap the duct tape securely around the loop. This offers a quick fix but isn’t as durable as sewing. For a long-term solution, consider sewing and sealing the loop properly.
What Materials Are Best For Repairing Tent Loops?
For repairing tent loops, use nylon or polyester thread. These materials are strong and weather-resistant. Pair them with a durable adhesive like seam sealer for added strength. These materials ensure your repairs last longer and withstand outdoor conditions.
How Often Should I Check Tent Peg Loops?
Check tent peg loops before and after each camping trip. Regular inspections help identify wear and prevent damage. Addressing issues early ensures your tent remains secure during use. Regular maintenance extends the life of your tent and enhances camping safety.
Conclusion
Repairing tent peg loops doesn’t have to be complex. Follow these steps carefully. Gather your tools. Inspect the loops for damage. Use strong materials for repairs. Reinforce weak areas. Check your work. Ensure stability for your next camping trip. By fixing the loops, your tent stays secure.
No more worries about windy nights. Enjoy your adventure with peace of mind. With practice, it becomes easier. You save money and gain skills. Now, you’re ready for the next camping challenge. Keep your tent in top shape. Happy camping!
